陈丹青:看过的东西走过的路,还有你所经历的一切,都会经历一个开眼界的过程。
但眼界开了并不是一件好事情,反而顿悟之后从此你就会知道,你在社会之中是完全没有位置可言的。我算个屁,什么事都有人做过,都有人做得那么好了。
年轻时候有过的那一股傻劲,慢慢地被磨得全没有了,开眼界仅仅只是让你活得更痛苦,我宁愿傻一点活着,也不愿意做一个开眼界的聪明人。

一、Vue 基础回顾
1. 基础结构
el 结构:
<template>
  <div id="app">
    <p>公司名称:{{ company.name }}</p>
    <p>公司地址:{{ company.address }}</p>
  </div>
</template>

<script>
  new Vue({
    el: '#app',
    data: {
      company: {
        name: 'title',
        address: '中国中关村'
      }
    }
  })
</script>
render 结构:
    <div id="app">
    </div>
    <script src="https://cdn.jsdelivr.net/npm/vue/dist/vue.js"></script>

    <script>
        new Vue({
            data: {
                company: {
                    name: 'title',
                    address: '中国中关村'
                }
            },
            render(h) {
                return h('div', [
                    h('p', '公司名称:' + this.company.name),
                    h('p', '公司地址:' + this.company.address)
                ])
            }
        }).$mount('#app')
    </script>
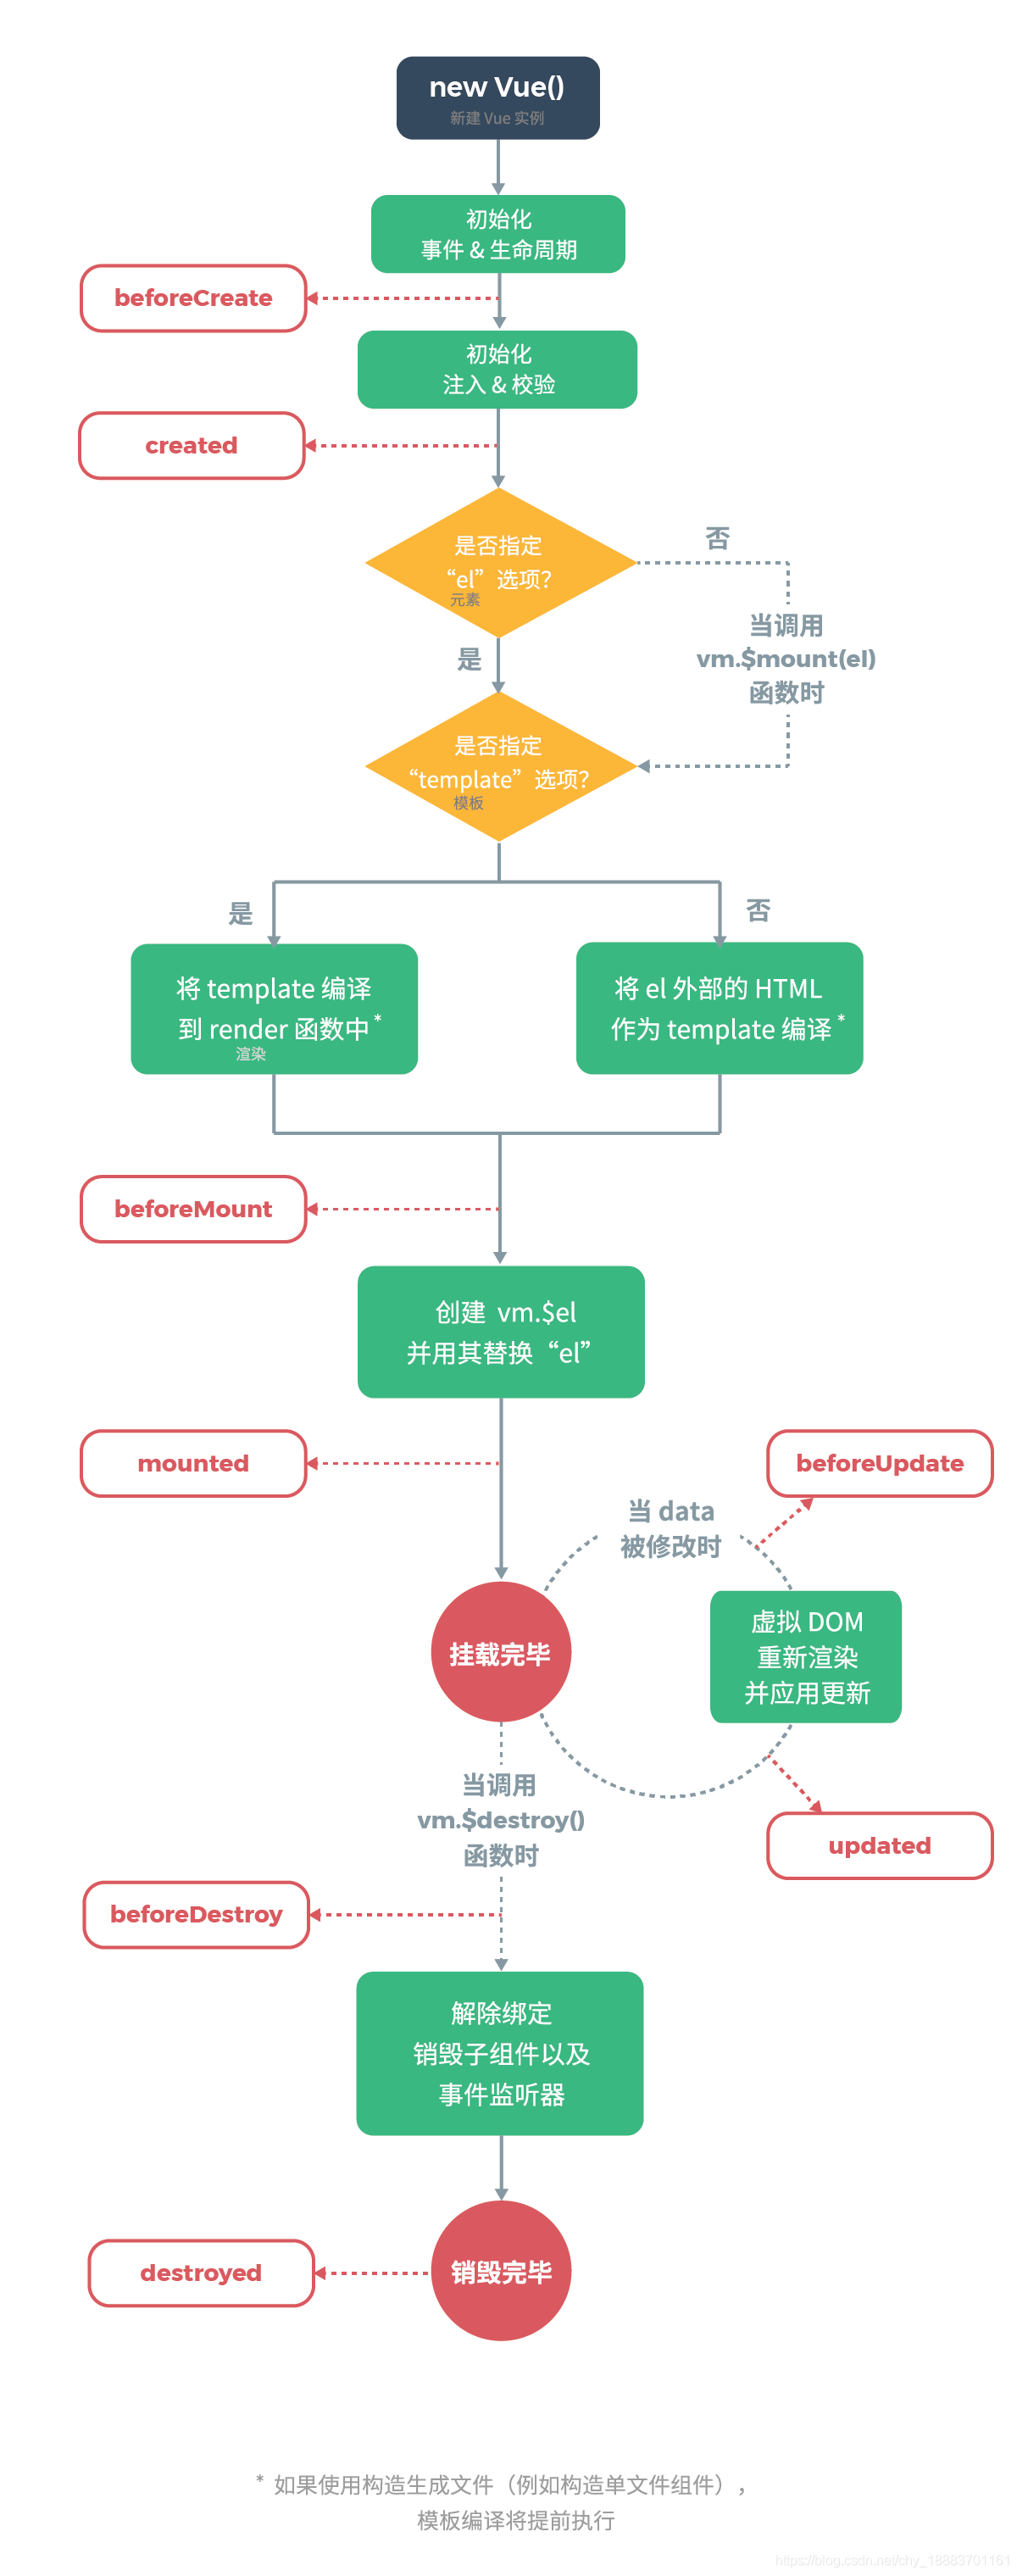
2. Vue 的声明周期

3. Vue 的语法和概念
- 插值表达式
- 指令(内置指令 14 个)
- 计算属性和侦听器
- class 和 style
- 条件渲染/列表渲染
- 表单输入绑定
- 组件
- 插槽
- 插件
- 混入 mixin
- 响应式
- 不同构建版本的 vue
二、Vue Router 基础
1. 基础使用
1. 创建路由页面

2. 注册路由插件 - 配置路由规则 - 创建 router 对象
编辑 index.js 文件(src/router/index.js):
import Vue from 'vue'
import VueRouter from 'vue-router'
import Index from '../views/Index.vue'
// 2. 注册路由插件
Vue.use(VueRouter)

// 3. 路由规则
const routes = [
  {
    path: '/',
    name: 'Index',
    component: Index
  },
  {
    path: '/blog',
    name: 'Blog',
    component: () => import(/* webpackChunkName: "blog" */ '../views/Blog.vue')
  },
  {
    path: '/photo',
    name: 'Photo',
    component: () => import(/* webpackChunkName: "photo" */ '../views/Photo.vue')
  }
]

// 4. 创建 router 对象
const router = new VueRouter({
  routes
})
export default router
3. 注册 router 对象
编辑 main.js 文件(src/main.js):
import Vue from 'vue'
import App from './App.vue'
import router from './router'

Vue.config.productionTip = false

new Vue({
  // 5. 注册 router 对象
  router,
  render: h => h(App)
}).$mount('#app')
4. 创建路由组建的占位 - 创建链接:
<template>
  <div id="app">
    <div id="nav">
      <!-- 7. 创建链接 -->
      <router-link to="/">Index</router-link> |
      <router-link to="/blog">Blog</router-link> |
      <router-link to="/photo">Photo</router-link>
    </div>
    <!-- 6. 创建路由组建的占位 -->
    <router-view/>
  </div>
</template>
2. 动态路由
1. 配置路由规则:
const routes = [
  {
    path: '/',
    name: 'Index',
    component: Index
  },
  {
    path: '/detail/:id',
    name: 'Detail',
    // 开启 props,会把 URL 中的参数传递给组件
    // 在组件中通过 props 来接收 URL 参数
    props: true,
    component: () => import(/* webpackChunkName: "detail" */ '../views/Detail.vue')
  }
]
2. 路由页面:
<template>
  <div>
    <!-- 方式1: 通过当前路由规则,获取数据 -->
    通过当前路由规则获取:{{ $route.params.id }}

    <br>
    <!-- 方式2:路由规则中开启 props 传参 -->
    通过开启 props 获取:{{ id }}
  </div>
</template>

<script>
export default {
  name: 'Detail',
  props: ['id']
}
</script>
3. 嵌套路由
1. 配置路由规则:
import Vue from 'vue'
import VueRouter from 'vue-router'
// 加载组件
import Layout from '@/components/Layout.vue'
import Index from '@/views/Index.vue'
import Login from '@/views/Login.vue'

Vue.use(VueRouter)

const routes = [
  {
    name: 'login',
    path: '/login',
    component: Login
  },
  // 嵌套路由
  {
    path: '/',
    component: Layout,
    children: [
      {
        name: 'index',
        path: '',
        component: Index
      },
      {
        name: 'detail',
        path: 'detail/:id',
        props: true,
        component: () => import('@/views/Detail.vue')
      }
    ]
  }
]
const router = new VueRouter({
  routes
})
export default router
2. 嵌套路由页面:
<template>
  <div>
    <div>
      <img width="25%" src="@/assets/logo.png">
    </div>
    <div>
      <router-view></router-view>
    </div>
    <div>
      Footer
    </div>
  </div>
</template>

<script>
export default {
  name: 'layout'
}
</script>
4. 编程式导航
路由跳转的三种方式:
// 不会记录跳转历史(浏览器无法前进/后退)
this.$router.replace('/login')

// 会记录历史
this.$router.push('/')
// this.$router.push({ name: 'Home' })
// 传递路由参数
// this.$router.push({ name: 'Detail', params: { id: 1 } })

// 跳转到记录中 回退2次 的页面
this.$router.go(-2)
三. Hash哈希 VS History
1. 区别
表现形式:
- Hash模式: http://localhost/#/detail?id=1234
- History模式: http://localhost/detail/1234
原理:
- Hash模式是基于锚点,以及
onHashChange事件。(通过锚点的值作为路由地址,当地址变化后,触发onHashChange事件,根据路由呈现页面内容) - History模式是基于HTML5中的History API
History.pushState()IE10以后才支持(路径发生变化,像服务器发送请求)History.replaceState()(不会像服务器发送请求,只会改变 url 地址,并且保留历史记录)
2. History模式
⑴. 基本使用
- History需要服务器的支持
- 单页应用中,服务端不存在http://www.test.com/login这样的地址会返回找不到该页面
- 在服务端应该除了静态资源外都返回单页应用的index.html
配置路由规则:
const routes = [
  {
    path: '/',
    name: 'Home',
    component: Home
  },
  {
    path: '/about',
    name: 'About',
    component: () => import(/* webpackChunkName: "about" */ '../views/About.vue')
  },
  // 配置无法访问到的路径
  {
    path: '*',
    name: '404',
    component: () => import(/* webpackChunkName: "404" */ '../views/404.vue')
  }
]
const router = new VueRouter({
  // 默认为 hash 默认
  mode: 'history',
  routes
})
export default router
⑵. 刷新 404 问题
因为 History刷新会像服务端发送请求,而服务端未设置关于路由的请求相应,所以会展示默认 404 内容
- Node.js服务器配置:
// 加载 node 模块的 path,处理路径
const path = require('path')
// 导入处理 history 模式的模块
const history = require('connect-history-api-fallback')
// 导入 express
const express = require('express')

const app = express()
// 关键:注册处理 history 模式的中间件
// !!!开启服务器支持,再次刷新页面,服务器会将默认路径返回给浏览器,由浏览器来处理路由地址
app.use(history())
// 处理静态资源的中间件,网站根目录 ../web
app.use(express.static(path.join(__dirname, '../web')))

// 开启服务器,端口是 3000
app.listen(3000, () => {
  console.log('服务器开启,端口:3000')
})
- Nginx服务器配置:
-
下载nginx
-
把压缩包解压到 C 盘根目录
-
启动命令行工具
# 启动 start nginx # 重启 nginx -s reload # 停止 nginx -s stop -
将打包项目拷贝到
nginx项目 -
在浏览器中输入
localhost地址访问nginx项目 -
如果没有处理history模式,刷新未配置的路径会报404的错误
-
修改
nginx.conf文件
-
// nginx.conf 文件
http {
 server{
  ...
  location / {
   ...
   index index.html index.htm;
   try_files $uri $uri/ /index.html;
?
   // $uri 为当前请求的路径
   // ($uri/表示当前目录找目录下的默认首页 即index的内容)
   // 如果还没找到,返回单页面应用的首页
  }
 }
}
执行流程:
服务器接收当前路径请求地址,如果没有当前url对应的资源,服务端会返回index.html首页;
当浏览器接收到服务端返回的是首页时,并有着对应的子路由名,将自动解析路由组件,从而显示对应的子路由组件
四. 手撕一个Vue Router
1. Vue 前置知识
- 插件
- 混入
- Vue.observable()
- 插槽
- render 函数
- 运行时和完整版的 Vue
2. Vue Router 的路由模式
Vue Router 是前端路由,在浏览器端判断当前的路径,并加载当前路径对应的组件
Hash 模式:
URL中#后面的内容作为路径地址,不会请求服务器,但是会记录历史- 监听
hashchange事件,路径改变后进行对应的组件渲染 - 根据当前路由地址找到对应组件重新渲染
History 模式:
- 通过
History.pushState()方法改变地址栏(不会向服务器发送请求,但会将这次URL记录到历史中) - 监听
popstate事件- 监听浏览器历史的变化,可以记录改变后的历史地址
- 调用
pushState或者replaceState并不会触发该事件 - 点击前进后退按钮或者调用
back或者forward方法时才触发
- 根据当前路由地址找到对应组件重新渲染
3. Vue Router 的实现原理
⑴. 核心代码:
// router/index.js
?
// Vue.use() 来注册插件
// 如果vue.use(xxx)  xxx 是个函数那么就调用这个函数,如果是个对象那么就调用这个对象中的install方法
Vue.use(VueRouter)
?
// 创建路由对象,VueRouter应该是个类,并且有个install方法
const router = new VueRouter({
 routes: [
  { name: 'home', path: '/', component: homeComponent }
 ]
})
// 创建 Vue 实例,注册 router 对象
new Vue({
 router,
 render: h => h(App)
}).$mount('#app')
⑵. 核心要点:
- 需要
Vue.use(VueRouter)注册,所以VueRouter是个具有install方法的类 - 类中需要定义路由规则
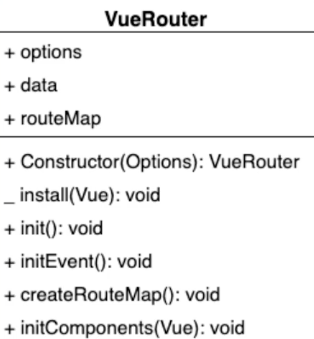
⑶. 类图:

-
类名: VueRouter
-
属性:
- options 对象: 记录构造函数中传入的对象
- data 对象: 有一个属性
current记录当前路由地址;目的是让该对象是响应式的,地址发生变化后对应组件会进行更新 - routeMap 对象: 记录路由地址和组件的对应关系,将路由规则解析到routerMap中来
-
方法:
-
+是对外公开的方法,_是静态方法 -
Coustructor(Options): 构造函数,初始化属性
-
install(Vue): 静态方法,实现vue的插件机制
-
init(): 调用下面三个方法,将不同代码分隔到不同方法实现
- initEvent(): 注册
popstate事件,监听浏览器历史的变化 - creatRouteMap(): 初始化
routeMap属性,把构造函数中传入的路由规则转换成键值对的形式存储到RouterMap对象。(路由地址:对应组件) - initComponents(Vue): 创建
router-link和router-vue两个组件
- initEvent(): 注册
4. Vue Router - Coustructor(构造函数)
创建 index.js 文件(vuerouter/index.js):
class VueRouter {
	constructor (options) {  // 初始化属性
	 // 记录路径和对应的组件
	  this.options = options  // 用户传入的路由规则
	  this.routeMap = {}  // 解析路由规则有以键值对的形式存储,形成路径和组件的对应关系

	  // 创建响应式对象,使用observable
	  this.data = _Vue.observable({
	    // 当前的默认路径
	    current: '/'
	  })
	}
}
5. Vue Router - install(注册插件)
let _Vue = null
class VueRouter {
	constructor (options) { ... }

    // 传入两个参数, VUe 的构造函数, 选项对象(可选)
    static install(Vue){
        //1 判断当前插件是否被安装
        if(VueRouter.install.installed) return
        // 给 install 对象增加一个属性用来记录插件状态(是否被安装)
        VueRouter.install.installed = true

        //2 把Vue的构造函数记录在全局
        _Vue = Vue

        //3 把创建Vue的实例传入的router对象注入到Vue实例
        // 需要所有实例共享一个成员, 添加到构造实例的原型上
        // _Vue.prototype.$router = this.$options.router
        // 这里的 this 指向的 VueRouter 这个类, 而不是 Vue 实例

        // 混入(给所有 Vue实例 混入一个对象)
        _Vue.mixin({
            beforeCreate(){
                // 只有 Vue 实例才需要执行(防止组件也执行)
                if(this.$options.router){
                    _Vue.prototype.$router = this.$options.router
                }
            }
        })
    }
}
6. Vue Router - creatRouteMap
- 功能: 遍历所有的路由规则,形成路径和组件的映射关系,存储到
routerMap中 - routerMap: 存储的键就是路由地址,值就是地址对应的组件(将来路由变化就可以根据键值对的对应关系找到对应的组件)
createRouteMap () {
 // routes => [{ name: '', path: '', component: }]
  // 遍历所有的路由规则,把路由规则解析成键值对的形式,存储到options中的routeMap中
  this.options.routes.forEach(route => {
    // 形成路径和组件的映射关系
    this.routeMap[route.path] = route.component
  })
}
7. Vue Router - initComponents
- router-link 组件:
功能: 将 router-link 标签中的内容渲染到 a 标签中去
initComponents (Vue) {  // 没有用_Vue参数参数传入的原因是为了减少当前方法对外部的依赖
  _Vue.component('router-link', {
    // 接收外部传入的参数
    props: {
      to: String
    },
    // 需要带编译器版本的 Vue.js 即完整版 Vue
    // 这样才能使用编译器将 template模板 转化为 render函数
    template: '<a :href="to"><slot></slot></a>'

	// vue 中的使用方式: <router-link to="/">Home</router-link>
}
- router-view 组件
- 相当于一个占位符,要根据当前路由地址,获取对应的路由组件
- 调用h函数,将获取到的当前路由地址对应的组件渲染到Router-view的位置
initComponents (Vue) {
    _Vue.component('router-link', {
      ...
    })

    const self = this // render方法时vue提供的,所以内部this并不是vueRouter的实例
    _Vue.component('router-view', {
      render (h) {
        // 当前路由地址
        // self.data.current

        // 根据当前路径找到对应的组件
        const component = self.routeMap[self.data.current]
        return h(component) // 将组件转换为虚拟DOM返回
      }
    })
}
8. Vue Router - init
功能: 包装 createRouteMap () 、 initComponents (Vue) 和 initEvent方便调用
init () {
  this.createRouteMap()
  this.initComponents(_Vue)
  this.initEvent()
}
并且在 install() 方法中的最后调用初始化方法
static install (Vue) {
    ...
     if (this.$options.router) {
        _Vue.prototype.$router = this.$options.router
       this.$options.router.init()  // 初始化
     }
 }
9. Vue 版本
⑴. Vue 的构建版本
- 运行时版: 不支持 template 模板,需要打包的时候提前编译(render函数创建虚拟DOM渲染到视图)
- 完整版: 包含运行时和编译器,体积比运行时版大 10K 左右编译器在程序运行的时候把模板转换成 render 函数,所以性能不如运行时版本的提前编译
⑵. Vue 完整版本
vue-cli创建的项目默认使用的是 运行时版本的Vue- 如果想切换成带编译器版本的
Vue.js,需要修改vue-cli配置 - 如果想要改配置需要在项目根目录下创建一个
vue.config.js并导出一个模块
//  vue.config.js
?
module.exports = {
  // 选项
  runtimeCompiler: true // 此时会加载带编译器版本的vue 默认为false
}
⑶. Vue 的运行时版本
采用 render 函数的形式来进行提前渲染,而不是程序执行时渲染
删除 vue.config.js ,编辑 vuerouter/index.js :
initComponents (Vue) {
_Vue.component('router-link', {
    // 接收外部传入的参数
    props: {
      to: String
    },

    // 这里使用h函数来创建一个超链接来代替模板形式:template: '<a :href="to"><slot></slot></a>'
    // 使用运行时版本的 Vue.js,但此时没有编译器,所以需要来写一个render函数
    render (h) { // 参数h函数是用来创建虚拟DOM,并调用h函数并将结果返回,h函数式vue源码提供
      // 此处仅以解析上述template模板为例,h函数的有三个参数
      return h('a', { // 1)创建的元素对应的选择器,此处用的a标签选择器
        attrs: { // 2) 配置对象,给当前选中DOM使用attrs设置属性或者使用on来设置事件处理函数
          href: this.to
        },
        on:{ // 给 a标签 注册点击事件
          click:this.clickhander
        }
      }, [this.$slots.default]) // 3) 获取默认的非具名插槽,并生成元素的子元素
    },
    methods:{
      clickhander(e){ //事件参数 e
        // pushiState只改变浏览器地址栏,不向服务器发送请求,也不能加载地址对应的组件
        history.pushState({}, "", this.to) // data【传递给popState】 title【网页标题】 url【当前超链接要跳转到的地址】
        this.$router.data.current = this.to // 响应式对象data,改变后或重新加载组价并渲染视图,来实现动态加载对应的组件
        e.preventDefault() // 阻止事件默认行为
      }
    }
  })
  ...
}
10. Vue Router - initEvent
- 用来实现前进后退功能
- 如果没有此方法,点击前进后退后地址改变但是组件页面不会重载,因为没有重新加载地址对应的组件
- 需要在
init方法中进行调用
initEvent(){
  window.addEventListener("popstate", () => {
    this.data.current = window.location.pathname
  })
}
11. Vue Router - 完整代码
console.dir(Vue)
let _Vue = null
class VueRouter {
    static install(Vue){
        //1 判断当前插件是否被安装
        if(VueRouter.install.installed){
            return;
        }
        VueRouter.install.installed = true
        //2 把Vue的构造函数记录在全局
        _Vue = Vue
        //3 把创建Vue的实例传入的router对象注入到Vue实例
        // _Vue.prototype.$router = this.$options.router
        _Vue.mixin({
            beforeCreate(){
                if(this.$options.router){
                    _Vue.prototype.$router = this.$options.router

                }

            }
        })
    }
    constructor(options){
        this.options = options
        this.routeMap = {}
        // observable
        this.data = _Vue.observable({
            current:"/"
        })
        this.init()

    }
    init(){
        this.createRouteMap()
        this.initComponent(_Vue)
        this.initEvent()
    }
    createRouteMap(){
        //遍历所有的路由规则 吧路由规则解析成键值对的形式存储到routeMap中
        this.options.routes.forEach(route => {
            this.routeMap[route.path] = route.component
        });
    }
    initComponent(Vue){
        Vue.component("router-link",{
            props:{
                to:String
            },
            render(h){
                return h("a",{
                    attrs:{
                        href:this.to
                    },
                    on:{
                        click:this.clickhander
                    }
                },[this.$slots.default])
            },
            methods:{
                clickhander(e){
                    history.pushState({},"",this.to)
                    this.$router.data.current=this.to
                    e.preventDefault()
                }
            }
            // template:"<a :href='to'><slot></slot><>"
        })
        const self = this
        Vue.component("router-view",{
            render(h){
                // self.data.current
                const cm=self.routeMap[self.data.current]
                return h(cm)
            }
        })

    }
    initEvent(){
        window.addEventListener("popstate",()=>{
            this.data.current = window.location.pathname
        })
    }
}
