toB端常用的扫码功能,当时找npm找组件很费时间所以留着自用,有需要的盆友也欢迎抱走。
一维码
扫码枪扫条形码
条码一般的扫码工具是像超市那样的扫码枪
生命周期里一直在监听扫码枪扫码键是否按下
  useEffect(() => {
    document.addEventListener("keydown", handleKeyDown);
    return () => document.removeEventListener("keydown", handleKeyDown);//useEffect通过return进行一些清除。
  }, [list]);//useEffect在每次变量list发生变化时调用,你们没有list可以写[]
  const handleKeyDown = (e) => {
    if (e.which == 13) { // 按键松开会传索引值13
      getScanInfo(code);// 将code传给getScanInfo函数
      code = '';
      lastTime = 0;
      return;
    }
    // 这个阶段都在扫码读取code
    const currCode = e.key;
    const currTime = new Date().getTime();
    if (currCode != 'Shift' && currCode != 'Unidentified') {
      if (code == '') {
        code += currCode;
      } else if (currTime - lastTime <= 300) {
        code += currCode;
      }
    }else if(currCode == 'Shift'){
      code = '';
    }
    lastTime = currTime;
  }
getScanInfo处理扫码值调用接口给出反馈(可不看)
  // 根据卡片编号获取卡片及物料数据
  const getScanInfo = async (val) => {
    if(!val){
      return;
    }
    if(isImplement){
      return;
    }
    setImplement(true);
    f7router.app.preloader.show()
    try {
      await StorageService.getScanInfo(val).then(data => {
        const code = data.code;
        const value = data.value;
        if (data && value) {
          if (code === 'M') {
            const index = list.findIndex(item => item.materialLabelId == value.id);
            if(index < 0){
              onToast("此物料不属于本次盘点任务!", 'center', '3000');
              return;
            }
            setSelectIndex(index);
            scrollToAnchor(index);
            if(list[index].status == 0 && checkTaskItem.status != 2){
              handleException(list[index],index);
            }
          }
        } else {
          onToast("请扫描正确二维码!", 'center', '3000');
        }
      });
    } catch (error) {
      onToast(error.message, 'center', '3000');
    }
    setImplement(false);
    f7router.app.preloader.hide()
  }
调用摄像头扫描条形码
找到一个唯一可用的,缺点就是相当朴素,没有ui扫码的图标 ,有能力的同志可以自己写一写样式,我们这里客户没有要求我就懒了(这样不好)。
地址:https://www.npmjs.com/package/react-webcam-barcode-scanner
安装它
npm i react-webcam-barcode-scanner
官网有react新版函数类使用方法我就不贴了,这个是class类组件老版本的项目不能直接使用,所以我改成了下面这个版本。
class BarCode extends Component {
  constructor(props){
    super(props)
    this.state = {
      flag: false,
    }
  }
  printText = (res) => {
    console.log('printText', res);
    if(res) {
      this.props.barCode(res);
      setTimeout(()=>{
        this.setState({
          flag: false
        });
      },3000);
    }
  };
  render(){
    if (this.state.flag == false){
      return(
        <>
        <BarcodeScannerComponent printText={this.printText}
        />
        </>
      )
    }else{
      return(
        <Result
          status="success"
          title="扫码成功"
        />
      )
    }
  }
}
index.js文件中引用调用即可,一定要注意,扫码页面不能设置过大,不然读取率相当之低,下面这个宽度是测试过后强烈推荐的。
        <Modal
          title="请将摄像头对准条形码"
          visible={barVisible}
          style={{ top: 0,height:'10%' }}
          width={'30%'}
          footer={null}
          onCancel={this.handleCancelBar}
        >
          <BarCode barCode={this.barCode} />
        </Modal>
还有一点,要想在项目中调用摄像头,一定要申请https证书,不然除了本地端口,其他局域网广域网ip均无法访问。
生成一维码
1.先装个JsBarcode
2.创建一个barCode.js
npm install jsbarcode --save
// 条形码
export default class Barcode extends Component {

  static defaultProps = {
    format: 'CODE128',
    renderer: 'svg',
    width: 1.6,
    height: 25,
    displayValue: false,
    textAlign: 'center',
    textPosition: 'bottom',
    textMargin: 6,
    fontSize: 14,
    background: '#ffffff',
    lineColor: '#000000',
    margin: 0,
    marginBottom: 0,
  };

  constructor(props) {
    super(props);
    this.update = this.update.bind(this);
  };

  componentDidMount() {
    this.update();
  };

  componentDidUpdate() {
    this.update();
  };

  handleBarcode = (r) => {
    this.barcode = r;
  }

  update() {
    const {
      value,
      format,
      width,
      height,
      displayValue,
      textAlign,
      textPosition,
      textMargin,
      fontSize,
      background,
      margin,
      lineColor,
      marginBottom,
    } = this.props;
    JsBarcode(this.barcode, value, {
      format,
      width,
      height,
      displayValue,
      textAlign,
      textPosition,
      textMargin,
      fontSize,
      background,
      margin,
      lineColor,
      marginBottom,
    })
  };

  render() {
    const { renderer } = this.props;
    if (renderer === 'svg') {
      return (
        <svg ref={this.handleBarcode} />
      );
    } else if (renderer === 'canvas') {
      return (
        <canvas ref={this.handleBarcode} />
      );
    } else if (renderer === 'img') {
      return (
        <img ref={this.handleBarcode} alt="" />
      );
    }
  };
}
修改其他属性可以研究下文档:https://www.npmjs.com/package/jsbarcode
3.引入即可,简单粗暴
import Barcode from './barcode'
<Barcode value={"1234567"} height={50} width={2} />
二维码
扫码二维码
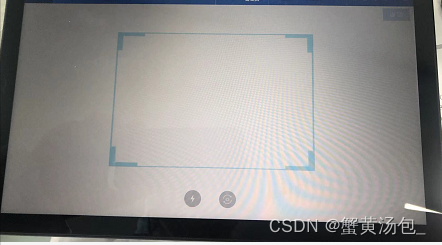
看效果图,保护隐私就放一张车间扫码pad使用的白底页面,在电脑上是白底的很正常,如果在移动端是白底调用不了摄像头的话,一定要检查root的样式background-color是不是透明呢。

先安装两个组件@ionic-native/qr-scanner,@ionic-native/core
npm install --save @ionic-native/qr-scanner
npm install @ionic-native/core --save
创建一个js文件,这个组件要引入一些资料挺多的,我改天整理下打包上传。
import React, { useEffect } from 'react';
import {
  scan,
  cancel,
  toggleCamera,
  toggleLight
} from '~/plugins/QRScanner';
import styles from './style.scss';
import PropTypes from 'prop-types';
const ScanPop = ({ history, goNext, visible, setScanVisible }) => {

  useEffect(() => {
    return () => {
      // 组件销毁时触发
      document.getElementById('root').style.background = '#f0f2f4';
      cancel();
    }
  })

  useEffect(() => {
  // 如果扫码时是白底,多考虑一下是不是root的background-color是不是被设置为白色而不是透明了。
    document.getElementById('root').style.background = 'transparent';
    document.body.style.background = 'transparent';

    scan().then(text => {
      goNext(text);
      document.getElementById('root').style.background = '#f0f2f4';
      document.body.style.background = '#f0f2f4';
    });

    setTimeout(() => {
      return () => {
        cancel();
      };
    }, 2000);
  }, [visible]);

  //打开闪光灯
  const handleToggleLight = () => {
    toggleLight();
  };

  //打开方向设想头
  const handleToggleCamera = () => {
    toggleCamera();
  };

  return (
    <div className={styles.content}>
      <Button className={styles.close} type="primary" onClick={() => setScanVisible(false)}>返回</Button>
      <div className={styles['page-scan-camera-ready']}>
        <div className={styles['guides']}>
          <div className={styles['qr-scan-guides']}>
            <div style={{ width: '100%', height: 2, background: '#008ad9' }}></div>
          </div>
        </div>
        <div className={styles['scanner-controls']}  >
          <span className={styles['icon-flash']} onClick={handleToggleLight} />
          <span className={styles['icon-camera-toggle']} onClick={handleToggleCamera} />
        </div>
      </div>
    </div>
  );
}

ScanPop.propTypes = {
  goNext: PropTypes.func,
};
export default ScanPop;
