Vue基础
1. Vue简介
1.1 Vue是什么?
Vue是一套用于构建用户界面的渐进式JavaScript框架
- 构建用户界面:将数据变成用户可以看到的界面
- 渐进式:是指Vue可以自底向上逐层的应用
- 对于简单应用,只需要轻量小巧的核心库
- 对于复杂应用,可以引入各种Vue插件
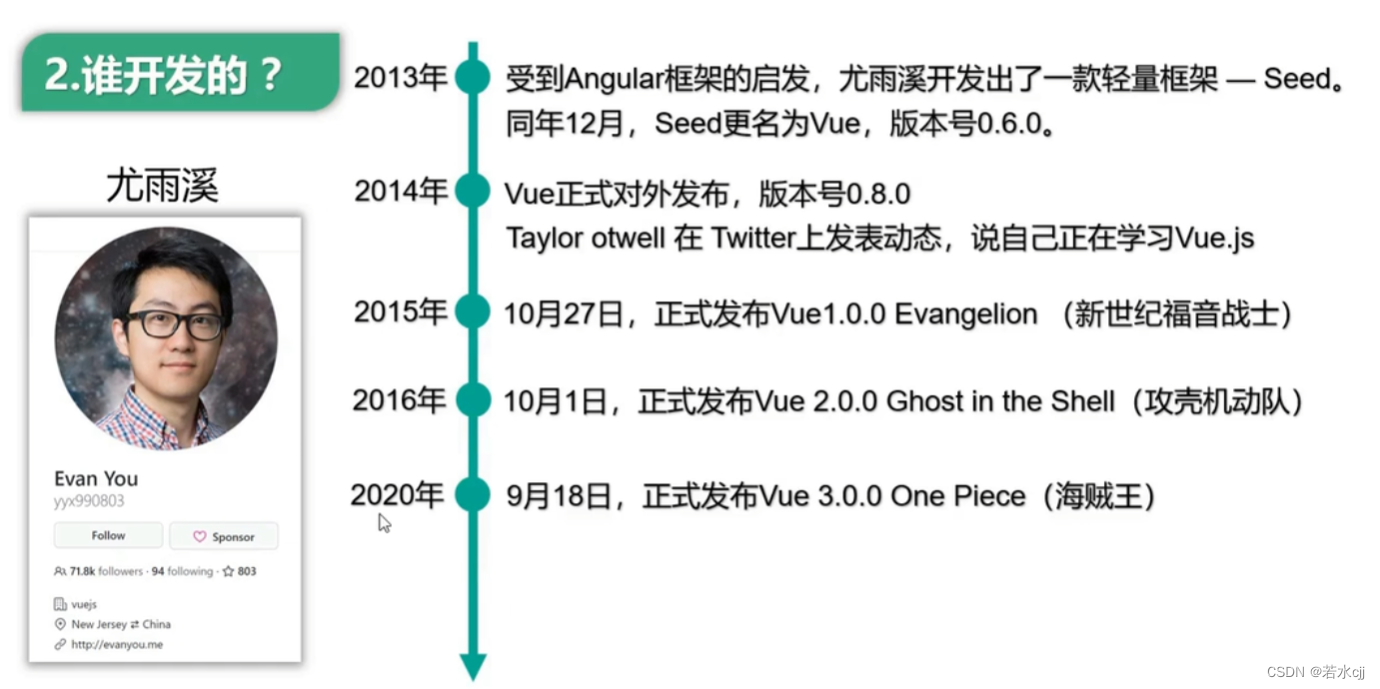
1.2 Vue的作者以及迭代版本
1.3 Vue的特点
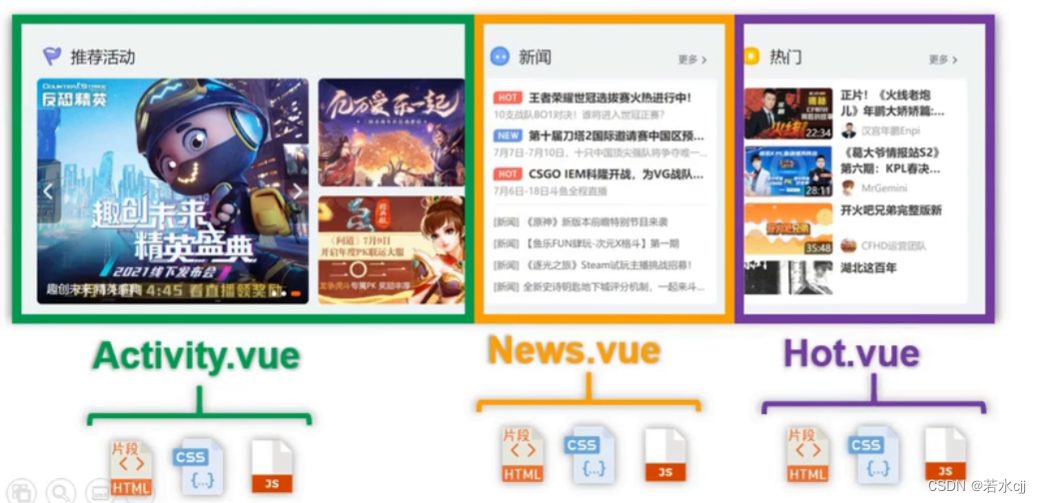
- 采用组件化的模式,提高代码复用率,并且让代码更好的维护
Vue将相近的部分封装成一个模块,一个模块中包含html,css,js代码,模块可以在任何地方复用,若修改模块中的内容不会影响其他模块
- 声明式编码,让编码人员无需直接操作DOM,提高开发效率

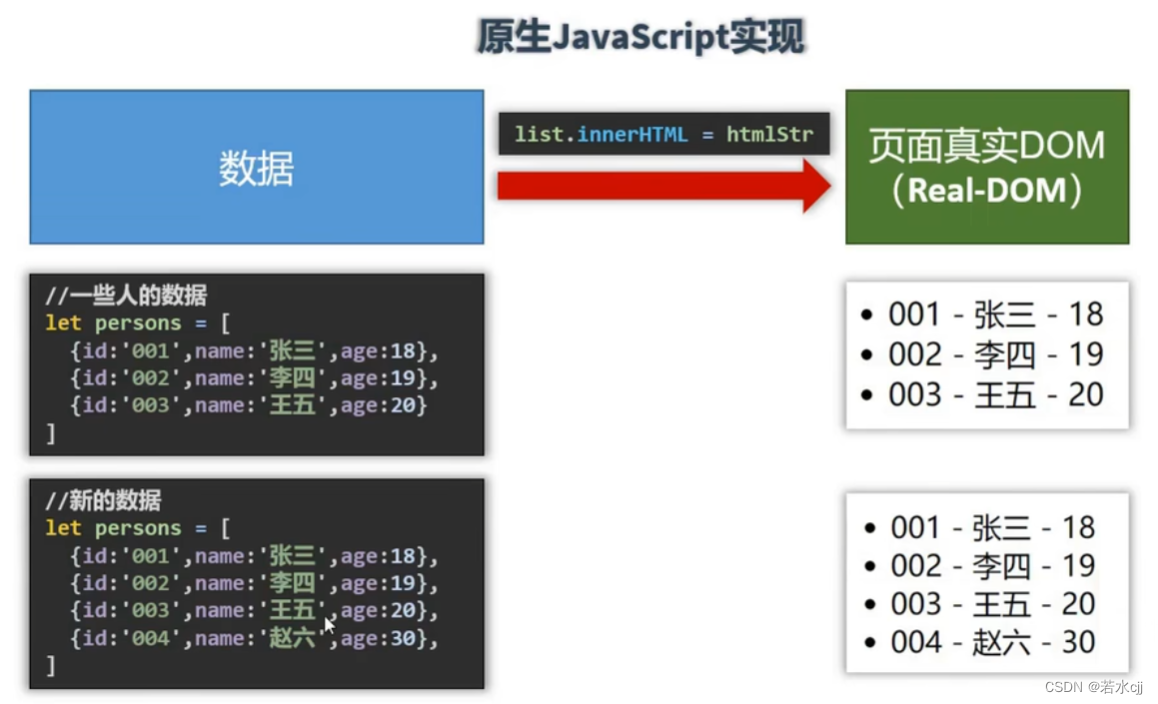
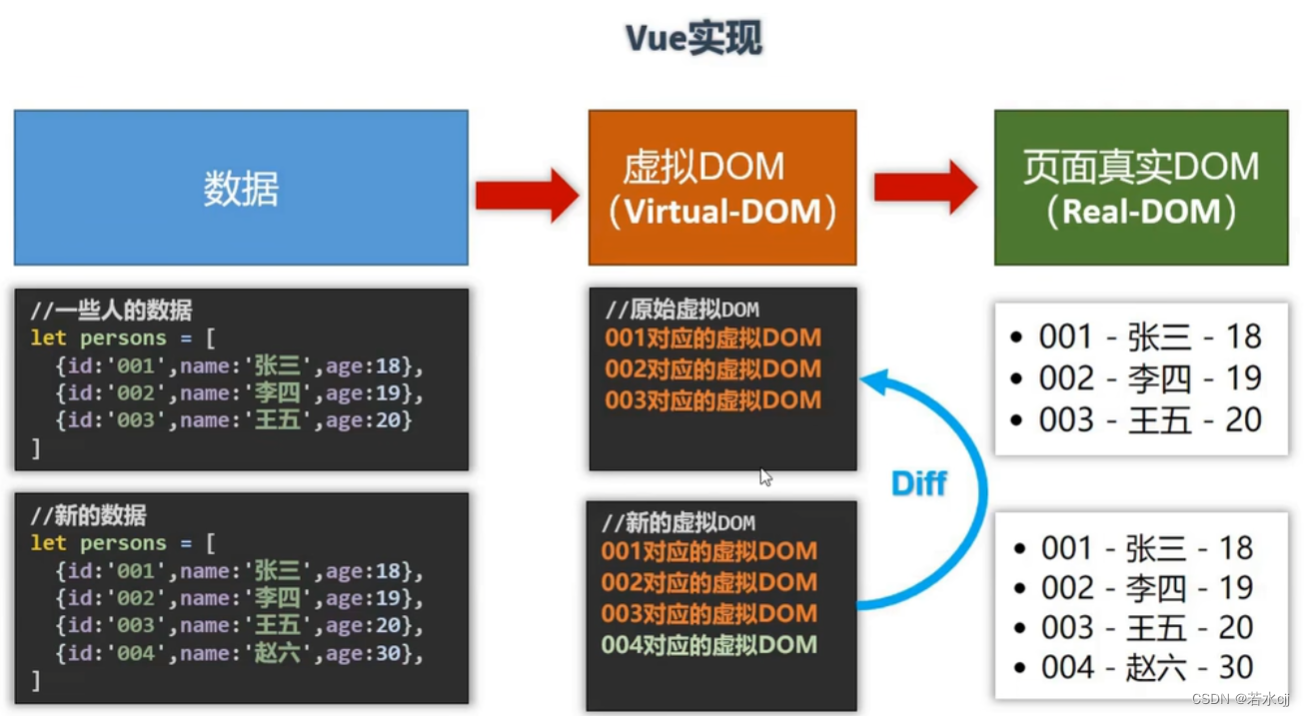
- 使用虚拟DOM + Diff算法,尽可能复用DOM节点
原生js实现数据更新时会覆盖原来的数据,效率较低
Vue会将数据先变成虚拟DOM,这样如果数据有变换时,使用Diff算法进行比较,如果新的虚拟DOM与旧的虚拟DOM中有相同的DOM,那么直接复用,能够极大的提升效率
2. 搭建Vue开发环境
2.1 安装Vue的方式
2.1.1 第一种安装方式:直接使用script标签引入
- 使用本地文件
<!DOCTYPE html>
<html lang="en">
<head>
    <meta charset="UTF-8">
    <meta http-equiv="X-UA-Compatible" content="IE=edge">
    <meta name="viewport" content="width=device-width, initial-scale=1.0">
    <title>Document</title>
    <!--
        引入vue之后,浏览器中会存在Vue构造函数,可在控制台输入Vue进行验证
     -->
    <script src="./vue.js"></script>

    <!--
        使用vue开发版本时,浏览器会有相关提示,提示如下,关闭可使用以下代码

            You are running Vue in development mode.
            Make sure to turn on production mode when deploying for production.
            See more tips at https://vuejs.org/guide/deployment.html

         Vue.config 是一个对象,包含Vue的全局配置,一次修改,处处可用,可以在启动应用之前修改相关属性
     -->
     <script>
         Vue.config.productionTip = false;
     </script>
</head>
<body>

</body>
</html>
- 使用CDN
xxxxxxx
2.1.2 第二种安装方式:使用NPM
XXXX
2.2 Vue小案例
<!DOCTYPE html>
<html lang="en">
<head>
    <meta charset="UTF-8">
    <meta http-equiv="X-UA-Compatible" content="IE=edge">
    <meta name="viewport" content="width=device-width, initial-scale=1.0">
    <title>Document</title>
    <script src="./vue.js"></script>

</head>
<body>
    <!-- 准备一个容器 -->
    <div id="root">
        <h1>{{ name }}</h1>
    </div>
     <script>
         Vue.config.productionTip = false;   // 阻止浏览器生成生产提示

        /*
            创建Vue实例,new的时候只传入一个参数,
            并且这个参数是一个对象,此对象称为配置对象
            配置对象中的key是固定的,value值也是固定的数据类型

        */
         const x = new Vue({
            // el是element的简称,它用于指定当前的Vue实例为哪个容器服务,值通常为css选择器字符串
            // 也可用为 el:document.getelementById('root')
            el:"#root",
            // data中用于存储数据,数据供el所指定的容器使用,其他容器不能使用
            data:{
                name:'玉米'
            }
         })
     </script>
</body>
</html>
2.3 总结
1.想让Vue工作,就必须创建一个Vue实例,且要传入一个配置对象;
2.root容器里的代码依然符合html规范,只不过混入了一些特殊的Vue语法;
3.root容器里的代码被称为【Vue模板】;
4.Vue实例和容器是一一对应的;
5.真实开发中只有一个Vue实例,并且会配合着组件一起使用;
6.{{xxx}}中的xxx要写js表达式,且xxx可以自动读取到data中的所有属性;
7.一旦data中的数据发生改变,那么页面中用到该数据的地方也会自动更新;
注意区分:js表达式 和 js代码(语句)
1.表达式:一个表达式会产生一个值,可以放在任何一个需要值的地方:
(1). a
(2). a+b
(3). demo(1)
(4). x === y ? ‘a’ : ‘b’
2.js代码(语句)
(1). if(){}
(2). for(){}
3. Vue模板语法
<!DOCTYPE html>
<html lang="en">

<head>
    <meta charset="UTF-8">
    <meta http-equiv="X-UA-Compatible" content="IE=edge">
    <meta name="viewport" content="width=device-width, initial-scale=1.0">
    <title>模板语法</title>
    <!-- 第一步:引入vue -->
    <script src="./vue.js"></script>
</head>

<body>
    <!--
		Vue模板语法有2大类:
			1.插值语法:
					功能:用于解析标签体内容。
					写法:{{xxx}},xxx是js表达式,且可以直接读取到data中的所有属性。
			2.指令语法:
					功能:用于解析标签(包括:标签属性、标签体内容、绑定事件.....)。
					举例:v-bind:href="xxx" 或  简写为 :href="xxx",xxx同样要写js表达式,
							且可以直接读取到data中的所有属性。
					备注:Vue中有很多的指令,且形式都是:v-????,此处我们只是拿v-bind举个例子。

		 -->

    <!-- 准备一个容器 -->
    <div id="root">
        <h1>插值语法</h1>
        <h1>Hello {{ name }}</h1>
        <hr>
        <h1>指令语法</h1>
        <!--
                1. a标签中href变成v-bind:href后,vue会将后面引号中的内容当作js表达式执行
                2. v-bind可以给标签中的任何属性动态绑定值
                     例如 <a v-bind:href="url" v-bind:x = "hello">点击跳转</a>
                3. v-bind可简写为:
                     例如 v-bind:href 可简写为 :href
                4. v-bind数据绑定为单向的,vue实例中数据的变化会影响页面,反之不会影响
             -->
        <a v-bind:href="web.url">点击跳转到 {{ web.name }}</a>
    </div>

    <script>
        new Vue({
            el: "#root",
            data: {
                name: 'zhangsan',
                web:{
                    name:"baidu",
                    url: "www.baidu.com"
                }
            }
        })
    </script>
</body>
</html>
4. el和data的两种写法
4.1 el的两种写法
<!DOCTYPE html>
<html lang="en">
<head>
    <meta charset="UTF-8">
    <meta http-equiv="X-UA-Compatible" content="IE=edge">
    <meta name="viewport" content="width=device-width, initial-scale=1.0">
    <title>el和data的两种写法</title>
        <!-- 第一步:引入vue -->
        <script src="./js/vue.js"></script>
</head>
<body>
    <!-- 准备一个容器 -->
    <div id="root">
        <h1>{{ name }}</h1>
    </div>

    <script>
        /*
            第一种el的写法,也是初学时最常使用的方式
                这种方式实现时是在实例化vue的时候就指定所
                服务的容器,以达到vue实例与容器关联的目的
        */

        // new Vue({
        //     el:"#root",
        //     data:{
        //         name:"zhangsan"
        //     }
        // })

        /*
            第二种el的写法
                 1. 首先声明一个变量,保存vue实例,然后输出,查看实例的具体内容,如下图所示
                 2. 在下图中第一个框中以$符开头的是vue为开发人员提供的,其他不以$开头的不是
                 直接为开发人	员使用的,vue底层会调用。
                 3. 下图中第二个框中是vue原型对象中的方法(详细内容可见第二幅图),在其原型对象
                 中有一个$mount方法,使用$mount("#root")也可实现el:"#root"同样的功能,而且
                 更加灵活,可以在任何需要的时刻指定容器
        */
        const v = new Vue({
            data:{
                name:"zhangsan"
            }
        })
        console.log(v)

        // 将v.$mount("#root")放到定时器中,使其经过2秒中再关联容器
        setInterval(() => {
            v.$mount("#root")
        }, 2000);
    </script>
</body>
</html>
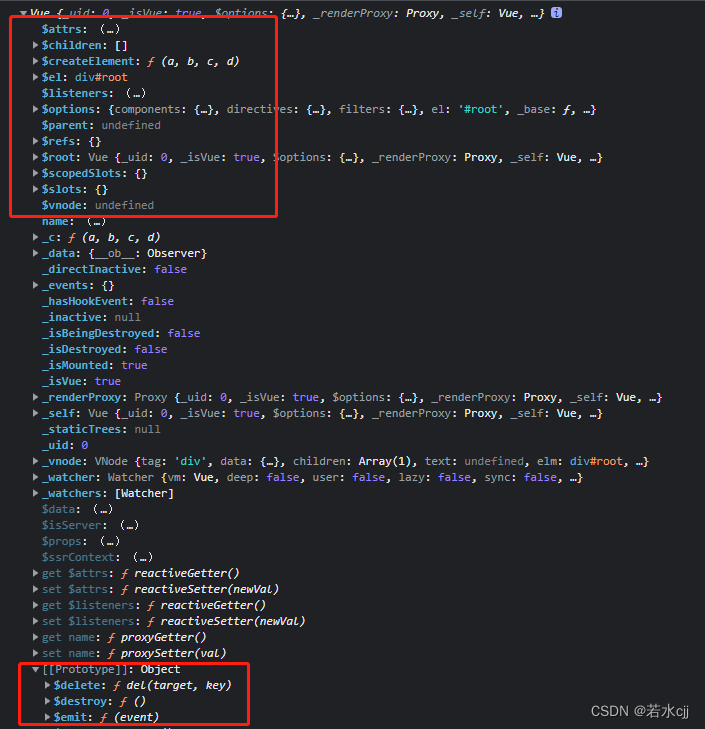
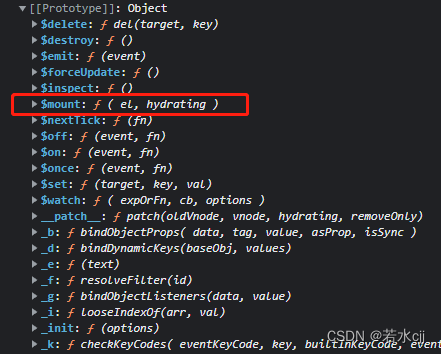
4.2 data的两种写法
<!DOCTYPE html>
<html lang="en">

<head>
    <meta charset="UTF-8">
    <meta http-equiv="X-UA-Compatible" content="IE=edge">
    <meta name="viewport" content="width=device-width, initial-scale=1.0">
    <title>el和data的两种写法</title>
    <!-- 第一步:引入vue -->
    <script src="./js/vue.js"></script>
</head>

    <!--
		data与el的2种写法
			1.el有2种写法
				(1).new Vue时候配置el属性。
				(2).先创建Vue实例,随后再通过vm.$mount('#root')指定el的值。
			2.data有2种写法
				(1).对象式
				(2).函数式
					如何选择:目前哪种写法都可以,以后学习到组件时,data必须使用函数式,否则会报错。
			3.一个重要的原则:
				由Vue管理的函数,一定不要写箭头函数,一旦写了箭头函数,this就不再是Vue实例了。
		-->

<body>
    <!-- 准备一个容器 -->
    <div id="root">
        <h1>{{ name }}</h1>
    </div>

    <script>

        // data的第一种写法:对象式

        // new Vue({
        //     el:"root",
        //     data:{
        //         name:"zhangsan"
        //     }
        // })


        // data的第二种写法:函数式

        /*
            此写法要求必须返回一个对象,对象中的数据,就是运行中所使用的数据
            使用组件时,必须使用函数式写法
        */
        new Vue({
            el: "#root",

            // 普通函数式写法
            // data:function(){
            //     // 这种写法中,this是Vue实例
            //     return {
            //         name:"zhangsan"
            //     }
            // }

            // 简单函数式写法
            // data() {
            //     // 这种写法中,this是Vue实例
            //     return {
            //         name: "zhangsan"
            //     }
            // }

            // data:()=>{
            //     // 如果使用箭头函数,this则是window,一定不能使用箭头函数
            //     return {
            //         name:"zhangsan"
            //     }
            // }

        })
    </script>
</body>
</html>
5. 数据绑定
<!DOCTYPE html>
<html lang="en">

<head>
    <meta charset="UTF-8">
    <meta http-equiv="X-UA-Compatible" content="IE=edge">
    <meta name="viewport" content="width=device-width, initial-scale=1.0">
    <title>数据绑定</title>
    <!-- 第一步:引入vue -->
    <script src="./js/vue.js"></script>
</head>

<body>
    <!--
		Vue中有2种数据绑定的方式:
			1.单向绑定(v-bind):数据只能从data流向页面。
			2.双向绑定(v-model):数据不仅能从data流向页面,还可以从页面流向data。
				备注:
					1.双向绑定一般都应用在表单类元素上(如:input、select等)
					2.v-model:value 可以简写为 v-model,因为v-model默认收集的就是value值。
		 -->
    <div id="root">
        <!-- 普通写法 -->
        <!-- 单向数据绑定 <input type="text" v-bind:value="name">
        <br>
        双向数据绑定 <input type="text" v-model:value="name"> -->

        <!-- 简单写法 -->
        单向数据绑定 <input type="text" :value="name">
        <br>
        双向数据绑定 <input type="text" v-model="name">

        <!--
            如下代码式错误的,因为v-model只能应用在表单类元素(输入类元素)上
                简单理解就是元素要有value属性才能使用v-model
         -->
        <h2 v-model:x="name">hello</h2>
    </div>

    <script>
        new Vue({
            el: "#root",
            data: {
                name: "zhangsan"
            }
        })
    </script>
</body>

</html>
6. MVVM模型
<!DOCTYPE html>
<html>
	<head>
		<meta charset="UTF-8" />
		<title>理解MVVM</title>
		<!-- 引入Vue -->
		<script type="text/javascript" src="./js/vue.js"></script>
	</head>
	<body>
		<!--
			MVVM模型
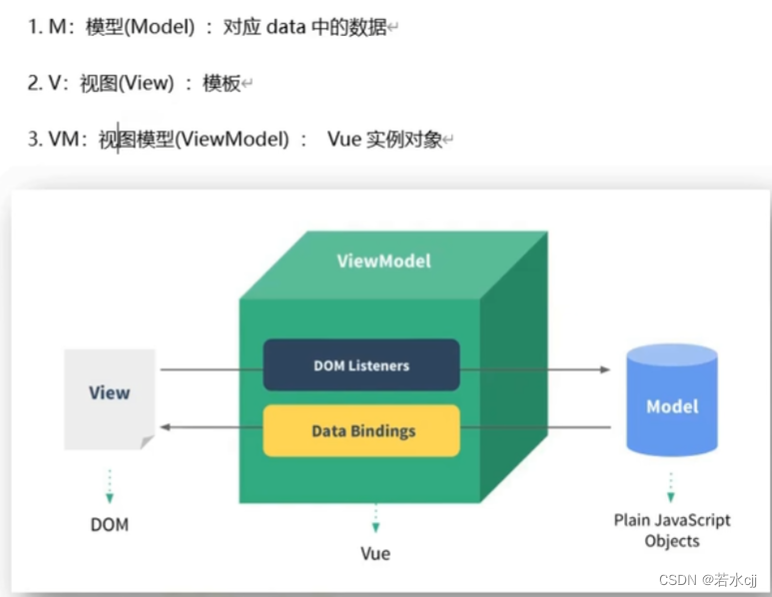
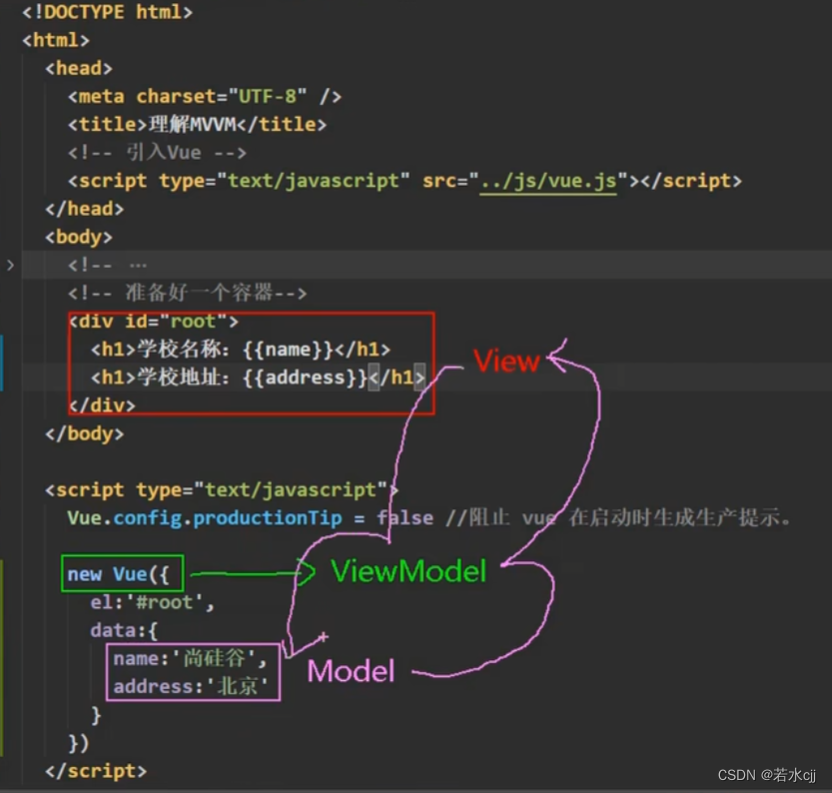
						1. M:模型(Model) :data中的数据
						2. V:视图(View) :模板代码
						3. VM:视图模型(ViewModel):Vue实例
			观察发现:
						1.data中所有的属性,最后都出现在了vm身上,如下图中红色框所示。
						2.vm身上所有的属性 及 Vue原型上所有属性,在Vue模板中都可以直接使用,
							如容器中测试所见。
		-->
		<!-- 准备好一个容器-->
		<div id="root">
			<h1>学校名称:{{name}}</h1>
			<h1>学校地址:{{address}}</h1>
			<!-- <h1>测试一下1:{{1+1}}</h1>
			<h1>测试一下2:{{$options}}</h1>
			<h1>测试一下3:{{$emit}}</h1>
			<h1>测试一下4:{{_c}}</h1> -->
		</div>
	</body>

	<script type="text/javascript">
		Vue.config.productionTip = false //阻止 vue 在启动时生成生产提示。

		const vm = new Vue({
			el:'#root',
			data:{
				name:'baidu',
				address:'北京',
			}
		})
		console.log(vm)
	</script>
</html>
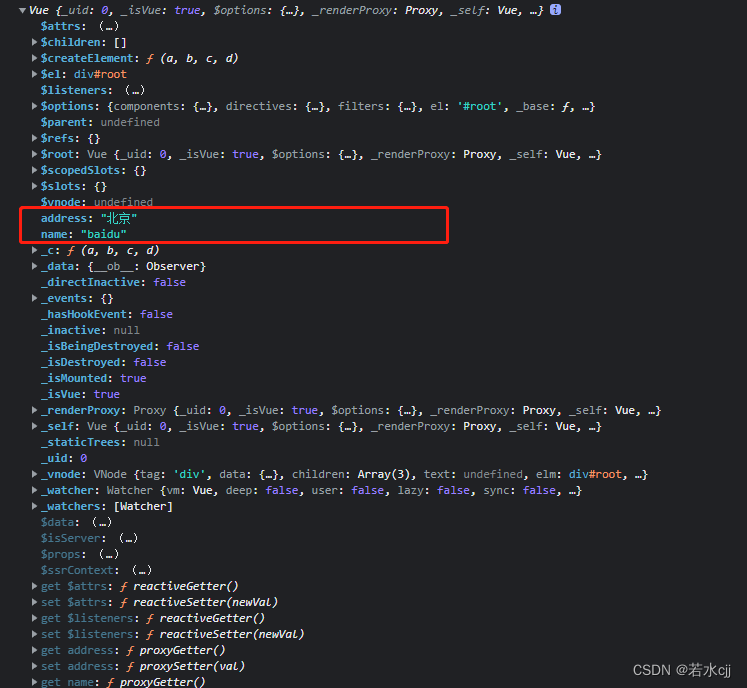
7. 数据代理
7.1 Object.definedProperty
definedProperty 方法作用是给一个对象添加属性
7.1.1 definedProperty 方法中的配置项
<!DOCTYPE html>
<html lang="en">
<head>
    <meta charset="UTF-8">
    <meta http-equiv="X-UA-Compatible" content="IE=edge">
    <meta name="viewport" content="width=device-width, initial-scale=1.0">
    <title>Document</title>
</head>
<body>
    <script>
        let num = 18;
        let person = {
            name:"zhangsan",
            sex:"nan"
        }
        // 需求:给person对象添加一个属性age,值为18
        /*
            参数一:操作的对象
            参数二:要添加的属性明
            参数三:配置项
        */
        Object.defineProperty(person, 'age',{
            value:18,
            /*
                enumerable控制属性是否可以枚举,默认为false,表示不可枚举
                    例如:
                        1.如果此属性的值为false,那么使用console.log(person)
                            输出时会看到age与其他的属性值呈现出不同的颜色

                        2. 如果使用console.log(Object.keys(person))遍历时,不能遍历到age属性
            */
            enumerable:true,
            /*
                控制属性是否可以被修改,默认为false,表示不能被修改
                    例如:
                        如果在控制台使用person.age = 19 修改age的值时,会发现虽然控制台
                        返回19,但是实际上person中age的值仍为18
            */
            writable:true,
            /*
                控制属性是否可以被删除,默认值为false,表示不可被删除
                例如:
                    在控制台中使用delete person.age 删除age属性时,会返回false
             */
            configurable:true,
        })
        console.log(person)
    </script>
</body>
</html>
7.1.2 definedProperty 方法中的getter/setter
注意:当definedProperty 方法的配置项中使用getter/setter方法时,不能出现value/writable 属性。
<!DOCTYPE html>
<html lang="en">
<head>
    <meta charset="UTF-8">
    <meta http-equiv="X-UA-Compatible" content="IE=edge">
    <meta name="viewport" content="width=device-width, initial-scale=1.0">
    <title>Document</title>
</head>
<body>
    <script>
        let num = 180;
        let person = {
            name:"zhangsan",
            sex:"nan"
        }
        // 需求:给person对象添加一个属性age,让其值为num的值
        /*
            参数一:操作的对象
            参数二:要添加的属性明
            参数三:配置项
        */
        Object.defineProperty(person, 'age',{

            // 当有人读取person的age属性时,get函数(也称为getter)就会被调用,并且返回就是age的值
            // get:function(){
            get(){  //get:function() 可简写为 get()
                console.log("person.age被读取了");
                return num;
            },

            // 当有人修改person的age的属性时,set函数(setter)就会被调用,且会收到修改的具体值
            set(value){
                console.log("person.age被修改了, 新值为:",value);
                num = value;
            }

        })

        console.log(person)
    </script>
</body>
</html>
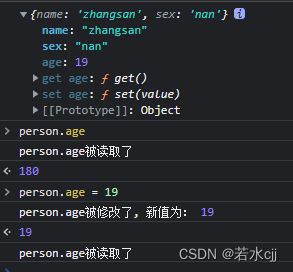
7.2 何为数据代理
<!DOCTYPE html>
<html lang="en">
<head>
    <meta charset="UTF-8">
    <meta http-equiv="X-UA-Compatible" content="IE=edge">
    <meta name="viewport" content="width=device-width, initial-scale=1.0">
    <title>何为数据代理</title>
</head>
<body>
    <!-- 数据代理:通过一个对象代理对另一个对象属性的操作(读或者写) -->
    <script>
    // 定义两个对象 obj1 和 obj2
        let obj1 = {x:100};
        let obj2 = {y:100};

        // 给defineProperty函数中设置的操作对象为obj2,操作属性为x
        Object.defineProperty("obj2", "x", {
            // 当获取x的值时实际上返回的是obj1.x的值
            get(){
                return obj1.x;
            },
            // 当设置x的值时实际上设置的是obj1.x的值
            set(value){
                obj1.x = value;
            }
        })
    </script>
</body>
</html>
7.3 Vue中的数据代理
<!DOCTYPE html>
<html lang="en">

<head>
    <meta charset="UTF-8">
    <meta http-equiv="X-UA-Compatible" content="IE=edge">
    <meta name="viewport" content="width=device-width, initial-scale=1.0">
    <title>vue中的数据代理</title>
    <script src="./js/vue.js"></script>
</head>

<body>
    <!--
		1.Vue中的数据代理:
				通过vm对象来代理data对象中属性的操作(读/写)
		2.Vue中数据代理的好处:
				更加方便的操作data中的数据
		3.基本原理:
				通过Object.defineProperty()把data对象中所有属性添加到vm上。
				每一个添加到vm上的属性,都指定一个getter/setter。
				在getter/setter内部去操作(读/写)data中对应的属性。
		 -->
    <!-- 准备好一个容器-->
    <div id="root">
        <h1> {{ name }}</h1>
        <h2>{{ address }}</h2>
    </div>
    <!--
        第一层理解:
            在vue实例中data属性里存在的数据会被添加到vue实例中,成为vue实例中的属性

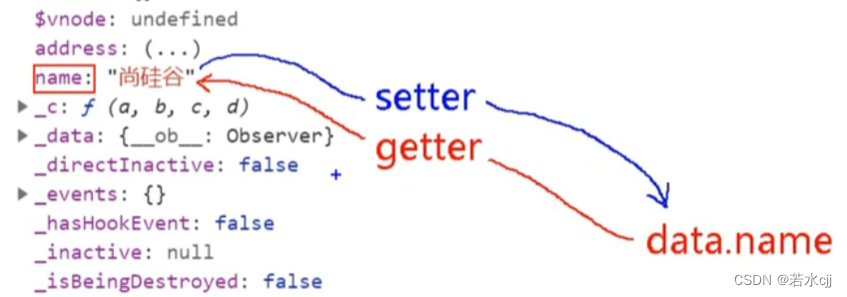
            在控制台中输入vm并回车可看到下图所示,1,3号框为添加到vue实例中的属性,
            当鼠标放到2,4号框时会显示调用属性getter,这表明,name和address中的值
            是从别的地方获取到的

            vue实例中添加的name和address属性有相应的getter和setter为其服务,具体见图2

            通过vm读取data中的属性,是使用对应的getter方法,修改data中的属性,也是使用
            对应的setter方法,此为数据代理

        第二层理解:
            vue中传入的data属性并不能在实例中直接看到,其中的数据以_data属性存储,即vm._data === data
            但是如果直接按照以前的方式写是不能访问到的,因此将里面的数据存入到一个对象中,将此对象传给data
                如下这种方式:
                <script>
                    let data = {
                            name:"zhangsan",
                            address:"beijing"
                        }
                    const vm = new Vue({
                        el:"#root",
                        data:data
                    })
                </script>

            new vue时传入的配置对象可称为options,因此vm._data === optinos.data === data

     -->
    <script>
        let data = {
            name: "zhangsan",
            address: "beijing"
        }
        const vm = new Vue({
            el: "#root",
            data: data
        })
    </script>
</body>

</html>
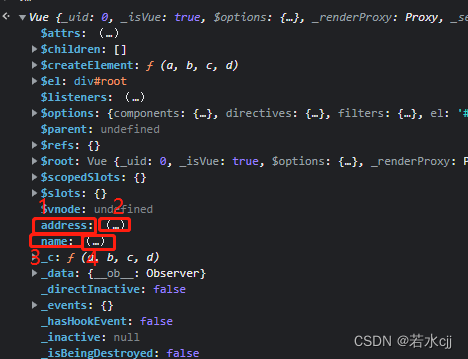
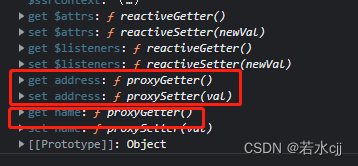
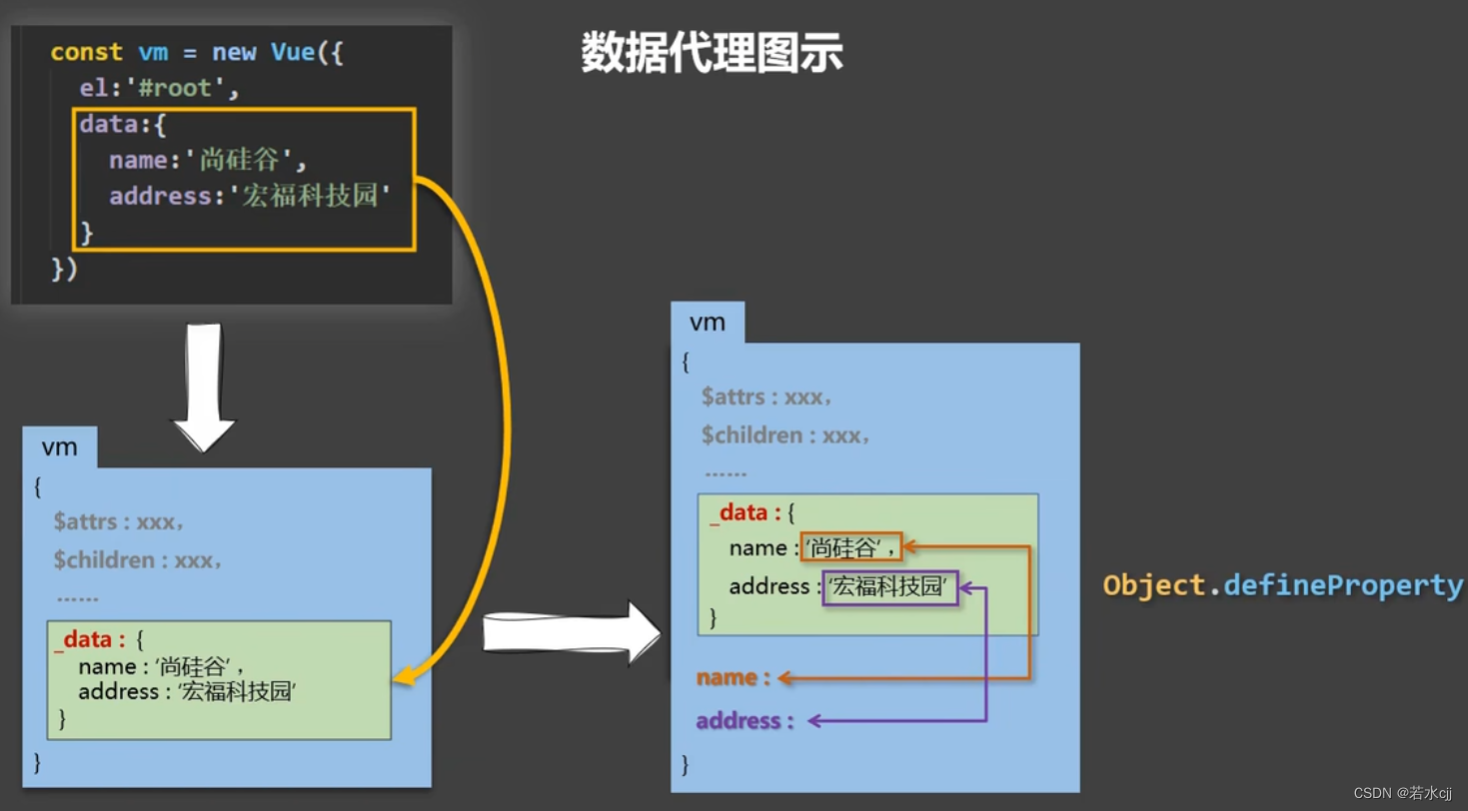
当编写完vue代码之后 (如下图左上角),会生成一个vue实例 (如下图左下角),在vue实例中会将原始代码中的数据完整的复制到_data属性中,截至到这里并没有数据代理的影子,随后使用Object.defineProerty方法向vm实例中添加属性,属性的来源为_data中的属性以及值,当读取或者修改vm对象中的name或address时,实际上是通过数据代理修改vm内部中_data中的name和address,因此下图中右下角紫色和橘色的线才是数据代理,这种数据代理的实现方式目的是为了让编码更方便,否则在页面中就要使用{{ _data.name }} 来展示数据,有了数据代理之后就可以使用 {{ name }} ,本质是读取_data中的name值
8. 事件处理
8.1事件的基本使用
<!DOCTYPE html>
<html lang="en">

<head>
    <meta charset="UTF-8">
    <meta http-equiv="X-UA-Compatible" content="IE=edge">
    <meta name="viewport" content="width=device-width, initial-scale=1.0">
    <title>事件的基本使用</title>
    <script src="./js/vue.js"></script>
</head>

<body>
    <!--
		事件的基本使用:
			1.使用v-on:xxx 或 @xxx 绑定事件,其中xxx是事件名;
			2.事件的回调需要配置在methods对象中,最终会在vm上;
			3.methods中配置的函数,不要用箭头函数!否则this就不是vm了;
			4.methods中配置的函数,都是被Vue所管理的函数,this的指向是vm 或 组件实例对象;
			5.@click="demo" 和 @click="demo($event)" 效果一致,但后者可以传参;
		-->
    <div id="root">
        <h1>{{name}}</h1>
        <!--
            v-on:click="showInfo1"的意思是当button元素被点击的时候执行showInfo1函数
         -->
        <button v-on:click="showInfo1">点击提示信息</button>
        <!-- @click 是 v-on:click的简写形式 -->
        <button @click="showInfo2(123)">点击提示信息2</button>
    </div>

    <script>
        new Vue({
            el: "#root",
            data: {
                name: "zhangsan"
            },
            methods: {
                showInfo1() {
                    alert("hello")
                },
                showInfo2(num) {
                    console.log(event.target.innerText)  // 函数中默认会传输event对象
                    alert(num)
                }
            }
        })
    </script>
</body>

</html>
8.2 事件修饰符
	<!--
		Vue中的事件修饰符:
			1.prevent:阻止默认事件(常用);
			2.stop:阻止事件冒泡(常用);
			3.once:事件只触发一次(常用);
			4.capture:使用事件的捕获模式;
			5.self:只有event.target是当前操作的元素时才触发事件;
			6.passive:事件的默认行为立即执行,无需等待事件回调执行完毕;
	-->
8.2.1 阻止默认事件
8.2.1.1 传统方式使用event.preventDefault()阻止默认事件
<!DOCTYPE html>
<html lang="en">
<head>
    <meta charset="UTF-8">
    <meta http-equiv="X-UA-Compatible" content="IE=edge">
    <meta name="viewport" content="width=device-width, initial-scale=1.0">
    <title>事件修饰符</title>
    <script src="./js/vue.js"></script>
</head>
<body>
    <div id="root">
        <!--
            为a标签添加一个点击事件,默认情况下,点击a标签之后,就会跳转到href指定
                的地址,为了阻止默认事件,可在showInfo中使用event.preventDefault()
         -->
        <a href="http://www.baidu.com" @click = "showInfo">点我提示信息</a>
    </div>

    <script>
        new Vue({
            el:"#root",
            methods:{
                showInfo(){
                    event.preventDefault()   // 阻止默认事件发生
                    alert("hello")
                }
            }
        })
    </script>
</body>
</html>
8.2.1.2 使用Vue提供的事件修饰符阻止默认事件
<!DOCTYPE html>
<html lang="en">
<head>
    <meta charset="UTF-8">
    <meta http-equiv="X-UA-Compatible" content="IE=edge">
    <meta name="viewport" content="width=device-width, initial-scale=1.0">
    <title>事件修饰符</title>
    <script src="./js/vue.js"></script>
</head>
<body>
    <div id="root">
        <!--
            在a标签中将@click变成@click.prevent即可阻止默认跳转事件的发生
         -->
        <a href="http://www.baidu.com" @click.prevent = "showInfo">点我提示信息</a>
    </div>

    <script>
        new Vue({
            el:"#root",
            methods:{
                showInfo(){
                    alert("hello")
                }
            }
        })
    </script>
</body>
</html>
8.2.2 阻止事件冒泡
8.2.2.1 传统阻止事件冒泡方式
<!DOCTYPE html>
<html lang="en">
<head>
    <meta charset="UTF-8">
    <meta http-equiv="X-UA-Compatible" content="IE=edge">
    <meta name="viewport" content="width=device-width, initial-scale=1.0">
    <title>事件修饰符</title>
    <script src="./js/vue.js"></script>
</head>
<body>
    <div id="root">

        <!--
            外层div 和 内部的button均绑定了点击事件,当点击了内部的button时
            ,冒泡行为会使得div也指定showInfo方法
        -->
        <div class="demo1" @click = "showInfo">
            <button @click = "showInfo">点我提示信息</button>
        </div>
    </div>

    <script>
        new Vue({
            el:"#root",
            methods:{
                showInfo(){
                    // 传统方式使用 event.stopPropagation();阻止事件向外冒
                    event.stopPropagation();
                    alert("hello")
                }
            }
        })
    </script>
</body>
</html>
8.2.2.2 Vue中阻止事件冒泡方式(stop)
<!DOCTYPE html>
<html lang="en">
<head>
    <meta charset="UTF-8">
    <meta http-equiv="X-UA-Compatible" content="IE=edge">
    <meta name="viewport" content="width=device-width, initial-scale=1.0">
    <title>事件修饰符</title>
    <script src="./js/vue.js"></script>
</head>
<body>
    <div id="root">

        <!--
            外层div 和 内部的button均绑定了点击事件,当点击了内部的button时
            ,冒泡行为会使得div也指定showInfo方法
        -->
        <div class="demo1" @click = "showInfo">
            <!-- Vue中使用@click.stop阻止事件向外冒 -->
            <button @click.stop = "showInfo">点我提示信息</button>
        </div>
    </div>

    <script>
        new Vue({
            el:"#root",
            methods:{
                showInfo(){
                    alert("hello")
                }
            }
        })
    </script>
</body>
</html>
8.2.3 事件只触发一次
<body>
    <div id="root">
        <!-- Vue中使用@click.once限定button只能够点击一次 -->
        <button @click.once="showInfo">点我提示信息</button>
    </div>

    <script>
        new Vue({
            el: "#root",
            methods: {
                showInfo() {
                    alert("hello")
                }
            }
        })
    </script>
</body>
8.3 键盘修饰符
<!DOCTYPE html>
<html lang="en">

<head>
    <meta charset="UTF-8">
    <meta http-equiv="X-UA-Compatible" content="IE=edge">
    <meta name="viewport" content="width=device-width, initial-scale=1.0">
    <title>键盘事件</title>
    <script src="./js/vue.js"></script>
</head>

<body>
    <!--
		1.Vue中常用的按键别名:
			回车 => enter
			删除 => delete (捕获“删除”和“退格”键)
			退出 => esc
			空格 => space
			换行 => tab (特殊,必须配合keydown去使用)
			上 => up
			下 => down
			左 => left
			右 => right

		2.Vue未提供别名的按键,可以使用按键原始的key值去绑定,但注意要转为kebab-case(短横线命名)

		3.系统修饰键(用法特殊):ctrl、alt、shift、meta
			(1).配合keyup使用:按下修饰键的同时,再按下其他键,随后释放其他键,事件才被触发。
			(2).配合keydown使用:正常触发事件。

		4.也可以使用keyCode去指定具体的按键(不推荐)

		5.Vue.config.keyCodes.自定义键名 = 键码,可以去定制按键别名
	-->
    <div id="root">
        <!-- v-on:keyup 这种情况下只要有键盘按下再抬起,就会执行showInfo方法 -->
        <!-- <input type="text" placeholder="按下回车提示输入" v-on:keyup = "showInfo"> -->
        <!-- 如果想要按下回车再执行showInfo方法,可用 v-on:keyup.enter -->
        <input type="text" placeholder="按下回车提示输入" v-on:keyup.enter="showInfo">
    </div>

    <script>
        new Vue({
            el: "#root",
            methods: {
                showInfo() {
                    console.log(event.target.value)
                }
            }
        })
    </script>
</body>

</html>
9. 计算属性与监视属性
9.1 计算属性
9.1.1 姓名案例–插值语法实现
<!DOCTYPE html>
<html lang="en">
<head>
    <meta charset="UTF-8">
    <meta http-equiv="X-UA-Compatible" content="IE=edge">
    <meta name="viewport" content="width=device-width, initial-scale=1.0">
    <title>姓名案例_插值语法实现</title>
    <script src="./js/vue.js"></script>
</head>
<body>
    <div id="root">
        姓:<input type="text" v-model:value="firstname">
        <br><br>
        名: <input type="text" v-model= "lastname">
        <br><br>
        全名:<span>{{firstname}} - {{lastname}}</span>
    </div>

    <script>
        new Vue({
            el:"#root",
            data:{
                firstname:"zhang",
                lastname:"san"
            }
        })
    </script>
</body>
</html>
9.1.2 姓名案例–methods实现
<!DOCTYPE html>
<html lang="en">
<head>
    <meta charset="UTF-8">
    <meta http-equiv="X-UA-Compatible" content="IE=edge">
    <meta name="viewport" content="width=device-width, initial-scale=1.0">
    <title>姓名案例_插值语法实现</title>
    <script src="./js/vue.js"></script>
</head>
<body>
    <div id="root">
        姓:<input type="text" v-model:value="firstname">
        <br><br>
        名: <input type="text" v-model= "lastname">
        <br><br>
        全名:<span>{{ fullname() }}</span>
    </div>

    <script>
        new Vue({
            el:"#root",
            data:{
                firstname:"zhang",
                lastname:"san"
            },
            methods:{
               fullname() {
                   // 在函数中要使用this访问vue实例中的属性,否则直接访问就会报错
                   return this.firstname + "-" + this.lastname
               }
            }
        })
    </script>
</body>
</html>
9.1.3 计算属性实现
<!DOCTYPE html>
<html lang="en">

<head>
    <meta charset="UTF-8">
    <meta http-equiv="X-UA-Compatible" content="IE=edge">
    <meta name="viewport" content="width=device-width, initial-scale=1.0">
    <title>姓名案例_计算属性实现</title>
    <script src="./js/vue.js"></script>
</head>

<body>
    <!--
		计算属性:
			1.定义:要用的属性不存在,要通过已有属性计算得来。
			2.原理:底层借助了Objcet.defineproperty方法提供的getter和setter。
			3.get函数什么时候执行?
				(1).初次读取时会执行一次。
				(2).当依赖的数据发生改变时会被再次调用。
			4.优势:与methods实现相比,内部有缓存机制(复用),效率更高,调试方便。
			5.备注:
				1.计算属性最终会出现在vm上,直接读取使用即可。
				2.如果计算属性要被修改,那必须写set函数去响应修改,且set中要引起计算时依赖的数据发生改变。
	 -->
    <div id="root">
        姓:<input type="text" v-model:value="firstname">
        <br><br>
        名: <input type="text" v-model="lastname">
        <br><br>
        全名:<span>{{ fullname }}</span>
    </div>

    <script>
        new Vue({
            el: "#root",
            data: {
                firstname: "zhang",
                lastname: "san"
            },
            /*
                对于Vue中的data和mothods来说,其内部的属性就是属性,内部的方法就是方法,
                而对于computed来说,将其内部的fullname属性放到vm上时,是调用set方法得到的返回值作为vm.fullname的值
            */
            computed: {
                fullname: {
                    /*
                        get有什么作用?当有人读取fullname时,get就会被调用,且返回值就作为fullname的值
                        get什么时候调用?
                            1. 初次读取fullname时
                            2. 所依赖的数据发生变换时
                    */
                    get() {
                        // console.log(this)  // 此处的this时vm
                        return this.firstname + "-" + this.lastname
                    },
                    // 当修改fullname的值时,就需要使用set方法
                    set(value) {
                        const arr = value.split("-")
                        this.firstname = arr[0]
                        this.lastname = arr[1]
                    }
                }
            }
        })
    </script>
</body>
</html>
9.1.4 计算属性的简写形式
<!DOCTYPE html>
<html lang="en">

<head>
    <meta charset="UTF-8">
    <meta http-equiv="X-UA-Compatible" content="IE=edge">
    <meta name="viewport" content="width=device-width, initial-scale=1.0">
    <title>姓名案例_计算属性实现</title>
    <script src="./js/vue.js"></script>
</head>

<body>
    <div id="root">
        姓:<input type="text" v-model:value="firstname">
        <br><br>
        名: <input type="text" v-model="lastname">
        <br><br>
        全名:<span>{{ fullname }}</span>
    </div>

    <script>
        new Vue({
            el: "#root",
            data: {
                firstname: "zhang",
                lastname: "san"
            },
            computed: {
                // 计算属性的完整写法
                // fullname: {
                //     get() {
                //         return this.firstname + "-" + this.lastname
                //     },
                //     set(value) {
                //         const arr = value.split("-")
                //         this.firstname = arr[0]
                //         this.lastname = arr[1]
                //     }
                // }

                // 第一种简写方式:
                /*
                    一般来说计算属性只会用来展示,不会进行修改,因此可用对
                    上述完整写法进行简写,function函数当成get函数
                */
                // fullname:function() {
                //         return this.firstname + "-" + this.lastname
                //     }
                // }


                // 第二种简写方式:
                // 上述写法可进一步简写为
                fullname() {
                        return this.firstname + "-" + this.lastname
                    }
                }
            }
        })
    </script>
</body>
</html>
9.2 监视属性
9.2.1 天气案例
<!DOCTYPE html>
<html>
	<head>
		<meta charset="UTF-8" />
		<title>天气案例</title>
		<!-- 引入Vue -->
		<script src="../js/vue.js"></script>
	</head>
	<body>
		<!-- 准备好一个容器-->
		<div id="root">
			<h2>今天天气很{{info}}</h2>
			<!-- 绑定事件的时候:@xxx="yyy" yyy可以写一些简单的语句 -->
			<!-- <button @click="isHot = !isHot">切换天气</button> -->
			<button @click="changeWeather">切换天气</button>
		</div>
	</body>

	<script type="text/javascript">
		Vue.config.productionTip = false //阻止 vue 在启动时生成生产提示。

		const vm = new Vue({
			el:'#root',
			data:{
				isHot:true,
			},
			computed:{
				info(){
					return this.isHot ? '炎热' : '凉爽'
				}
			},
			methods: {
				changeWeather(){
					this.isHot = !this.isHot
				}
			},
		})
	</script>
</html>
9.2.2 天气案例—监视属性
<!DOCTYPE html>
<html>

<head>
    <meta charset="UTF-8" />
    <title>天气案例</title>
    <!-- 引入Vue -->
    <script type="text/javascript" src="./js/vue.js"></script>
</head>

<body>
    <!--
		监视属性watch:
			1.当被监视的属性变化时, 回调函数自动调用, 进行相关操作
			2.监视的属性必须存在,才能进行监视!!
			3.监视的两种写法:
				(1). new Vue时传入watch配置
				(2). 通过vm.$watch监视
		 -->
    <!-- 准备好一个容器-->
    <div id="root">
        <h2>今天天气很{{info}}</h2>
        <button @click="changeWeather">切换天气</button>
    </div>
</body>

<script type="text/javascript">
    Vue.config.productionTip = false //阻止 vue 在启动时生成生产提示。

    const vm = new Vue({
        el: '#root',
        data: {
            isHot: true,
        },
        computed: {
            info() {
                return this.isHot ? '炎热' : '凉爽'
            }
        },
        methods: {
            changeWeather() {
                this.isHot = !this.isHot
            }
        },
        // 第一种监视属性的写法
        // watch:{
        //     isHot:{
        //         // immediate的作用是初始化时就调用handler
        //         immediate:true,
        //         /*
        //              handler什么时候调用?当isHot发生改变时,
        //              并且调用时会返回修改前的值以及修改后的值
        //         */
        //         handler(newValue, oldValue){
        //             console.log("ishot被监视了",newValue, oldValue)
        //         }
        //     }
        // }
    })

    // 第二种监视属性的写法, 通过此方法监视时注意要在监视属性上加上引号
    vm.$watch('isHot', {
        immediate: true,
        handler(newValue, oldValue) {
            console.log("ishot被监视了", newValue, oldValue)
        }
    })
</script>

</html>
9.2.3 天气案例–深度监视
<!DOCTYPE html>
<html>

<head>
    <meta charset="UTF-8" />
    <title>天气案例</title>
    <!-- 引入Vue -->
    <script type="text/javascript" src="./js/vue.js"></script>
</head>

<body>
    <!-- 准备好一个容器-->
    <div id="root">
        <h2>今天天气很{{info}}</h2>
        <button @click="changeWeather">切换天气</button>
        <br><br>
        <button v-on:click="num.a++">为a加1</button>
        <span>a的值为: {{num.a}}</span>
        <br><br>
        <button v-on:click="num.b++">为b加1</button>
        <span>a的值为: {{num.b}}</span>
    </div>
</body>

<script type="text/javascript">
    Vue.config.productionTip = false //阻止 vue 在启动时生成生产提示。

    const vm = new Vue({
        el: '#root',
        data: {
            isHot: true,
            num: {
                a: 1,
                b: 2
            }
        },
        computed: {
            info() {
                return this.isHot ? '炎热' : '凉爽'
            }
        },
        methods: {
            changeWeather() {
                this.isHot = !this.isHot
            }
        },
        watch: {
            isHot: {
                immediate: true,
                handler(newValue, oldValue) {
                    console.log("ishot被监视了", newValue, oldValue)
                }
            },
            num:{
                deep:true,  // 默认情况下,watch是不能监视到多层属性的
                handler() {
                    console.log("num中的值被改变了")
                }
            }
        }
    })

</script>
</html>
9.2.4 监视的简写形式
监视简写的前提时只使用handler一个属性,deep、immediate等均不使用
<!DOCTYPE html>
<html>
	<head>
		<meta charset="UTF-8" />
		<title>天气案例_监视属性_简写</title>
		<!-- 引入Vue -->
		<script type="text/javascript" src="../js/vue.js"></script>
	</head>
	<body>
		<!-- 准备好一个容器-->
		<div id="root">
			<h2>今天天气很{{info}}</h2>
			<button @click="changeWeather">切换天气</button>
		</div>
	</body>

	<script type="text/javascript">
		Vue.config.productionTip = false //阻止 vue 在启动时生成生产提示。

		const vm = new Vue({
			el:'#root',
			data:{
				isHot:true,
			},
			computed:{
				info(){
					return this.isHot ? '炎热' : '凉爽'
				}
			},
			methods: {
				changeWeather(){
					this.isHot = !this.isHot
				}
			},
			watch:{
				//正常写法
				/* isHot:{
					// immediate:true, //初始化时让handler调用一下
					// deep:true,//深度监视
					handler(newValue,oldValue){
						console.log('isHot被修改了',newValue,oldValue)
					}
				}, */
				//简写
				/* isHot(newValue,oldValue){
					console.log('isHot被修改了',newValue,oldValue,this)
				} */
			}
		})

		//正常写法
		/* vm.$watch('isHot',{
			immediate:true, //初始化时让handler调用一下
			deep:true,//深度监视
			handler(newValue,oldValue){
				console.log('isHot被修改了',newValue,oldValue)
			}
		}) */

		//简写
		/* vm.$watch('isHot',function(newValue,oldValue){
			console.log('isHot被修改了',newValue,oldValue,this)
		}) */

	</script>
</html>
9.3 watch与computed的比较
<!DOCTYPE html>
<html>
	<head>
		<meta charset="UTF-8" />
		<title>姓名案例_watch实现</title>
		<!-- 引入Vue -->
		<script type="text/javascript" src="../js/vue.js"></script>
	</head>
	<body>
		<!--
			computed和watch之间的区别:
				1.computed能完成的功能,watch都可以完成。
				2.watch能完成的功能,computed不一定能完成,例如:watch可以进行异步操作。
				两个重要的小原则:
					1.所被Vue管理的函数,最好写成普通函数,这样this的指向才是vm 或 组件实例对象。
					2.所有不被Vue所管理的函数(定时器的回调函数、ajax的回调函数等、
						Promise的回调函数),最好写成箭头函数,因为箭头函数没有自己的this,它的
						this继承自外部函数的作用域。这样this的指向才是vm 或 组件实例对象。
		-->
		<!-- 准备好一个容器-->
		<div id="root">
			姓:<input type="text" v-model="firstName"> <br/><br/>
			名:<input type="text" v-model="lastName"> <br/><br/>
			全名:<span>{{fullName}}</span> <br/><br/>
		</div>
	</body>

	<script type="text/javascript">
		Vue.config.productionTip = false //阻止 vue 在启动时生成生产提示。

		const vm = new Vue({
			el:'#root',
			data:{
				firstName:'张',
				lastName:'三',
				fullName:'张-三'
			},
			watch:{
				firstName(val){
					setTimeout(()=>{
						console.log(this)
						this.fullName = val + '-' + this.lastName
					},1000);
				},
				lastName(val){
					this.fullName = this.firstName + '-' + val
				}
			}
		})
	</script>
</html>
10. class与style绑定
<!DOCTYPE html>
<html lang="en">

<head>
    <meta charset="UTF-8">
    <meta http-equiv="X-UA-Compatible" content="IE=edge">
    <meta name="viewport" content="width=device-width, initial-scale=1.0">
    <title>绑定样式</title>
    <script src="./js/vue.js"></script>
    <style>
        .basic {
            width: 400px;
            height: 100px;
            border: 1px solid black;
        }

        .happy {
            border: 4px solid red;
            ;
            background-color: rgba(255, 255, 0, 0.644);
            background: linear-gradient(30deg, yellow, pink, orange, yellow);
        }

        .sad {
            border: 4px dashed rgb(2, 197, 2);
            background-color: gray;
        }

        .normal {
            background-color: skyblue;
        }

        .atguigu1 {
            background-color: yellowgreen;
        }

        .atguigu2 {
            font-size: 30px;
            text-shadow: 2px 2px 10px red;
        }

        .atguigu3 {
            border-radius: 20px;
        }
    </style>
</head>

<body>
    <div id="root">
        <!-- 绑定class样式 --- 字符串写法, 适用于:样式的类名不确定,需要动态指定的情况 -->
        <div class="basic" v-bind:class="mood" v-on:click="changeClass">{{ name }}</div>

        <!-- 绑定class样式 --- 数组写法,适用于:要绑定的样式个数不确定,名字也不确定 -->
        <div class="basic" v-bind:class="classArr">{{ name }}</div>

        <!-- 绑定class样式 --- 对象写法,适用于:要绑定的样式个数确定,名字不确定,但要动态决定用不用 -->
        <div class="basic" :class="classObj">{{ name }}</div>
        <!-- 绑定class样式 --- 对象写法: -->
        <div class="basic" :style="styleObj">{{ name }}</div>

        <!-- 绑定class样式 --- 数组写法: -->
        <div class="basic" :style="styleArr">{{ name }}</div>
    </div>

    <script>
        Vue.config.productTip = false;

        new Vue({
            el: "#root",
            data: {
                name: "zhangsan",
                mood: "normal",
                classArr: ['atguigu1', 'atguigu2', 'atguigu13'],
                classObj: {
                    atguigu1: false,
                    atguigu2: true
                },
                styleObj: {
                    backgroundColor: "red"
                },
                styleObj2: {
                    fontSize: '40px',
                    color: 'blue',
                },
                styleArr: [{
                    fontSize: '40px',
                    color: 'blue',
                }, {
                    backgroundColor: "red"
                }]
            },
            methods: {
                changeClass() {
                    this.mood = "sad"
                }
            }
        })
    </script>
</body>

</html>
