参考视频:【评论送书】Go语言 Gin+Vue 前后端分离实战 - OceanLearn_哔哩哔哩_bilibili
上一篇:Gin+Gorm+PostGresSQL+Vue项目实战(3)_代码骑士的博客-CSDN博客
一、使用中间件
1、下载jwt包:
什么是JWT:

详细内容: 什么是 JWT -- JSON WEB TOKEN - 简书 (jianshu.com)
终端下载:
go get github.com/dgrijalva/jwt-go ??充电:什么是token?
 详细内容:?什么是token - 简书 (jianshu.com)
在common文件夹下新建文件jwt.go:?
?
?jwt.go:
package common

import (
	"testGinAndVue01/model"
	"time"

	"github.com/dgrijalva/jwt-go"
)

var jwtKey = []byte("a_secret_crect") //定义秘钥

type Claims struct {
	UserId uint
	jwt.StandardClaims
}

func ReleaseToken(user model.User) (string, error) {
	expirationTime := time.Now().Add(7 * 24 * time.Hour)
	claims := &Claims{
		UserId: user.ID,
		StandardClaims: jwt.StandardClaims{
			ExpiresAt: expirationTime.Unix(),
			IssuedAt:  time.Now().Unix(),
			Issuer:    "codeKnight",
			Subject:   "user token",
		},
	}

	token := jwt.NewWithClaims(jwt.SigningMethodHS256, claims) //选择加密方式
	tokenString, err := token.SignedString(jwtKey)
	if err != nil {
		return "", err
	}
	return tokenString, nil
}
usercontroll.go进行部分修改:
//发放token给前端

			token, err := common.ReleaseToken(user)
			if err != nil {
				ctx.JSON(http.StatusUnprocessableEntity, gin.H{"code": 500, "msg": "系统异常"})
				log.Printf("token generate error:%v", err)
				return
			}

			//返回结果
			ctx.JSON(200, gin.H{
				"code": 200,
				"data": gin.H{"token": token},
				"msg":  "登录成功",
			})
?usercontroll.go:
package controller

import (
	"log"
	"net/http"
	"testGinAndVue01/common"
	"testGinAndVue01/model"
	"testGinAndVue01/util"

	"github.com/gin-gonic/gin"
	"golang.org/x/crypto/bcrypt"
	//"gorm.io/gorm"
)

func Register(ctx *gin.Context) {
	//db := common.InitDB()
	db := common.GetDB()

	//获取参数
	name := ctx.PostForm("name")
	telephone := ctx.PostForm("telephone")
	password := ctx.PostForm("password")
	//数据验证
	if len(telephone) != 11 {
		ctx.JSON(http.StatusUnprocessableEntity, gin.H{"code": 422, "msg": "手机号必须是11位"})
		return
	}
	if len(password) < 6 {
		ctx.JSON(http.StatusUnprocessableEntity, gin.H{"code": 422, "msg": "密码至少6位"})
		return
	}
	//如果名称为空值就随机生成十位字符串
	if len(name) == 0 {
		name = util.RandomString(10)
	}

	log.Println(name, telephone, password)
	//判断手机号是否存在
	if isTelephoneExist_(telephone) {
		ctx.JSON(http.StatusUnprocessableEntity, gin.H{"code": 422, "msg": "该手机号已被注册"})
		return
	}
	//创建用户
	hasedPassword, err := bcrypt.GenerateFromPassword([]byte(password), bcrypt.DefaultCost) //进行密码加密
	if err != nil {
		ctx.JSON(http.StatusInternalServerError, gin.H{"code": 500, "msg": "加密错误"})
		return
	}
	newUser := model.User{
		Name:      name,
		Telephone: telephone,
		Password:  string(hasedPassword),
	}
	db.Create(&newUser)
	//返回结果
	ctx.JSON(http.StatusOK, gin.H{
		"code": 200,
		"msg":  "注册成功!",
	})
}

func isTelephoneExist_(telephone string) bool {
	var user model.User
	db := common.GetDB()
	db.Where("telephone=?", telephone).First(&user)
	if user.ID != 0 {
		return true
	} else {
		return false
	}
}

func Login(ctx *gin.Context) {
	//获取参数
	telephone := ctx.PostForm("telephone")
	password := ctx.PostForm("password")
	//数据验证
	if len(telephone) != 11 {
		ctx.JSON(http.StatusUnprocessableEntity, gin.H{"code": 422, "msg": "手机号必须是11位"})
		return
	}
	if len(password) < 6 {
		ctx.JSON(http.StatusUnprocessableEntity, gin.H{"code": 422, "msg": "密码至少6位"})
		return
	}
	//判断用户是否注册过
	var user model.User
	DB := common.GetDB()
	if isTelephoneExist_(telephone) {
		//判断密码是否正确
		DB.Where("telephone=?", telephone).First(&user)
		if err := bcrypt.CompareHashAndPassword([]byte(user.Password), []byte(password)); err != nil {
			ctx.JSON(http.StatusUnprocessableEntity, gin.H{"code": 400, "msg": "密码错误"})
			return
		} else {

			//发放token给前端

			token, err := common.ReleaseToken(user)
			if err != nil {
				ctx.JSON(http.StatusUnprocessableEntity, gin.H{"code": 500, "msg": "系统异常"})
				log.Printf("token generate error:%v", err)
				return
			}

			//返回结果
			ctx.JSON(200, gin.H{
				"code": 200,
				"data": gin.H{"token": token},
				"msg":  "登录成功",
			})
		}
	} else {
		ctx.JSON(http.StatusUnprocessableEntity, gin.H{"code": 422, "msg": "该用户不存在"})
		return
	}
}
测试:
发送登录请求:

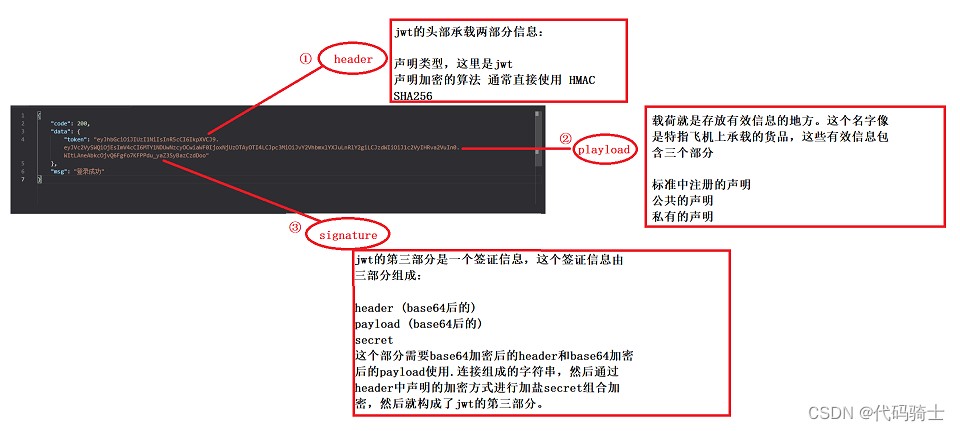
接收token代码:?

?简单来说,token就是生成一个字符串令牌使客户端下次登录的时候只要看到携带的“token”就可以实现用户登录不用在带上用户名密码从而减少服务器压力。jwt一般被用来在身份提供者和服务提供者间传递被认证的用户身份信息,以便于从资源服务器获取资源,也可以增加一些额外的其它业务逻辑所必须的声明信息,该token也可直接被用于认证,也可被加密。
JWT的构成
第一部分我们称它为头部(header),第二部分我们称其为载荷(payload, 类似于飞机上承载的物品),第三部分是签证(signature).

?2、使用中间件
新建文件夹:middleware
新建文件: ?
?
authmiddleware.go
package middleware

import (
	"net/http"
	"strings"
	"testGinAndVue01/common"
	"testGinAndVue01/model"

	"github.com/gin-gonic/gin"
)

func AuthMiddleware() gin.HandlerFunc {
	return func(ctx *gin.Context) {
		//获取authorization header
		tokenString := ctx.GetHeader("Authorization")

		//解析格式
		if tokenString == "" || !strings.HasPrefix(tokenString, "Bearer") {
			ctx.JSON(http.StatusUnauthorized, gin.H{"code": 401, "msg": "权限不足"})
			ctx.Abort()
			return
		}
		tokenString = tokenString[7:]
		token, claims, err := common.ParseToken(tokenString)
		if err != nil || !token.Valid {
			ctx.JSON(http.StatusUnauthorized, gin.H{"code": 401, "msg": "权限不足"})
			ctx.Abort()
			return
		}

		//验证通过后获取claims中的userId
		userId := claims.UserId
		DB := common.GetDB()
		var user model.User
		DB.First(&user, userId)

		//用户不存在(无效)
		if user.ID == 0 {
			ctx.JSON(http.StatusUnauthorized, gin.H{"code": 401, "msg": "权限不足"})
			ctx.Abort()
			return
		}

		//用户存在(将user信息返回上下文)
		ctx.Set("user", user)
		ctx.Next()
	}
}
修改文件:jwt.go
增添解析token函数
//解析token
func ParseToken(tokenString string) (*jwt.Token, *Claims, error) {
	claims := &Claims{}
	token, err := jwt.ParseWithClaims(tokenString, claims, func(t *jwt.Token) (interface{}, error) {
		return jwtKey, nil
	})

	return token, claims, err
}
修改文件:usercontroller.go
添加获取用户信Info函数
//用户信息
func Info(ctx *gin.Context) {
	user, _ := ctx.Get("user")

	ctx.JSON(http.StatusOK, gin.H{"code": 200, "data": gin.H{"user": user}})
}
添加用户信息路由

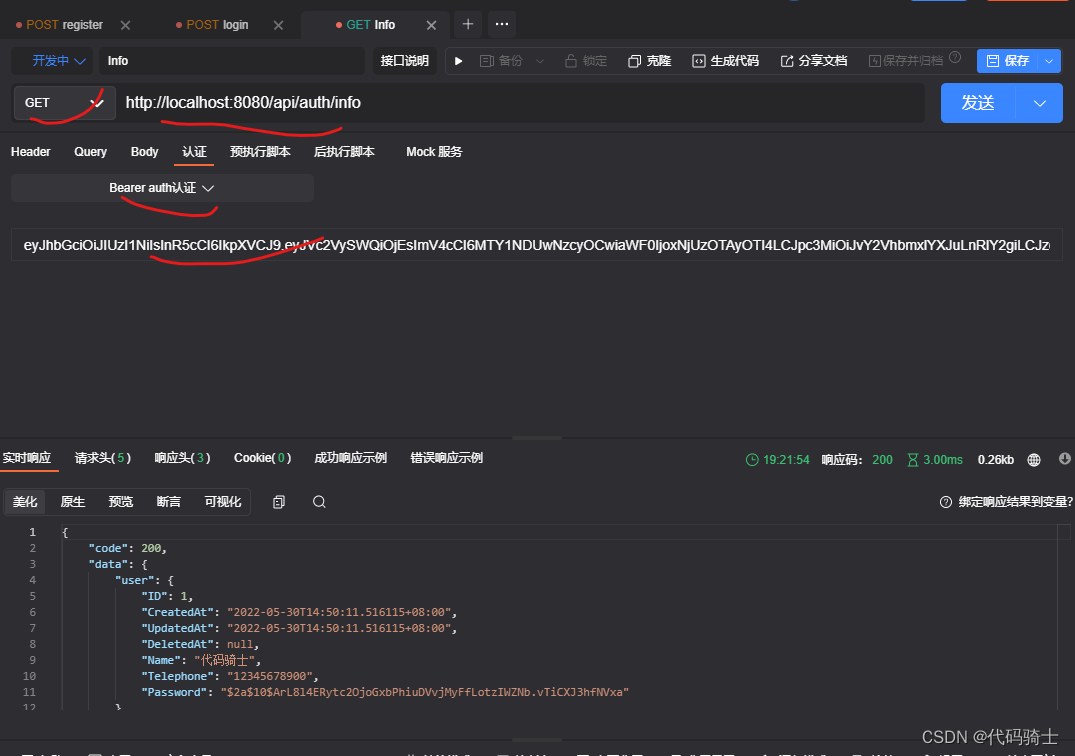
?3、演示
使用中间件token获取用户信息演示:
1、登录生成tokenString

2、复制token串,复制在认证下面的token栏中
?
?可以看到用户在数据库中的全部信息。
下一篇: