功能上线 十分开森~~
功能描述:基于element-ui的el-table改造,支持自增自定义列,修改当前列信息以及当前列的附加信息,支持修改当前行的信息以及校验,容错回退数据。
接下来庖丁解牛
首先看一下我的自认为写的很low的改造的table 这是目前我能想到的根据业务需求最优的处理方案了
有大神能一段循环代码就可以处理的欢迎提建议赐教
<el-tabs v-model="activeName" type="card" @tab-click="handleClick">
          <el-tab-pane label="商品信息" name="two"></el-tab-pane>
          <div>
            <div class="table-div" v-if="goodsList1.length > 0">
              <h4 class="titleH4">设备单信息</h4>
              <div class="equipment_table">
                <template>
                  <el-table
                    :data="goodsList1.slice((currentPage1 - 1) * pagesize1, currentPage1 * pagesize1)"
                    :row-style="{ height: '50px' }"
                    :default-sort="{ prop: 'goodsNum' }"
                    max-height="300"
                    @header-click="openDetails"
                    @cell-click="cellClick"
                  >
                    <el-table-column prop="goodsSpec" label="原型机BOM" width="140"></el-table-column>
                    <el-table-column prop="goodsProperty1" label="原型机型号" width="140"></el-table-column>
                    <el-table-column prop="mschannelCode" label="生产BOM" width="140"></el-table-column>
                    <el-table-column prop="goodsShowno" label="下单BOM" width="140"></el-table-column>
                    <el-table-column prop="pricesetNprice" label="商品售价" width="140"></el-table-column>
                    <el-table-column prop="contractGoodsPrice" label="减免后价格" width="140"></el-table-column>
                    <el-table-column prop="goodsNum" label="修改后的数量" width="140"></el-table-column>
                    <el-table-column prop="goodsCamount" label="原商品数量" width="140"></el-table-column>
                    <el-table-column prop="memberContactQq" label="电源线适配器" width="140"></el-table-column>
                    <el-table-column prop="contractGoodsAppraise" label="是否触发管控" width="140"></el-table-column>
                    <el-table-column prop="goodsDayinfo" label="产品状态" width="140"></el-table-column>
                    <el-table-column prop="goodsProperty2" label="制式" width="140"></el-table-column>
                    <el-table-column prop="goodsProperty3" label="能耗" width="140"></el-table-column>
                    <el-table-column prop="goodsProperty4" label="时区" width="140"></el-table-column>
                    <el-table-column prop="goodsSpec1" label="维保年限" width="140"></el-table-column>
                    <el-table-column prop="goodsProperty5" label="产品语言包" width="140"></el-table-column>
                    <el-table-column prop="goodsNum" label="商品数量" width="140"></el-table-column>
                    <el-table-column prop="goodsSupplynum" label="剩余数量" width="140"> </el-table-column>

                    <el-table-column
                      v-for="(columnItem, index) in tableColumns"
                      :key="index"
                      :prop="columnItem.prop"
                      :label="columnItem.label"
                      fit
                      :min-width="columnItem.width"
                      style="background-color: rgb(143, 222, 114);"
                    >
                      <template slot-scope="scope">
                        <div></div>
                        <el-input
                          v-if="columnItem.prop.includes('sendgoodsBatch1')"
                          v-model.number="scope.row.sendgoodsBatch1"
                          @blur="goodsBlur($event, scope.row.sendgoodsBatch1, scope.row)"
                          clearable
                        ></el-input>

                        <el-input
                          v-if="columnItem.prop.includes('sendgoodsBatch2')"
                          v-model.number="scope.row.sendgoodsBatch2"
                          @blur="goodsBlur($event, scope.row.sendgoodsBatch2, scope.row)"
                          clearable
                        ></el-input>
                        。。。。此处省略了100个el-input
                        之所写100次判断是为了v-model的绑定唯一,循环写的话我不知道怎么动态绑定v-model


   </template>
                    </el-table-column>
                  </el-table>
自增自定义列
提交自增列的信息,批次作为表头信息
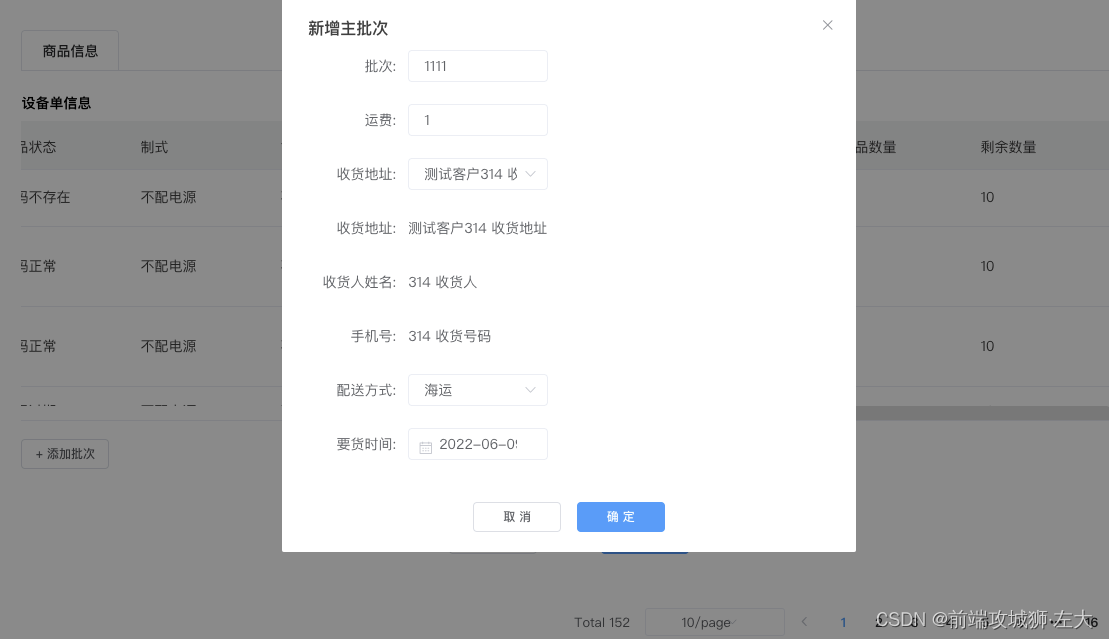
这是一个集新增编辑于一体的dialong
 <el-dialog :title="newTitle" :visible.sync="centerDialogVisible" width="40%">
      <el-form :label-position="labelPosition" label-width="100px">
        <el-form-item label="关联批次:" v-if="isAddChild">
          <span>{{ editList[0].sendgoodsBatchPno }}</span>
          <!-- <el-input disabled v-model="editList[0].sendgoodsBatchPno"></el-input> -->
        </el-form-item>
        <el-form-item label="发运集:" v-if="isEdit">
          <span>{{ shipSet }}</span>
        </el-form-item>
        <el-form-item label="批次:">
          <el-input v-model="sendgoodsBatchNo" clearable></el-input>
        </el-form-item>
        <el-form-item label="运费:">
          <el-input v-model="transportMoney" clearable></el-input>
        </el-form-item>
        <el-form-item :label="newLabel">
          <el-select v-model="address" @change="changeAddress" placeholder="请选择" value-key="addressId" clearable>
            <el-option v-for="item in forwarderArr" :key="item.value" :label="item.address" :value="item"></el-option>
          </el-select>
        </el-form-item>
        <el-form-item label="收货地址: " v-if="address.address">
          <span>{{ address.address }}</span>
        </el-form-item>
        <el-form-item label="收货人姓名: " v-if="address.addressMember">
          <span>{{ address.addressMember }}</span>
        </el-form-item>
        <el-form-item label="手机号: " v-if="address.addressPhone">
          <span>{{ address.addressPhone }}</span>
        </el-form-item>
        <el-form-item label="配送方式:">
          <el-select v-model="transportType" placeholder="请选择" clearable>
            <el-option v-for="item in distributionTypeArr" :key="item.expressCode" :label="item.expressName" :value="item.expressCode"> </el-option>
          </el-select>
        </el-form-item>
        <el-form-item label="要货时间:">
          <el-date-picker v-model="requestDate" value-format="yyyy-MM-dd" type="date" placeholder="选择日期" clearable> </el-date-picker>
        </el-form-item>
      </el-form>

      <span slot="footer" class="dialog-footer">
        <el-button @click="centerDialogVisible = false">取 消</el-button>
        <el-button v-if="isEdit" type="primary" @click="editSubmit">确 定</el-button>
        <el-button v-if="!isEdit" type="primary" @click="submitBatchEvent">确 定</el-button>
        <span v-if="isEdit">
          <el-button v-if="!isAddChild" type="success" @click="addSubmit">新 增</el-button>
        </span>
      </span>
    </el-dialog>
主要注意一下自增列需要注意每次增加的key值要保持不一样,实现方式往期的文章有介绍过
接下来看一下提交表单的动作
submitBatchEvent() {
      let a = 1
      this.tableColumns.map(vl => {
        if (vl.prop.includes('sendgoodsBatch')) { //判断当前增加了多少列
          a += 1  //自增
        }
      })
      this.sendgoodsBatchNewCode = 'sendgoodsBatch' + a  //生成新的prop
      this.goodsList1.map(vl => {
        vl.sendgoodsParamsBatchOpList.push({
          sendgoodsBatchKey: this.sendgoodsBatchNewCode,
          transportMoney: this.transportMoney,
          address: this.address.address,
          addressMember: this.address.addressMember,
          addressPhone: this.address.addressPhone,
          transportType: this.transportType,
          shipSet: '',
          sendgoodsBatchNo: this.sendgoodsBatchNo,
          requestDate: this.requestDate,
        })
      })  //给大数组填装信息

      this.tableColumns.push({
        prop: this.sendgoodsBatchNewCode,
        label: this.sendgoodsBatchNo,
        width: '150',
      })   //给循环列填装信息

      console.log(this.goodsList1[0].sendgoodsParamsBatchOpList, 'XXXXXXXXXXXXXXXXXXXXXXXX')
      this.centerDialogVisible = false
    },
恭喜你就得到了一个自定义的列
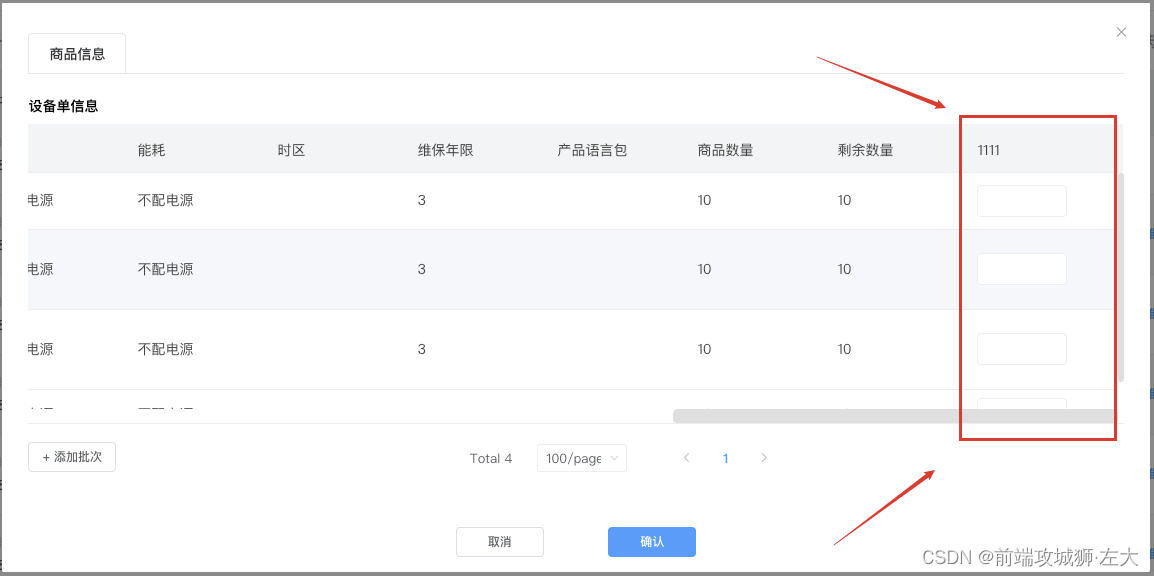
然后我们可以对自己增加的当前列做点什么呢?
查看详情
对吧 基操 我们看一下刚刚表单提交的信息
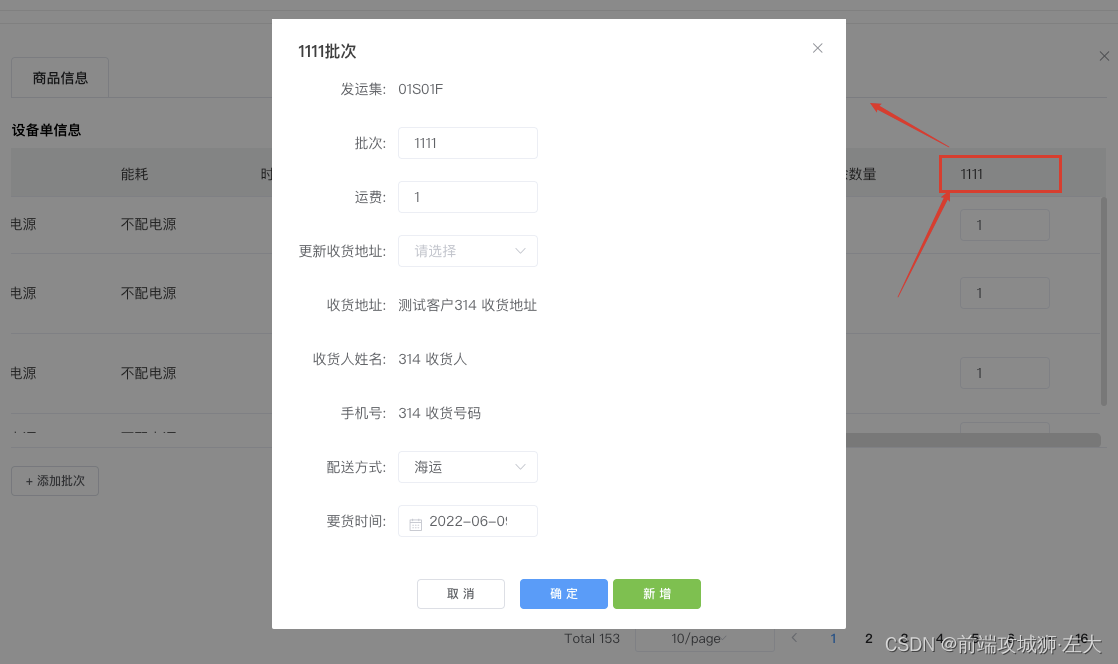
这里主要用到了一个table的表头点击事件@header-click=“openDetails”

这个宝藏方法可是俺辛辛苦苦问度娘问出来的
 openDetails(column, even) {
      this.column = column     //获取当前列的信息
      console.log(column, '00000000000000000000')
      this.sendgoodsParamsBatchOpList = this.goodsList1[0].sendgoodsParamsBatchOpList
      console.log(this.sendgoodsParamsBatchOpList, '111111111111111111')
      this.editList = this.sendgoodsParamsBatchOpList.filter(vl => {
        return vl.sendgoodsBatchKey == column.property
      })  //从数组删选出当前列的所有信息
      console.log(this.editList, 'XXXXXXXXXXXXXXXXXXXXXXXX')
      if (this.editList[0].sendgoodsBatchPcode == -1 || this.editList[0].sendgoodsBatchPcode == '' || !this.editList[0].sendgoodsBatchPcode) {
        this.isAddChild = false
        this.newTitle = column.label + '批次'
        this.newLabel = '更新收货地址: '
      } else {
        this.newTitle = column.label + '子批次'
        this.isAddChild = true
      }//给复用框变形

      this.isEdit = true
      this.shipSet = this.editList[0].shipSet
      this.sendgoodsBatchNo = this.editList[0].sendgoodsBatchNo
      this.transportMoney = this.editList[0].transportMoney
      this.address = {}
      this.address.address = this.editList[0].address
      this.address.addressMember = this.editList[0].addressMember
      this.address.addressPhone = this.editList[0].addressPhone
      this.transportType = this.editList[0].transportType
      if (this.editList[0].requestDate) {
        this.requestDate = timestampToTime(this.editList[0].requestDate)
      } else {
        this.requestDate = ''
      } //处理时间格式
      this.sendgoodsBatchOldNo = this.editList[0].sendgoodsBatchNo
      this.sendgoodsBatchOldCode = this.editList[0].sendgoodsBatchCode  //一系列的赋值操作
      this.centerDialogVisible = true
    },
修改当前列的信息

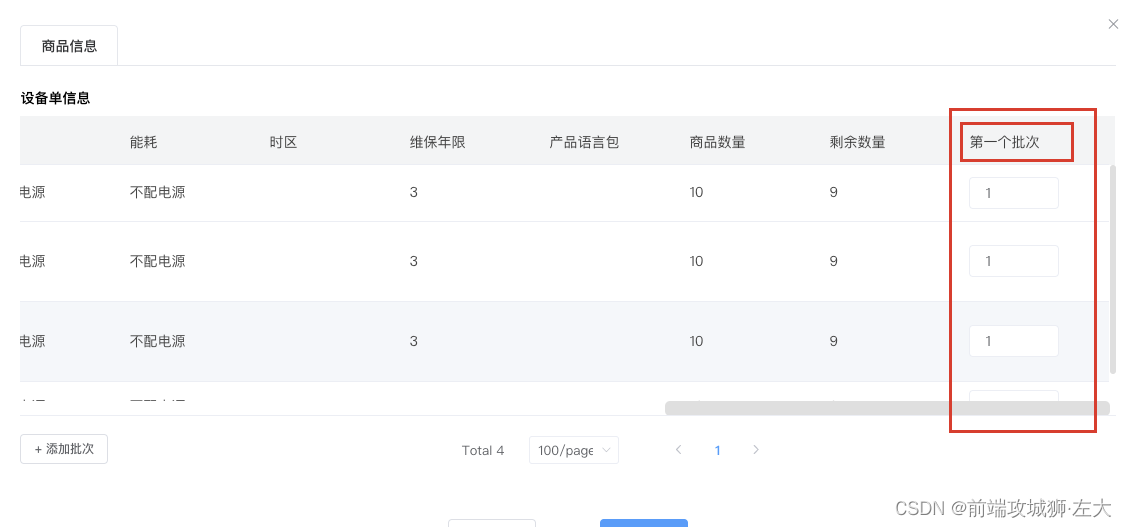
好的 我们修改了当前列的表头信息 以及里面的附加信息
展示一下确认编辑事件逻辑 因为业务关系里面具体逻辑不在赘述
editSubmit() {
      this.goodsList1.map(item => {
        item.sendgoodsParamsBatchOpList.map(vl => {
          if (vl.sendgoodsBatchKey == this.column.property) {  //找到当前列信息
            this.aa = vl.shipSet
            vl.sendgoodsBatchNo = this.sendgoodsBatchNo
          }
          if (vl.shipSet == this.aa) {  //修改信息
            vl.transportMoney = this.transportMoney
            vl.address = this.address.address
            vl.addressMember = this.address.addressMember
            vl.addressPhone = this.address.addressPhone
            vl.transportType = this.transportType
            vl.shipSet = this.shipSet
            vl.requestDate = this.requestDate
          }
        })
      })
      this.tableColumns = []
      if (this.goodsList1[0].sendgoodsParamsBatchOpList.length > 0) {
        this.goodsList1[0].sendgoodsParamsBatchOpList.map(vl => {
          this.tableColumns.push({
            prop: vl.sendgoodsBatchKey,
            label: vl.sendgoodsBatchNo,
            width: '150',
          })
        })
      }
      this.centerDialogVisible = false
    },
该表格还支持复用主分批信息 增加子分批信息 修改某一个分批信息做到该批次信息统一修改
表格的信息校验
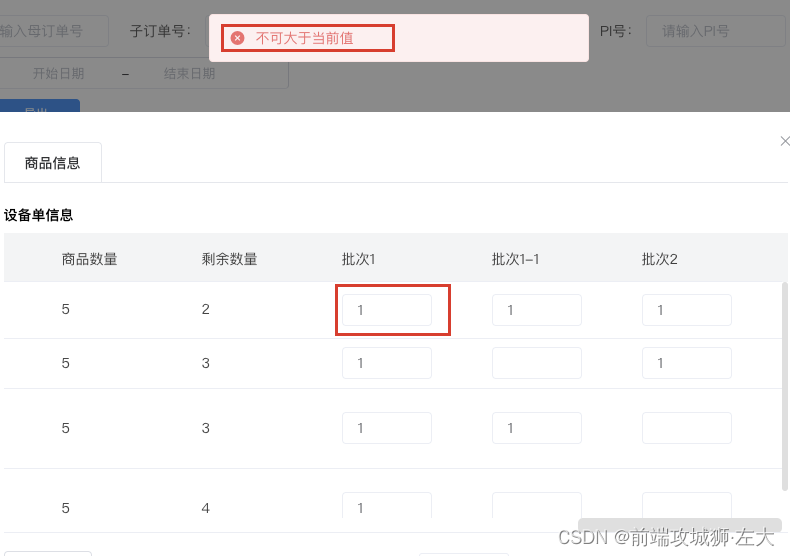
1.当输入的数据大于原来的数据时 提示错误 并还原原数据 (区别原有就是空的时候)
2.当输入的信息所有批次的行向数量之和 大于商品总数量的时候 提示错误 并还原原数据
首先要拿到当前input框的位置 也就是你要知道你改的是那个商品下的那个批次
这里又用到了一个宝藏事件方法 @cell-click=“cellClick”

我们看一下这个方法有多好用
 cellClick(row, column, cell, event) {
      console.log(column, 'cccccccccccccccc')
      this.oldKey = column.property
    },
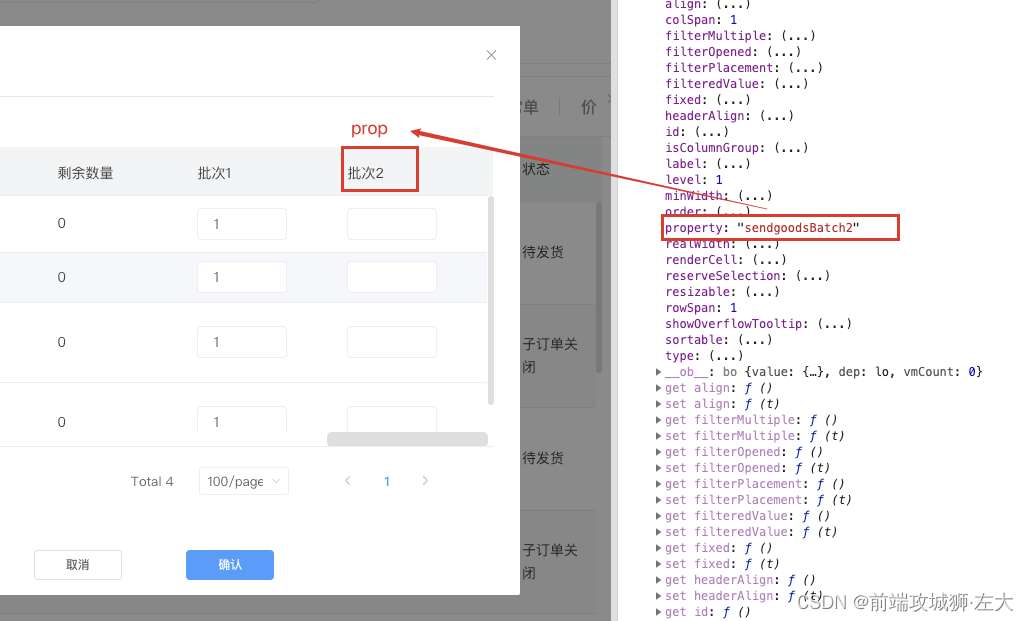
他可以拿到当前列的prop 嗯~~我们能拿到prop不就好说了嘛
当输入完后 我们触发失焦事件拿到当前行的数据 行和列加起来对比
xy轴嘛
然后还有一个前提备份数据用来容错还原数据 所以在created阶段先深拷贝一份list备用
this.OldGoodsList1 = JSON.parse(JSON.stringify(this.goodsList1))
接下来处理失焦事件
 goodsBlur(val, num, value) {
      //如果输入的值大于历史数据 容错并还原历史数据
      this.OldGoodsList1.map(item => {
        if (item.sendgoodsGoodsCode == value.sendgoodsGoodsCode) {
          //对比拿到当前行
          Object.keys(item).forEach(i => {
            if (i == this.oldKey) {
              //对比拿到当前列
              if (item[i]) {
                //item[i]为当前input框原有的值
                if (Number(item[i]) < num) {
                  this.$message.error('不可大于当前值')
                  Object.keys(value).forEach(i => {
                    //循环对比还原数据
                    if (i == this.oldKey) {
                      value[i] = item[i]
                    }
                  })
                }
              }
            }
          })
        }
      })
      //重新计算
      let sum = 0
      // 求和
      Object.keys(value).forEach(i => {
        if (i.includes('sendgoodsBatch')) {
          sum = sum + Number(value[i])
        }
      })
      value.goodsSumNew = sum
      value.goodsSupplynum = value.goodsNum - value.goodsSumNew
      value.goodsResidue = value.goodsNum - value.goodsSumNew
      //如果输入的值和批次所有的值的和大于商品库存数量 容错并还原历史数据
      this.OldGoodsList1.map(item => {
        if (item.sendgoodsGoodsCode == value.sendgoodsGoodsCode) {
          Object.keys(item).forEach(i => {
            if (i == this.oldKey) {
              // 注意区分历史数据为空否
              if (item[i]) {
                if (sum > value.goodsNum) {
                  this.$message.error('分批总数量不能大于商品数量')
                  Object.keys(value).forEach(i => {
                    if (i == this.oldKey) {
                      value[i] = item[i]
                      let sum = 0
                      Object.keys(value).forEach(i => {
                        if (i.includes('sendgoodsBatch')) {
                          sum = sum + Number(value[i])
                        }
                      })
                      value.goodsSumNew = sum
                      value.goodsSupplynum = value.goodsNum - value.goodsSumNew
                      value.goodsResidue = value.goodsNum - value.goodsSumNew
                    }
                  })
                  return
                }
              } else {
                if (sum > value.goodsNum) {
                  this.$message.error('分批总数量不能大于商品数量')
                  Object.keys(value).forEach(i => {
                    if (i == this.oldKey) {
                      value[i] = ''
                      let sum = 0
                      Object.keys(value).forEach(i => {
                        if (i.includes('sendgoodsBatch')) {
                          sum = sum + Number(value[i])
                        }
                      })
                      value.goodsSumNew = sum
                      value.goodsSupplynum = value.goodsNum - value.goodsSumNew
                      value.goodsResidue = value.goodsNum - value.goodsSumNew
                    }
                  })
                  return
                }
              }
            }
          })
        }
      })

      return
      console.log(this.goodsList1, 'sumsumsumsumsumsumsumsum')
    },
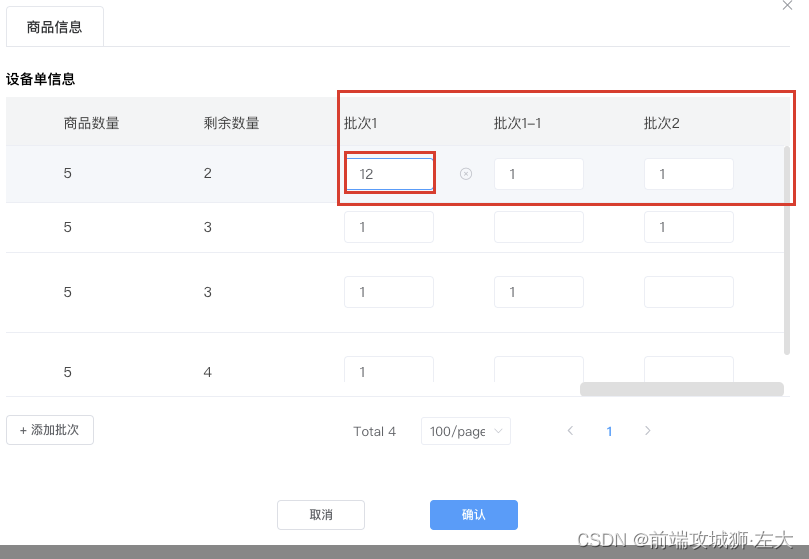
容错并还原历史数据
到此为止功能全部记录完毕 如有建议多多指教