山东大学程序设计能力提升平台
丁心宜
文章目录
- 山东大学程序设计能力提升平台
- 2022.3.1 动效的实现
- 2022.3.10 el-upload File转Blob
- 2022.3.20 浏览器的适配
- 2022.3.30 发布文章添加标签
- 2022.4.10 实现导入excel,上传文件和导出(1)
- 2022.4.20 实现导入excel,上传文件和导出(2)
- 2022.5.15 ES6复习巩固
- 2022.5.20 mavon-editor将md文本转化成html
- 2022.5.30 通过设置代理解决跨域问题
- 2022.6.1 前端分页
2022.3.1 动效的实现
通过监听滚轮事件,判断组件距离最上层的距离判断是否应该将显现.
这里使用了animate动画库.
Dom结构如下:
<template>
  <div class="product" :style="{ top: divTop }">
    <div class="fareWall">
      <div
        :v-show="showFareWall"
        :class="{
          animate__animated: showFareWall,
          animate__fadeInRight: showFareWall,
          container: showFareWall,
          no_Display: !showFareWall,
        }"
      >
        <img
          src="../../assets/imgs/pc/wall.png"
          alt=""
          width="300"
          style="position: relative; display: inline-block; top: 100px"
        />

        <div class="text">
          <span class="title">{{ $t("digitalProductService.fareWall") }}</span>
          <span class="content">
            {{ $t("product.fareWall_detail1") }}
            <br />
            {{ $t("product.fareWall_detail2") }}
            <br />
            {{ $t("product.fareWall_detail3") }}
            <br />
            {{ $t("product.fareWall_detail4") }}
          </span>
        </div>
      </div>
    </div>
    <div class="notify">
      <div
        :v-show="showNotify"
        :class="{
          animate__animated: showNotify,
          animate__fadeInLeft: showNotify,
          container: showNotify,
          no_Display: !showNotify,
        }"
      >
        <div class="text">
          <span class="title">
            <a href="https://noti.sectoken.io" style="color: #0c4f6d">{{
              $t("product.transNotice")
            }}</a></span
          >
          <span class="content" style="text-align: left">
            {{ $t("product.transNotice_detail1") }}
            <br />
            {{ $t("product.transNotice_detail2") }}
          </span>
        </div>
        <a href="https://noti.sectoken.io" style="color: #0c4f6d">
          <img
            src="../../assets/imgs/pc/notify.png"
            alt=""
            width="190"
            style="position: relative; display: inline-block; top: 100px"
          />
        </a>
      </div>
    </div>
    <div class="wallet">
      <div
        :v-show="showWallet"
        :class="{
          animate__animated: showWallet,
          animate__fadeInRight: showWallet,
          container: showWallet,
          no_Display: !showWallet,
        }"
      >
        <img
          src="../../assets/imgs/pc/B.png"
          alt=""
          width="280"
          style="position: relative; display: inline-block; top: 120px"
        />

        <div class="text">
          <span class="title"> {{ $t("product.wallet") }}</span>
          <span class="content">
            {{ $t("product.wallet_detail1") }}
            <br />
            {{ $t("product.wallet_detail2") }}
            <br />
            {{ $t("product.wallet_detail3") }}
            <br />
            {{ $t("product.wallet_detail4") }}
            <br />
            {{ $t("product.wallet_detail5") }}
          </span>
        </div>
      </div>
    </div>
    <div class="digitalCurrentNode">
      <div
        :v-show="showNode"
        :class="{
          animate__animated: showNode,
          animate__fadeInLeft: showNode,
          container: showNode,
          no_Display: !showNode,
        }"
      >
        <div class="text">
          <span class="title"> {{ $t("product.node") }}</span>
          <span class="content">
            {{ $t("product.node_detail1") }}
            <br />
            {{ $t("product.node_detail2") }}
            <br />
            {{ $t("product.node_detail3") }}
            <br />
          </span>
        </div>
        <img
          src="../../assets/imgs/pc/node.png"
          alt=""
          width="300"
          style="position: relative; display: inline-block; top: 100px"
        />
      </div>
    </div>
  </div>
</template>
js:
<script>
export default {
  name: "Product",
  mounted() {
    window.addEventListener("scroll", this.handleScroll);
  },
  data() {
    return {
      showFareWall: false,
      currentScroll: 0,
      showNotify: false,
      showWallet: false,
      showNode: false,
    };
  },
  computed: {
    divTop: function () {
      return document.documentElement.clientHeight + 1170 + "px";
    },
  },
  methods: {
    handleScroll() {
      this.currentScroll = window.pageYOffset; //表示当前滚动的位置
      if (this.currentScroll >= 1200) {
        this.showFareWall = true;
      }
      if (this.currentScroll >= 1700) {
        this.showNotify = true;
      }
      if (this.currentScroll >= 2200) {
        this.showWallet = true;
      }
      if (this.currentScroll >= 2700) {
        this.showNode = true;
      }
      // if (this.currentScroll >= this.$refs.test2ref.offsetTop - 100) {
      //   this.testShow2 = true;
      // }
      // if (this.currentScroll >= this.$refs.test3ref.offsetTop - 100) {
      //   this.testShow3 = true;
      //   setTimeout(() => {
      //     this.testShow3 = false;
      //   }, 400);
      // }
    },
  },
};
</script>
scss:
<style lang="scss" scoped>
.product {
  height: 2160px;
  position: absolute;
  left: 0;
  right: 0;
  /*width: 100%;*/
}

.fareWall {
  position: relative;
  left: 0;
  top: 0;
  height: 540px;
  right: 0;
  background: #f7feff;

  .container {
    position: relative;
    width: 100%;
    height: 100%;
    text-align: center;
  }
  .text {
    position: relative;
    width: 600px;
    text-align: left;
    top: 70px;
    margin-left: 15%;
    display: inline-block;
    .title {
      font-size: 26px;
      display: block;
      width: 100%;
      font-weight: bold;
      line-height: 37px;
      color: #0c4f6d;
      opacity: 1;
      margin-bottom: 40px;
    }
    .content {
      margin-top: 40px;
      width: 100%;
      height: 132px;
      font-size: 18px;
      font-weight: bold;
      line-height: 50px;
      color: #0c4f6d;
      opacity: 1;
    }
  }
  .animate__animated.animate__fadeInRight {
    --animate-duration: 1s;
  }
  .no_Display {
    display: none;
  }
}

.notify {
  position: relative;
  left: 0;
  top: 0;
  height: 540px;
  right: 0;
  background: #ecf7fc;
  .container {
    position: relative;
    width: 100%;
    height: 100%;
    text-align: center;
  }
  .text {
    position: relative;
    width: 702px;
    text-align: left;
    top: 30px;
    margin-right: 13%;
    display: inline-block;
    .title {
      font-size: 26px;
      display: block;
      width: 100%;
      font-weight: bold;
      line-height: 37px;
      color: #0c4f6d;
      opacity: 1;
      margin-bottom: 40px;
    }
    .content {
      margin-top: 40px;
      width: 612px;
      height: 132px;
      font-size: 18px;
      font-weight: bold;
      line-height: 50px;
      color: #0c4f6d;
      opacity: 1;
    }
  }
  .animate__animated.animate__fadeInRight {
    --animate-duration: 2s;
  }
  .no_Display {
    display: none;
  }
}

.wallet {
  position: relative;
  left: 0;
  top: 0;
  height: 540px;
  right: 0;
  background: #f7feff;
  .container {
    position: relative;
    width: 100%;
    height: 100%;
    text-align: center;
  }
  .text {
    position: relative;
    width: 540px;
    text-align: left;
    top: 90px;
    margin-left: 10%;
    display: inline-block;
    .title {
      font-size: 26px;
      display: block;
      width: 100%;
      font-weight: bold;
      line-height: 37px;
      color: #0c4f6d;
      opacity: 1;
      margin-bottom: 40px;
    }
    .content {
      margin-top: 40px;
      width: 612px;
      height: 132px;
      font-size: 18px;
      font-weight: bold;
      line-height: 40px;
      color: #0c4f6d;
      opacity: 1;
    }
  }
  .animate__animated.animate__fadeInRight {
    --animate-duration: 1s;
  }
  .no_Display {
    display: none;
  }
}

.digitalCurrentNode {
  position: relative;
  left: 0;
  top: 0;
  height: 540px;
  right: 0;
  background: #ecf7fc;
  .container {
    position: relative;
    width: 100%;
    height: 100%;
    text-align: center;
  }
  .text {
    position: relative;
    width: 600px;
    text-align: left;
    top: 40px;
    margin-right: 10%;
    display: inline-block;
    .title {
      font-size: 26px;
      display: block;
      width: 100%;
      font-weight: bold;
      line-height: 37px;
      color: #0c4f6d;
      opacity: 1;
      margin-bottom: 40px;
    }
    .content {
      margin-top: 40px;
      width: 612px;
      height: 132px;
      font-size: 18px;
      font-weight: bold;
      line-height: 40px;
      color: #0c4f6d;
      opacity: 1;
    }
  }
  .animate__animated.animate__fadeInRight {
    --animate-duration: 2s;
  }
  .no_Display {
    display: none;
  }
}

/*img {*/
/*  display: inline-block;*/
/*  vertical-align: middle;*/
/*  -webkit-transform: perspective(1px) translateZ(0);*/
/*  transform: perspective(1px) translateZ(0);*/
/*  box-shadow: 0 0 1px rgba(0, 0, 0, 0);*/
/*  -webkit-transition-duration: 0.3s;*/
/*  transition-duration: 0.3s;*/
/*  -webkit-transition-property: transform;*/
/*  transition-property: transform;*/
/*}*/
/*img:hover {*/
/*  -webkit-transform: scale(1.1);*/
/*  transform: scale(1.1);*/
/*}*/
</style>
2022.3.10 el-upload File转Blob
   <el-upload
            action=""
            :on-change="analyzeZip"          >
            <el-button
              slot="trigger"
              >上传测试数据</i
            ></el-button>
   </el-upload>
      <script>
       // file转blob
fileToBlob(file, callback) {
  const type = file.type;
  const reader = new FileReader();
  reader.onload = (evt) => {
    const blob = new Blob([evt.target.result], { type });
    if (typeof callback === "function") {
      callback(blob);
    } else {
      console.log("我是 blob:", blob);
    }
  };
  reader.readAsDataURL(file);
},

analyzeZip(file) {
  const _file = file.raw;
  this.fileToBlob(_file, async (blob) => {
    console.log(blob);

  });
      <script/>
虽然最后发现formdata.append("file",blob)还是会把blob转化成file,呵呵
2022.3.20 浏览器的适配
监听浏览器尺寸变化
1.实现监听浏览器长度,宽度的变化调整背景图的尺寸
<template>
  <div class="back" id="back3">
    <link
      rel="stylesheet"
      href="//at.alicdn.com/t/font_2700258_8tioo1ql138.css"
    />
    <img src="../../assets/imgs/mobile/bg.png" id="img3" />
    <div class="titleTop">***</div>
    <div class="middle"></div>
    <div class="titleBottom">Protect digital assets</div>
    <div class="more">
      <i class="iconfont icon-jiantou_yemian_xiangxia_o" style="font-size: 20px" />
    </div>
  </div>
</template>

<script>
export default {
  name: "mbIndexPage",
  props: {
    Width: Number,
    Height: Number,
  },
  data() {
    return {
      width: document.documentElement.clientWidth,
      height: document.documentElement.clientHeight,
      props: ["Width", "Height"],
    };
  },
  mounted() {
    this.change();
  },
  // 实时监听页面宽高
  watch: {
    // eslint-disable-next-line no-unused-vars
    Width(newWidth, oldWidth) {
      this.width = newWidth;
      // console.log(newWidth);
      this.change();
    },
    // eslint-disable-next-line no-unused-vars
    Height(newHeight, oldHeight) {
      this.height = newHeight;
      // console.log(newHeight);
      this.change();
    },
  },
  methods: {
    change() {
      var pic = document.getElementById("img3");
      pic.width = this.width;
      // console.log(pic.width);
      pic.height = this.height + 3;
      var back = document.getElementById("back3");
      back.width = this.width;
      // console.log(pic.width);
      back.height = this.height + 3;
    },
  },
};
</script>

<style scoped>
.back {
  z-index: 1;
  position: absolute;
  left: 0;
  right: 0;
  top: 0;
}
.titleTop {
  width: 77px;
  height: 21px;
  font-size: 16px;
  position: absolute;
  text-align: left;
  top: 90px;
  left: 32px;
  font-weight: bold;
  line-height: 0;
  color: #ffc300;
  opacity: 1;
  z-index: 20;
}
.middle {
  width: 89.2px;
  height: 4px;
  position: absolute;
  top: 108px;
  left: 32px;
  z-index: 20;
  background-color: #ffc300;
  opacity: 1;
}
.titleBottom {
  width: 190px;
  height: 42px;
  font-size: 16px;
  font-weight: bold;
  line-height: 26px;
  color: #fff;
  opacity: 1;
  position: absolute;
  text-align: left;
  top: 117px;
  left: 32px;
  z-index: 20;
}
.more {
  position: relative;
  bottom: 30px;
  left: 0;
  right: 0;
  width: 100%;
  text-align: center;
  z-index: 55;
}
</style>
媒体查询
2.使用媒体查询来检测屏幕长宽来调整应该显示哪套界面,例如入口文件中:
.mbPopupCell {
  font-size: 16px;
  width: 100px;
  color: #fff;
  text-align: left;
  margin: 0 auto 0 auto;
  padding: 20px 0 23px 0;
}
.home {
  height: 100%;
  color: #f9f9f9;
  background: #F7FEFF;
}
.pc {
  height: 100px;
}
//pc端
@media only screen and (min-width: 1200px) {
  .pc {
    display: block !important;
  }
  .pad {
    display: none !important;
    touch-action: auto !important;
  }
  .mobile {
    display: none !important;
    touch-action: auto !important;
  }
}
//pad端
@media only screen and (min-width: 768px) and(max-width: 1199px) {
  .pc {
    display: none !important;
  }
  .mobile {
    display: none !important;
    touch-action: auto !important;
  }
  .pad {
    display: block !important;
    touch-action: auto !important;
  }
}
// 手机端
@media only screen and (max-width: 767px) {
  .pc {
    display: none !important;
  }
  .mobile {
    display: block !important;
    touch-action: auto !important;
  }
  .pad {
    display: none !important;
    touch-action: auto !important;
  }
}
2022.3.30 发布文章添加标签
发布文章添加标签和分类,主要有创建标签,删除标签,添加分类等操作,含有对element原生组件的一些改动.
html:
<template>
  <div id="writeArticle" class="writeArticle">
    <div class="editor">
      <div class="title">
        <div class="gotoManage" @click="gotoManage()">
          <i class="iconfont icon-xiangzuo" style="font-size: 22px;position: relative;top: 2px;right: 3px"></i>
          <span>管理博文</span>
        </div>
        <div class="inputDiv">
          <input
            v-model="title"
            :style="{width:inputWidth}"
            class="titleInput"
            maxlength="50"
            placeholder="请输入文章标题"
            style="font-family: chen_ch"
            type="text">
        </div>
        <div v-show="!edit" class="draft" @click="publishArticle(1)">
          存草稿
        </div>
        <div v-show="!edit" class="publish" @click="publishArticle(2)">
          发布博文
        </div>
        <div v-show="edit"
             class="publish"
             @click="publishArticle(3)">
          更新博文
        </div>
      </div>
      <mavon-editor
        ref="md"
        v-model="value"
        :style="{height:divHeight}"
        :toolbars="markdownOption"
        class="mavon"
        codeStyle="tomorrow-night-blue"
        @change="changeInput"
        @imgAdd="imgAdd"
      />
    </div>
    <el-dialog
      :title="dialogTitle"
      :visible.sync="publicFormVisible"
      class="publishArticleDialog"
      width="700px">
      <el-form :model="form">
        <el-form-item :label-width="formLabelWidth" label="分类">
          <div class="tag">
            <el-tag
              v-for="tag in Categories"
              :key="tag"
              :disable-transitions="false"
              closable
              @close="handleCategoriesClose(tag,Categories)">
              {{ tag }}
            </el-tag>
            <el-input
              v-if="inputCategoriesVisible"
              ref="saveCategoriesTagInput"
              v-model="inputCategoriesValue"
              class="input-new-tag"
              size="small"
              @blur="handleCategoriesInputConfirm(Categories)"
              @keyup.enter.native="handleCategoriesInputConfirm(Categories)"
            >
            </el-input>
            <el-button v-else v-show="showAddBtn" class="button-new-tag" size="small" @click="showCategoriesInput">+ 分类
            </el-button>
          </div>

          <div class="radio">
            <el-radio-group v-model="radio" @change="changeCategories">
              <el-radio v-for="Category in AllCategories"
                        :key="Category.categoryId"
                        :label="Category.categoryId"
                        class="Category"
              >
                {{ Category.categoryName }}
              </el-radio>

            </el-radio-group>
          </div>
        </el-form-item>
        <el-form-item :label-width="formLabelWidth" label="标签">
          <div class="tag">
            <el-tag
              v-for="tag in Tags"
              :key="tag"
              :disable-transitions="false"
              closable
              style="float: left"
              @close="handleClose(tag,Tags)">
              {{ tag }}
            </el-tag>
            <el-input
              v-if="inputVisible"
              ref="saveTagInput"
              v-model="inputValue"
              class="input-new-tag"
              size="small"
              @blur="handleInputConfirm(Tags)"
              @keyup.enter.native="handleInputConfirm(Tags)"
            >
            </el-input>
            <el-button v-else class="button-new-tag" size="small" @click="showInput">+ 标签</el-button>
          </div>
          <div class="radio">

            <el-checkbox-group v-model="checkedTags" @change="changeCheckedTags">
              <el-checkbox v-for="Tag in AllTags"
                           :key="Tag.tagId"
                           :label="Tag.tagId"
              >
                {{ Tag.tagName }}
              </el-checkbox>
            </el-checkbox-group>
          </div>
        </el-form-item>
      </el-form>
      <div slot="footer" class="dialog-footer">
        <div class="cancel" @click="publicFormVisible = false">
          取消
        </div>
        <div class="confirm" @click="confirmPublish">
          {{ dialogTitle }}
        </div>
      </div>
    </el-dialog>
  </div>
</template>
js:
<script>
const lrz = require("lrz");
export default {
  name: "writeArticle",
  data() {
    return {
      md: "",
      lock: [],
      editCategoryTags: [],
      editCategoryId: null,
      render: "",
      title: "",
      value: "",
      dialogTitle: "",
      articleId: null,
      // object[]
      AllCategories: [],
      // names[]
      Categories: [],
      // object[]
      AllTags: [],
      // ids
      checkedTags: [],
      // name
      Tags: [],
      publicFormVisible: false,
      showAddBtn: true,
      edit: false,
      inputVisible: false,
      inputCategoriesVisible: false,
      inputValue: "",
      inputCategoriesValue: "",
      radio: 0,
      form: {
        name: "",
        region: "",
        date1: "",
        date2: "",
        delivery: false,
        type: [],
        resource: "",
        desc: ""
      },
      formLabelWidth: "80px",
      markdownOption: {
        bold: true, // 粗体
        italic: true, // 斜体
        header: true, // 标题
        underline: true, // 下划线
        strikethrough: true, // 中划线
        mark: true, // 标记
        quote: true, // 引用
        link: true, // 链接
        imagelink: true, // 图片链接
        code: true, // code
        table: true, // 表格
        fullscreen: true, // 全屏编辑
        /* 1.3.5 */
        undo: true, // 上一步
        redo: true, // 下一步
        trash: true, // 清空
        save: true, // 保存(触发events中的save事件)
        /* 1.4.2 */
        navigation: true, // 导航目录
        /* 2.1.8 */
        alignleft: true, // 左对齐
        aligncenter: true, // 居中
        alignright: true, // 右对齐
        /* 2.2.1 */
        subfield: true, // 单双栏模式
        preview: true // 预览
      }
    };
  },
  watch: {
    Categories(value) {
      if (value.length === 0) {
        this.radio = 0;
      }
      this.showAddBtn = value.length < 1;
    }
  },
  computed: {
    inputWidth: function() {
      return document.documentElement.clientWidth - 640 + "px";
    },
    divHeight: function() {
      return document.documentElement.clientHeight - 55 + "px";
    }
  },
  mounted() {
    // 如果是编辑页跳转过来的
    if (this.$route.params.id) {
      this.edit = true;
      this.articleId = this.$route.params.id;
      this.getOneArticle(this.$route.params.id);
    }
    this.getAllCategory();
    this.getAllTags();
  },
  methods: {
    gotoManage() {
      this.$router.push(
        {
          name: "blogManagement"
        }
      );
    },
    async getOneArticle(id) {
      let res = await this.$axios({
        method: "post",
        url: this.GLOBAL.url + "/article/getOne",
        data: {
          articleId: id
        }
      });
      if (res.data.code === 0) {
        this.value = res.data.result.md;
        this.title = res.data.result.title;
        this.md = res.data.result.md;
      } else {
        this.$message.error("原文章加载失败了哦~");
      }
    },
    async imgAdd(pos, $file) {
      let DateURL = "";
      this.lock.push(true);
      let len = this.lock.length;
      await lrz($file.miniurl, { quality: 0.95 }).then(res => {
        DateURL = res.base64;
      });
      let newFile = this.dataURLtoFile(DateURL);
      let url = await this.getURL(newFile);
      this.$refs.md.$img2Url(pos, url);
      this.lock[len - 1] = false;
    },
    dataURLtoFile(dateURL) {
      let filename = `${new Date().getTime()}.png`;
      let arr = dateURL.split(",");
      let mime = arr[0].match(/:(.*?);/)[1];
      let bstr = atob(arr[1]);
      let n = bstr.length;
      let u8arr = new Uint8Array(n);
      while (n--) {
        u8arr[n] = bstr.charCodeAt(n);
      }
      return new File([u8arr], filename, { type: mime });
    },
    async getURL(file) {
      let formData = new FormData();
      let url = "";
      formData.append("image", file);
      await this.$axios({
        url: "https://image.kieng.cn/upload.html?type=qq",
        method: "post",
        data: formData,
        headers: { "Content-Type": "multipart/form-data; boundary=----WebKitFormBoundary7N5jgep6nLmUuWxd" }
      }).then((res) => {
        url = res.data.data.url;
      });
      return url;
    },
    async confirmPublish() {
      if (this.lock.indexOf(true) > -1) {
        this.$message.error("图片正在上传中,请稍等...");
        return;
      }
      if (this.dialogTitle === "更新博文") {
        await this.update();
      } else {
        await this.confirmPreserve();
        if (this.dialogTitle === "发布博文") {
          await this.publish();
        }
      }

      this.publicFormVisible = false;
    },
    // 更新博文
    async update() {
      let id = null;
      if (this.Categories.length !== 0) {
        let name = this.Categories[0];
        id = await this.AllCategories.filter((ele) => {
          if (ele.categoryName === name) {
            return true;
          }
        })[0].categoryId;
      }
      let res = await this.$axios({
        method: "post",
        url: this.GLOBAL.url + "/article/update",
        data: {
          articleId: this.articleId,
          categoryId: id,
          tagIds: this.checkedTags,
          title: this.title,
          content: this.render,
          md: this.md
        }
      });
      this.publicFormVisible = false;
      if (res.data.code === 0) {
        this.articleId = res.data.result.articleId;
        this.$message.success("更新成功");
      } else {
        this.$message.error(res.data.result);
      }
    },
    // 存草稿
    async confirmPreserve() {
      let id = null;
      if (this.Categories.length !== 0) {
        let name = this.Categories[0];
        id = await this.AllCategories.filter((ele) => {
          if (ele.categoryName === name) {
            return true;
          }
        })[0].categoryId;
      }
      let res = await this.$axios({
        method: "post",
        url: this.GLOBAL.url + "/article/create",
        data: {
          categoryId: id,
          tagIds: this.checkedTags,
          title: this.title,
          content: this.render,
          md: this.md
        }
      });
      this.publicFormVisible = false;
      if (res.data.code === 0) {
        this.articleId = res.data.result.articleId;
        this.$message.success("保存成功");

      } else {
        this.$message.error(res.data.result);
      }

    },
    // 发布
    async publish() {
      let res = await this.$axios({
        method: "post",
        url: this.GLOBAL.url + "/article/publish",
        data: {
          articleId: this.articleId
        }
      });

      if (res.data.code === 0) {
        this.articleId = res.data.result.articleId;
        this.$message.success("发送成功");
      } else {
        this.$message.error(res.data.result);
      }
    },
    changeCheckedTags(checkedTags) {
      let checkedTagName = this.AllTags.filter((ele) => {
        if (checkedTags.indexOf(ele.tagId) > -1) {
          return true;
        }
      }).map((ele) => {
        return ele.tagName;
      });
      let len = checkedTagName.length;
      let originalLen = this.Tags.length;
      if (len > originalLen) {
        checkedTagName.forEach((ele) => {
          if (this.Tags.indexOf(ele) === -1) {
            this.Tags.push(ele);
          }
        });
      } else {
        let newTags = [];
        this.Tags.forEach((ele) => {
          if (checkedTagName.indexOf(ele) !== -1) {
            newTags.push(ele);
          }
        });
        this.Tags = newTags;

      }
    },
    changeCategories(radio) {
      console.log(radio);
      this.Categories.length = 0;
      this.AllCategories.forEach((ele, index, arr) => {
        if (ele.categoryId === radio) {
          this.Categories.push(arr[index].categoryName);
        }
      });

    },
    getAllCategory() {
      let self = this;
      this.$axios({
        method: "post",
        url: this.GLOBAL.url + "/category/getAll"
      }).then(res => {
        console.log(res);
        if (res.data.code === 0) {
          self.AllCategories = res.data.result.categorys;
        } else {
          this.$message.error(res.data.result);
        }
      }).catch(err => {
        self.$message.error("无法连接到服务器" + err);
      });
    },
    getAllTags() {
      let self = this;
      this.$axios({
        method: "post",
        url: this.GLOBAL.url + "/tag/getAll"
      }).then(res => {
        console.log(res);
        if (res.data.code === 0) {
          self.AllTags = res.data.result.tags;
        } else {
          this.$message.error(res.data.result);
        }
      }).catch(err => {
        self.$message.error("无法连接到服务器" + err);
      });
    },
    handleClose(tag, Tags) {
      Tags.splice(Tags.indexOf(tag), 1);
      let id = null;
      for (let ele of this.AllTags) {
        if (ele.tagName === tag) {
          id = ele.tagId;
          break;
        }
      }
      this.checkedTags.splice(this.checkedTags.indexOf(id), 1);
    },
    handleCategoriesClose(tag, Tags) {
      Tags.splice(Tags.indexOf(tag), 1);
    },
    showInput() {
      this.inputVisible = true;
      this.$nextTick(() => {
        this.$refs.saveTagInput.$refs.input.focus();
      });

    },
    showCategoriesInput() {
      this.inputCategoriesVisible = true;
      this.$nextTick(() => {
        this.$refs.saveCategoriesTagInput.$refs.input.focus();
      });
    },
    async handleInputConfirm(Tags) {
      let inputValue = this.inputValue;
      let flag = true;
      this.AllTags.forEach((ele) => {
        if (inputValue.trim() === ele.tagName) {
          flag = false;
        }
      });
      if (inputValue && flag) {
        Tags.push(inputValue);
        let length = Tags.length;
        let res = await this.$axios({
          method: "post",
          url: this.GLOBAL.url + "/tag/create",
          data: {
            "tagName": this.Tags[length - 1]
          }
        });

        if (res.data.code === 0) {
          this.getAllTags();
          let id = res.data.result.tagId;
          this.checkedTags.push(id);
          this.$message.success("添加成功");
        } else {
          this.$message.error(res.data.result);
        }

      }
      this.inputVisible = false;
      this.inputValue = "";
    },
    async handleCategoriesInputConfirm(Tags) {
      let inputValue = this.inputCategoriesValue;
      let flag = true;
      this.AllCategories.forEach((ele) => {
        if (inputValue.trim() === ele.categoryName) {
          flag = false;
        }
      });
      if (inputValue && flag) {
        Tags.push(inputValue);
        let res = await this.$axios({
          method: "post",
          url: this.GLOBAL.url + "/category/create",
          data: {
            "categoryName": this.Categories[0]
          }
        });
        if (res.data.code === 0) {
          this.getAllCategory();
          this.radio = res.data.result.categoryId;
          this.$message.success("添加成功");
        } else {
          this.$message.error(res.data.result);
        }

      }
      this.inputCategoriesVisible = false;
      this.inputCategoriesValue = "";

    },
    // autoSelect(id){
    //   this.AllCategories.forEach((ele,index)=>{
    //     // if(ele.categoryId===id){
    //
    //     }
    //   })
    // },
    publishArticle(flag) {
      if (this.article === "" || this.render === "") {
        this.$message.error("博客的题目或内容不能为空哦~");
      } else {
        if (flag === 1) {
          this.dialogTitle = "存草稿";
        } else if (flag === 2) {
          this.dialogTitle = "发布博文";
        } else {
          this.dialogTitle = "更新博文";
        }
        this.publicFormVisible = true;
      }
    },
    changeInput(value, render) {
      this.render = render;
      this.md = value;
    }
  }
};
</script>
scss:
<style lang="scss" scoped>
.writeArticle {
  /*background: red;*/
  width: 100%;
  height: 100%;
  position: relative;
  top: 0;

  .editor {
    height: 100%;
    width: 100%;
    position: relative;
    margin: 0 auto;
    top: 0;

    .title {

      line-height: 55px;
      position: relative;
      height: 55px;
      top: 0;
      left: 0;
      right: 0;
      //background: red;
      //      background: red;
      //opacity: 0.5;
      background: rgba(255, 255, 255, 0.6);
      font-family: chen_ch;

      .gotoManage {
        width: 120px;
        height: 55px;
        position: relative;
        float: left;
        color: #757575;
        font-size: 20px;
        z-index: 66;
        //margin-right: 10px;
        margin-left: 10px;
        cursor: pointer !important;

      }

      .inputDiv {
        height: 55px;
        position: relative;
        top: 0;
        left: 0;
        width: 100%;
        background: transparent;


        input:focus {
          border-color: #66afe9;
          outline: 0;
          -webkit-box-shadow: inset 0 1px 1px rgba(0, 0, 0, .075), 0 0 8px rgba(102, 175, 233, .6);
          box-shadow: inset 0 1px 1px rgba(0, 0, 0, .075), 0 0 8px rgba(102, 175, 233, .6)
        }


        .titleInput {
          background: transparent;
          border: 2px solid #ccc;
          outline-style: none;
          border-radius: 20px;
          top: 5px;
          line-height: 40px;
          height: 40px;
          padding-left: 20px;
          font-size: 20px;
          position: relative;
          //display: block;
          float: left;
          //overflow: hidden;
          transition-duration: 0.3s;
          //          transition-duration: fade-in();
        }
      }

      .draft {
        position: absolute;
        top: 4px;

        height: 43px;
        background: (255, 255, 255, 0.2);
        width: 120px;
        font-size: 20px;
        text-align: center;
        color: #545c64;
        right: 144px;
        border: 2px solid #545c64;
        //float: right;
        border-radius: 30px;
        line-height: 43px;
        transition-duration: 0.3s;
        cursor: pointer;
      }

      .draft:hover {
        box-shadow: 2px 2px 2px rgba(0, 0, 0, 0.2);
        background: #434A50;
        color: #fff;
        transition-duration: 0.3s;

      }

      .publish:hover {
        background: #fff;
        color: red;
        box-shadow: 2px 2px 2px rgba(0, 0, 0, 0.2);
        transition-duration: 0.3s;
      }

      .publish {
        transition-duration: 0.3s;
        position: absolute;
        //float: right;
        height: 43px;
        text-align: center;
        top: 4px;
        line-height: 43px;
        cursor: pointer;
        right: 10px;
        width: 120px;
        font-size: 18px;

        color: #fff;
        border-radius: 30px;
        background: red;
        border: 2px solid red;
      }
    }

    .mavon {

      position: relative;

    }
  }

  /deep/ .el-dialog__title {
    font-size: 24px !important;
    font-family: chen_ch;
  }

  /deep/ .el-form-item__label {
    font-size: 20px !important;
    font-family: chen_ch;
  }

  /deep/ .el-dialog {
    background: url("../../assets/imgs/little-monster-white.png") no-repeat;

    background-size: cover;
    margin-top: 7vh !important;
    border-radius: 20px !important;
    max-height: 820px;
    overflow-y: auto;
    transition-duration: 0.3s;

  }


  /deep/ .el-dialog:hover {

    box-shadow: 3px 3px 3px rgba(0, 0, 0, 0.3);
  }

  /deep/ .el-dialog__body {
    padding: 20px 40px 0 30px !important;
    background: rgba(255, 255, 255, 0.7) !important;
  }


  /deep/ .el-dialog__footer, /deep/ .el-dialog__header {
    background: rgba(255, 255, 255, 0.7) !important;

  }

  /deep/ .el-form-item {
    margin-bottom: 0 !important;
  }

  .publishArticleDialog {
    //background: url("../../assets/imgs/little-monster.png") no-repeat;
    //background-size: cover;
    overflow-y: auto;

    .dialog-footer {
      font-family: chen_ch;
      position: relative;
      bottom: 0;
      right: 20px;
      height: 70px;

      .cancel {
        position: absolute;
        top: 4px;

        height: 43px;
        background: (255, 255, 255, 0.2);
        width: 120px;
        font-size: 20px;
        text-align: center;
        color: #545c64;
        right: 144px;
        border: 2px solid #545c64;
        //float: right;
        border-radius: 30px;
        line-height: 43px;
        transition-duration: 0.3s;
        cursor: pointer;
      }

      .cancel:hover {
        box-shadow: 2px 2px 2px rgba(0, 0, 0, 0.2);
        background: #434A50;
        color: #fff;
        transition-duration: 0.3s;

      }

      .confirm:hover {
        background: #fff;
        color: red;
        box-shadow: 2px 2px 2px rgba(0, 0, 0, 0.2);
        transition-duration: 0.3s;
      }

      .confirm {
        transition-duration: 0.3s;
        position: absolute;
        //float: right;
        height: 43px;
        text-align: center;
        top: 4px;
        line-height: 43px;
        cursor: pointer;
        right: 10px;
        width: 120px;
        font-size: 18px;

        color: #fff;
        border-radius: 30px;
        background: red;
        border: 2px solid red;
      }
    }

    .tag {
      text-align: left;
      padding-left: 45px;
      width: 520px;

      .el-tag {
        margin: 10px;
        display: inline-block;

      }

      .button-new-tag {
        margin-left: 10px;
        height: 32px;
        line-height: 30px;
        padding-top: 0;
        padding-bottom: 0;
      }

      .input-new-tag {
        width: 90px;
        margin-left: 10px;
        vertical-align: bottom;
      }
    }

    .radio {
      border: 2px solid #cccccc;
      border-radius: 10px;
      height: 150px;
      width: 400px;
      overflow-y: auto;
      padding: 15px 20px 20px 50px;
      margin: 20px auto 20px auto;
      text-align: left;

      .Category {
        width: 70px;
        height: 35px;
        text-align: left;
        line-height: 35px;
        display: inline-block;
      }
    }


  }
}
</style>
2022.4.10 实现导入excel,上传文件和导出(1)
组件excelInport.vue
<template>
  <el-card>
    <div slot="header">
      <span style="float: left">学生信息上传</span>
      <el-upload ref="upload" :auto-upload="false" :headers="headers" :multiple="false" :on-change="onChange"
                 :show-file-list="false" action=''>
        <el-button slot="trigger" size="small" type="primary">
          选择文件<i :class="'el-icon-files'"></i>
        </el-button>
        <el-button :disabled="loading ||
        students.length==0"
                   size="small"
                   style="margin-left: 10px;" type="success"
                   @click="submitUpload">
          点击上传
          <i :class="loading?'el-icon-loading':'el-icon-upload'"></i>
        </el-button>
        <el-button :disabled="fileRes==''" size="small" style="float: right" type="text" @click="outExe">
          导出excel文件
          <i class="el-icon-download"></i>
        </el-button>
      </el-upload>
    </div>
    <el-table :data="students" border stripe style="width: 100%">
      <el-table-column label="学号" prop="id">
      </el-table-column>
      <el-table-column label="姓名" prop="name">
      </el-table-column>
    </el-table>
  </el-card>
</template>

<script>
const XLSX = require("xlsx");

export default {
  name: "excelImport",

  data() {
    return {
      loading: false,
      formdata: {},
      students: [],
      headers: {
        Authorization: "Bearer " + localStorage.getItem("token"),
      },
      fileRes: "",
    };
  },
  props: {
    upload: {
      type: Function,
      default: () => {
        return Function;
      },
    },
  },
  methods: {
    onChange(file) {
      this.formdata = new FormData();
      this.formdata.append("file", file.raw);
      this.processFile(file);
    },
    getHeaderRow(sheet) {
      const headers = [];
      /* sheet['!ref']表示所有单元格的范围,例如从A1到F8则记录为 A1:F8*/
      const range = XLSX.utils.decode_range(sheet["!ref"]);
      let C,
          R = range.s.r; /* 从第一行开始 */
      /* 按列进行数据遍历 */
      for (C = range.s.c; C <= range.e.c; ++C) {
        /* 查找第一行中的单元格 */
        const cell = sheet[XLSX.utils.encode_cell({c: C, r: R})];
        let hdr = "UNKNOWN " + C; // <-- 进行默认值设置
        if (cell && cell.t) {
          hdr = XLSX.utils.format_cell(cell);
        }
        headers.push(hdr);
      }
      return headers;
    },

    processFile(file) {
      this.students = [];
      const reader = new FileReader();
      reader.onload = (e) => {
        /* 解析数据 */
        const bstr = e.target.result;
        const wb = XLSX.read(bstr, {type: "binary"});
        /* 获取文件的第一个工作表(WorkSheet) */
        const wsname = wb.SheetNames[0];
        const ws = wb.Sheets[wsname];
        /* 数组转换 */
        const data = XLSX.utils.sheet_to_json(ws, {header: 1});
        /* 进行表格数据更新 */
        for (let i = 1; i < data.length; i++) {
          let item = {
            id: String(data[i][0]),
            name: data[i][1],
          };
          this.students.push(item);
        }
        /* 进行表格表头数据更新 */
        this.cols = this.getHeaderRow(ws);
      };
      reader.readAsBinaryString(file.raw);
    },
    async submitUpload() {
      this.loading = true;
      this.fileRes = await this.upload(this.formdata);

      this.loading = false;
      this.$message({
        message: "上传成功!请点击最下方按钮导出xlsx文件",
        type: "success",
      });
    },
    outExe() {
      this.$prompt("此操作将导出excel文件, 是否继续?", "请输入文件名", {
        confirmButtonText: "确定",
        cancelButtonText: "取消",
        type: "warning",
      })
          .then(({value}) => {
            // this.excelData = this.dataList; //你要导出的数据list。
            this.saveExcel(value);
          })
          .catch(() => {
          });
    },
    saveExcel(name) {
      const content = this.fileRes.data;
      console.log(content);
      const blob = new Blob([content]); //构造一个blob对象来处理数据
      let fileName = "绑定码.xlsx";
      if (name) {
        fileName = name + ".xlsx";
      }
      //对于<a>标签,只有 Firefox 和 Chrome(内核) 支持 download 属性
      //IE10以上支持blob但是依然不支持download
      if ("download" in document.createElement("a")) {
        //支持a标签download的浏览器
        const link = document.createElement("a"); //创建a标签
        link.download = fileName; //a标签添加属性
        link.style.display = "none";
        link.href = URL.createObjectURL(blob);
        document.body.appendChild(link);
        link.click(); //执行下载
        URL.revokeObjectURL(link.href); //释放url
        document.body.removeChild(link); //释放标签
      } else {
        //其他浏览器
        navigator.msSaveBlob(blob, fileName);
      }
    },
  },
};
</script>

<style scoped>
.head div {
  display: inline-block;
}
</style>
2022.4.20 实现导入excel,上传文件和导出(2)
组件的使用
html:
<excel :upload="upload" />
js:
import excel from "../../components/excelImport";
export default {
	name: "userListDetails",
	components: {
		excel,
	},,
	methods:{
			async upload(data) {
			data.append("id", this.id);
			let res = await this.$ajax.post("/usergroup/addStudent", data, {
				headers: {
					Authorization: "Bearer " + localStorage.getItem("token"),
					"Content-Type": "multipart/form-data",
				},
				responseType: "blob", //服务器返回的数据类型
			});

			await this.getInfo();
			return res;
		},}}
2022.5.15 ES6复习巩固
1.let变量声明及声明特性
1.1 变量声明
    let a;
    let b, c, d;
    let e = 100;
    let f = 1, g = 2, h = 3;
1.2 不能重复声明
     let star='a'
     let star='b'
报错,但是var可以
1.3 块级作用域
全局,函数,eval
{
let girl = '丁心宜'
}
console.log(girl)
let 打印不出,var 可以
1.4 不存在变量提升*
console.log(song)
let song = '小燕子穿花衣'
会报错
但是用var相当于
var song;
console.log(song)
let song='小燕子穿花衣'
//undefined
不报错
1.5 不影响作用域链
虽然是块级作用域,但不影响作用域链
作用域链(Scoped chain):由子级作用域返回父级作用域中寻找变量,就叫做作用域链。
    {
      let score = '120'
      function fn1() {
        let school = '山东大学'
        function fn() {
          console.log(school);
          console.log(score)
        }
        fn();
      }
      fn1()
    }
两个变量都能打印出来。这里为了说明问题,用了两层,其实多少层都能寻找到变量。
2. const声明常量及其特性
声明方法
const 变量名 = 值
注意事项:
- 声明的时候要赋初值
- 一般常量名全部大写(潜规则)
- 常量不能重新赋值
- 块级作用域
{
    const PLATER='DXY'
}
console.log(PLAYER)
//ERROR:not defined
- 对于数组和对象的元素修改,因为地址没有发生改变,因此不算做对常量的修改,不会报错*
const ARR = [1,2,3,4]
ARR.push(5)
// 不报错
3. 变量的解构赋值
3.1 数组的解构
const F4=['迪丽热巴','古力娜扎','杨幂','刘诗诗'];
let [di,gu,yang,liu] = F4;
console.log(di)
//迪丽热巴
3.2 对象的解构
const zhao = {
    name: '赵本山',
    age: '不详',
    xiaopin: function(){
        console.log('我可以演小品')
    }
}
let {name,age,xiaopin} = zhao
xiaopin()
// 或者
let {xiaopin} = zhao
xiaopin()
4. 模板字符串
数据类型:String
声明:
let str=`模板字符串`
内容中可以出现换行符
变量拼接
let lovest = 'AngelaBaby';
let out = `${lovest} is the BEST actress in my heart!`
5. 对象的简化写法
ES6允许在大括号里面直接写入变量和函数,作为对象的属性和方法。方法的写法也可以省略。
    let name = 'dxy'
    let age = 21
    let speak = function () {
      console.log('我爱说废话');
    }
    const person = {
      name, // 即:name:name
      age, // 即:age:age
      speak // 即:speak.speak
      improve(){
          console.log(111)
      }
      /*
      等同于:
      improve:functon(){
         console.log(111)
      }
      **/
    }
    person.speak()
6. 箭头函数及其声明特点
6.1 声明方法
声明一个函数:
// 一般
let fn = function(a,b){
   //代码体
}
// 箭头函数
let fn = (a,b) => {
    //代码体
}
6.2 特性
6.2.1 静态this
箭头函数的this是静态的,时钟指向函数声明时所在作用域下this的值。
  function getName() {
      console.log(this.name)
    }
    let getName2 = () => {
      console.log(this.name)
    }
    window.name = '窗体对象name'
    const obj = {
      name: "一个对象的名字"
    }
    // getName();
    // getName2();
    // 都会返回window.name

    // call方法调用
    getName.call(obj)
    // this被动态的改为对象
    getName2.call(obj)
    // this还是原来的窗体
另外一个例子:
需求,点击方块立刻变成粉色。
普通写法,需要将this存起来,因为function的this指向会发生改变
    let ad = document.getElementById('ad')
    ad.addEventListener("click", function () {
      let _this = this
      let changeColor = function () {
        _this.style.background = 'pink'
      }
      changeColor()
    })
箭头函数写法,不用存this,因为箭头函数的this是静态的,它的this就指向function的this,即名为ad的变量。
    let ad = document.getElementById('ad')
       ad.addEventListener("click", function () {
       changeColor = () => {
         this.style.background = 'pink'
       }
      changeColor()
    })
6.2.2 不能作为构造函数实例化对象
个人理解是,既然this在声明时已经指向函数所在作用域下this的值,那么this就不能再重新赋值,作为一个新的对象了。(不能把窗体作为一个刚new的Person对象)
错误示例:
    let Person = (name, age) => {
      this.name = name
      this.age = age
    }
    let me = new Person('xiao', 30)
    console.log(me)
    //Uncaught TypeError: Person is not a constructor
6.2.3 不能使用arguments对象
arguments对象是在函数调用时存储形参的对象
function func1(a, b, c) {
  console.log(arguments[0]);
  // expected output: 1

  console.log(arguments[1]);
  // expected output: 2

  console.log(arguments[2]);
  // expected output: 3
}

func1(1, 2, 3);
但是箭头函数没有这个对象
    let fn = () => {
      console.log(arguments);
    }
    fn()
    //Uncaught ReferenceError: arguments is not defined
6.2.4 箭头函数的简写
6.2.4.1 省略小括号
当形参有且只有一个时。
let add = n =>{
   return n+n
}
console.log(add(9))
//18
6.2.4.2 省略花括号
当代码体只有1条语句时,此时return也必须省略,而且语句的执行结果就是函数的返回值。
let pow = n => n * n
console.log(pow(9))
6.2.4.3 案例
const arr=[1,6,9,10,100,25]
const result=arr.filter(function(item){
    if(item%2===0){return true}
    else{return false}
})
箭头函数简写:
const result = arr.filter(item=>item%2===0)
结果都是[6,10,100],都是对的。
6.2.5 箭头函数的应用场景
- 适合于this无关的回调,定时器,数组的方法回调
- 不适合与this有关的回调,事件回调,对象的方法
比如:
{
    name:'Sabina',
    getName:function(){
        return this.name;
        //可以拿到这个对象name
    }
    getName1:()=>{
        return this.name
        //这个时候的this指向的是外层作用域的this值
    }
}
7. 函数参数的默认值
如果不赋值,即为undefined
或者,与解构赋值结合:
function connect({host='127.0.0.1',username,pswd,port}){

}
connect({
    host:'baidu.com',
    username:'root',
    pswd:'123456',
    port:3306
})
8. rest参数
ES6引入rest参数,用于获取函数的实参,用来代替arguments
- ES5获取实参的方式:
function date(){
    console.log(arguments)
}
date('丁小宜','丁心宜','dxy')
打印出来的arguments是一个对象
- ES6通过rest参数获取实参:
function date(...args){
    console.log(args)
}
date('丁小宜','丁心宜','dxy')
打印出来的是一个数组。注意,如果方法有多个参数,要把arguments放在最后。
function fn(a,b,...args){
    console.log(a)//1
    console.log(b)//2
    console.log(args)//[3,4,5,6]
}
fn(1,2,3,4,5,6)
9. 扩展运算符
…运算符可以将数组转换成逗号分隔的参数序列(实参)
const tfboys = ['易烊千玺','王源','王俊凯']
function chunwan(){
    console.log(arguments)
}
chunwan(...tfboys)
//相当于传了三个参数,而不是一个数组
9.1 扩展运算符的应用
9.1.1 数组的合并
const arr1 = [1,2,3]
const arr2 = [4,5,6]
const arr = [...arr1,arr2]
9.1.2 数组的拷贝
浅拷贝
const arr1 = [1,2,3]
const arr2 = [...arr1]
9.1.3 将维数组转换为真正的数组
const divs = document.querySelectorAll('div')
let divArr = [...divs]
console.log(divArr)
10. Symbol数据类型
一种类似于string的数据类型,但是又不同。
JS一共有7种数据类型,分别为USONB:
- U:undefined
- S:String Symbol
- O:Object
- N:Number Null
- B:boolean
10.1 Symbol的创建
// 构造函数
let s0 = Symbol()
let s1 = Symbol('1')
let s2 = Symbol('1')
console.log(s1===s2)//false
// Symbol.for创建
let s3 = Symbol.for('1')
let s4 = Symbol.for('1')
console.log(s3===s4);//true
10.2 向对象中添加Symbol类型的属性
    let game = {
      name: "狼人杀",
      [Symbol('say')]: function () {
        console.log('我可以发言')
      },
      [Symbol('explotion')]: function () {
        console.log('我可以自爆')
      }
    }
    console.log(game);
打印的game:
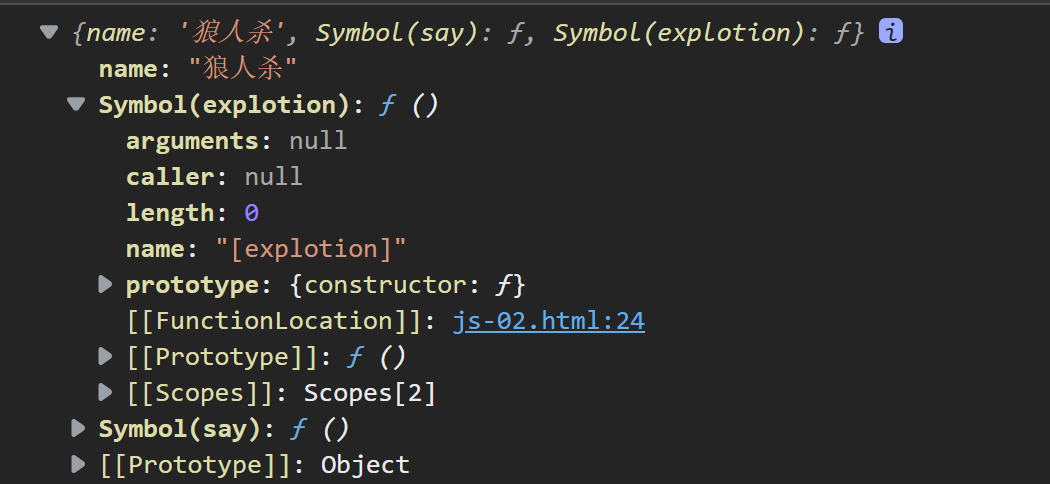
或者添加同名方法:
    let game = {
      name: "俄罗斯方块",
      up: function () {

      },
      down: function () { }
    }
    let methods = {
      up: Symbol(),
      down: Symbol()
    }
    game[methods.up] = function () {
      console.log('我可以改变形状');
    }
    game[methods.down] = function () {
      console.log('我可以快速下降');
    }
    console.log(game);
打印结果:

10.3 Symbol的内置属性
这些内置属性是Symbol的属性,同时Symbol.xx又作为对象的属性存在,目的是为了扩展对象的功能。
10.3.1 Symbol.hasInstance 对象类型检测
用于类型检测,检测某个对象是否是某个自定义类的实例,以此来控制instanceof的值。下面这个例子可以判断某个参数是否为非空数组:
    class Arr1 {
      static [Symbol.hasInstance](instance) {
        return Array.isArray(instance) && instance.length > 0
      }
    }
    console.log([] instanceof Arr1)
10.3.2 Symbol.isConcatSpreadable
Symbol.isConcatSpreadable是一个布尔值属性,表示该对象用于Array.prototype.concat()时,是否可以展开。
    const arr1 = [1, 2, 3]
    const arr2 = [4, 5, 6]
    arr2[Symbol.isConcatSpreadable] = false
    console.log(arr1.concat(arr2));
    // expected [1,2,3,[4,5,6]]
11. 迭代器
为不同的数据结构提供统一的访问机制,任何数据只要部署了Iterator接口,就可以完成遍历操作。
- Iterator接口主要供for…of消费
- 原生具备Iterator接口的数据:
Array,arguments,Set,Map,String,TypedArray,NodeList - 工作原理:
    const xiyou = ['1', '2', '3', '4']
    // 创建一个指针对象,指向当前数据结构的起始位置
    let iterator = xiyou[Symbol.iterator]()
    // 第一次调用next方法,指针自动指向数据结构的第一个成员
    // 之后的每一次调用next方法指针一直向后移动,直到指向最后一个成员
    console.log(iterator.next());
    console.log(iterator.next());
    console.log(iterator.next());
    console.log(iterator.next());
    console.log(iterator.next());
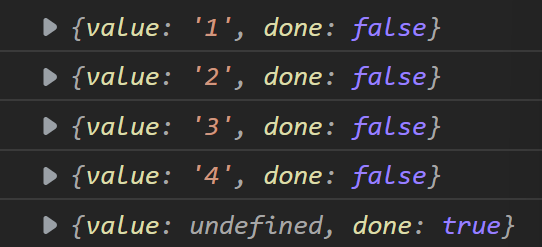
可以看到,每次调用next方法都会返回一个包含value和done属性的对象。
也可以通过对象遍历对象中的数组,而不是直接遍历,体现了面向对象的思想:
    const katzchen = {
      name: '猫猫',
      stus: [
        '心心',
        '心宜',
        '丁心宜',
        'dxy'
      ],
      [Symbol.iterator]() {
        let index = 0
        return {
          next: () => {
            if (index < this.stus.length) {
              const result = { value: this.stus[index], done: false }
              index++
              return result
            }
            else {
              return { value: undefined, done: true }
            }
          }
        }
      }
    }
    for (item of katzchen) {
      console.log(item)
    }
打印结果:

12. 生成器函数
生成器可以和迭代器配合使用来解决回调地狱的问题。
12.1 生成器函数的声明与调用
- 声明
// 1
function * fnName(){}
// 2
function* fnName(){}
// 3
function *fnName(){}
// 4
function*fnName(){}
- 调用:
    function* gen() {
    yield '一只没有耳朵'
    console.log(111);
    yield '一只没有尾巴'
    console.log(222);
    yield '真奇怪'
    console.log(333);
    }
    let iterator = gen()
    iterator.next()
    iterator.next()
    iterator.next()
    iterator.next()
    //expected output:111 222 333
yield可以将函数分割成n+1段
12.2 next方法
- 打印next方法,每次执行next只会执行到这个next对应的yield语句,不会再继续向下执行。
    function* gen() {
    yield '一只没有耳朵'// 第1个next()执行到这里
    console.log(111);
    yield '一只没有尾巴'// 第2个next()执行到这里
    console.log(222);
    yield '真奇怪'// 第3个next()执行到这里
    console.log(333);
    }// 第4个next()执行到这里
    let iterator = gen()
    console.log(iterator.next())
    console.log(iterator.next())
    console.log(iterator.next())
    console.log(iterator.next())
输出:
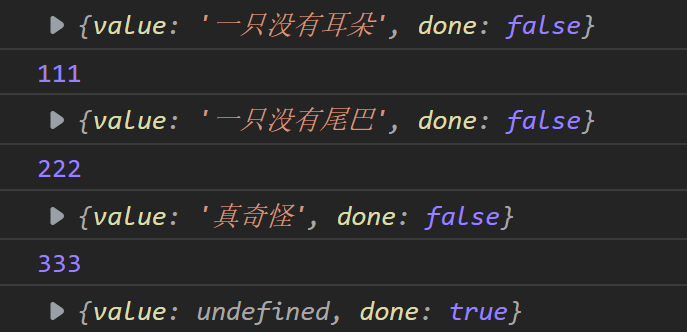
- next方法可以传入实参并获取
    function* gen(arg) {
      console.log(arg);
    }
    let iterator = gen('AAA')
    console.log(iterator.next())

12.3 yield理解
当调用 next方法时,开始执行,遇到 yield 表达式,就暂停后面的操作,将 yield 后面的表达式的值,作为返回的对象的 value 值.
以下示例会实现每隔一秒分别打印三个不同的数据的功能:
    function getUsers() {
      setTimeout(() => {
        let data = '用户数据'
        // next实参将作为第一个yield语句的返回结果
        iterator.next(data)
      }, 1000)
    }
    function getOrders() {
      setTimeout(() => {
        let data = '订单数据'
        iterator.next()
      }, 1000)
    }
    function getGoods() {
      setTimeout(() => {
        let data = '商品数据'
        iterator.next()
      }, 1000)
    }

    function* gen() {
      let Users = yield getUsers();
      console.log(Users);
      let Orders = yield getOrders();
      console.log(Orders);
      let Goods = yield getGoods();
      console.log(Goods);
    }
    let iterator = gen()
    iterator.next()
13. Promise
用来解决地狱回调的问题。
13.1 Promise的基本使用
Promise对象构造函数的参数是一个方法,提供了两个函数resolve和reject,这两个参数谁放在前面,如果被执行就直接return,不会再继续向下执行。
    const p = new Promise(function (resolve, reject) {
      setTimeout(function () {
        let success = '数据读取成功';
        //设置Promise对象状态为成功
        resolve(success)

        let err = '数据读取失败'
        //设置Promise对象状态为失败
        reject(err)
      }, 1000)
    })
    // Promise对象的then方法里面的两个参数也是两个匿名方法,分别是成功和失败的参数。
    p.then((value) => {
      console.log(value);
    }, (reason) => {
      console.log(reason);
    })
13.2 Promise读取文件
// 1.引入fs模块
const fs = require('fs')
// 2.调用方法读取文件
// fs.readFile('./ES6.md', (err, data) => {
//   if (err) throw err
//   console.log(data.toString());
// })
// 3.使用Promise封装
const p = new Promise(function (resolve, reject) {
  fs.readFile('./ES6.md', (err, data) => {
    if (err) reject(err);
    resolve(data)
  })
})
p.then(value => console.log(value.toString()), reason => console.log('读取失败',reason))
13.3 Promise封装AJAX请求
封装前:
    // 创建对象
    const xhr = new XMLHttpRequest();

    // 初始化
    xhr.open('GET', 'https://api.apiopen.top/getJoke')

    // 发送
    xhr.send()

    // 绑定事件,处理相应结果
    xhr.onreadystatechange = () => {
      if (xhr.readyState === 4) {
        if (xhr.status >= 200 && xhr.status < 300) {
          console.log(xhr.response);
        }
      } else {
        console.log(xhr.status);
      }
    }
封装后:
    const p = new Promise((resolve, reject) => {

      // 创建对象
      const xhr = new XMLHttpRequest();

      // 初始化
      xhr.open('GET', 'https://api.apiopen.top/getJoke')

      // 发送
      xhr.send()

      // 绑定事件,处理相应结果
      xhr.onreadystatechange = function () {
        // console.log(xhr);
        if (xhr.readyState === 4) {
          if (xhr.status >= 200 && xhr.status < 300) {
            resolve(xhr.response)
          } else {
            reject('请求失败');
          }
        }
      }
    })

    p.then(function (value) {
      console.log(value)
    },
      function (reason) {
        console.log(reason)
      })
扫盲:
XMLHttpRequest.readyState 属性返回一个 XMLHttpRequest 代理当前所处的状态。一个 XHR 代理总是处于下列状态中的一个:

所以同一次请求可能在不同的时刻经历过XMLHttpRequest.readyState===2,3,4的情况。所以这个自定义属性不应该写成这样:
    xhr.onreadystatechange = function () {
        // console.log(xhr);
        if (xhr.readyState === 4) {
          if (xhr.status >= 200 && xhr.status < 300) {
            resolve(xhr.response)
          }
        }
        else {
            reject('请求失败');
          }
      }
这样会打印出两个请求失败和一个成功后的response。
- XMLHttpRequest的MDN : https://developer.mozilla.org/zh-CN/docs/Web/API/XMLHttpRequest
13.4 then方法
13.4.1 返回的Promise对象的状态
调用then方法,返回值的promise对象的值就是return的值(或是Promise的参数)
- 如果回调函数返回的是非Promise类型的数据,状态为成功
- 如果是Promise对象,看对象的状态,如果为resolve则为成功,如果为reject则为失败
- 如果抛出错误则Promise对象状态一定是失败
三种情况的示例:
    const p = new Promise((resolve, reject) => {
      setTimeout(() => {
        resolve('用户数据')
      }, 2000)
    })
    let result = p.then(value => {
      console.log(value)
      // 1. 非Promise类型
      // return 123;
      // 2. Prmise类型
      // return new Promise((resolve,reject)=>{
      //   resolve('ok')
      //   reject('error')
      // })
      // 3.抛出错误
      // throw '出错啦!'
    }, reason => {
      console.warn(reason)
    })
    console.log(result);
13.4.2 链式调用
then支持链式调用:
p.then((value)=>{},reason=>{}).then((value)=>{},reason=>{})
13.5 catch方法
其实是一个语法糖,相当于then不实现参数中成功的方法。
    const p = new Promise((resolve, reject) => {
      setTimeout(() => {
        reject("出错啦!")
      }, 1000)
    })
    p.catch(reason => {
      console.log(reason);
    })
    // 相当于
    // p.then(_, reason => console.log(reason))
14. Set
一个数据类型,不包括重复的元素,是Objet
基本用法:
    // 声明
    let s = new Set(['大事儿', '小事儿', '好事儿', '坏事儿', '小事儿'])

    console.log(s);// ['大事儿', '小事儿', '好事儿', '坏事儿']
    // 添加新元素
    s.add('111')
    // 删除元素
    s.delete('坏事儿')
    // 检测
    s.has('好事儿')
    // 清空
    s.clear()
    // 遍历
    for(let v of s){
      console.log(v);
    }
15. Map
一个数据类型,包括键值对,是Objet,其中key可以是任何数据类型
- size 返回Map的元素个数
- set 增加一个新元素,返回当前Map。如:(m.set(‘key’,‘value’))
- get 返回键名对象的键值
- has 检测map中是否含有某个元素,返回boolean
- clear清空集合,返回undefind
16. class类
通过class关键字,可以定义类。这是ES6引入的更加面向对象编程的语法,但是他的大多数功能ES5也可以实现。
16.1 class声明类
    // ES5声明类
    function Phone(brand, price) {
      this.brand = brand
      this.price = price
    }
    Phone.prototype.call = function () {
      console.log('我可以打电话!');
    }
    // 注意,如果不加prototype则是在函数上直接添加属性,在实例化的时候对象不会有这个属性
    // 我们称他为静态属性
    let Huawei = new Phone('华为', 5999)
    Huawei.call()
    console.log(Huawei);
    // ES6声明类
    class Shouji {
      // 构造方法,在new的时候就会执行这个实例对象上的constractor方法
      constructor(brand, price) {
        this.brand = brand
        this.price = price
      }
      //方法必须这样写,不能使用ES5的对象完整形式
      call() {
        console.log('我也可以打电话~');
      }
    }
    let OnePlus = new Shouji("1+", 1999)
    OnePlus.call()
    console.log(OnePlus);

16.2 constractor定义构造函数初始化
ES5实现继承:
    function Phone(brand, price) {
      this.brand = brand
      this.price = price
    }

    Phone.prototype.call = function () {
      console.log('我可以打电话');
    }

    function smartPhone(brand, price, color, size) {
      Phone.call(this, brand, price)
      this.color = color
      this.size = size
    }
    // 设置子级构造函数的原型
    smartPhone.prototype = new Phone
    // 这行可以不加,不加的话子类就没有原型了
    smartPhone.prototype.constructor = smartPhone

    //声明子类的方法
    smartPhone.prototype.photo = function () {
      console.log('我可以拍照');
    }

    const xiaomi = new smartPhone('小米', 3999, 'blue', '5.1inch')
    console.log(xiaomi);
    xiaomi.call()
    xiaomi.photo()
打印结果:
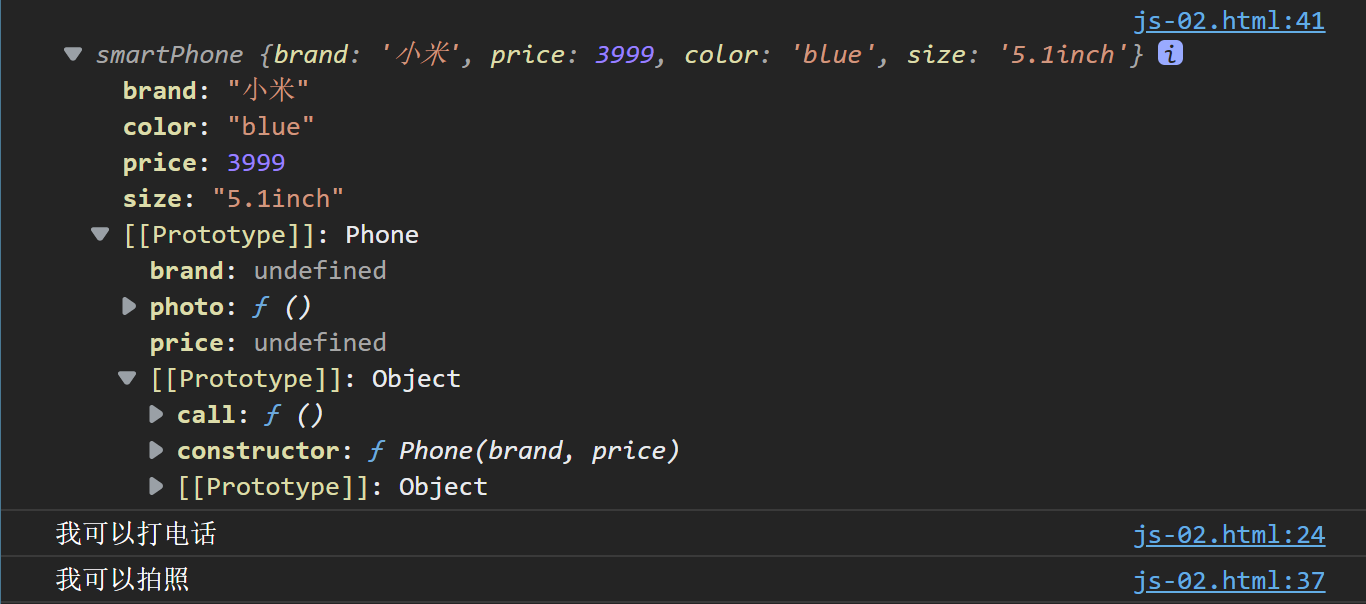
16.3 extends继承父类,super调用父级构造方法
ES6实现类继承:
    class Phone {
      constructor(brand, price) {
        this.brand = brand
        this.price = price
      }
      call() {
        console.log('我可以打电话');
      }
    }

    class SmartPhone extends Phone {
      constructor(brand, price, color, size) {
        // 相当于
        // Phone.call(this,brand,price)
        super(brand, price)
        this.color = color
        this.size = size
      }
      photo() {
        console.log('我可以拍照');
      }
      playGame(){
        console.log('我可以玩游戏');
      }
    }
    const xiaomi = new SmartPhone('小米', 3999, 'blue', '5.1inch')
    console.log(xiaomi);
    xiaomi.call()
    xiaomi.photo()
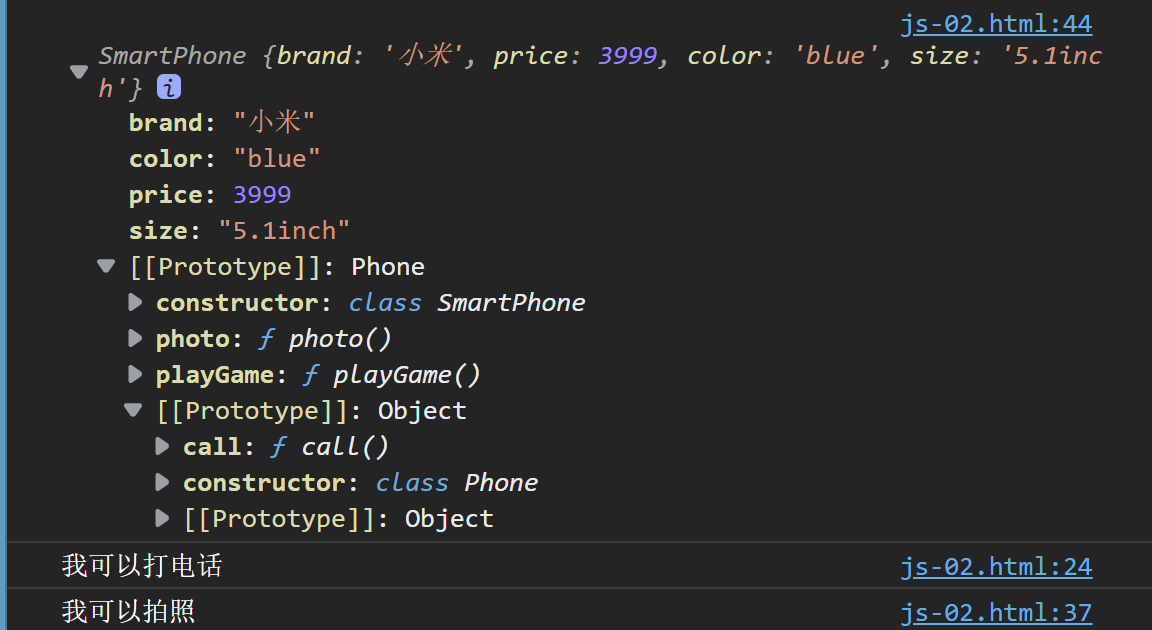
16.4 父类方法可以重写
子类直接在方法里面写父类同名方法就可以实现父类方法的重写,不再赘述。
16.5 getter和setter
    class Phone {

      get price() {
        console.log('价格属性被读取了');
    return '520'
      }
      set price(newVal) {
        console.log('价格属性被修改了');
      }
    }

    let s = new Phone()

    console.log(s.price);
    s.price = 'free'

17. 数值扩展
17.1 Number.EPSILON是JS最小精度
    function equal(a, b) {
      return Math.abs(a - b) < Number.EPSILON ? true : false

    }
    console.log(0.1 + 0.2 === 0.3);//false
    console.log(equal(0.1 + 0.2, 0.3));//true
17.2 进制运算
- 2进制:0b开头
- 8进制:0o开头
- 16进制:0x开头
17.3 其他
- Number.trunc:将数字的小数部分抹掉
- Math.sign 判断一个数是正数(return 1)负数(return -1)还是0(return 0)
18. ES5-ES6对象方法拓展
18.1 Object.is判断两个值是否完全相等,如果是对象的话,必须是同一个引用。
Object.is('foo', 'foo');     // true
Object.is(window, window);   // true

Object.is('foo', 'bar');     // false
Object.is([], []);           // false

var foo = { a: 1 };
var bar = { a: 1 };
Object.is(foo, foo);         // true
Object.is(foo, bar);         // false

Object.is(null, null);       // true

// 特例
Object.is(0, -0);            // false
Object.is(0, +0);            // true
Object.is(-0, -0);           // true
Object.is(NaN, 0/0);         // true
Object.is(NaN,NaN)           // true
18.2 Object.assign 对象的合并
Object.assign(Object1,Object2)
如果属性两个对象存在同名属性,则会用Object2的属性覆盖Object1的属性。不同名的互不覆盖。
18.3 Object.setPrototypeOf设置原型对象
    const school = {
      name: '山东大学'
    }
    const cities = {
      xiaoqu: ['济南', '威海', '青岛']
    }
    // 设置school的原型为cities
    Object.setPrototypeOf(school, cities);
    console.log(school);
    // 获取原型
    console.log(Object.getPrototypeOf(school));

19. 模块化
通过模块化,可以提高项目的复用性,降低维护成本等。
19.1 模块暴露语法汇总
19.1.1 分别暴露
export let school = '山东大学'
export let geli = function(){
    console.log('隔离中')
}
19.1.2 统一暴露
let school = '山东大学'
let geli = function(){
    console.log('隔离中')
}
export {school,geli}
19.1.3 默认暴露(VUE常用)
export default{
    school:'山东大学',
    geli:function(){
        console.log('隔离中')
    }
}
19.2 模块引入语法汇总
19.2.1 通用的导入方式
import * as m1 from "./src/m1.js"
19.2.2 解构赋值的形式
这种形式可以直接使用school和geli这两个变量。
import {school,geli} from "./src/m1.js"
如果有重名的变量,可以使用别名的方式:
import {school,geli} from "./src/m1.js"
import {school as university} from "./src/m2.js"
对于默认暴露,这里引入的是default属性的变量,但是不能直接使用default,必须起一个别名采用如下固定格式:
import {default as m3} from "./src/m3.js"
19.3.3 简便形式(only默认暴露)
只针对默认暴露!!
import m3 from "./src/m3.js"
19.3 入口文件方式
使用入口文件进行引入(app.js),然后在html中引用:
<script src="./../js/app.js" type="module"></script>
20. ES7新特性
20.1 幂运算
console.log(2**10)//1024
21. ES8新特性
21.1 async
会返回一个promise对象,对象的状态取决于return的值:
- 若返回的结果不是一个Promise类型的对象,则async函数返回的promise对象的状态都是resolved.
- 抛出错误的话Promise对象的状态为rejected.
- 若返回的结果是一个Promise类型的对象,取决于返回的Promise对象的状态.
    async function fn() {
      return new Promise((resolve, reject) => {
        // resolve('成功的数据')
        reject('失败的数据')
      })
    }

    const result = fn();
    console.log(result);

如果调用then,则then调用的回调函数取决于Promise的状态.
21.2 await
await必须写在async函数中,其右测表达书一般为primise对象,返回的是promise成功的值,如果promise失败了就会抛出异常,需要通过try…catch处理.
    const p = new Promise((resolve, reject) => {
      // resolve('成功啦!')
      reject('失败啦!')
    })
    async function main() {
      try {
        let result = await p
        console.log(result);
      } catch (e) {
        console.log(e);
      }
    }
    main()
21.3 async await 读取文件
let fs = require('fs')
 function readMd() {
  return new Promise((resolve, reject) => {
    fs.readFile("./../md/ES6.md", (err, data) => {
      if (err) reject(err)
      resolve(data)
    })
  })
}
async function main() {
  let data = await readMd()
  console.log(data.toString());
}
main()
21.4 async,await封装ajax请求
首先用promise对AJAX请求进行封装:
    function sendAJAX(url) {
      let xml = new XMLHttpRequest()
      xml.open('get', url)
      xml.send()
      return new Promise((resolve, reject) => {
        xml.onreadystatechange = function () {
          if (xml.readyState === 4) {
            if (xml.status >= 200 && xml.status < 300) {
              resolve(xml.response)

            } else {
              reject(xml.status)
            }
          }
        }
      })
    }
调用then方法:
    const result=sendAJAX('https://api.apiopen.top/getJoke')
    .then(res=>console.log(res),err=>console.log(err))
或者使用async&await:
    async function main() {
      let result = await sendAJAX("https://api.apiopen.top/getJoke")
      console.log(result);
    }
    main()
都可以打印响应体或者失败的状态码.
22. ES8对象方法拓展
首先创建一个对象:
    const school = {
      name: '山东大学',
      cities: ['济南', '威海', '青岛'],
      xueke: ['理科', '工科', '文科']
    }
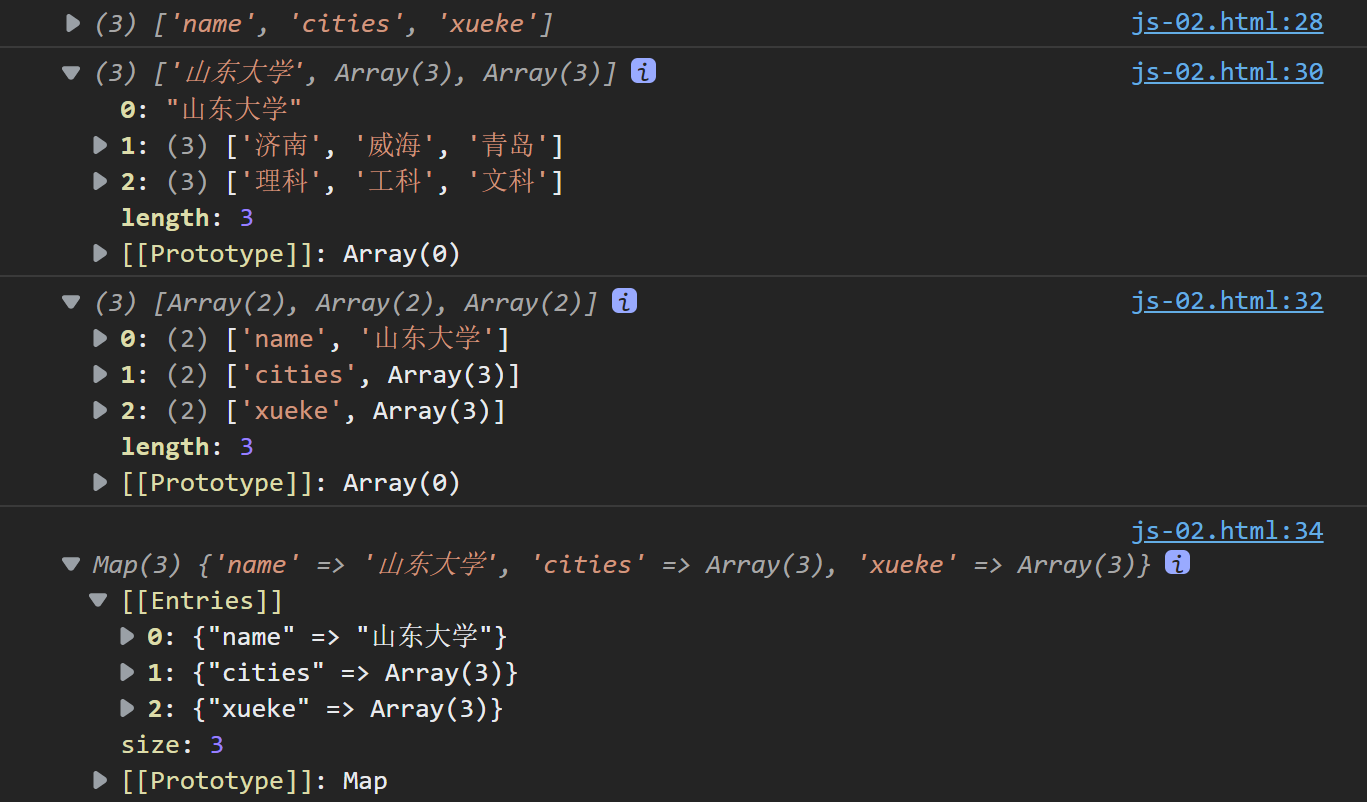
22.1 Object.values()和Object.entries()
应用实例,注意2,3是ES8的新特性
    // 1.获取对象所有的键
    console.log(Object.keys(school));
    // 2.获取对象所有的值
    console.log(Object.values(school));
    // 3.entries:获取键值
    console.log(Object.entries(school));
    // 4.创建map
    console.log(new Map(Object.entries(school)));
打印结果:
22.2 Object.getOwnPropertyDescriptors获取对象属性的描述对象
console.log(Object.getOwnPropertyDescriptors(school));
打印结果:

23. ES9
23.1 rest参数
rest参数可以将函数实参中剩下的参数存到一个对象里,例如
    function connect({ host, port, ...user }) {
      console.log(host);
      console.log(port);
      console.log(user);
    }
    connect({
      host: '127.0.0.1',
      port: 3306,
      username: 'dxy',
      password: '123456'
    })

23.2 扩展运算符
可以实现对象的合并.
    const lifeOne = {
      o: '吃饭'
    }
    const lifeTwo = {
      t: '睡觉'
    }
    const lifeThree = {
      c: '写代码'
    }
    const life = { ...lifeOne, ...lifeTwo, ...lifeThree }
    console.log(life);
    // {o: '吃饭', t: '睡觉', c: '写代码'}
24. ES10新特性
24.1 Object.fromEntries()
可以将二维数组或Map转换成对象
      // 二维数组,将二维数组转化为对象
    let arr = [['school', '山东大学'], ['compus', '软件学院,微电子学院']]

    const result = Object.fromEntries(arr)
    console.log(result);

    // Map
    const m=new Map()
    m.set('school','山东大学')
    m.set('compus','软件学院,微电子学院')
    console.log(Object.fromEntries(m));

和Object.entries()互为逆运算
    // 二维数组,将二维数组转化为对象
    let arr = [['school', '山东大学'], ['compus', '软件学院,微电子学院']]

    const result = Object.fromEntries(arr)
    console.log(result);

    // 对比Object.entries()
    const arr1 = Object.entries(result)
    console.log(arr1);

24.2 字符串方法 trimStart()和trimEnd()
let str='  iloveyou   '

console.log(str);
// 去掉开头空格
console.log(str.trimStart());
// 去掉结尾空格
console.log(str.trimEnd());
// 去掉所有空格
console.log(str.trim());
24.3 数组方法 flat()和flatMap()
flat()可以将数组从高维转为低维,默认参数是1,即维度-1,如果不是1则需要填写参数,参数为目前维度-目标维度,是一个Number。
map()方法如果返回的是一个高维数组,也可以使用flatMap()将Map()转化成一个低维数组。
24.4. 私有属性
在类的前面加#即可制定这个属性为私有属性,这个属性不能在对象中直接调用,要通过类的方法调用这个对象的私有属性,体现了面向对象的思想。
    class Person {
      name;
      #age;
      #weight;
      constructor(name, age, weight) {
        this.name = name
        this.#age = age
        this.#weight = weight
      }
      get() {
        console.log(this.name);
        console.log(this.#age);
        console.log(this.#weight);
      }
    }
    const girl = new Person('小红', 21, '50kg')
    // 通过类的方法打印才能打印出来
    girl.get()
    // console.log(girl.#age);
    // Uncaught SyntaxError: Private field '#age' must be declared in an enclosing class
24.5 Promise.Allsettled()方法
可以一次接收多个Promise对象(用数组排列),无论每一个Promise结果如何,其返回的Promise总是resolved,和all不一样,all只在每一个Promise都为resolved时候返回的才是才是resolve。
24.6 可选链操作符
可以用?.代替&&进行链式判断,举一个传参的例子,如果我们行要访问对象的某个参数,首先需要检验它在不在,如果不在会返回undefined,不会报错:
    function main(config) {
      //相当于 const dbHost = config && config.db && config.db.host;
      const dbHost = config?.db?.host;
      console.log(dbHost);
    }
    main({
      db: {
        host: '192.127.1.100',
        username: 'root'
      },
      cache: {
        host: '192.127.1.200',
        username: 'admin'
      }
    })
    //192.127.1.100
24.7 动态引入
使用import()动态引入另一个模块,返回的是一个promise对象,只需要调用这个对象的方法即可。
举例:
第一步:在html中引入app.js,添加按钮写id:
<body>
  <button id="btn">点击</button>
  <script src="./../js/app.js" type="module">

  </script>

</body>
第二步:在app.js获取id:
const btn = document.getElementById('btn')
第三步:在btn.js写一个点击事件和方法并暴露出去:
export function hello() {
  alert('Hello')
}
第四步:在app.js动态引入并使用btn.js的函数:
btn.onclick = function () {
  import('./btn.js').then(module => {
    module.hello()
  })
}
点击按钮就会触发alert事件:

24.8 BigInt类型
用处不多,主要注意声明的时候在数字后面加n就会检测出是bigint类型了,而且两个BigInt不能喝Number运算,只能和BigInt运算。
2022.5.20 mavon-editor将md文本转化成html
项目场景
通过markwodn编辑器mavon-editor获取用户输入内容,并用md格式(其实是html)渲染到其他页面上.
原理
mavon-editor可以将我们输入的文本实时地转化成html并进行渲染,我们通过@change方法拿到编辑文本的html,在其他地方进行渲染成md格式的效果
方法
1.下载,引入marvon-editor
gitee:
https://gitee.com/dsnull/mavonEditor/
下载:
npm install mavon-editor --save
引入:
全局引入,在main.js中:
  import Vue from 'vue'
    import mavonEditor from 'mavon-editor'
    import 'mavon-editor/dist/css/index.css'
    // use
    Vue.use(mavonEditor)
    new Vue({
       router,
    store,
    render: h => h(App)
}).$mount('#app')
2.使用mavon-editor把md文本转换成html
HTML:
<mavon-editor v-model="text" @change="changeData"/>
js:
  export default{
      data() {
        return {
          text: "",
          render:""
        }
      },
      methods: {
        changeData(value, render) {
        	// value中是文本值,render是渲染出的html文本
          this.render = render;
        },
        onSubmit(){
        this.$ajax({
          method: 'POST',
          url: "http://localhost:3000/question",
          // 发送请求,存到数据库里,这里使用jsonserver模拟后端
          data: {
          	//this.text就是changeData方法里的value
          	text:this.text
          	//this.render是渲染后的数据,是changeData方法里的render
            render: this.render,
          }
          // eslint-disable-next-line no-unused-vars
        }).then((res) => {
          this.$message({
            message: '提交成功',
            type: 'success'
          })
		}
      }
    }
可以看到这里text是原文本,render是渲染后的html文本,我们用它去渲染md.

3.用html文本进行渲染
前端获取html文本之后就可以再次使用mavon-editor进行渲染了
<article v-html="this.render" />
效果
编辑框:

article:
2022.5.30 通过设置代理解决跨域问题
vue.config.js:
module.exports = {
  devServer: {
    host: "0.0.0.0",
    port: 8080, //Vue运行的端口号
    https: false,
    open: true,
    // 配置多个代理
    proxy: {
      "/api": {
        target: "http://1111:8080", //服务器域名( + 端口号)
        ws: true,//开启websocket,根据情况而定
        changeOrigin: true, //是否需要改变浏览器访问域名
        pathRewrite: {
          "^/api": "",//意为:写成/api开头的才进行替换
        },
      },

    },
  },
};
创建config/http.js 文件,进行axios自定义封装
import axios from "axios";

// 请求拦截器
axios.interceptors.request.use(
  (config) => {
    // 添加全局请求头(token)的操作
    // config.headers['token'] = ...
    return config;
  },
  (error) => {
    return Promise.reject(error);
  }
);

// 响应拦截器
axios.interceptors.response.use(
  (response) => {
    // 数据拿到之后,数据预处理
    // 对某些特定的返回格式的数据进行提取加工
    return response.data;
  },
  (error) => {
    return Promise.reject(error.response);
  }
);
function successfun(res) {
  if (res.code === 200) {
    // 请求成功后,code为200的情况,数据也可以在这里进一步处理
    return res;
  } else {
    // 虽然请求成功,但code不为200的情况的处理
    return res;
  }
}
function errorfun(res) {
  // 请求失败的响应返回数据自定义
  if (res.code !== 200) {
    // return {message:'访问失败了!'}
    return res;
  }
}
export default {
  /**
   *
   * @param {*} localhost vue.config.js 跨域设置中的域名代理
   * @param {*} url 域名后的url路径部分
   * @param {*} data POST请求的携带数据
   * @param {*} params GET请求的携带数据
   * @returns
   */
  post(localhost,url, data) {
    //post请求
    return axios({
      method: "post",
      baseURL: localhost,
      url,
      data: data,
      withCredentials: true,
      timeout: 5000, //响应时间
    }).then(
      (res) => {
        return successfun(res);
      },
      (err) => {
        return errorfun(err);
      }
    );
  },
  get(localhost,url, params) {
    //get请求
    return axios({
      method: "get",
      baseURL: localhost,
      url,
      params,
      withCredentials: true,
      timeout: 5000,
    }).then(
      (res) => {
        return successfun(res);
      },
      (err) => {
        return errorfun(err);
      }
    );
  },
};
使用:
<script>
// 引入自定义封装的http请求
import http from '../config/http'

export default {
  name: 'App',
  methods:{
    request(){
      http.get('/api','/history/',{
       // 访问令牌或者其他token
      }).then( res => {
        console.log(res);
      })
    }

  }
}
</script>
2022.6.1 前端分页
注意事项:分页table并不是本来就绑定的,需要对数据进行处理
element的分页组件和表格组件并不是绑定的,所以如果前端分页的话,分页组件只能控制点击时显示哪部分数据,因此table也只能绑定显示的数据而不是所有数据.
实现:
html:
 <el-table
            :header-cell-style="{background:'#DFECF0',color:'#000'}"
            :cell-style="cellStyle"
            size="small"
            :data="dataShow"
            style="width: 100%">
            <!--若干el-table-column...-->
            <!--注意绑定的是dataShow就可以了-->
</el-table>


<el-pagination
            :page-size="pageSize"
            @current-change="handleCurrentChange"
            :current-page.sync="currentPage"
            layout="prev, pager, next"
            :total="totalAPI">
        </el-pagination>
js:
export default{
data(){
return{
 // 分页数据
      totalPageData: [],
      pageSize: 5,
      pageNum: 1,
      currentPage: 1,
      totalAPI: 1,
	  tableData: [],
      dataShow: [],}
}
method:{
 handleCurrentChange(currentPage) {
      this.currentPage = currentPage;
      this.dataShow = this.totalPageData[currentPage - 1]
      // console.log(this.currentPage)  //点击第几页
    },
 calcPageData() {
      if (this.tableData.length > 1) {
        this.pageNum = Math.ceil(this.totalAPI / this.pageSize) || 1
      }
      for (let i = 0; i < this.pageNum; i++) {
        this.totalPageData[i] = this.tableData.slice(this.pageSize * i, this.pageSize * (i + 1))

      }
      this.dataShow = this.totalPageData[this.currentPage - 1]
    },
  getAPITokenList() {
      this.tableData.length = 0
      let _this = this
      http.get('/proxyName',
          _this.GLOBAL.User + '/token_list/',
          {},
          {"Authorization": "Bearer " + sessionStorage.getItem('tk')})
          .then(res => {
            if (res.code === 200) {
              let length = res.data.length
              _this.totalAPI = length
              for (let i = 0; i < length; i++) {
                var Data = {}
                Data.tokenID = res.data[i].token_id
                Data.tokenLabel = res.data[i].label
                Data.date = res.data[i].create_time
                Data.overTime = res.data[i].overtime
                Data.whiteList = (res.data[i].ip_white).toString()
                _this.tableData.push(Data)
              }
              this.calcPageData()
            } else {
              this.$message({
                type: 'error',
                message: _this.$t('customerCenter.fail_get_tokenList')
              });
            }
            console.log(res)

          })
    },}
}