初学Vue
路由
1、简介
1.1 单页面应用SPA
SPA(single page web application),单页面应用。
简单来说就是整个应用只有一个完整的页面,当点击页面中某个内容时,浏览器不会另外打开一个新页面来显示,而是直接在当前页面把内容显示出来,或者说是让当前页面做个局部更新。
1.2 路由概念
1.2.1 简述
我们先学两个单词:router(路由器),route(路由)
一个路由器可以管理多个路由,一个路由route就是一种key-value的对应关系。这里的key就代表路由器上一个网线接口,value值就代表一台服务器。

编程中的路由也还是key-value这样的对应关系,不过此时key代表一个地址,value是一个组件component或者function。通过key值,来显示key所对应的value的内容。
例如:拿vuex官网举例,都是SPA单页面应用,如下
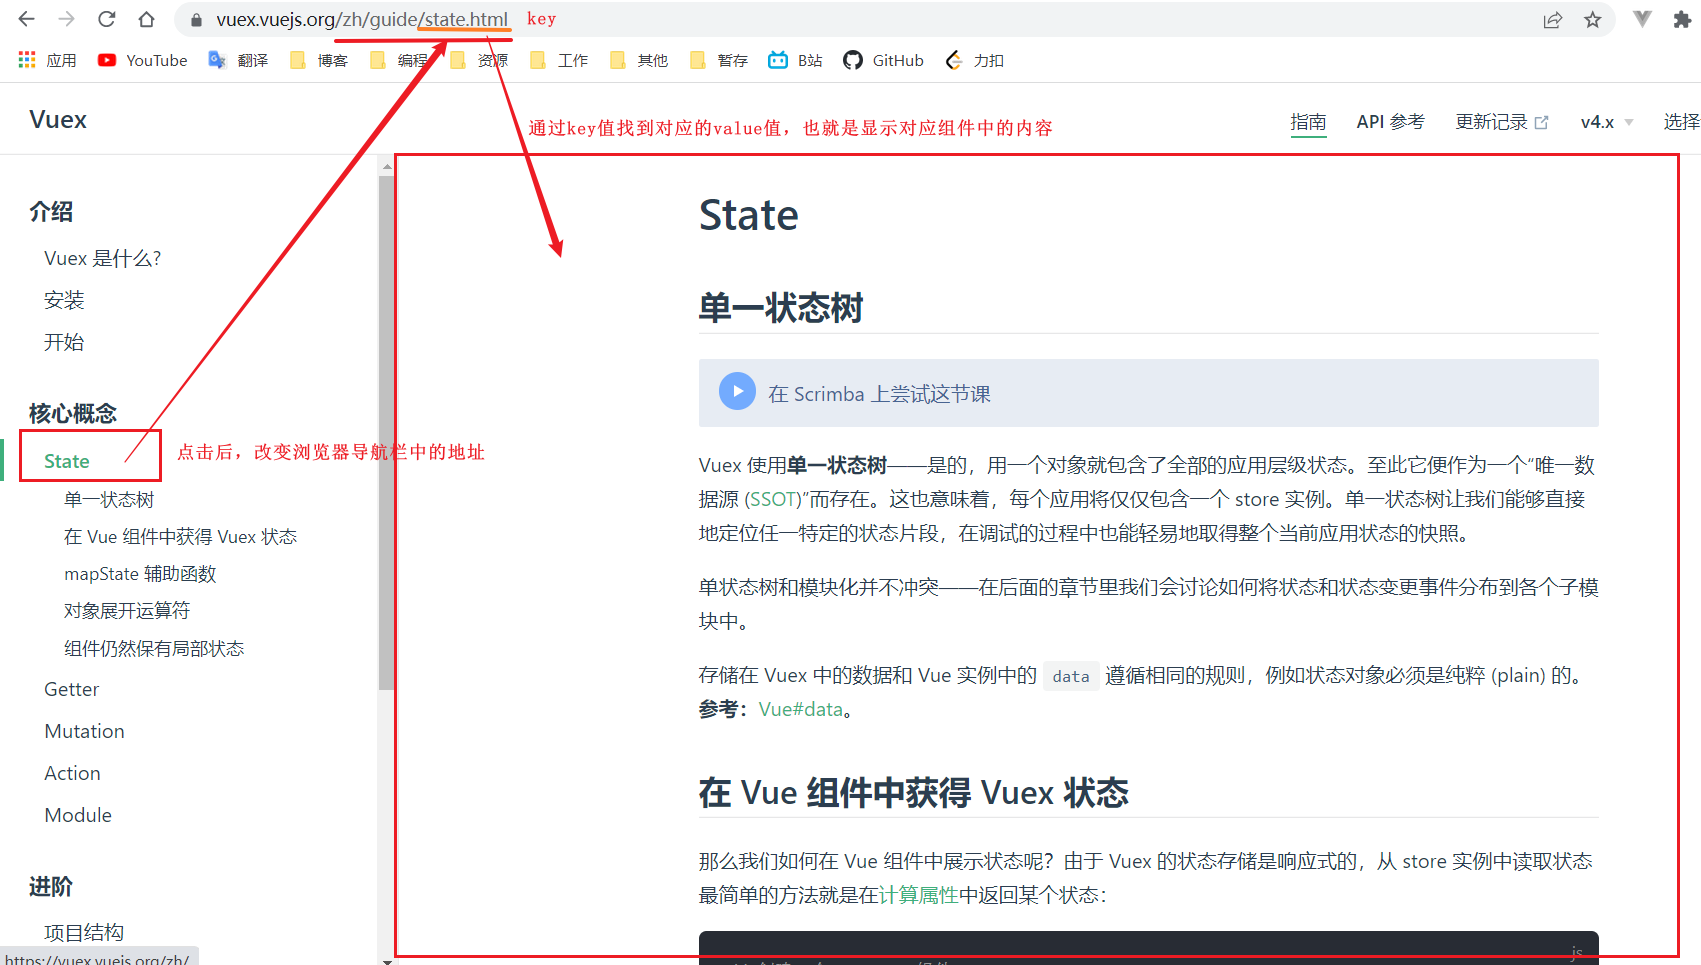
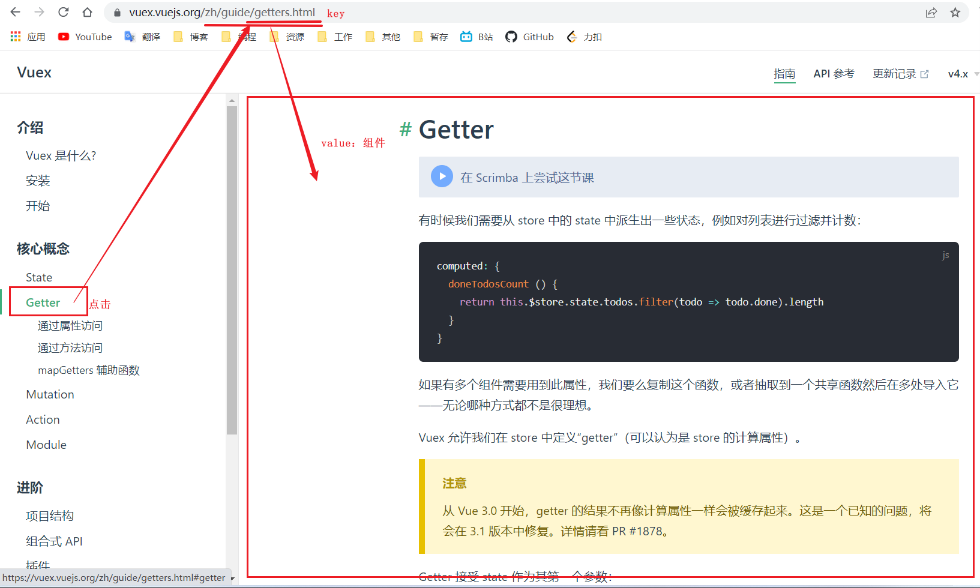
可以看到,当点击网页导航栏中的链接时,浏览器导航栏中的地址就会发生改变(注意此时页面并没有进行刷新),因为地址发生改变,所以页面产生局部更新,这个过程就是由路由实现的(监视地址,局部更新页面)
1.2.2 路由分类
- 后端路由:
- 1) value是function,用于处理客户端提交的请求
- 2)工作过程:服务器接收到一个请求时,根据请求路径找到匹配的函数来处理请求,返回响应数据
- 后端路由:
- value是组件component,用于展示页面内容
- 工作过程:当浏览器的路径改变时,对应的组件就会显示
1.2.3 关于vue-router
是vue的一个插件库,专门用来实现SPA应用
2、路由的基本使用
- 安装路由vue-router:
npm i vue-router。
需要注意的是,如果用的vue2,那么路由安装版3,如果用的vue3,那么路由安装版4 - 在入口文件main.js中导入路由:
import VueRouter from 'vue-router',并应用路由插件:Vue.use(VueRouter) - 在src/pages目录下创建路由组件Route1.vue、Route2.vue…,将两个结构相似的组件间不同的内容放到组件的template标签中,用于切换时展示不同的内容。
- 创建一个管理路由的js文件,目录src/router/route.js
,编写router配置项
// 引入vue-router
import VueRouter from 'vue-router'
// 引入路由组件
import Route1 from '../pages/Route1.vue'
import Route2 from '../pages/Route2.vue'

// 创建router实例对象,去管理一组一组的路由规则
const router = new VueRouter({
	routes:[
		{
			path:'/route1', // key值,组件在浏览器导航栏中的地址
			component:Route1 // value值,组件名称
		},
		{
			path:'/route2',
			component:Route2
		}
	]
})
- 在main.js入口文件中引入路由器,并配置路由器
main.js
// 引入路由器
import router from './router/route.js'

// 配置路由器
new Vue({
  render: h => h(App),
  router:router // 配置
}).$mount('#app')
- 路由组件的切换
点击就可切换要显示的组件
<router-link to='/route1'>Route1</router-link>
<router-link to='/route2'>Route2</router-link>
to='/route1’是浏览器导航栏中要输入的地址
- 指定组件展示到页面中的位置
<router-view></router-view>
实例展示:
-
实现如下效果:
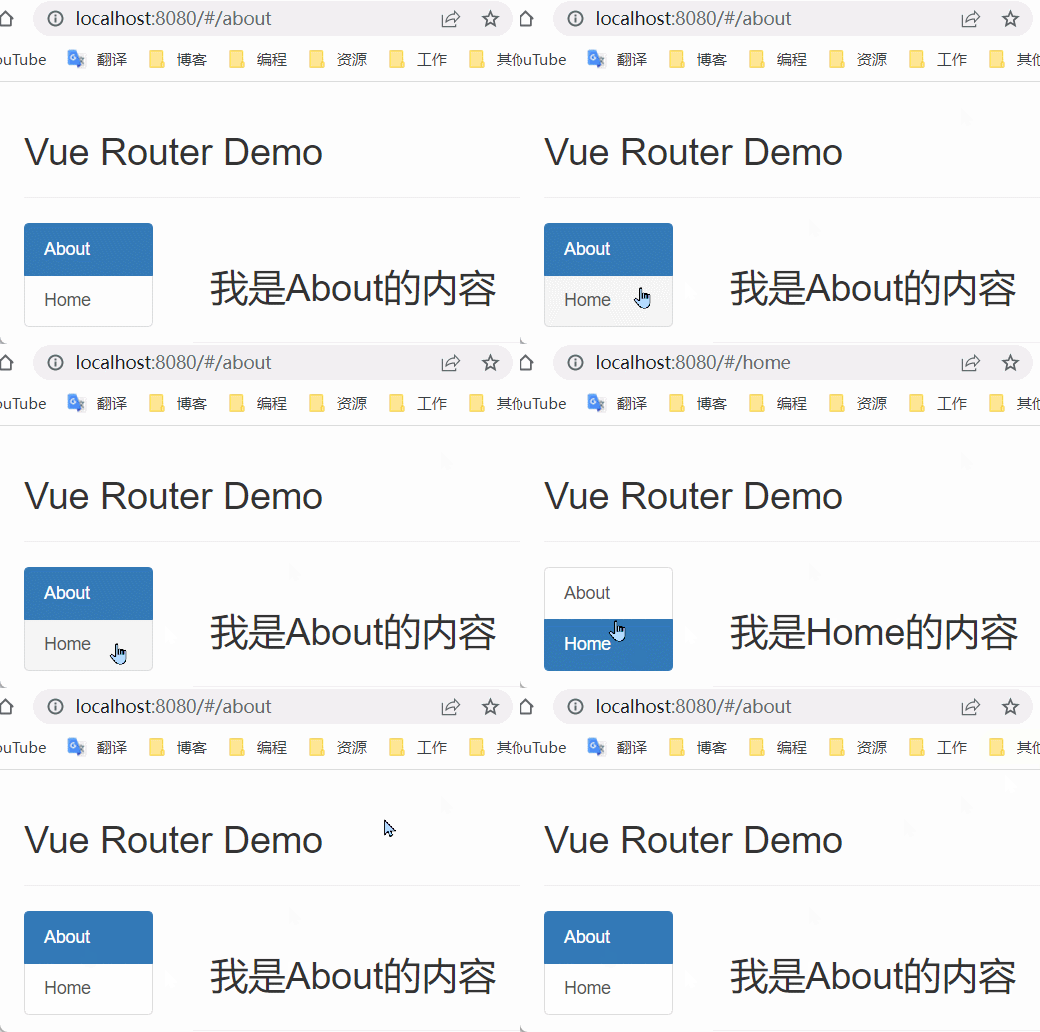
可以看到,并这里不是切换到了另一个页面,而是对当前页面进行局部更新。 -
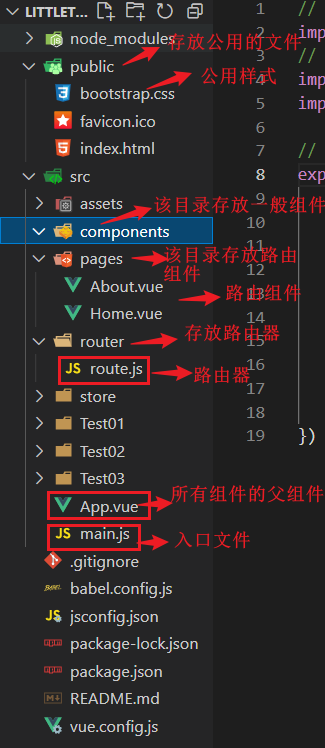
目录展示
- 具体代码
public/index.js
<!DOCTYPE html>
<html lang="">
  <head>
    <meta charset="utf-8">
    <meta http-equiv="X-UA-Compatible" content="IE=edge">
    <meta name="viewport" content="width=device-width,initial-scale=1.0">
    <link rel="icon" href="<%= BASE_URL %>favicon.ico">
    <!-- 引入bootstrap.css样式 -->
    <link rel="stylesheet" href="<%= BASE_URL %>bootstrap.css">
    <title><%= htmlWebpackPlugin.options.title %></title>
  </head>
  <body>
    <noscript>
      <strong>We're sorry but <%= htmlWebpackPlugin.options.title %> doesn't work properly without JavaScript enabled. Please enable it to continue.</strong>
    </noscript>
    <div id="app"></div>
    <!-- built files will be auto injected -->
  </body>
</html>
src/main.js
// 引入vue
import Vue from 'vue'
// 引入App
import App from './App.vue'
// 导入vue-router
import VueRouter from 'vue-router'
// 引入路由器
import router from './router/route.js'

Vue.config.productionTip = false

// 应用VueRouter路由
Vue.use(VueRouter)

new Vue({
  render: h => h(App),
  router:router // 配置
}).$mount('#app')
路由组件
src/pages/About.vue
<template>
  <div>
      <h2>我是About的内容</h2>
  </div>
</template>

<script>
    export default {
        name:'About'
    }
</script>
<style></style>
src/pages/Home.vue
<template>
  <div>
      <h2>我是Home的内容</h2>
  </div>
</template>

<script>
    export default {
        name:'Home'
    };
</script>

<style></style>
路由器
src/router/route.js
// 该文件专门用于创建整个应用的路由器
import VueRouter from 'vue-router'
// 引入组件
import About from '../pages/About.vue'
import Home from '../pages/Home.vue'

// 创建一个路由器并暴露
export default new VueRouter({
    routes:[
        {
            path:'/home',
            component:Home
        },
        {
            path:'/about',
            component:About
        }
    ]
})
src/App.vue
<template>
  <div>
    <div>
      <div class="row">
        <div class="col-xs-offset-2 col-xs-8">
          <div class="page-header"><h2>Vue Router Demo</h2></div>
        </div>
      </div>
      <div class="row">
        <div class="col-xs-2 col-xs-offset-2">
          <div class="list-group">
            <!-- 导航栏部分,选择一个点击时,会显示对应的组件,to属性指定要显示的组件的path,这个path在路由中配置过了 -->
            <router-link class="list-group-item" active-class="active" to="/about">About</router-link>
            <!--active-classs='active'用于当导航栏点击时高亮显示-->
            <router-link class="list-group-item" active-class="active" to="/home">Home</router-link>
          </div>
        </div>
        <div class="col-xs-6">
          <div class="panel">
            <div class="panel-body">
              <!-- 此处根据用户点击的导航项显示对应的组件 -->
              <!-- router-view 标签指定组件呈现的位置 -->
              <router-view></router-view>
            </div>
          </div>
        </div>
      </div>
    </div>
  </div>
</template>

<script>
export default {
  name: "App",
};
</script>

<style>
</style>
(1)这里通过点击导航栏切换组件的过程中,并没有引起任何的网络请求
(2)一般的组件只需要通过components配置项进行配置,而这里的路由组件需要通过路由器(route.js)进行管理,通过router-link和router-view标签进行使用
(3)在路由组件的切换过程中,被切换掉的组件直接被销毁了,通过在路由组件中使用钩子beforeDestroy(){console.log(“被销毁了”)}可以证明。被切换上的路由组件就会被挂载上,挂载上就会被展示。
3、$route和 $router
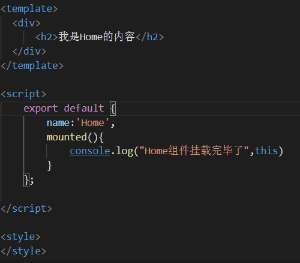
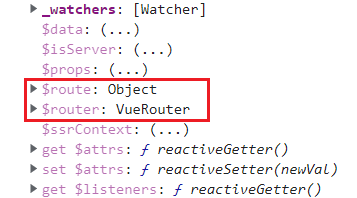
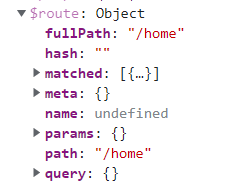
$route存储了路由组件的配置信息,每个路由组件都有一个$route。
$router一个应用仅此一个,用来所有管理路由规则的。

4、嵌套(多级)路由
简单来说就是路由中嵌套了其他路由,如下:
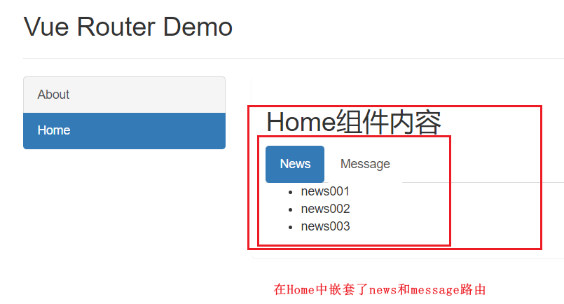
主要代码就是在路由器文件route.js中添加一个配置项children,表示嵌套子级路由,如下:
src/router/route.js
// 该文件专门用于创建整个应用的路由器
import VueRouter from 'vue-router'
// 引入组件
import About from '../pages/About.vue'
import Home from '../pages/Home.vue'
import News from '../pages/News.vue'
import Message from '../pages/Message.vue'

// 创建一个路由器并暴露
export default new VueRouter({
    routes:[
        // 一级路由
        {
            path:'/about',
            component:About
        },
        {
            path:'/home',
            component:Home,
            // 子级路由
            children:[
                {
                    path:'news',
                    component:News,
                },
                {
                    path:'message',
                    component:Message
                }
            ]
        },
    ]
})
5、路由传参
$route下由如下属性
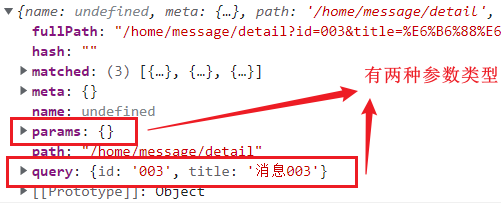
5.1 query参数
query参数的数据会直接在浏览器导航栏中显示

- 传参:
第一种方式:跳转路由并携带query参数的传参方式,to的字符串写法(包裹在模板字符串中)
<ul>
   <li v-for="m in messageList" :key="m.id">
     <!-- 第一种方式:跳转路由并携带query参数的传参方式,to的字符串写法 -->
     <router-link
     :to="`/home/message/detail?id=${m.id}&title=${m.title}`">
     {{m.title}}
     </router-link>
   </li>
 </ul>
:to中是一个字符串
通过模板字符串将数据传入过去
第二种方式:跳转路由并携带query参数,to的对象写法
<ul>
   <li v-for="m in messageList" :key="m.id">
     <!-- 第二种方式:跳转路由并携带query参数,to的对象写法 -->
     <router-link :to="{
         path:'/home/message/detail',
         query:{
             id:m.id,
             title:m.title
         }
     }">{{m.title}}</router-link>
   </li>
 </ul>
:to中是一个对象
path:‘xxx’,数据传送的对象(组件),(要将数据传送给哪个组件)
query:{xxx},传送的数据,以对象方式传送过去
- 接收参数:
$route.query.xxx接收对应的参数
<ul>
    <!-- 接收参数:$route.query.xxx -->
    <li>消息编号:{{$route.query.id}}</li>
    <li>消息标题:{{$route.query.title}}</li>
</ul>
- 路由命名:简化路由跳转
1、给路由命名{ path:'/demo', component:[ { path:'test', component:Test, children:[ { name:'hello' ,// 给路由命名 path:'welcome', component:Hello, } ] } ] }2、简化跳转
<!--不给路由命名时,需要写完整的路径-->
<router-link :to="/demo/test/welcome">跳转</router-link>

<!--简写后:直接通过名字跳转-->
<router-link :to="{name:'hello'}">跳转</router-link>

<!--通过路由名字跳转并传query参数-->
<router-link
	:to="{
		name:'hello',
		query:{
			id:666,
			title:'你好'
		}
}">跳转</router-link>
5.2 params参数
params传递参数的形式和query相似,但还是有区别
- params要重新配置一下路由,声明接收params参数
{
	path:'/home',
	comonent:Home,
	children:[
		{
			path:'news',
			conponent:news
		},
		{
			component:Message,
			children:[
				{
					name:'xiangqing',
					path:'detail/:id/:titel',// 使用占位符声明接收params参数
					component:Detail
				}
			}
		}
	]
}
- 传递参数
第一种方式:跳转并携带params参数,to的字符串写法
<li v-for="m in messageList" :key="m.id">
	<!--第一种方式:跳转并携带params参数,to的字符串写法-->
	<router-link :to="`/home/message/detail/${m.id}/${m.title}`"}>跳转</router-link>
</li>
第二种方式:跳转路由并携带params参数,to的对象写法
<!--第二种方式:跳转并携带params参数,to的对象写法-->

<li v-for="m in messageList" :key="m.id">
	<!--第二种方式:跳转并携带params参数,to的对象写法-->
	<router-link :to="{
            name:'xijie',
            params:{
                id:m.id,
                title:m.title
            }
        }">{{m.title}}</router-link>
</li>
需要注意的是,params方式传参在:to的对象写法中,不能使用path配置项,必须使用命名路由的name配置。
- 接收参数
$route.params.xxx接收参数
<ul>
    <!-- 接收参数:$route.params.xxx -->
    <li>消息编号:{{$route.params.id}}</li>
    <li>消息标题:{{$route.params.title}}</li>
</ul>
6、路由的props配置项
作用:让路由组件更加方便的接收到参数
- 传送数据
src/router/route.js
{
	name:'xiangqing',
	path:'deatil/:id',
	component:Detail,

	// 写法一:
	// 值为对象,该对象中的所有key-value都会以props的形式传给目标组件
	// 缺点是:key-value的值是固定的
	/*
	props:{id:002,title:'hello'}
	*/

	// 写法二:
	// props值为布尔值,布尔值为true,则把路由接收到的所有params且只能是params以props的形式传给目标组件
	// 缺点:有限制,只能传params,不能传query)
	/*
	props:true
	*/

	// 写法三:(推荐)
	// props值为函数,该函数返回的对象中每一组key-value都会通过props传给目标组件
	props(route){
		return {
			id:route.query.id,
			title:route.query.title
		}
	}
}
- 接收数据
// 组件中使用props接收
props:['id','title']
7、router-link的replace与push属性
- 功能:
控制路由跳转时操作浏览器历史记录的模式 - 浏览器的历史记录有两种写入方式:分别是push和replace,push是追加历史记录,replace是替换当前记录,路由跳转时候默认为push
- 开启replace模式:
<router-link replace>xxx</router-link>
简单来说就是,push模式下,通过点击浏览器返回上一页的箭头,可以从当前页面返回到上个页面;replace模式下,不能返回上一页面。