项目仓库: https://github.com/chenfenbgin/vue3code
vue3 官网学习地址:https://staging-cn.vuejs.org
一、vue3基础
1、vue3改变
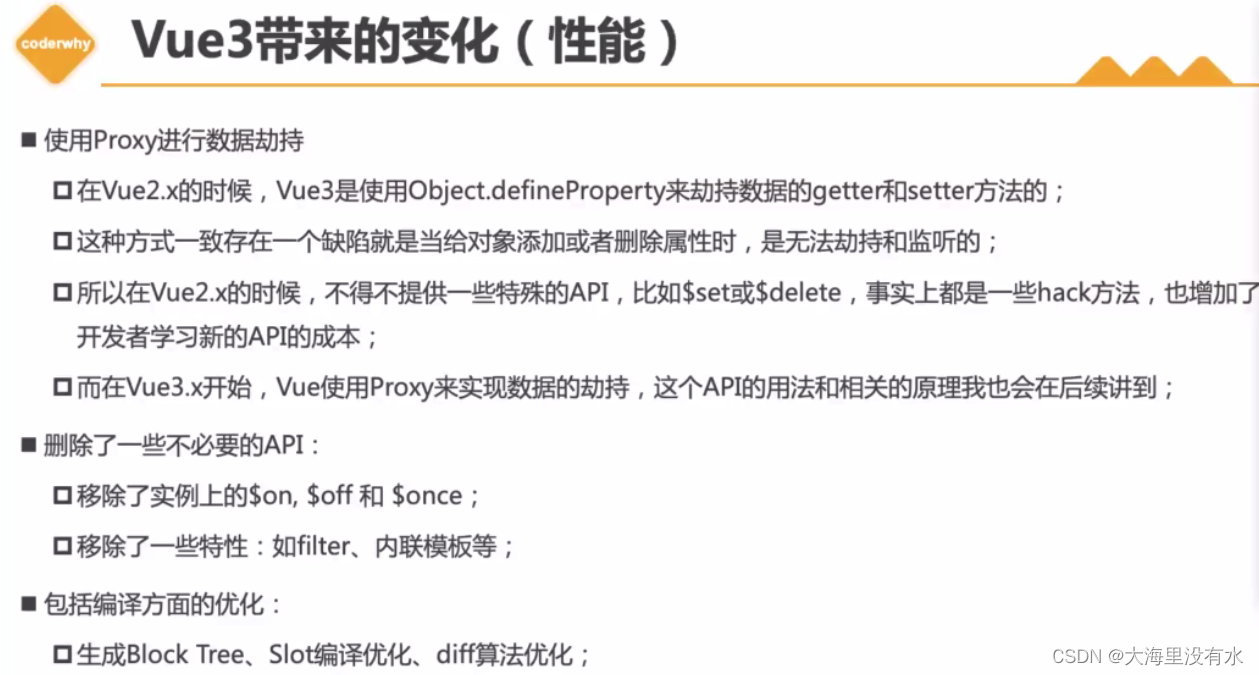
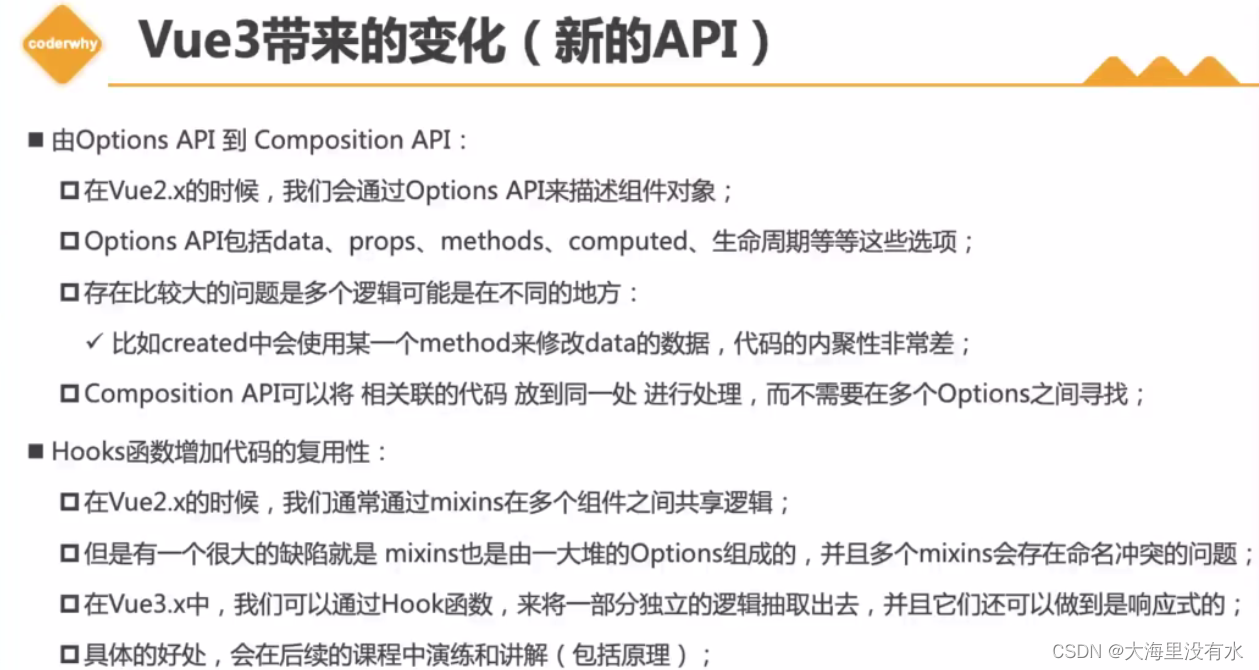
2、vue引入
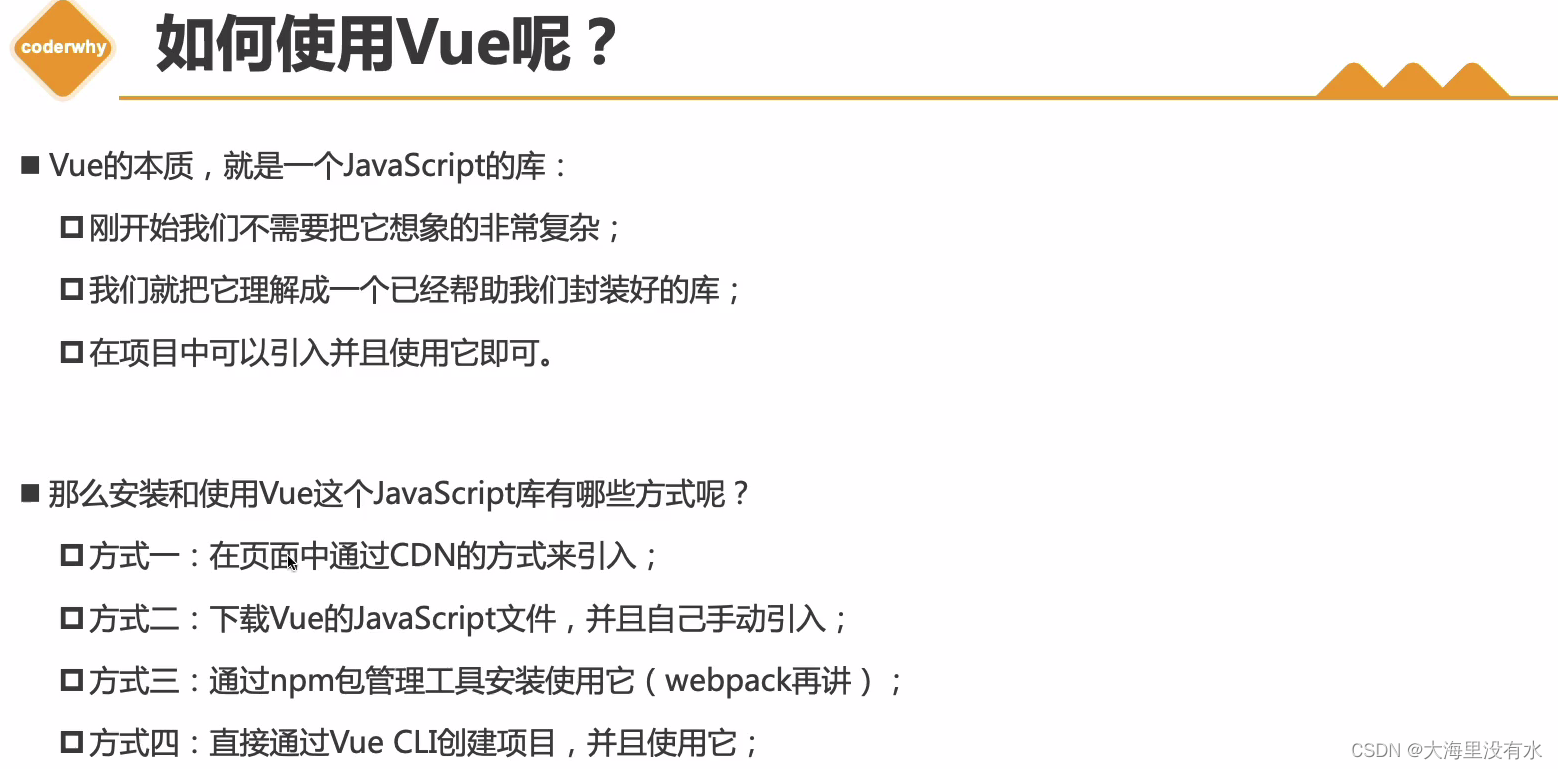
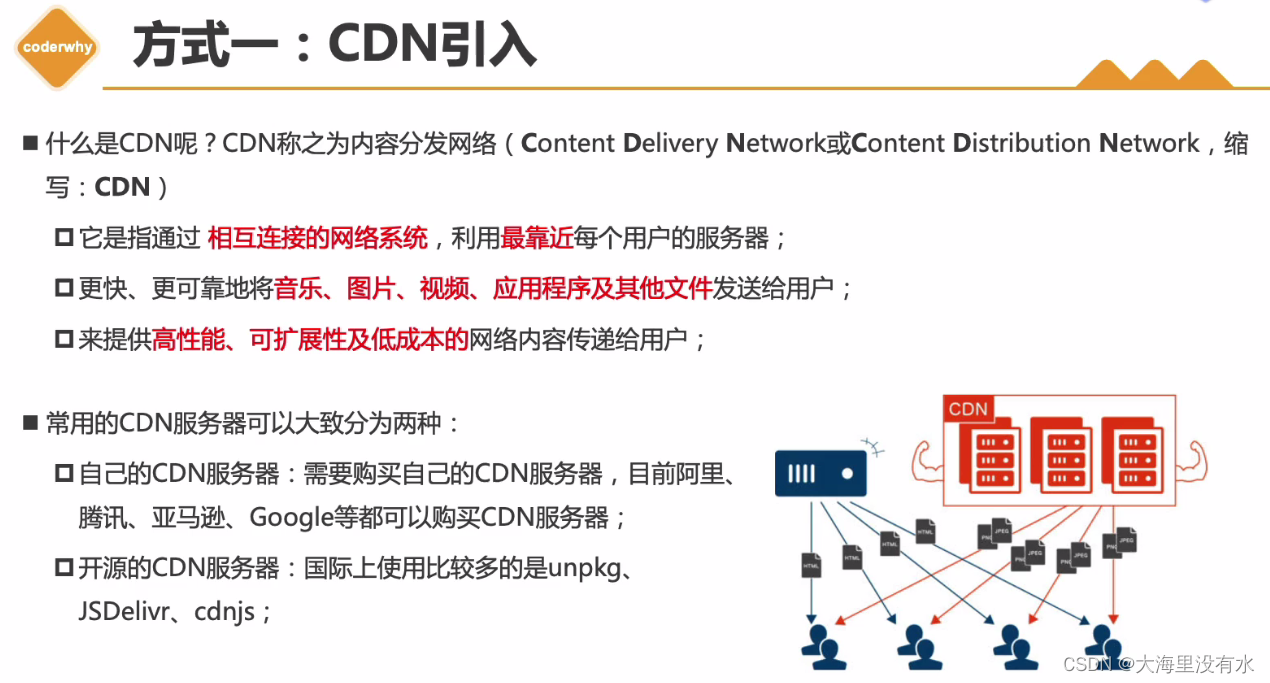
2.1、CDN引入
<!DOCTYPE html>
<html lang="en">
  <head>
    <meta charset="UTF-8" />
    <meta http-equiv="X-UA-Compatible" content="IE=edge" />
    <meta name="viewport" content="width=device-width, initial-scale=1.0" />
    <title>Document</title>
  </head>
  <body>
    <div id="app"></div>

    <!-- 引入vue3源代码 -->
    <script src="https://unpkg.com/vue@3"></script>

    <!-- 使用 -->
    <script>
      const chen = {
        template: "<h2>hello world</h2>",
      };
      const app = Vue.createApp(chen);
      // 挂载,这里不需要我们写document.getxxx,它内部会自己执行的,直接写#app
      app.mount("#app");
    </script>
  </body>
</html>

2.2、下载 - 本地引入

<!DOCTYPE html>
<html lang="en">
  <head>
    <meta charset="UTF-8" />
    <meta http-equiv="X-UA-Compatible" content="IE=edge" />
    <meta name="viewport" content="width=device-width, initial-scale=1.0" />
    <title>Document</title>
  </head>
  <body>
    <div id="app"></div>

    <!-- 引入本地下载的vue。js -->
    <script src="./js/vue.js"></script>
    <script>
      // 不需要返回一个变量在进行挂载,使用链式编程
      Vue.createApp({
        template: "<h2>hello world2</h2",
      }).mount("#app");
    </script>
  </body>
</html>
3、计数器
3.1、原生实现
<!DOCTYPE html>
<html lang="en">
  <head>
    <meta charset="UTF-8" />
    <meta http-equiv="X-UA-Compatible" content="IE=edge" />
    <meta name="viewport" content="width=device-width, initial-scale=1.0" />
    <title>Document</title>
  </head>
  <body>
    <h2 class="counter">0</h2>
    <button class="increment" @click="increment">+1</button>
    <button class="decrement" @click="decrement">-1</button>

    <script>
      //1.获取所有的元素
      const counterEL = document.querySelector(".counter");
      const incrementEL = document.querySelector(".increment");
      const decrementEL = document.querySelector(".decrement");

      //2.定义变量
      let counter = 100;
      counterEL.innerHTML = counter;

      //3.监听按钮的点击
      incrementEL.addEventListener("click", () => {
        counter += 1;
        counterEL.innerHTML = counter;
      });

      decrementEL.addEventListener("click", () => {
        counter -= 1;
        counterEL.innerHTML = counter;
      });
    </script>
  </body>
</html>
3.2、vue实现
<!DOCTYPE html>
<html lang="en">
  <head>
    <meta charset="UTF-8" />
    <meta http-equiv="X-UA-Compatible" content="IE=edge" />
    <meta name="viewport" content="width=device-width, initial-scale=1.0" />
    <title>Document</title>
  </head>

  <body>
    <!-- template属性: 就是我们要渲染的信息,我们看到的html标签,这些标签会替换掉到我们挂载的innerHTML上 -->
    <div id="app">
      <!-- 这里的内容在挂载之前是会被清空的。 -->
      哈哈哈
    </div>

    <!-- <script src="./js/vue.js"></script> -->
    <script src="https://unpkg.com/vue@3"></script>
    <script>
      Vue.createApp({
        template: `
                <div>
                    <h2>{{message}}</h2>
                    <h2>{{counter}}</h2>
                    <button @click="increment">+1</button>
                    <button @click="decrement">-1</button>
                </div>
            `,
        data: function () {
          // 下面的这些属性是可以被加入到响应式中的,并且可以在上面的模板中使用
          return {
            message: "hello world vue.js",
            counter: 100,
          };
        },
        methods: {
          increment() {
            console.log("点击了加1");
            this.counter++;
          },
          decrement() {
            console.log("点击了减1");
            this.counter--;
          },
        },
      }).mount("#app");
    </script>
  </body>
</html>
4、声明式和命令式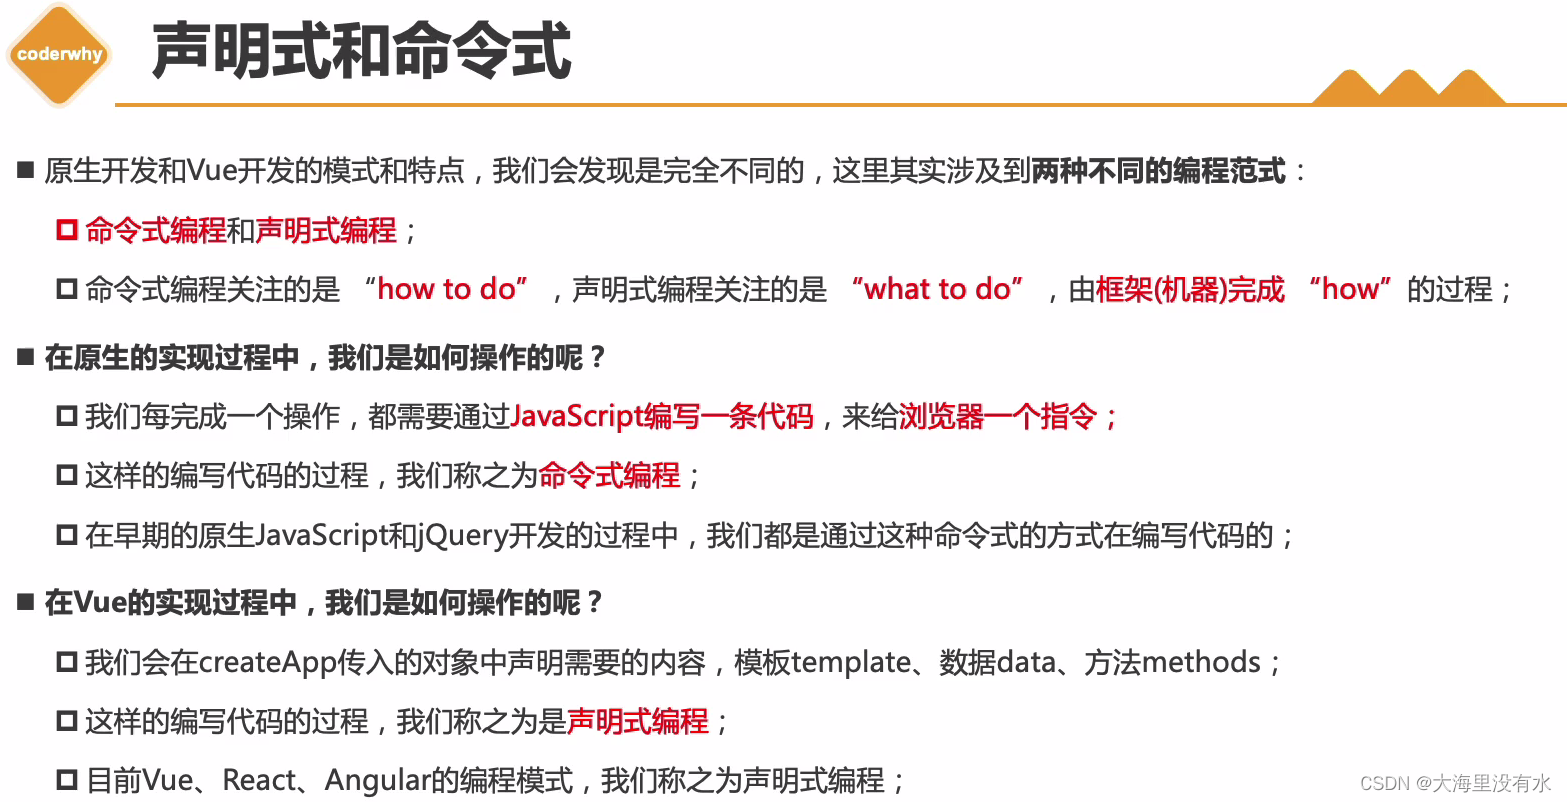
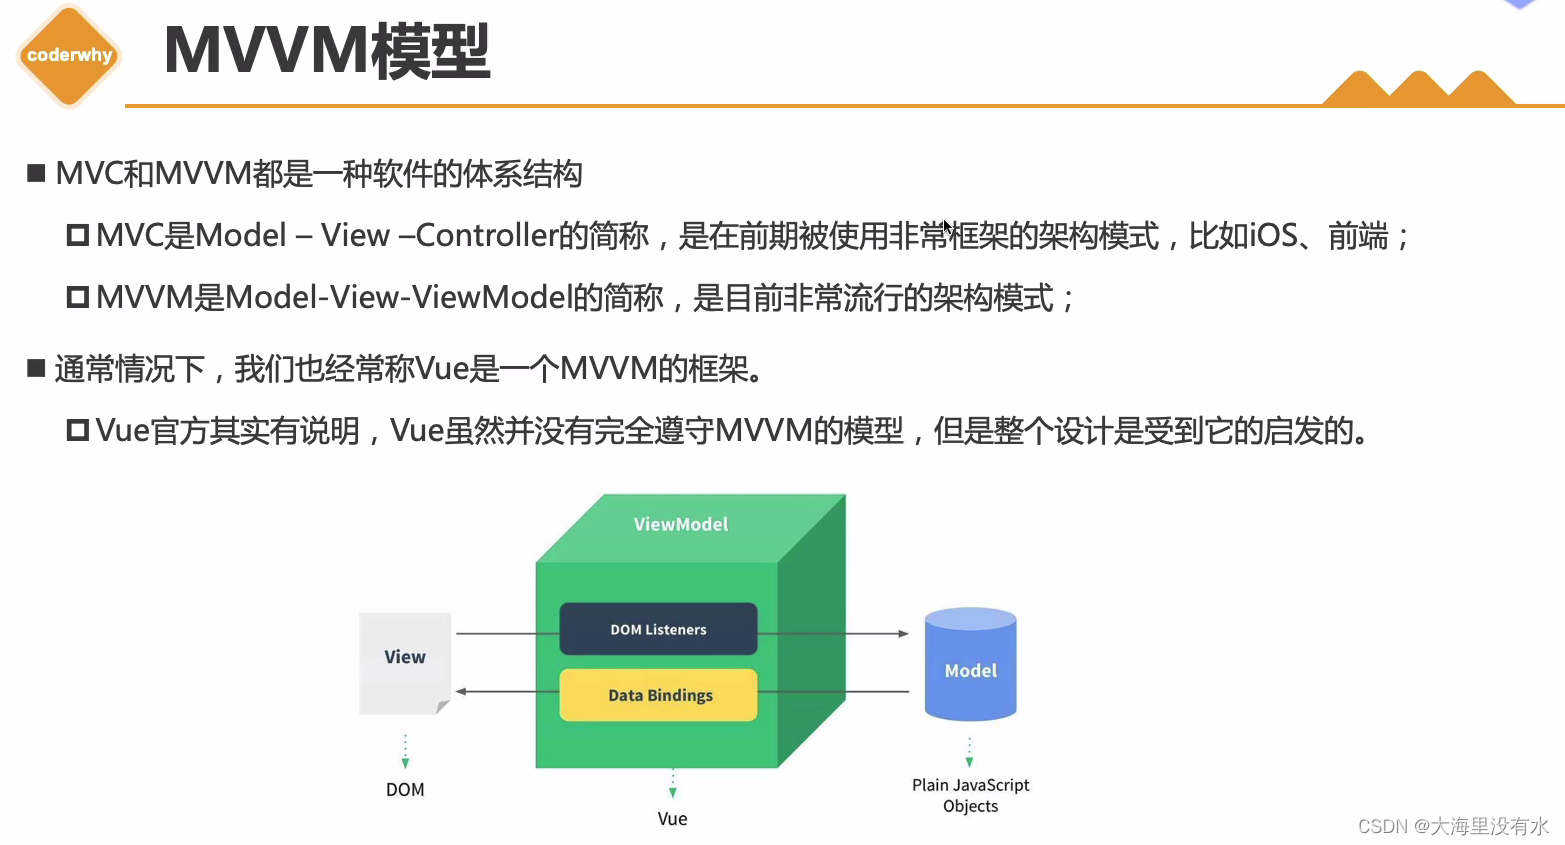
5、MVVM
6、template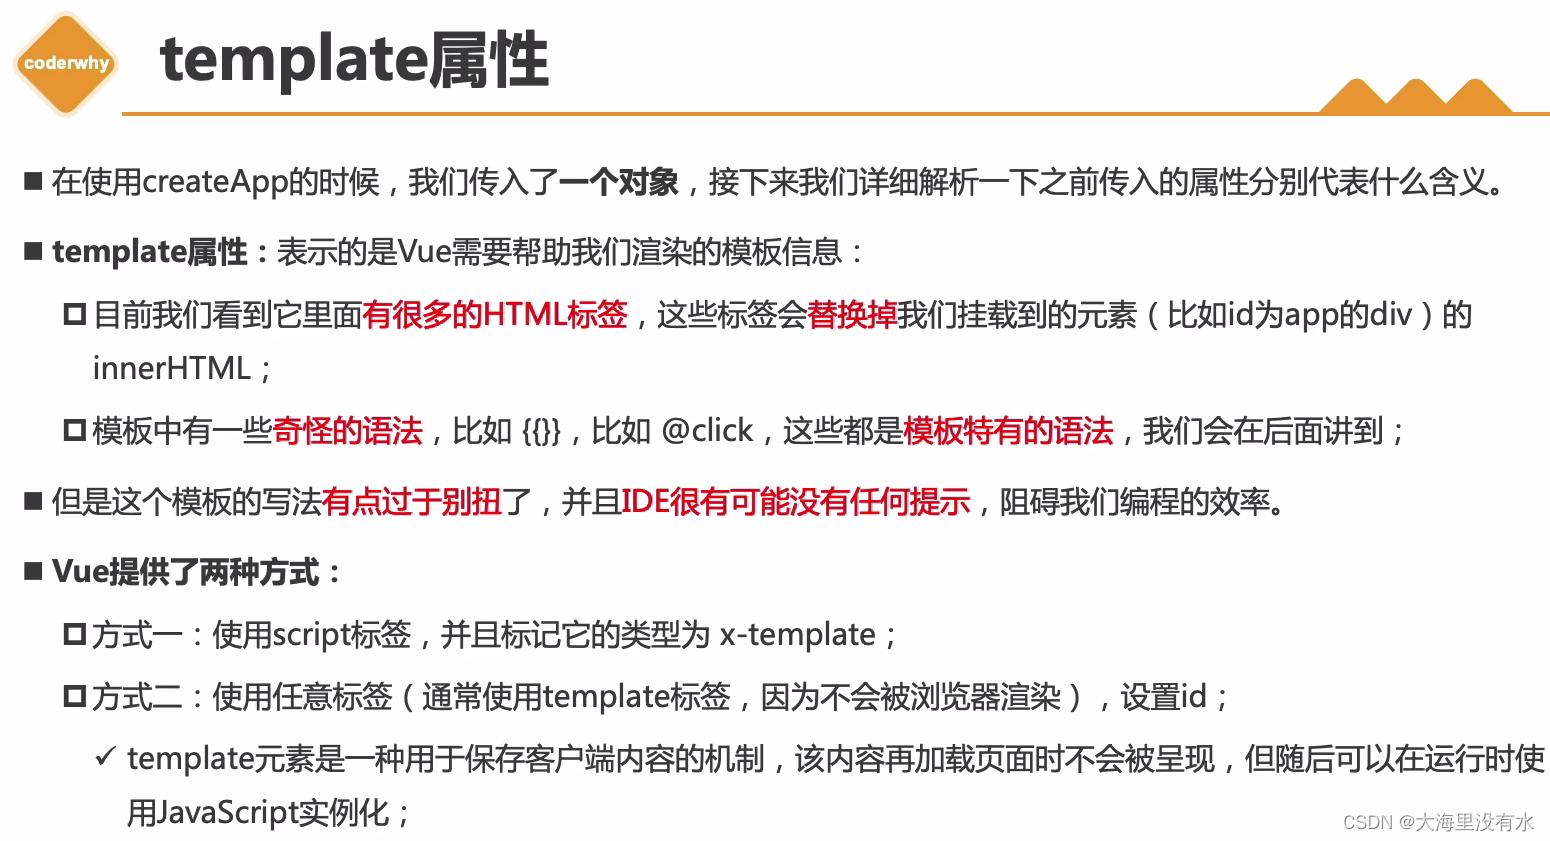
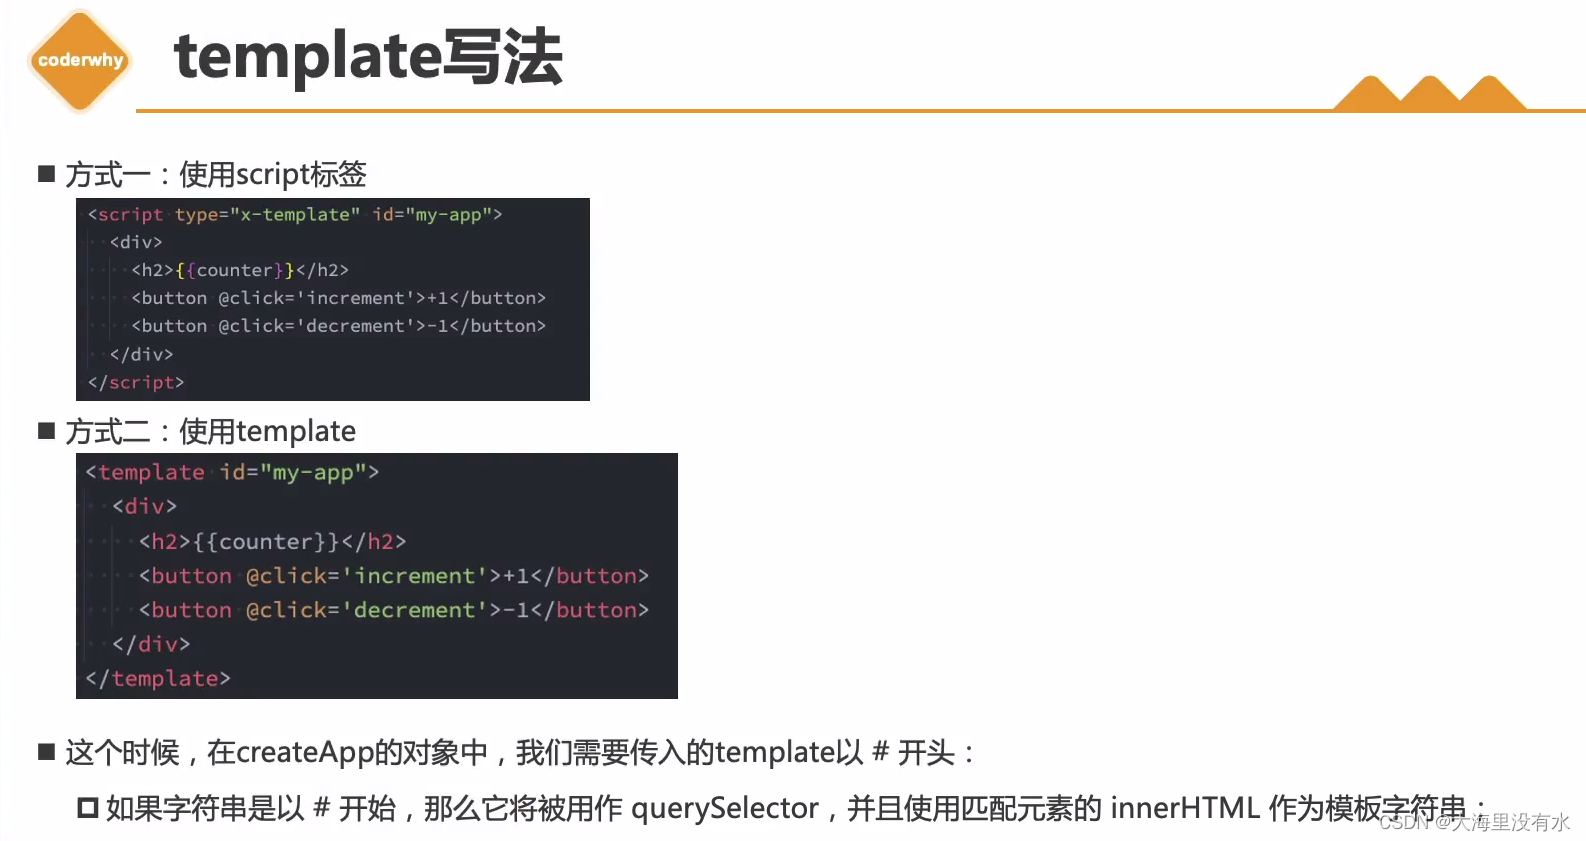
6.1、template写法一:
<!DOCTYPE html>
<html lang="en">
  <head>
    <meta charset="UTF-8" />
    <meta http-equiv="X-UA-Compatible" content="IE=edge" />
    <meta name="viewport" content="width=device-width, initial-scale=1.0" />
    <title>Document</title>
  </head>

  <body>
    <div id="app">哈哈哈</div>

    <script type="x-template" id="chen">
      <div>
        <h2>{{message}}</h2>
        <h2>{{counter}}</h2>
        <button @click="increment">+1</button>
        <button @click="decrement">-1</button>
      </div>
    </script>

    <script src="https://unpkg.com/vue@3"></script>
    <script>
      Vue.createApp({
        /**
         * 在执行createApp的对象中 ,如果我们传入的template以#开头,
         * 它会被用作querySeletor,并且使用匹配元素的innerHTML作为模板字符串;
         *
         * 内部执行document.querySeletor("#chen"),也就是拿到该标签的内容,放到这里template: ''
         */
        template: "#chen",
        data: function () {
          return {
            message: "hello world vue.js",
            counter: 100,
          };
        },
        methods: {
          increment() {
            console.log("点击了加1");
            this.counter++;
          },
          decrement() {
            console.log("点击了减1");
            this.counter--;
          },
        },
      }).mount("#app");
    </script>
  </body>
</html>
6.2、template写法2:
<!DOCTYPE html>
<html lang="en">
  <head>
    <meta charset="UTF-8" />
    <meta http-equiv="X-UA-Compatible" content="IE=edge" />
    <meta name="viewport" content="width=device-width, initial-scale=1.0" />
    <title>Document</title>
  </head>

  <body>
    <div id="app">哈哈哈</div>

    <!-- 这个template是html中默认就有的,而且template里面的东西是不会被浏览器渲染的;
       虽然解析器在加载页面时确实会加载<template>元素的内容,但这样做只是确保内容有效,
       但内容时不会被渲染的。这个是被JavaScript使用的, vue会读取

       如果这里template -> 改成div,这里是会渲染两次的
  -->
    <template id="chen">
      <div>
        <h2>{{message}}</h2>
        <h2>{{counter}}</h2>
        <button @click="increment">+1</button>
        <button @click="decrement">-1</button>
      </div>
    </template>

    <script src="https://unpkg.com/vue@3"></script>
    <script>
      Vue.createApp({
        template: "#chen",
        data: function () {
          return {
            message: "hello world vue.js",
            counter: 100,
          };
        },
        methods: {
          increment() {
            console.log("点击了加1");
            this.counter++;
          },
          decrement() {
            console.log("点击了减1");
            this.counter--;
          },
          //不可以使用箭头函数的方式写
          // btnClick: () => {
          //   // this === window? 不可以
          //   // 写成箭头函数时,这个this就是一个window
          //   // 在箭头函数中时不绑定this的
          //   console.log(this);
          // }
        },
      }).mount("#app");

      const foo = function () {
        console.log(this); //this是 window
      };
      foo(); //this是 window, 这个函数在执行的时候,其实是会做一个window的绑定的,也就是window.foo(); 隐式绑定

      const obj = { bar: foo };
      obj.bar(); //obj
    </script>
  </body>
</html>
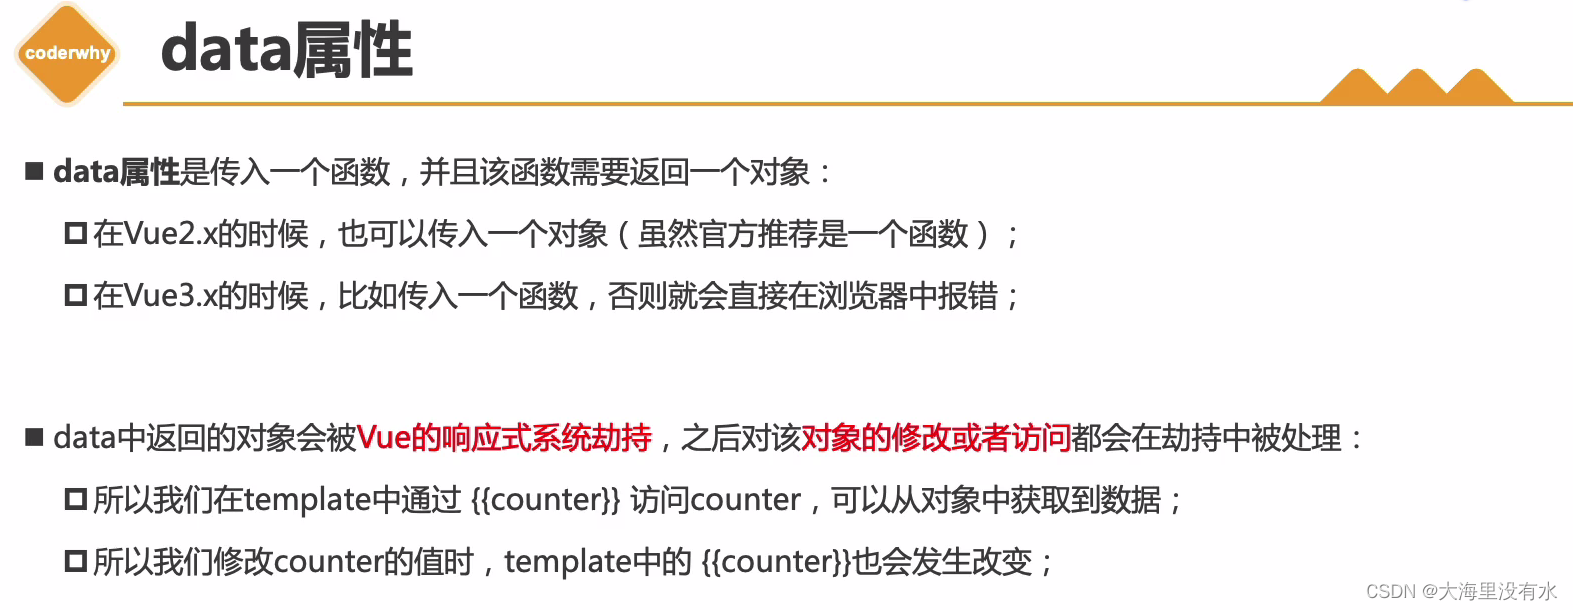
7、data
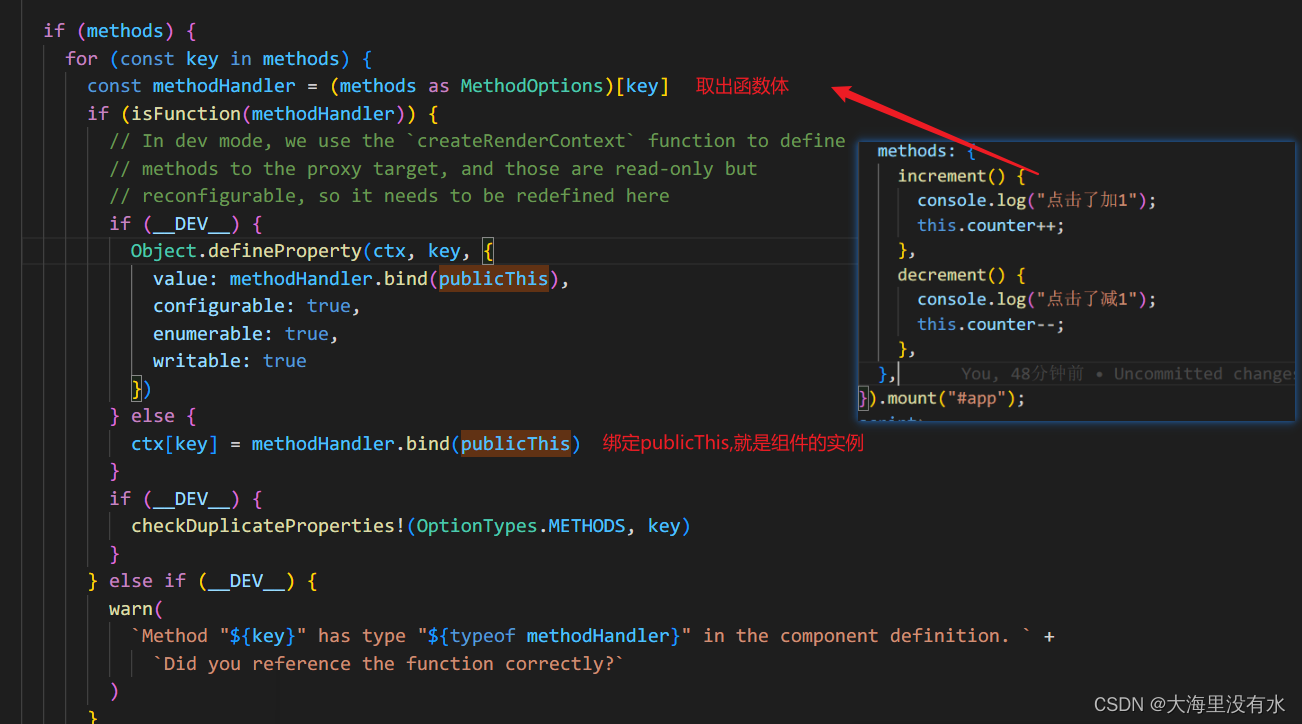
8、method
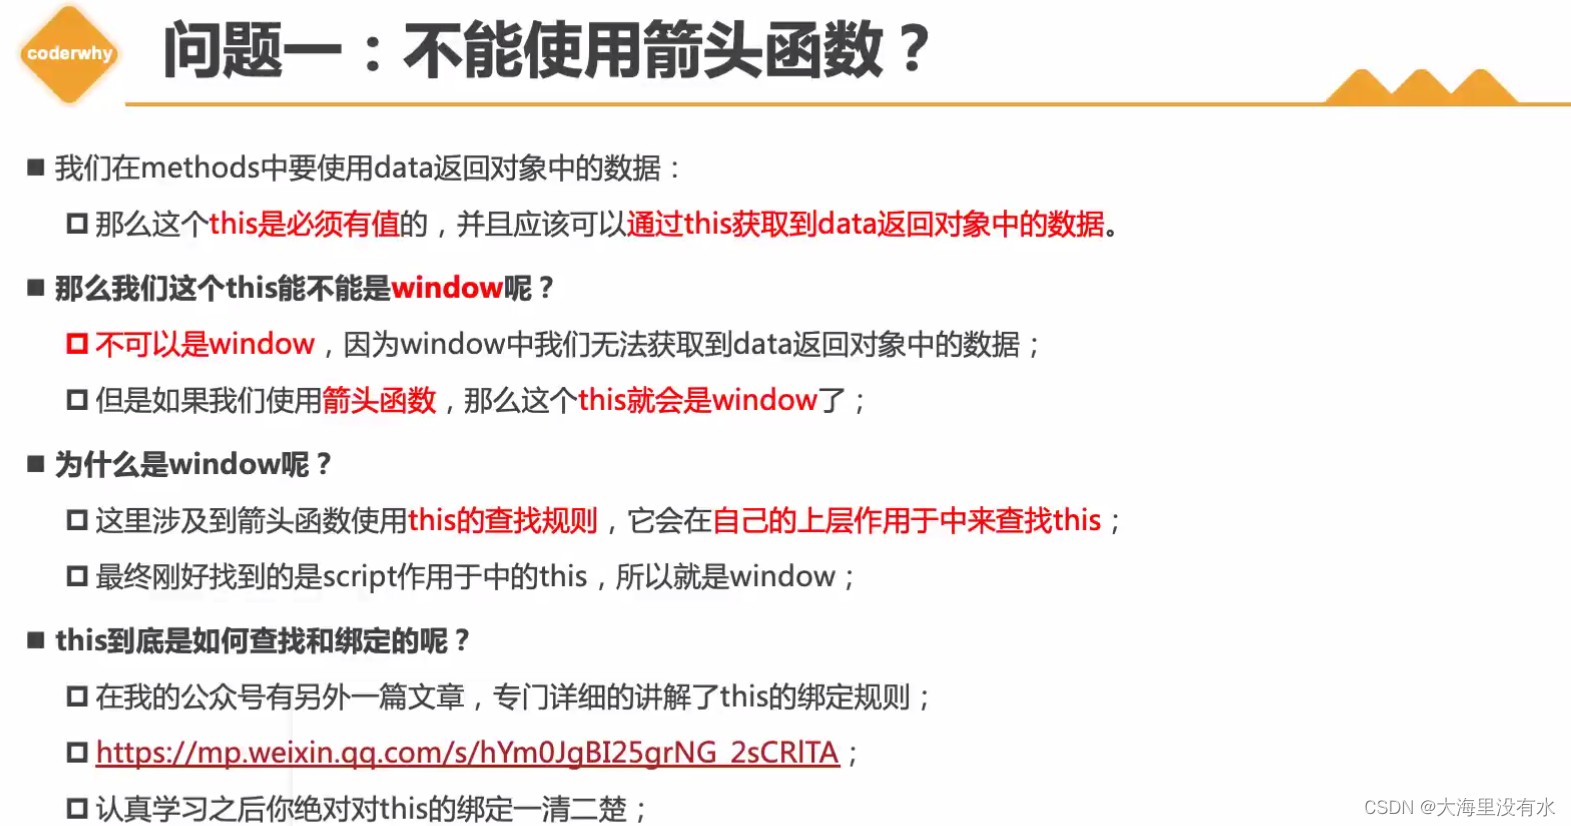
注:this绑定是就是我们组件对应的代理对象了
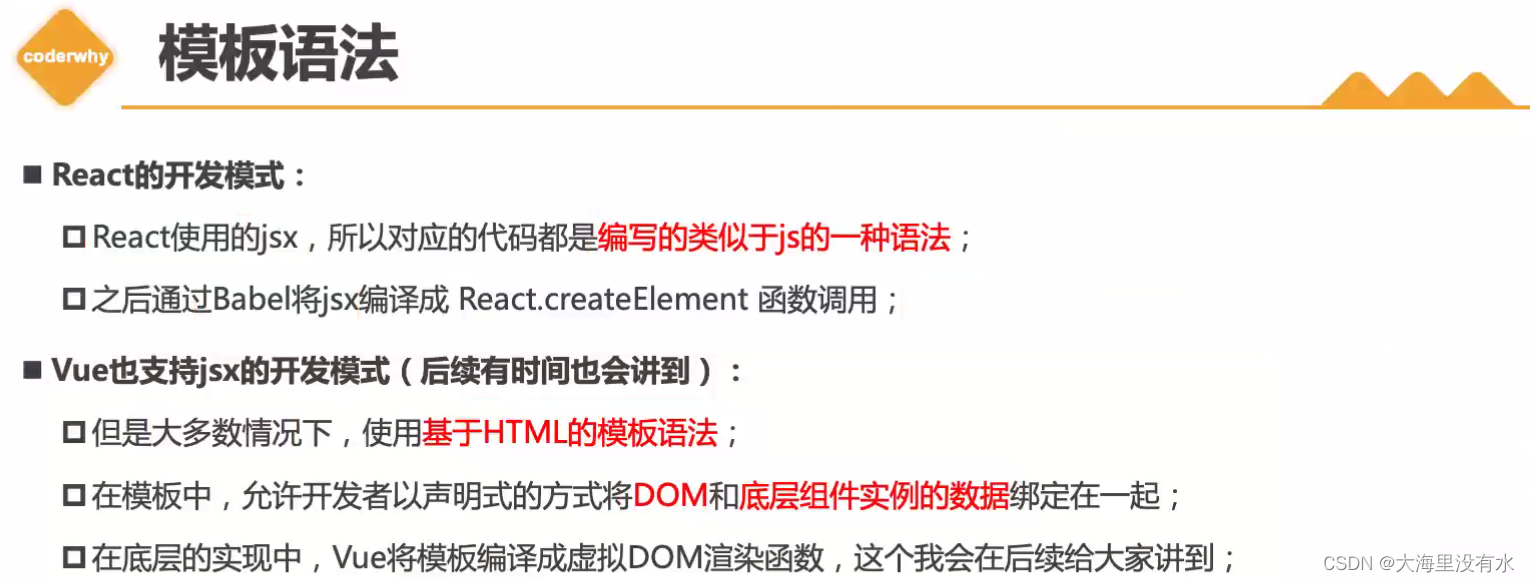
9、语法
9.1、Mustche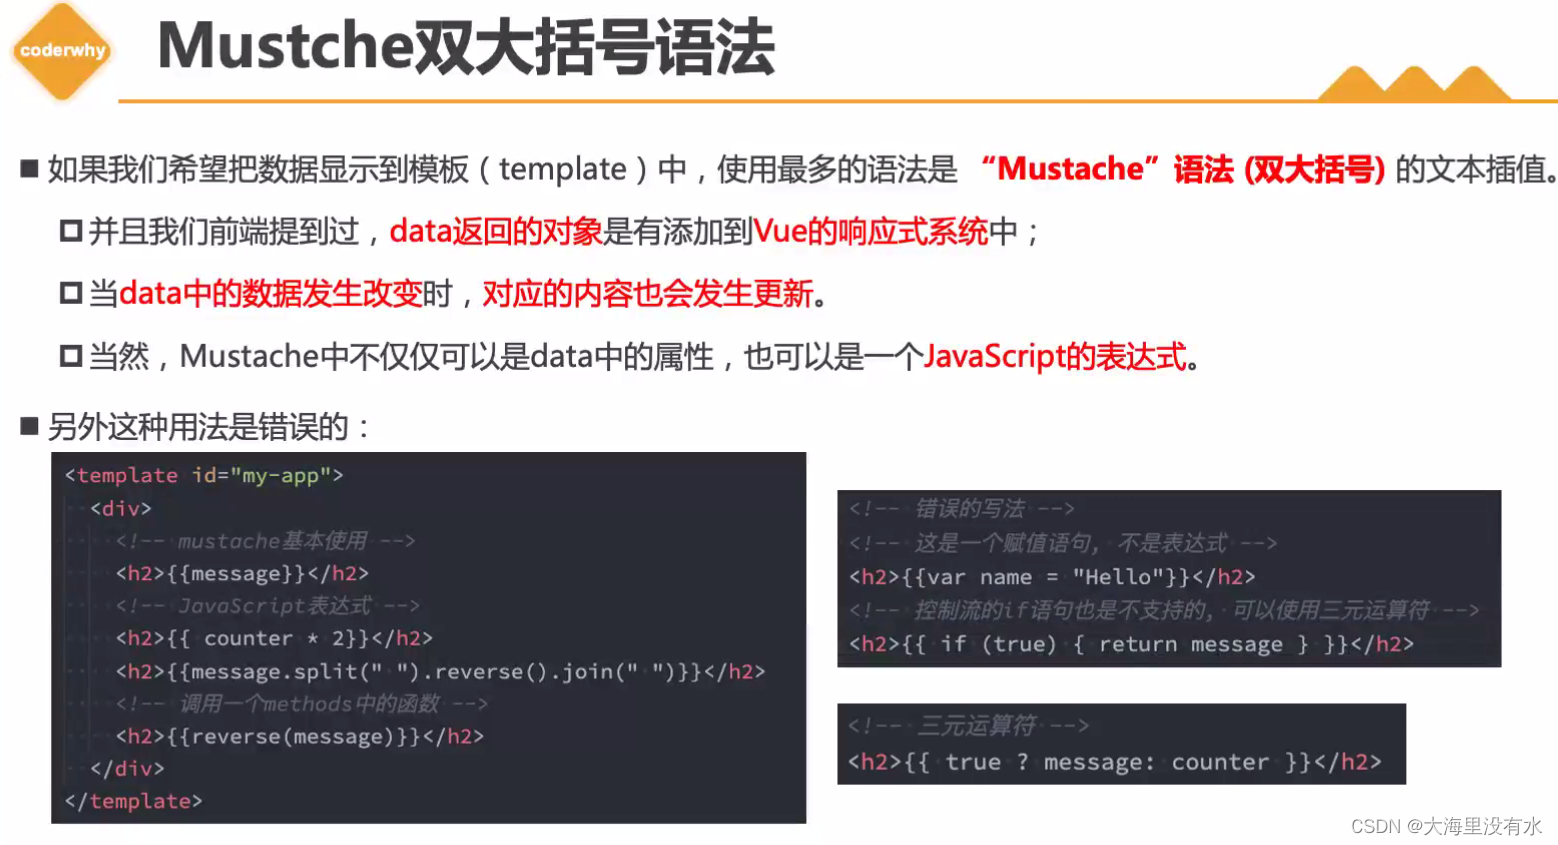
9.2、v-once
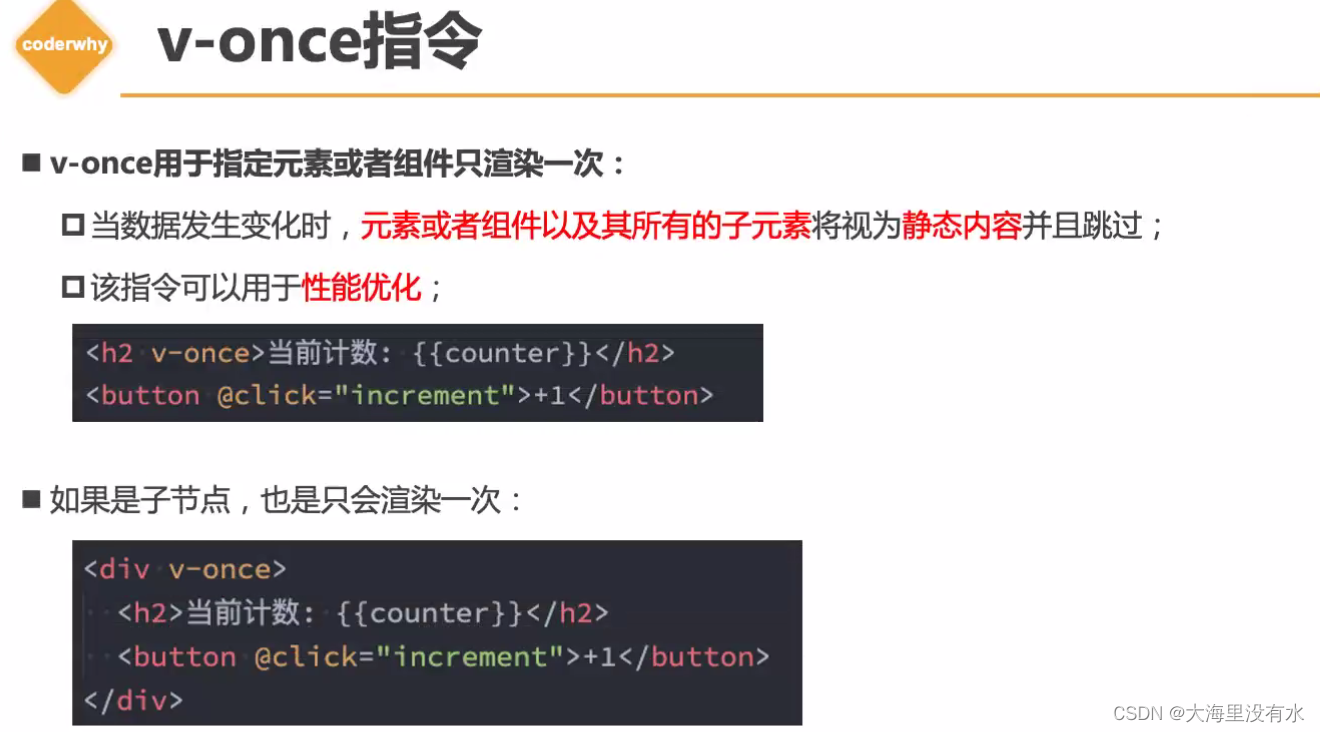
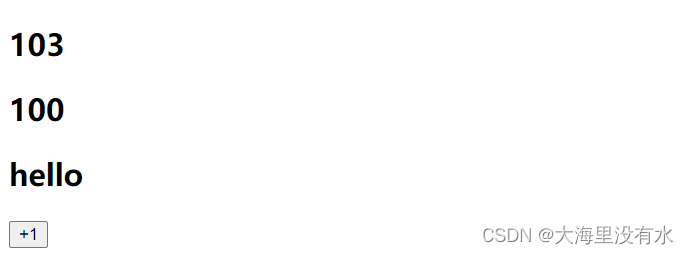
<!DOCTYPE html>
<html lang="en">
  <head>
    <meta charset="UTF-8" />
    <meta http-equiv="X-UA-Compatible" content="IE=edge" />
    <meta name="viewport" content="width=device-width, initial-scale=1.0" />
    <title>Document</title>
  </head>

  <body>
    <div id="app"></div>

    <template id="chen">
      <h2>{{counter}}</h2>

      <!-- 只渲染一次,并且是所有子组件都不会渲染的 -->
      <div v-once>
        <h2>{{counter}}</h2>
        <h2>{{message}}</h2>
      </div>
      <button @click="increment">+1</button>
    </template>

    <script src="https://unpkg.com/vue@3"></script>
    <script>
      Vue.createApp({
        template: "#chen",
        data: function () {
          return {
            counter: 100,
            message: "hello",
          };
        },
        methods: {
          increment() {
            this.counter++;
          },
        },
      }).mount("#app");
    </script>
  </body>
</html>
9.3、v-html
<!DOCTYPE html>
<html lang="en">
  <head>
    <meta charset="UTF-8" />
    <meta http-equiv="X-UA-Compatible" content="IE=edge" />
    <meta name="viewport" content="width=device-width, initial-scale=1.0" />
    <title>Document</title>
  </head>

  <body>
    <div id="app"></div>

    <template id="chen">
      <div>
        <!-- 如果是这样展示,就只是展示 <span style="color: red; background: bule">哈哈哈哈</span> -->
        {{message}}
      </div>
      <div v-html="message"></div>
    </template>

    <script src="../js/vue.js"></script>
    <script>
      Vue.createApp({
        template: "#chen",
        data: function () {
          return {
            message:
              '<span style="color: red; background: bule">哈哈哈哈</span>',
          };
        },
        methods: {},
      }).mount("#app");
    </script>
  </body>
</html>

9.4、v-pre

9.5、v-bind
9.5.1、基本使用
<!DOCTYPE html>
<html lang="en">
  <head>
    <meta charset="UTF-8" />
    <meta http-equiv="X-UA-Compatible" content="IE=edge" />
    <meta name="viewport" content="width=device-width, initial-scale=1.0" />
    <title>Document</title>
  </head>

  <body>
    <div id="app"></div>

    <!-- vue2 template模板中只能有一个根元素 -->
    <!-- vue3 template模板中允许有两个或多个根元素 -->
    <template id="chen">
      <img :src="imgUrl" />
      <a :href="link">百度一下</a>
    </template>

    <script src="https://unpkg.com/vue@3"></script>
    <script>
      Vue.createApp({
        template: "#chen",
        data: function () {
          return {
            imgUrl: "https://avatars.githubusercontent.com/u/54337779?s=40&v=4",
            link: "https://www.baidu.com",
          };
        },
        methods: {},
      }).mount("#app");
    </script>
  </body>
</html>

9.5.2、v-bind绑定class - 对象语法
<!DOCTYPE html>
<html lang="en">
  <head>
    <meta charset="UTF-8" />
    <meta http-equiv="X-UA-Compatible" content="IE=edge" />
    <meta name="viewport" content="width=device-width, initial-scale=1.0" />
    <title>Document</title>

    <style>
      .active {
        color: red;
      }
    </style>
  </head>

  <body>
    <div id="app"></div>

    <template id="chen">
      <!-- 对象语法: {'active': boolean} 当后面的值为true是,active才会绑定进来 -->

      <!-- 也可以有多个键值对.  'active'单引号可以不加的 -->
      <div :class="{'active': isActive, 'title': true}">小陈必胜</div>

      <!-- 默认的class 和动态的class 结合 -->
      <div class="abc dde" :class="{'active': isActive, 'title': true}">
        小陈必胜
      </div>

      <button @click="toggle">切换</button>

      <!-- 将对象放到一个单独的属性中 -->
      <div class="abc dde" :class="classObj">小陈必胜</div>

      <!-- 将返回的对象放到一个methods方法中, 当然也可以使用computed-->
      <div class="abc dde" :class="getClassObj()">小陈必胜</div>
    </template>

    <script src="https://unpkg.com/vue@3"></script>
    <script>
      Vue.createApp({
        template: "#chen",
        data: function () {
          return {
            message: "hello world",
            isActive: false,
            classObj: { active: true, title: true },
          };
        },
        methods: {
          toggle() {
            this.isActive = !this.isActive;
          },
          getClassObj() {
            return {
              active: true,
              title: true,
            };
          },
        },
      }).mount("#app");
    </script>
  </body>
</html>

9.5.3、v-bind绑定class - 数组语法
<!DOCTYPE html>
<html lang="en">
  <head>
    <meta charset="UTF-8" />
    <meta http-equiv="X-UA-Compatible" content="IE=edge" />
    <meta name="viewport" content="width=device-width, initial-scale=1.0" />
    <title>Document</title>
    <style>
      .active {
        color: red;
      }
    </style>
  </head>

  <body>
    <div id="app"></div>

    <template id="chen">
      <div :class="['abc', title]">哈哈哈</div>
      <!-- 数组里允许嵌套对象语法、三元运算符 -->
      <div :class="['abc', title, isActive ? 'active': '', {active: isActive}]">
        哈哈哈a
      </div>
    </template>

    <script src="https://unpkg.com/vue@3"></script>
    <script>
      Vue.createApp({
        template: "#chen",
        data: function () {
          return {
            title: "ddd",
            isActive: true,
          };
        },
        methods: {},
      }).mount("#app");
    </script>
  </body>
</html>

9.5.4、v-bind绑定style- 对象语法
<!DOCTYPE html>
<html lang="en">
  <head>
    <meta charset="UTF-8" />
    <meta http-equiv="X-UA-Compatible" content="IE=edge" />
    <meta name="viewport" content="width=device-width, initial-scale=1.0" />
    <title>Document</title>
  </head>

  <body>
    <div id="app"></div>

    <template id="chen">
      <!-- 之前我们是这么写的 -->
      <div style="color: red">嘻嘻嘻</div>

      <!-- 现在我们使用对象语法 , red不加单引号,无法显示红色,因为被当前变量-->
      <div :style="{color: 'red'}">哈哈哈</div>
      <div :style="{color: finalColor}">哈哈哈</div>

      <!-- 这里可以使用短横线,也可以使用驼峰,fontSize,但是短横线需要使用''-->
      <div :style="{color: finalColor, 'font-size': '59px'}">哈哈哈</div>

      <!-- 也可以直接绑定一个对象 -->
      <div :style="finalStyleObj">呵呵黑</div>

      <!-- 放到方法中 -->
      <div :style="getfinalStyleObj()">呵呵黑2</div>
    </template>

    <script src="https://unpkg.com/vue@3"></script>
    <script>
      Vue.createApp({
        template: "#chen",
        data: function () {
          return {
            finalColor: "red",
            finalStyleObj: {
              // 可以写成 'font-size': '34px',
              fontSize: "20px",
              backgroundColor: "red",
            },
          };
        },
        methods: {
          getfinalStyleObj() {
            return {
              fontSize: "20px",
              backgroundColor: "blue",
            };
          },
        },
      }).mount("#app");
    </script>
  </body>
</html>

9.5.5、 v-bind绑定style- 数组语法
<!DOCTYPE html>
<html lang="en">
  <head>
    <meta charset="UTF-8" />
    <meta http-equiv="X-UA-Compatible" content="IE=edge" />
    <meta name="viewport" content="width=device-width, initial-scale=1.0" />
    <title>Document</title>
  </head>

  <body>
    <div id="app"></div>

    <template id="chen">
      <!-- 两个对象属性会进行合并 -->
      <div :style="[styleObj, styleObj1]">hhh</div>
    </template>

    <script src="https://unpkg.com/vue@3"></script>
    <script>
      Vue.createApp({
        template: "#chen",
        data: function () {
          return {
            styleObj: {
              color: "red",
              fontSize: "23px",
            },
            styleObj1: {
              textDecoration: "underline",
            },
          };
        },
        methods: {},
      }).mount("#app");
    </script>
  </body>
</html>

9.5.6、v-bind 动态绑定属性名称
<!DOCTYPE html>
<html lang="en">
  <head>
    <meta charset="UTF-8" />
    <meta http-equiv="X-UA-Compatible" content="IE=edge" />
    <meta name="viewport" content="width=device-width, initial-scale=1.0" />
    <title>Document</title>
  </head>

  <body>
    <div id="app"></div>

    <template id="chen">
      <div :[name]="value">呵呵黑</div>
    </template>

    <script src="https://unpkg.com/vue@3"></script>
    <script>
      Vue.createApp({
        template: "#chen",
        data: function () {
          return {
            name: "abcde",
            value: "keobd",
          };
        },
        methods: {},
      }).mount("#app");
    </script>
  </body>
</html>

9.5.7、v-bind 属性直接绑定一个对象
<!DOCTYPE html>
<html lang="en">
  <head>
    <meta charset="UTF-8" />
    <meta http-equiv="X-UA-Compatible" content="IE=edge" />
    <meta name="viewport" content="width=device-width, initial-scale=1.0" />
    <title>Document</title>
  </head>

  <body>
    <div id="app"></div>

    <template id="chen">
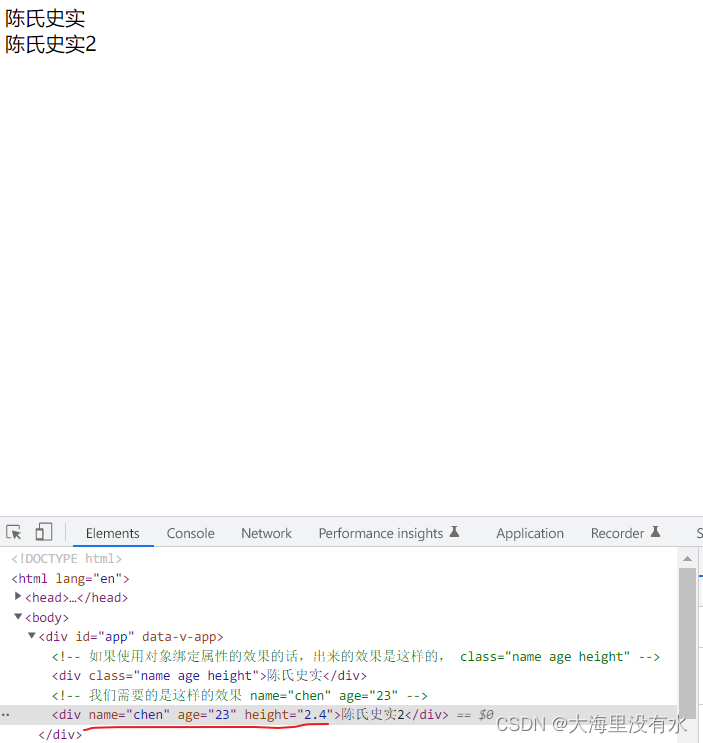
      <!-- 如果使用对象绑定属性的效果的话,出来的效果是这样的, class="name age height" -->
      <div :class="info">陈氏史实</div>

      <!-- 我们需要的是这样的效果 name="chen" age="23" -->
      <div :="info">陈氏史实2</div>
    </template>

    <script src="https://unpkg.com/vue@3"></script>
    <script>
      Vue.createApp({
        template: "#chen",
        data: function () {
          return {
            info: {
              name: "chen",
              age: 23,
              height: 2.4,
            },
          };
        },
        methods: {},
      }).mount("#app");
    </script>
  </body>
</html>
9.6、v-on绑定事件
9.6.1、v-on基本使用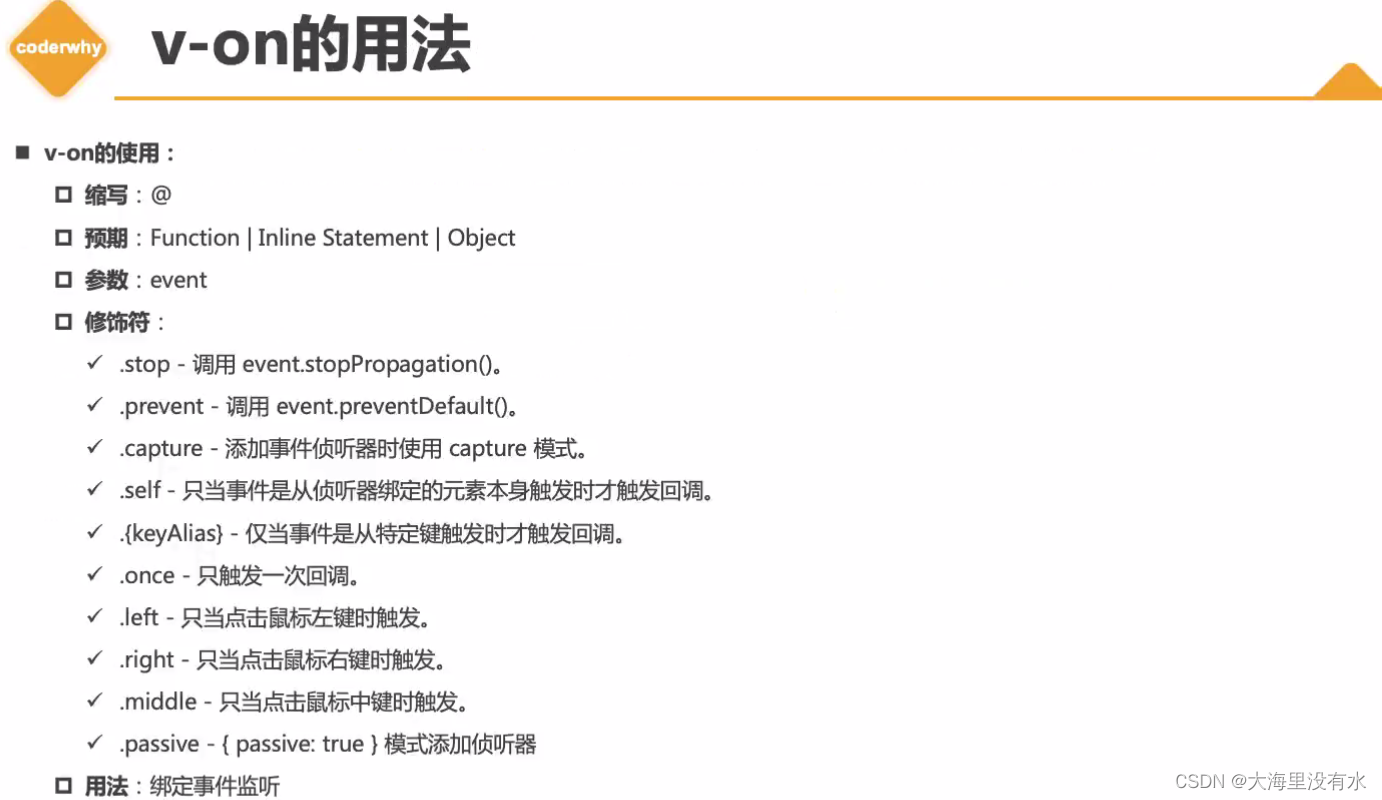
<!DOCTYPE html>
<html lang="en">
  <head>
    <meta charset="UTF-8" />
    <meta http-equiv="X-UA-Compatible" content="IE=edge" />
    <meta name="viewport" content="width=device-width, initial-scale=1.0" />
    <title>Document</title>

    <style>
      .area {
        width: 300px;
        height: 300px;
        background: red;
      }
    </style>
  </head>

  <body>
    <div id="app"></div>

    <template id="chen">
      <!-- 完整写法: v-on:监听的事件="methods中的方法" -->
      <!-- <button v-on:click="btnClick">按钮1</button> -->
      <button @click="btnClick">按钮1</button>
      <div class="area" @mousemove="mouse">区域</div>

      <!-- 可以绑定一个表达式: inline statement -->
      <button @click="counter++">{{counter}}</button>

      <!-- 可以绑定一个对象,绑定多个方法 -->
      <div class="area" v-on="{click: btnClick, mousemove: mouse}">
        <!-- 语法糖 -->
      <div class="area" @="{click: btnClick, mousemove: mouse}">
        {{counter}}
      </div>
    </template>

    <script src="https://unpkg.com/vue@3"></script>
    <script>
      Vue.createApp({
        template: "#chen",
        data: function () {
          return {
            counter: 1100,
          };
        },
        methods: {
          btnClick() {
            console.log("点击了按钮1");
          },
          mouse() {
            console.log("在area里面移动");
          },
        },
      }).mount("#app");
    </script>
  </body>
</html>
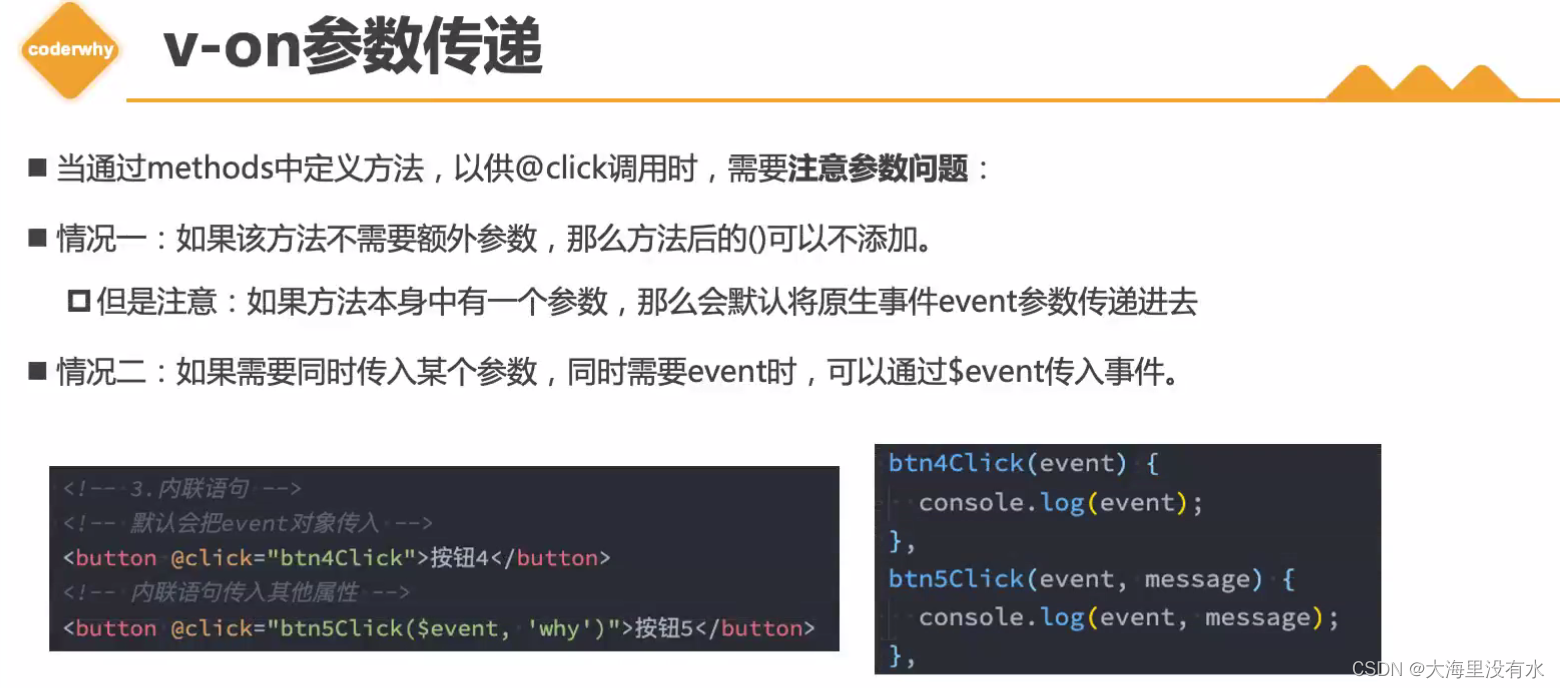
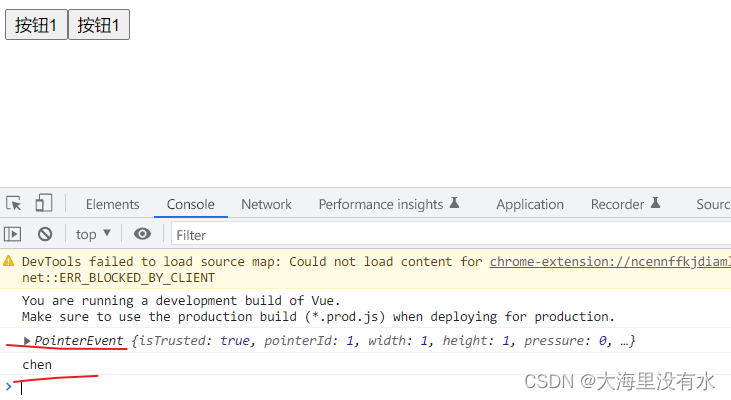
9.6.2、v-on 传递参数
<!DOCTYPE html>
<html lang="en">
  <head>
    <meta charset="UTF-8" />
    <meta http-equiv="X-UA-Compatible" content="IE=edge" />
    <meta name="viewport" content="width=device-width, initial-scale=1.0" />
    <title>Document</title>
  </head>

  <body>
    <div id="app"></div>

    <template id="chen">
      <!-- 默认传入event对象,可以在方法中直接获取 -->
      <button @click="btnClick">按钮1</button>

      <!-- $event可以获取到事件发生时的事件对象 -->
      <button @click="btnClick1($event, 'chen')">按钮1</button>
    </template>

    <script src="https://unpkg.com/vue@3"></script>
    <script>
      Vue.createApp({
        template: "#chen",
        data: function () {
          return {};
        },
        methods: {
          // vue内部默认传过来event对象
          btnClick() {
            console.log(event);
          },
          btnClick1(event, name) {
            console.log(event);
            console.log(name);
          },
        },
      }).mount("#app");
    </script>
  </body>
</html>
9.6.3、v-on 修饰符
<!DOCTYPE html>
<html lang="en">
  <head>
    <meta charset="UTF-8" />
    <meta http-equiv="X-UA-Compatible" content="IE=edge" />
    <meta name="viewport" content="width=device-width, initial-scale=1.0" />
    <title>Document</title>
  </head>

  <body>
    <div id="app"></div>

    <template id="chen">
      <div @click="divClick">
        <button @click.stop="btnClick">按钮</button>
      </div>
    </template>

    <script src="https://unpkg.com/vue@3"></script>
    <script>
      Vue.createApp({
        template: "#chen",
        data: function () {
          return {};
        },
        methods: {
          divClick() {
            console.log("divclick");
          },
          btnClick() {
            console.log("btnclick");
          },
        },
      }).mount("#app");
    </script>
  </body>
</html>

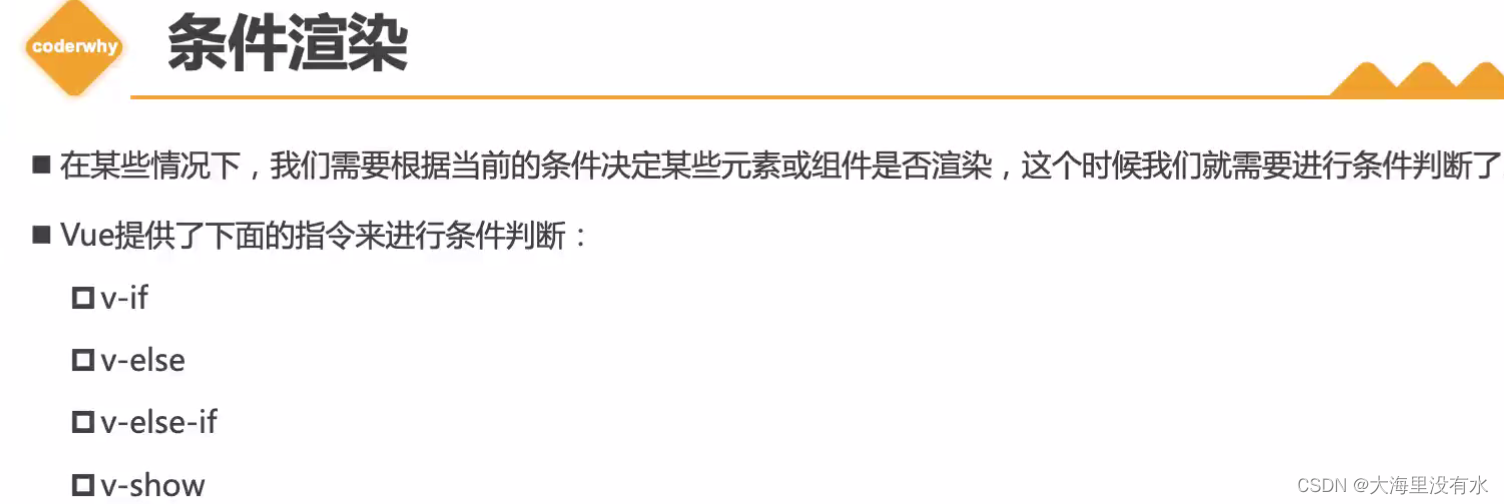
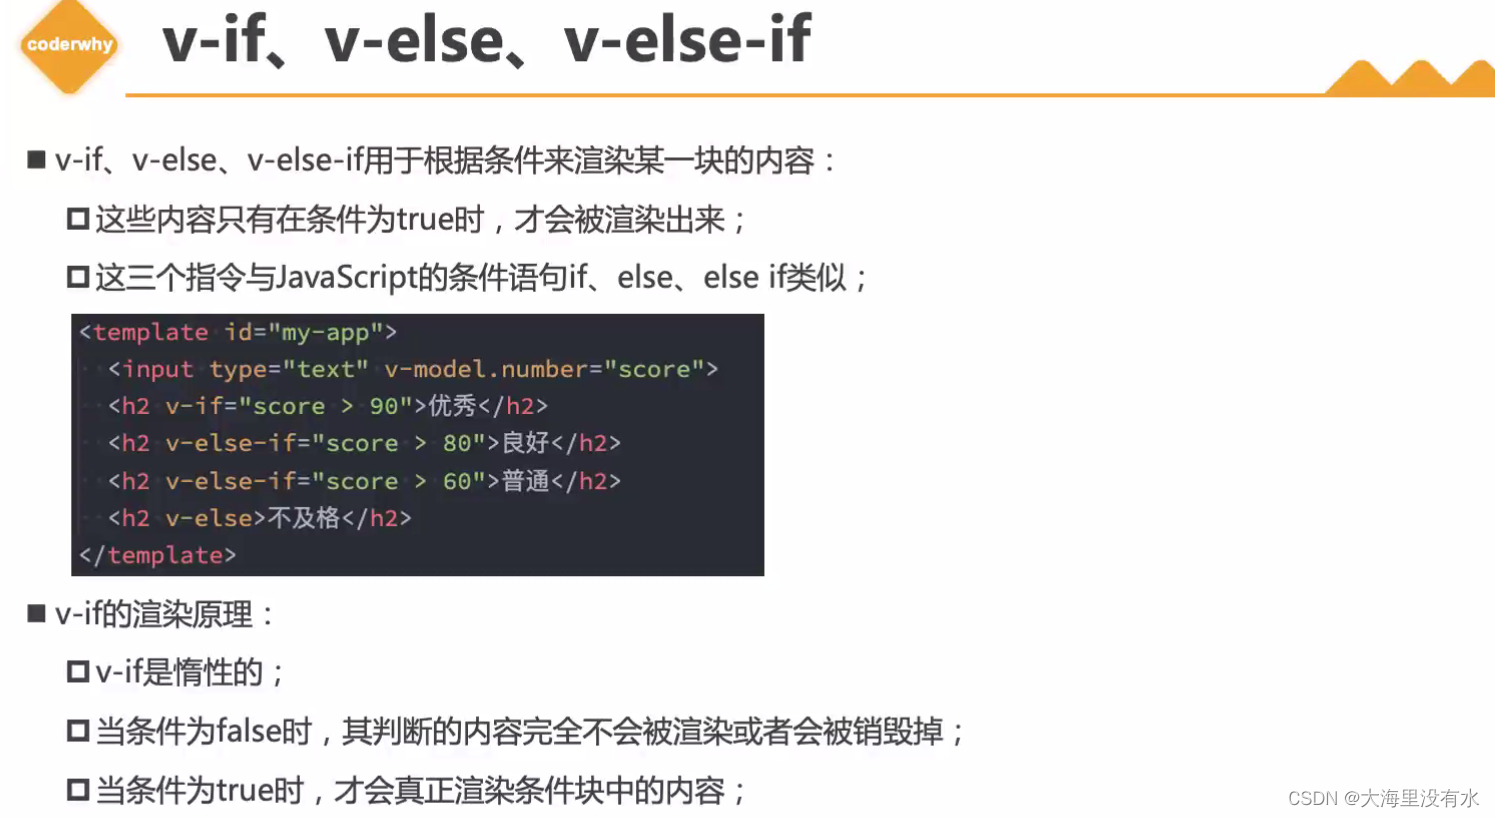
9.7、条件渲染
9.7.1、v-if多条件渲染
<!DOCTYPE html>
<html lang="en">
  <head>
    <meta charset="UTF-8" />
    <meta http-equiv="X-UA-Compatible" content="IE=edge" />
    <meta name="viewport" content="width=device-width, initial-scale=1.0" />
    <title>Document</title>
  </head>

  <body>
    <div id="app"></div>

    <!-- v-if时惰性的,
       当条件为false时,其判断的内容完全不会被渲染或者会被销毁
       当条件为true时,才会真正渲染条件块中的内容;
  -->
    <template id="chen">
      <h2 v-if="score > 90">优秀</h2>
      <h2 v-else-if="score > 60">良好</h2>
      <h2 v-else>不及格</h2>
    </template>

    <script src="https://unpkg.com/vue@3"></script>
    <script>
      Vue.createApp({
        template: "#chen",
        data: function () {
          return {
            score: 90,
          };
        },
        methods: {},
      }).mount("#app");
    </script>
  </body>
</html>
9.7.2、v-if结合template
<!DOCTYPE html>
<html lang="en">
  <head>
    <meta charset="UTF-8" />
    <meta http-equiv="X-UA-Compatible" content="IE=edge" />
    <meta name="viewport" content="width=device-width, initial-scale=1.0" />
    <title>Document</title>
  </head>

  <body>
    <div id="app"></div>

    <template id="chen">
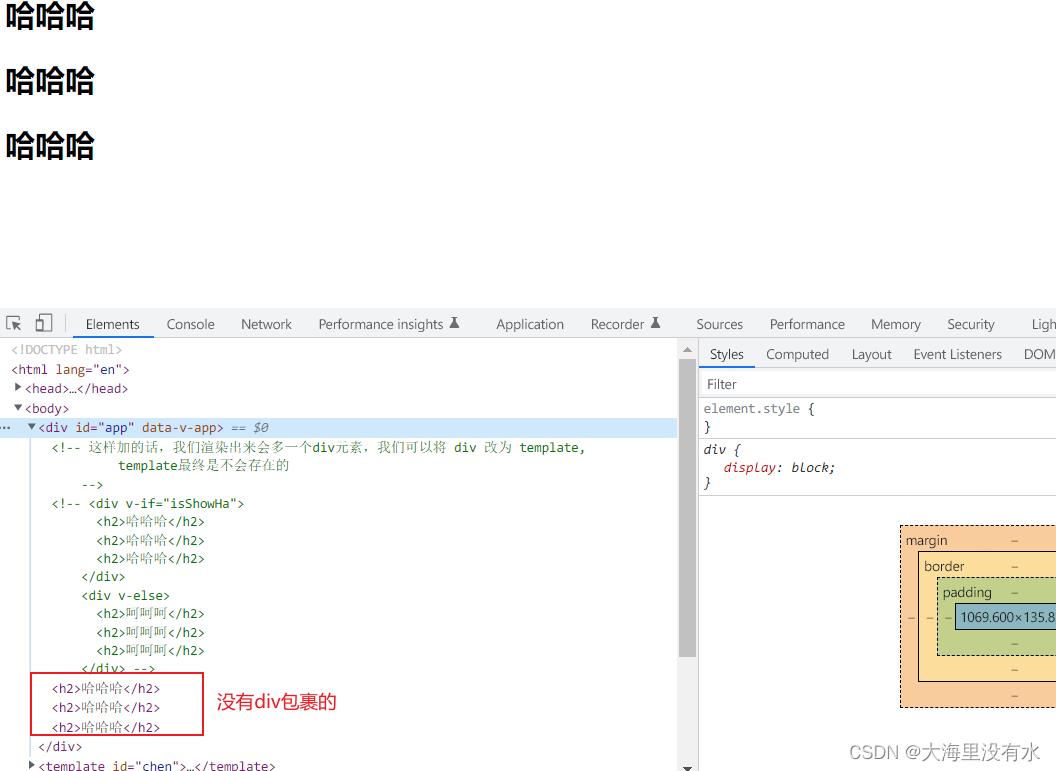
      <!-- 这样加的话,我们渲染出来会多一个div元素,我们可以将 div 改为 template,
         template最终是不会存在的
    -->
      <!-- <div v-if="isShowHa">
      <h2>哈哈哈</h2>
      <h2>哈哈哈</h2>
      <h2>哈哈哈</h2>
    </div>
    <div v-else>
      <h2>呵呵呵</h2>
      <h2>呵呵呵</h2>
      <h2>呵呵呵</h2>
    </div> -->

      <template v-if="isShowHa">
        <h2>哈哈哈</h2>
        <h2>哈哈哈</h2>
        <h2>哈哈哈</h2>
      </template>
      <template v-else>
        <h2>呵呵呵</h2>
        <h2>呵呵呵</h2>
        <h2>呵呵呵</h2>
      </template>
    </template>

    <script src="https://unpkg.com/vue@3"></script>
    <script>
      Vue.createApp({
        template: "#chen",
        data: function () {
          return {
            isShowHa: true,
          };
        },
        methods: {},
      }).mount("#app");
    </script>
  </body>
</html>
9.7.3、v-show
<!DOCTYPE html>
<html lang="en">
  <head>
    <meta charset="UTF-8" />
    <meta http-equiv="X-UA-Compatible" content="IE=edge" />
    <meta name="viewport" content="width=device-width, initial-scale=1.0" />
    <title>Document</title>
  </head>

  <body>
    <div id="app"></div>

    <template id="chen">
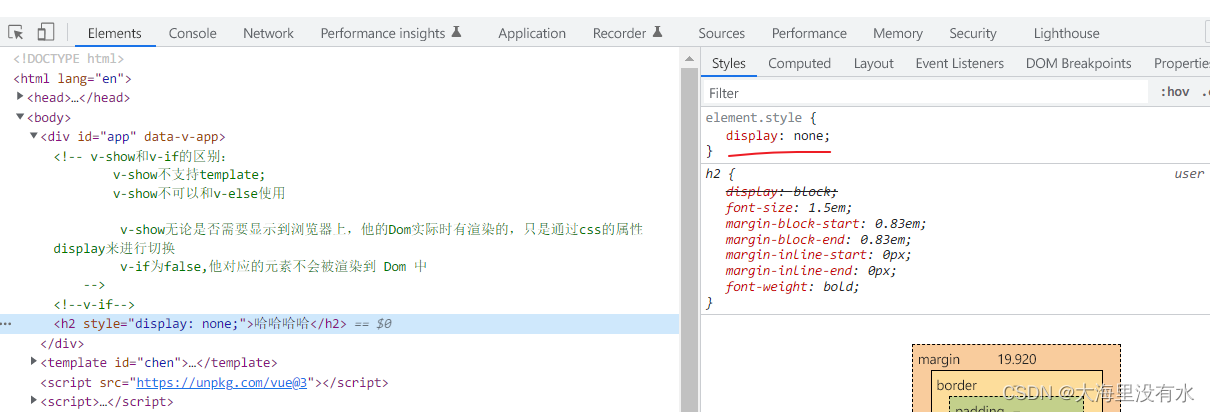
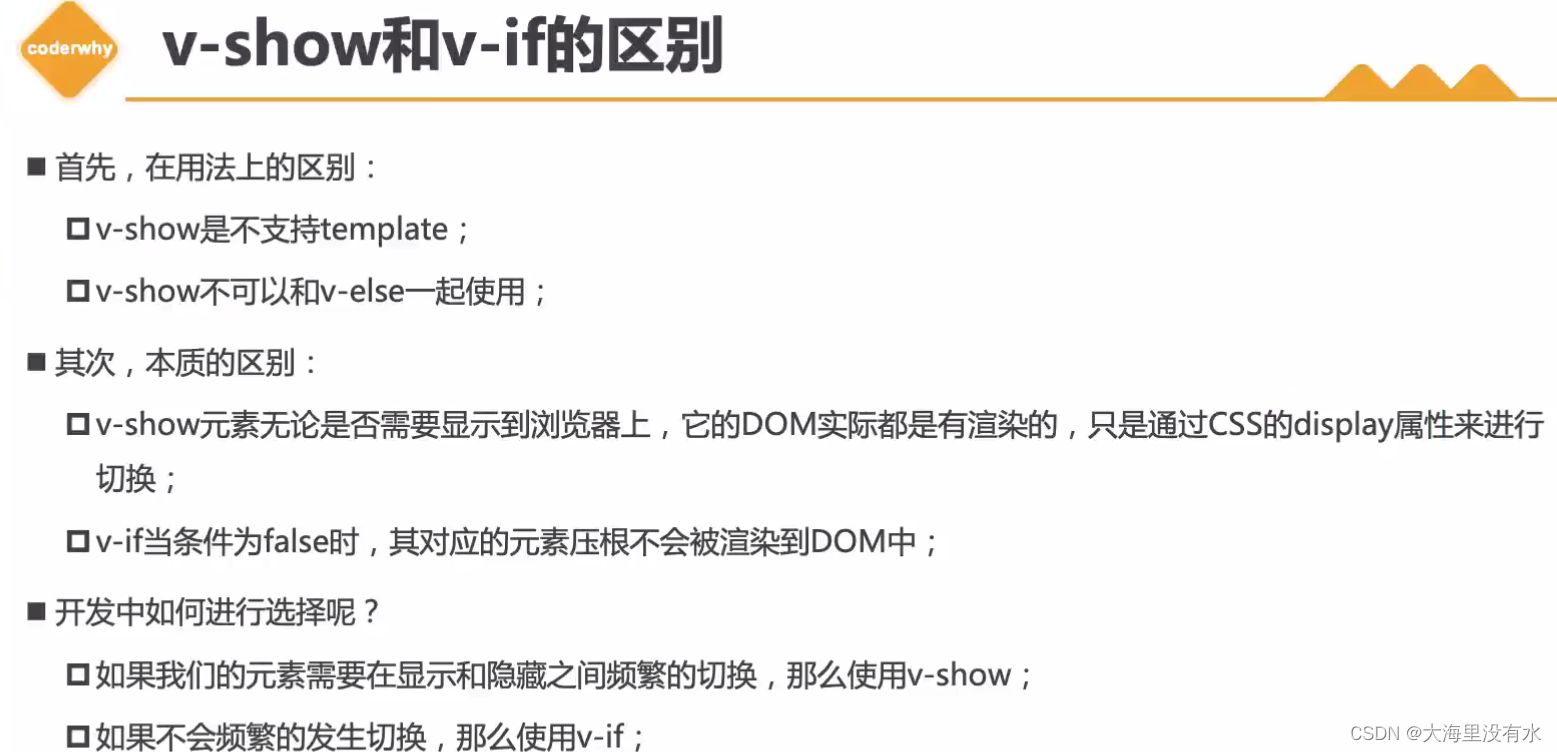
      <!-- v-show和v-if的区别:
        v-show不支持template;
        v-show不可以和v-else使用

         v-show无论是否需要显示到浏览器上,他的Dom实际时有渲染的,只是通过css的属性display来进行切换
         v-if为false,他对应的元素不会被渲染到 Dom 中
    -->
      <h2 v-if="isShow">哈哈哈哈</h2>
      <h2 v-show="isShow">哈哈哈哈</h2>
    </template>

    <script src="https://unpkg.com/vue@3"></script>
    <script>
      Vue.createApp({
        template: "#chen",
        data: function () {
          return {
            isShow: !true,
          };
        },
        methods: {},
      }).mount("#app");
    </script>
  </body>
</html>
9.8、v-for
<!DOCTYPE html>
<html lang="en">
  <head>
    <meta charset="UTF-8" />
    <meta http-equiv="X-UA-Compatible" content="IE=edge" />
    <meta name="viewport" content="width=device-width, initial-scale=1.0" />
    <title>Document</title>
  </head>

  <body>
    <div id="app"></div>

    <template id="chen">
      <!-- v-for遍历数组 -->
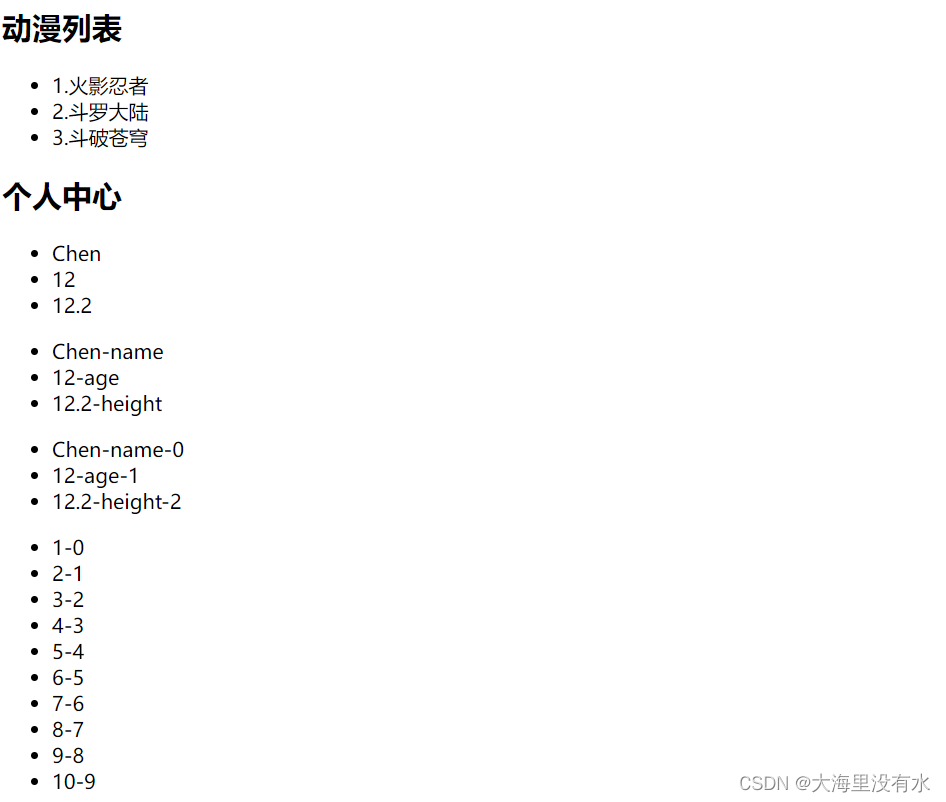
      <h2>动漫列表</h2>
      <ul>
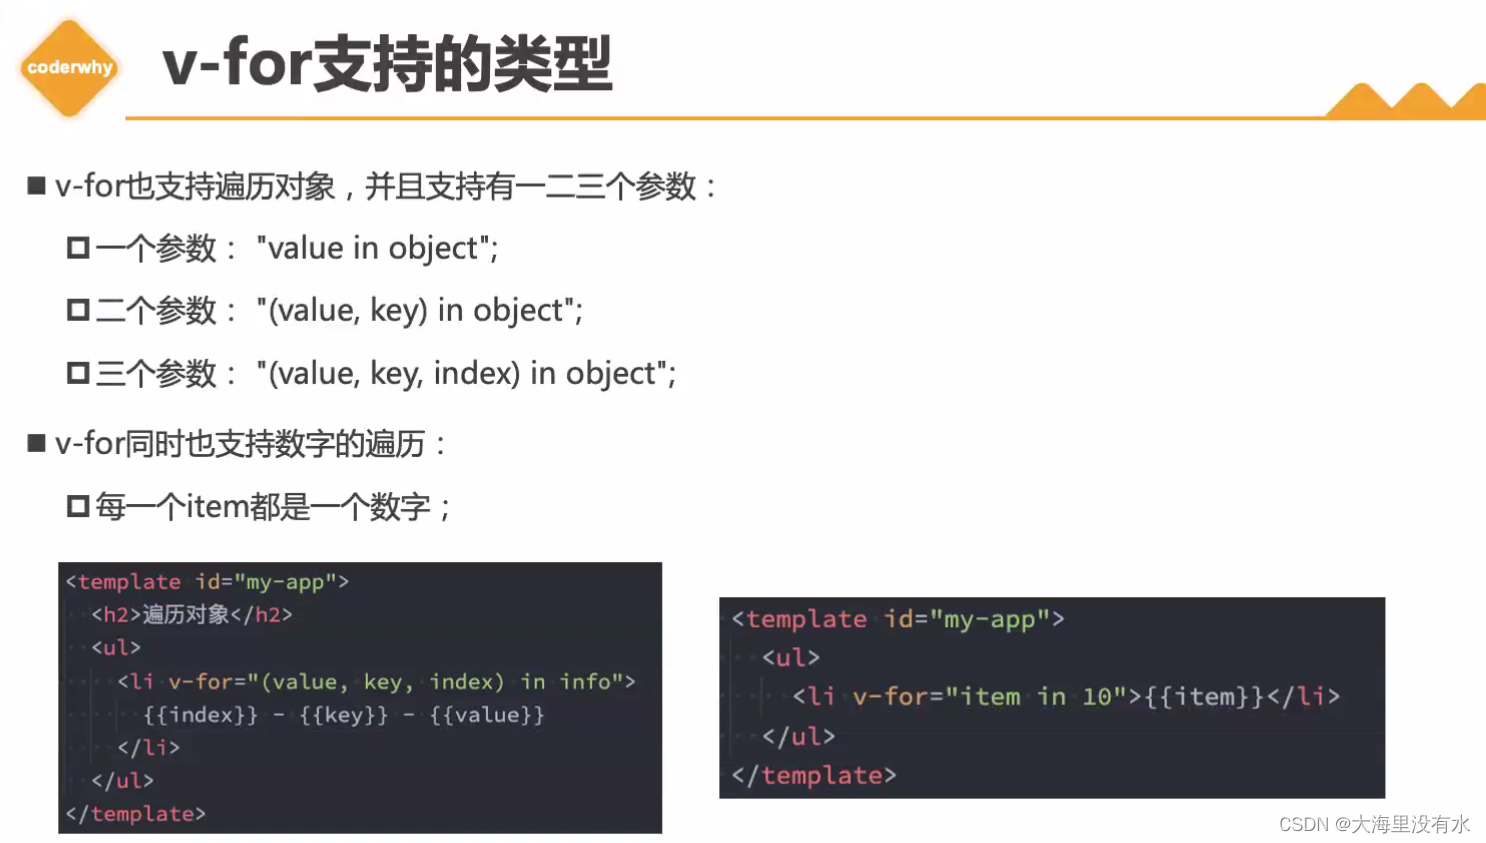
        <li v-for="(item,index) in movies">{{index + 1}}.{{item}}</li>
      </ul>

      <!-- v-for遍历对象属性 -->
      <h2>个人中心</h2>
      <ul>
        <!-- 如果只写一个,拿到的是value的值,Chen, 12, 12.2 -->
        <li v-for="value in info">{{value}}</li>
      </ul>

      <ul>
        <li v-for="(value,key) in info">{{value}}-{{key}}</li>
      </ul>

      <ul>
        <li v-for="(value, key, index) in info">{{value}}-{{key}}-{{index}}</li>
      </ul>

      <!-- 遍历数字 -->
      <ul>
        <li v-for="(num, index) in 10">{{num}}-{{index}}</li>
      </ul>
    </template>

    <script src="https://unpkg.com/vue@3"></script>
    <script>
      Vue.createApp({
        template: "#chen",
        data: function () {
          return {
            movies: ["火影忍者", "斗罗大陆", "斗破苍穹"],
            info: {
              name: "Chen",
              age: 12,
              height: 12.2,
            },
          };
        },
        methods: {},
      }).mount("#app");
    </script>
  </body>
</html>
9.8.1 v-for与template结合使用
<!DOCTYPE html>
<html lang="en">
  <head>
    <meta charset="UTF-8" />
    <meta http-equiv="X-UA-Compatible" content="IE=edge" />
    <meta name="viewport" content="width=device-width, initial-scale=1.0" />
    <title>Document</title>
    <style>
      .line {
        list-style: none;
        border-top: 1px solid black;
        margin-bottom: 10px;
      }
    </style>
  </head>

  <body>
    <div id="app"></div>

    <template id="chen">
      <ul>
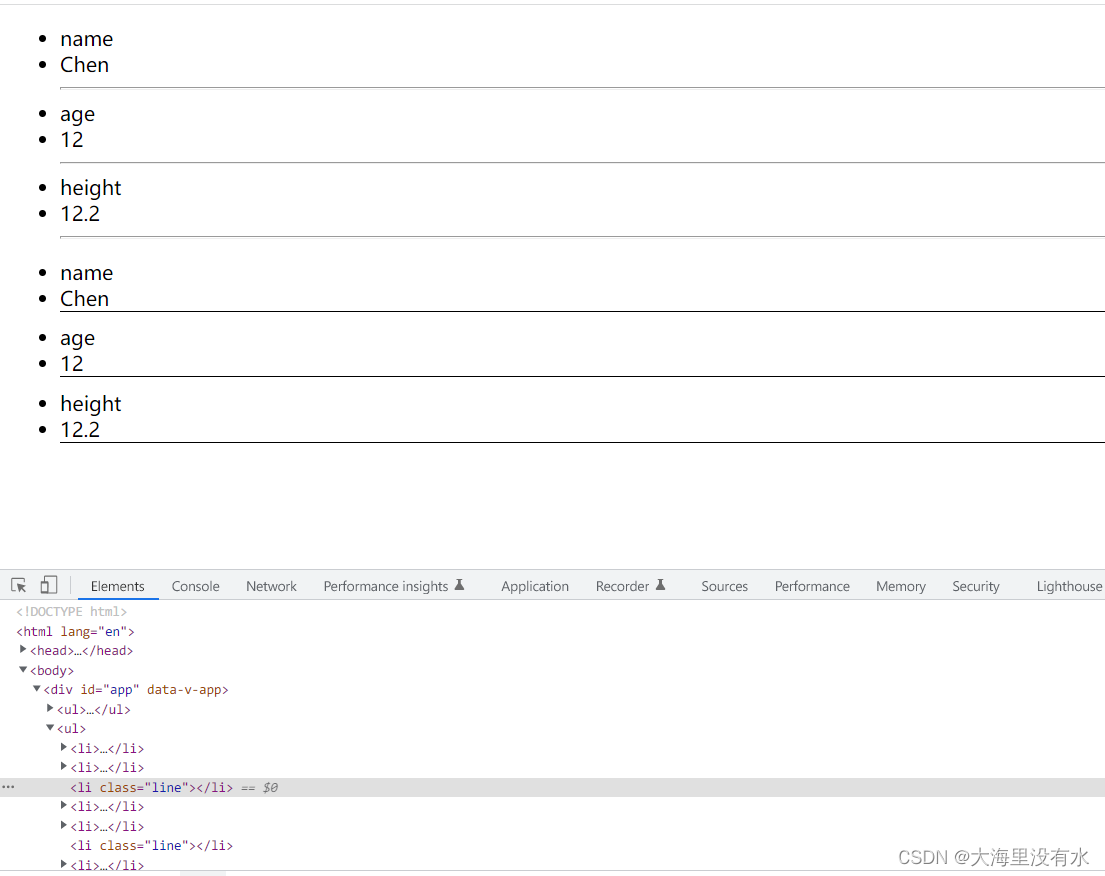
        <!-- 不推荐ul, hr 里面包含 div ,性能问题, 我们可以将其改为 template-->
        <div v-for="(value, key) in info">
          <li>{{key}}</li>
          <li>{{value}}</li>
          <hr />
        </div>
      </ul>

      <ul>
        <template v-for="(value, key) in info">
          <li>{{key}}</li>
          <li>{{value}}</li>
          <li class="line"></li>
        </template>
      </ul>
    </template>

    <script src="https://unpkg.com/vue@3"></script>
    <script>
      Vue.createApp({
        template: "#chen",
        data: function () {
          return {
            info: {
              name: "Chen",
              age: 12,
              height: 12.2,
            },
          };
        },
        methods: {},
      }).mount("#app");
    </script>
  </body>
</html>
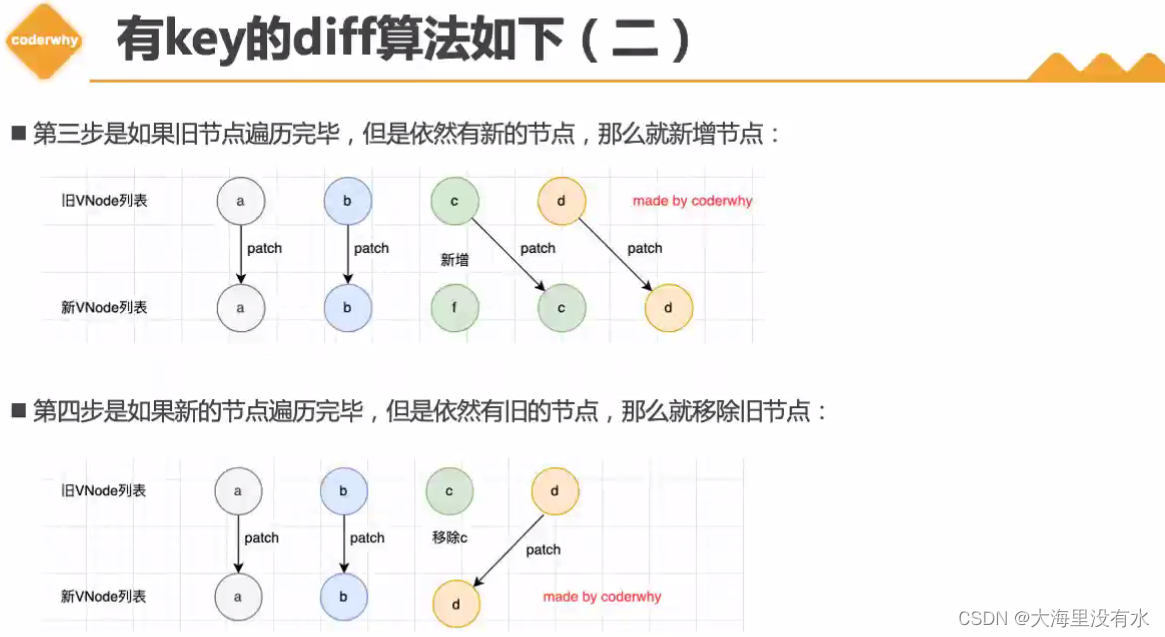
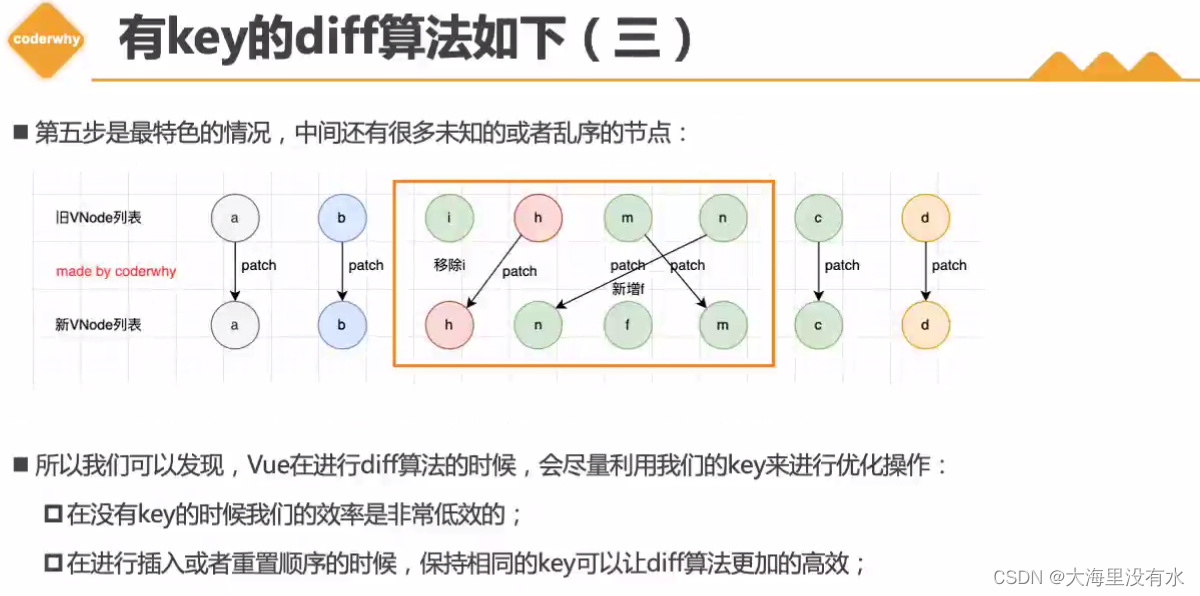
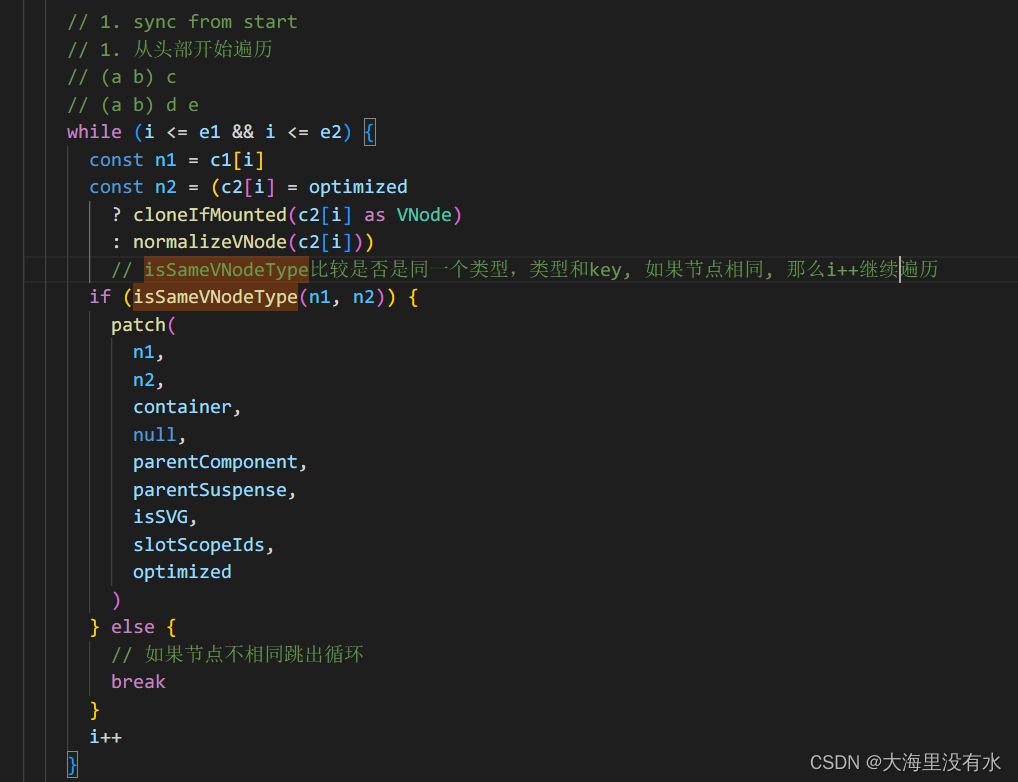
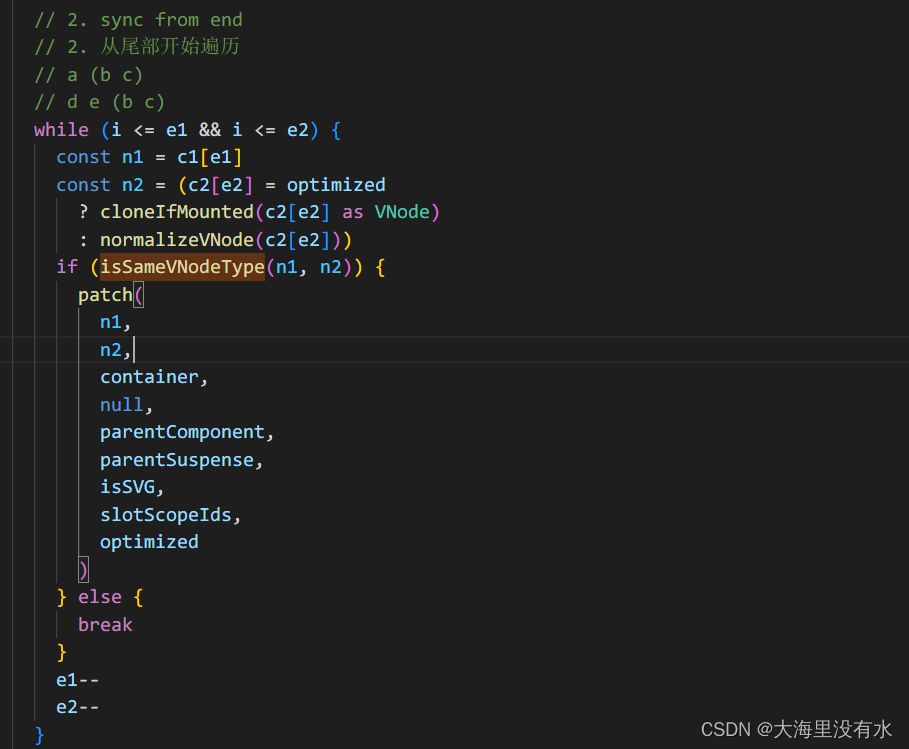
9.8.2、 v-for中key的作用
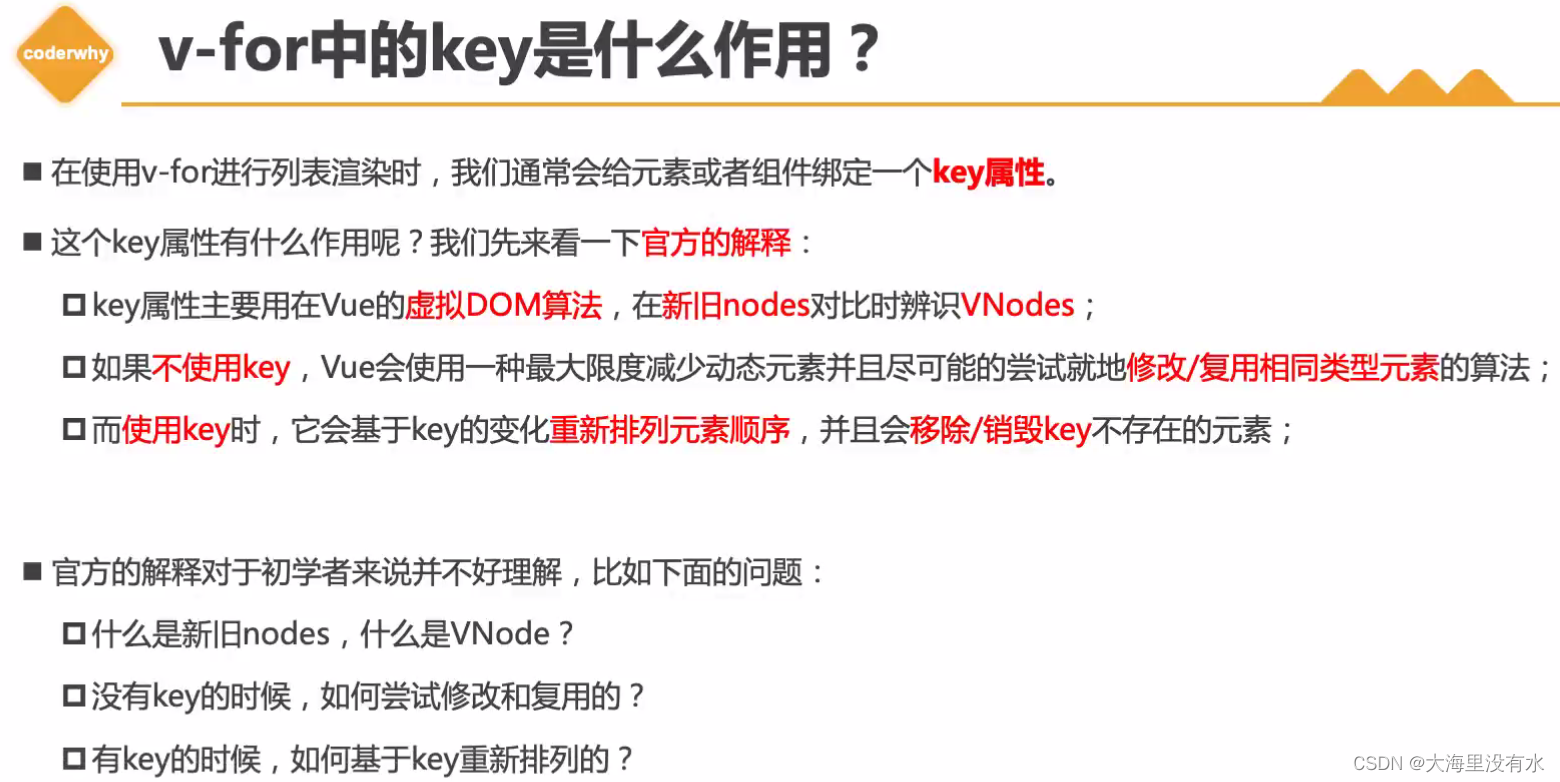
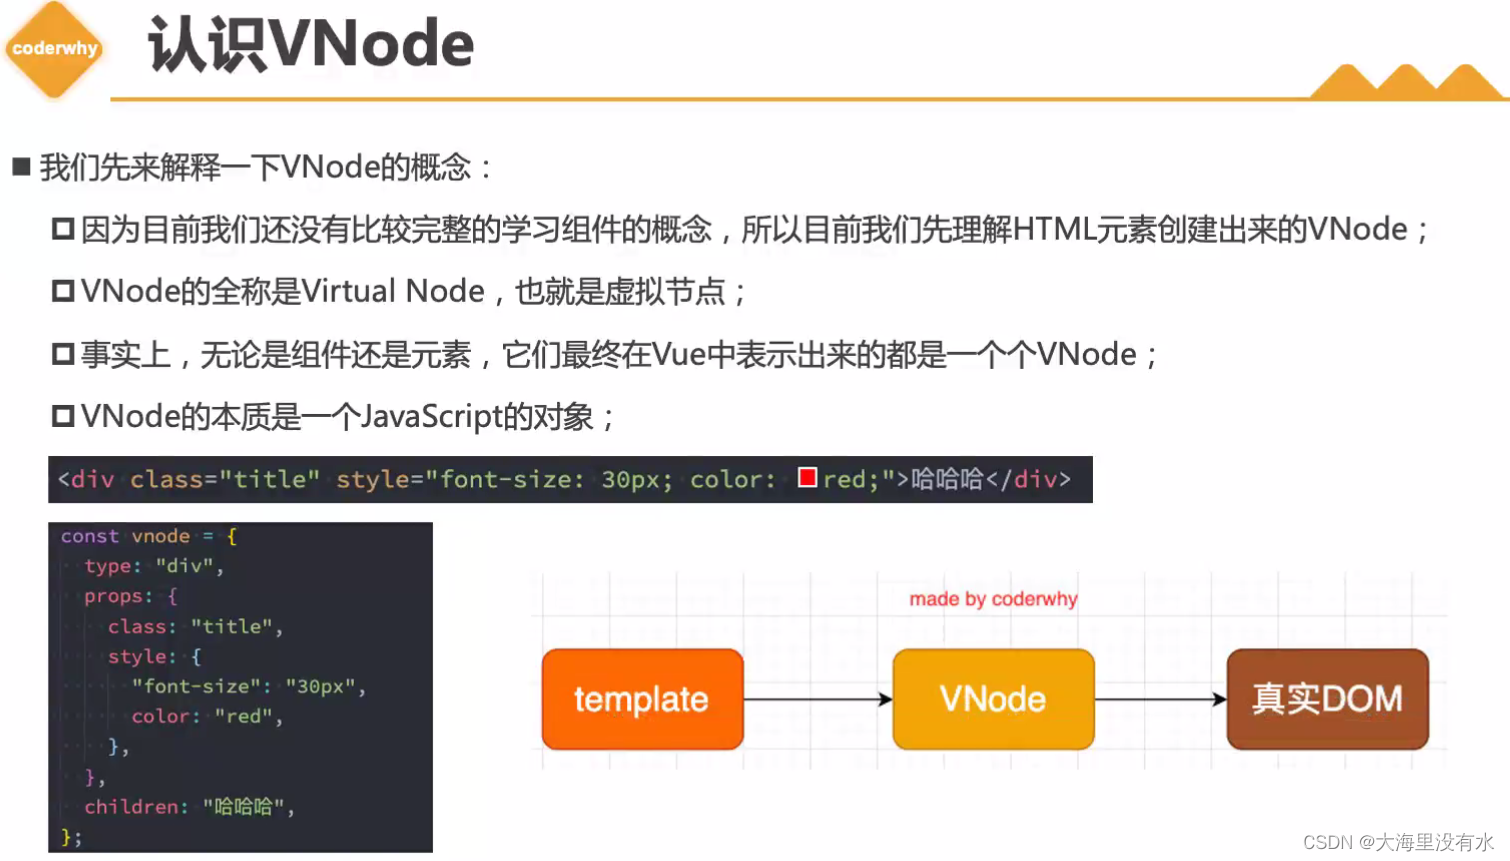
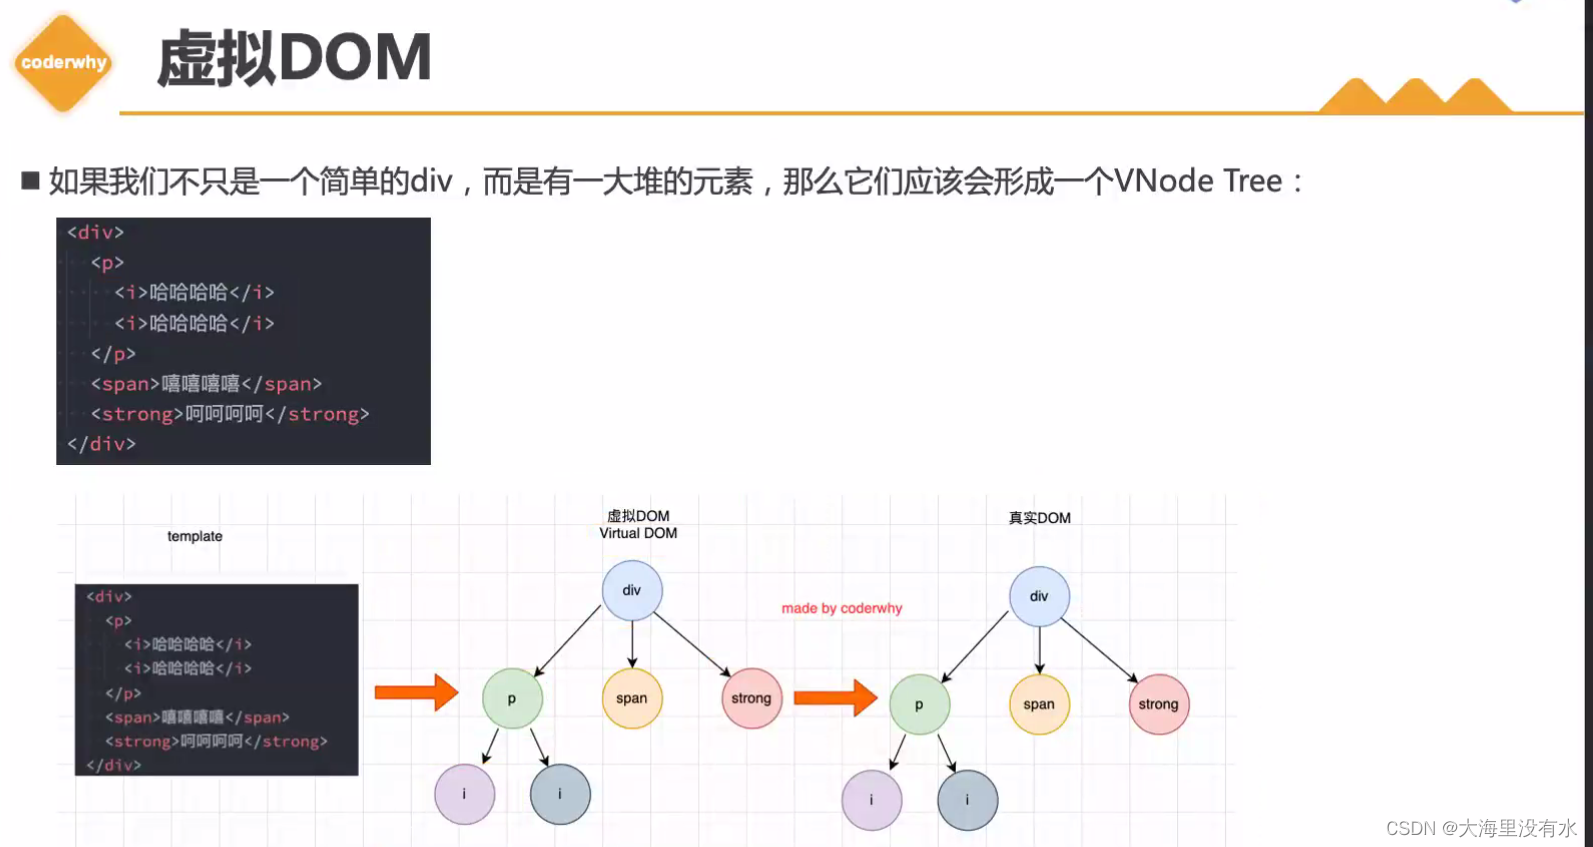
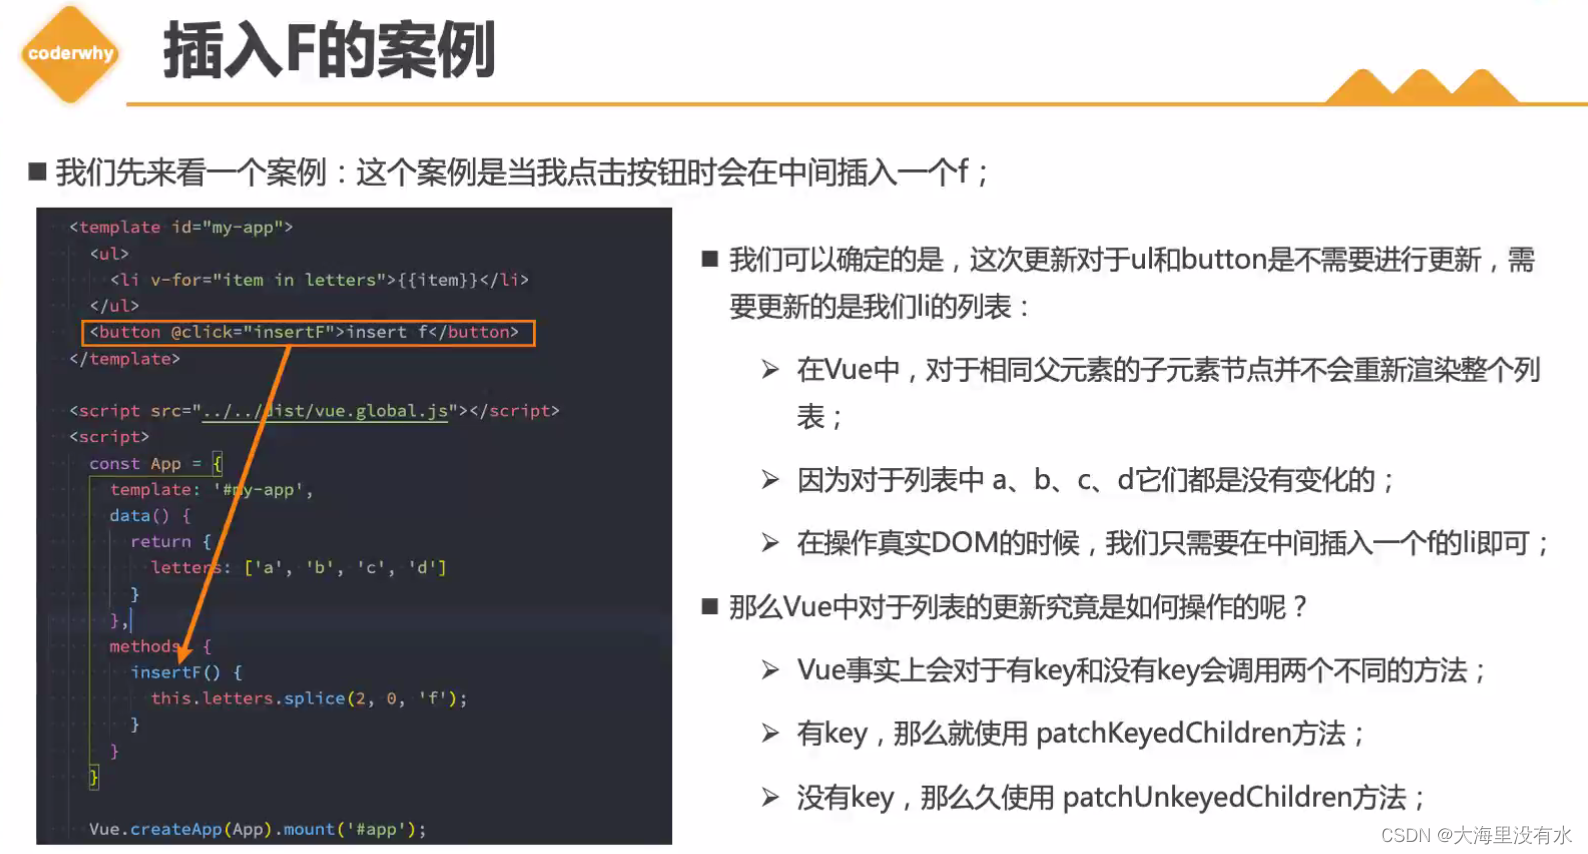
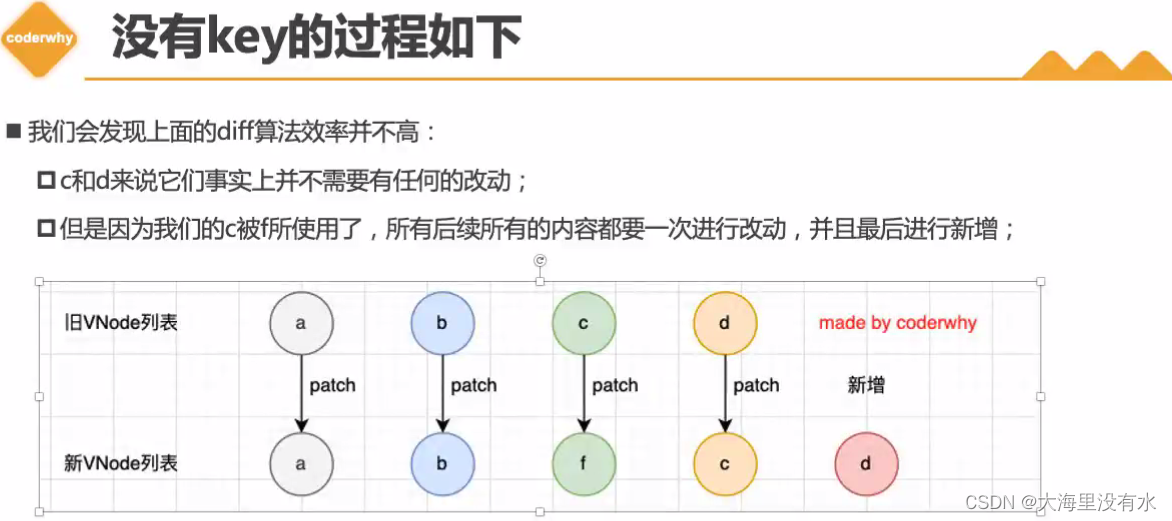
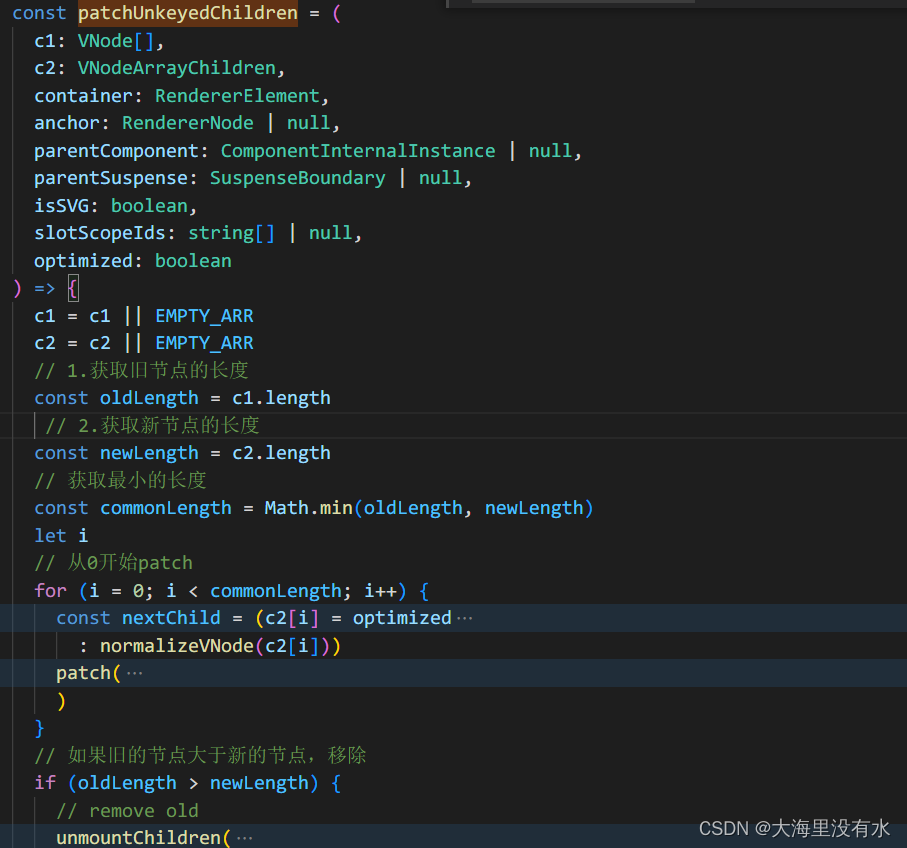
没有key的算法, 源码如下
有key的算法, 源码如下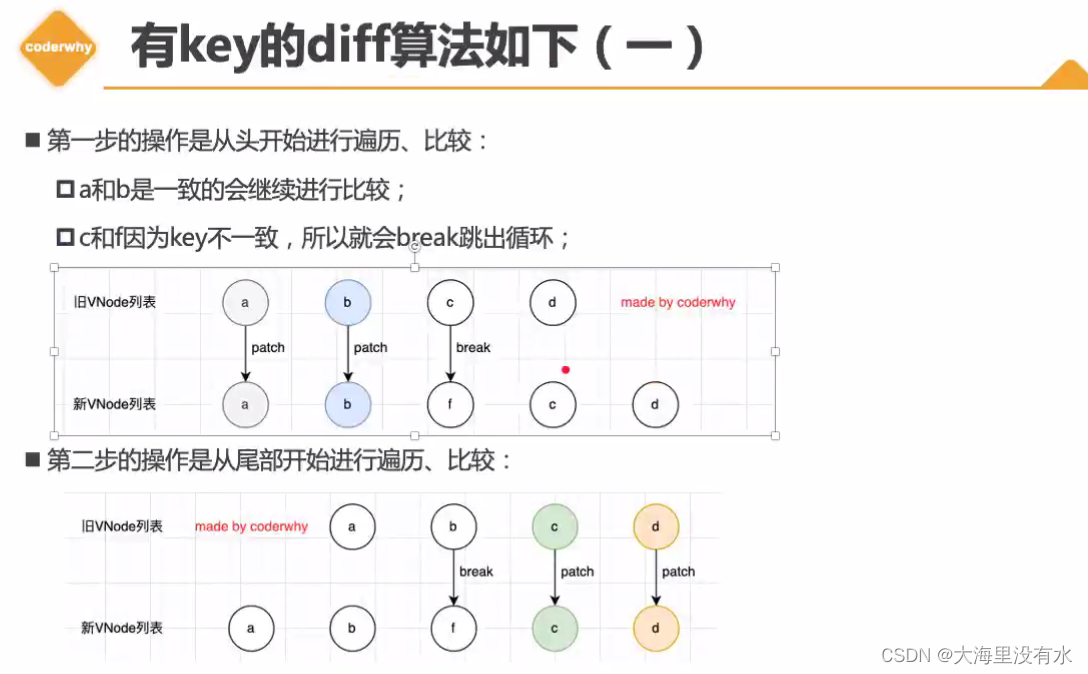
10、method 和 计算属性(对于任何包含响应式的数据)
<!DOCTYPE html>
<html lang="en">
  <head>
    <meta charset="UTF-8" />
    <meta http-equiv="X-UA-Compatible" content="IE=edge" />
    <meta name="viewport" content="width=device-width, initial-scale=1.0" />
    <title>Document</title>
  </head>

  <body>
    <div id="app"></div>

    <template id="chen">
      <button @click="changeFirstName">修改按钮</button>

      <h2>{{ fullName}}</h2>
      <h2>{{ fullName}}</h2>
      <h2>{{ fullName}}</h2>

      <!-- data中的数据是响应式的,只要发生改变,就会刷新页面 -->
      <h2>{{ getFullName() }}</h2>
      <h2>{{ getFullName() }}</h2>
      <h2>{{ getFullName() }}</h2>
    </template>

    <script src="https://unpkg.com/vue@3"></script>
    <script>
      Vue.createApp({
        template: "#chen",
        data: function () {
          return {
            firstName: "chen",
            lastName: "ping",
          };
        },
        computed: {
          // 计算属性是有缓存的,当我们多次使用计算属性时,计算属性中的运算只有执行一次。
          // 计算属性会随着依赖的数据(firstName)的改变,而重新进行计算
          fullName() {
            console.log("computed");
            return this.firstName + " " + this.lastName;
          },
        },
        methods: {
          getFullName() {
            console.log("methods");
            return this.firstName + " " + this.lastName;
          },
          changeFirstName() {
            this.firstName = "madongmei";
          },
        },
      }).mount("#app");
    </script>
  </body>
</html>
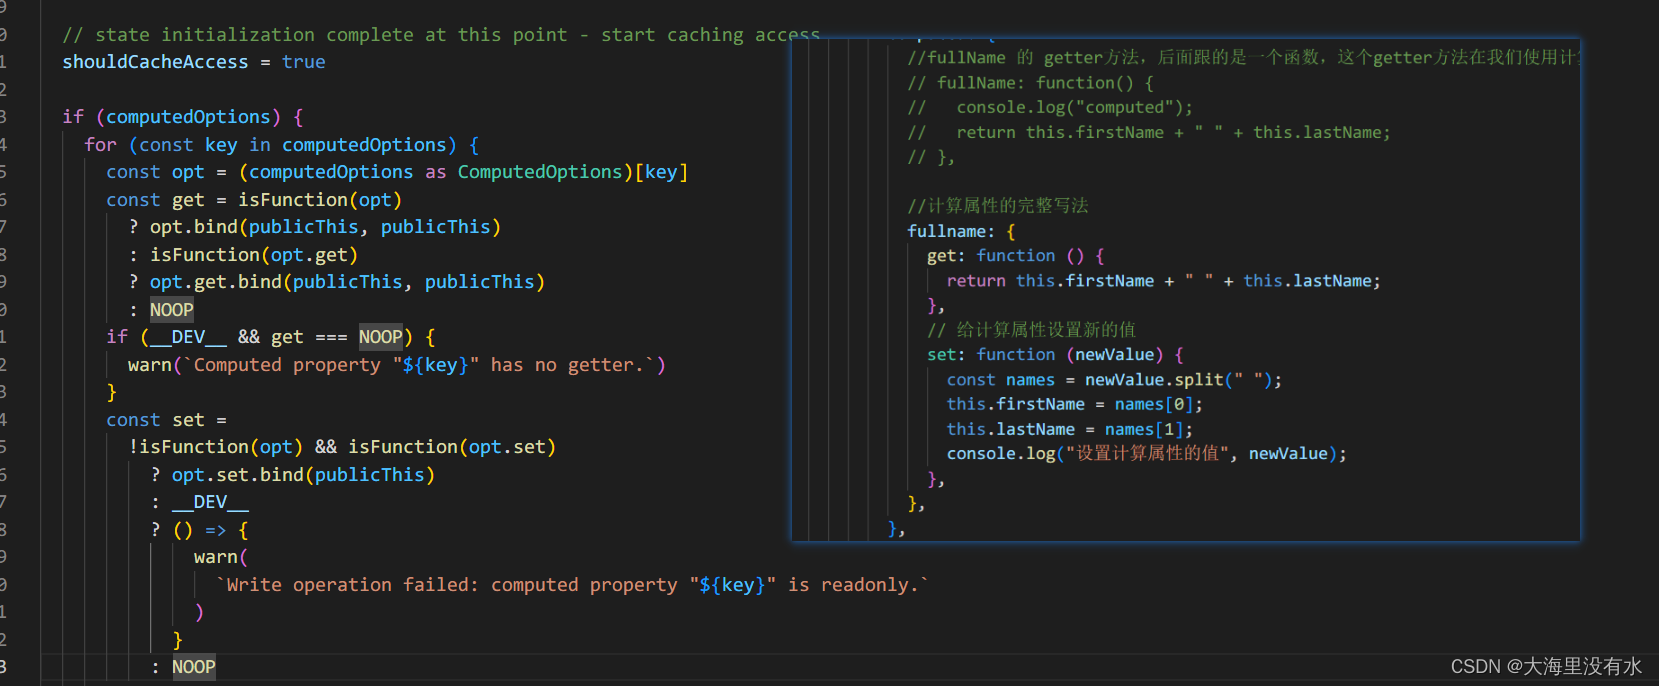
10.1、计算属性的setter/getter
<!DOCTYPE html>
<html lang="en">
  <head>
    <meta charset="UTF-8" />
    <meta http-equiv="X-UA-Compatible" content="IE=edge" />
    <meta name="viewport" content="width=device-width, initial-scale=1.0" />
    <title>Document</title>
  </head>

  <body>
    <div id="app"></div>

    <template id="chen">
      <button @click="changeFullName">修改按钮</button>

      <h2>{{ fullname }}</h2>
    </template>

    <script src="https://unpkg.com/vue@3"></script>
    <script>
      Vue.createApp({
        template: "#chen",
        data: function () {
          return {
            firstName: "chen",
            lastName: "ping",
          };
        },
        computed: {
          //fullName 的 getter方法,后面跟的是一个函数,这个getter方法在我们使用计算属性的时候会进行调用
          // fullName: function() {
          //   console.log("computed");
          //   return this.firstName + " " + this.lastName;
          // },

          //计算属性的完整写法
          fullname: {
            get: function () {
              return this.firstName + " " + this.lastName;
            },
            // 给计算属性设置新的值
            set: function (newValue) {
              const names = newValue.split(" ");
              this.firstName = names[0];
              this.lastName = names[1];
              console.log("设置计算属性的值", newValue);
            },
          },
        },
        methods: {
          changeFullName() {
            // 一旦给计算属性赋值, 就会调他的set方法,
            this.fullname = "chen bairen";
          },
        },
      }).mount("#app");
    </script>
  </body>
</html>
源码computed 对传入函数 和 对象两种情况的判断 :NOOP是空的函数实现
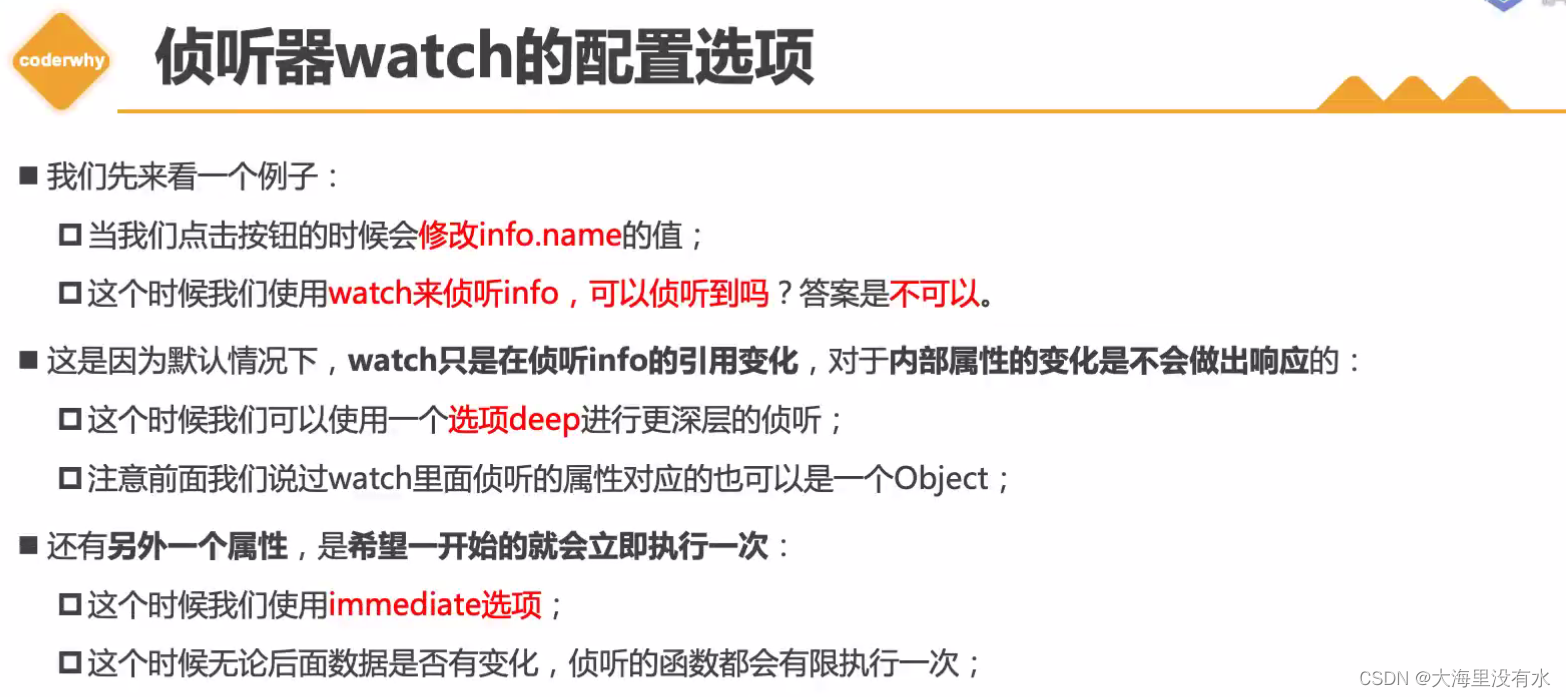
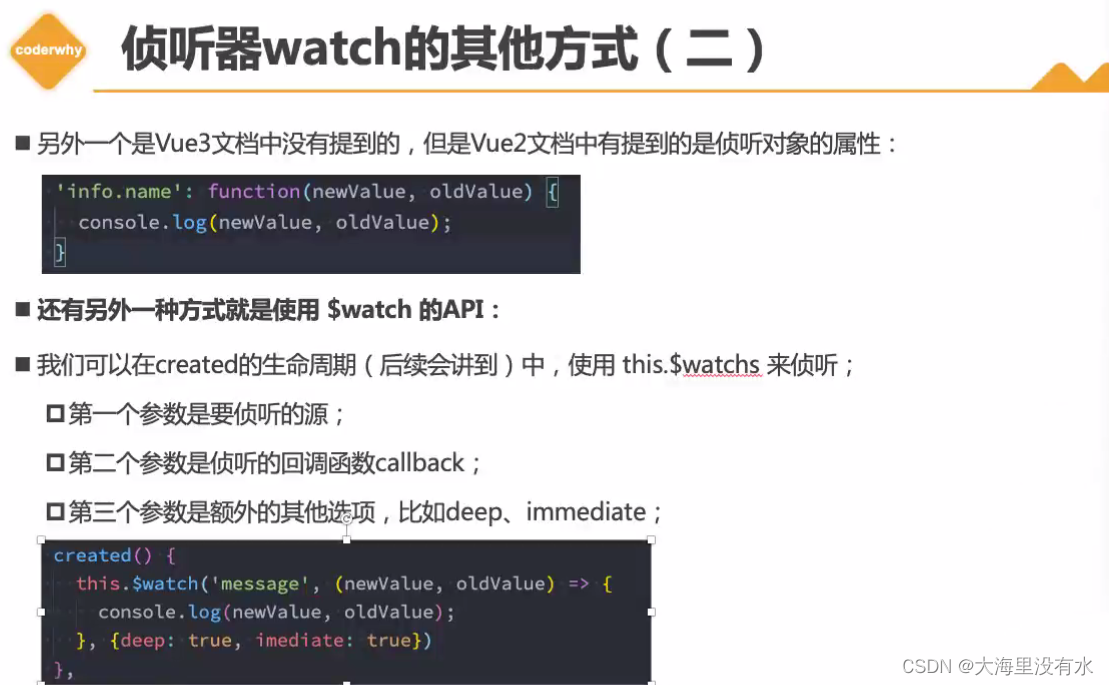
11、侦听器watch
<!DOCTYPE html>
<html lang="en">
  <head>
    <meta charset="UTF-8" />
    <meta http-equiv="X-UA-Compatible" content="IE=edge" />
    <meta name="viewport" content="width=device-width, initial-scale=1.0" />
    <title>Document</title>
  </head>

  <body>
    <div id="app"></div>

    <template id="chen">
      <h2>{{ info.name}}</h2>
      <!-- <h2>{{ info.nba.name}}</h2> -->
      <button @click="changeInfo">改变info</button>

      <!-- 上面的<h2>{{ info.name}}</h2>是可以发送改变的,但是watch中没侦听到 -->
      <button @click="changeInfoName">改变info中的name</button>
      <button @click="changeInfoNbaName">改变info.nba.中的name</button>
    </template>

    <script src="https://unpkg.com/vue@3"></script>
    <script>
      Vue.createApp({
        template: "#chen",
        data() {
          return {
            info: { name: "chen", age: 13, nba: { name: "xiao" } },
          };
        },
        // watch 可以跟函数、对象、数组
        watch: {
          // info(newInfo, oldInfo){
          //   console.log("newInfo: ", newInfo, "oldValue", oldInfo)
          // }

          // 方式一: 深度监听, 不管多深都可以侦听到的
          // 上面的写法,跟下面的写法是一样的
          // info: {
          //   handler: function (newInfo, oldInfo) {
          //     // 打印的值一样,是因为他两个用的是同一个引用,如果需要监听旧的值,需要拷贝一份
          //     // console.log("newInfo: ", newInfo, "oldValue", oldInfo)
          //     console.log("newInfo:", newInfo.info, "oldValue", oldInfo.info)
          //   },
          //   deep: true,   // 深度监听,可以监听到changeInfoName函数中的改变
          //   immediate: true //  深度监听/立即执行(一定会执行一次)
          // },

          // 方式二: 监听info里面的name,还有另一个种写法:
          "info.name": function (newValue, oldValue) {
            console.log("newValue, oldValue", newValue, oldValue);
          },
        },
        methods: {
          changeInfo() {
            this.info = { name: "ping" };
          },
          // watch 无法监听到, 默认情况下我们的监听器只会针对监听的 数据本身的改变,(内部发生的改变是不能监听的)
          changeInfoName() {
            this.info.name = "hahha";
          },
          changeInfoNbaName() {
            this.info.nba.name = "辰";
          },
        },
        created() {
          // 方式三: this.$watch
          // 可以有返回值
          const unwatch = this.$watch(
            "info.name",
            function (newValue, oldValue) {
              console.log("------", newValue, oldValue);
            },
            {
              deep: true,
              immediate: true,
            }
          );
          // 调用unwatch可以取消监听
        },
      }).mount("#app");
    </script>
  </body>
</html>
12、v-model
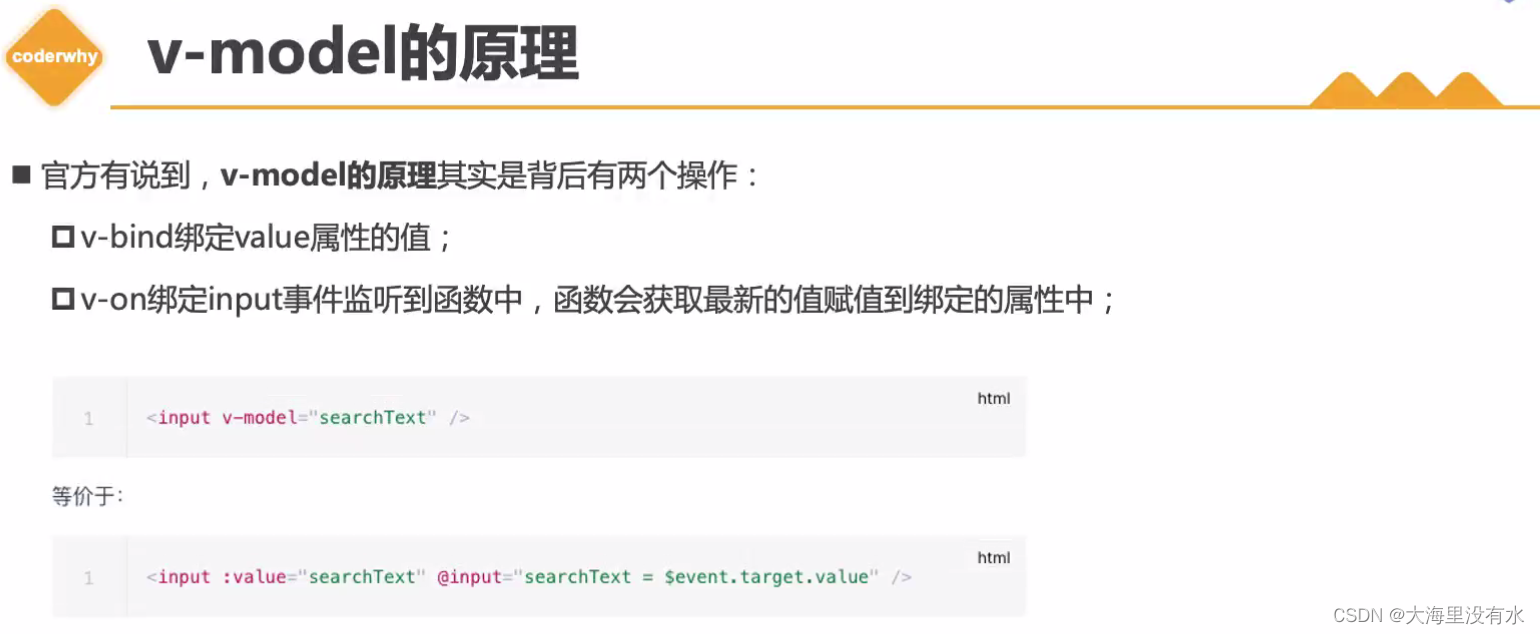
<!DOCTYPE html>
<html lang="en">
  <head>
    <meta charset="UTF-8" />
    <meta http-equiv="X-UA-Compatible" content="IE=edge" />
    <meta name="viewport" content="width=device-width, initial-scale=1.0" />
    <title>Document</title>
  </head>

  <body>
    <div id="app"></div>

    <template id="chen">
      <!-- 第一种实现: 分了两步:
        1.v-bind value的绑定
        2.监听input事件,更新message的值
      -->
      <input type="text" :value="message" @input="inputChange" />
      <!-- 等价于 @input事件: 只要输入修改, 事件立马触发-->
      <input
        type="text"
        :value="message"
        @input="message = $event.target.value"
      />

      <!-- 第二种实现 -->
      <input type="text" v-model="message" />
      <h2>{{message}}</h2>
    </template>

    <script src="https://unpkg.com/vue@3"></script>
    <script>
      Vue.createApp({
        template: "#chen",
        data: function () {
          return {
            message: "hell world",
          };
        },
        methods: {
          inputChange(event) {
            this.message = event.target.value;
          },
        },
      }).mount("#app");
    </script>
  </body>
</html>
<!DOCTYPE html>
<html lang="en">
  <head>
    <meta charset="UTF-8" />
    <meta http-equiv="X-UA-Compatible" content="IE=edge" />
    <meta name="viewport" content="width=device-width, initial-scale=1.0" />
    <title>Document</title>
  </head>

  <body>
    <div id="app"></div>

    <template id="chen">
      <!-- 1.绑定textarea -->
      <label for="intro">
        自我介绍
        <textarea
          name="intro"
          id="intro"
          cols="30"
          rows="10"
          v-model="intro"
        ></textarea>
      </label>
      <h2>intro: {{ intro }}</h2>

      <!-- 2. checkbox -->
      <!-- 2.1 单选框 -->
      <label for="agree">
        <input id="agree" type="checkbox" v-model="isAgree" />同意协议
        <h2>isAgree: {{isAgree}}</h2>
      </label>
      <!-- 2.2 多选框 -->
      <span>你的爱好: </span>
      <label for="basketball">
        <input
          id="basketball"
          type="checkbox"
          v-model="hobbies"
          value="basketball"
        />篮球
      </label>
      <label for="football">
        <input
          id="football"
          type="checkbox"
          v-model="hobbies"
          value="football"
        />足球
      </label>

      <label for="tennis">
        <input
          id="tennis"
          type="checkbox"
          v-model="hobbies"
          value="tennis"
        />网球
      </label>
      <h2>hobbies: {{hobbies}}</h2>

      <!-- 3.radio -->
      <span>你的性别: </span>
      <label for="male">
        <input id="male" type="radio" v-model="gender" value="male" />男
      </label>
      <label for="female">
        <input id="female" type="radio" v-model="gender" value="female" />女
      </label>
      <h2>gender: {{gender}}</h2>

      <!-- 4.select -->
      <span>喜欢的水果:</span>
      <select v-model="fruit" multiple size="2">
        <option v-for="item of fruits" :value="item">{{item.value}}</option>
        <option value="apple">苹果</option>
        <option value="orange">橘子</option>
        <option value="banana">香蕉</option>
      </select>
      <h2>fruit: {{fruit}}</h2>
    </template>

    <script src="https://unpkg.com/vue@3"></script>
    <script>
      Vue.createApp({
        template: "#chen",
        data: function () {
          return {
            intro: "hello world",
            isAgree: false,
            hobbies: [],
            gender: "",
            fruit: "orange",
          };
        },
        methods: {},
      }).mount("#app");
    </script>
  </body>
</html>
12.1 v-model修饰符
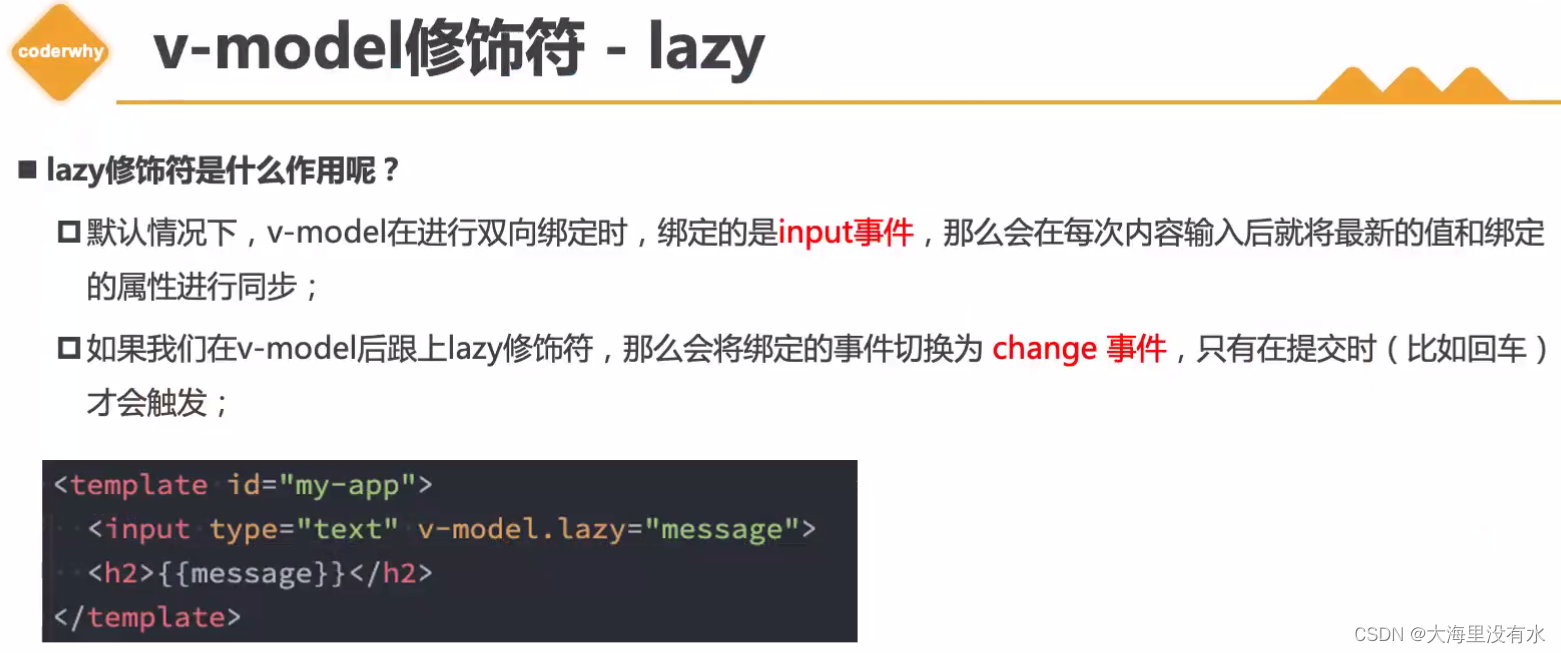
<!DOCTYPE html>
<html lang="en">
  <head>
    <meta charset="UTF-8" />
    <meta http-equiv="X-UA-Compatible" content="IE=edge" />
    <meta name="viewport" content="width=device-width, initial-scale=1.0" />
    <title>Document</title>
  </head>

  <body>
    <div id="app"></div>

    <template id="chen">
      <!-- 只有点击回车才触发
         默认情况下,v-model在进行双向绑定时,绑定的是input事件,那么会在每次内容输入后就将最新的值和绑定的属性进行同步;
         如果我们在v-model后跟上lazy修饰符,那么会将绑定的事件切换为 change 事件,只有在提交时(比如回车)才会触发;
    -->
      <!-- 1.lazy修饰符 -->
      <!-- <input type="text" v-model.lazy="message"> -->

      <!-- 2.number修饰符 -->
      <!-- <input type="text" v-model.number="message"> //一旦赋值,就会转换为string -->

      <input type="text" v-model.trim="message" />
      <h2>{{message}}</h2>
      <button @click="getType">查看数据类型</button>
    </template>

    <script src="https://unpkg.com/vue@3"></script>
    <script>
      Vue.createApp({
        template: "#chen",
        data: function () {
          return {
            // message: 'hello world'
            message: 1000, //message总是string类型,即使在我们设置type为number也是string类型;如果我们希望转换为数字类型,那么可以使用 .number 修饰符:
          };
        },
        methods: {
          getType() {
            console.log(this.message, typeof this.message);
          },
        },
      }).mount("#app");
    </script>
  </body>
</html>
二、vue组件
1、组件树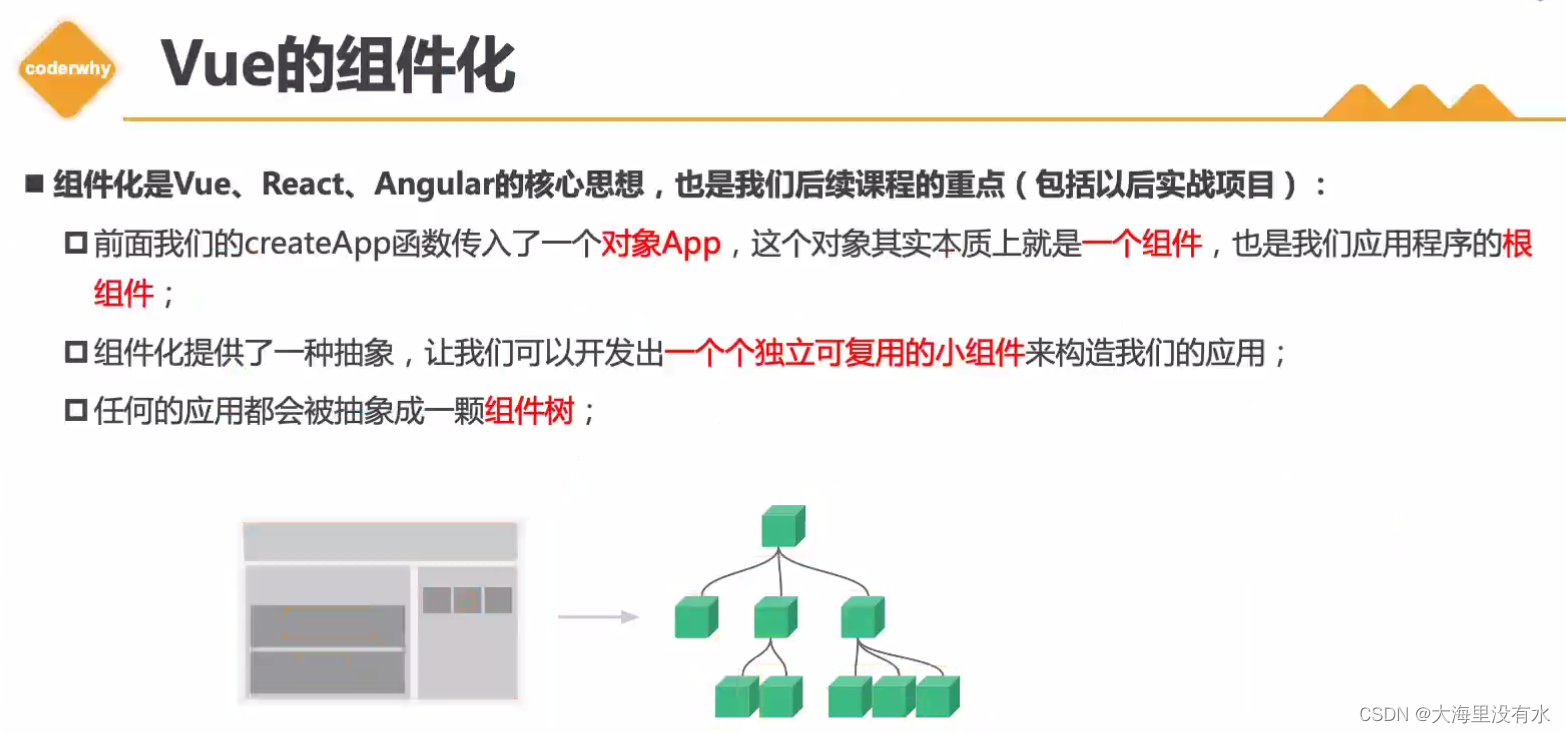
2、注册局部组件
<!DOCTYPE html>
<html lang="en">
  <head>
    <meta charset="UTF-8" />
    <meta http-equiv="X-UA-Compatible" content="IE=edge" />
    <meta name="viewport" content="width=device-width, initial-scale=1.0" />
    <title>Document</title>
  </head>

  <body>
    <div id="app"></div>
    <!-- 比如我们注册了三个全局组件:ComponentA、ComponentB、ComponentC;
       在开发中我们只使用了ComponentA、ComponentB,如果ComponentC没有用到但是我们依然在全局进行了注册,
       那么就意味着类似于webpack这种打包工具在打包我们的项目时,我们依然会对其进行打包;
       这样最终打包出的JavaScript包就会有关于ComponentC的内容,用户在下载对应的JavaScript时也会增加包的大小;
   -->

    <template id="chen">
      <h2>{{message}}</h2>
      <component-a></component-a>
    </template>

    <template id="component-a">
      <h2>我是组件a</h2>
      <p>我是内容</p>
    </template>

    <script src="https://unpkg.com/vue@3"></script>
    <script>
      const ComponentA = {
        template: "#component-a",
      };

      const App = {
        template: "#chen",
        // 局部注册
        components: {
          //key: 组件名称
          //value: 组件对象
          ComponentA: ComponentA,
        },
        data() {
          return {
            message: "hello world",
          };
        },
      };

      const app = Vue.createApp(App);
      app.mount("#app");
    </script>
  </body>
</html>
