最近开发新项目要实现一个低代码平台,在画布上拖拖拽拽,就可以实现一些算法流程,生成所需要的代码。
然后就考虑使用antv x6来实现,跟别的工具一样,依旧觉得文档很烂,看了好多资料才实现,踩了很多坑,希望能对大家有些帮助吧~
1.生成配置画布
1.1 创建一个用来生成画布的节点
   <div className={styles.content} id="content">
        <div id="container" ref={refContainer}></div>
      </div>
1.2 生成画布
  // 初始,mounted生命周期时, container组件还没挂载。
  const [container, setcontainer] = useState(document.createElement("div"));

  // 获取container对象
  const refContainer = (container) => {
    setcontainer(container);
  };

  // 绑定画布
  useEffect(() => {
	const graph = new Graph({
      container: container,
      width: "100%",
      height: "100%",
      background: {
         color: "#ffffff", // 设置画布背景颜色
      }
   }
})
1.3 对画布更多选项的配置
useEffect(() => {
    const d =
      "M4.834,4.834L4.833,4.833c-5.889,5.892-5.89,15.443,0.001,21.334s15.44,5.888,21.33-0.002c5.891-5.891,5.893-15.44,0.002-21.33C20.275-1.056,10.725-1.056,4.834,4.834zM25.459,5.542c0.833,0.836,1.523,1.757,2.104,2.726l-4.08,4.08c-0.418-1.062-1.053-2.06-1.912-2.918c-0.859-0.859-1.857-1.494-2.92-1.913l4.08-4.08C23.7,4.018,24.622,4.709,25.459,5.542zM10.139,20.862c-2.958-2.968-2.959-7.758-0.001-10.725c2.966-2.957,7.756-2.957,10.725,0c2.954,2.965,2.955,7.757-0.001,10.724C17.896,23.819,13.104,23.817,10.139,20.862zM5.542,25.459c-0.833-0.837-1.524-1.759-2.105-2.728l4.081-4.081c0.418,1.063,1.055,2.06,1.914,2.919c0.858,0.859,1.855,1.494,2.917,1.913l-4.081,4.081C7.299,26.982,6.379,26.292,5.542,25.459zM8.268,3.435l4.082,4.082C11.288,7.935,10.29,8.571,9.43,9.43c-0.858,0.859-1.494,1.855-1.912,2.918L3.436,8.267c0.58-0.969,1.271-1.89,2.105-2.727C6.377,4.707,7.299,4.016,8.268,3.435zM22.732,27.563l-4.082-4.082c1.062-0.418,2.061-1.053,2.919-1.912c0.859-0.859,1.495-1.857,1.913-2.92l4.082,4.082c-0.58,0.969-1.271,1.891-2.105,2.728C24.623,26.292,23.701,26.983,22.732,27.563z";

    // 连接过程中产生的新边的样式
    Graph.registerEdge(
      "dag-edge",
      {
        inherit: "edge",
        attrs: {
          line: {
            stroke: "#9DADB6",
            strokeWidth: 2,
            sourceMarker: null,
            targetMarker: {
              //
              name: "block", // 实心箭头
            },
          },
        },
      },
      true
    );

    // 自定义连接器,将起点、路由返回的点、终点加工为 <path> 元素的 d 属性,返回边在画布上渲染后的样式
    Graph.registerConnector(
      "algo-connector",
      (s, e) => {
        const offset = 4;
        const deltaY = Math.abs(e.y - s.y);
        const control = Math.floor((deltaY / 3) * 2);

        const v1 = { x: s.x, y: s.y + offset + control };
        const v2 = { x: e.x, y: e.y - offset - control };

        return Path.normalize(
          `M ${s.x} ${s.y} // 起始位置
           L ${s.x} ${s.y + offset} // 到达位置
           C ${v1.x} ${v1.y} ${v2.x} ${v2.y} ${e.x} ${e.y - offset} // 曲线到
           L ${e.x} ${e.y} // 到达位置
          `
        );
      },
      true
    );
    // 绑定画布
    const graph = new Graph({
      container: container,
      width: "100%",
      height: "100%",
      background: {
        color: "#ffffff", // 设置画布背景颜色
      },
      grid: {
        size: 10, // 网格大小 10px
        visible: true, // 渲染网格背景
        type: "mesh",
        args: {
          color: "rgba(245,245,245,1)",
        },
      },
      history: true, // 撤销/重做,默认禁用
      snapline: {
        // 是否添加对齐线
        enabled: true,
        sharp: true,
      },
      // scroller: { // 画布是否可滚动
      //   enabled: true,
      //   pageVisible: false,
      //   pageBreak: false,
      //   pannable: true,
      // },
      mousewheel: {
        // 是否可用鼠标绽放
        enabled: true,
        modifiers: ["ctrl", "meta"],
      },
      highlighting: {
        // 触发某种交互时的高亮样式
        magnetAdsorbed: {
          // 连接桩可以被连接时高亮
          name: "stroke",
          args: {
            attrs: {
              fill: "#fff",
              stroke: "#31d0c6",
              strokeWidth: 4,
            },
          },
        },
      },
      connecting: {
        // 配置全局的连线规则

        snap: true, // 是否自动吸附
        allowBlank: false, // 是否允许连接到空白点
        allowLoop: false, // 是否允许创建循环连线
        highlight: true, // 拖动边时,是否高亮显示所有可用的连接桩或节点
        connector: "algo-connector", // 边渲染到画布后的样式
        connectionPoint: "anchor", // 指定连接点
        anchor: "center", // 指定被连接的节点的锚点
        validateMagnet({ magnet }) {
          // magnet 被按下时,是否创建新的边
          return magnet.getAttribute("port-group") !== "top";
        },
        createEdge() {
          // 连接的过程中创建新的边
          return graph.createEdge({
            shape: "dag-edge",
            attrs: {
              line: {
                strokeDasharray: "5 5",
              },
            },
            zIndex: -1,
          });
        },
      },
      selecting: {
        // 是否可通过点击或者套索框选节点
        enabled: true,
        multiple: true,
        rubberEdge: true,
        rubberNode: true,
        modifiers: "shift",
        rubberband: true,
      },
    });

    graph.enableHistory();
    globalGraph = graph; // 定义一个全局变量,用来存放graph,待生成拖拽事件的时候用
  }, [container]); // useEffect 依赖container变化,不然会一直重复渲染
记得生成画布事件一定要放在useEffect中哦,因为dom异步渲染事件可能会导致诸如‘container is not undefined’ 类的错误
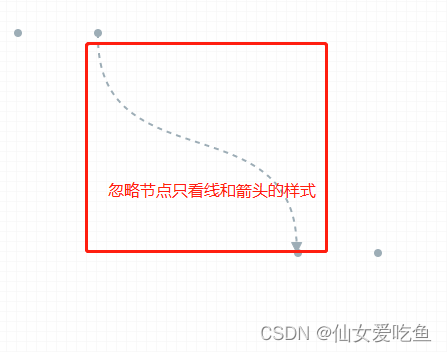
配置好箭头和边的新样式后长这样子

下面我们就要写拖拽生成节点了
2.拖拽生成节点
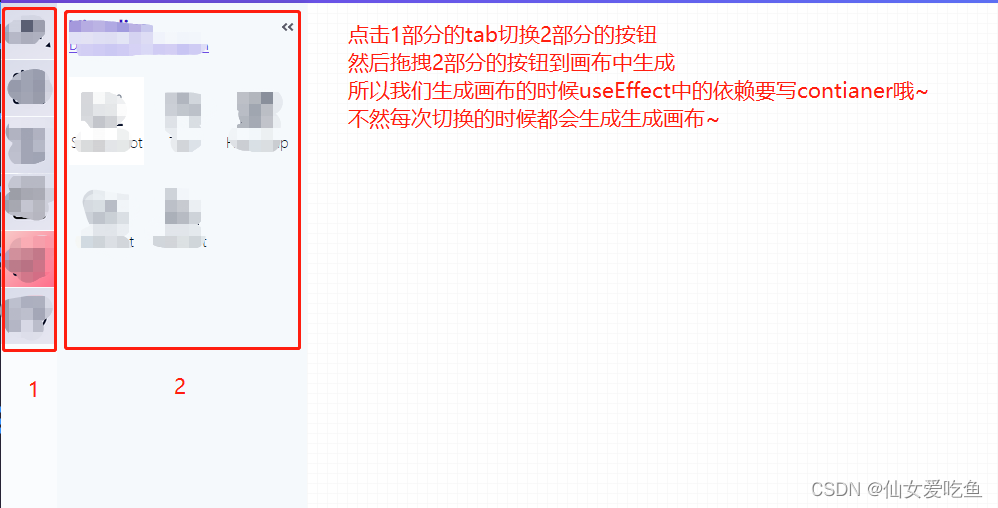
我们的页面结构是这样的,

然后我们给左侧tab面板中的按钮绑定拖拽事件,使用onMouseDown
 <div className={styles.toolsContent}>
            {currentToolList.map((item, index) => {
              return (
                <div
                  onClick={() => handleModel(index)}
                  onMouseDown={(e) => startDrag(item, e)}
                >
                </div>
              );
            })}
          </div>

 // 绑定事件,传入graph对象
  const startDrag = (type, e) => {
    if (graph) {
      startDragToGraph(globalGraph, type, e, handleRun, setLoading); // 传入(graph对象,当前节点类型,事件对象,打开弹窗事件,设置loading事件)
    }
  };
3.定义antv x6的拖拽事件(startDragToGraph.js)
import {
  Addon
} from '@antv/x6'
import {
  insertCss
} from 'insert-css'
import {
  createWorkflow,
  queryTypeById
} from "@/service/knn/csvExcel";
import {
  message,
} from "antd";

// 拖拽生成节点
export const startDragToGraph = (graph, type, e, handleRun, setLoading) => {

const dnd = new Addon.Dnd({
    target: graph,
    scaled: false,
    animation: true
  })

 const target = graph.createNode({
    width: 64,
    height: 92,
    // shape: 'react-shape', //这里只可以使用react component返回节点,
    // component: <MyComponent type={type} />,
    shape: 'html',

    html: () => { // 使用html模板字符串返回节点
      const wrap = `
                <div class='wrap ${type.tag}'>
                  <div class="left">
                    <svg xmlns="http://www.w3.org/2000/svg" viewBox="0 0 17 62" class="design-iconfont" width="128" height="128">
                      <path d="M11,470 C34.7512315,470 54.025641,488.792549 54.025641,512 C54.025641,513.104569 53.1302105,514 52.025641,514 C50.9210715,514 50.025641,513.104569 50.025641,512 C50.025641,491.024671 32.5644403,474 11,474 C9.8954305,474 9,473.104569 9,472 C9,470.895431 9.8954305,470 11,470 Z" transform="scale(-1 1) rotate(45 564.97622613 205.94213543)" fill="#9DADB6" fill-rule="nonzero"></path>
                    </svg>
                  </div>

                  <div class="middle">
                  <div class="shape">
                    <img class="icon" src=${type.icon}></img>
                  </div>
                  <div class="text">${type.name}</div>
                  </div>
                  <div class="right">
                  <svg xmlns="http://www.w3.org/2000/svg" viewBox="0 0 17 62" class="design-iconfont" width="128" height="128">
                    <path d="M63,470 C86.7512315,470 106.025641,488.792549 106.025641,512 C106.025641,513.104569 105.130211,514 104.025641,514 C102.921072,514 102.025641,513.104569 102.025641,512 C102.025641,491.024671 84.5644403,474 63,474 C61.8954305,474 61,473.104569 61,472 C61,470.895431 61.8954305,470 63,470 Z" transform="rotate(45 599.48904713 163.72435072)" fill="#9DADB6" fill-rule="nonzero"></path>
                  </svg>
                  </div>
                </div>
              `
      return wrap
    },
    ports: ports,
  })

  // 初始化拖拽面板
  dnd.start(target, e.nativeEvent)
}
定义锚点的代码(可以连接线的节点位置,样式等)
const ports = {
  groups: {
    left: {
      position: {
        name: 'absolute'
      },
      attrs: {
        circle: {
          r: 4,
          magnet: true,
          stroke: '#9DADB6',
          strokeWidth: 0,
          fill: '#9DADB6',
        },
      },
    },
    right: {
      position: {
        name: 'absolute'
      },
      attrs: {
        circle: {
          r: 4,
          magnet: true,
          stroke: '#9DADB6',
          strokeWidth: 0,
          fill: '#9DADB6',
        },
      },
    },
  },
  items: [{
      id: 'port3',
      group: 'left',
      args: {
        x: 0 - 8,
        y: 64 / 2,
        angle: 45,
      },
    },
    {
      id: 'port4',
      group: 'right',
      args: {
        x: 64 + 8,
        y: 64 / 2,
        angle: 45,
      },
    }
  ],
}
我们的css这样写
insertCss(`
  .wrap {
    display: flex;
    align-items: center;
    justify-content: center;
  }

  .left {
    width: 64px;
    height: 64px;
    position: absolute;
    left: -34px;
    top: 0px
  }
  .right {
    width: 64px;
    height: 64px;
    position: absolute;
    left: 34px;
    top: 0px
  }
  .design-iconfont {
    width: 100%;
    height: 100%;
  }
  .shape {
    width: 64px;
    height: 64px;
    display: flex;
    align-items: center;
    justify-content: center;
    background: #F6BAE0;
    border-radius: 100%;
  }
  .icon {
    width: 26px;
    height: 34px;
  }
  .text {
    font-size: 14px;
    margin-top: 12px;
    font-family: Helvetica;
    font-weight: ;
    font-size: 14px;
    color: #040D26;
    letter-spacing: 0;
    text-align: center;
    line-height: 12px;
  }
`)
如果用react component实现自定义节点这样写
class MyComponent extends React.Component {
  shouldComponentUpdate() {
    const node = this.props.node
    if (node) {
      if (node.hasChanged('data')) {
        return true
      }
    }

    return false
  }


   abs() {
      console.log(11111111111111111)
  }

  render() {
    const {type} = this.props
    return (
      <div class="wrap" onClick={() => this.abs()}>
        <div class="left">
          <svg xmlns="http://www.w3.org/2000/svg" viewBox="0 0 17 62" class="design-iconfont" width="128" height="128">
            <path d="M11,470 C34.7512315,470 54.025641,488.792549 54.025641,512 C54.025641,513.104569 53.1302105,514 52.025641,514 C50.9210715,514 50.025641,513.104569 50.025641,512 C50.025641,491.024671 32.5644403,474 11,474 C9.8954305,474 9,473.104569 9,472 C9,470.895431 9.8954305,470 11,470 Z" transform="scale(-1 1) rotate(45 564.97622613 205.94213543)" fill="#9DADB6" fill-rule="nonzero"></path>
          </svg>
        </div>

        <div class="middle">
          <div class="shape">
            <img class="icon" ></img>
          </div>
          <div class="text">{type.name}</div>
        </div>
        <div class="right">
          <svg xmlns="http://www.w3.org/2000/svg" viewBox="0 0 17 62" class="design-iconfont" width="128" height="128">
            <path d="M63,470 C86.7512315,470 106.025641,488.792549 106.025641,512 C106.025641,513.104569 105.130211,514 104.025641,514 C102.921072,514 102.025641,513.104569 102.025641,512 C102.025641,491.024671 84.5644403,474 63,474 C61.8954305,474 61,473.104569 61,472 C61,470.895431 61.8954305,470 63,470 Z" transform="rotate(45 599.48904713 163.72435072)" fill="#9DADB6" fill-rule="nonzero"></path>
          </svg>
        </div>
      </div>
    )
  }
}
4.如何给自定义节点写交互事件
为了给节点写交互事件真的踩了好几次坑,还把事情想复杂了,记录都在这里,x6生成节点后,有一个唯一的固定的id,生成或者双击等都可以获取到这个id,我们直接使用这个id与后端交互

拖拽结束后,我们与后端交互,获取node.id,服务端返回正确后再放到画布上面

4.1拖拽生成节点
const dnd = new Addon.Dnd({
    target: graph,
    scaled: false,
    animation: true,
    validateNode(droppingNode, options) {
      console.log('droppingNode, options=================', droppingNode, options)
      return droppingNode.shape === 'html' ?
        new Promise((resolve, reject) => {

          try {
            setLoading(true)
            createWorkflow({
              widget_type: type.typeId,
              widget_id: droppingNode.id
            }).then((res) => {
              const {
                data,
                code,
                msg
              } = res;
              if (code !== 200) {
                message.error(`抱歉!${msg}`);
                return;
              }
              setLoading(false)
              resolve(true)

            });
          } catch (err) {
            message.error("当前网络不好,请稍候重试!");
            console.error(err);
          }
        }) : true
    },
    // getDropNode(droppingNode, options) {
    //   console.log('拖拽结束时,获取放置到目标画布的节点',droppingNode, options)
    // }
  })
4.2双击打开弹窗
graph.on('node:dblclick', ({
    e,
    x,
    y,
    node,
    view
  }) => {
    console.log('node,===============', node.id)
    queryTypeById({
      widget_id: node.id
    }).then(res => {
      console.log('queryTypeByIdres', res)
      handleRun({ // 执行传入的打开弹窗事件,设置节点相关事件)
        id: node.id,
        type: res.data
      })

    })
  })
好啦,antv x6的初始使用我们现在已经完成啦!后续如果还有其他坑或者比较难调试的功能我也会发上来,大家有什么问题都可以给我留言哦~
