一、vue组件
组件(component)是vue.js最强大的功能之一。组件的作用就是封装可重用的代码,通常一个组件就是一个功能体,便于在多个地方都能够调用这个功能体。 每个组件都是Vue的实例对象。 我们实例化的Vue对象就是一个组件,而且是所有组件的根组件
如何使用组件
1.定义组件
cons modal={ template:`` }
2.在父组件中注册组件components:{modal}
3.在父组件作用域内使用组件<modal></modal>
1.1全局组件
全局定义组件 vue.component(“组件名”,{属性})
<!DOCTYPE html>
<html>
	<head>
		<meta charset="utf-8">
		<title></title>
		<script src="../js/vue.js"></script>
	</head>
	<body>
		<div id="app">
			<h1>组件</h1>
			<p>拆分项目为多个简单组件,可以降低项目复杂度</p>
			<p>组件让多人合作团队开发更加快捷</p>
			<p>组件复用,让项目开发更加便捷</p>
			<count></count>
			<count></count>
		</div>
	</body>
	<script>
		//全局组件(当前项目任意实例中可以使用)
		// count组件名,template模板
		Vue.component("count",{
			template:`<button @click="num++">{{num}}</button>`,
			data(){
				return{num:100}
			}
		})
		var vm=new Vue({
			el:"#app",
		})
	</script>
</html>
注意:
1.组件中的data是一个函数,不是对象
2.组件中必须有一个唯一的根元素
3.模板中内容较多时候建议使用模板字符串
1.2局部组件
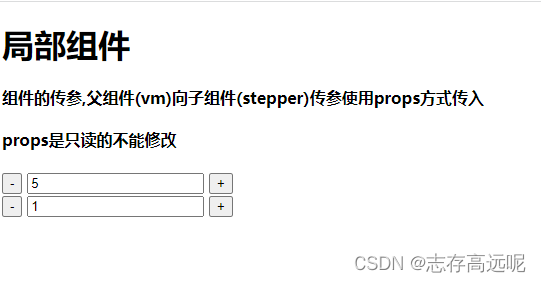
步进器实例:
<!DOCTYPE html>
<html>
	<head>
		<meta charset="utf-8">
		<title></title>
		<script src="../js/vue.js"></script>
	</head>
	<body>
		<div id="app">
			<h1>局部组件</h1>
			<!-- 3.使用组件 -->
			<h4>组件的传参,父组件(vm)向子组件(stepper)传参使用props方式传入</h4>
			<h4>props是只读的不能修改</h4>
			<stepper :num="mynum"></stepper><br>
			<stepper></stepper>
		</div>
	</body>
	<script>
		// 1.定义组件
		const stepper={
			template:`<span>
			<button @click="count--">-</button>
			<input type="text" v-model.number="count"/>
			<button @click="count++">+</button>
			</span>
			`,
			data(){
				return{count:this.num}
			},
			props:{
				num:{type:Number,default:1}
			}
		}
		var vm=new Vue({
			el:"#app",
			// 2.注册组件
			components:{stepper},
			data(){
				return{mynum:5}
			}
		})
	</script>
</html>

二、组件的传参
可以看到,在局部组件中父组件向子组件传了一个参数mynum,
接下来就说一下父组件是如何向子组件传参以及子组件如何向父组件传参的
2.1父传子
<!DOCTYPE html>
<html>
	<head>
		<meta charset="utf-8">
		<title></title>
		<script src="../js/vue.js"></script>
	</head>
	<body>
		<div id="app">
			<my-son :num="number"></my-son>
		</div>
	</body>
	<script>
		let mySon = {
			template: `
			   <div>我是接受父组件传递过来的数据 {{ num }}</div>
			   `,
			props: {
				num: {
					type: Number
				}
			}
		};
		var vue = new Vue({
			el: "#app",
			data: {
				number: 100
			},
			methods: {},
			components: {
				"my-son": mySon
			}
		});
	</script>
	</body>
</html>
效果:

步骤总结:
1、父组件定义数据
2、父组件通过属性的方式给子组件传递数据
3、子组件通过props属性接受数据并做参数设置
4、子组件使用传递过来的数据
2.2子传父
<!DOCTYPE html>
<html>
	<head>
		<meta charset="utf-8">
		<title></title>
		<script src="../js/vue.js"></script>
	</head>
	<body>
		<div id="app">
			<my-son @childhandle="fuhandle"></my-son>
			<div>{{ con }}</div>
		</div>
	</body>
	<script>
		let mySon = {
			data: function() {
				return {
					msg: "子组件中的内容"
				};
			},
			template: `
			<div>
				<button @click="childClick">点击</button>
			</div>
			`,
			methods: {
				childClick: function() {
					this.$emit("childhandle", this.msg);
				}
			}
		};
		var vue = new Vue({
			el: "#app",
			data: {
				con: ""
			},
			methods: {
				fuhandle: function(val) {
					this.con = val;
				}
			},
			components: {
				"my-son": mySon
			}
		});
	</script>
	</body>
</html>
步骤如下:
1、子组件绑定事件
<button @click=‘childClick’>点击
调用this.$emit方法传递数据,第一个参数是自己定义的事件名,第二个参数是传递的数据
2、父组件监听传递的事件childhandle
3、父组件中对监听的事件做处理,拿到传递的数值再在页面显示或其他处理。
三、组件的插槽
3.1插槽基础用法
<div id="app">
 	 <modal>
	 	<P>插槽内容1</p>
  		<P>插槽内容2</p>
	</modal>
</div>
<script>
const modal={
	templat:`
   <slot></slot>
	`
};
new Vue({
	el: "#app",
	components:{modal},
	})
</script>
注意:
-
父级的填充内容如果指定到子组件的没有对应名字插槽,那么该内容不会被填充到默认插槽中。
-
如果子组件没有默认插槽,而父级的填充内容指定到默认插槽中,那么该内容就“不会”填充到子组件的任何一个插槽中。
-
如果子组件有多个默认插槽,而父组件所有指定到默认插槽的填充内容,将“会” “全都”填充到子组件的每个默认插槽中。
3.2具名插槽
具名插槽其实就是在父组件中添加一个 slot=‘自定义名字’ 的属性,
然后在子组件中的 <slot><slot> 里面添加 name=‘自定义名字’ 即可
如果父组件中有一部分没有添加 slot 属性,则此处就是默认的插槽,
在子组件中的 <slot></slot> 直接就是使用的父组件的默认插槽部分
<!DOCTYPE html>
<html>
	<head>
		<meta charset="utf-8">
		<title></title>
		<script src="../js/vue.js"></script>
	</head>
	<body>
		<div id="app">
			<myson>
				<template #header>
					<p>我是头部内容</p>
				</template>
				<template v-slot:main>
					<p>我是主体内容</p>
				</template>
				<template #footer>
					<p>我是底部内容</p>
				</template>
			</myson>
		</div>
	</body>
	<script>
		const myson = {
			template: `
			<p>
			  <slot name="header"></slot>
	          <slot name="main"></slot>
	          <slot name="footer"></slot>
			</p>
	      `,
		};
		var vue = new Vue({
			el: "#app",
			data: {},
			methods: {},
			components: {
				myson
			},
		});
	</script>
	</body>
</html>
四、轮播图实例
代码如下:
swiper.js
const swiper = {
	template: `
	<div class="swiper" ref="container">
	 <transition-group :name="name" tag="div">
		<div v-for="(item,index) in gallery"
		v-show="current==index"
		:key="item" class="swiper-slide">
			<img :src="item" alt="" >
		</div>
	 </transition-group>

		<div class="span">
			<span @click="step(index)" :class="current==index-1?'active':''" v-for="index in (gallery.length)"></span>
		</div>
		<div class="pre" @click="pre">
			?
		</div>
		<div class="next" @click="next">
			?
		</div>
	</div>
	`,
	props: {
		"gallery": {
		//类型为数组或者对象时,默认值需要有个返回值
			type: Array,
			default () {
				return []
			}
		},
		//传入的current默认显示第几张
		"curent": {
			type: Number,
			default: 3
		},
		//传入的定时器参数
		"interval": {
			type: Number,
			default: 2000
		},
		//传入的name参数,实现轮播图不同的动画效果
		"name":{
			type:String,
			default:"slide"
		}
	},
	data() {
		return {
			current: this.curent,
			cid: null,
			time: this.interval,
		}
	},
	methods: {
		auto() {
			this.cid = setInterval(() => {
				this.current++
				if (this.current >= this.gallery.length) {
					this.current = 0
				}
			}, this.time)
		},
		stop() {
			clearInterval(this.cid)
		},
		//点击span按钮,实现点击第几个按钮显示第几张
		step(index) {
			console.log(index)
			this.current = index - 1
		},
		//点击上一张,让current--
		pre() {
			console.log(this.current)
			if (this.current == 0) {
				this.current = 5
			} else {
				this.current--
			}
		},
		//点击下一张,让current++
		next() {
			if (this.current == 5) {
				this.current = 0
			} else {
				this.current++
			}
		}
	},
	//dom挂载完毕
	mounted() {
		//dom挂载完毕执行auto计时器
		this.auto();
		// this.$refs.xxx 获取节点的最有效方式
		this.$refs.container.addEventListener("mouseover", this.stop);
		// 鼠标移除,开始自动播放
		this.$refs.container.addEventListener("mouseout", this.auto);
		setTimeout(() => {
			//选择到swiper节点下面每张幻灯片的高度
			var swiper = this.$refs.container.querySelector(`.swiper-slide:nth-of-type(${this.curent+1})`)
			console.log(swiper.offsetHeight)
			//设置swiper节点的高度等于每张幻灯片的高度
			this.$refs.container.style.height = swiper.offsetHeight + "px"
		}, 500)

	}
}
swiper.html
<!DOCTYPE html>
<html>
	<head>
		<meta charset="utf-8">
		<title></title>
		<script src="../js/vue.js"></script>
		<script src="../js/swiper.js"></script>
	</head>
	<style>

		.swiper .span{
			width: 120px;
			position: absolute;
			left: 140px;
			bottom: 10px;
			display: flex;
			justify-content: space-around;
		}
		.swiper .span>span{
			display: inline-block;
			width: 12px;
			height: 12px;
			background-color:rgba(0, 0, 0, .5);
			border-radius: 50%;
			cursor: pointer;
		}
		.active{
			transform: scale(1.2);
			background-color: #55ffff !important;
		}
		.pre,.next{
		 font-size: 60px;
		position: absolute;
		top:42%;
		bottom:50%;
		cursor: pointer;
		color:#fff;
		}
		.pre{
			left:5px;
		}
		.next{
			right:5px;
		}
		.pre:hover{
			color:#f70;
		}
		.next:hover{
			color:#f70;
		}
		.swiper{
			position: relative;
			overflow: hidden;
		}
		.swiper-slide{
			position: absolute;
		}
		/* 定义淡入淡出动画 */
		@keyframes fadeIn{
			from{opacity: 0;}
			to{opacity: 1;}
		}
		@keyframes fadeOut{
			0%{opacity: 1;}
			100%{opacity: 0;}
		}
		/* 定义滑动动画 */
		@keyframes slideIn{
			from{transform: translate(-100%,0);}
			to{transform: translate(0%,0);}
		}
		@keyframes slideOut{
			0%{transform: translate(0%,0);}
			100%{transform: translate(100%,0);}
		}
		.slide-enter-active{
			animation: slideIn linear 1s;
		}
		.slide-leave-active{
			animation: slideOut linear 1s;
		}
		.fade-enter-active{
			animation: fadeIn linear 1s;
		}
		.fade-leave-active{
			animation: fadeOut linear 1s;
		}
	</style>
	<body>
		<div id="app">
			<h1>swiper组件</h1>
			<swiper :name="'slide'"  :gallery="gallery" :curent="1" :interval="2000" style="width: 400px;"></swiper>
			<swiper :name="'fade'" :gallery="list" :curent="3" :interval="2000" style="width: 400px;"></swiper>
		</div>
	</body>
	<script>
		new Vue({
			el:"#app",
			components:{swiper},
			data:{
				gallery:[
					"https://img2.woyaogexing.com/2022/07/05/5cd45f96952c9a4f!400x400.jpg",
					"https://img2.woyaogexing.com/2022/07/05/25237ec39e5591bd!400x400.jpg",
					"https://img2.woyaogexing.com/2022/07/05/83974c9472b97f78!400x400.jpg",
					"https://img2.woyaogexing.com/2022/07/05/0fb9352f4ba47507!400x400.jpg",
					"https://img2.woyaogexing.com/2022/07/05/1e40e03244057f0e!400x400.jpg",
					"https://img2.woyaogexing.com/2022/07/05/5f587d6b5d31647e!400x400.jpg"
				],
				list:[
					"https://img2.woyaogexing.com/2022/07/05/f39dad5b4d98a792!400x400.jpg",
					"https://img2.woyaogexing.com/2022/07/05/897eaeb9398b6aaf!400x400.jpg",
					"https://img2.woyaogexing.com/2022/07/05/e00d116bbd94386a!400x400.jpg",
					"https://img2.woyaogexing.com/2022/07/05/8e3309a2a8986038!400x400.jpg",
					"https://img2.woyaogexing.com/2022/07/05/c5604330af074c3c!400x400.jpg",
					"https://img2.woyaogexing.com/2022/07/05/96327c4b83f25ffb!400x400.jpg",
				]
			}
		})
	</script>
</html>