文章目录
一、组件的生命周期
1. 生命周期 & 生命周期函数
生命周期(Life Cycle)是指一个组件从创建 -> 运行 -> 销毁的整个阶段,强调的是一个时间段。
生命周期函数:是由 vue 框架提供的内置函数,会伴随着组件的生命周期,自动按次序执行。
注意:生命周期强调的是时间段,生命周期函数强调的是时间点。
3. 组件生命周期函数的分类
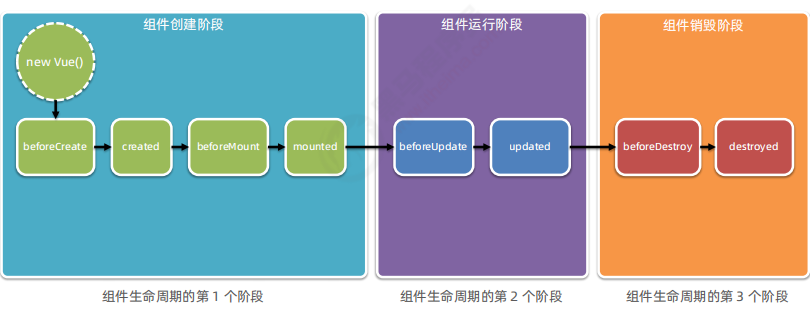
4. 生命周期图示
4.1 组件创建阶段之编译HTML结构
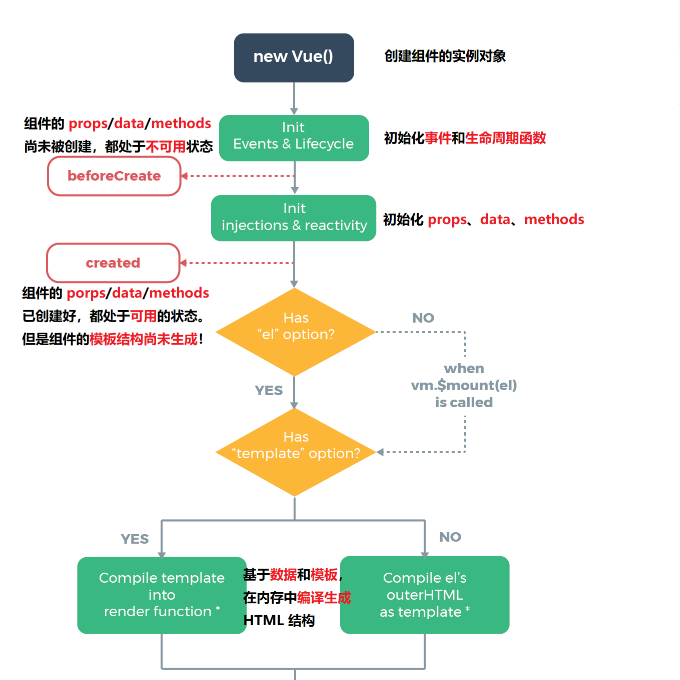
<!-- 测试Create -->
<template>
  <div class="test-container">
    <h3 id="myh3">Test.vue 组件---{{ books.length }} 本图书</h3>
    <p id="myp">message 的值是:{{ message }}</p>
  </div>
</template>

<script>
export default {
  props: ['info'],
  data() {
    return {
      message: 'hello vue.js',
      // 定义books数组,存储图书数据
      books: [],
    }
  },
  methods: {
      show() {
      console.log('调用了Test组件的show方法')
    },
    // 使用Ajax请求图书列表的数据
    initBookList() {
      const xhr = new XMLHttpRequest()
      xhr.addEventListener('load', () => {
        const result = JSON.parse(xhr.responseText)
        this.books = result.data
      })
      xhr.open('GET', 'http://www.liulongbin.top:3006/api/getbooks')
      xhr.send()
    },
  },
  // 创建阶段的第一个生命周期
  beforeCreate() {
  	//报错,此时data、props、methods尚未被创建
    console.log(this.info)
    console.log(this.message)
    this.show()
  },
  // created生命周期函数,非常常用
  //经常在它里面,调用method中的方法,请求服务器的数据
  // 并且,把请求到的数据,转存到打他中,供template模板渲染的时候使用
  created() {
    this.initBookList()
    console.log(this.books)
  },
}
</script>
4.2 组件创建阶段之渲染HTML结构
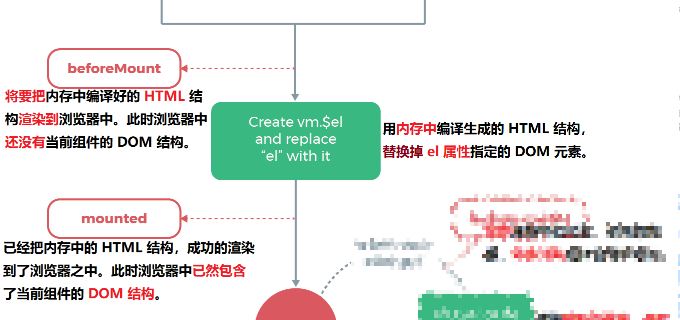
<template>
  <div class="test-container">
    <h3 id="myh3">Test.vue 组件</h3>
    <p id="myp">message 的值是:{{ message }}</p>
  </div>
</template>

<script>
export default {
  props: ['info'],
  data() {
    return {
      message: 'hello vue.js',
    }
  },
  methods: {},

  beforeMount() {
    console.log(this.$el) // 输出underfine
    const dom = document.querySelector('#myh3')
    console.log(dom) 无输出
  },

  // 要操作DOM元素,最早要在mounted,在mounted阶段才将DOM结构渲染到浏览器
  mounted() {
    console.log(this.$el) //输出Dom结构
    const dom = document.querySelector('#myh3')
    console.log(dom) //输出Dom结构
  },
}
</script>
4.2 组件运行阶段

<template>
  <div class="test-container">
    <h3 id="myh3">Test.vue</h3>
    <p id="myp">message 的值是:{{ message }}</p>
    <button @click="message += '~'">修改message的值</button>
  </div>
</template>

<script>
export default {
  props: ['info'],
  data() {
    return {
      message: 'hello vue.js',
    }
  },
  methods: {},

  //当数据变化时执行,不可以操作最新的DOM结构
  beforeUpdate() {
    console.log('beforeUpdate')
    const dom = document.querySelector('#myp')
    console.log(dom.innerHTML) // 更改前的数据
  },

  //当数据变化时执行,可以操作最新的DOM结构
  updated() {
    console.log('Update')
    const dom = document.querySelector('#myp')
    console.log(dom.innerHTML) // 更改后的数据
  },
}
</script>
4.2 组件销毁阶段
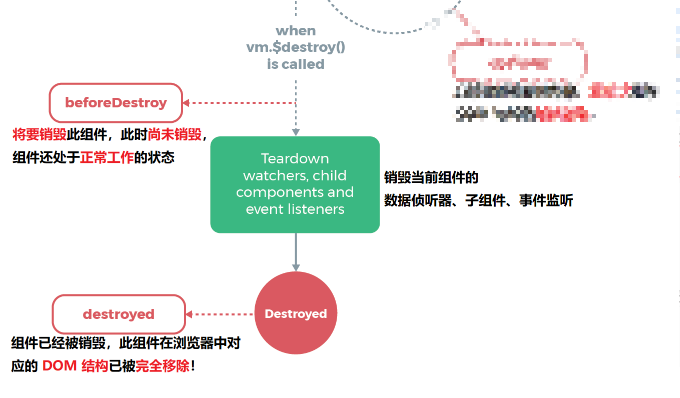
<!-- 调用者 -->
<template>
  <div class="app-container">
    <Test info="你好" v-if="flag"></Test>
    <br />
    <button @click="flag = !flag">变化</button>
  </div>
</template>
<template>
  <div class="test-container">
    <h3 id="myh3">Test.vue 组件</h3>
    <p id="myp">message 的值是:{{ message }}</p>
  </div>
</template>

<script>
export default {
  props: ['info'],
  data() {
    return {
      message: 'hello vue.js',
    }
  },
  methods: {},
  beforeDestroy() {
    console.log('beforeDestroy')
  },
  destroyed() {
    console.log('destroyed')
    //报错
  },
}
</script>
二、组件之间的数据共享
1. 组件之间的关系
在项目开发中,组件之间的最常见的关系分为如下两种:
① 父子关系
② 兄弟关系
2. 父子组件之间的数据共享
父子组件之间的数据共享又分为:
① 父 -> 子共享数据
② 子 -> 父共享数据
2.1 父组件向子组件共享数据
父组件向子组件共享数据需要使用自定义属性。示例代码如下:
// 父组件
<template>
  <div class="app-container">
    <Son :info="message"></Son>
  </div>
</template>

<script>
import Son from '@/components/Son.vue'
export default {
  data() {
    return {
      message: 'son',
    }
  },
  components: {
    Son
  },
}
</script>
// 子组件
<template>
  <div>
    <p>APP 父组件传递来的info值:{{ info }}</p>
  </div>
</template>

<script>
export default {
  // 可以用来接收父组件的信息
  props: ['info'],
}
</script>
2.2 子组件向父组件共享数据
子组件向父组件共享数据使用自定义事件。示例代码如下:
// 父组件
<template>
  <div class="app-container">
    <Son @numChange="getNewCount">{{countFromSon}}</Son>
  </div>
</template>

<script>
import Son from '@/components/Son.vue'
export default {
  data() {
    return {
      countFromSOn: 0,
    }
  },
  components: {
    Son
  },
  methods: {
  	getNewCount(val) {
  		this.countFromSon = val
  	}
  }
}
</script>
// 子组件
<template>
  <div>
    <p>count的值:{{count}}</p>
    <button @click="add">+1</button>
  </div>
</template>

<script>
export default {
	data() {
  		return {
  			count: 0
  		}
	}
	methods: {
		add() {
			this.count++;
			this.$emit('numChange',this.count)
		}
	}
}
</script>
3. 兄弟组件之间的数据共享
在 vue2.x 中,兄弟组件之间数据共享的方案是 EventBus
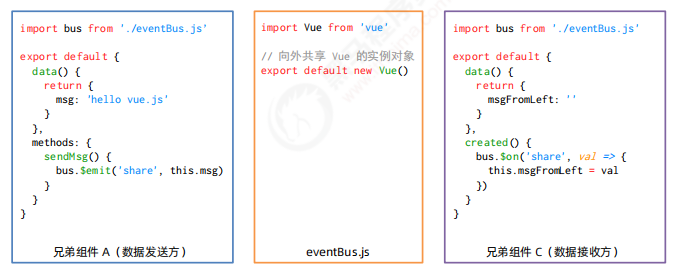
EventBus 的使用步骤
① 创建 eventBus.js 模块,并向外共享一个 Vue 的实例对象
② 在数据发送方,调用 bus.$emit('事件名称', 要发送的数据) 方法触发自定义事件
③ 在数据接收方,调用 bus.$on('事件名称', 事件处理函数) 方法注册一个自定义事件
// 兄弟组件(数据发送方)
<template>
  <div>
    <p>msg的值:{{msg}}</p>
    <button @click="sendMsg"></button>
  </div>
</template>

<script>
import bus from './eventBus.js'
export default {
	data() {
  		return {
  			msg: 'vue'
  		}
	}
	methods: {
		sendMsg() {
			bus.$emit('share', msg)
		}
	}
}
</script>
//兄弟组件(接收方)
<template>
  <div>
    <p>msg的值:{{msgFromLeft}}</p>
  </div>
</template>

<script>
import bus from './eventBus.js'
export default {
	data() {
  		return {
  			msgFromLeft: ''
  		}
	}
	methods: {},
	//生命周期函数
	created() {
		bus.$on('share' val => {
			this.msgFromLeft = val
		})
	}
}
</script>
//eventBus.js
import Vue from 'vue'
// 向外共享的实例对象
export dafault new Vue()
三、ref应用
1. 什么是 ref 引用
ref 用来辅助开发者在不依赖于 jQuery 的情况下,获取 DOM 元素或组件的引用。
每个 vue 的组件实例上,都包含一个$refs对象,里面存储着对应的 DOM 元素或组件的引用。默认情况下,组件的 $refs 指向一个空对象。
<template>
  <div>
    <h3>MyRef组件</h3>
    <button @click="getRef">获取 $refs引用</button>
  </div>
</template>
<script>
export dafault {
	methods:{
		getRef() {consle.log(this)}
	}
}
</script>
2. 使用 ref 引用 DOM 元素
如果想要使用 ref 引用页面上的 DOM 元素,则可以按照如下的方式进行操作:
<template>
  <div>
    <h3 ref="myh3">MyRef组件</h3>
    <button @click="getRef">获取 $refs引用</button>
  </div>
</template>
<script>
export dafault {
	methods:{
		this.$refs.myh3.color='red'
	}
}
</script>
3. 使用 ref 引用组件实例
如果想要使用 ref 引用页面上的组件实例,则可以按照如下的方式进行操作:
<template>
	<Son ref='mySon' ></Son>
	<button @click='fadd'>+1</button>
</template>
<script>
import Son from '@/components/Son.vue'
export dafault {
	methods:{
		fadd () {
			this.$refs.mySon.add()
		}
	}
}
</script>
<template>
	<h3>{{count}}</h3>
	<button @click='add'>+1</button>
</template>
<script>
export dafault {
	data() {
		return: {
			count: 0
		}
	}
	methods:{
		add () {
			this.count++
		}
	}
}
</script>
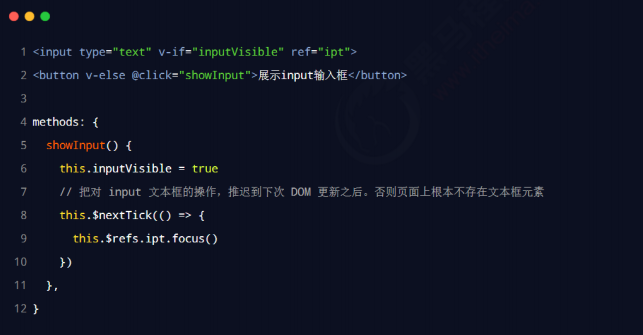
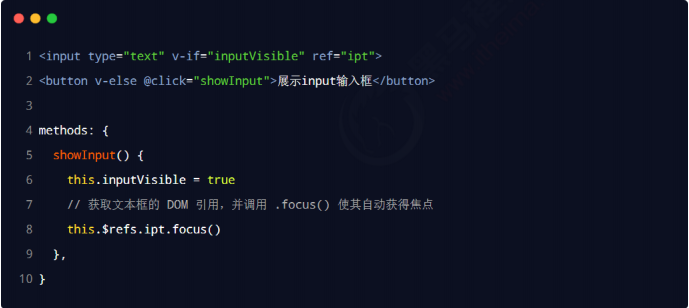
4. this.$nextTick(cb) 方法
组件的
$nextTick(cb)方法,会把 cb 回调推迟到下一个 DOM 更新周期之后执行。通俗的理解是:等组件的DOM 更新完成之后,再执行 cb 回调函数。从而能保证 cb 回调函数可以操作到最新的 DOM 元素。
不使用$nextTick(cb)
使用$nextTick(cb)

