一.使用vue-cli创建工程
Vue3简介
github上的tags地址:https://github.com/vuejs/vue-next/releases/tag/v3.0.0
1 源码的升级
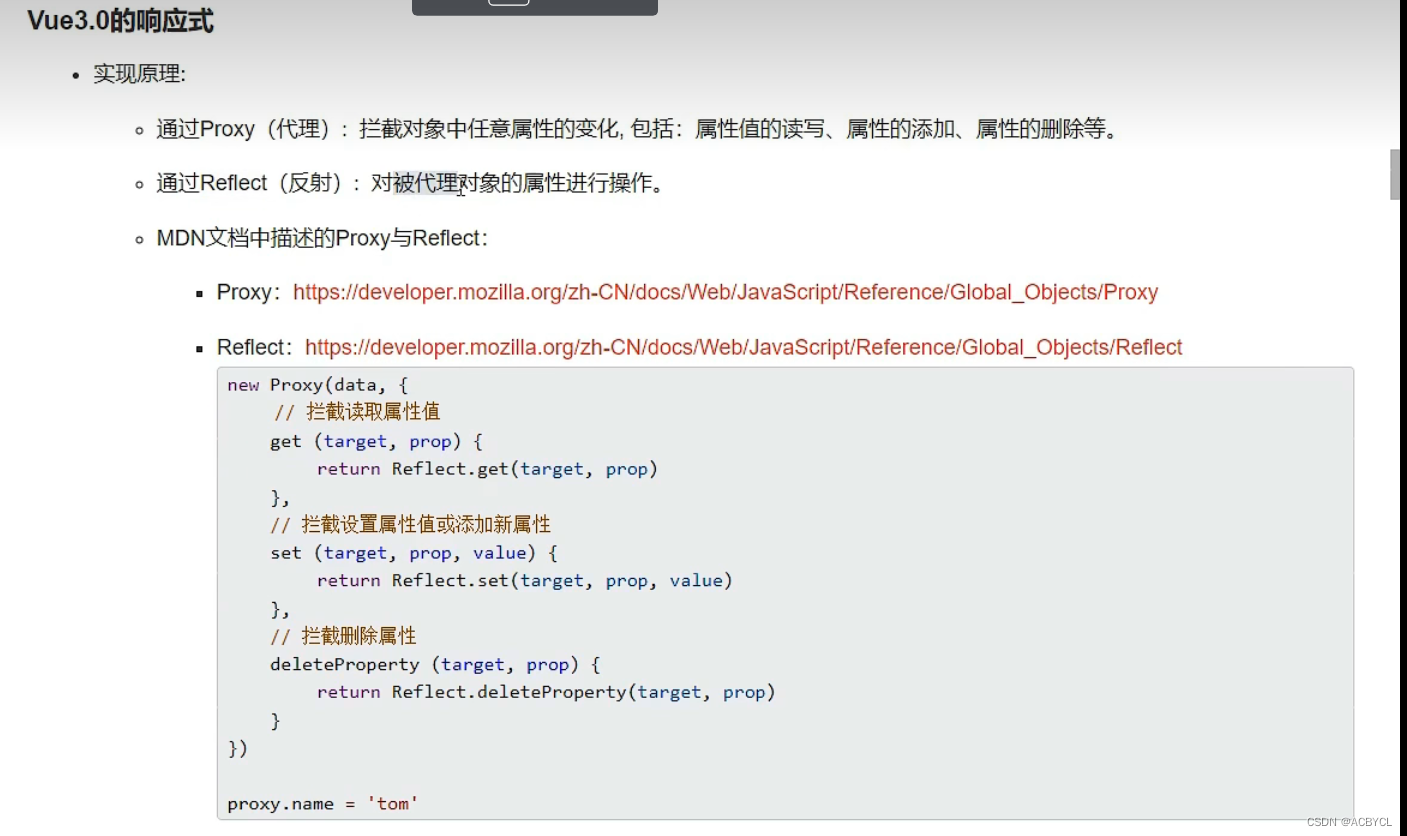
- 使用Proxy代替 defineProperty实现响应式
- 重写虚拟DOM的实现和Tree-Shaking
2 新的特性
2.1Composition API(组合API): - setup配置
- ref与reactive
- watch与watchEffect
- provide与inject
2.2新的内置组件 - Fragment
- Teleport
- Suspense
2.3 其他改变 - 新的周期钩子
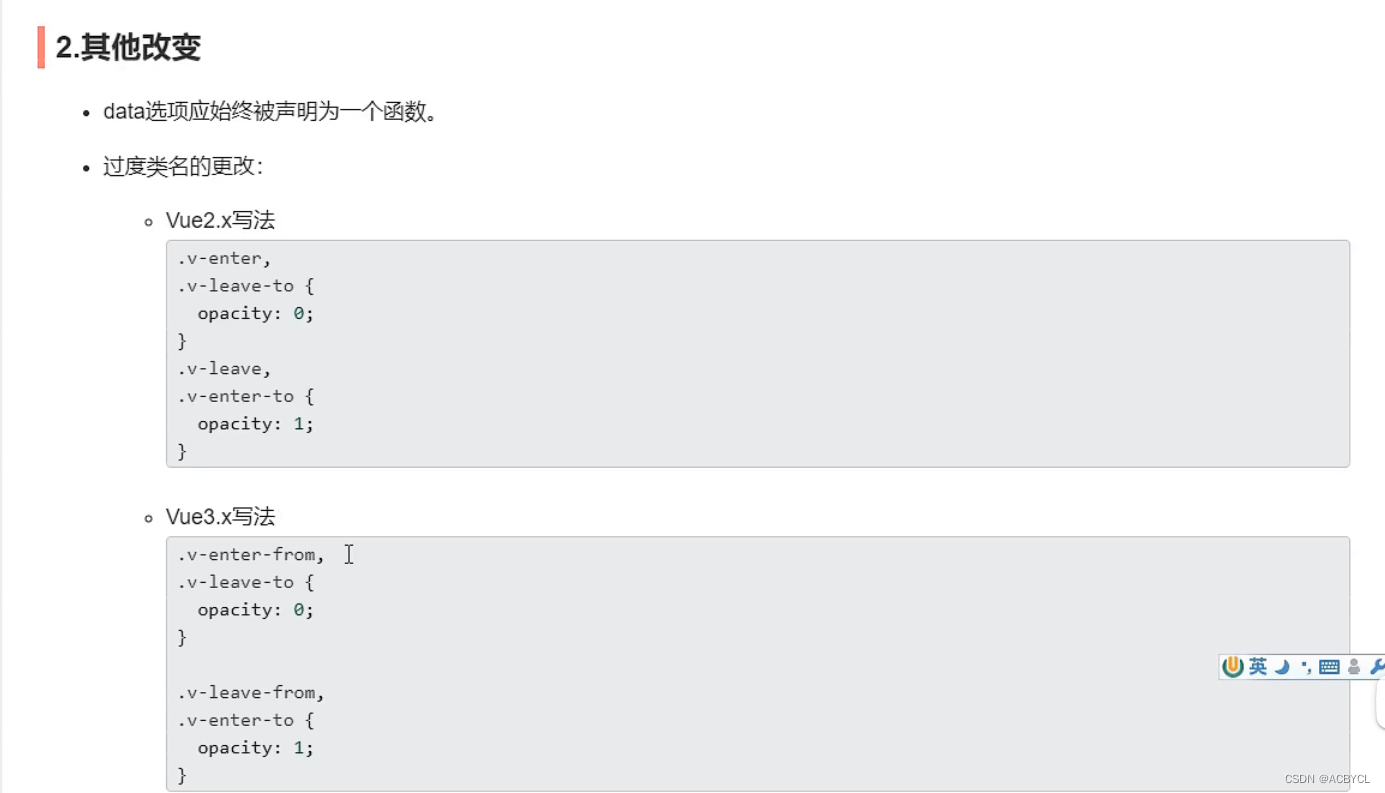
- data选项应始终被声明为一个函数
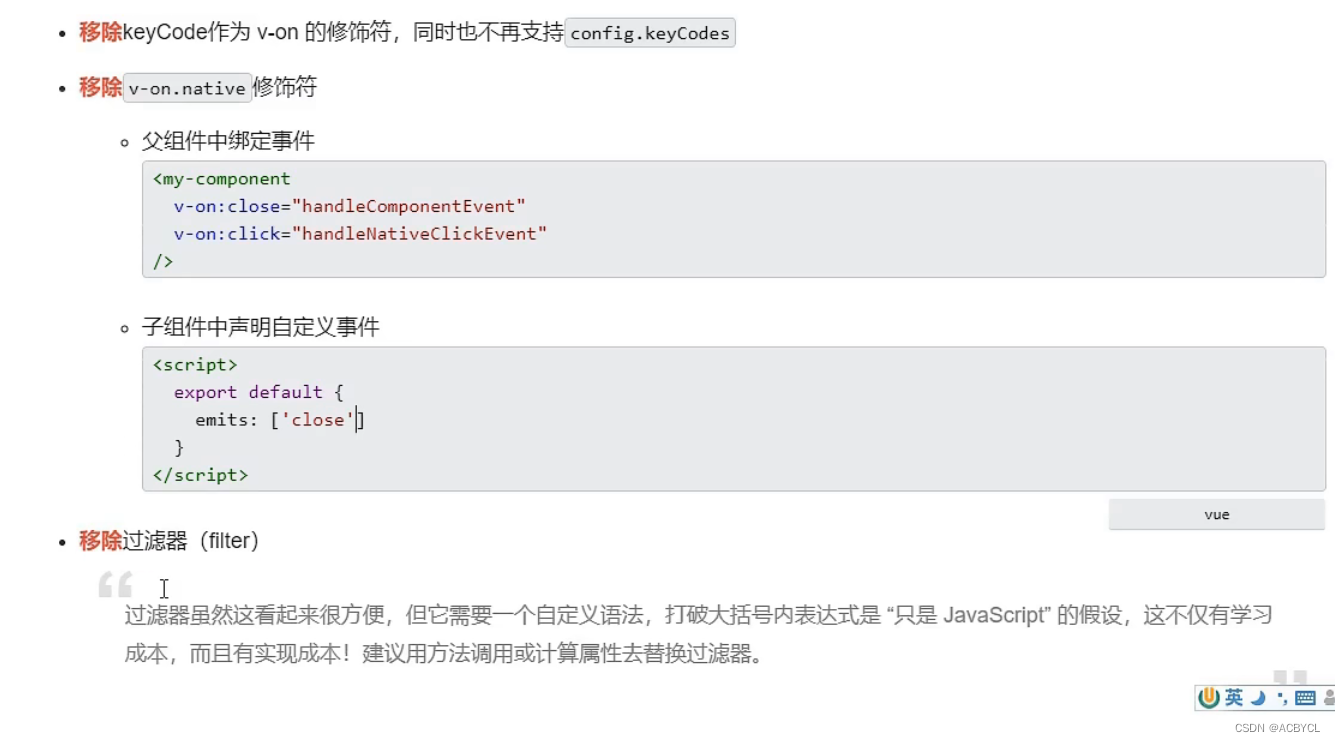
- 移除keyCode支持作为v-on的修饰符
查看版本必须大于4.3
vue -v
//vue --version
创建vue项目
C:\Users\tianyu>cd Desktop
C:\Users\tianyu\Desktop>vue create vue3_test

cd vue3_test
yarn serve
使用vite创建
官方文档:https://v3.cn.vuejs.org/guide/installation.html#vite
vite官网:https://vitejs.cn

优势
- 启动速度快,因为没有依赖包
## 创建工程
npm init vite-app <project-name>
## 进入工程目录
cd <project-name>
## 安装依赖
npm install
## 运行
npm run dev
二.分析工程结构
脚手架安装失败原因
-
- npm原因:建议清理缓存
-
- 重装node.js
-
- 网络问题:配置淘宝镜像
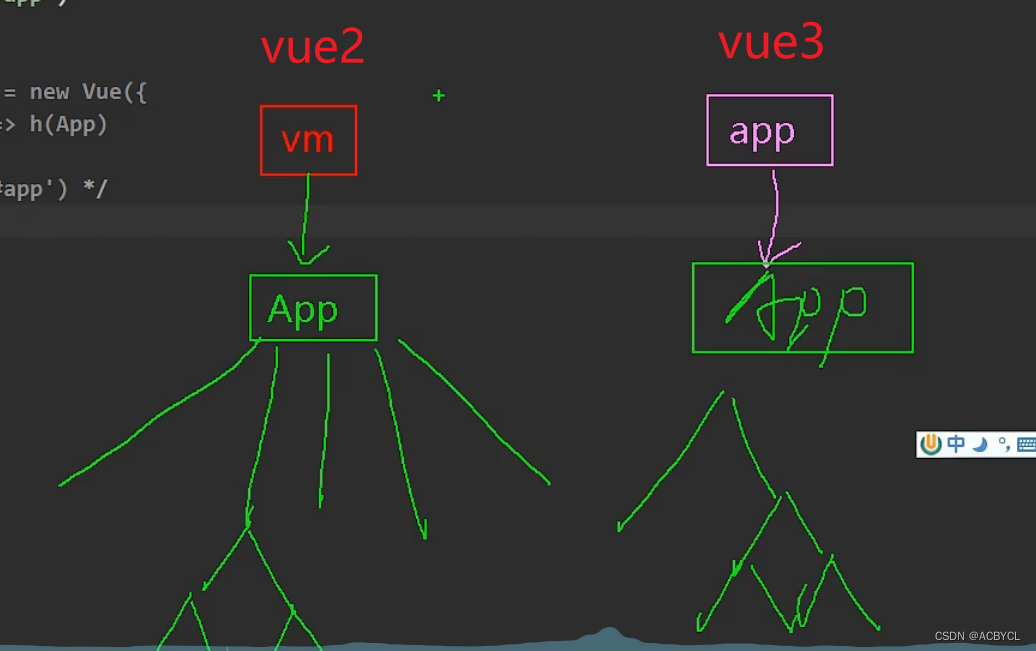
vue2和vue3的结构区别
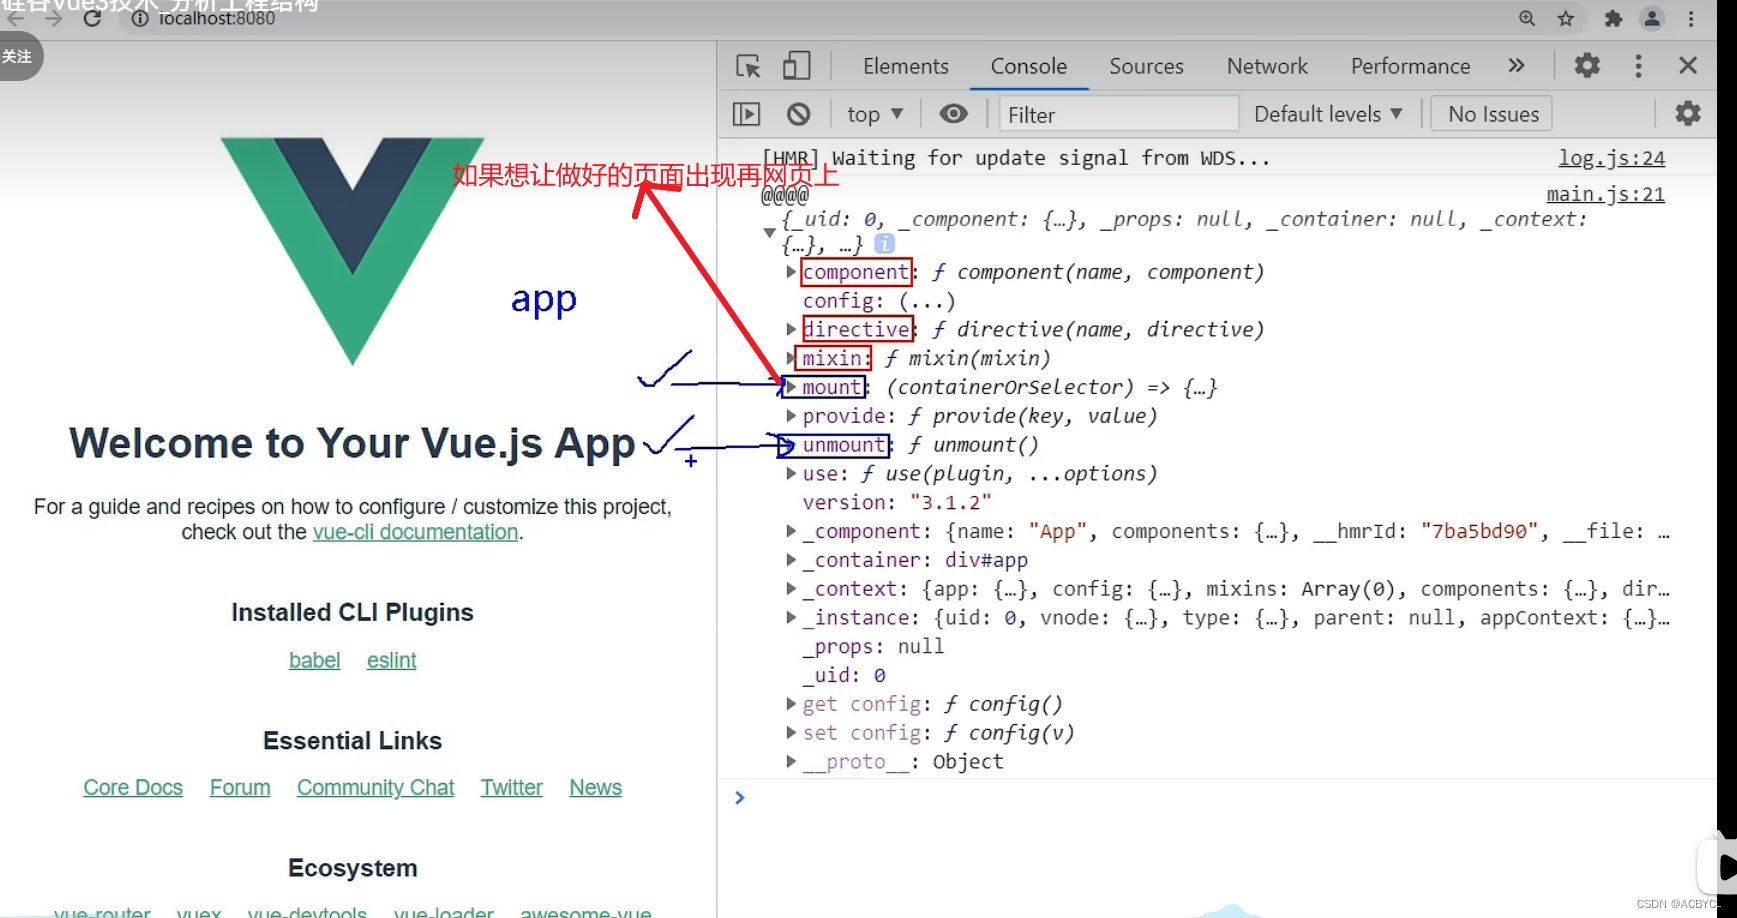
查看vue3里createApp里面的东西
关闭语法检查
vue.config.js
const { defineConfig } = require('@vue/cli-service')
module.exports = defineConfig({
  transpileDependencies: true,
  lintOnSave:false    //关闭语法检查
})
vue3特殊之处
vue里面可以没有跟组件
//vue里面可以没有跟组件
<template>
  <img alt="Vue logo" src="./assets/logo.png">
  <HelloWorld msg="Welcome to Your Vue.js App"/>
</template>
main.js
// createApp:引入的不在是Vue的构造函数,引入的是一个名为createApp的工厂函数(无需new,里面的方法直接调用,首字母小写)
import { createApp } from 'vue'
import App from './App.vue'

// 创建应用实例对象--app(类似于之前vue2中的vm,但app比vm"轻",因为去掉了一些不用的函数)
const app=createApp(App)
// 产看app里面的内容
console.log('@@@@',app)
// 挂载
app.mount('#app')

// 1秒后卸载 app
setTimeout(()=>{
    app.unmount('#app')
},1000)


// Vue2:
// const vm=new VueElement({
//     render:h=>h(App)
// })
// vm.$mount('#app')
三.常用Composition API
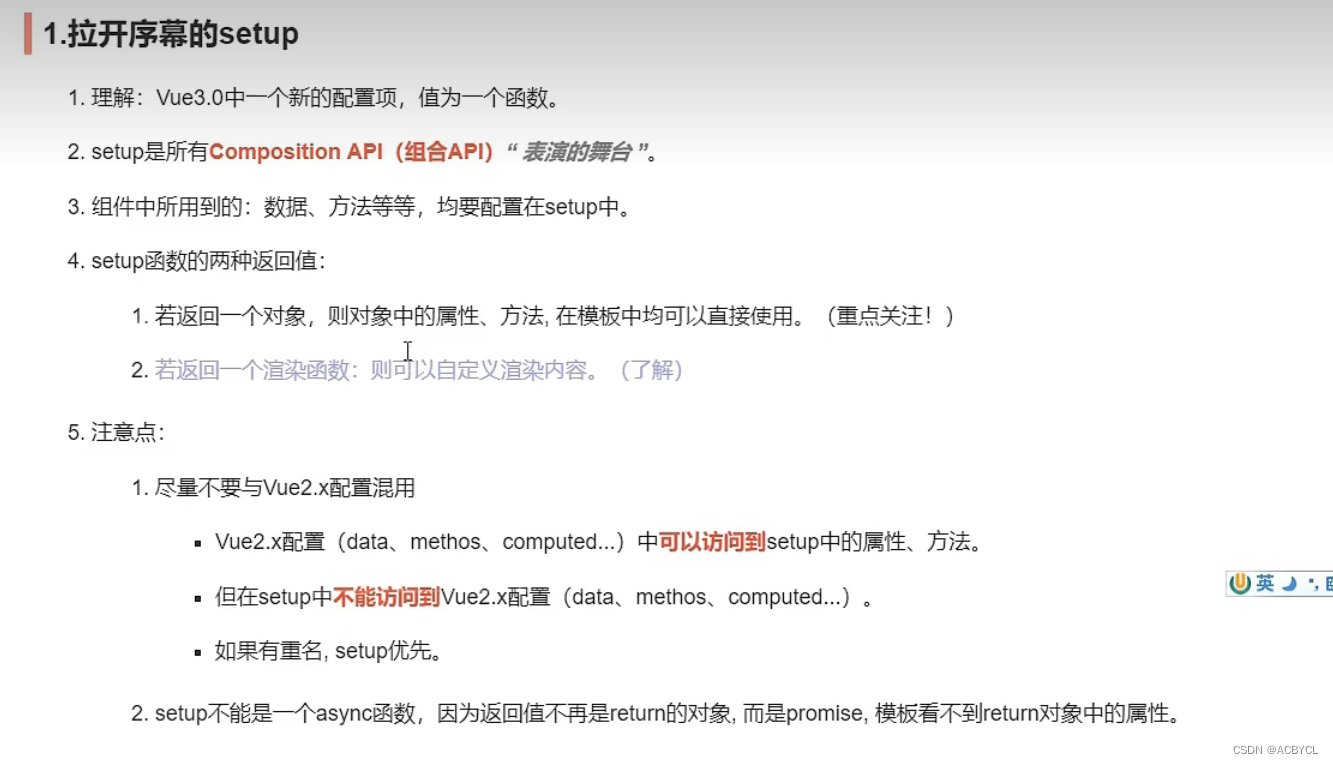
1.拉开序幕的setup
是什么?
相当于一个演员表演的舞台(station),所有的**函数,变量**都要在其体内
代码展示
App.vue
<template>
  <h1>一个人的信息</h1>
  <h2>姓名:{{name}}</h2>
  <h2>年龄:{{age}}</h2>
  <button @click="sayHello">说话</button>
</template>

<script>
// import { h } from '@vue/runtime-core'

export default {
  name: 'App',
  setup(){
    // 数据
    let name='张三'
    let age=18

    // 方法
    function sayHello(){
      alert(`我叫${name},我${age}岁了,你好啊!`)
    }

    // 返回一个对象(常用)
    return{
      name,
      age,
      sayHello
    }

    // 返回一个函数(渲染函数)   h函数只渲染h1--尚硅谷   不常用
    // return ()=>h('h1','尚硅谷')
  }

}
</script>

<style>
</style>
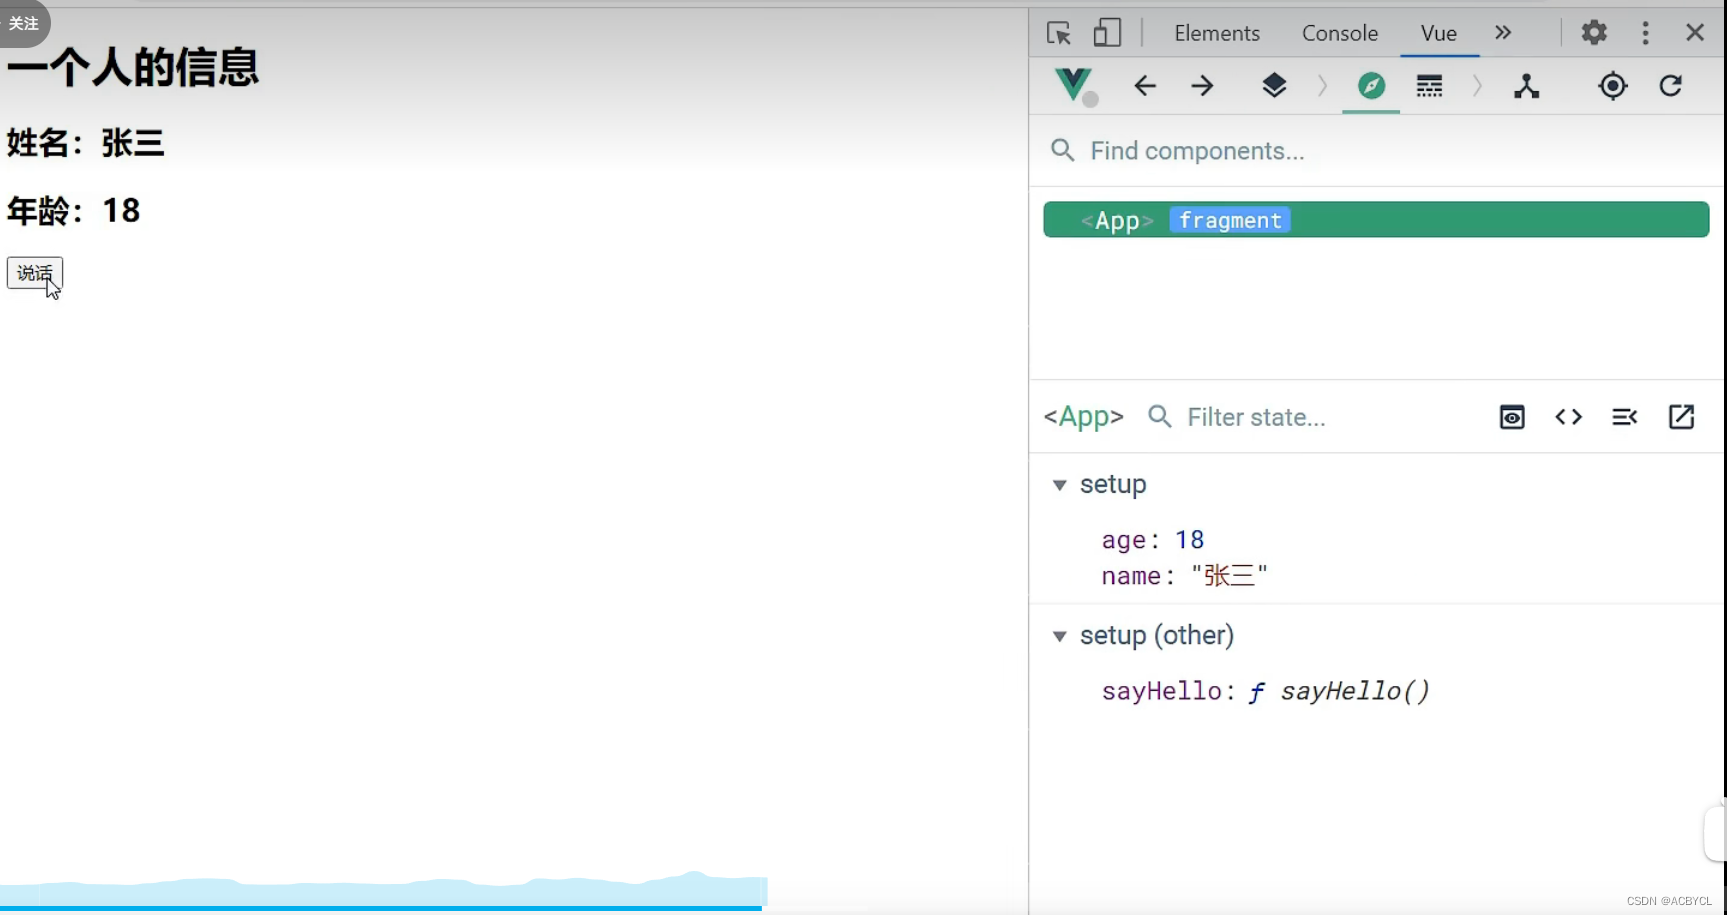
执行结果
2.ref
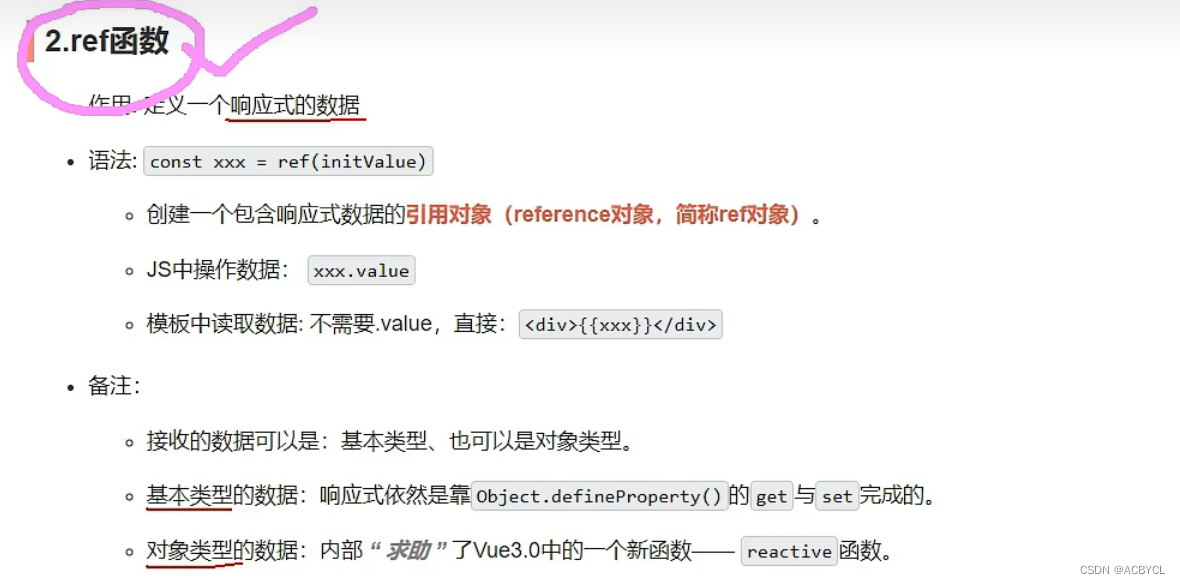
是什么?
用来打标识,是数据变为响应式的

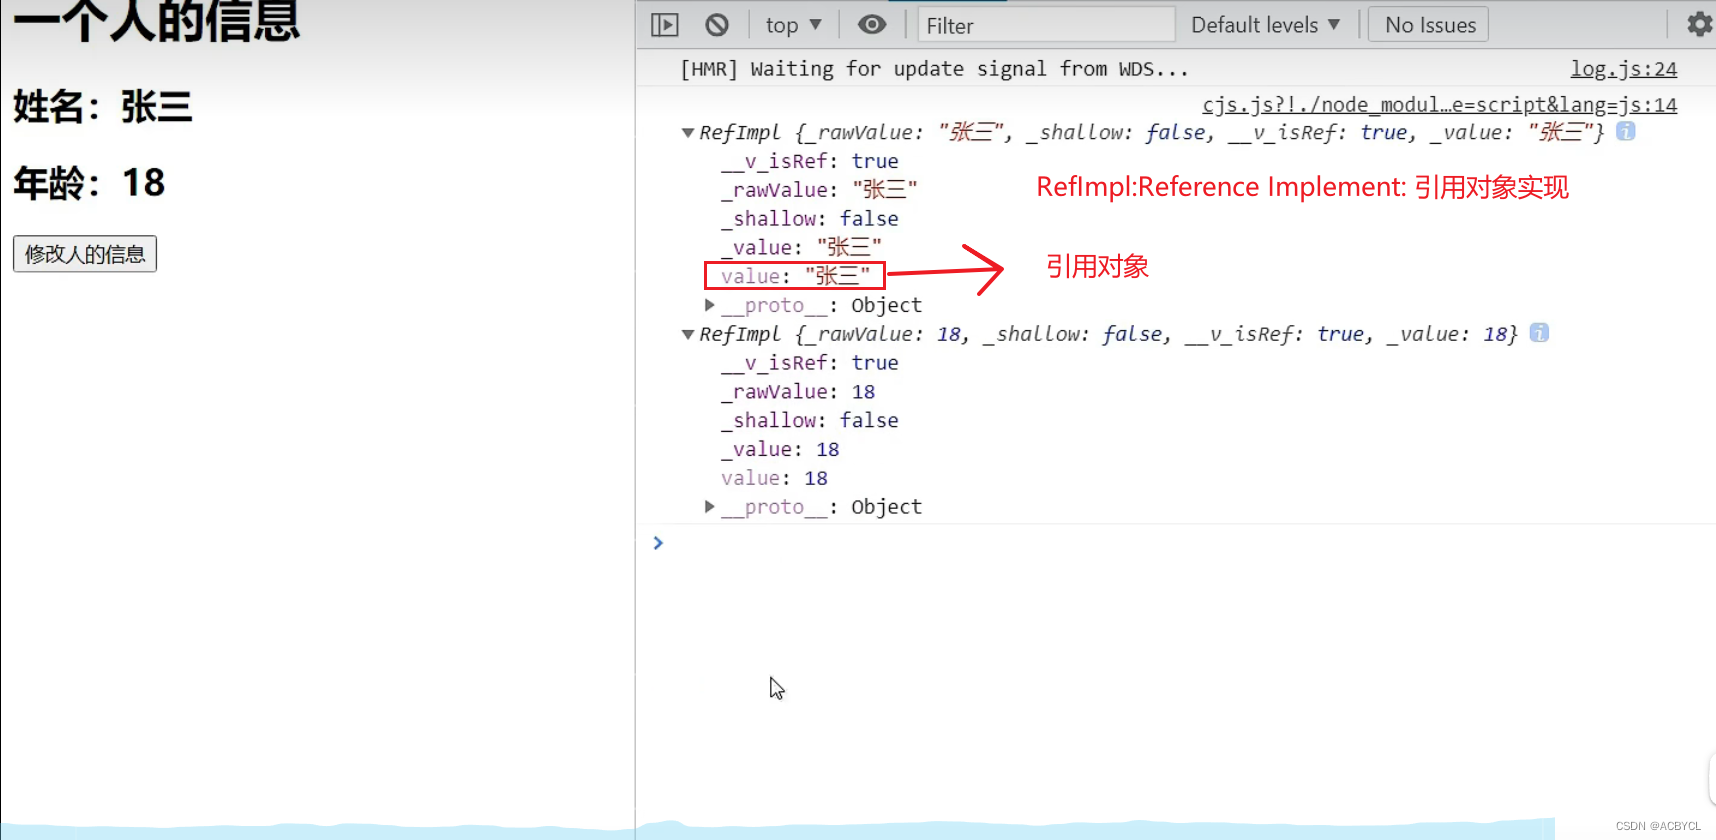
ref的基本使用
App.vue
<template>
  <h1>一个人的信息</h1>
  <!-- 这里可以写name.value,但是模板自动识别了 -->
  <h2>姓名:{{name}}</h2>
  <h2>年龄:{{age}}</h2>
  <button @click="changeInfo">修改人的信息</button>
</template>

<script>
import {ref} from 'vue'
export default {
  name: 'App',
  setup(){
    // 数据
    let name=ref('张三')
    let age=ref(18)

    // 方法
    function changeInfo(){
      // 因为repl上有引用对象value,所以可以用它来修改值
      name.value='李四'
      age.value=48
    }

    // 返回一个对象(常用)
    return{
      name,
      age,
      changeInfo
    }
  }
}
</script>

<style>
</style>
展示结果
ref处理对象类型
3 . reactive函数

proxy
作用:遵循响应式原理,用来响应数据
只有reactive才能把对象数据变为proxy
ref偷偷求助了reactive

代码展示
app.vue
<template>
  <h1>一个人的信息</h1>
  <h2>姓名:{{name}}</h2>
  <h2>年龄:{{age}}</h2>
  <h3>工作种类:{{job.type}}</h3>
  <h3>工作薪水:{{job.salary}}</h3>
  <h3>爱好:{{hobby}}</h3>
  <h3>测试的数据c:{{job.a.b.c}}</h3>
  <button @click="changeInfo">修改人的信息</button>
</template>

<script>
import { ref,reactive } from '@vue/reactivity'
export default {
  name: 'App',
  setup(){
    let name=ref('张三')
    let age=ref(18)
    let job=reactive({
      type:"前端工程师",
      salary:'30k',
      a:{
        b:{
          c:666
        }
      }
    })
    let hobby=(['抽烟','喝酒','烫头'])
    function changeInfo(){
      // ref响应的数据
      name.value='李四'
      age.value=48
      // reactive响应的数据
      job.type='UI设计师'
      job.salary='60k'
      job.a.b.c=999
      hobby[0]='学习'
    }
    return{
      name,
      job,
      age,
      hobby,
      changeInfo
    }
  }
}
</script>

<style>
</style>
结果展示
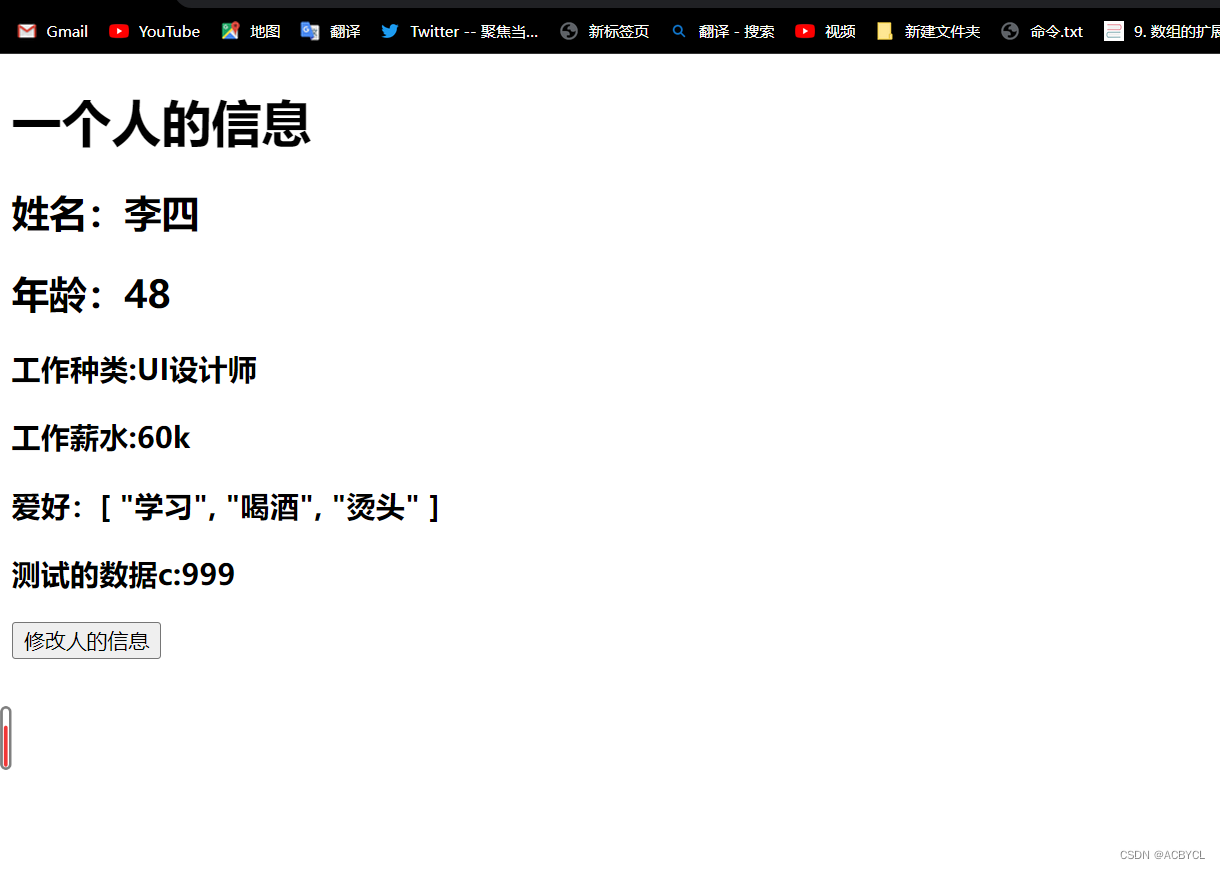
总结
ref:改变数据必须得通过value
reactive:是一个函数,里面必须是一个对象reactive({}),不比通过value来访问数据
4.vue3.0中得响应式原理
1.vue2得响应式
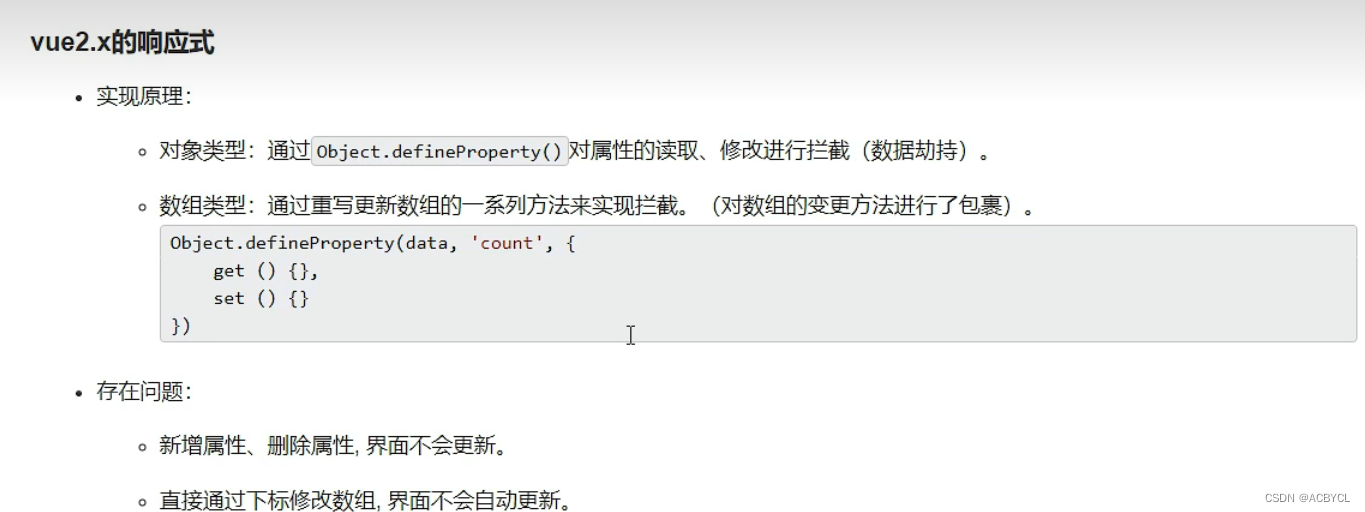
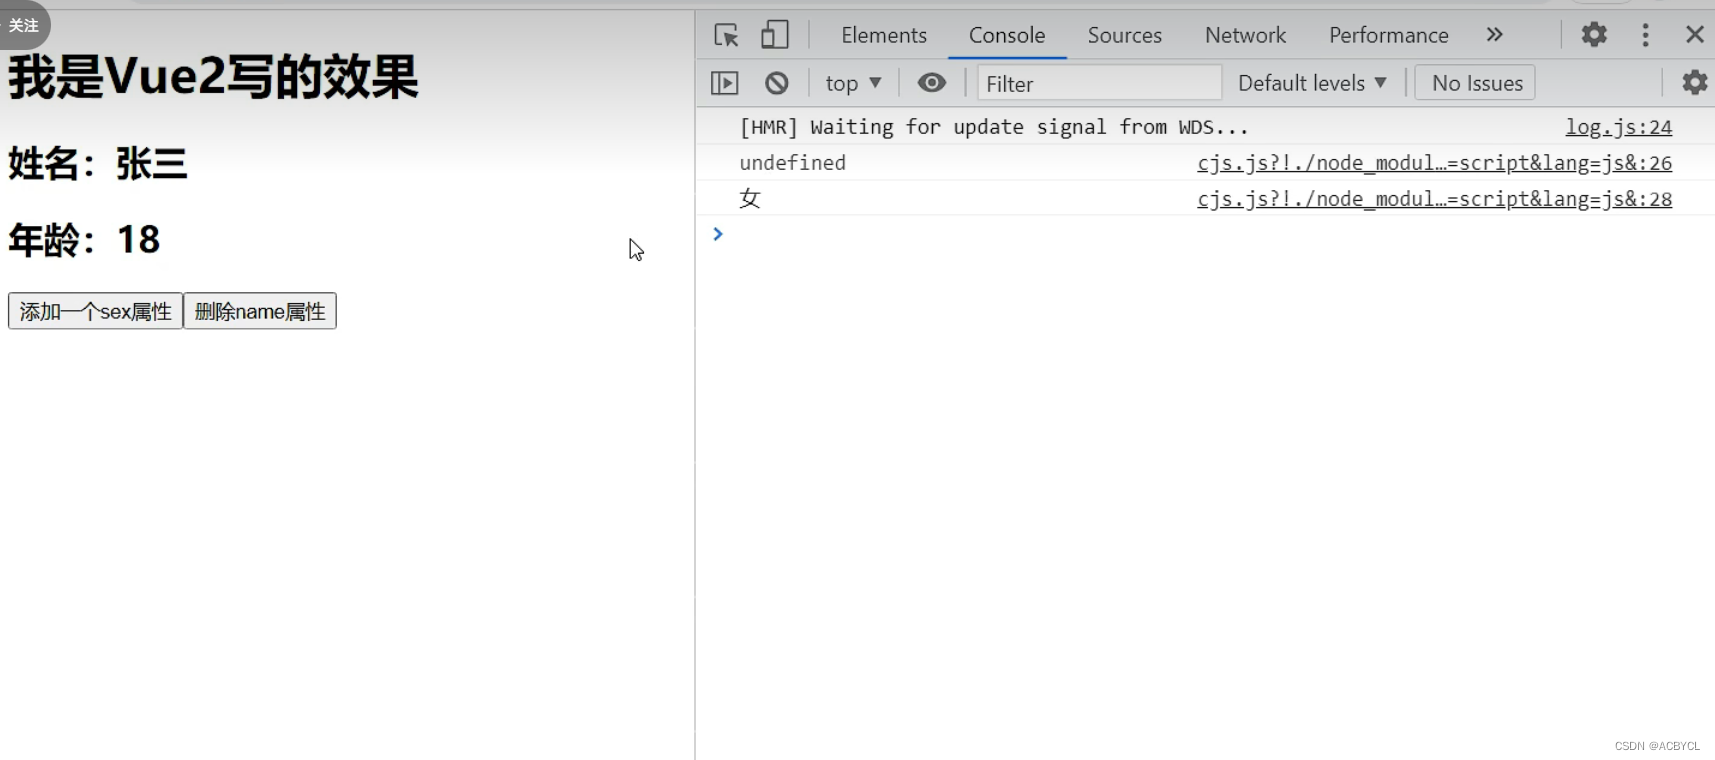
这样写数据不会发生变化
app.vue
<template>
  <div>
    <h1>我是Vue2写得效果</h1>
    <h2 v-show="person.name">姓名:{{person.name}}</h2>
    <h2>年龄:{{person.age}}</h2>
    <h2 v-show="person.sex">性别:{{person.sex}}</h2>
    <h2>爱好:{{person.hobby}}</h2>
    <button @click="addSex">添加一个sex属性</button>
    <button @click="deleteName">删除name属性</button>
    <button @click="updateHobby">修改第一个爱好的名字</button>
  </div>
</template>

<script>
  // import Vue from 'vue'
export default {
  name: 'App',
  data(){
    return{
      person:{
        name:'张三',
        sex:'男',
        age:18,
        hobby:['学习','吃饭']
      }
    }
  },
  methods:{
    addSex(){
      // // 这样写数据不会发生改变
      // console.log(this.person.sex)   //undefined
      // this.person.sex='女'
      // console.log(this.person.sex)    //女

      // 解决方案二    用$set
      this.$set(this.person,'sex','女')
      // // 解决方案一     用vue.set
      // Vue.set(this.person,'sex','女')

    },
    deleteName(){
      // // 数据不会更新
      //   console.log(this.person.name)   //张三
      //   delete this.person.name
      //   console.log(this.person.name)    //undefined

      // // 解决方案二
      // this.$delete(this.person,'name')
      // // 解决方案二
      // Vue.delete(this.person,'name','女')
    },
    updateHobby(){
      // 问题:数据不会改变
      this.person.hobby[0]='逛街' //不会更改

      // 解决方案一:
      this.$set(this.person.hobby,0,'逛街')
      // 解决方案二:
      this.person.hobby.splice(0,1,'逛街')
    }

  }
}
</script>

<style>
</style>
点击后数据不会发生改变
在这里插入代码片
2.vue3中得响应式
MDN文档中描述的Proxy与Reflect:
- Proxy:https://developer.mozilla.org/zh-CN/docs/Web/JavaScript/Reference/Global_Objects/Proxy
- Reflect:https://developer.mozilla.org/zh-CN/docs/Web/JavaScript/Reference/Global_Objects/Reflect
<!DOCTYPE html>
<html lang="en">
<head>
    <meta charset="UTF-8">
    <meta http-equiv="X-UA-Compatible" content="IE=edge">
    <meta name="viewport" content="width=device-width, initial-scale=1.0">
    <title>Document</title>
</head>
<body>
    <script>
        let person={
            name:'张三',
            age:18
        }
        let obj={a:1,b:2}
        // 1.错误的响应式
        // Object.defineProperty('obj','c',{
        //     get(){
        //         return 3
        //     }
        // })
        // Object.defineProperty('obj','c',{
        //     get(){
        //         return 3
        //     }
        // })//会报错,因为重复定义了

        // Object与Reflect(映射)方法的区别:
        // 前者会报错,且没有返回值true/false,不能捕获错误
        // 如果想继续走,就需要try ... catch()

        // // 2.正确的响应式
        // const x1=Reflect.defineProperty('obj','c',{
        //     get(){
        //         return 3
        //     }
        // })
        // console.log(x1)//true
        // const x2=Reflect.defineProperty('obj','c',{
        //     get(){
        //         return 3
        //     }
        // })
        // console.log(x1)//false
        // if(x2){
        //     console.log('某某操作成功了!')
        // }else{
        //     console.log('某某操作失败了')
        // }

        // 3.vue的底层响应式原理
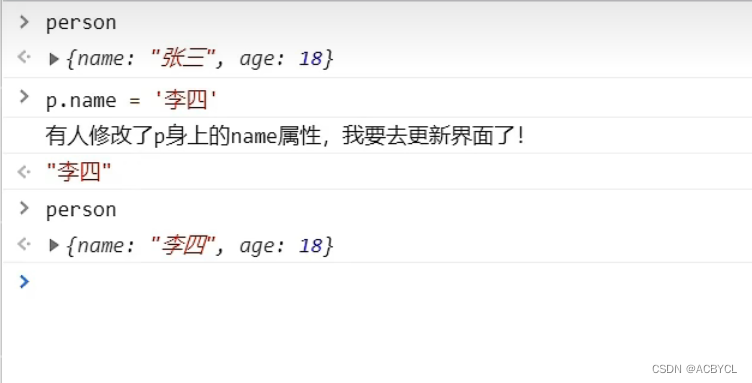
        const p=new Proxy(person,{
            // 有人读取p的某个属性时调用
            get(target,proName){
                console.log(`有人读取了p身上的${propName}属性`)
                return Reflect.get(target,propName)
            },
            // 有人修改了p的某个属性,或给p追加某个属性时调用
            set(target,propName,value){
                console.log(`有人修改了p身上的${propName}属性,我要去更新界面了`)
                Reflect.set(target,propName,value)//修改值
            },
            // 有人删除p的某个属性时调用
            deleteProperty(target,proName){
                console.log(`有人删除了p身上的${propName}属性,我要去更新界面了`)
                return Reflect.deleteProperty(target,propName)//删除值
            }
        })

    </script>

</body>
</html>
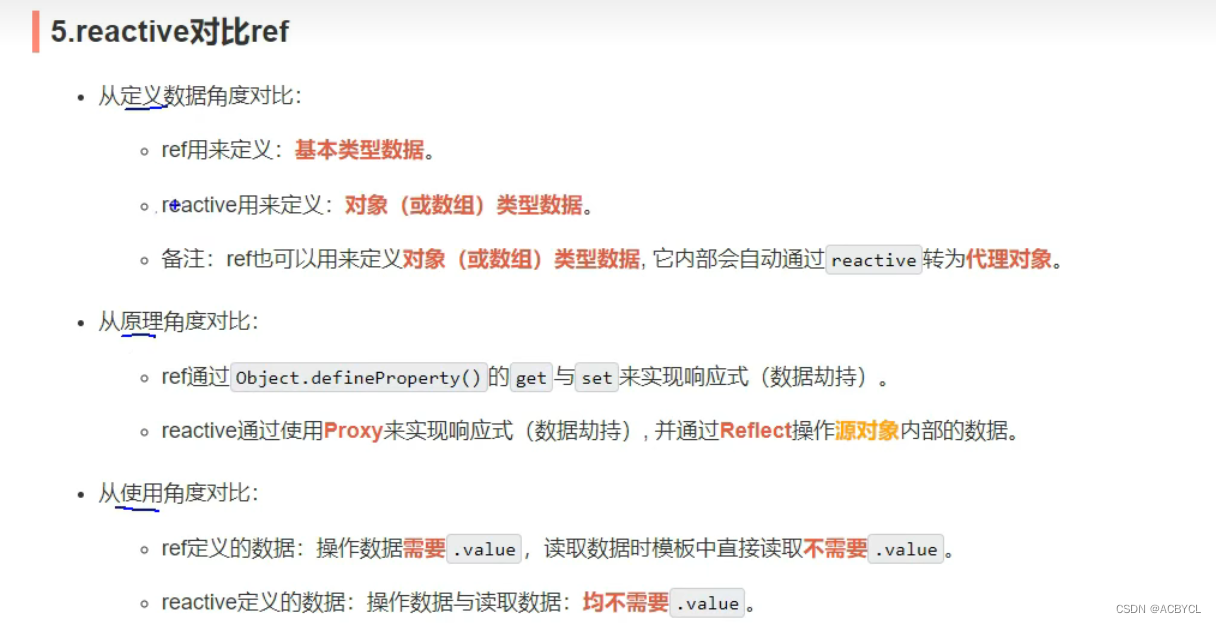
5.reactive对比ref
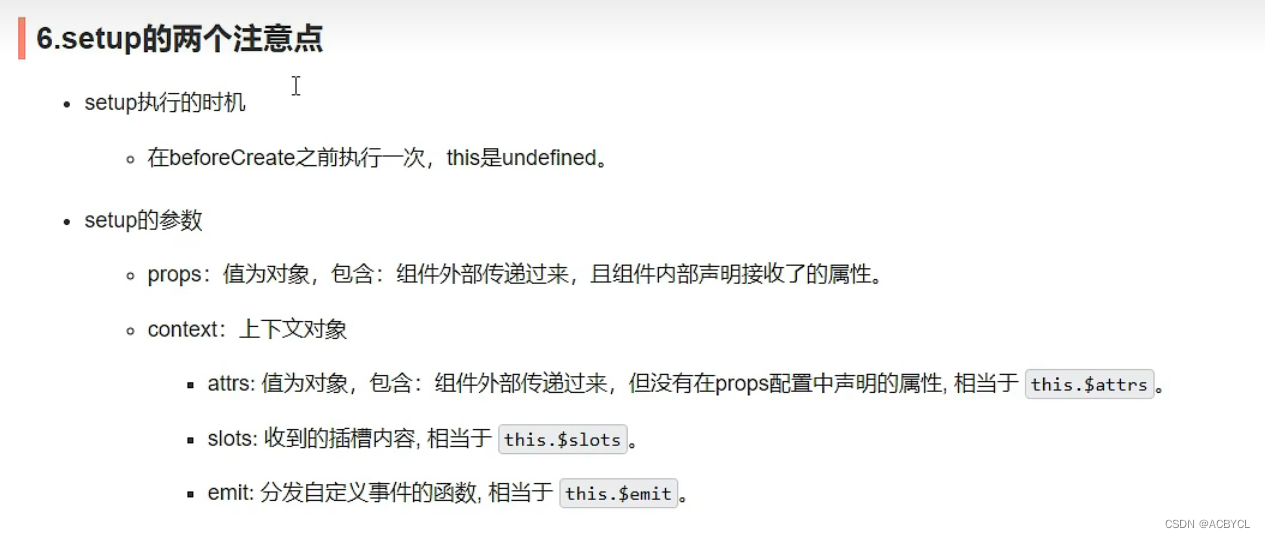
6.setup的两个注意点
笔记:
- vue2中 props:[‘msg’,‘school’]接受的数据传到vc上去了,如果没有声明接受只能通过 a t t r s 获取,声明接受了 attrs获取 ,声明接受了 attrs获取,声明接受了attr里的数据没有。好像一个捡漏的东西
- 插槽:父组件留坑位,子组件填坑
- VNODE:虚拟的节点
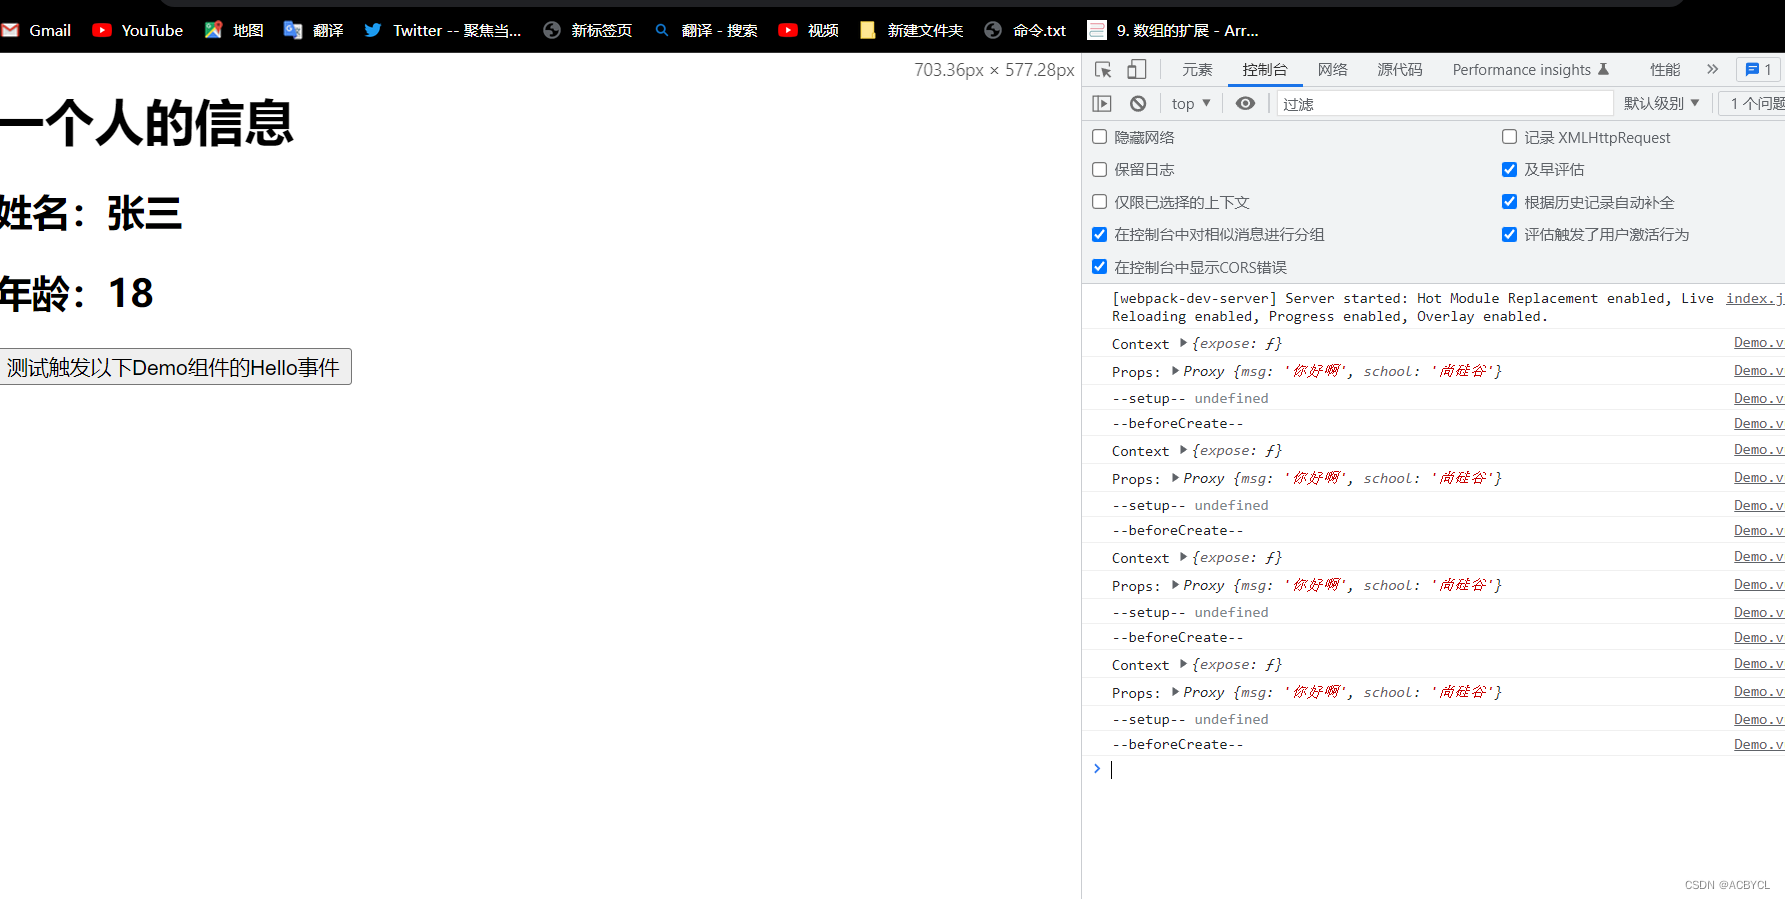
Demo.vue
<template>
  <h1>一个人的信息</h1>
  <h2>姓名:{{person.name}}</h2>
  <h2>年龄:{{person.age}}</h2>
  <button @click="test">测试触发以下Demo组件的Hello事件</button>
</template>

<script>
import {reactive} from 'vue'
export default {
    name:'Demo',
    beforeCreate(){
        console.log('--beforeCreate--')
    },
    props:['msg','school'],// proxy:代理对象
    emits:['hello'],   //用来给app组件发射一个hello函数
    // context里面装的是{expose}
    setup(props,context){
        console.log('Context',context)
        console.log('Props:',props)
        console.log('--setup--',this)//输出结果比beforecreated早   --setup--  undefined
        // 数据
        let person=reactive({
            name:'张三',
            age:18
        })

        function test(){
            context.emit('hello',666)
        }

        // 返回一个对象(常用)
        return {
            person,
            test
        }
    }

}
</script>

<style>

</style>
app.vue
<template>
  <!-- 用来给props传数据,插槽是再里面传东西 -->
  <!-- 如果想用原生组件,后加.native....如:@click.native -->
 <Demo msg="你好啊" school="尚硅谷"></Demo>
</template>

<script>
import Demo from './components/Demo.vue'
export default {
    name: "App",
    components:{Demo},
    setup(){
      function showHelloMsg(value){
        alert(`你好啊,你触发了hello事件,我收到的参数是${value}`)
      }
      return{
        showHelloMsg
      }
    }
}
</script>

<style>
</style>
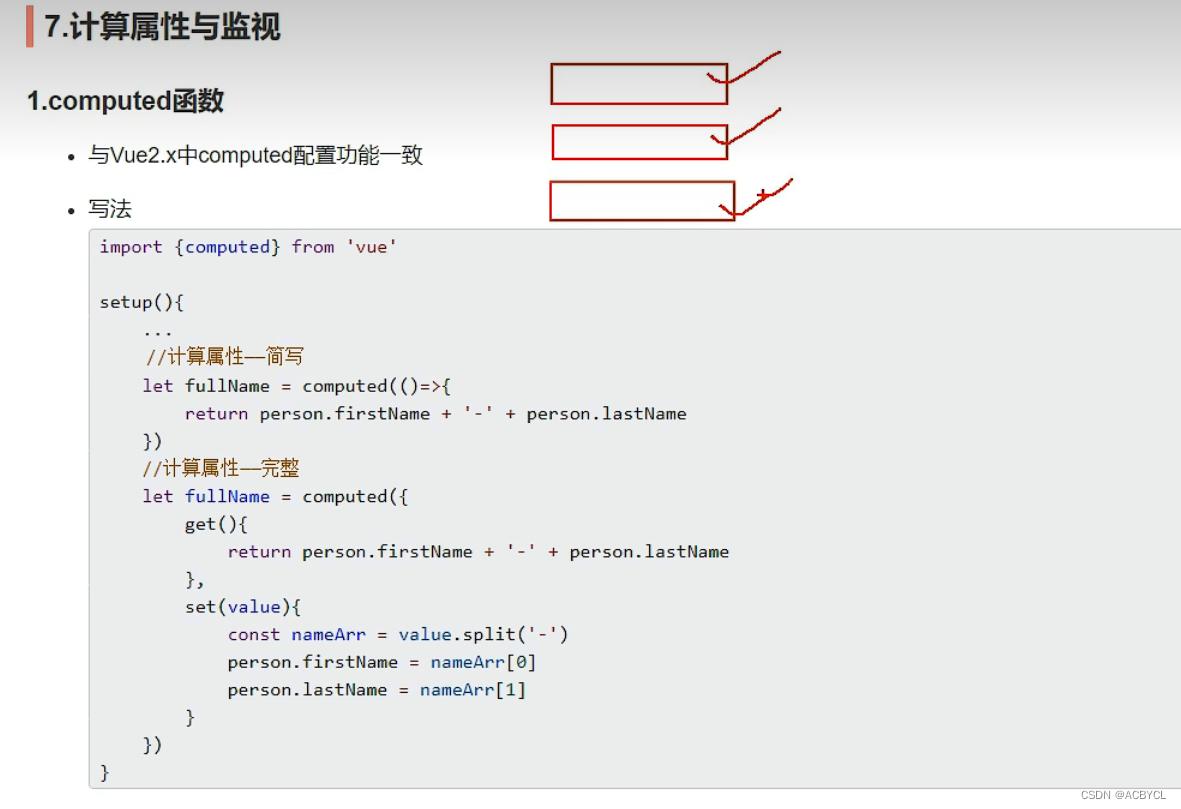
7.计算属性与监视
app.vue
<template>
  <demo></demo>
</template>

<script>
import Demo from './components/Demo.vue'
export default {
    name: "App",
    components:{Demo},
}
</script>

<style>
</style>
Demo.vue
<template>
  <h1>一个人的信息</h1>
  姓:<input type="text" v-model="person.firstName">
  <br>
  名:<input type="text" v-model="person.lastName">
  <br>
  全名:<input type="text" v-model="person.fullName">

</template>

<script>
import { reactive } from '@vue/reactivity'
import { computed } from '@vue/runtime-core'
export default {
    name:'Demo',
    setup(){
        let person=reactive({
            firstName:'张',
            lastName:'三'
        })
        // 计算属性-简写(没有考虑计算属性被修改的情况)
        // person.fullName=computed(()=>{
        //     return person.firstName+'-'+person.lastName
        // })


        person.fullName=computed({
            get(){
                return person.firstName+'-'+person.lastName
            },
            set(value){
                const nameArr=value.split('-')
                person.firstName=nameArr[0]
                person.lastName=nameArr[1]
            }
        })

        // 返回一个对象(常用)
        return{
            person
        }
    }


}
</script>

<style>
</style>
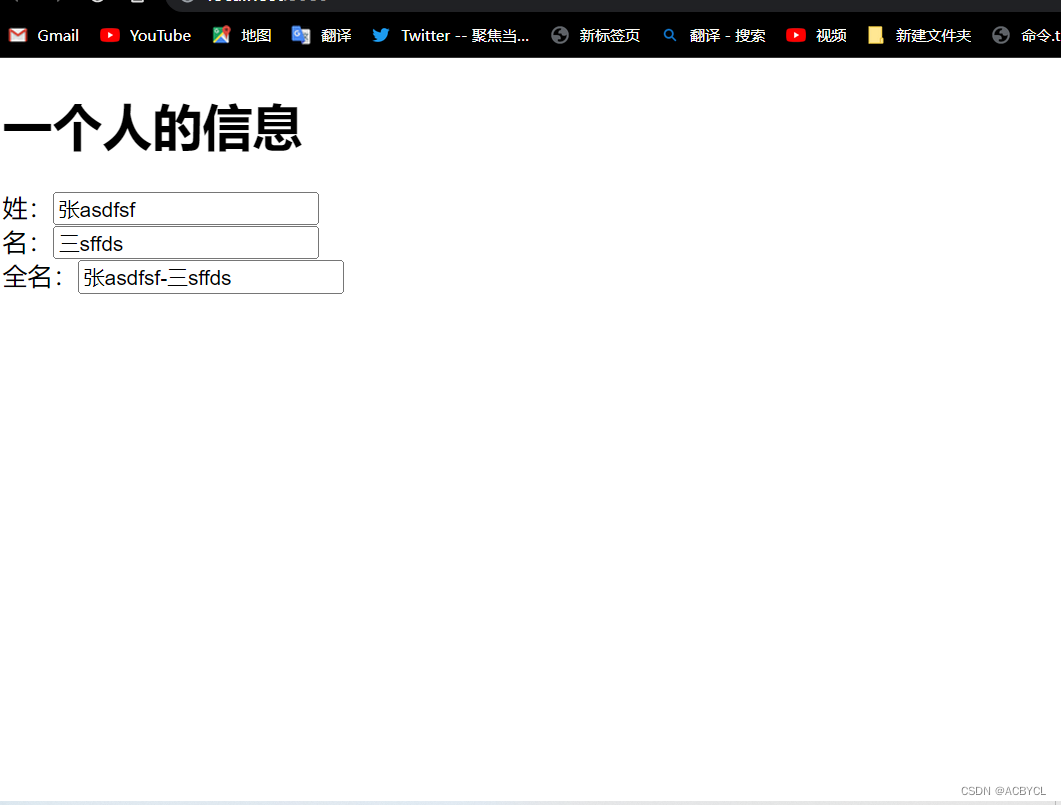
总结:
computed变为一个方法,可以写computed(()=>{})
也可以写成对象且无需返回:computed({})
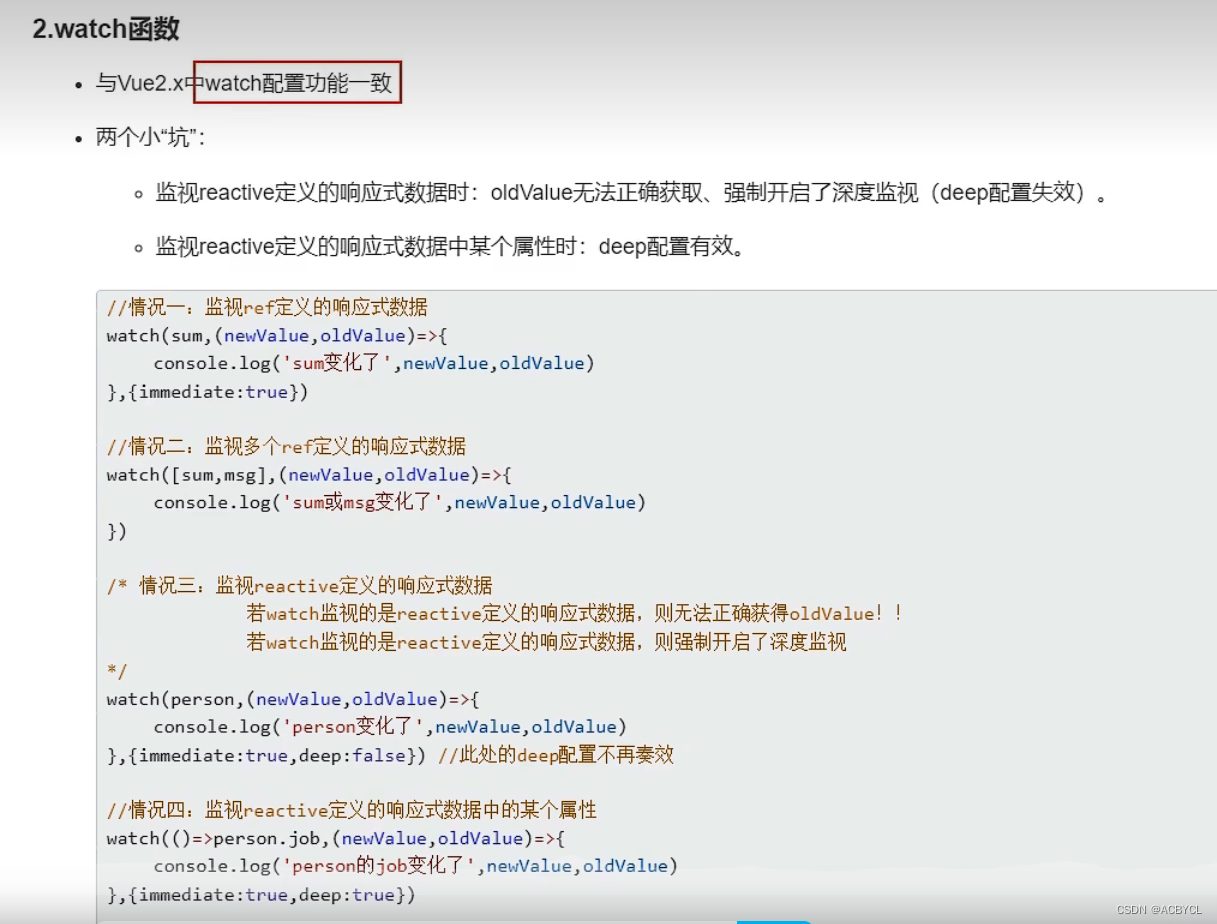
8.watch属性
Demo.vue
<template>
    <h2>当前求和为:{{sum}}</h2>
    <button @click="sum++">点我+1</button>
    <br>
    <h2>当前的信息为:{{msg}}</h2>
    <button @click="msg+='!'">修改信息</button>
    <br>
    <h2>姓名:{{person.name}}</h2>
    <h2>年龄:{{person.age}}</h2>
    <h2>薪资:{{person.job.j1.salary}}</h2>
    <button @click="person.name+='~'">修改姓名</button>
    <button @click="person.age++">增长年龄</button>
    <button @click="person.job.j1.salary++">涨薪</button>


</template>

<script>
import { reactive, ref } from '@vue/reactivity'
import { watch } from '@vue/runtime-core'

export default {
    name:'Demo',
    setup(){
        let sum=ref(0)
        let msg=ref('你好啊')
        let person=reactive({
            name:'张三',
            age:18,
            job:{
                j1:{
                    salary:20
                }
            }
        })

        // // 情况一:监视ref所定义的一个响应式数据
        // watch(sum,(newValue,oldValue)=>{
        //     console.log('sum变化了',newValue,oldValue)
        // },{immediate:true,deep:true})

        // 情况二:监视ref所定义的多个响应式数据
        //  watch([sum,msg],(newValue,oldValue)=>{
        //     console.log('sum或msg变化了',newValue,oldValue)
        // },{immediate:true,deep:true})

        // 情况三:监视的reactive所定义的一个响应式数据的全部属性
                // 1.注意:此处无法正确的获取oldValue
                // 2.注意:强制开启了深度监视(deep配置无效)
        watch(person,(newValue,oldValue)=>{
            console.log('person的job变化了',newValue,oldValue)
        },{deep:false})//此处的deep配置无效

        // 情况四:监视reactive所定的一个响应式数据中的某个属性
        watch(()=>person.name,(newValue,oldValue)=>{
            console.log('person的name变化了',newValue,oldValue)
        })

        // 情况五:监视reactive所定义的一个响应式数据中的某些属性
        watch([()=>person.name,()=>person.age],(newValue,oldValue)=>{
            console.log('person的name或age变化了',newValue,oldValue)
        })


        // 特殊情况
        watch(()=>person.job,(newValue,oldValue)=>{
            console.log('person的job变化了',newValue,oldValue)
        },{deep:true})//此处由于监视的是reactive素定义的对象中的某个属性,所以deep配置有效

        return {
            sum,
            msg,
            person
        }
    }
}
</script>

<style>
</style>
app.vue
<template>
  <demo></demo>
</template>

<script>
import Demo from './components/Demo.vue'
export default {
    name: "App",
    components:{Demo},
}
</script>

<style>
</style>
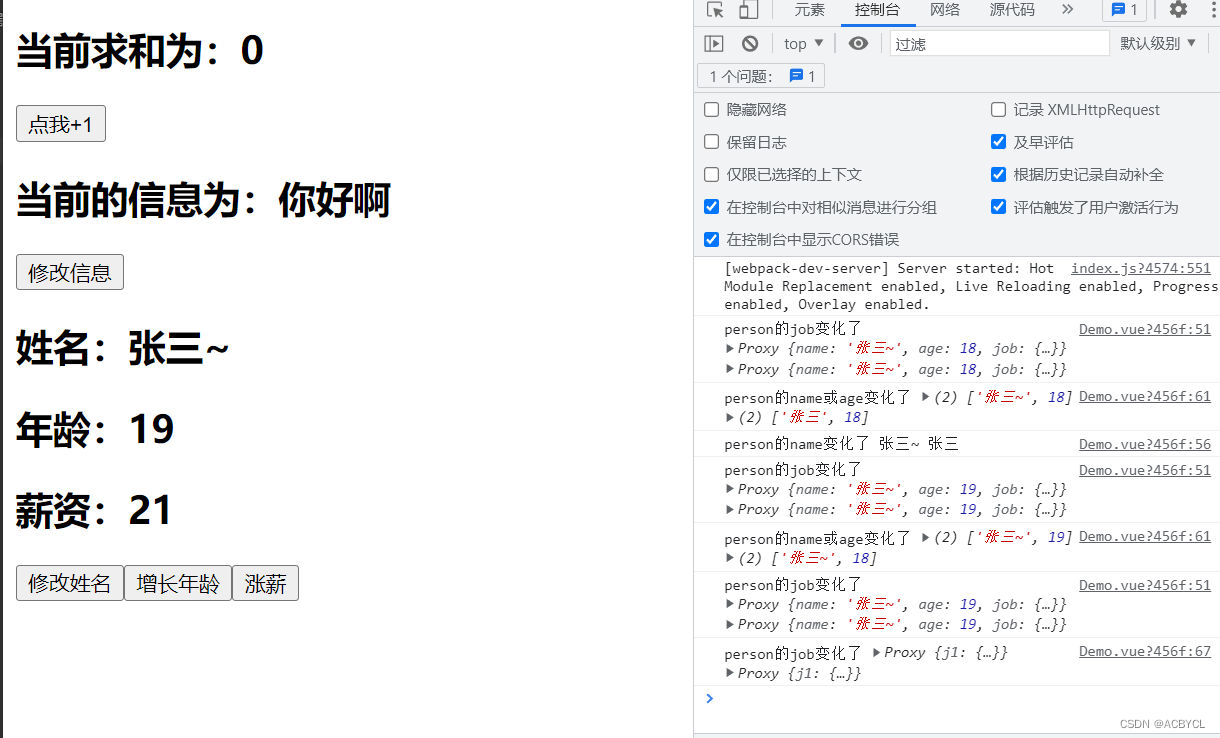
总结:
1.newValue变成一个数组,不再仅仅是一个数
2.reactive里面的对象,自动有深度监视功能。watch不用开启深度deep监视
3.当ref({})里面是个对象时,会走reactive(内部会生成一个proxy代理对象)路线,且必须通过.value来取值
watch时value的值
Demo.vue
<template>
    <h2>当前求和为:{{sum}}</h2>
    <button @click="sum++">点我+1</button>
    <br>
    <h2>当前的信息为:{{msg}}</h2>
    <button @click="msg+='!'">修改信息</button>
    <br>
    <h2>姓名:{{person.name}}</h2>
    <h2>年龄:{{person.age}}</h2>
    <h2>薪资:{{person.job.j1.salary}}</h2>
    <button @click="person.name+='~'">修改姓名</button>
    <button @click="person.age++">增长年龄</button>
    <button @click="person.job.j1.salary++">涨薪</button>


</template>

<script>
import { reactive, ref } from '@vue/reactivity'
import { watch } from '@vue/runtime-core'

export default {
    name:'Demo',
    setup(){
        let sum=ref(0)
        let msg=ref('你好啊')
        let person=reactive({
            name:'张三',
            age:18,
            job:{
                j1:{
                    salary:20
                }
            }
        })

        console.log(person)

		//不要用.value监视一个具体的值 如0,会报错
		//也不要监视一个具体的值
        watch(sum,(newValue,oldValue)=>{
            console.log('sum的值变化了',newValue,oldValue)
        })

        // 问题访问不到,因为ref走的是reactive的路线需要开起深度监视
        // 解决方案一:  通过访问.value
        watch(person.value,(newValue,oldValue)=>{
            console.log('person的值变化了',newValue,oldValue)
        })

        // 方案二:开启deep
        watch(person,(newValue,oldValue)=>{
            console.log('person的值变化了',newValue,oldValue)
        },{deep:true})

        return {
            sum,
            msg,
            person
        }
    }
}
</script>

<style>
</style>
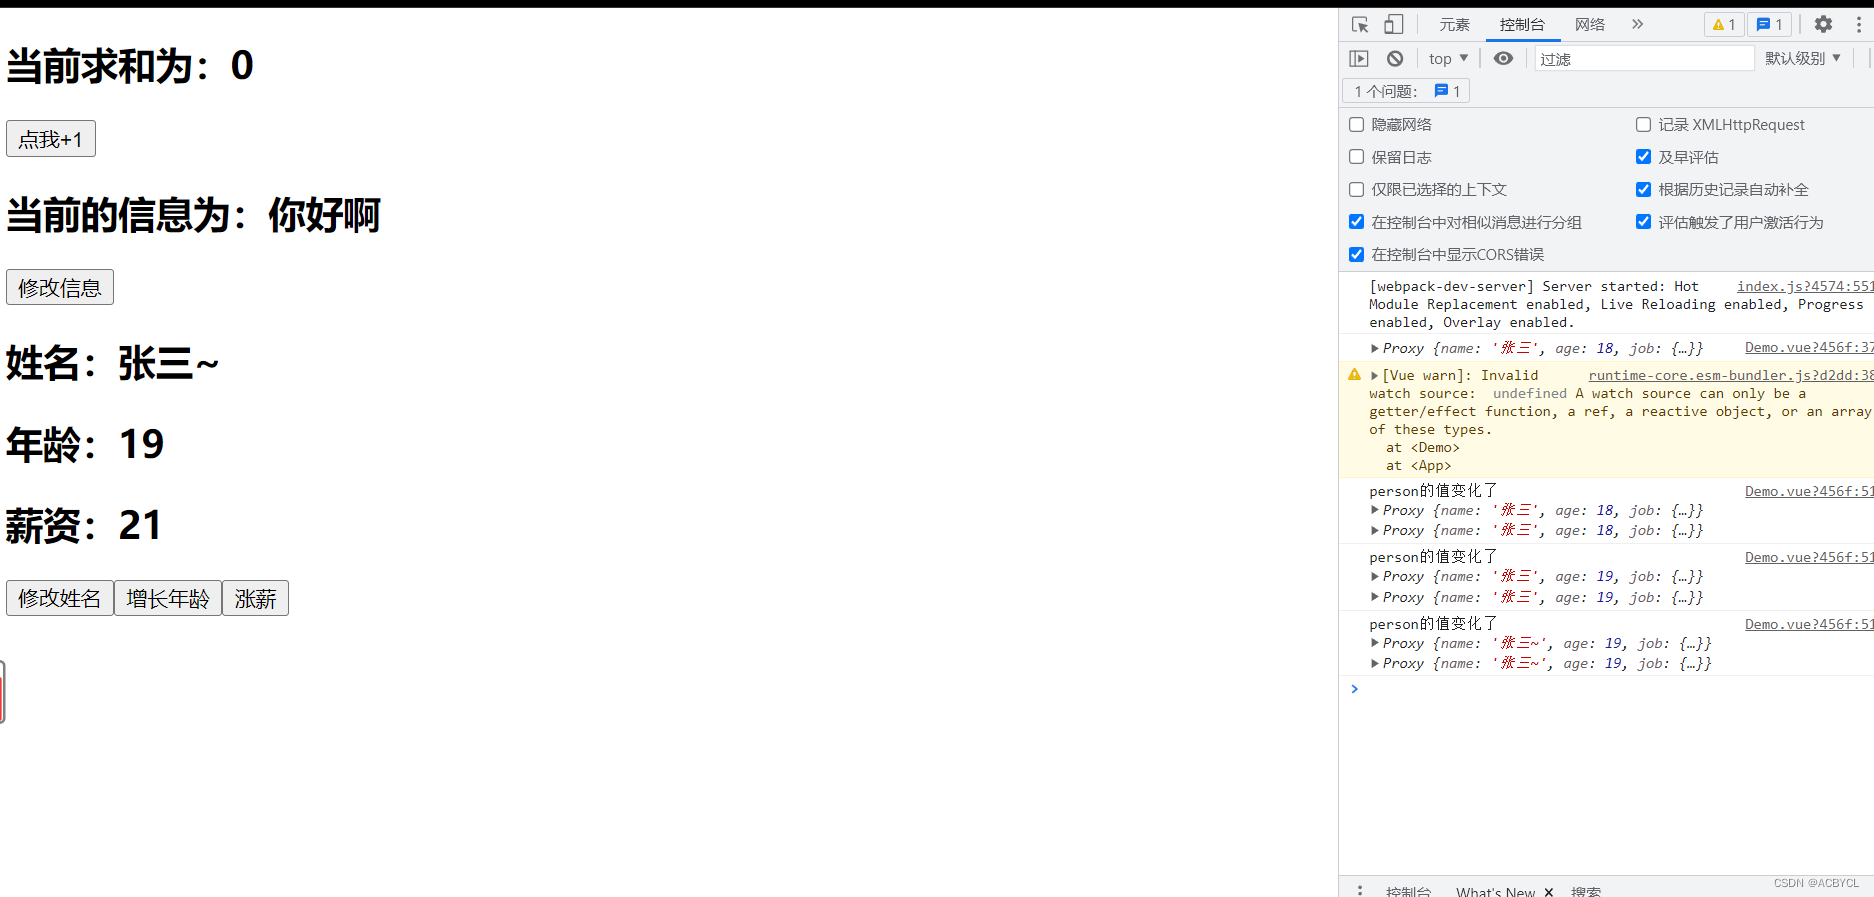
总结:
1.当sum=ref(0),不能用watch(sum.value)的.value来访问,因为是具体的值
2.proxy相当于地址,地址不变引用不变
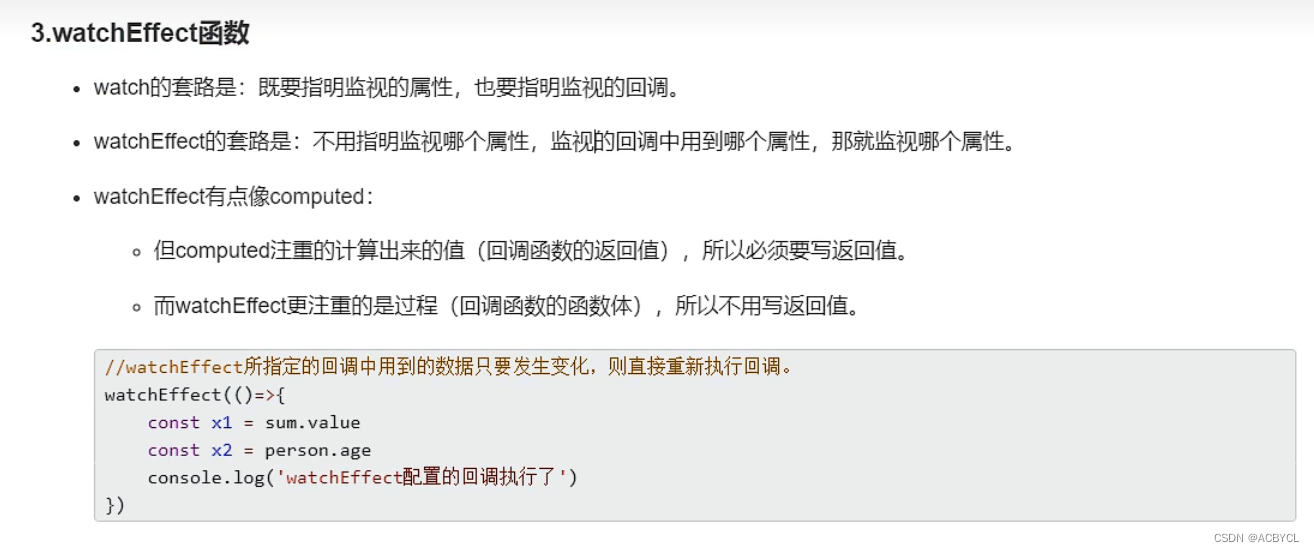
watchEffec函数
Demo.vue
<template>
    <h2>当前求和为:{{sum}}</h2>
    <button @click="sum++">点我+1</button>
    <br>
    <h2>当前的信息为:{{msg}}</h2>
    <button @click="msg+='!'">修改信息</button>
    <br>
    <h2>姓名:{{person.name}}</h2>
    <h2>年龄:{{person.age}}</h2>
    <h2>薪资:{{person.job.j1.salary}}</h2>
    <button @click="person.name+='~'">修改姓名</button>
    <button @click="person.age++">增长年龄</button>
    <button @click="person.job.j1.salary++">涨薪</button>


</template>

<script>
import { reactive, ref } from '@vue/reactivity'
import { watch, watchEffect } from '@vue/runtime-core'

export default {
    name:'Demo',
    setup(){
        let sum=ref(0)
        let msg=ref('你好啊')
        let person=reactive({
            name:'张三',
            age:18,
            job:{
                j1:{
                    salary:20
                }
            }
        })

        watchEffect(()=>{
            const x1=sum.value
            const x2=person.job.j1.salary
            console.log('watchEffect所指定的回调执行了')
        })

        return {
            sum,
            msg,
            person
        }
    }
}
</script>

<style>
</style>
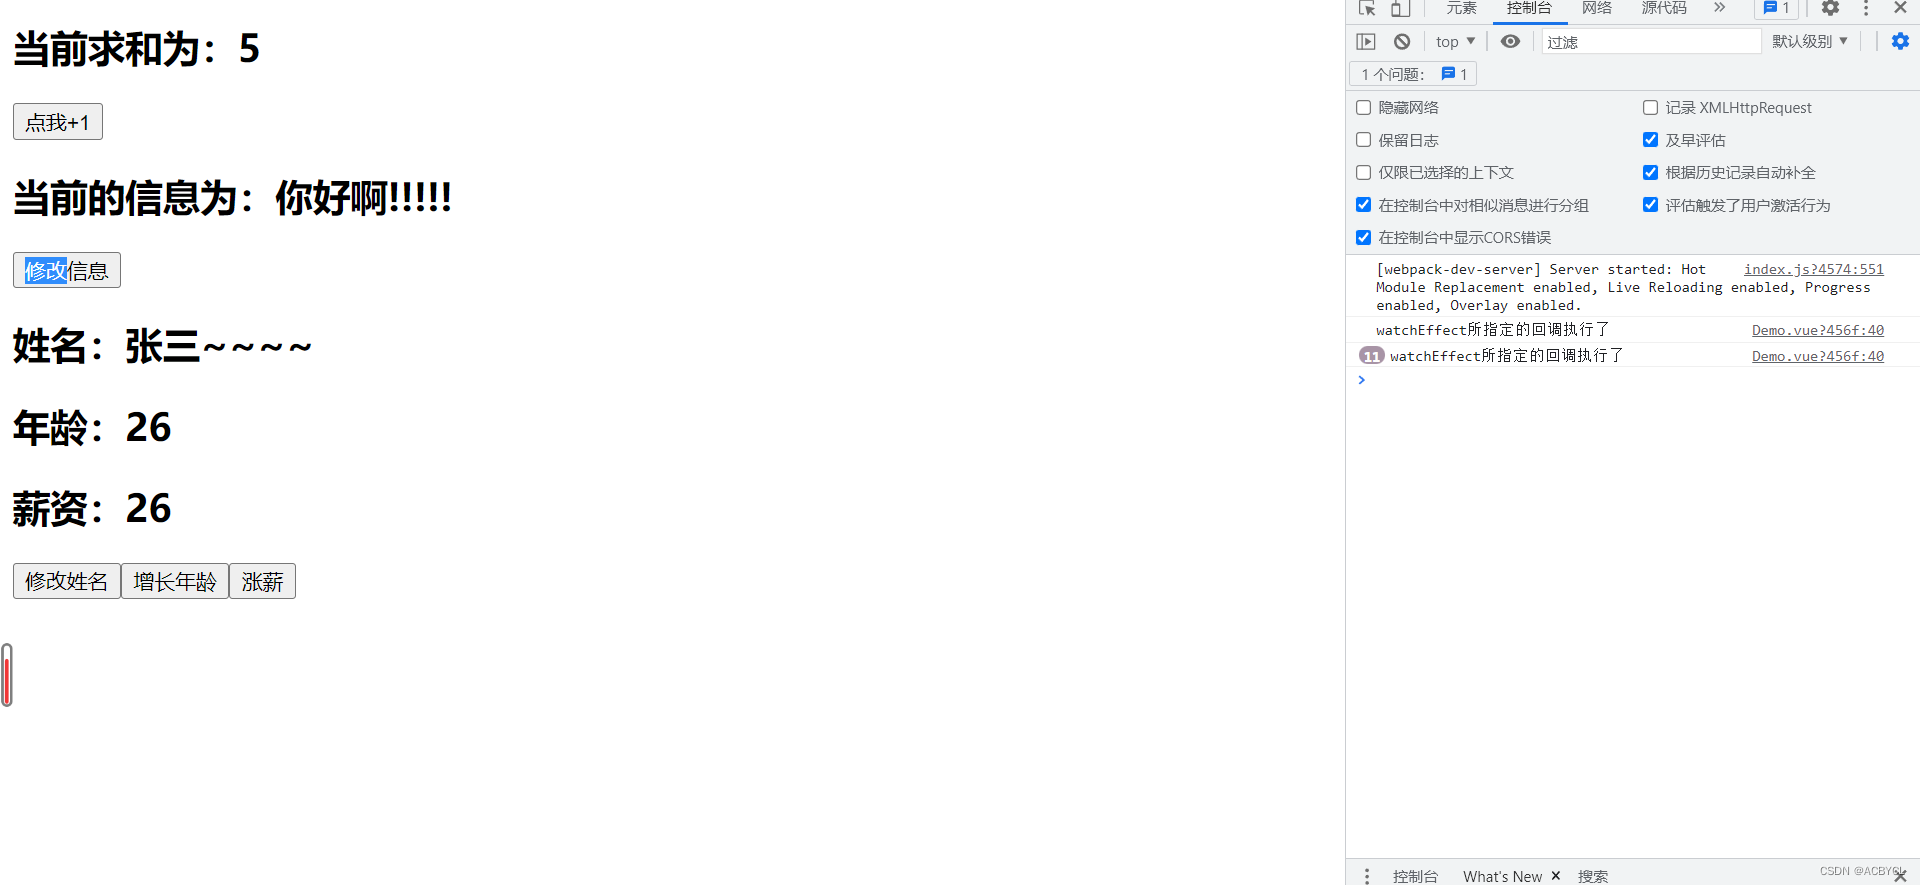
总结:
1.watchEffect不说它监视谁
2.computed函数初始化时执行一次,依赖的数据发生变化时执行一次
3.watchEffect有点像,谁用了,监视谁
4.watchEffect注重过程,computed注重值
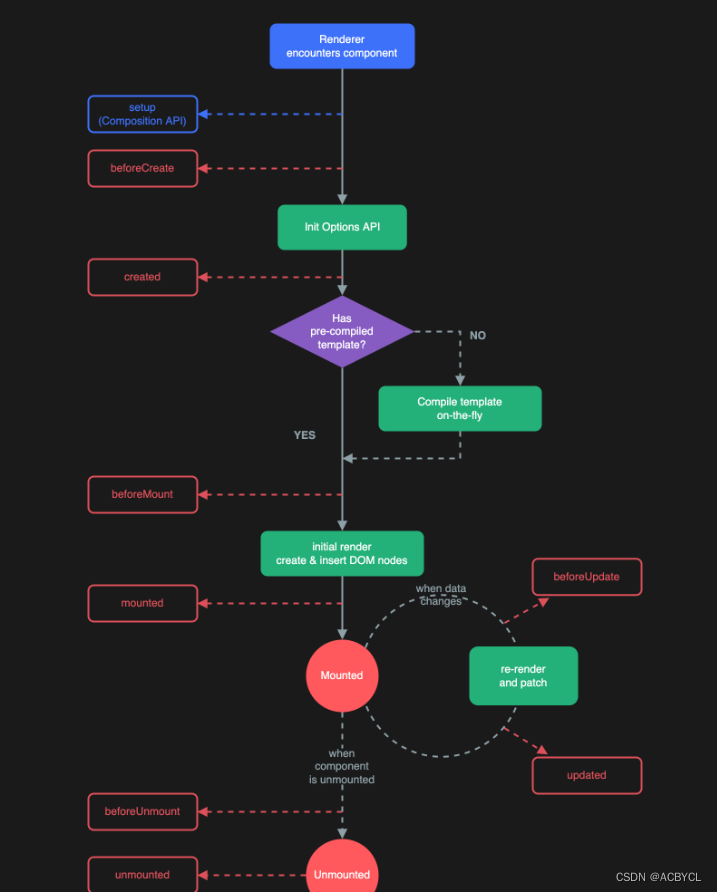
9.Vue3生命周期
生命周期钩子两种写法:
- 配置项式:与setup平级
- 组合式API式:写在setup里面
Demo.vue
<template>
    <h2>当前求和为:{{sum}}</h2>
    <button @click="sum++">点我+1</button>
</template>

<script>
import { onBeforeMount, onBeforeUnmount, onBeforeUpdate, onMounted, onUnmounted, onUpdated } from '@vue/runtime-core'
import { ref } from 'vue'


export default {
    name:'Demo',
    setup(){
        console.log('----setup---')
        let sum=ref(0)
        onBeforeMount(()=>{
            console.log('---onBeforeMount---')
        })
        onMounted(()=>{
            console.log('---onMounted---')
        })
        onBeforeUpdate(()=>{
            console.log('---onBeforeUpdate---')
        })
        onUpdated(()=>{
            console.log('---onUpdated---')
        })
        onBeforeUnmount(()=>{
            console.log('---onBeforeUnmount---')
        })
        onUnmounted(()=>{
            console.log('---onUnmounted---')
        })

        return{
            sum
        }

    },

    // 2.通过配置项形式使用生命周期钩子
    beforeCreate(){
        console.log('---beforeCreate---')
    },
    created(){
        console.log('---created---')
    },
    beforeMount(){
        console.log('---beforeMount---')
    },
    mounted(){
        console.log('---mounted---')
    },
    beforeUpdate(){
        console.log('---beforeUpdate---')
    },
    updated(){
        console.log('---updated---')
    },
    beforeUnmount(){
        console.log('---beforeUpdate---')
    },
    unmounted(){
        console.log('---updated---')
    },


}
</script>

<style>
</style>
app.vue
<template>
  <button @click="isShowDemo=!isShowDemo">切换隐藏/显示</button>
  <demo v-if="isShowDemo"></demo>
</template>

<script>
import { ref } from '@vue/reactivity'
import Demo from './components/Demo.vue'
export default {
    name: "App",
    components:{Demo},
    setup(){
      let isShowDemo=ref(true)
      return{
        isShowDemo
      }
    }
}
</script>

<style>
</style>
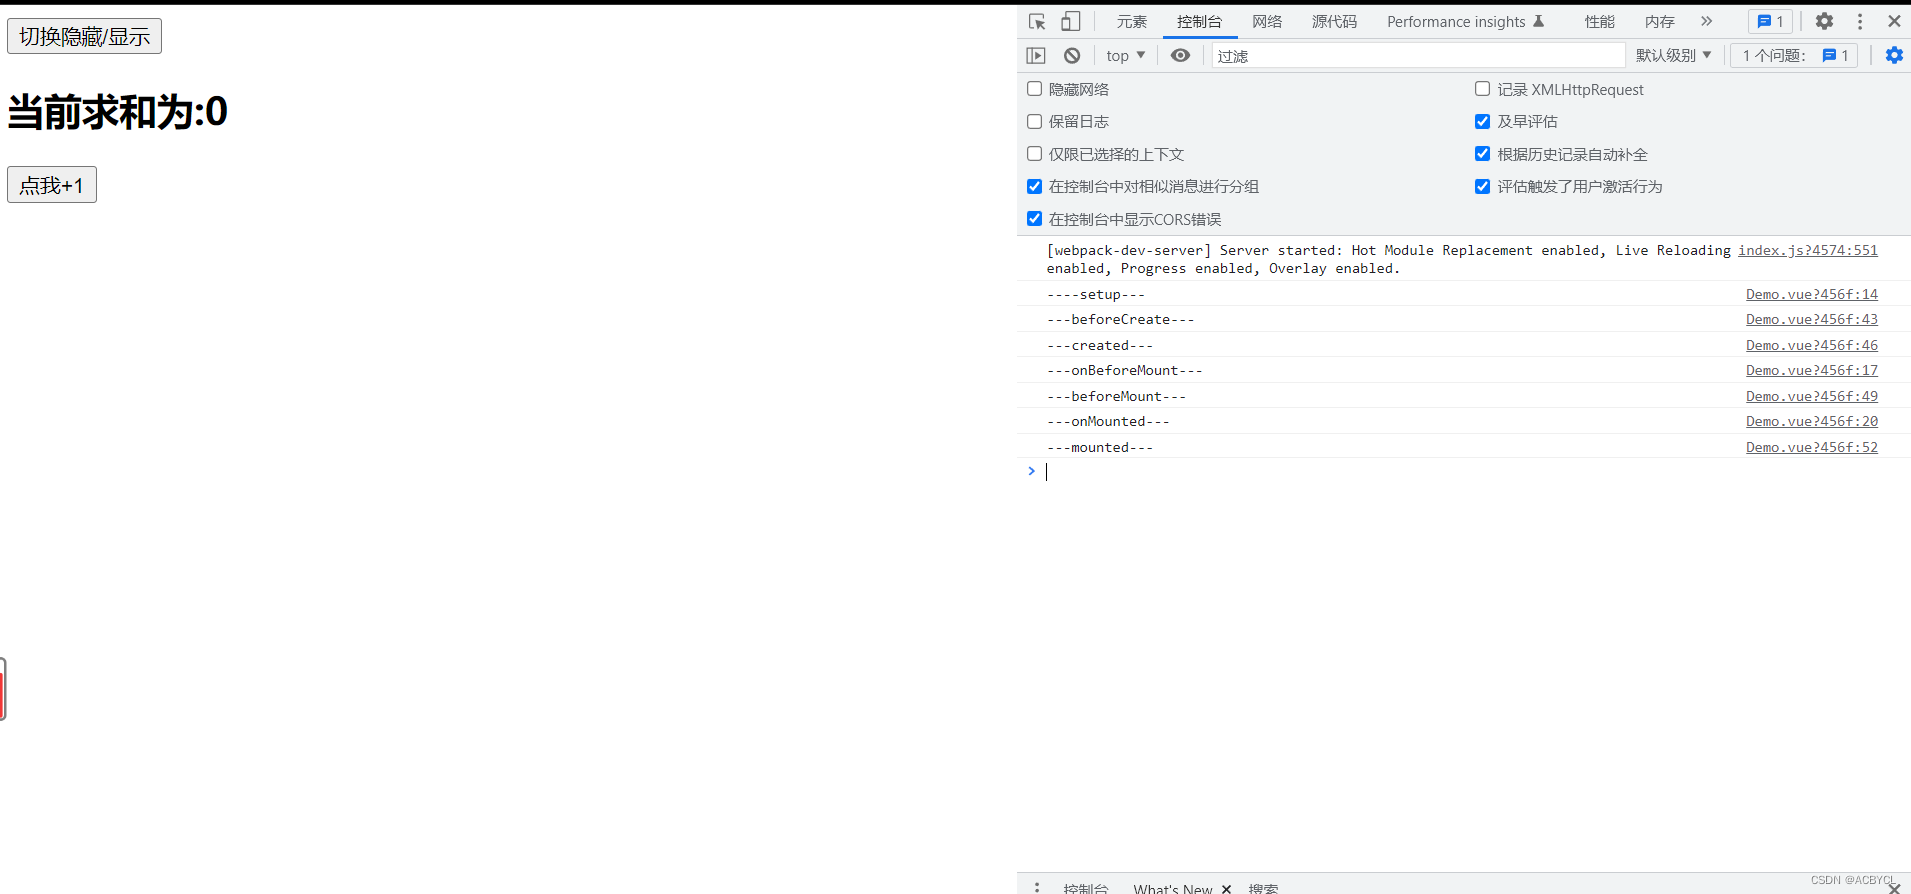
总结:
1.vue3可以继续使用vue2的生命周期钩子但有两个改名
- beforeDestroy---->beforeUnmount
- destroyed----> unmounted
2.setup执行在beforeCreate之前
3.setup与beforeCreate是平级的关系,可以写在同一个层级
4.vue2在挂载之前可以执行beforeCreate(),created().但vue3必须先挂载,再执行
5.折叠#region-----#endregion
6.钩子对应关系vue2vue3
beforeCreate=>setup()
created=====>setup()
beforeMount()=>onBeforeMount
mounted=====>onMounted
beforeUpdate====>onBeforeUpdate
update=========>onUpdated
beforeUnmounted====>onBeforeUnmount
unmounted=======>onUnmounted
9.自定义hook函数

app.vue
<template>
  <button @click="isShowDemo=!isShowDemo">切换隐藏/显示</button>
  <demo v-if="isShowDemo"></demo>
  <hr>
  <test></test>
</template>

<script>
import { ref } from '@vue/reactivity'
import Demo from './components/Demo.vue'
import Test from './components/test.vue'
export default {
    name: "App",
    components:{Demo, Test},
    setup(){
      let isShowDemo=ref(true)
      return{
        isShowDemo
      }
    }
}
</script>

<style>
</style>
Demo.vue
<template>
    <h2>当前求和为:{{sum}}</h2>
    <button @click="sum++">点我+1</button>
    <br>
    <h2>当前点击鼠标的坐标为:x:{{point.x}},y:{{point.y}}</h2>
</template>

<script>
import { ref } from '@vue/reactivity'
import usePoint from '../hooks/usePoint'

export default {
    name:'Demo',
    setup(){
        let sum=ref(0)
        let point=usePoint()

        return{
            sum,
            point
        }
    }

}
</script>

<style>
</style>
test.vue
<template>
  <h2>我是Test组件</h2>
  <h2>当前点击鼠标的坐标为:{{point.x}},y:{{point.y}}</h2>

</template>

<script>
    import usePoint from '../hooks/usePoint';
    export default {
        name:'Test',
        setup(){
            const point = usePoint()
            return{
                point
            }
        }

    }
</script>

<style>

</style>
hooks / usePoint.js
<template>
  <h2>我是Test组件</h2>
  <h2>当前点击鼠标的坐标为:{{point.x}},y:{{point.y}}</h2>

</template>

<script>
    import usePoint from '../hooks/usePoint';
    export default {
        name:'Test',
        setup(){
            const point = usePoint()
            return{
                point
            }
        }

    }
</script>

<style>

</style>
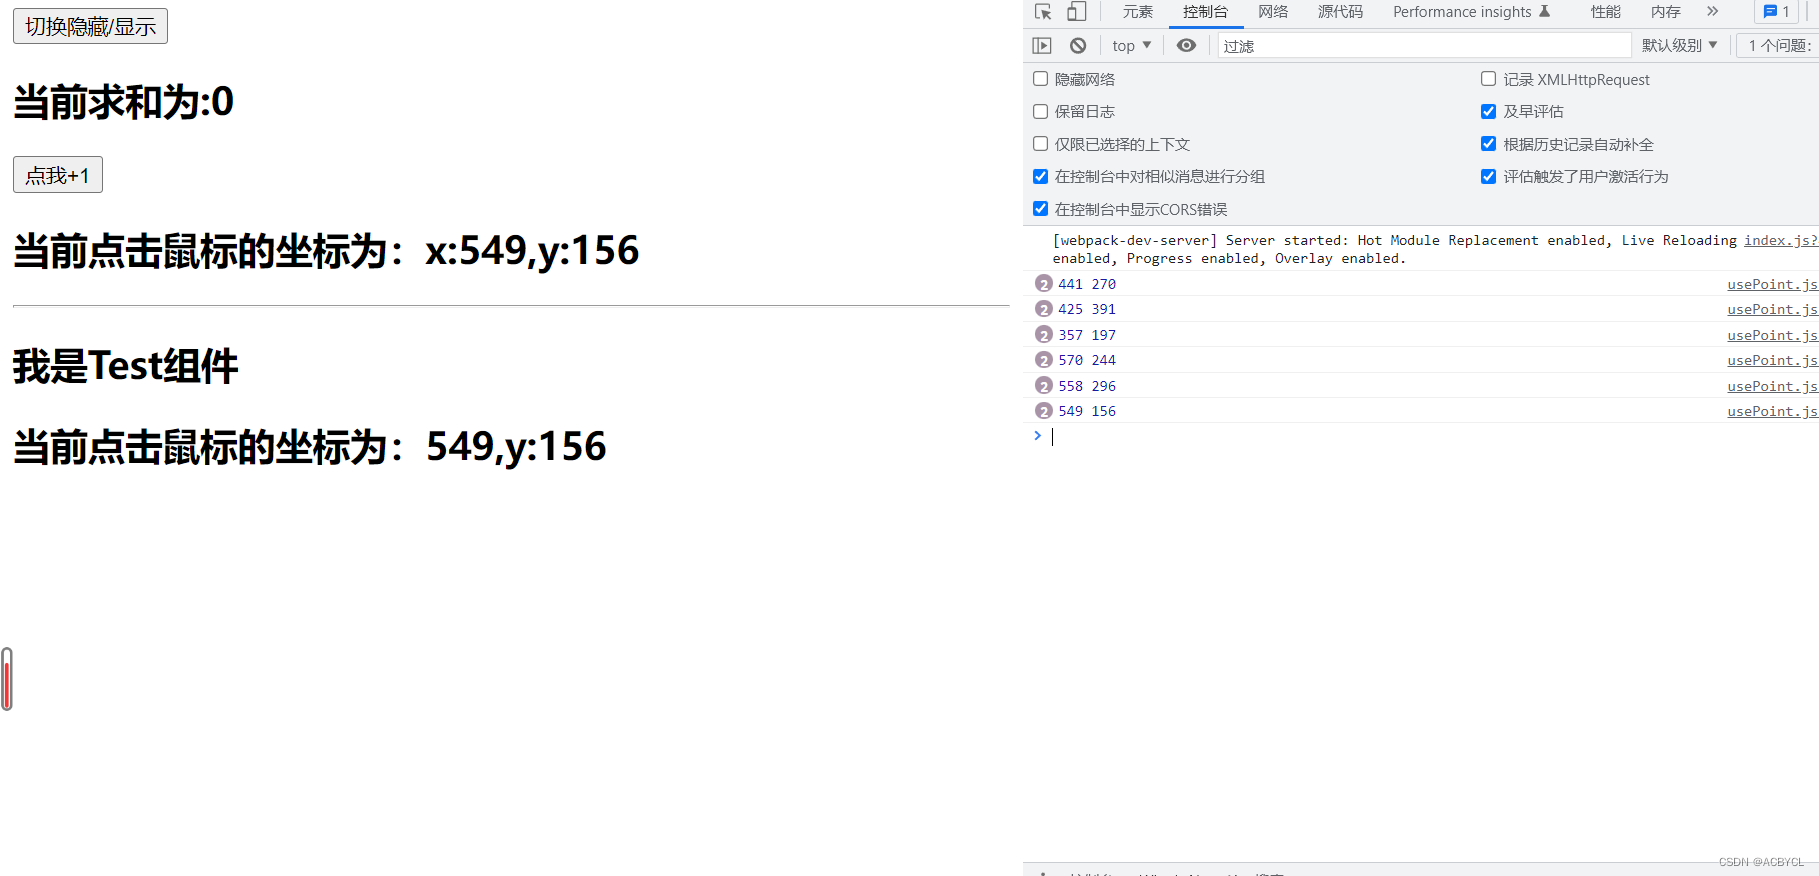
总结:
- 1.hook只是一个普普通通的js,可以提高功能的复用
- 2.组件和hook功能都一样
10.toRef(把什么变成ref)

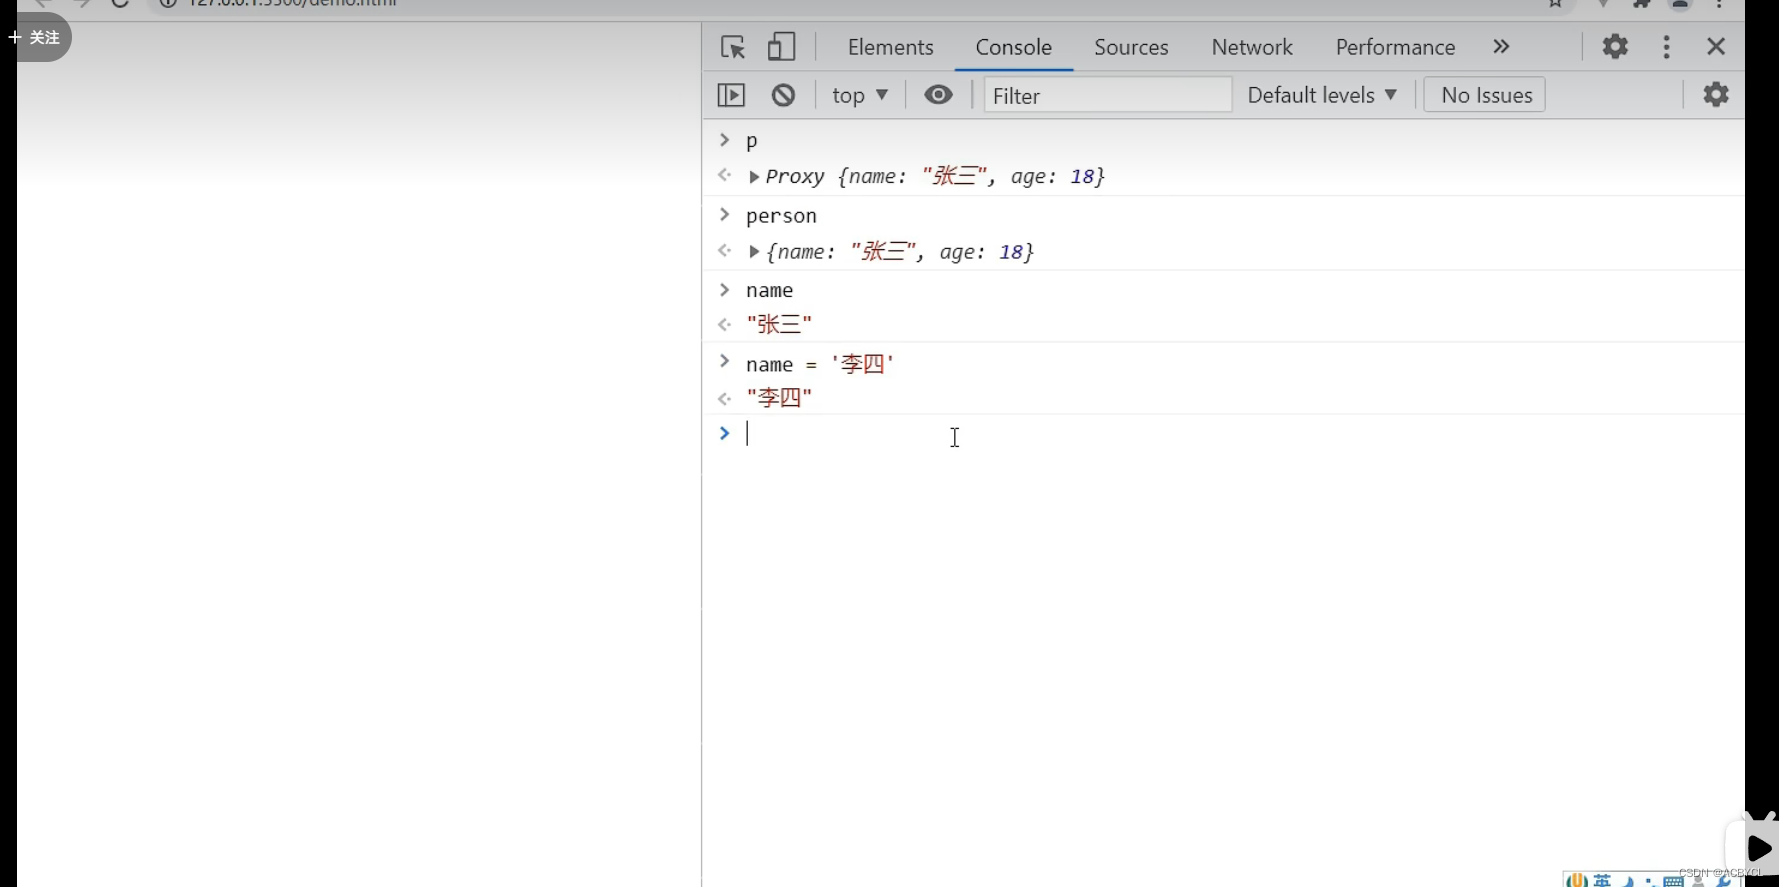
问题:复制的数据非响应式
<!DOCTYPE html>
<html lang="en">
<head>
    <meta charset="UTF-8">
    <meta http-equiv="X-UA-Compatible" content="IE=edge">
    <meta name="viewport" content="width=device-width, initial-scale=1.0">
    <title>Document</title>
</head>
<body>
    <script>
        let person={
            name:'张三',
            age:18
        }
        let p=new Proxy(person,{
            set(target,propName,value){
                console.log(`${propName}被修改了,我要去更新页面`)
                // target[propName]=value
                Reflect.set(target,propName,value)
            }
        })
        // 问题:
        // 这里是数据而非响应式
        let name=p.name

    </script>
</body>
</html>
Demo.vue
<template>
    <h4>{{person}}</h4>
    <h2>姓名:{{name}}</h2>
    <h2>年龄:{{age}}</h2>
    <h2>薪资:{{job.j1.salary}}</h2>
    <button @click="name+='~'">修改姓名</button>
    <button @click="age++">增长年龄</button>
    <button @click="person.job.j1.salary++">涨薪</button>


</template>

<script>
import { reactive, toRef,toRefs } from '@vue/reactivity'

export default {
    name:'Demo',
    setup(){
        let person=reactive({
            name:'张三',
            age:18,
            job:{
                j1:{
                    salary:20
                }
            }
        })

        // // 1.toref()处理响应式引用关系
        // const name1=person.name
        // console.log('%%%',name1)

        // const name2=toRef(person,'name')
        // console.log('####',name2)

        // 2.toRefs()处理多个数据
        const x=toRefs(person)
        console.log('******',x)


        return{
            person,
            // 解决方案一:ref
            // name:toRef(person,'name'),
            // age:toRef(person,'age'),
            // salary:toRef(person.job.j1,'salary'),

            // 解决方案二:toRefs()处理多个数据
            ...toRefs(person)
        }
    }

}
</script>

<style>
</style>
app.vue
<template>
  <demo></demo>
  <hr>
</template>

<script>
import Demo from './components/Demo.vue'
export default {
    name: "App",
    components:{Demo},
    setup(){

      return{

      }
    }
}
</script>

<style>
</style>
执行结果
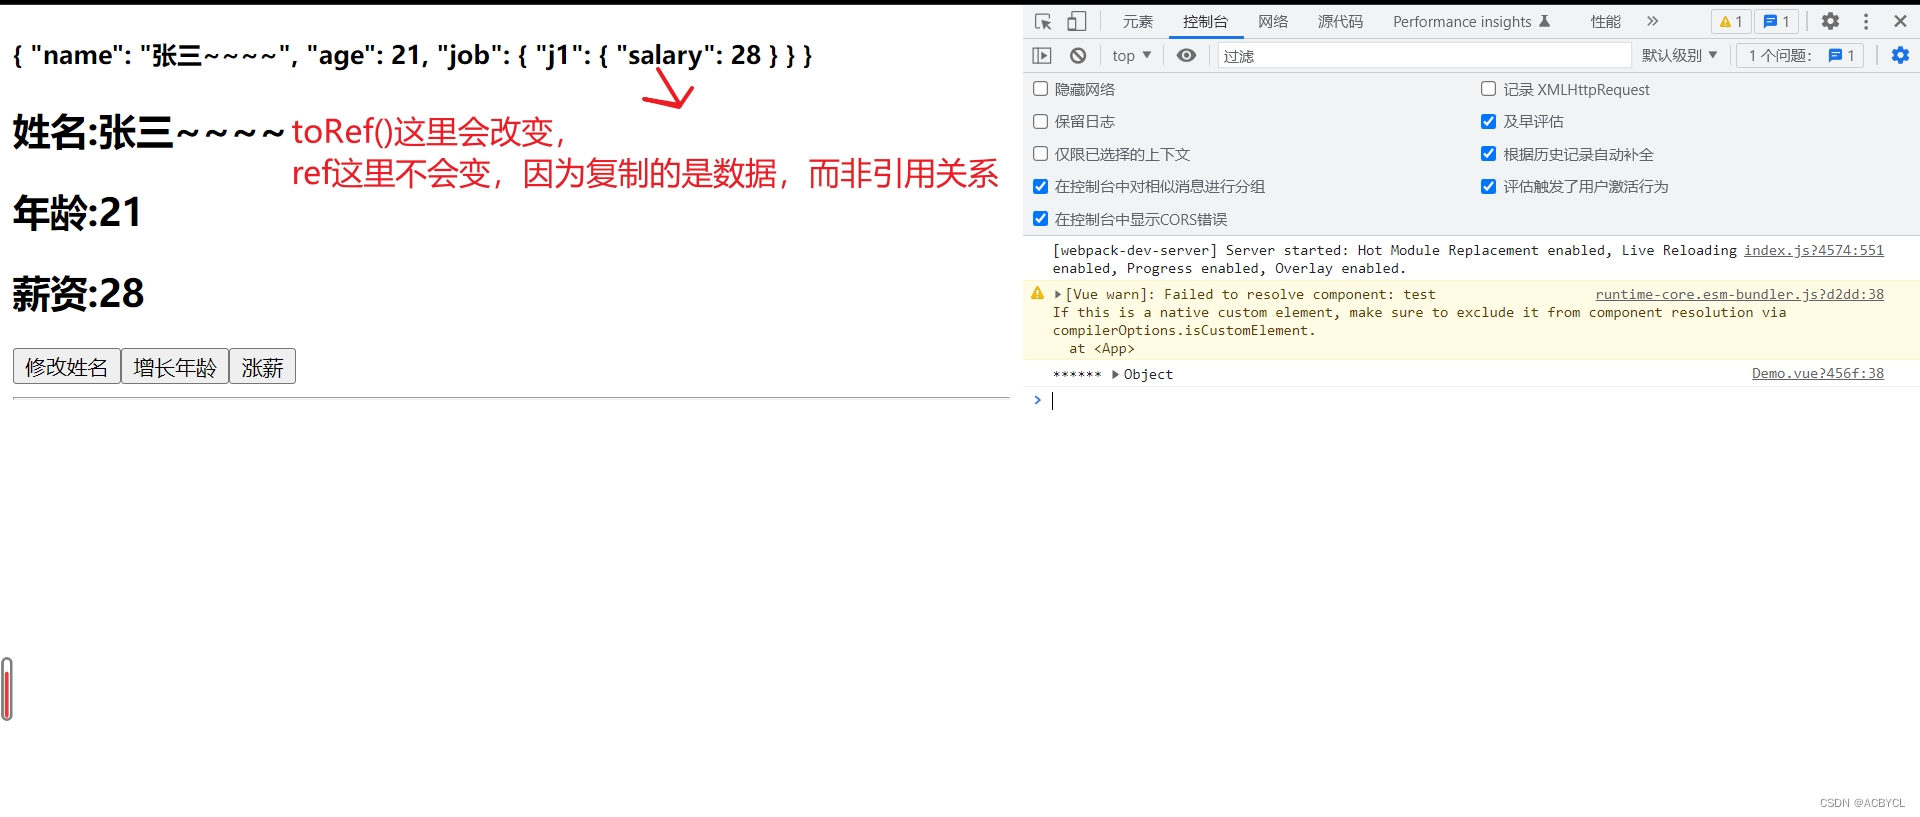
总结:
1.ref是复制的数据,原数据不变,toRef是引用关系(通过getter,setter指向)
2.toRefs()只能处理第一层,不能深层次响应
三.其他Composition API
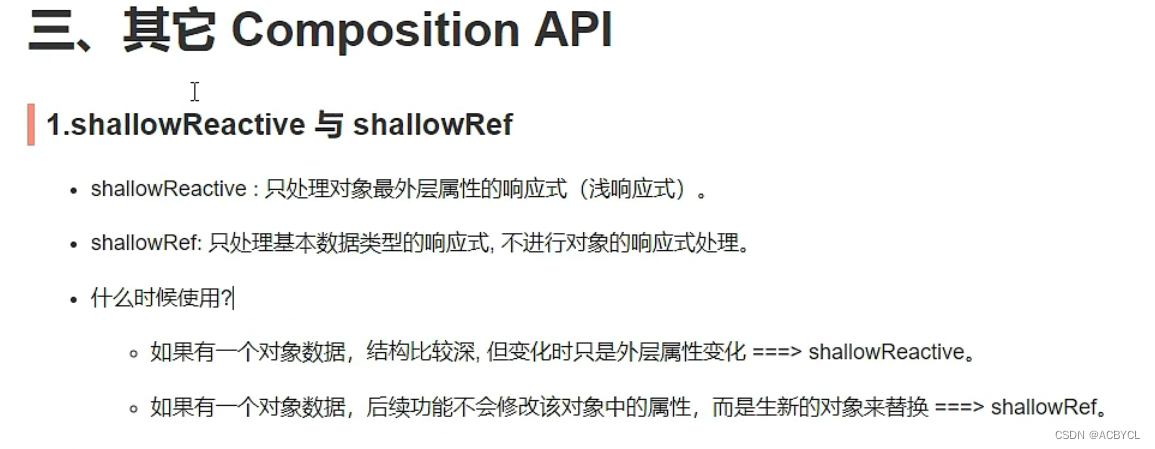
1.shallowReactive与shallowRef
Demo.vue
<template>
    <h4>当前的x值是:{{x}}</h4>
    <button @click="x={y:888}">点我x+1</button>
    <button @click="x.y++">点我x.y++</button>
    <br>
    <h4>{{person}}</h4>
    <h2>姓名:{{name}}</h2>
    <h2>年龄:{{age}}</h2>
    <h2>薪资:{{job.j1.salary}}</h2>
    <button @click="name+='~'">修改姓名</button>
    <button @click="age++">增长年龄</button>
    <button @click="person.job.j1.salary++">涨薪</button>


</template>

<script>
import { reactive,toRefs,shallowRef} from '@vue/reactivity'

export default {
    name:'Demo',
    setup(){
        //1.shallowReactive:只处理第一层数据的响应式
        // let person.shallowReactive({
        let person=reactive({
            name:'张三',
            age:18,
            job:{
                j1:{
                    salary:20
                }
            }
        })

        let x=shallowRef({
            y:0
        })
        console.log('*****',x)

        return{
            x,
            person,
            ...toRefs(person)
        }
    }

}
</script>

<style>
</style>
app.vue
<template>
  <demo></demo>
  <hr>
</template>

<script>
import Demo from './components/Demo.vue'
export default {
    name: "App",
    components:{Demo},
    setup(){

      return{

      }
    }
}
</script>

<style>
</style>
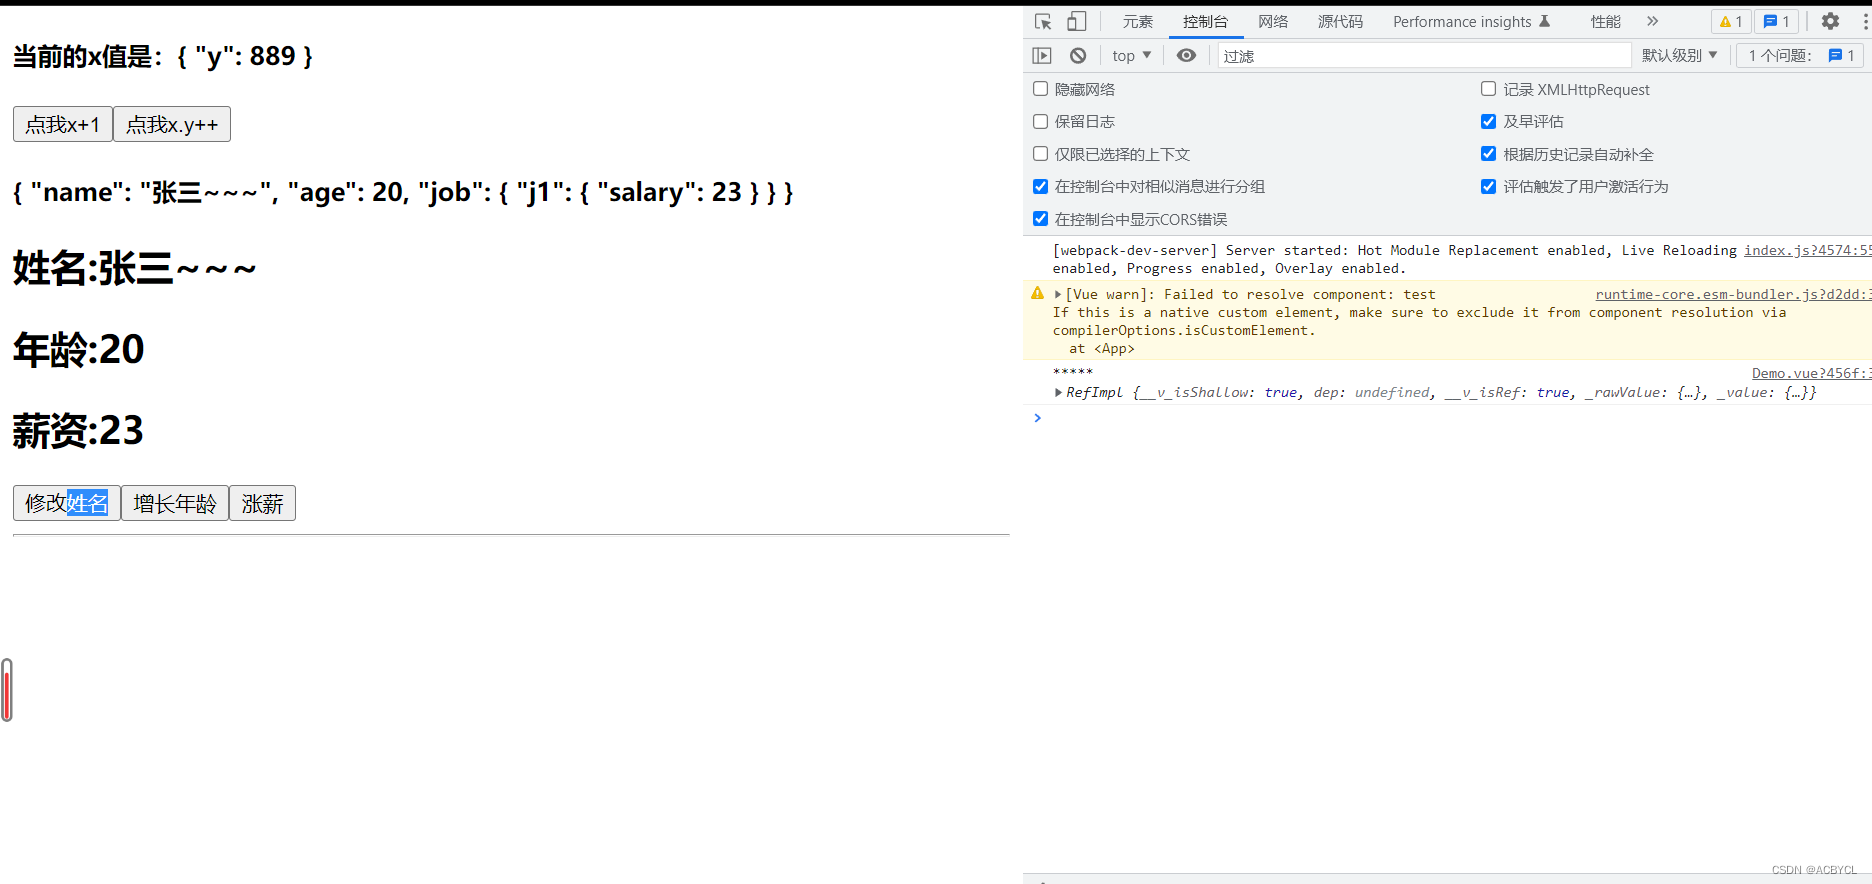
总结:
1.reactive会把对象里所有的东西变为响应式
2.ref的value:proxy, shallowRed的value:Object,拿来就用
2.readonly与shallowReadonly
页面不变得两种情况:
- 1.页面不是响应式得
- 2.页面不让改

总结:
起到保护作用,不许修改
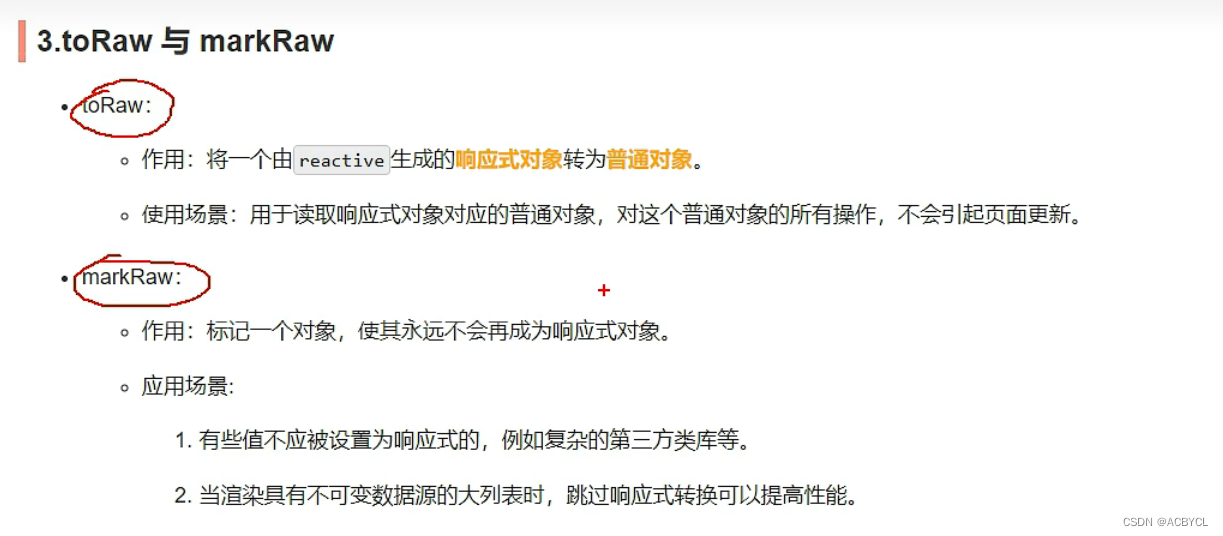
3.toRaw与markRaw
demo.vue
<template>
    <h4>当前求和为:{{sum}}</h4>
    <button @click="sum++">点我++</button>
    <br>
    <h2>姓名:{{name}}</h2>
    <h2>年龄:{{age}}</h2>
    <h2>薪资:{{job.j1.salary}}</h2>
    <h3 v-show="person.car">座驾信息:{{person.car}}</h3>
    <button @click="name+='~'">修改姓名</button>
    <button @click="age++">增长年龄</button>
    <button @click="job.j1.salary++">涨薪</button>
    <button @click="showRawPerson">输出最原始得person</button>
    <button @click="addCar">给人添加一台车</button>
    <button @click="person.car.name+='!'">换车名</button>
    <button @click="person.car.price++">换价格</button>
    <button @click="changePrice">换价格</button>
</template>

<script>
import { reactive,toRefs,ref, toRaw, markRaw} from '@vue/reactivity'

export default {
    name:'Demo',
    setup(){
        let sum=ref(0)
        let person=reactive({
            name:'张三',
            age:18,
            job:{
                j1:{
                    salary:20
                }
            }
        })
        function showRawPerson(){
            const p=toRaw(person)
            p.age++
            console.log(p)
        }

        function addCar(){
            let car={name:'奔驰',price:40}
            person.car=markRaw(car)
        }

        function changePrice(){
            person.car.price++
            console.log(person.car.price)
        }

        return{
            sum,
            person,
            ...toRefs(person),
            showRawPerson,
            addCar,
            changePrice
        }
    }

}
</script>

<style>
</style>
app.vue
<template>
  <demo></demo>
  <hr>
</template>

<script>
import Demo from './components/Demo.vue'
export default {
    name: "App",
    components:{Demo},
    setup(){

      return{

      }
    }
}
</script>

<style>
</style>
执行结果
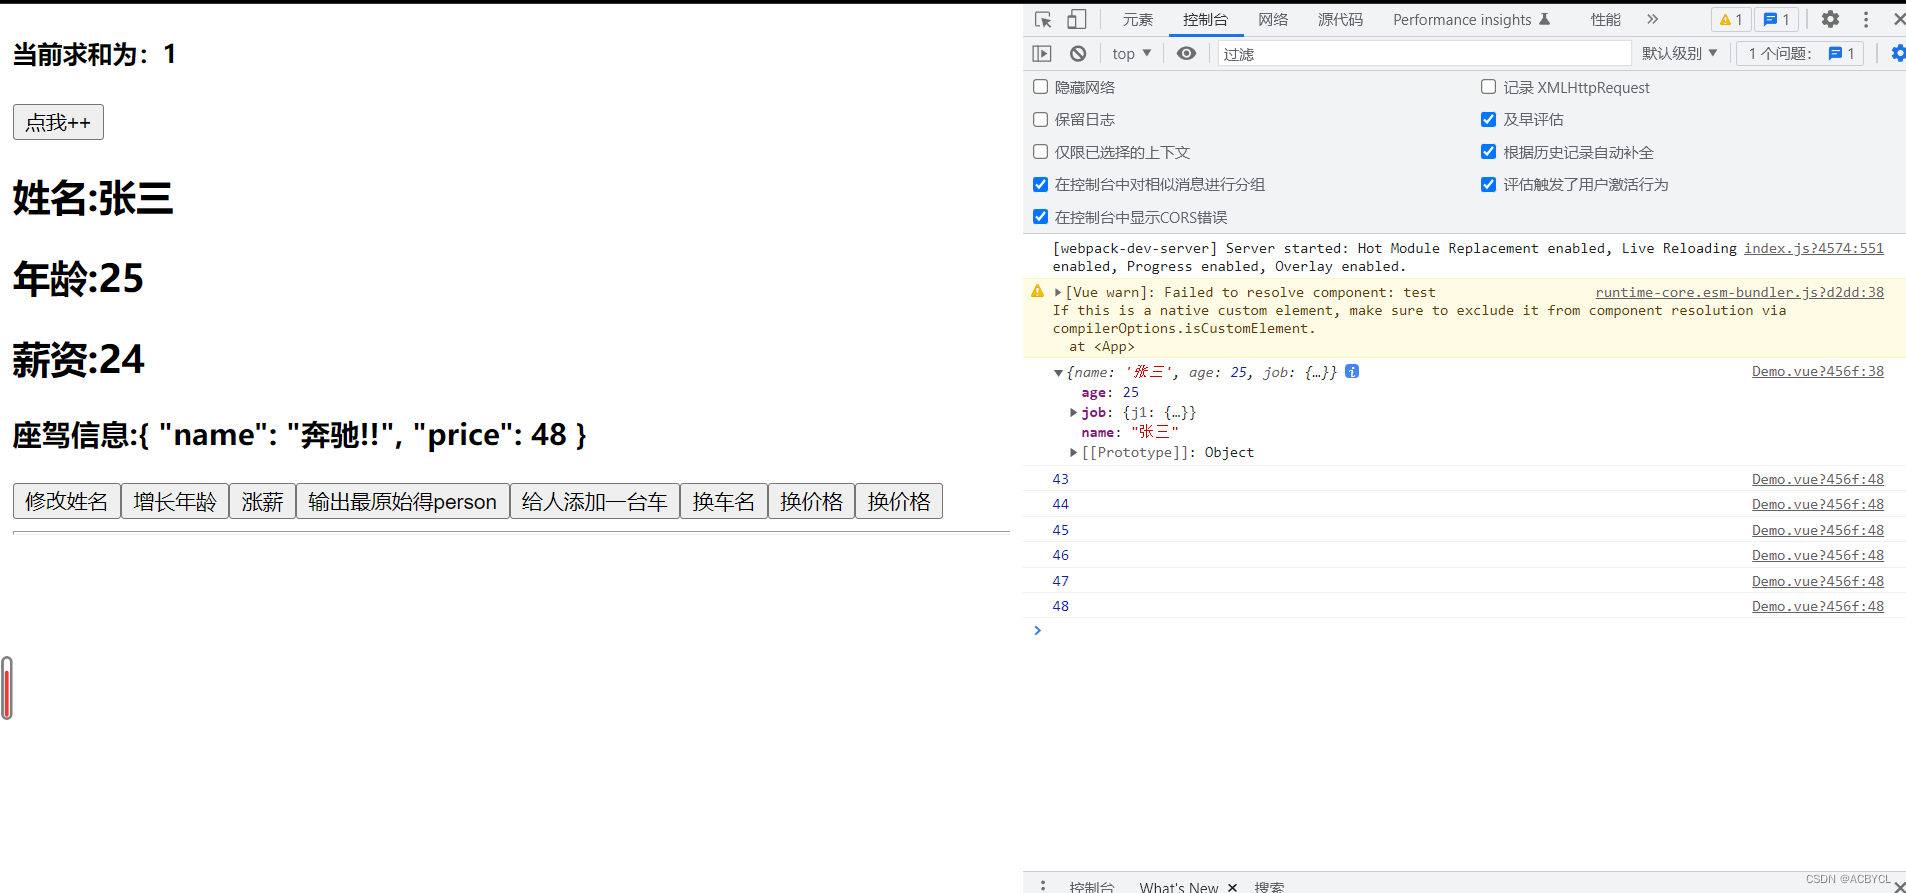
总结:
1.toRaw()只能处理reactive
2.setup只会调用一次,
3.值是undefined,不展示
4.customRef
custom:自定义
- 作用:创建一个自定义的ref,并对其依赖项跟踪和更新触发进行显示控制
trigger():让vue重新去读取模板
track():追踪数据。有追踪,get才会重新解析
实现防抖效果:
app.vue
<template>
  <input type="text" v-model="keyWord">
  <h3>{{keyWord}}</h3>

</template>

<script>
import { trigger } from '@vue/reactivity'
import { customRef } from 'vue'

export default {
    name: "App",
    components:{},
    setup(){
      // 自定义一个ref----名为:myRef
      function myRef(value,delay){
        let timer
        return customRef((track,trigger)=>{
          return{
            get(){
              console.log(`有人从myRef这个容器中读取数据了,我把${value}给他了`)
              track()//通知vue追踪value的变化(提前和get商量一下,让它认为这个value是有用的)
              return value
            },
            set(newValue){
              console.log(`有人把myRef这个容器中数据改了:${newValue}`)
              clearTimeout(timer)
              timer=setTimeout(()=>{
                value=newValue
                trigger()//通知vue去重新解析模板
              },delay)
            }
          }
        })
      }

      // let keyWord=ref('hello')  //使用vue提供的ref
      let keyWord=myRef('hello',500)//使用程序自定义的ref

      return{
        keyWord
      }
    }
}
</script>

<style>
</style>
执行结果
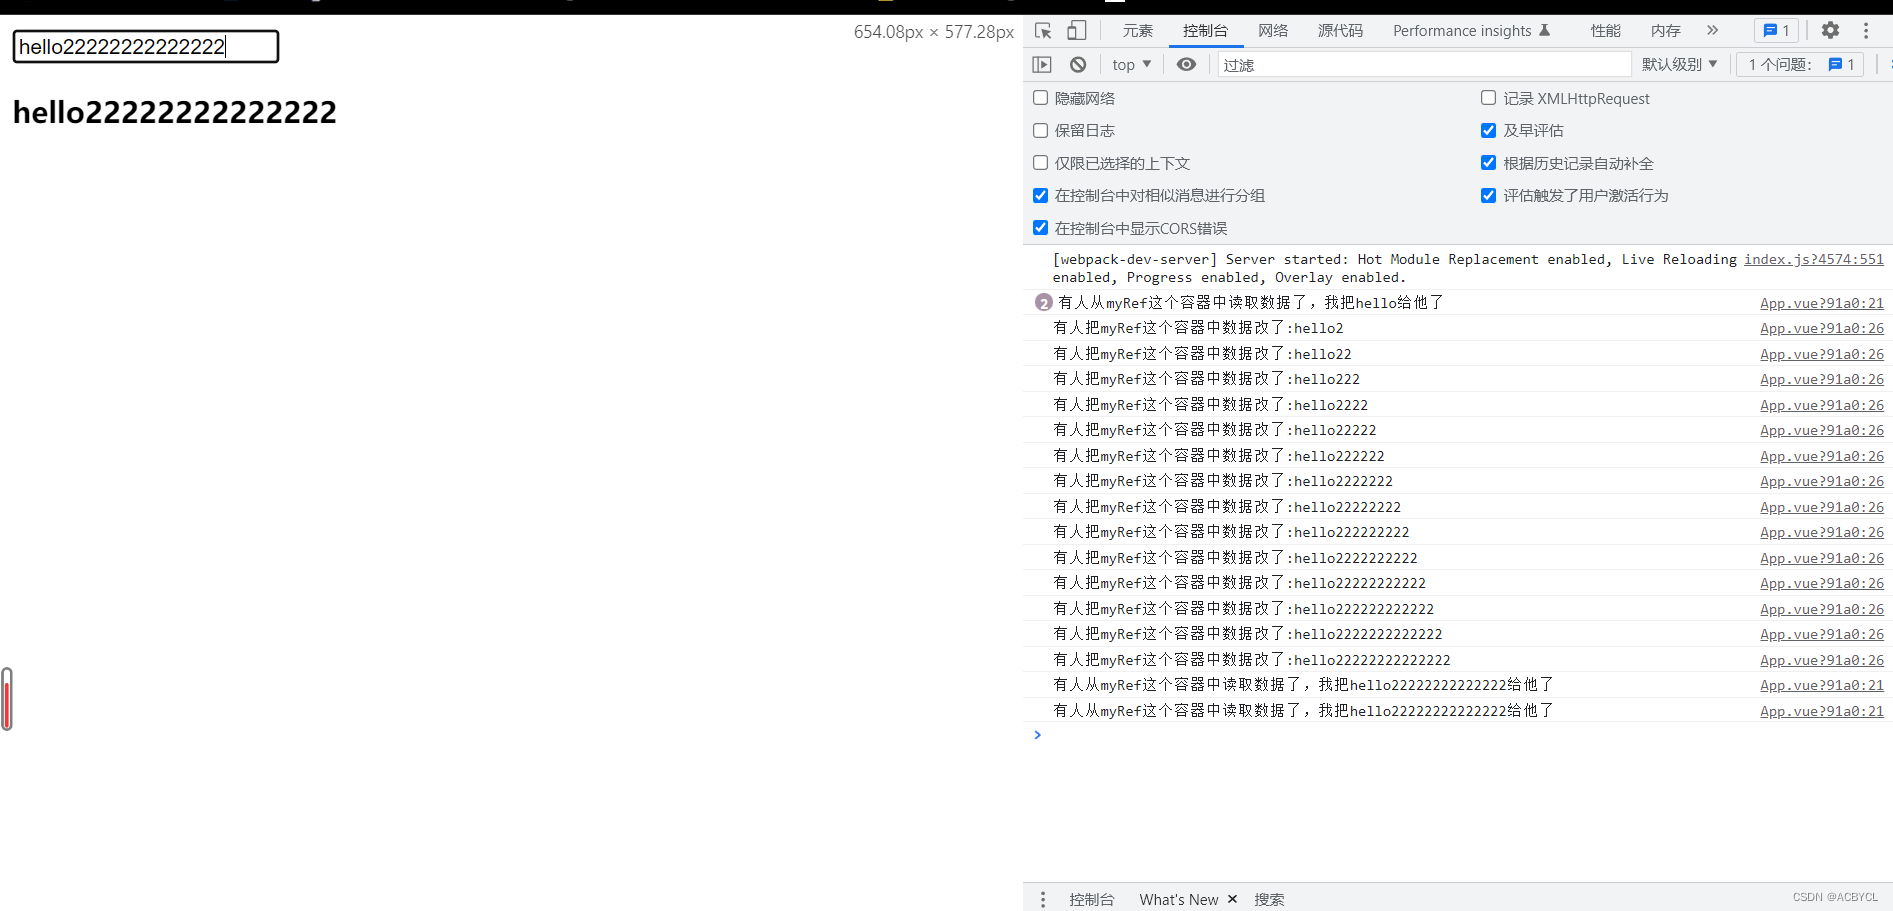
总结:
1.customRef()是一个自定义的ref函数
2.有人读,运行get()。有人改,使用set()
3.cls—快速打出console
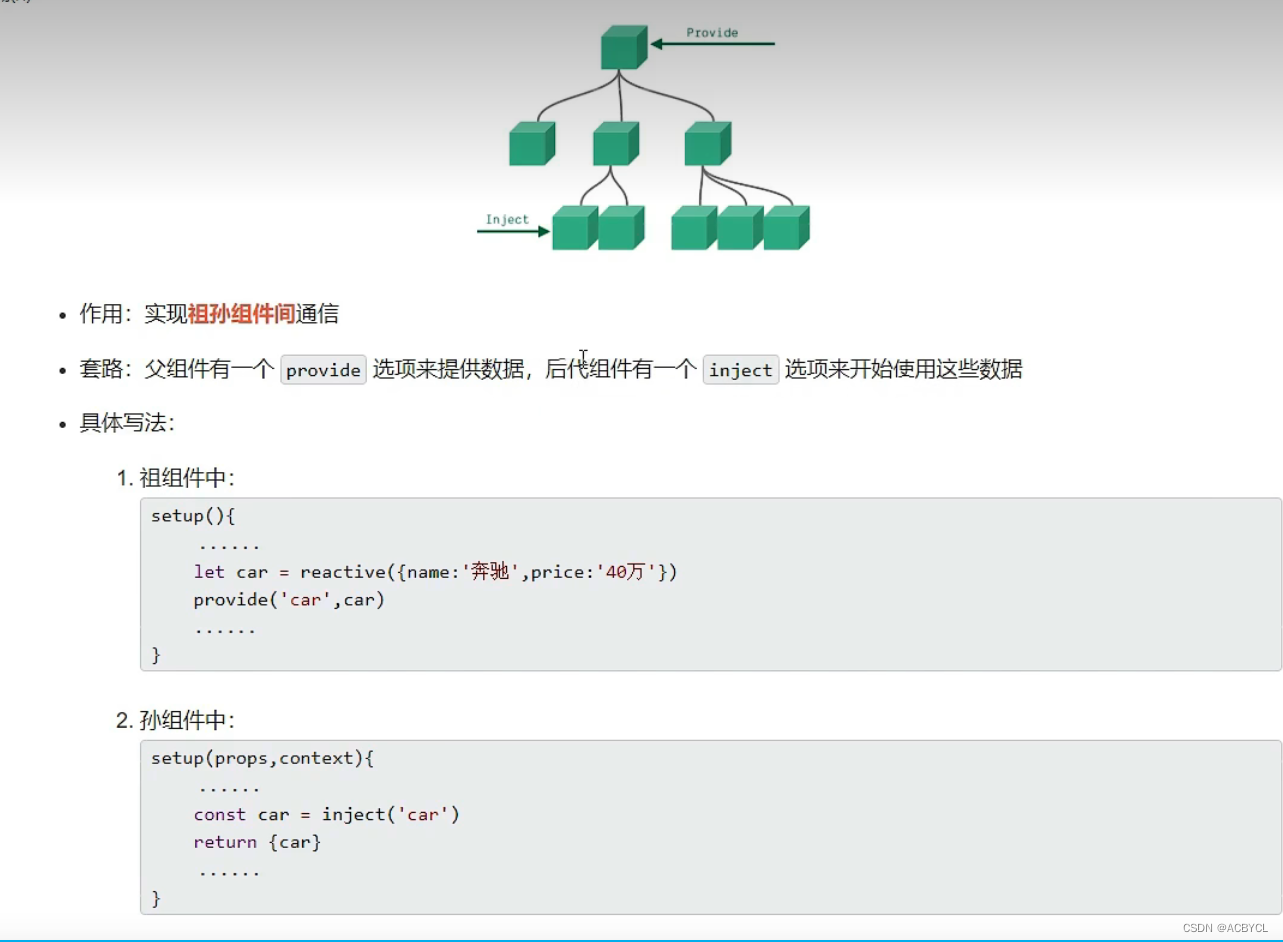
5.provide与inject
app.vue
<template>
  <div class="app">
    <h3>我是App组件(组),{{name}}----{{price}}</h3>
    <Child></Child>
  </div>
</template>

<script>
import { reactive, toRefs } from '@vue/reactivity';
import Child from './components/Child.vue';
import { provide } from '@vue/runtime-core';
export default {
    components: { Child },
    setup(){
      let car=reactive({name:'奔驰',price:'40w'})
      provide('car',car)//给自己的后代组件传递数据
      return{
        ...toRefs(car)
      }
    }
}
</script>

<style>
.app{
    background-color: gray;
    padding: 10px;
}
</style>
Child.vue
<template>
    <div class="child">
      <h3>我是Child组件(子)</h3>
        <Son></Son>
    </div>
  </template>

  <script>
import { inject } from '@vue/runtime-core';
import Son from './Son.vue';
  export default {
    components: { Son },
    setup(){
        let x=inject('car')
        console.log(x,'Chold-----')
    }
}
  </script>

  <style>
  .child{
      background-color: skyblue;
      padding: 10px;
  }
  </style>
Son.vue
<template>
    <div class="son">
      <h3>我是SOn组件(孙)----{{car.name}}---{{car.price}}</h3>
    </div>
  </template>

  <script>
import { inject } from '@vue/runtime-core'
  export default {
    setup(){
        let car=inject('car')
        return{
            car
        }
    }

  }
  </script>

  <style>
  .son{
      background-color: orange;
      padding: 10px;
  }
  </style>
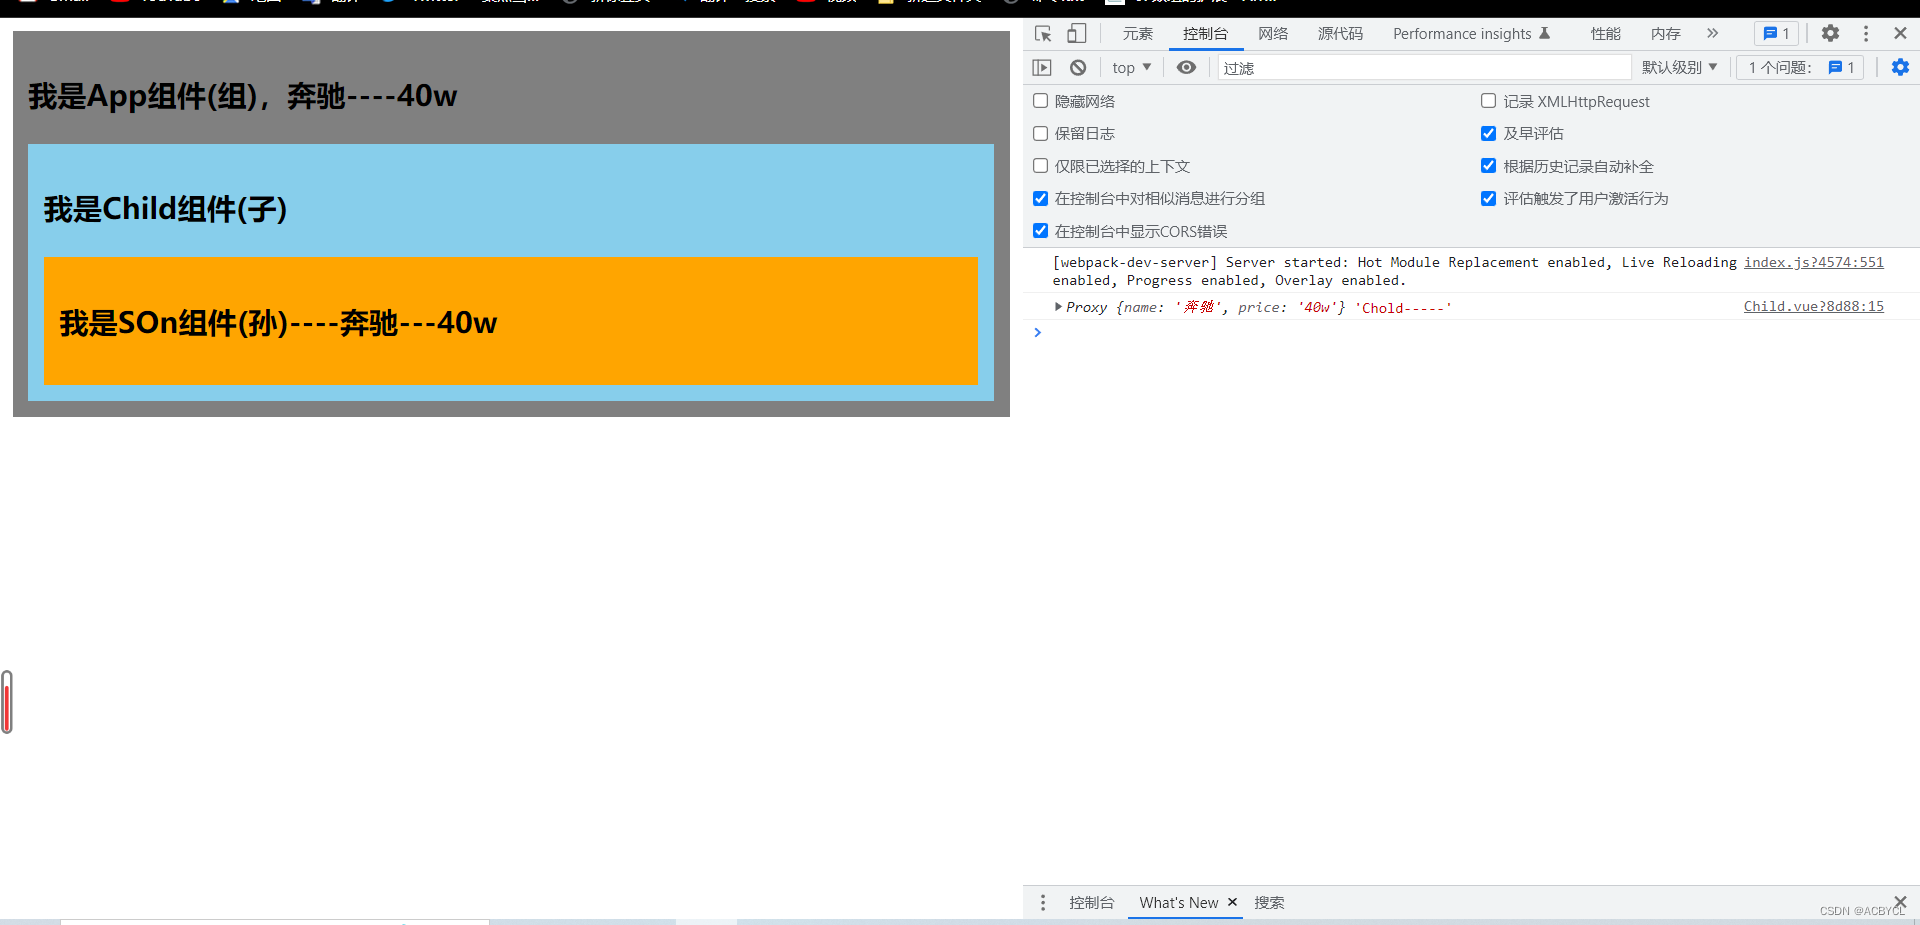
总结:
1.只要app.vue 通过provided一下,他的任意子组件都可以用,哪怕是跨级
2.inject:注入
3.用于组件间通信
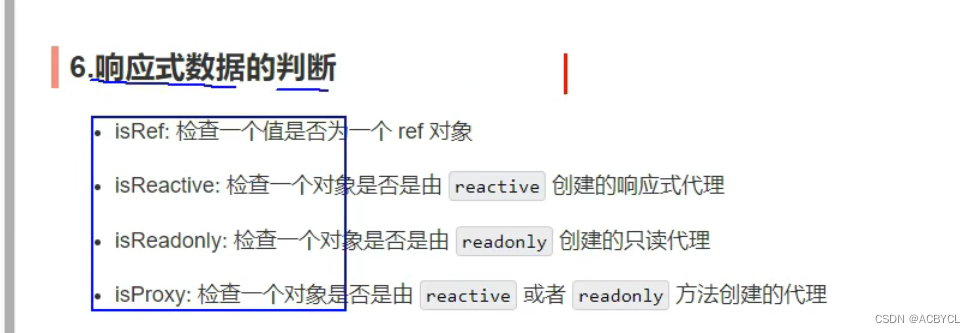
6.响应式数据的判断
app.vue
<template>
  <h3>我是App组件(祖)</h3>
</template>

<script>
import { isProxy, isReactive, isReadonly, isRef, reactive, readonly, toRefs ,ref} from '@vue/reactivity'

export default {
    components: {},
    setup(){
      let car=reactive({name:'奔驰',price:'40w'})
      let sum=ref(0)
      let car2=readonly(car)

      console.log(isRef(sum))
      console.log(isReactive(car))
      console.log(isReadonly(car2))
      console.log(isProxy(car))
      console.log(isProxy(sum))   //false
      return{
        ...toRefs(car)
      }
    }
}
</script>

<style>
</style>
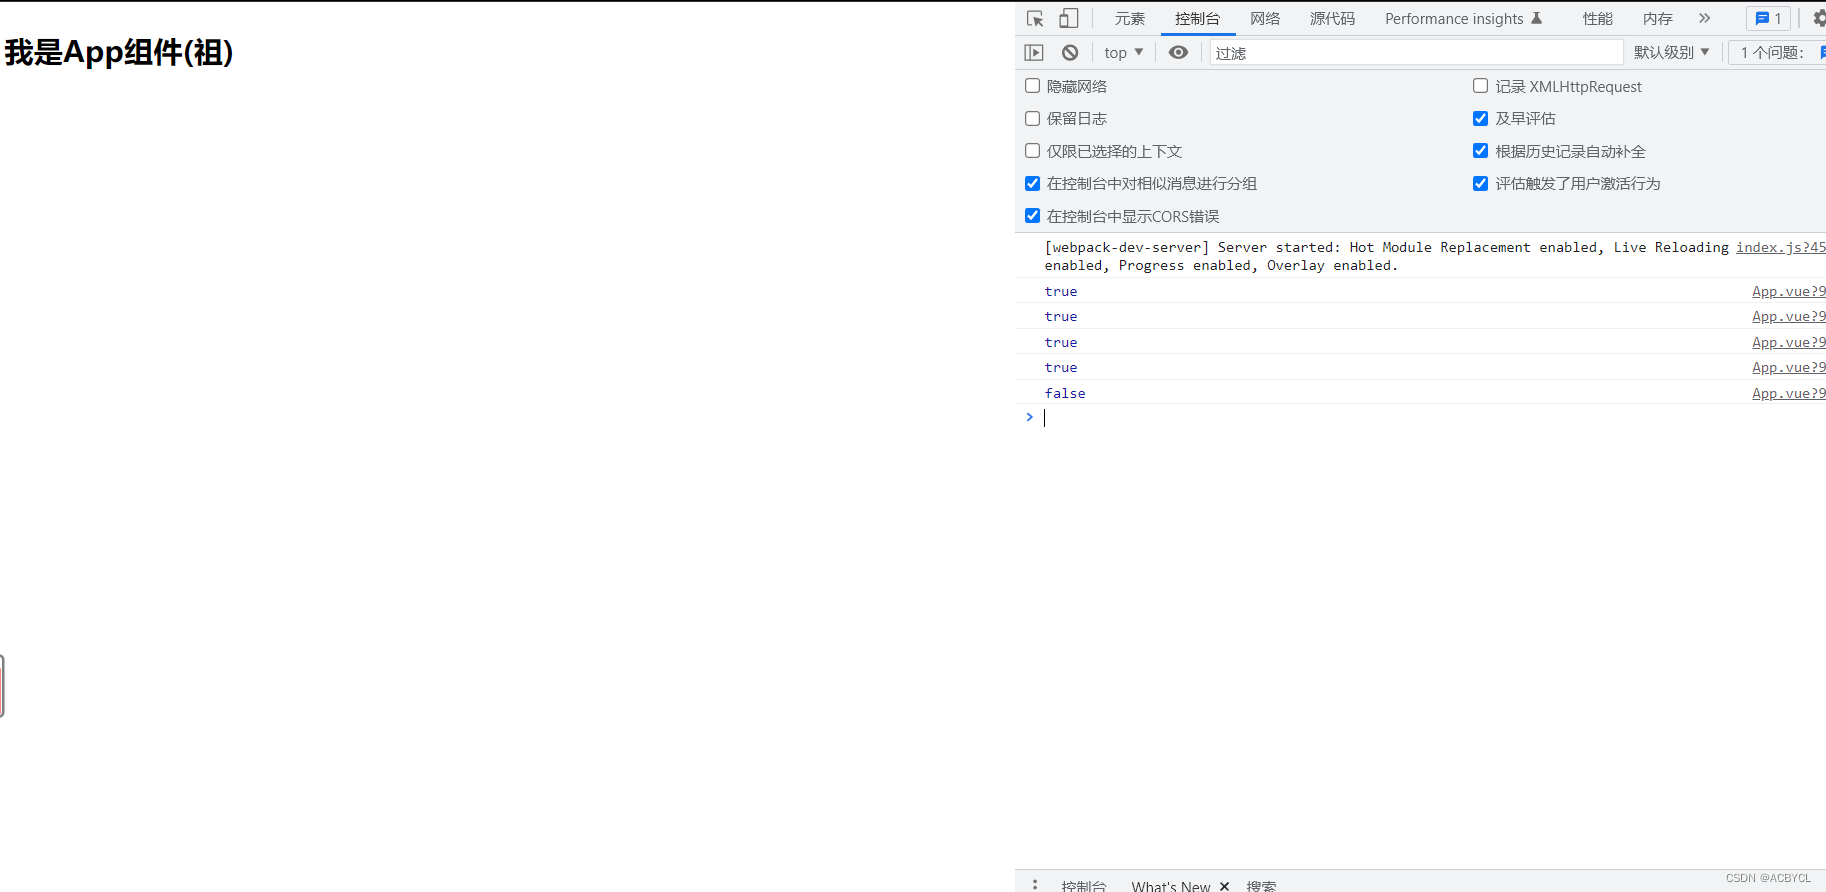
总结:
1.ref底层用的是底层Object.defined
2.readonly处理了响应式数据,但返回的还是proxy,而不是Object
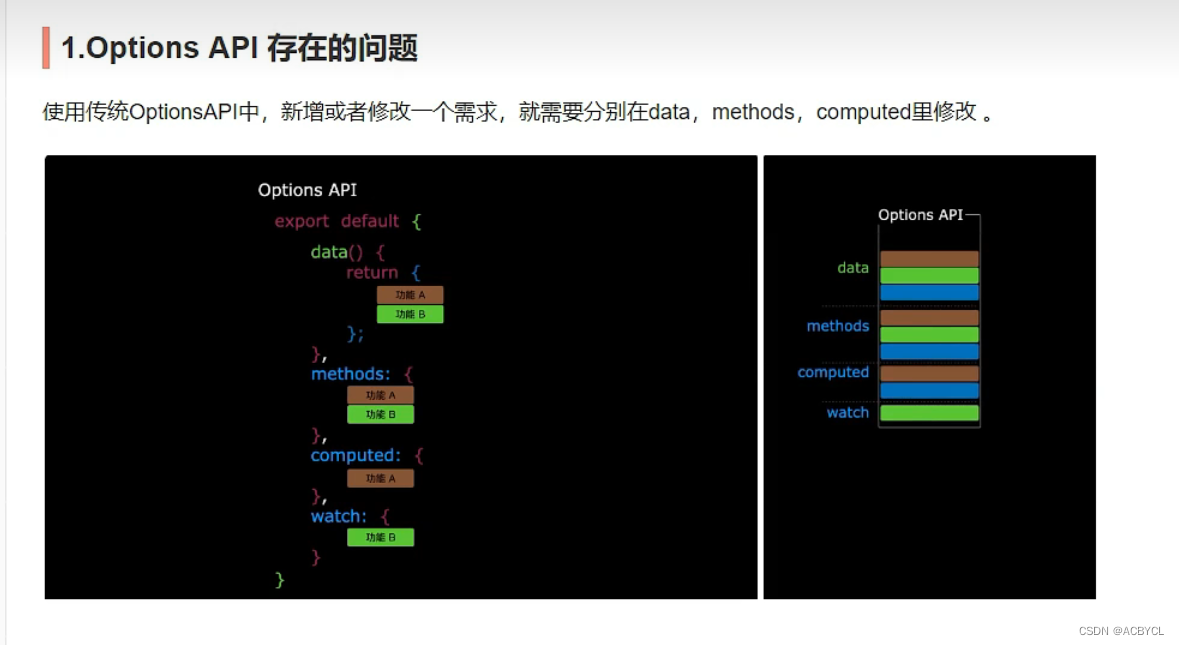
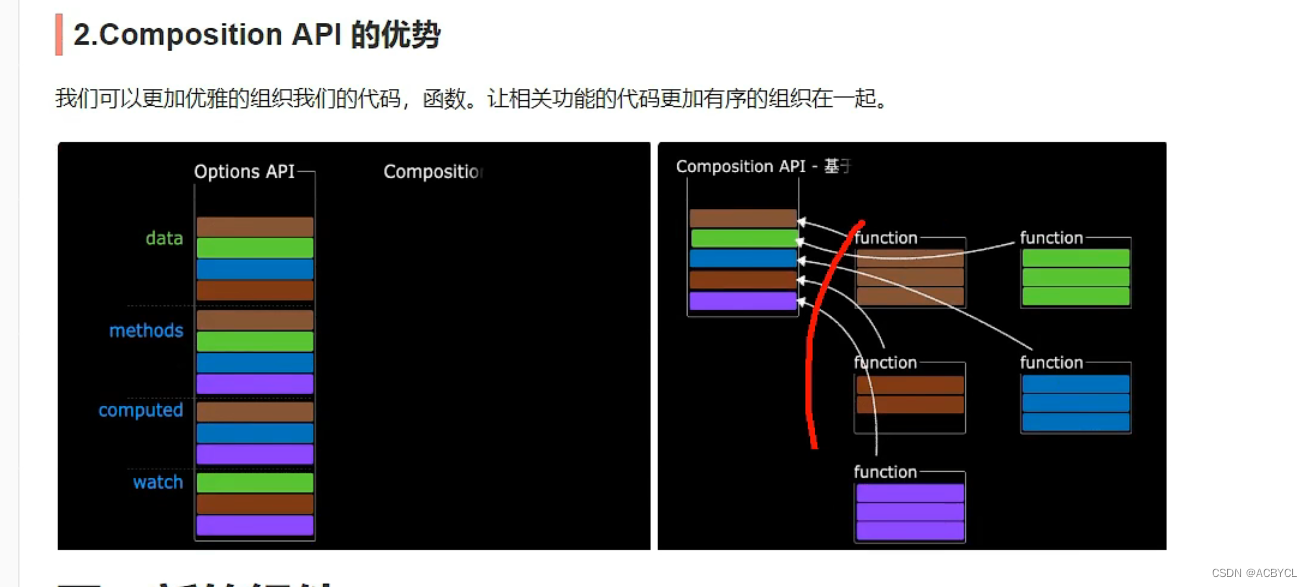
四.Composition API的优势
五.新组件
1.Fragment
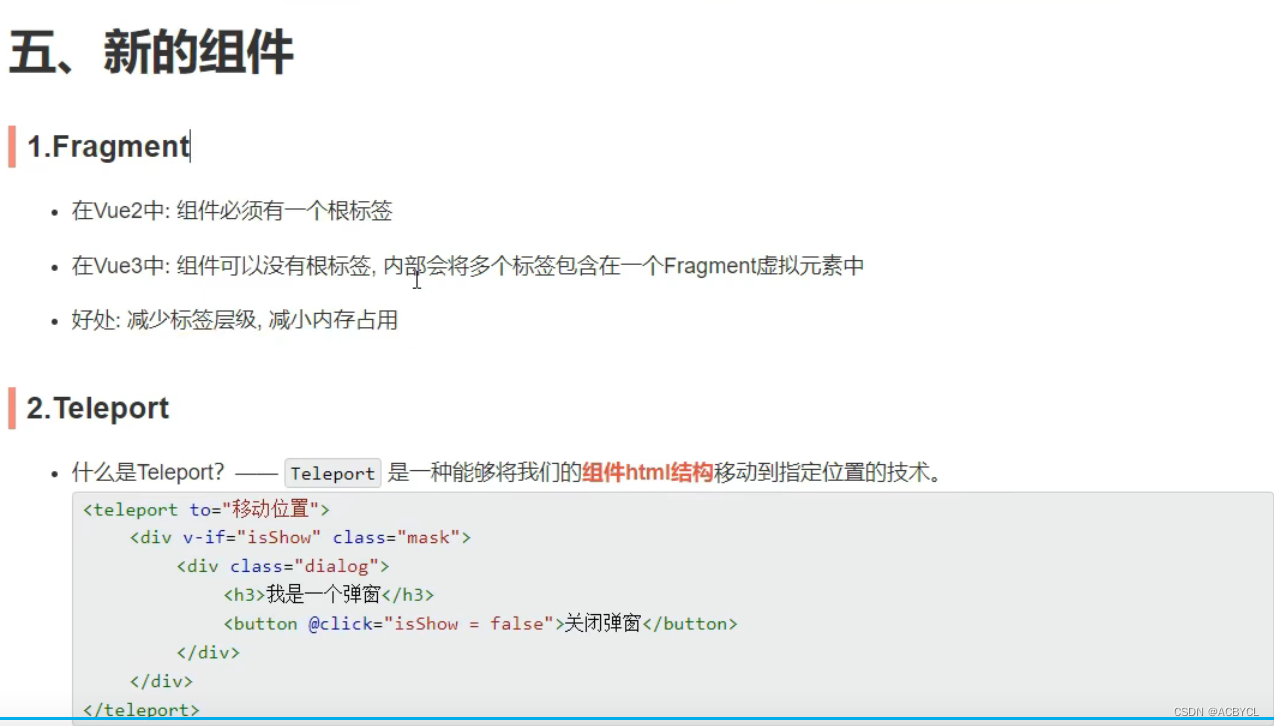
2.Teleport

app.vue
<template>
  <div class="app">
    <h3>我是App组件</h3>
    <Child></Child>
  </div>
</template>

<script>
import Child from "./components/Child.vue";

export default {
    components: { Child },
    setup(){

    }
}
</script>

<style>
  .app{
    background-color: gray;
    padding: 10px;
  }
</style>
Child.vue
<template>
  <div class="child">
    <h3>我是Child组件</h3>
    <Son></Son>
  </div>
</template>

<script>
import Son from "./Son.vue";
export default {
    components: { Son }
}
</script>

<style>
    .child{
        background-color: skyblue;
        padding: 10px;
    }
</style>
Son.vue
<template>
  <div class="son">
    <h3>我是Son组件</h3>
    <Dialong></Dialong>
  </div>
</template>

<script>
import Dialong from './Dialong.vue';
export default {
    components: { Dialong }
}
</script>

<style>
.son{
    background-color: orange;
    padding: 10px;
}
</style>
Dialong.vue
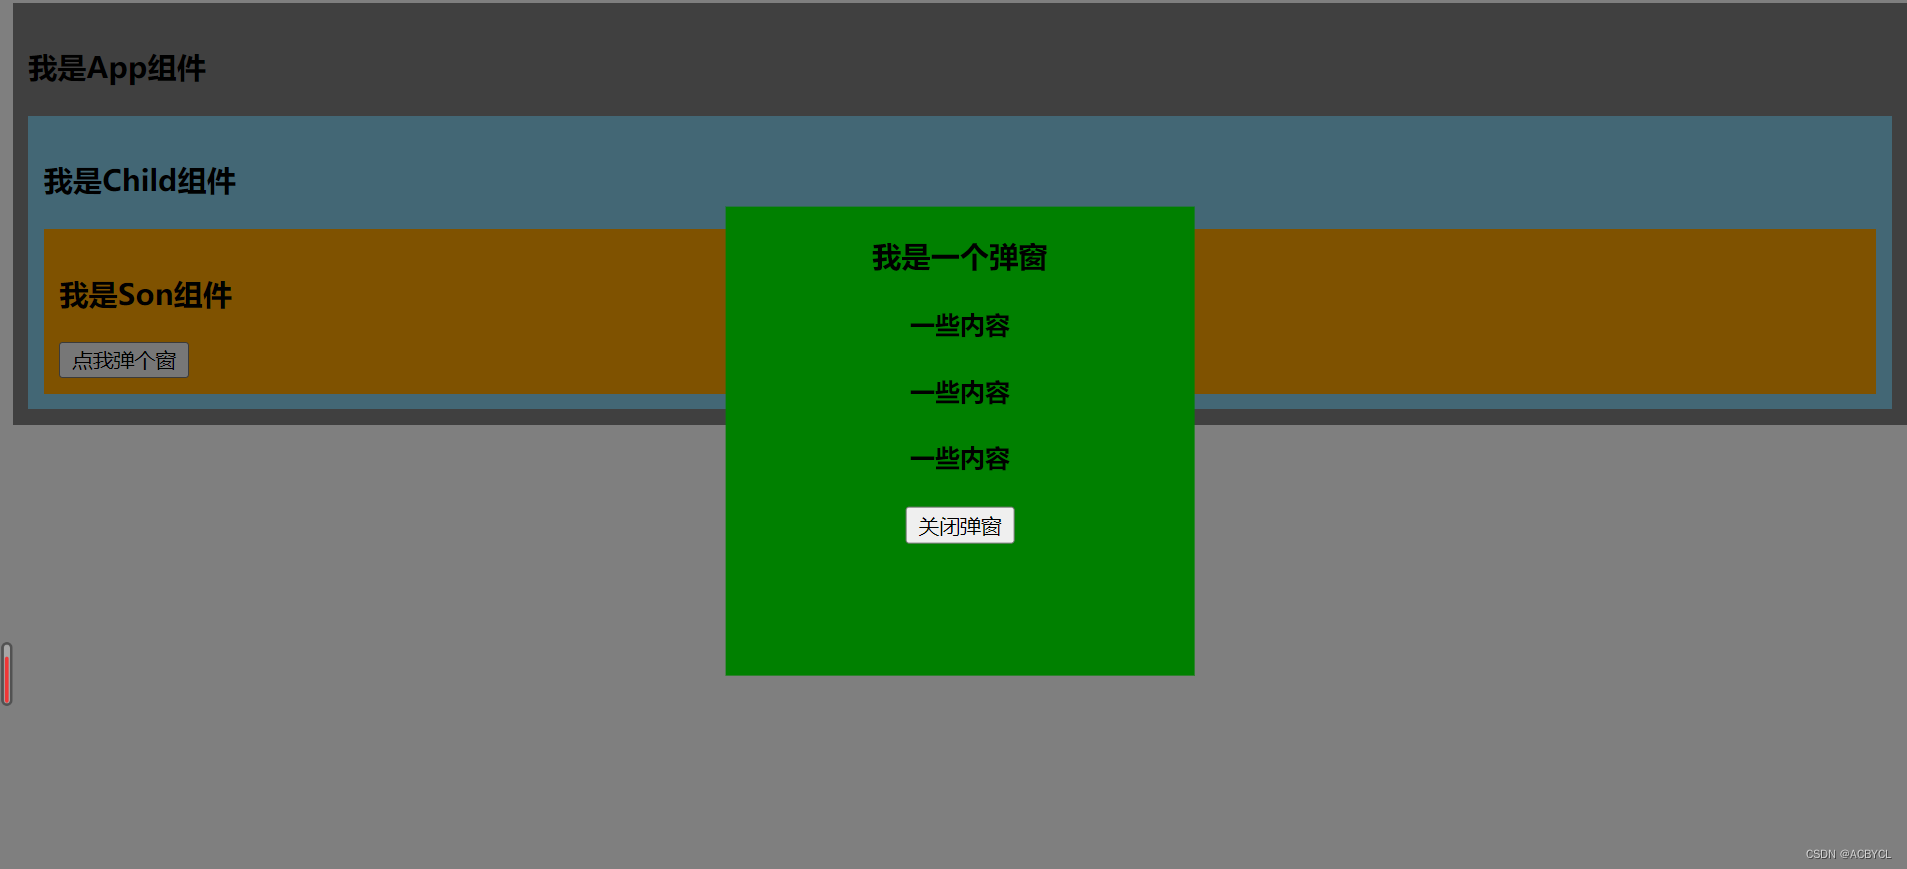
<template>
  <div>
    <button @click="isShow=true">点我弹个窗</button>
    <teleport to="body">
        <div class="mask"  v-if="isShow">
            <div class="dialog">
                <h3>我是一个弹窗</h3>
                <h4>一些内容</h4>
                <h4>一些内容</h4>
                <h4>一些内容</h4>
                <button @click="isShow=false">关闭弹窗</button>
            </div>
        </div>
    </teleport>
  </div>
</template>

<script>
import {ref} from 'vue'
export default {
    setup(){
        let isShow=ref(false)


        return {
            isShow
        }
    }

}
</script>

<style>
    .mask{
        position: absolute;
        top: 0;
        bottom: 0;
        left: 0;
        right: 0;
        background-color: rgba(0, 0, 0, 0.5);

    }
.dialog{
    position: absolute;
    top: 50%;
    left: 50%;
    transform: translate(-50%,-50%);
    text-align: center;
    width: 300px;
    height: 300px;
    background-color: green;
}
</style>
执行结果
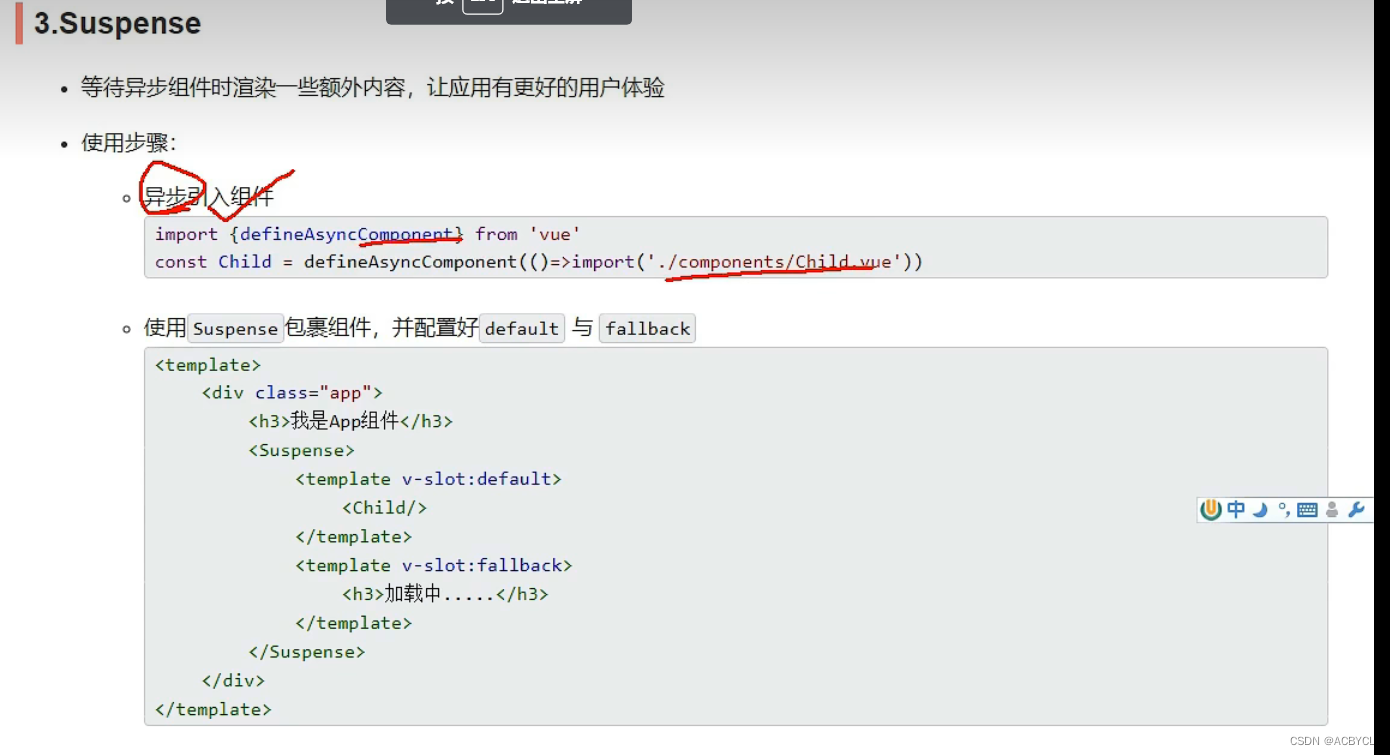
3.Suspense–异步
app.vue
<template>
  <div class="app">
    <h3>我是App组件</h3>
    <Suspense>
      <template v-slot:default>
        <Child></Child>
      </template>
      <template v-slot:fallback>
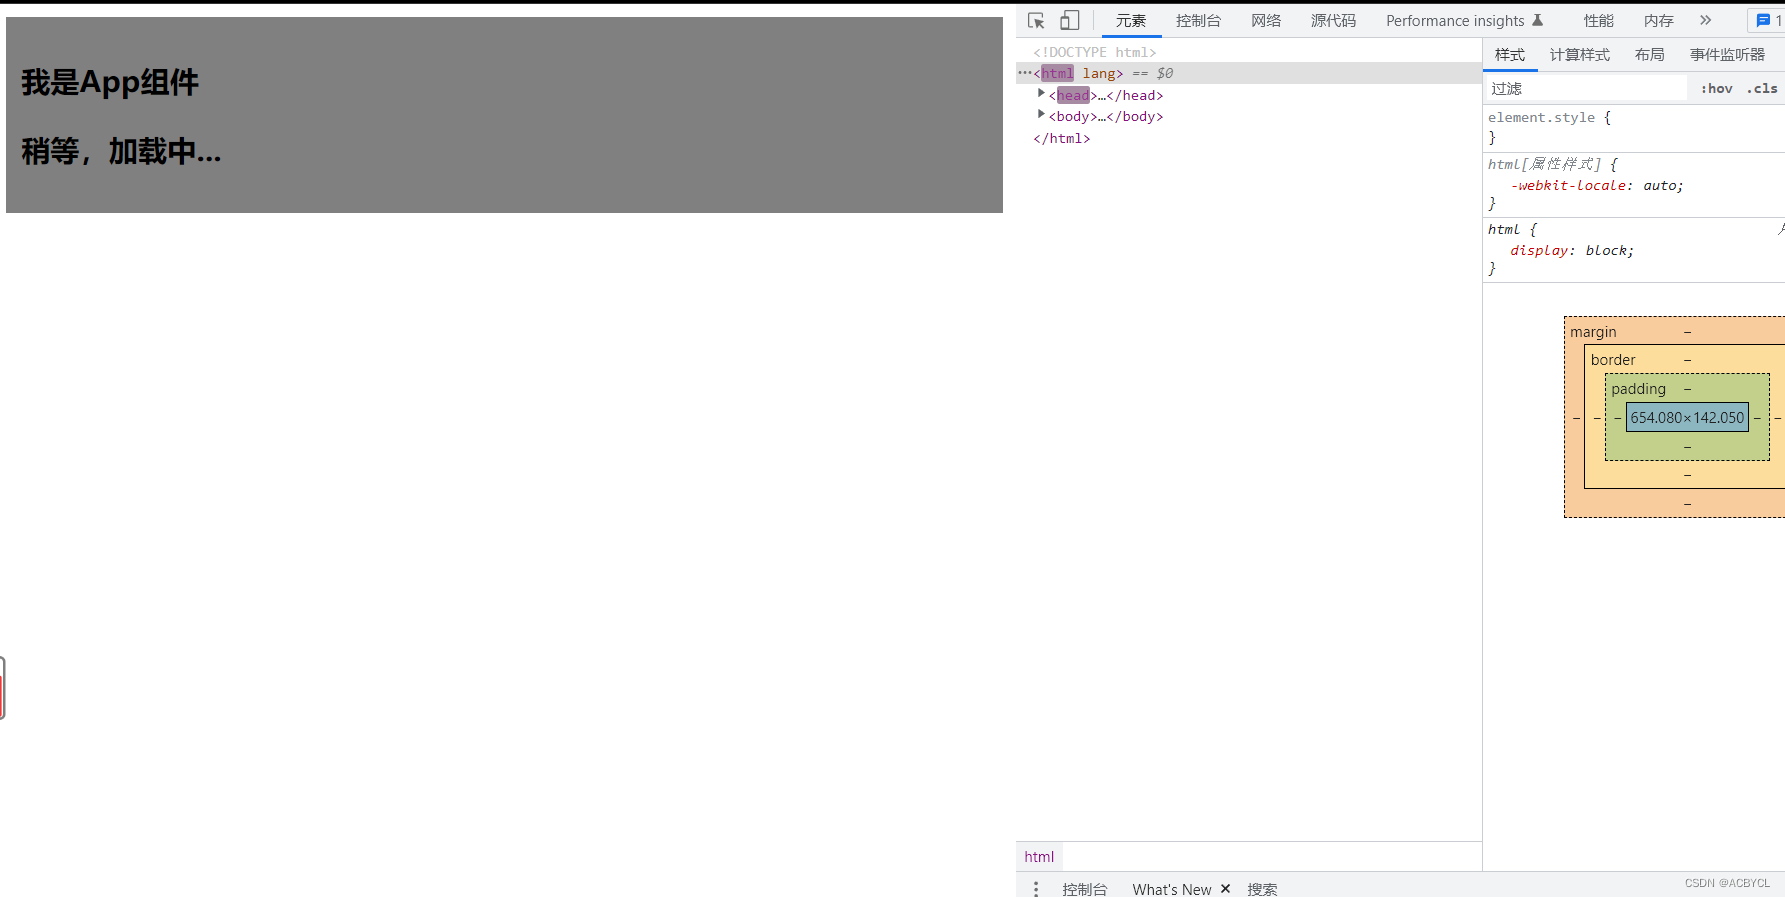
        <h3>稍等,加载中...</h3>
      </template>
    </Suspense>
  </div>
</template>

<script>
// import Child from "./components/Child.vue";//静态引入
import { defineAsyncComponent } from "vue";
const Child=defineAsyncComponent(()=>import('./components/Child'))//异步引入
export default {
    components: { Child },
    setup(){

    }
}
</script>

<style>
  .app{
    background-color: gray;
    padding: 10px;
  }
</style>
Child.vue
<template>
  <div class="child">
    <h3>我是Child组件</h3>
    {{sum}}
  </div>
</template>

<script>
    import { ref } from 'vue'
export default {
    components: {},
    async setup(){
        let sum=ref(0)
        let p=new Promise((resolve,reject)=>{
            setTimeout(()=>{
                resolve({sum})
            },3000)
        })
        return await p
    }
}
</script>

<style>
    .child{
        background-color: skyblue;
        padding: 10px;
    }
</style>
执行结果
总结:
1.Suspense里面有两个插槽,第一个:要放置加载慢的插槽。第二个:应急插槽-先加载快的
2.子组件的setup不返回数,主页面就不加载更新
六.其他
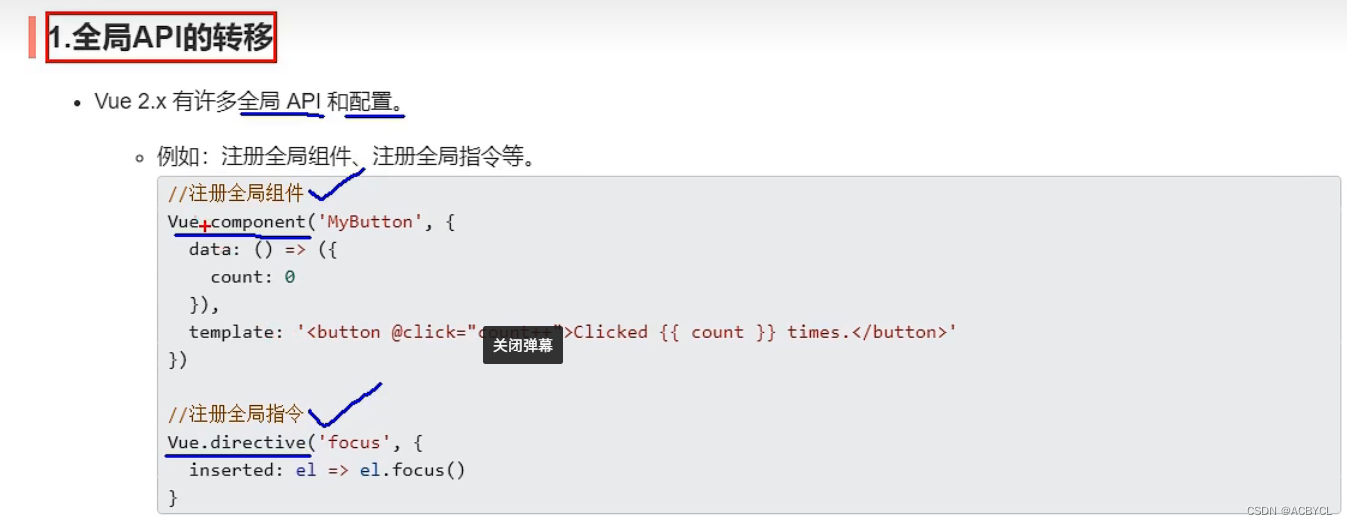
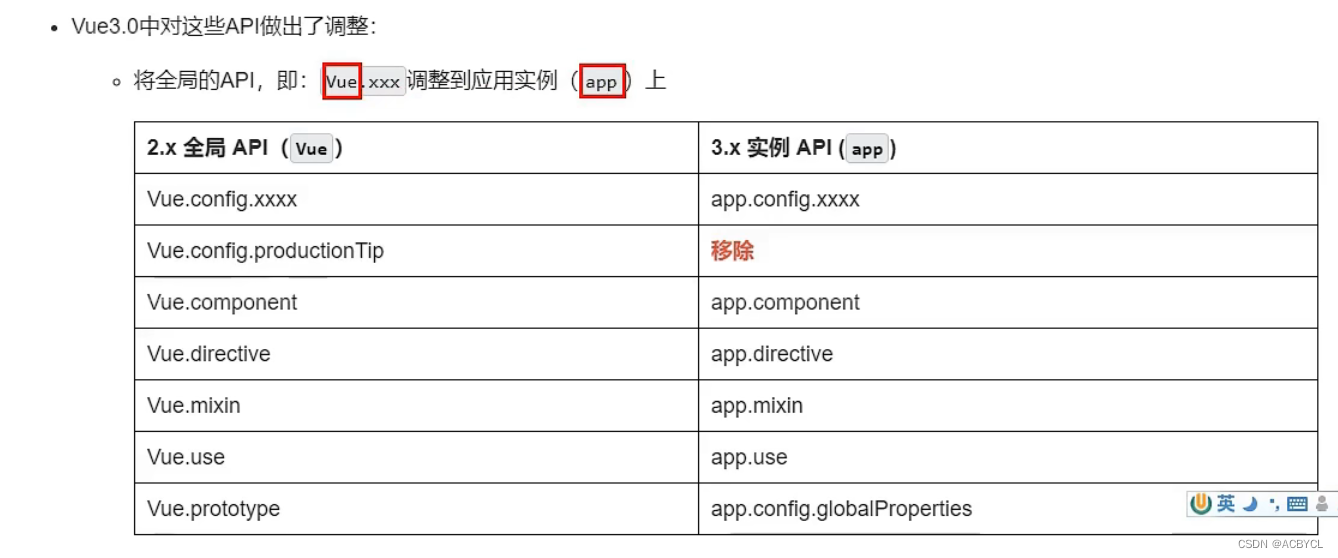
1.全局API的转移
2.其他改变
