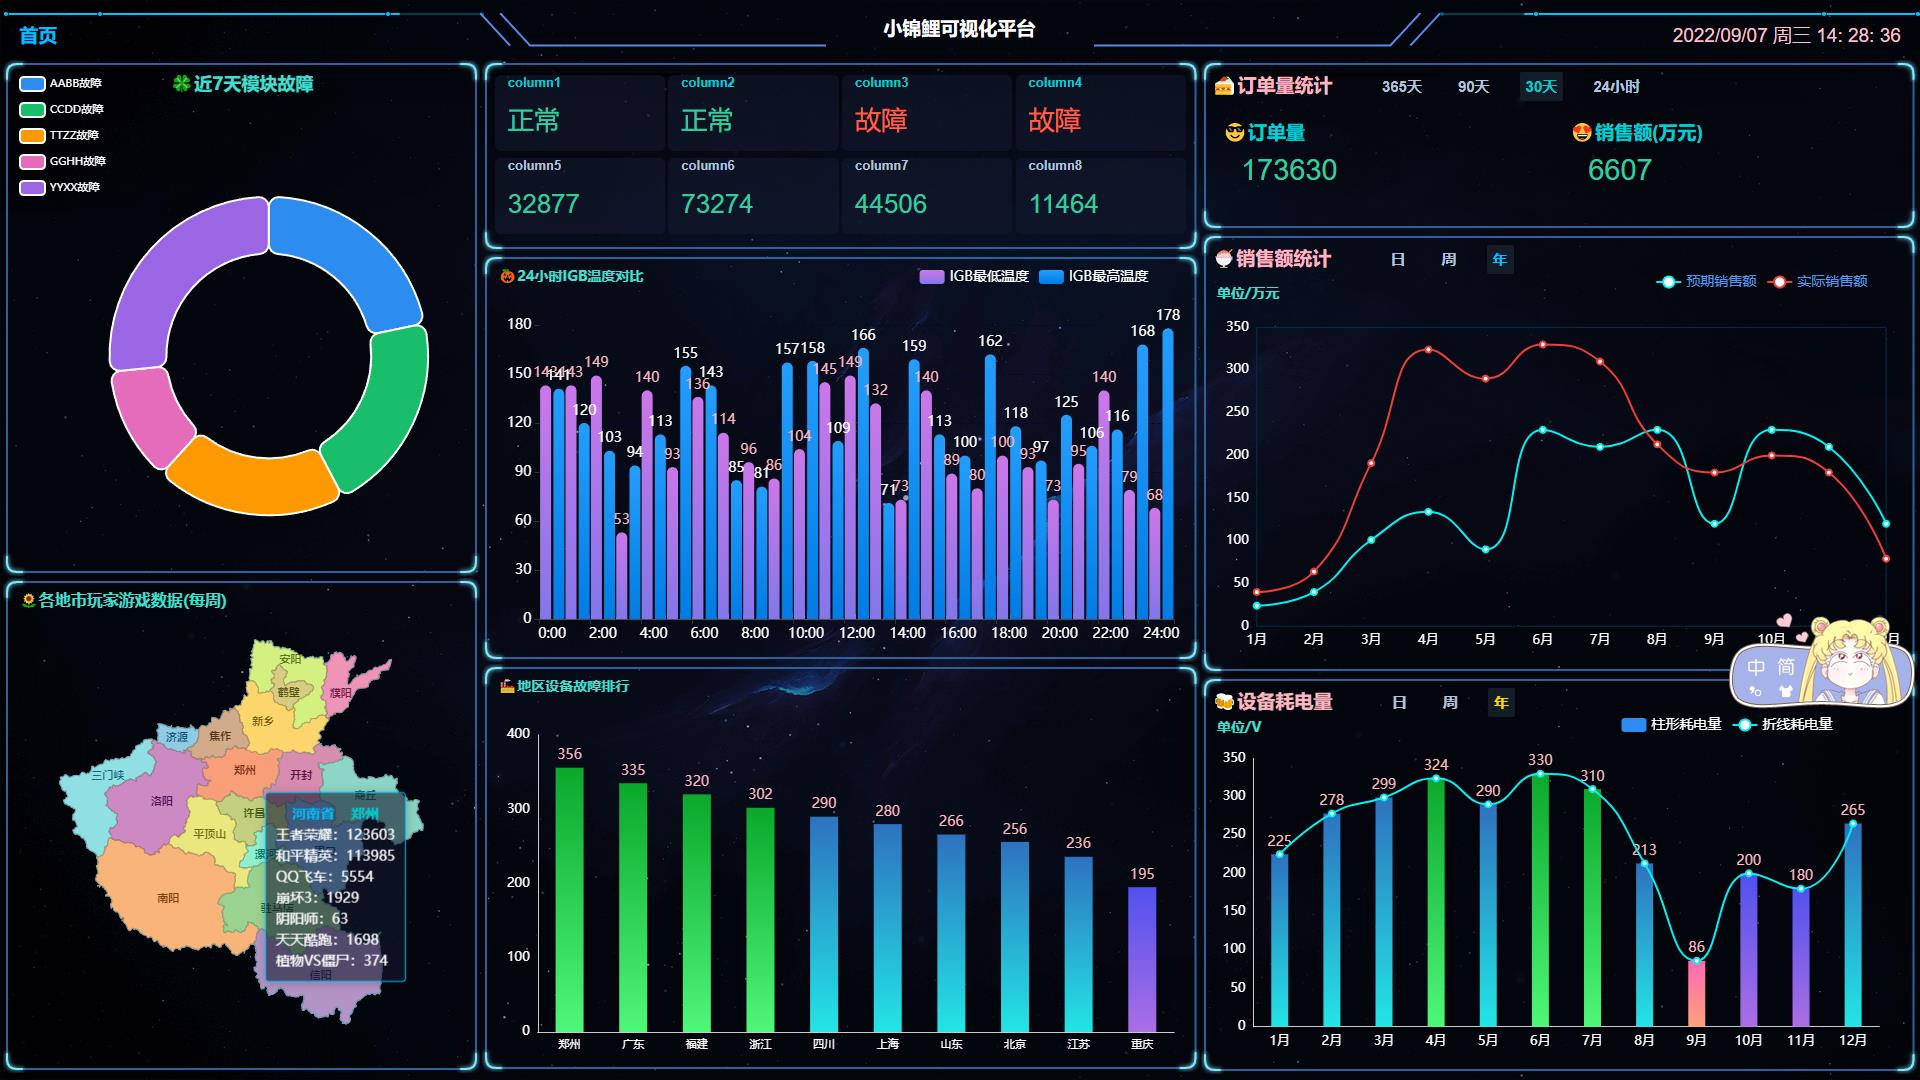
🇨🇳 koi-screen (响应式可视化大屏)
Gitee:https://gitee.com/BigCatHome/koi-screen
Github:https://github.com/yuxintao6/koi
项目访问地址(仅支持PC端)
http://www.koi-screen.online/#/
http://www.koi-screen.online/#/ems
http://www.koi-screen.online/#/pcs
域名正在备案,请先使用IP访问
想看效果用来测试尺寸大小是否适应的话,请访问Gitee地址,里面有项目访问地址。
项目特点: koi-screen
- 1、亲测自适应15.6寸至55寸大屏自适应,不是这个尺寸区间的并未进行测试,预测70寸屏幕也可以自适应。
- 2、采用Vue2.0、ElementUI、Axios、ECharts、DataV和Flex布局等技术进行构建。
- 3、根据分辨率进行响应式自适应,例如:1920x1080, 2K,1680x960等分辨率。
- 4、根据适应浏览器大小而进行自适应,自适应Echarts图表,字体和图标。
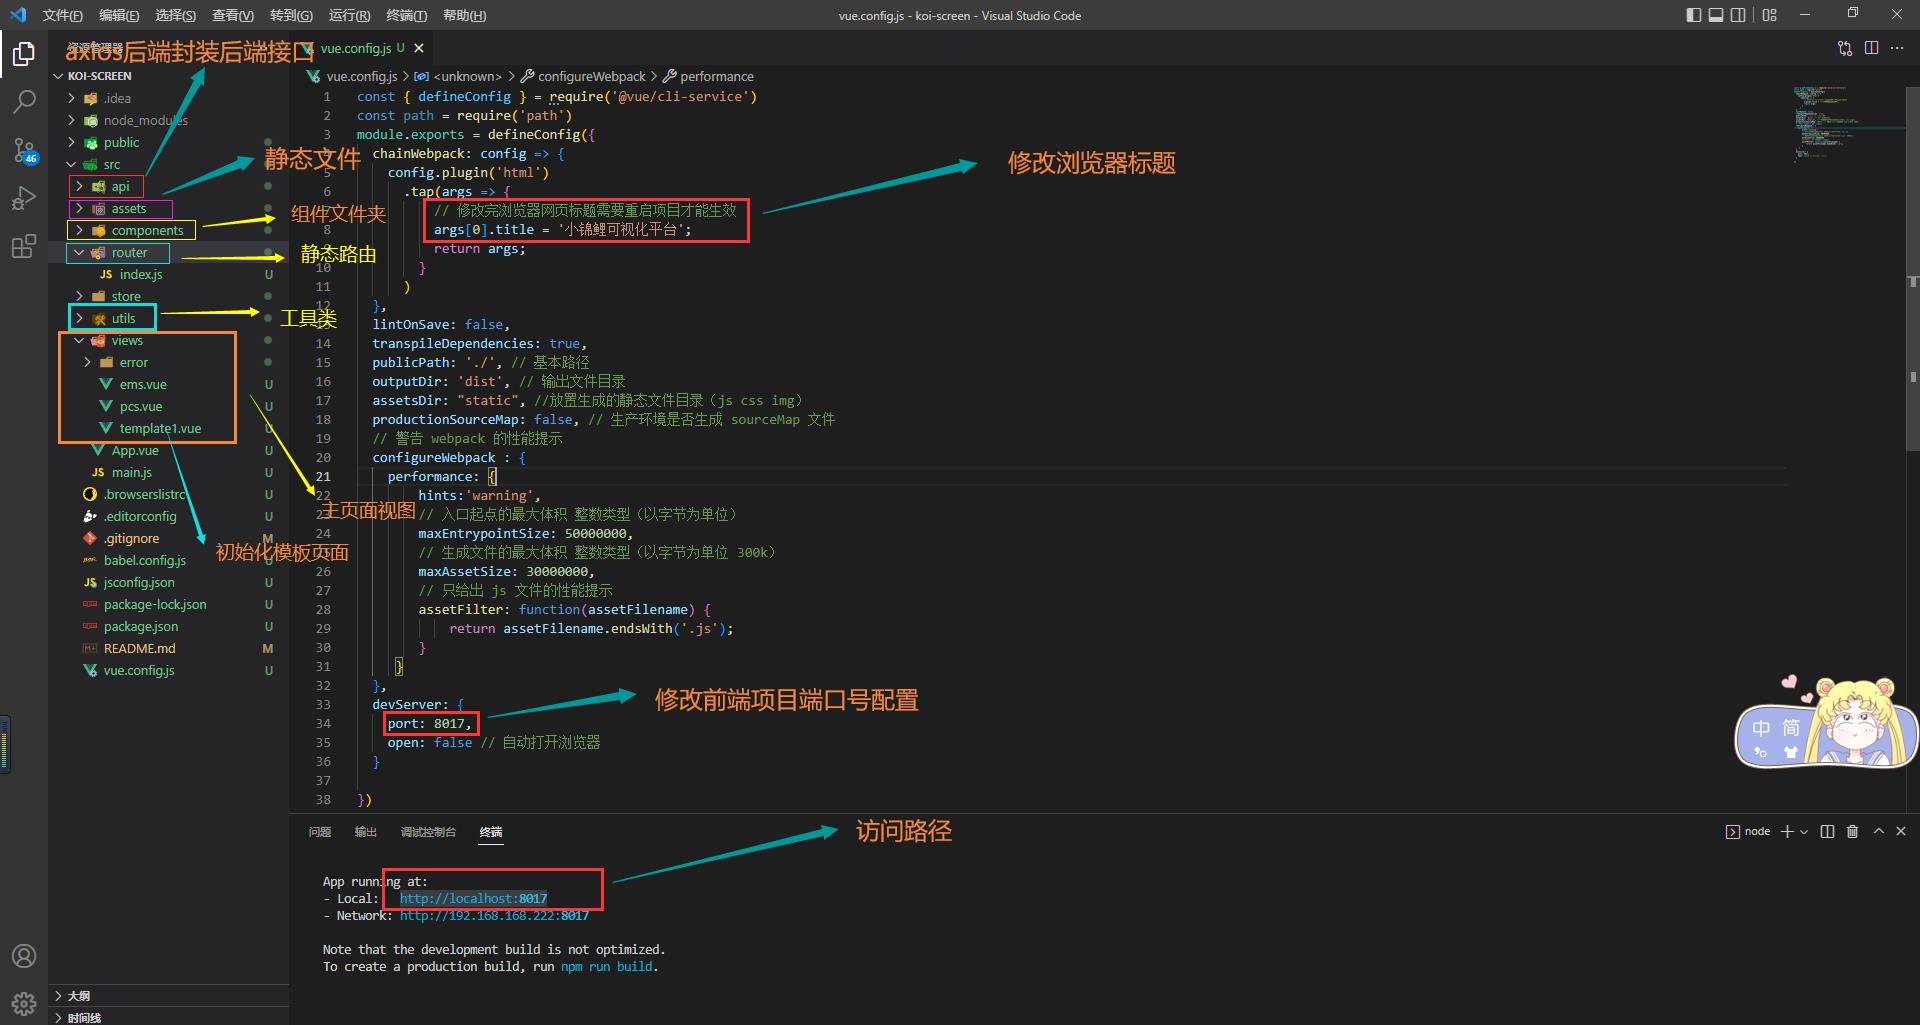
项目目录
:tw-1f4a1: 1、项目介绍
- 1、亲测自适应15.6寸至55寸大屏。
- 2、采用Vue2.0、ElementUI、Axios、ECharts、DataV和Flex布局等进行构建。
- 3、希望各位兄台在白嫖的时候,记得star和fork。当然大佬们可以提出bug和建议,以及完善项目
注意:本项目开发,是基于Google进行开发,最好使用Google浏览器或者火狐浏览器进行打开。
:tw-1f4af: 2、可视化监控大屏作用
- 大数据时代,人们不仅讲究以事实说话,更愿意以数据说话。到底该如何更直观地展现数据,让使用者去作出正确决策或行动、帮助使用者发挥数据本身的价值?在此背景下,数据大屏可视化应运而生。
- 在数据的获取、储存、共享和分析中,数据可视化尤为重要。
- 随着社会信息化的高速增长,数据大屏已经在很多商业领域彰显价值,比如会议展厅、园区管理、城市交通调度中心、公安指挥中心、企业生产监控等重要场所。
- 大屏信息量的高度集中,能够多方位、多角度、全景展现各项指标,实时监控,动态一目了然。
🌻 3、平台简介
- 在此之前本来想找一款可进行快速开发的模板,但是在市面上并未见到符合心中要求的。
- 作者采用vue2.0x、DataV、Element-UI以及Echarts进行开发,致力于打造一款可适应屏幕分辨率的可视化监控大屏。
- 本项目适应Echarts大小以及字体大小都根据分辨率进行等比例适应。
- 宽度:1、flex布局。2、grid网格布局。3、Element-UI的Layout布局。最终采用第三种。
- 高度:宽度和高度使用定时器对浏览器进行监控,用来监控页面的动态变化大小,以用来计算字体和高度大小。
- 已封装Axios,调用后端API接口的方法和ruoyi-vue前端一样,在api文件中的js里面写接口,vue页面进行调用。
4、 :tw-1f380: 采用技术
- Vue/Cli:https://cn.vuejs.org/
- Element-UI的Layout布局:https://element.eleme.cn/#/zh-CN/component/layout
- Axios:访问后端接口API方式跟RuoYi项目保持一致。
- DataV:http://datav.jiaminghi.com/guide/borderBox.html#dv-border-box-12
- vue-concise-slider
- Flex布局:https://www.runoob.com/w3cnote/flex-grammar.html
- Echarts:https://echarts.apache.org/zh/index.html
- 等等技术。
:tw-1f60a: 5、作者:・?・
?
:tw-1f33c: 6、安装启动步骤
6.1、项目下载依赖
npm install 或者 cnpm install
6.2、项目启动
npm run serve
6.3、项目地址
作者写过并完善的可视化大屏,可进行参考!
http://www.koi-screen.online/#/
http://www.koi-screen.online/#/ems
http://www.koi-screen.online/#/pcs
6.4、项目启动报错
项目启动报错,大概率是npm版本问题或者前端对应环境node和npm未进行安装。
以下步骤:
首先,先删除node_modules文件夹和package-lock.json文件,然后开始执行下方步骤:
1、查看npm版本是否安装: npm -v    我的版本显示是:8.18.0
2、查看node版本是否安装:node --version  我的版本显示是::v14.16.0
3、配置npm镜像地址:npm install -g cnpm --registry=https://registry.npmmirror.com 或者 npm install -g cnpm --registry=https://registry.npm.taobao.org
4、重新下载项目中所需要的依赖:
  4.1、安装Vue/Cli:
    安装:npm i -g @vue/cli
  4.2、Element-UI依赖:
    官网:https://element.eleme.cn/#/zh-CN/component/installation
    安装:npm i element-ui -S
  4.3、Axios依赖:
    安装:npm install axios -g
  4.4、DataV依赖:
    官网:http://datav.jiaminghi.com/
    安装:npm install @jiaminghi/data-view
  4.5、vue-concise-slider轮播列表
   官网:https://chenxuan0000.github.io/vue-seamless-scroll/zh/guide/
   安装:npm install vue-seamless-scroll --save
5、下载项目依赖:npm install
6、启动项目:npm run serve
7、项目打包:npm run build
6.5、如果不小心下载了Eslint,如何进行删除
Eslint彻底删除步骤:
1、删除根目录下那一个含有eslint关键字的配置文件。
2、删除package.json里面含有eslint和husky关键字的包和他们的配置信息。
3、最好搜索全项目文件,删除一切eslint相关的配置代码。
4、删除完后,重新下载依赖 npm install,重启项目 npm run serve 。
:tw-1f367: 7、标题常用emoji和路由配置
- 😄 😃 😆 😍 😘 😆 😁 😉 😂 😭 😎 😷 😵 🌝 🌍 🌎 🌏 ?? 🔯 ?? 🕙
- 💛 💙 💜 ?? 💚 💔 💓 💗 💘 💖 ?? ? ? 💤 🎵 🐛 🐞 🐠 🐕 ?? 🚩
- 💩 👍 👊 ?? ? 👈 👈 ?? 🙏 👩 👨 👦 👧 👶 👲 👮 😻 🐢 🐬 🐧 🚋 🚅
- 😽 😼 🙀 😿 😹 👹 👺 💀 👄 💋 👀 💌 💬 ?? ?? ?? 🌀 🌁 🐇 🐾 🚔
- 🐱 🐶 🐭 🐹 🐰 🐺 🐸 🐯 🐻 🐷 🐽 🐴 🐎 🐵 🐘 🐼 🐍 🐦 🐤 🐔 🚍
- 💐 🌸 🌷 🍀 🌹 🌻 🌺 🍁 🍃 🌿 🍄 🌵 🌴 🌲 🌳 🌼 🌞 🎃 🎁 👻 🔔 🎉
- 🔍 🔎 🔒 🔆 🔨 💣 ?? ?? 📙 📘 📐 ?? 🏆 💎 💍 👠 🍵 🍺 🍻 🍔 🍗 🍖
- 🍚 🍦 🍨 🍩 🍧 🍎 🍭 🍊 🍋 🍓 🍑 🍐 🍍 🍅 🌽 🏡 🏫 🏠 💒 ?? 🏭 🌈
路由配置
新建页面后,进行路由配置。
访问除静态路由配置的路径外,统一返回404页面。
  {
    path: '/ems',
    name: 'ems',
    component: () => import('../views/ems.vue')
  },
:tw-1f41e: 8、封装Axios与Ruoyi-Vue调用后端方式保持一致
baseURL: ‘http://127.0.0.1:8017’ ->此项用来配置nginx对应的上线地址。
路径:
src/utils/request.js
import axios from 'axios'
import { Message } from 'element-ui'

// create an axios instance
const service = axios.create({
  //baseURL: process.env.VUE_BASE_API,
  baseURL: 'http://127.0.0.1:8017',
  timeout: 8000 // request timeout 设置请求超时时间,单位(毫秒)
})

// response interceptor 响应拦截
service.interceptors.response.use(
  response => {
    const res = response.data // response.data里面的数据才是后台返回给我们的数据  200  500
    // 200  500 后端这几个特定异常判断没有问题后,才能放行,进行相应数据
   if (res.code === 500) {
      Notification.error({
        title: '服务器内部出现异常,请联系管理员'
      })
      return Promise.reject('error')// 记录错误
    } else if (res.code === 400) { // 可能是其它参数出错
      Notification.error({
        title: res.msg
      })
      return Promise.reject('error')// 记录错误
    } else {
      // 以上验证通过之后再放行
      return res
    }
  },
  error => {
    console.log('err' + error) // for debug
    Message({
      //message: error.message,
      message: "接口数据异常,请联系管理员",
      showClose: true,
      dangerouslyUseHTMLString: true,
      type: 'error',
      duration: 3 * 1000
    })
    return Promise.reject(error)
  }
)

export default service
vue页面调用接口方式:
// 引入api包中的后端接口方法
import { getCurrentData } from "@/api/ems/index"

mounted() {
   this.getData();
},
data() {
   return {
     allData: [],
    }
},
methods: {
    getData() {
      getCurrentData().then(res => {
         this.allData = res.data;
      });
 }
:tw-1f40b: 9、前端项目通用代码模板
require(“…/…/…/assets/theme/shine”) 引入的是自定义主题,
如果想要Echarts变得好看,并且不需要过多的反复配置,则最好在官网定制一个主题。
这里作者已经自定义主题,如若有看着不舒服的阔以去Echarts官网进行配置。
网址:https://echarts.apache.org/zh/theme-builder.html
<!-- 初始化代码 -->
<template>
    <div ref="refChart" :style="{ height: kHOne + 'px'}"></div>
</template>

<script>
export default {
  name: '',
  components: {},
  data () {
  return {
    // 获取浏览器可视区域高度(包含滚动条)、 window.innerHeight
    // 获取浏览器可视区域高度(不包含工具栏高度)、document.documentElement.clientHeight
    // 获取body的实际高度  (三个都是相同,兼容性不同的浏览器而设置的) document.body.clientHeight
    screenHeight: window.innerHeight || document.documentElement.clientHeight || document.body.clientHeight,
    screenWidth: window.innerWidth || document.documentElement.clientWidth || document.body.clientWidth,
    allData: [],
    // 浏览器高度
    kHOne: null,
    // 浏览器宽度
    kWOne: null,
    // 浏览器字体大小
    kFOne: null,
    // 自适应浏览器获取宽高大小定时器
    koiTime: null
  }
  },
  created () {},
  beforeMount(){
    this.kHOne = Math.round(this.screenHeight * 0.3)
  },
  mounted(){
    // 页面大小改变时触发
    window.addEventListener('resize',this.getScreenHeight, false);
    // 页面大小改变时触发
    window.addEventListener('resize',this.getScreenWidth, false);
    // 鼠标移动时触发
    //window.addEventListener('mousemove',this.getHeight, false);
    // 自适应浏览器获取宽高大小定时器
    this.resizeScreen();
    // 获取接口数据
    this.getData();
    // 局部刷新定时器
    //this.getDataTimer();
  },
  beforeDestroy () {

  },
  destroyed() {
    // 清除自适应屏幕定时器
    clearInterval(this.koiTime);
    this.koiTime = null;
    // 页面大小改变时触发销毁
    window.removeEventListener('resize',this.getScreenHeight, false);
    // 页面大小改变时触发销毁
    window.removeEventListener('resize',this.getScreenWidth, false);
  },
  methods: {
    // 自适应浏览器获取宽高大小定时器
    resizeScreen(){
      this.koiTime = setInterval(() => {
        this.getScreenHeight();
        this.getScreenWidth();
      }, 200)
    },
    // 获取浏览器高度进行自适应
    getScreenHeight() {
        this.screenHeight = window.innerHeight || document.documentElement.innerHeight || document.body.clientHeight;
        // 四舍五入取整数
        this.kHOne = Math.round(this.screenHeight * 0.3);
        //console.log("高度->"+this.screenHeight +"-"+ this.kHOne);
    },
    // 字体大小根据宽度自适应
    getScreenWidth(){
      this.screenWidth = window.innerWidth || document.documentElement.clientWidth || document.body.clientWidth;
      // 浏览器字体计算
      this.kFOne = Math.round(this.screenWidth / 100);
      // 浏览器宽度宽度
      this.kWOne = this.screenWidth;
      //console.log("宽度->"+this.screenWidth);
    },
    getData() {
      // 调用接口方法
      // getModuleData().then(res => {
      //       this.allData = res.data;
      //       //console.log("ALLDATA->"+JSON.stringify(this.allData.pcsSum));
      //       // echarts查不到数据,将初始化echarts的方法全部放置到接口方法中即可。
      // })
      // 获取服务器的数据, 对this.allData进行赋值之后, 调用updateChart方法更新图表
      //console.log("ALLDATA->",JSON.stringify(res.data))
      //console.log("ALLDATA->",JSON.stringify(this.allData))
      //this.updateChart();
      // 向data数据中set值
      // if(this.allData.apcsFault == "正常"){
      //     this.$set(this.titleItem1[0].number,'content',textNormal)
      // }else {
      //     this.$set(this.titleItem1[0].number,'content',this.allData.apcsFault)
      //     this.$set(this.titleItem1[0].number.style,'fill',textColor)
      // }
    },
    // 定时器
    getDataTimer(){
      this.koiTimer = setInterval(() => {
        // 执行刷新数据的方法
        this.getData();
        //console.log("Hello World")
      }, 3000)
    },
  }
}
</script>
<style lang='less' scoped>

</style>
:tw-1f383: 10、主页采用Element-UI布局
官网参考:https://element.eleme.cn/#/zh-CN/component/layout
        <!-- Element-UI Layout布局 box-bg-color -->
        <div class="layoutHome">
          <el-row>
            <el-col :span="6">
              <div :style="{ height: kHTwo + 'px'}">
                <dv-border-box-12 style="padding:12px">
                  1eft1
                </dv-border-box-12>
              </div>

              <div :style="{ height: kHThree + 'px'}">
                <!-- style="padding:12px" -->
                <dv-border-box-12 style="padding:12px">
                  1eft2
                </dv-border-box-12>
              </div>
            </el-col>

            <el-col :span="12">
              <div :style="{ height: kHFour + 'px'}">
                <dv-border-box-12 style="padding:12px">
                  center1
                </dv-border-box-12>
              </div>
              <div :style="{ height: kHFive + 'px'}">
                <dv-border-box-12 style="padding:12px">
                  center2
                </dv-border-box-12>
              </div>
            </el-col>

            <el-col :span="6">
              <div :style="{ height: kHSix + 'px'}">
                <dv-border-box-12 style="padding:12px">
                  right1
                </dv-border-box-12>
              </div>
              <div :style="{ height: kHSeven + 'px'}">
                <dv-border-box-12 style="padding:12px">
                  right2
                </dv-border-box-12>
              </div>
              <div :style="{ height: kHEight + 'px'}">
                <dv-border-box-12 style="padding:12px">
                  right3
                </dv-border-box-12>
              </div>
            </el-col>

          </el-row>
        </div>
          <!-- 总体布局end -->
:tw-1f60e: 11、组件展示代码
目的:为了快速开发,直接复制粘贴改下高度即可。
1、饼形图自适应
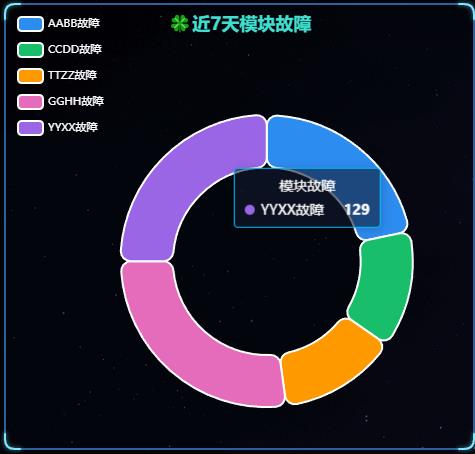
<!-- left1 -->
<template>
    <div ref="refChart" :style="{ height: kHOne + 'px'}"></div>
</template>

<script>
import { getModuleData } from "../../../api/ems/index";
require("../../../assets/theme/shine")
export default {
  name: '',
  components: {},
  data () {
  return {
    // 获取浏览器可视区域高度(包含滚动条)、 window.innerHeight
    // 获取浏览器可视区域高度(不包含工具栏高度)、document.documentElement.clientHeight
    // 获取body的实际高度  (三个都是相同,兼容性不同的浏览器而设置的) document.body.clientHeight
    screenHeight: window.innerHeight || document.documentElement.clientHeight || document.body.clientHeight,
    screenWidth: window.innerWidth || document.documentElement.clientWidth || document.body.clientWidth,
    chartInstance: null,
    allData: [
                { value: 5, name: 'PCS模块故障' },
                { value: 6, name: 'DC储能模块故障' },
                { value: 7, name: 'DC光伏模块故障' },
                { value: 8, name: 'DCAC模块故障' },
                { value: 9, name: '电池故障' }
    ],
    kHOne: null,
    koiTime: null,
    // 局部刷新定时器
    koiTimer: null,
  }
  },
  created () {},
  beforeMount(){
    this.kHOne = Math.round(this.screenHeight * 0.44)
  },
  mounted(){
    // 页面大小改变时触发
    window.addEventListener('resize',this.getScreenHeight, false);
    // 页面大小改变时触发
    window.addEventListener('resize',this.getScreenWidth, false);
    // 鼠标移动时触发
    //window.addEventListener('mousemove',this.getHeight, false);
    this.resizeScreen();
    // 图表初始化
    this.initChart();
    this.getData();
    window.addEventListener("resize", this.screenAdapter);
    this.screenAdapter();
    // 局部刷新定时器
    //this.getDataTimer();
  },
  beforeDestroy () {
    // 销毁Echarts图表
    this.chartInstance.dispose();
    this.chartInstance = null;
  },
  destroyed() {
    // 清除自适应屏幕定时器
    clearInterval(this.koiTime);
    this.koiTime = null;
    // 清除局部刷新定时器
    clearInterval(this.koiTimer);
    this.koiTimer = null;
    // 页面大小改变时触发
    window.removeEventListener('resize',this.getScreenHeight, false);
    // 页面大小改变时触发
    window.removeEventListener('resize',this.getScreenWidth, false);
    window.removeEventListener("resize", this.screenAdapter);
  },
  methods: {
    resizeScreen(){
      this.koiTime = setInterval(() => {
        this.getScreenHeight();
        this.getScreenWidth();
      }, 200)
    },
    // 获取浏览器高度进行自适应
    getScreenHeight() {
        this.screenHeight = window.innerHeight || document.documentElement.innerHeight || document.body.clientHeight;
        // 四舍五入取整数
        this.kHOne = Math.round(this.screenHeight * 0.44);
        //console.log("高度->"+this.screenHeight +"-"+ this.kHOne);
    },
    // 字体大小根据宽度自适应
    getScreenWidth(){
      this.screenWidth = window.innerWidth || document.documentElement.clientWidth || document.body.clientWidth;
      //console.log("宽度->"+this.screenWidth);
    },
    initChart() {
      this.chartInstance = this.$echarts.init(this.$refs.refChart,'shine');
      const initOption = {
        title: {
          text: "🌼近30天模块故障",
          left: 'center'
        },
        tooltip: {
          trigger: 'item'
        },
        legend: {
            orient: 'vertical',
            left: 'left',
        },
        series: [
            {
              name: '模块故障',
              type: 'pie',
              // 环形图大小
              radius: ['45%', '70%'],
              // 环形图位置
              center: ["56%", "60%"],
              avoidLabelOverlap: false,
              itemStyle: {
                borderRadius: 10,
                borderColor: '#fff',
                borderWidth: 2
              },
              label: {
                show: false,
                position: 'center'
              },
              emphasis: {
                label: {
                  show: true,
                  fontSize: '14',
                  fontWeight: 'bold'
                }
              },
              labelLine: {
                show: false
              },
            }
          ]
      };
      // 图表初始化配置
      this.chartInstance.setOption(initOption);
    },
    getData() {
      // getModuleData().then(res => {
      //     this.allData = res.data;
      //     this.updateChart();
      //     //console.log("数据left1->"+JSON.stringify(this.allData.pcsSum));
      //     // echarts查不到数据,将初始化echarts的方法全部放置到接口方法中即可。
      // })
      // 获取服务器的数据, 对this.allData进行赋值之后, 调用updateChart方法更新图表
      //console.log("ALLDATA->",JSON.stringify(res.data))
      //console.log("ALLDATA->",JSON.stringify(res.allData))
      this.updateChart();
    },
    updateChart() {
      // 处理图表需要的数据
      const dataOption = {
        series: [
            {
              data: [
                // { value: this.allData.pcsSum, name: 'PCS模块故障' },
                // { value: this.allData.dcsSum, name: 'DC储能模块故障' },
                // { value: this.allData.dcpvSum, name: 'DC光伏模块故障' },
                // { value: this.allData.dcacSum, name: 'DCAC模块故障' },
                // { value: this.allData.batterySum, name: '电池故障' }
                { value: 5, name: 'PCS模块故障' },
                { value: 6, name: 'DC储能模块故障' },
                { value: 7, name: 'DC光伏模块故障' },
                { value: 8, name: 'DCAC模块故障' },
                { value: 9, name: '电池故障' }
              ]
            }
          ]
      };
      // 图表数据变化配置
      this.chartInstance.setOption(dataOption);
    },
    screenAdapter() {
      this.titleFontSize = (this.$refs.refChart.offsetWidth / 100) * 2;
      const adapterOption = {
        title: {
          textStyle: {
            fontSize: Math.round(this.titleFontSize * 2),
          },
        },
        // 圆点分类标题
        legend: {
          textStyle: {
            fontSize: Math.round(this.titleFontSize * 1.2),
          },
        },
        // xAxis: {
        //   //  改变x轴字体颜色和大小
        //   axisLabel: {
        //     textStyle: {
        //       fontSize: this.titleFontSize,
        //     },
        //   },
        // },
        // yAxis: {
        //   //  改变y轴字体颜色和大小
        //   axisLabel: {
        //     textStyle: {
        //       fontSize: this.titleFontSize,
        //     },
        //   },
        // },
      };
      // 图标自适应变化配置
      this.chartInstance.setOption(adapterOption);
      this.chartInstance.resize();
    },
    // 定时器
    getDataTimer(){
      this.koiTimer = setInterval(() => {
        // 执行刷新数据的方法
        this.getData();
        //console.log("Hello World")
      }, 60000 * 10)
    },

  }
}
</script>
<style scoped='scss' scoped>

</style>
2、折线图自适应
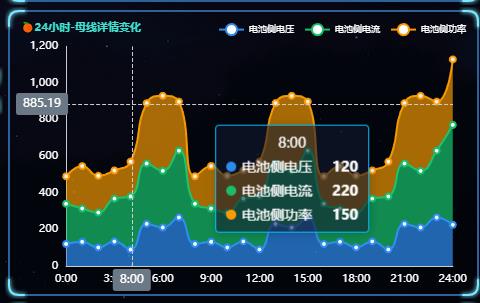
<!-- echarts模板,有局部刷新需要在mounted自行开启 -->
<template>
    <div ref="refChart" :style="{ height: kHOne + 'px'}"></div>
</template>

<script>
require("../../../assets/theme/shine")
import { get24HoursData2 } from "../../../api/ems/index";
export default {
  name: '',
  components: {},
  data () {
  return {
    // 获取浏览器可视区域高度(包含滚动条)、 window.innerHeight
    // 获取浏览器可视区域高度(不包含工具栏高度)、document.documentElement.clientHeight
    // 获取body的实际高度  (三个都是相同,兼容性不同的浏览器而设置的) document.body.clientHeight
    screenHeight: window.innerHeight || document.documentElement.clientHeight || document.body.clientHeight,
    screenWidth: window.innerWidth || document.documentElement.clientWidth || document.body.clientWidth,
    chartInstance: null,
    allData: [],
    kHOne: null,
    // 自适应浏览器获取宽高大小定时器
    koiTime: null,
    // 局部刷新定时器
    koiTimer: null,
  }
  },
  created () {},
  beforeMount(){
    this.kHOne = Math.round(this.screenHeight * 0.3)
  },
  mounted(){
    // 页面大小改变时触发
    window.addEventListener('resize',this.getScreenHeight, false);
    // 页面大小改变时触发
    window.addEventListener('resize',this.getScreenWidth, false);
    // 鼠标移动时触发
    //window.addEventListener('mousemove',this.getHeight, false);
    // 自适应浏览器获取宽高大小定时器
    this.resizeScreen();
    // 图表初始化
    this.initChart();
    // 获取接口数据
    this.getData();
    // 调用Echarts图表自适应方法
    this.screenAdapter();
    // Echarts图表自适应
    window.addEventListener("resize", this.screenAdapter);
    // 局部刷新定时器
    //this.getDataTimer();
  },
  beforeDestroy () {
    // 销毁Echarts图表
    this.chartInstance.dispose();
    this.chartInstance = null;
  },
  destroyed() {
    // 清除自适应屏幕定时器
    clearInterval(this.koiTime);
    this.koiTime = null;
    // 清除局部刷新定时器
    clearInterval(this.koiTimer);
    this.koiTimer = null;
    // 页面大小改变时触发销毁
    window.removeEventListener('resize',this.getScreenHeight, false);
    // 页面大小改变时触发销毁
    window.removeEventListener('resize',this.getScreenWidth, false);
    // Echarts图表自适应销毁
    window.removeEventListener("resize", this.screenAdapter);
  },
  methods: {
    // 自适应浏览器获取宽高大小定时器
    resizeScreen(){
      this.koiTime = setInterval(() => {
        this.getScreenHeight();
        this.getScreenWidth();
      }, 200)
    },
    // 获取浏览器高度进行自适应
    getScreenHeight() {
        this.screenHeight = window.innerHeight || document.documentElement.innerHeight || document.body.clientHeight;
        // 四舍五入取整数
        this.kHOne = Math.round(this.screenHeight * 0.3);
        //console.log("高度->"+this.screenHeight +"-"+ this.kHOne);
    },
    // 字体大小根据宽度自适应
    getScreenWidth(){
      this.screenWidth = window.innerWidth || document.documentElement.clientWidth || document.body.clientWidth;
      //console.log("宽度->"+this.screenWidth);
    },
    initChart() {
      this.chartInstance = this.$echarts.init(this.$refs.refChart,'shine');
      const initOption = {
        title: {
          text: "🍊24小时-母线详情变化",
          left: 'left'
        },
        legend: {
            left: 'right',
        },
        tooltip: {
          trigger: 'axis',
          axisPointer: {
            type: 'cross',
            label: {
              backgroundColor: '#6a7985'
            }
          }
        },
        // toolbox: {
        //   feature: {
        //     saveAsImage: {}
        //   }
        // },
        grid: {
          top: '10%',
          left: '3%',
          right: '4%',
          bottom: '6%',
          containLabel: true
        },
        xAxis: [
          {
            type: 'category',
            boundaryGap: false,
          }
        ],
        yAxis: [
          {
            type: 'value'
          }
        ],
        series: [
          {
            type: 'line',
            stack: 'Total',
            areaStyle: {},
            emphasis: {
              focus: 'series'
            },
          },
          {
            type: 'line',
            stack: 'Total',
            areaStyle: {},
            emphasis: {
              focus: 'series'
            },
          },
          {
            type: 'line',
            stack: 'Total',
            areaStyle: {},
            emphasis: {
              focus: 'series'
            },
          }
        ]
      };
      // 图表初始化配置
      this.chartInstance.setOption(initOption);
    },
    getData() {
      // 调用接口方法
      // get24HoursData2().then(res => {
      //       this.allData = res.data;
      //       // 局部刷新数据
      //       this.updateChart();
      //       //console.log("ALLDATA->"+JSON.stringify(this.allData));
      //       // echarts查不到数据,将初始化echarts的方法全部放置到接口方法中即可。
      // })
      // 获取服务器的数据, 对this.allData进行赋值之后, 调用updateChart方法更新图表
      //console.log("ALLDATA->",JSON.stringify(res.data))
      //console.log("ALLDATA->",JSON.stringify(this.allData))
      this.updateChart();
    },
    updateChart() {
      // 处理图表需要的数据
      const dataOption = {
        legend: {
          data: ['电池侧电压', '电池侧电流', '电池侧功率']
        },
        xAxis: [
          {
            data: ['0:00', '1:00', '2:00', '3:00', '4:00', '5:00', '6:00', '7:00', '8:00', '9:00', '10:00', '11:00', '12:00', '13:00', '14:00', '15:00', '16:00', '17:00', '18:00', '19:00', '20:00', '21:00', '22:00', '23:00', '24:00']
            //data: this.allData.timeHour
          }
        ],
        series: [
          {
            name: '电池侧电压',
            data: [120, 132, 101, 134, 90, 230, 210, 265,120, 132, 101, 134, 90, 230, 210, 265,120, 132, 101, 134, 90, 230, 210, 265, 225]
            //data: this.allData.column1
          },
          {
            name: '电池侧电流',
            data: [220, 182, 191, 234, 290, 330, 310, 365,220, 182, 191, 234, 290, 330, 310, 365,220, 182, 191, 234, 290, 330, 310, 365, 546]
            //data: this.allData.column2
          },
          {
            name: '电池侧功率',
            data: [150, 232, 201, 154, 190, 330, 410, 268,150, 232, 201, 154, 190, 330, 410, 268,150, 232, 201, 154, 190, 330, 410, 268, 358]
            //data: this.allData.column3
          }
        ]
      };
      // 图表数据变化配置
      this.chartInstance.setOption(dataOption);
    },
    screenAdapter() {
      this.titleFontSize = Math.round(this.$refs.refChart.offsetWidth / 40);
      const adapterOption = {
        title: {
          textStyle: {
            fontSize: Math.round(this.titleFontSize),
          },
        },
        // 圆点分类标题
        legend: {
          textStyle: {
            fontSize: Math.round(this.titleFontSize / 1.2),
          },
        },
        xAxis: {
          //  改变x轴字体颜色和大小
          axisLabel: {
            textStyle: {
              fontSize: Math.round(this.titleFontSize),
            },
          },
        },
        yAxis: {
          //  改变y轴字体颜色和大小
          axisLabel: {
            textStyle: {
              fontSize: Math.round(this.titleFontSize),
            },
          },
        },
      };
      // 图表自适应变化配置
      this.chartInstance.setOption(adapterOption);
      this.chartInstance.resize();
    },
    // 定时器
    getDataTimer(){
      this.koiTimer = setInterval(() => {
        // 执行刷新数据的方法
        this.getData();
        //console.log("Hello World")
      }, 60000 * 10)
    },
  }
}
</script>
<style lang='less' scoped>

</style>
3、柱形图自适应
4、数据无缝轮播
正在开发中,有小伙伴开发完了可以直接提供于我。
5、中国地图
正在开发中,有小伙伴开发完了可以直接提供于我。
6、有小伙伴开发后可进行贡献,作者会完善文档内容。
正在开发中,有小伙伴开发完了可以直接提供于我。
:tw-1f48c: 12、项目部署
- 1、购买服务器,阿里云或者腾讯云等,这里不在进行步骤展示。
- 2、打包命令:npm run build ,会生成一个dist包。
- 3、域名购买,域名解析映射购买的服务器IP、SSL证书申请以及域名备案等三步。不再进行演示,不清楚阔以直接面向百度
- 4、开放防火墙80端口和443端口,一般情况都会默认开放。
- 5、nginx配置,阿里云域名上面有帮助文档,也可以进行参考。
worker_processes  1;

events {
    worker_connections  1024;
}

http {
    include       mime.types;
    default_type  application/octet-stream;
    sendfile        on;
    keepalive_timeout  65;

	server {
		gzip on;
		gzip_min_length  5k;
		gzip_buffers     4 16k;
		gzip_comp_level 5;
		gzip_types text/plain application/javascript application/x-javascript text/css application/xml text/javascript application/x-httpd-php image/jpeg image/gif image/png;
		gzip_vary on;
        # SSL 访问端口号为 80
		listen  80;
        # 填写绑定证书的域名,本地的是localhost
		server_name  koi-screen.online,localhost;

		location / {
			try_files $uri $uri/ /index.html;
        # 项目目录 nginx目录中的前端带包dist文件夹,默认dist,可以修改文件夹名称
			root   dist;
			index  index.html;
		}

        # /api 开头的后端项目
        location /api {
                proxy_pass http://localhost:8007/;
            }

    }

    #以下属性中,以ssl开头的属性表示与证书配置有关。
    server {
        listen 443 ssl;
        #配置HTTPS的默认访问端口为443。
        #如果未在此处配置HTTPS的默认访问端口,可能会造成Nginx无法启动。
        #如果您使用Nginx 1.15.0及以上版本,请使用listen 443 ssl代替listen 443和ssl on。
        # 填写绑定证书的域名
        server_name 填写域名;
        root html;
        index index.html index.htm;
        # SSL证书地址
        ssl_certificate cert/域名.pem;
        # SSL证书公钥
        ssl_certificate_key cert/域名.key;
        # 超时时间
        ssl_session_timeout 5m;
        # 请按照以下套件配置,配置加密套件,写法遵循 openssl 标准。
        ssl_ciphers ECDHE-RSA-AES128-GCM-SHA256:ECDHE:ECDH:AES:HIGH:!NULL:!aNULL:!MD5:!ADH:!RC4;
        # 表示使用的加密套件的类型。
        ssl_protocols TLSv1.1 TLSv1.2; #表示使用的TLS协议的类型,您需要自行评估是否配置TLSv1.1协议。
        ssl_prefer_server_ciphers on;
        location / {
            proxy_pass  http://域名;
        }
    }

}
13、欢迎各位兄台积极优化,剔除BUG进行修复以及开源贡献自适应组件模板代码。
- 每一份开源来之不易,欢迎兄台们喜欢的捧个场,让作者更有每天持之以恒的动力。
