webpack是一种前端资源构建工具,是一个静态资源打包器,通过其内部的loader和plugins插件对项目进行构建打包,最终达到代码模块化
 ?
?
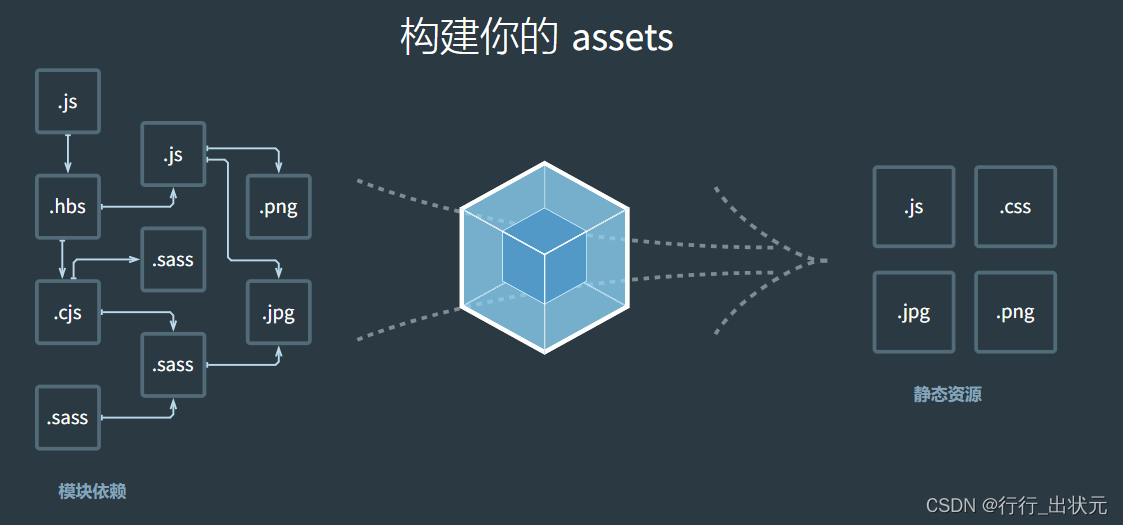
module:各个源码文件,可以引用的都是模块(左边这些一个个文件,就是一个个module)
chunk:打包过程中的代码块,根据文件引用关系生成的就是chunk(中间的是chunk)
bundle:最终的输出文件,可以直接在浏览器中运行(右边的就是打包输出的bundle)
为什么要用webpack?
- 每一个静态资源都是一个模块
- 能够定制模块打包的每一个部分
- 拆分依赖树成块
- 让初始化加载时间更少
- 能够集成第三方类库
- 适用于大型项目
webpack 构建流程

??说明:
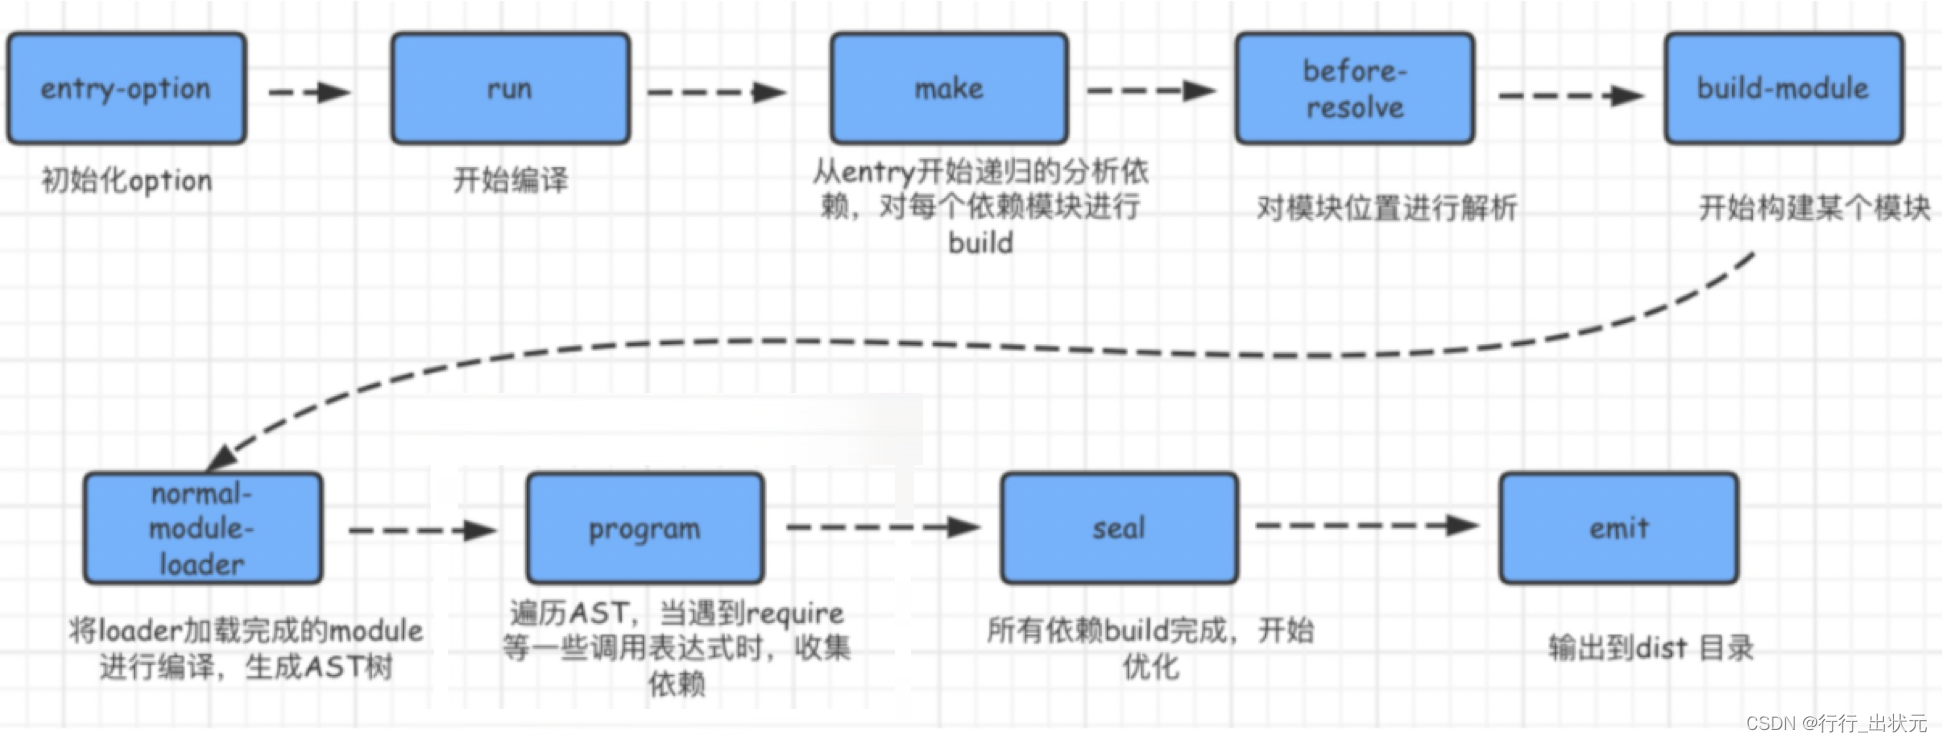
- entry-option:读取 webpack 配置,调用 new Compile(config) 函数准备编译
- run:开始编译
- make:从入口开始分析依赖,对依赖模块进行 build
- before-resolve:对位置模块进行解析
- build-module:开始构建模块
- normal-module-loader:生成 AST 树
- program:遍历 AST 树,遇到 require 语句收集依赖
- seal:build 完成开始优化
- emit:输出 dist 目录
webpack.config.js基础配置项:
'use strict';
const path = require('path');
const utils = require('./utils');
const config = require('../config');
const vueLoaderConfig = require('./vue-loader.conf');
const webpack = require('webpack');
const PostCompilePlugin = require('webpack-post-compile-plugin')
const TransformModulesPlugin = require('webpack-transform-modules-plugin')
function resolve (dir) {
  return path.join(__dirname, '..', dir)
}
const createLintingRule = () => ({
  test: /\.(js|vue)$/,
  loader: 'eslint-loader',
  enforce: 'pre',
  include: [resolve('src'), resolve('test')],
  options: {
    formatter: require('eslint-friendly-formatter'),
    emitWarning: !config.dev.showEslintErrorsInOverlay,
    fixed: true
  }
});

module.exports = {
  context: path.resolve(__dirname, '../'),
  entry: {
    app: './src/main.js'
  },
  externals: {
  },
  output: {
    path: config.build.assetsRoot,
    filename: '[name].js',
    publicPath: process.env.NODE_ENV === 'production'
      ? config.build.assetsPublicPath
      : config.dev.assetsPublicPath
  },
  resolve: {
    extensions: ['.js', '.vue', '.json'],
    alias: {
      'vue$': 'vue/dist/vue.esm.js',
      '@': resolve('src'),
    }
  },
  plugins: [
    new PostCompilePlugin(),
    new TransformModulesPlugin(),
    new webpack.ProvidePlugin({})
  ],
  module: {
    rules: [
      ...(config.dev.useEslint ? [createLintingRule()] : []),
      {
        test: /\.vue$/,
        loader: 'vue-loader',
        options: vueLoaderConfig
      },
      {
        test: /\.js$/,
        loader: 'babel-loader',
        exclude: /node_modules/
        // include: [resolve('src'), resolve('test'), resolve('node_modules/webpack-dev-server/client')]
      },
      {
        test: /\.(png|jpe?g|gif|svg)(\?.*)?$/,
        loader: 'url-loader',
        options: {
          limit: 10000,
          name: utils.assetsPath('image/[name].[hash:7].[ext]')
        }
      },
      {
        test: /\.(mp4|webm|ogg|mp3|wav|flac|aac)(\?.*)?$/,
        loader: 'url-loader',
        options: {
          limit: 10000,
          name: utils.assetsPath('media/[name].[hash:7].[ext]')
        }
      },
      {
        test: /\.(woff2?|eot|ttf|otf)(\?.*)?$/,
        loader: 'url-loader',
        options: {
          limit: 10000,
          name: utils.assetsPath('fonts/[name].[hash:7].[ext]')
        }
      },
      {
        test: /.exec.js$/,
        use: [ 'script-loader' ]
      }, {
        test: /\.css$/,
        include: path.resolve(__dirname, './node_modules'),
        loaders: ["style", "css", "postcss"]
      },
      {
        test:/\.scss$/,
        include: path.resolve(__dirname, './node_modules'),
        loaders: ["style", "css", "sass", "postcss"]
      },
      {
        test:/\.sass$/,
        include: path.resolve(__dirname, './node_modules'),
        loaders: ["style", "css", "sass", "postcss"]
      },
      {
        test: /\.less$/,
        loader: "style-loader!css-loader!less-loader"
      },
      {
        test: /\.styl$/,
        loader: "style-loader!css-loader!less-loader"
      }
    ]
  },
  node: {
    setImmediate: false,
    dgram: 'empty',
    fs: 'empty',
    net: 'empty',
    tls: 'empty',
    child_process: 'empty'
  }
}
webpack.config.js基础配置说明:
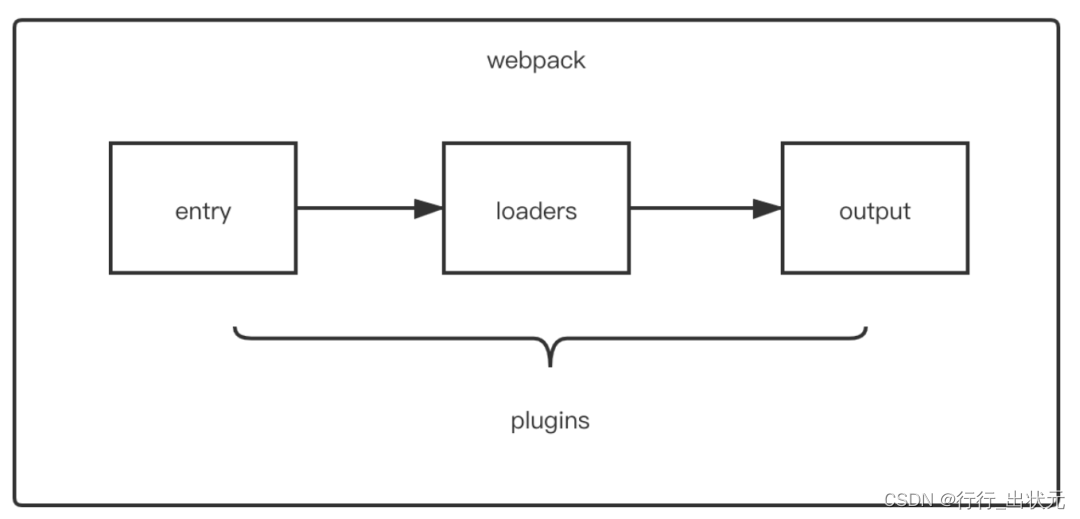
- entry,打包时模块入口文件
- output,打包好的输出文件的存放位置、文件名、文件基础路径publicPath
- module,配置各种类型文件的解析规则, 比如说.vue文件、.js文件
- rosolve,配置alias(别名),或者定义寻找模块的规则
- loader:webpack只能处理JavaScript 和 JSON 文件,loader 让 webpack 能够将其他类型的文件转为有效模块添加到依赖图中
- plugins,配置扩展插件,扩展webpack的更多功能,解决loader无法处理的事情
- devServer,实现本地http服务等
常用的几个loader:
url-loader:将图片转为base64字符串,能更快的加载图片
file-loader:加载本地图片,图片过大,使用file-loader加载图片
source-map-loader:允许 webpack 跨库且持续的维护 source map 数据,更易于调试
image-loader:加载并压缩图片文件
babel-loader:把 ES6 转换成 ES5,兼容浏览器
css-loader:解析css文件中的@import依赖关系,也就是css之间的依赖关系
style-loader:将webpack处理之后的内容插入到HTML的HEAD标签中
eslint-loader:通过 ESLint 检查 JavaScript 代码
常用的几个插件plugins:
html-webpack-plugin:在打包结束后,自动生成一个 html 文件,并把打包生成的 js 模块引入到该 html 中
安装:npm install html-webpack-plugin -D
const HtmlWebpackPlugin = require('html-webpack-plugin')
plugins: [
	new HtmlWebpackPlugin({
		filename: 'index.html',
		template: 'index.html',
		inject: true
	})
]
clean-webpack-plugin:每次修改一些配置,重新打包时,不用再手动删除dist文件
安装:npm install clean-webpack-plugin -D
const { CleanWebpackPlugin } = require('clean-webpack-plugin')
module.exports = {
   // 其他省略
   plugins: [
      new CleanWebpackPlugin()
   ]
}
copy-webpack-plugin:将项目中的某单个文件或整个文件夹在打包的时候复制一份到打包后的文件夹中(即复制一份到dist目录下)
安装:npm install copy-webpack-plugin -D
const CopyWebpackPlugin = require('copy-webpack-plugin')
plugins: [
	// copy custom static assets
	new CopyWebpackPlugin([
	  {
		from: path.resolve(__dirname, '../static'),
		to: config.dev.assetsSubDirectory,
		ignore: ['.*']
	  },
	  {
		from: path.resolve(__dirname, '../static/MP_verify_xxxxxxxxxxxxwOCy.txt'),
		to: 'MP_verify_xxxxxxxxxxxxwOCy.txt',
		toType: 'file'
	  }
	])
]
DefinePlugin:允许在编译时创建配置的全局对象,是一个 webpack 内置的插件,不需要安装,对开发模式和发布模式的构建允许不同的行为非常有用
plugins: [
	new webpack.DefinePlugin({
		'process.env': require('../config/dev.env')
	})
]
Loader和Plugin的区别:
1、功能不同:
Loader 是文件加载器,能够加载资源文件并对这些文件进行统一的处理,诸如编译,压缩 最终一起打包在指定的文件夹中,如将less/sass -> css,ES6/7/8 -> ES5
Plugins 是webpack的插件,可以扩展 Webpack 的功能,如打包优化、资源管理、环境变量注入,可以用来处理各种各样的任务
2、运行时机不同:
Loader运行在打包文件之前,loader为在模块加载时的预处理文件
Plugins在整个编译周期都起作用

?webpack 的热更新:
Webpack内置的功能,Hot Module Replacement,简称HMR,无需完全刷新整个页面的同时,更新模块,节省时间、提升体验
可以通过HotModuleReplacementPlugin 或 hot: true开启
devServer: {
	hot: true
}

plugins: [
	new webpack.HotModuleReplacementPlugin()
]
当开启热更新后,启动本地服务时,会创建 WebSocket 建立浏览器与服务器建立通信,当代码发生变化时,将变化的代码推送到浏览器端进行自动更新

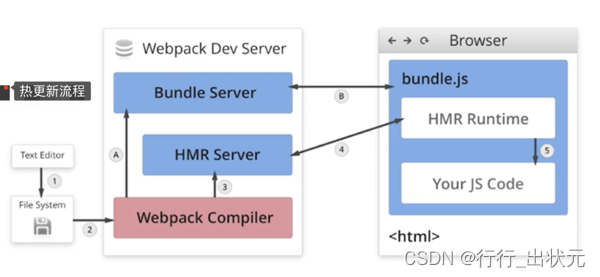
Webpack 热更新的大致原理是,文件经过 Webpack-complier 编译好后传输给 HMR Server,HMR Server 知道哪个资源 (模块) 发生了改变,并通知 HMR Runtime 有哪些变化,HMR Runtime 就会更新我们的代码,这样浏览器就会更新并且不需要刷新
几个名词解释:
Webpack-complier:Webpack 的编译器,将 Javascript 编译成 bundle(就是最终的输出文件)
HMR Server:将热更新的文件输出给 HMR Runtime
Bunble Server:提供文件在浏览器的访问,也就是我们平时能够正常通过 localhost 访问我们本地网站的原因
HMR Runtime:开启了热更新的话,在打包阶段会被注入到浏览器中的 bundle.js,这样 bundle.js 就可以跟服务器建立连接,通常是使用 Websocket ,当收到服务器的更新指令的时候,就去更新文件的变化
bundle.js:构建输出的文件