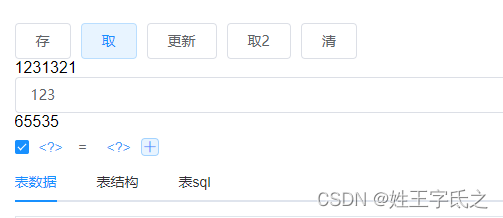
我在一个页面中引入了一个子组件,我希望在父组件点击(按钮一)事件时切换子组件的值,并且在点击别的按钮(按钮二)的时候将当前子组件的属性保存下来。再点击之前的按钮(按钮一)将子组件还原成原始状态
这里需要你了解keep-alive 的工作原理,如果不懂也能一抹黑的用
组件完整代码:
<script>
export default {
  name: 'RKeepAlive',
  data() {
    return {
      vNode: null
    }
  },
  render: function(createElement) {
    if (this.vNode) {
      return this.vNode
    }
    return this.$slots.default[0]
  },
  created() {
    this.cache = Object.create(null)
    this.param = Object.create(null)
    this.keys = []
  },
  methods: {
    keepView(pid) {
      return new Promise(resolve => {
        const vNode = this.$slots.default[0]
        const { cache, keys, param } = this
        let id = vNode.elm.id
        if (id) {
          id = pid
        }
        const key = id
        const data = deepClone(vNode, this.$createElement)
        if (cache && cache[key]) {
          const len = keys.findIndex(x => x === key)
          if (len >= 0) {
            keys.splice(len, 1)
            keys.push(key)
          }
        } else {
          keys.push(key)
        }
        cache[key] = data
        param[key] = {
          data: JSON.parse(JSON.stringify(data.componentInstance._data)),
          props: JSON.parse(JSON.stringify(data.componentInstance._props))
        }
        vNode.data.keepAlive = true
      })
    },
    getView(pid) {
      let vNode = this.$slots.default[0]
      const { cache, param } = this
      const id = pid
      const key = id
      if (cache[key]) {
        this.vNode = Object.create(null)
        cache[key].componentInstance._data = JSON.parse(JSON.stringify(param[key].data))
        vNode = cache[key]
      }
      this.vNode = vNode
    },
    clearView() {
      this.vNode = null
    }
  }
}
function deepClone(vnode, createElement) {
  function cloneVNode(node) {
    const clonedChildren = node.children && node.children.map(vnode => cloneVNode(vnode))
    const cloned = createElement(node.tag, node.data, clonedChildren)
    cloned.text = node.text
    cloned.isComment = node.isComment
    cloned.componentOptions = node.componentOptions
    cloned.componentInstance = node.componentInstance
    cloned.elm = node.elm
    cloned.context = node.context
    cloned.ns = node.ns
    cloned.isStatic = node.isStatic
    cloned.key = node.key
    return cloned
  }
  const clonedVNodes = cloneVNode(vnode)
  return clonedVNodes
}
</script>
分析:
这是由vue 提供的一个渲染方法,当VueComponent发生变化时会带动render发生相应渲染
在这里采取了与keep-alive一致的方式,使用slot插入式
 render: function(createElement) {
    if (this.vNode) {
      return this.vNode
    }
    return this.$slots.default[0]
  },
初始化三个data
cache 用来存储this.$slots.default
param用来存储slot插槽中子组件的data
keys 在这里并没有用到,但是保留下来了
 created() {
    this.cache = Object.create(null)
    this.param = Object.create(null)
    this.keys = []
  },
这个方法是用来存储当前渲染的操作
keepView(pid) {
      return new Promise(resolve => {
        const vNode = this.$slots.default[0]
        const { cache, keys, param } = this
        let id = vNode.elm.id
        if (id) {
          id = pid
        }
        const key = id
        const data = deepClone(vNode, this.$createElement)
        if (cache && cache[key]) {
          const len = keys.findIndex(x => x === key)
          if (len >= 0) {
            keys.splice(len, 1)
            keys.push(key)
          }
        } else {
          keys.push(key)
        }
        cache[key] = data
        param[key] = {
          data: JSON.parse(JSON.stringify(data.componentInstance._data)),
          props: JSON.parse(JSON.stringify(data.componentInstance._props))
        }
        vNode.data.keepAlive = true
        console.log(this)
      })
    },
获取存储的渲染,并还原
这里需要做操作:this.vNode = Object.create(null),在这里是对VueComponent做一个欺骗,如果不进行欺骗vNode是null,VueComponent是不会发起对render的调用的
 getView(pid) {
      let vNode = this.$slots.default[0]
      const { cache, param } = this
      const id = pid
      const key = id
      if (cache[key]) {
        this.vNode = Object.create(null)
        cache[key].componentInstance._data = JSON.parse(JSON.stringify(param[key].data))
        vNode = cache[key]
      }
      this.vNode = vNode
    },
vnode的深度复制
function deepClone(vnode, createElement) {
  function cloneVNode(node) {
    const clonedChildren = node.children && node.children.map(vnode => cloneVNode(vnode))
    const cloned = createElement(node.tag, node.data, clonedChildren)
    cloned.text = node.text
    cloned.isComment = node.isComment
    cloned.componentOptions = node.componentOptions
    cloned.componentInstance = node.componentInstance
    cloned.elm = node.elm
    cloned.context = node.context
    cloned.ns = node.ns
    cloned.isStatic = node.isStatic
    cloned.key = node.key
    return cloned
  }
  const clonedVNodes = cloneVNode(vnode)
  return clonedVNodes
}
测试
做一个简单子组件
<template>
  <div>
    1231321
    <el-input v-model="input"></el-input>
    {{ids}}
  </div>
</template>
<script>
export default {
  name: 'TestView',
  props: {
    ids: {
      type: Number,
      default: 0
    }
  },
  data() {
    return {
      input: ''
    }
  }

}
</script>
测试代码
<el-button @click="test(true)"> 存</el-button>
<el-button @click="test(false)"> 取</el-button>
<el-button @click="test1(false)"> 更新</el-button>
<el-button @click="test2(false)"> 取2</el-button>
<el-button @click="test2(true)"> 清</el-button>
<r-keep-alive ref="keepView">
 	<component :is="cop" :id="index" :ids="index" />
</r-keep-alive>
import RKeepAlive from '@/rewrite/r-keep-alive.vue'
import testView from '@/rewrite/test-view.vue'
export defalt{
	data() {
		return{
		      index: 65535,
		      cop: 'test-view'
		}
	},
	methods: {
		test(item) {
	      console.log(item)
	      if (item) {
	       	// 存
	        this.$refs.keepView.keepView(this.index)
	      } else {
			// 取
	        this.$refs.keepView.getView(65535)
	        // this.index = 65535
	        // this.cop = 'test-view'
	      }
	    },
     	test2(item) {
	      if (!item) {
	        this.index = 65536
	        // this.$refs.keepView.clearView()
	      } else {
	        this.$refs.keepView.getView(65536)
	      }
	    },
	    test1() {
	      this.index = 65536
	      // this.cop = 'test-viewi'
	    },
	}
}

最终展示效果

操作 :
1 在输入框输入: 123
2. 点击存
3. 点击更新 ,从新输入: 321
4. 点击存
5. 点击取(出现 id=65535存的数据)

- 点击清 (出现id= 65536存的数据)

说明:
这是基于vue2 的,vue3没测不知道好不好用
在取值时候一定要先欺骗组件更新了,否则不会过
在同一个子组件的时候this. s l o t s . d e f a u l t [ 0 ] . c o m p o n e n t I n s t a n c e 无论如何都是会改变的,所以选择了使用 p a r a m 在取得时候做替换 t h i s . slots.default[0].componentInstance无论如何都是会改变的,所以选择了使用param在取得时候做替换 this. slots.default[0].componentInstance无论如何都是会改变的,所以选择了使用param在取得时候做替换this.slots.default[0].componentInstance的_props 与prarm.prop之间是不能赋值的,如果赋值,VueComponent不会刷新
最后
本人是全栈,对前端也是一知半解,欢迎大佬来更新方法