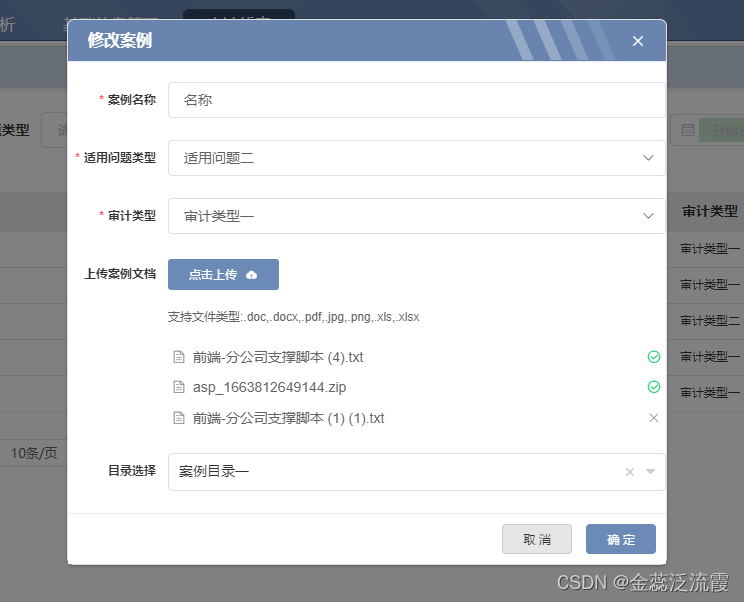
效果图

可以上传多个文件
Vue部分
<template>
  <div>
    <el-form-item label="案例名称" prop="caseName">
      <el-input v-model="formObj.caseName" placeholder="请输入案例名称"/>
    </el-form-item>
    <el-form-item label="适用问题类型" prop="questionType">
      <asp-dict dictCode="question_type" v-model="formObj.questionType"></asp-dict>
    </el-form-item>
    <el-form-item label="审计类型" prop="auditType">
      <asp-dict dictCode="audit_types" v-model="formObj.auditType"></asp-dict>
    </el-form-item>
    <el-form-item label="上传案例文档" prop="fileList">
      <el-upload
        v-model="formObj.fileList"
        name="file"
        :with-credentials="true"
        :action="uploadAction"
        :headers="headers"
        :drag="drag"
        :show-file-list="showFileList"
        :file-list="fileList"
        :disabled="disabled"
        :before-upload="beforeUpload"
        :on-change="handleChange"
        :on-remove="handleRemove"
        :on-preview="handlePreviewDl"
        :on-progress="handleProcess"
        multiple
      >
        <el-button size="small" type="primary">
          点击上传
          <i class="el-icon-upload el-icon--right"/>
        </el-button>
        <div  slot="tip" class="el-upload__tip">支持文件类型:.doc,.docx,.pdf,.jpg,.png,.xls,.xlsx</div>
      </el-upload>
    </el-form-item>
    <el-form-item label="目录选择" prop="parentId">
      <tree-select
        v-model="formObj.caseCatalogueId"
        :options="treeData"
        :normalizer="normalizer"
        :show-count="true"
        placeholder="请选择目录"
      />
    </el-form-item>
  </div>
</template>

<script>
  const uidGenerator = () => {
    return '-' + parseInt(Math.random() * 10000 + 1, 10)
  }
  const FILE_TYPE_ALL = 'all'
  const FILE_TYPE_IMG = 'image'
  const FILE_TYPE_TXT = 'file'

  import { getTreeList } from '@/api/catalogue/catalogueCase'
  // 导入 ASP 平台通用组件包
  import AspDev from '@/utils/aspdev'
  import TreeSelect from '@riophae/vue-treeselect'
  import '@riophae/vue-treeselect/dist/vue-treeselect.css'
  // 解构通用组件
  const {
    AspDict
  } = AspDev
  export default {
    components: {
      AspDict,
      TreeSelect
    },
    name: 'caseForm',
    props: {
      formObj:{},
      text: {
        type: String,
        required: false,
        default: '点击上传'
      },
      prompt: {
        type: [String, Boolean],
        required: false,
        default: ''
      },
      fileType: {
        type: String,
        required: false,
        default: FILE_TYPE_ALL
      },
      fileSuffix: {
        type: String,
        required: false,
        default: ""
      },
      limitSize: {
        type: Number,
        required: false
      },
      /* 这个属性用于控制文件上传的业务路径*/
      bizPath: {
        type: String,
        required: false,
        default: 'temp'
      },
      limit: {
        type: Number,
        required: false
      },
      drag: {
        type: Boolean,
        required: false,
        default: false
      },
      showFileList: {
        type: Boolean,
        required: false,
        default: true
      },
      disabled: {
        type: Boolean,
        required: false,
        default: false
      },
      value: {
        type: [String, Array],
        required: false
      }
    },
    watch: {
      value(val) {
        this.initFileList(val)
      }
    },
    data() {
      return {
        uploadAction: window._CONFIG['BASE_URL'] + '/finance/case/upload', // 上传的文件服务器地址
        downloadAction: window._CONFIG['BASE_URL'] + '/common/download/resource?name=', // 文件下载服务器地址
        headers: {},
        fileList: [],
        treeData: [],
        // 树形对应
        defaultProps: {
          children: 'children',
          label: 'name',
        },
      }
    },
    created() {
      this.initFileList(this.value)
      //获取案例目录树形结构
      getTreeList(this.queryParams).then((response) => {
        this.treeData = response.data
      })
    },
    methods: {
      initFileList(arr) {
        if (!arr || arr.length === 0) {
          this.fileList = []
          return
        }
        var fileList = []
        for (var a = 0; a < arr.length; a++) {
          fileList.push({
            uid: uidGenerator(),
            name: arr[a].fileName,
            status: 'success',
            filePath: arr[a].filePath,
            url: `${this.downloadAction}${encodeURI(arr[a].filePath)}`,
            response: {
              status: 'history',
              url: `${this.downloadAction}${encodeURI(arr[a].filePath)}`
            }
          })
        }
        this.fileList = fileList
      },
      // 限制上传类型
      beforeUpload: function (file) {
        const fileType = file.type;
        const fileSize = file.size / 1024 / 1024;
        const fileSuffix = file.name.replace(/^.*(\.[a-z0-9]+)$/gi, "$1");
        if (fileType === FILE_TYPE_IMG) {
          if (fileType.indexOf('image') < 0) {
            this.msgError('请上传图片')
            return false
          }
        } else if (fileType === FILE_TYPE_TXT) {
          if (fileType.indexOf('image') >= 0) {
            this.msgError('请上传文件')
            return false
          }
        }
        if (this.fileSuffix && this.fileSuffix.indexOf(fileSuffix) < 0) {
          this.msgError('上传文件格式有误')
          return false
        }
        if (fileSize > this.limitSize) {
          this.msgError('超出上传大小限制')
          return false
        }
        this.$emit("beforeUpload", file);
        return true
      },
      handleChange(file, fileList) {
        if (file.status === 'success') {
          this.msgSuccess(`${file.name} 上传成功!`)
          fileList = fileList.map(file => {
            if (file.response && file.response.status !== 'history') {
              file.url = `${this.downloadAction}${encodeURI(file.response.filePath)}`
              file.filePath = file.response.filePath
              //TODO 这里处理为 接口返回地址 择以接口地址为准
              if(file.response.url) {
                file.url = file.response.url;
              }
            }
            return file
          })
        } else if (file.status === 'fail') {
          this.msgError(`${file.name} 上传失败.`)
        } else if (file.status === 'removed') {
          this.handleRemove(file)
        }
        this.fileList = fileList
        if (file.status === 'success') {
          this.handlePathChange()
        }
      },
      // 触发双向数据绑定数据
      handlePathChange() {
        const uploadFiles = this.fileList
        var arr = []
        if (!uploadFiles || uploadFiles.length === 0) {
          arr = []
        }
        if (this.limit === 1) {
          arr.push({
            filePath: uploadFiles[uploadFiles.length - 1].filePath,
            name: uploadFiles[uploadFiles.length - 1].name,
            fileUrl: uploadFiles[uploadFiles.length - 1].url,
          })
        } else {
          for (var a = 0; a < uploadFiles.length; a++) {
            arr.push({
              filePath: uploadFiles[a].filePath,
              name: uploadFiles[a].name,
              fileUrl: uploadFiles[a].url,
            })
          }
        }
        this.formObj.fileList=arr
        this.$emit('change', arr)
      },
      // 删除文件时
      handleRemove(file, fileList) {
        this.deleteFile(file.filePath)
          .then(() => {
            this.fileList = fileList
            this.handlePathChange()
            this.msgSuccess('文件删除成功')
          })
          .catch(() => {
            this.msgError('文件删除失败')
          })
      },
      handlePreviewDl(file) {
        this.download(file.filePath, true, file.name)
      },
      handleProcess(event, file, fileList) {
        this.$emit('process', {
          event, file, fileList
        });
      },
      normalizer(node) {
        if (node.children && !node.children.length) {
          delete node.children
        }
        return {
          id: node.caseCatalogueId,
          label: node.name,
          children: node.children,
        }
      },
      //回显文件
      echoFile(fileList){
        this.fileList=fileList
      },
    },
    model: {
      prop: 'value',
      event: 'change'
    }
  }
</script>
<style lang="scss" scoped>
  @import '@/assets/styles/table37.scss';
</style>
里面最主要的方法我认为是handleChange这方法,这个方法请求后台接口返回后台的响应值;uploadAction 去填写后台文件上传的接口请求;handlePathChange这个方法去给他触发双向数据绑定数据 最终拿到arr数组,然后我们吧这个数组赋值给我们的**v-model=“formObj.fileList”**然后去提交给后台统一保存 ;echoFile这个方法是为了每次打开新增清空和回显文件 这里我是这样调用的触发 的
/** 修改按钮操作 */
      handleUpdate(row) {
        this.reset()
        this.$nextTick(() => {
          this.$refs['formUpdate'].echoFile([])
        })
        const caseId = row.caseId || this.ids
        getCase(caseId).then(res => {
          this.form = res.data
          const queryData = res.data
          const addRouterTem = this.addRouter
          this.$nextTick(() => {
            this.$refs['formUpdate'].echoFile(res.data.fileList)
          })
          if (this.needTagsView) {
            this.open = true
            this.title = '修改案例'
          } else {
            this.$router.push(
              {
                'path': addRouterTem,
                'query': { formObj: queryData }
              }
            )
          }
        })
      },
后台部分
这里用MultipartFile[] file 数组去接收多个文件
/**
     * 通用上传请求
     */
    @PostMapping("/upload")
    public AjaxResult uploadFile(MultipartFile[] file) throws Exception
    {
        AjaxResult ajax = AjaxResult.success();
        try
        {
            for (MultipartFile f : file) {
                // 上传文件路径
                String filePath = AspDevConfig.getUploadPath();//配置文件yml文件填写的路径
                // 上传并返回新文件名称
                String fileName = FileUploadUtils.upload(filePath, f);
                String url = serverConfig.getUrl() + fileName;//页面访问的全路径
                ajax.put("name", f.getName());
                ajax.put("filePath", fileName);
                ajax.put("url", url);
            }
            return ajax;
        }
        catch (Exception e)
        {
            return AjaxResult.error(e.getMessage());
        }
    }
批量上传多个文件我建议用两个表,一个用主表,一个用来存放文件详细的
在新增的时候互不影响存个主表id就行
 /**
     * 新增案例
     *
     * @param tCase 案例
     * @return 结果
     */
    @Override
    @Transactional(readOnly = false)
    public int insertTCase(TCase tCase) {
        String uuid = UUID.randomUUID().toString();
        tCase.setCreateBy(UserInfoUtil.getUserInfo().getUserID());
        tCase.setCreateTime(DateUtils.getNowDate());
        if (StringUtils.isEmpty(tCase.getCaseId())) {
            tCase.setCaseId(uuid);
        }
        List<TCaseFile> fileList = tCase.getFileList();
        fileList.forEach(t->{
            t.setCaseId(uuid);
            t.setFileId(UUID.randomUUID().toString());
            t.setCreateBy(UserInfoUtil.getUserInfo().getUserID());
            t.setCreateTime(DateUtils.getNowDate());
            tCaseFileMapper.insertTCaseFile(t);
        });
        return tCaseMapper.insertTCase(tCase);
    }
在修改文件的时候我采用的是把所有文件删除,然后在统一在添加上
/**
     * 修改案例
     *
     * @param tCase 案例
     * @return 结果
     */
    @Override
    @Transactional(readOnly = false)
    public int updateTCase(TCase tCase) {
        tCase.setUpdateBy(UserInfoUtil.getUserInfo().getUserID());
        tCase.setUpdateTime(DateUtils.getNowDate());
        //更新之前全部删除文件详细
        tCaseFileMapper.deleteTCaseFileById(tCase.getCaseId());
        List<TCaseFile> fileList = tCase.getFileList();
        fileList.forEach(t->{
            t.setCaseId(tCase.getCaseId());
            t.setFileId(UUID.randomUUID().toString());
            t.setCreateBy(UserInfoUtil.getUserInfo().getUserID());
            t.setCreateTime(DateUtils.getNowDate());
            tCaseFileMapper.insertTCaseFile(t);
        });
        return tCaseMapper.updateTCase(tCase);
    }
基本上就是这么多步骤