问题背景
最近在做一个Vue项目时,在打包上线的时候发现项目部署完第一次访问时间特别慢,整个登录页面加载用了8-10秒,很明显这个速度达不到项目上线的要求,于是开始了对项目打包之后增快加载速度的研究。

未优化前的项目加载时间,都在7秒以上,而且包文件特别大。
寻找问题及解决问题
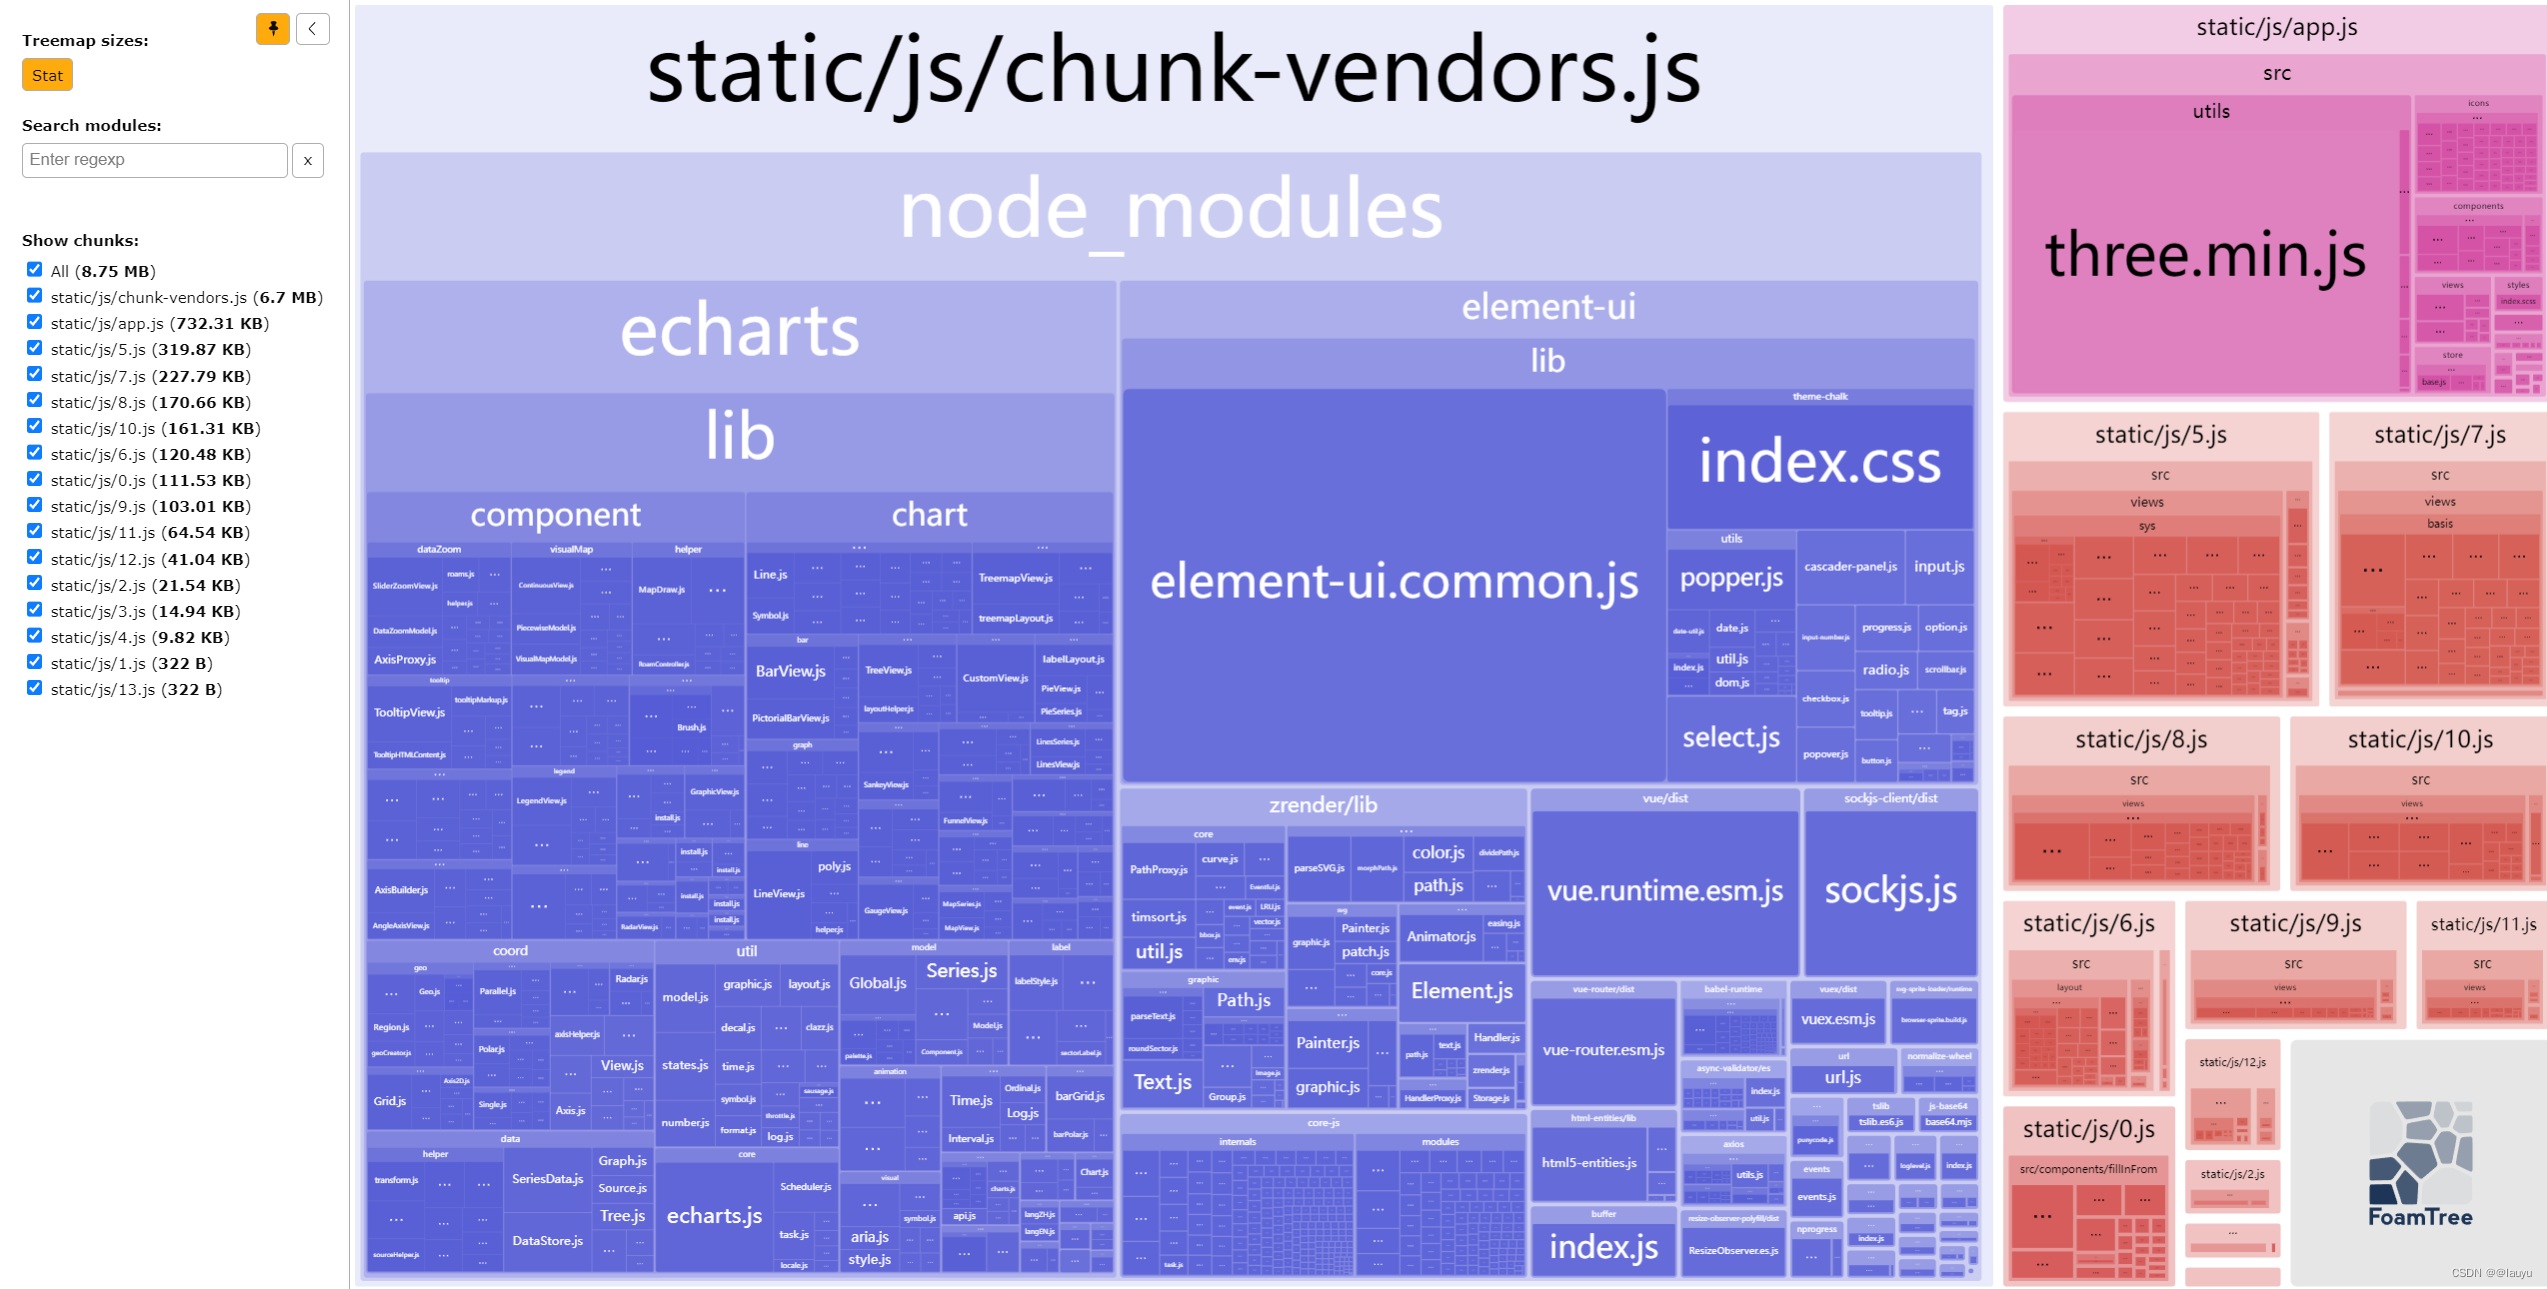
- 先安装了webpack-bundle-analyzer工具,对打包文件大小进行分析监测。
//安装
npm install webpack-bundle-analyzer -S
//在vue.config.js文件中引用
const BundleAnalyzerPlugin = require('webpack-bundle-analyzer').BundleAnalyzerPlugin;
//在plugins中使用
plugins: [new BundleAnalyzerPlugin()]
通过对打包之后的文件大小进行分析,发现其中three.js,echarts等模块占用空间比较大,同时我对代码进行了排查,发现对这两个模块都是进行的全部引入,但是实际上很多东西都没有使用,于是我对这些模块进行删减,改为部分引入,从而减少包文件的大小,同时将一些没有使用的模块进行删除,从而优化整体包文件的大小。

经过以上模块删减之后,的确访问速度有了一些提升,但是效果不是明显,大概加快了1-2秒左右,对于这个系统来说肯定是还不够的,于是研究之后对打包之后的文件进行压缩。
- 安装compression-webpack-plugin工具,对打包之后的文件进行gzip压缩,同时配合nginx进行配置。
//安装工具
npm install compression-webpack-plugin -S
//引入工具
const CompressionPlugin = require('compression-webpack-plugin');
//使用工具
 plugins: [
            new CompressionPlugin({
                algorithm: 'gzip', // 使用gzip压缩
                test: /\.js$|\.html$|\.css$/, // 匹配文件名
                filename: '[path].gz[query]', // 压缩后的文件名(保持原文件名,后缀加.gz)
                minRatio: 1, // 压缩率小于1才会压缩
                threshold: 10240, // 对超过10k的数据压缩
                deleteOriginalAssets: false, // 是否删除未压缩的源文件,谨慎设置,如果希望提供非gzip的资源,可不设置或者设置为false(比如删除打包后的gz后还可以加载到原始资源文件)
            }),
        ]
安装工具的时候可以会出现以下报错,大概意思呢就是说你的webpack版本和这个工具的版本不匹配,只要在安装工具的时候指定一下版本或者在安装命令后面加上 --legacy-peer-deps 这个语句,就能解决这个问题。
–legacy-peer-deps的作用
在NPM v7中,现在默认安装peerDependencies。
在很多情况下,这会导致版本冲突,从而中断安装过程。
–legacy-peer-deps标志是在v7中引入的,目的是绕过peerDependency自动安装;它告诉 NPM 忽略项目中引入的各个modules之间的相同modules但不同版本的问题并继续安装,保证各个引入的依赖之间对自身所使用的不同版本modules共存。
npm ERR! code ERESOLVE
npm ERR! ERESOLVE could not resolve
npm ERR!
npm ERR! While resolving: shopcar-demo@0.1.0
npm ERR! Found: webpack@5.72.0
npm ERR! node_modules/webpack
npm ERR!   peer webpack@"^4.0.0 || ^5.0.0" from @soda/friendly-errors-webpack-plugin@1.8.1
npm ERR!   node_modules/@soda/friendly-errors-webpack-plugin
npm ERR!     @soda/friendly-errors-webpack-plugin@"^1.8.0" from @vue/cli-service@5.0.4
npm ERR!     node_modules/@vue/cli-service
npm ERR!       peer @vue/cli-service@"^3.0.0 || ^4.0.0 || ^5.0.0-0" from @vue/cli-plugin-babel@5.0.4
npm ERR!       node_modules/@vue/cli-plugin-babel
npm ERR!         dev @vue/cli-plugin-babel@"~5.0.0" from the root project
npm ERR!       4 more (@vue/cli-plugin-eslint, @vue/cli-plugin-router, ...)
npm ERR!   webpack@"^5.54.0" from @vue/cli-plugin-babel@5.0.4
npm ERR!   node_modules/@vue/cli-plugin-babel
npm ERR!     dev @vue/cli-plugin-babel@"~5.0.0" from the root project
npm ERR!   17 more (@vue/cli-plugin-eslint, @vue/cli-service, ...)
npm ERR!
npm ERR! Could not resolve dependency:
npm ERR! less-loader@"5.0.0" from the root project
npm ERR!
npm ERR! Conflicting peer dependency: webpack@4.46.0
npm ERR! node_modules/webpack
npm ERR!   peer webpack@"^2.0.0 || ^3.0.0 || ^4.0.0" from less-loader@5.0.0
npm ERR!   node_modules/less-loader
npm ERR!     less-loader@"5.0.0" from the root project
npm ERR!
npm ERR! Fix the upstream dependency conflict, or retry
npm ERR! this command with --force, or --legacy-peer-deps
npm ERR! to accept an incorrect (and potentially broken) dependency resolution.
npm ERR!
npm ERR! See C:\Users\admin\AppData\Local\npm-cache\eresolve-report.txt for a full report.

npm ERR! A complete log of this run can be found in:
npm ERR!     C:\Users\admin\AppData\Local\npm-cache\_logs\2022-05-07T09_45_32_750Z-debug-0.log
经过以上配置之后,你会发现打包之后的dist/js文件夹里面出现了一些.gz格式的文件,这个就是拆解压缩之后文件包,他们文件都比较小,之后我们还需要nginx的配置文件进行配置,配置代码如下
server {
    listen       80;
    listen  [::]:80;
    server_name  localhost;

    #access_log  /var/log/nginx/host.access.log  main;

    gzip  on;
    # 设置缓冲区大小
    gzip_buffers 4 16k;

    #压缩级别官网建议是6
    gzip_comp_level 6;
    #压缩的类型
    gzip_types text/plain application/javascript text/css application/xml text/javascript application/x-httpd-php;

    location / {
        root   /usr/share/nginx/html;
        index  index.html index.htm;
    }
开启gzip模式,配置压缩级别和压缩类型,到这一步就差不多可以了,现在我们再查看一下项目的访问速度:

这里我们可以看到,时间被压缩到2秒以内,访问速度达到了很大的提升,也符合了我们项目上线的要求,至此项目的访问速度优化就到这里结束了。
如果大家觉得不错,请给上点赞、收藏、关注吧。