组件生命周期的引出
组件的渲染: ReactDOM.render(<Life/>,document.getElementById('test'))
组件的卸载:ReactDOM.unmountComponentAtNode(document.getElementById('test'))
组件实例被创建之后会调用组件实例原型上的render函数,同时也会调用componentDidMount函数:
componentDidMount():组件挂载完毕之后进行调用。它和render()一样都是由组件实例对象调用的,所以this也是组件实例对象。componentWillUnmount():组件将要卸载时进行调用。this是组件实例对象。
实现效果:(组件实现渐变效果,点击按钮可以卸载组件)

该效果就可以使用上面提及的函数实现
<!DOCTYPE html>
<html lang="en">
<head>
    <meta charset="UTF-8">
    <meta http-equiv="X-UA-Compatible" content="IE=edge">
    <meta name="viewport" content="width=device-width, initial-scale=1.0">
    <title>字符串ref</title>
</head>
<body>
    <!-- 容器 -->
    <div id="test"></div>

    <script type="text/javascript" src="../js/react.development.js"></script>
    <script type="text/javascript" src="../js/react-dom.development.js"></script>
    <script type="text/javascript" src="../js/babel.min.js"></script>

    <script type="text/babel">
        //  <!-- 1.创建类式组件 -->
        class Life extends React.Component{
            state = {opacity:1}
            // 作为回调使用,要使用箭头函数
            death = ()=>{
                //  卸载组件(在哪个节点中的组件要被卸载)
                ReactDOM.unmountComponentAtNode(document.getElementById('test'))
            }

            // 组件挂载完毕之后进行调用
            componentDidMount(){
                this.timer = setInterval(()=>{
                    let {opacity} = this.state
                    opacity -= 0.1
                    if(opacity<=0) opacity = 1
                    this.setState({opacity})
                },200)
            }
            // 组件卸载之前进行调用
            componentWillUnmount(){
                // 卸载组件之前进行清空
                clearInterval(this.timer)
            }
            // 组件挂载完毕之后进行调用一次,状态更新之后也调用
            render(){
                return (
                    <div>
                        <h2 style={{opacity:this.state.opacity}}>渐变显示</h2>
                        <button onClick={this.death}>点我unmount卸载组件</button>
                    </div>
                )
            }

        }
        // <!--2.渲染虚拟DOM到页面 -->
        ReactDOM.render(<Life/>,document.getElementById('test'))
    </script>
</body>
</html>
像componentDidMount()、render() 这样的函数就是生命周期回调函数(或生命周期钩子函数、生命周期钩子)
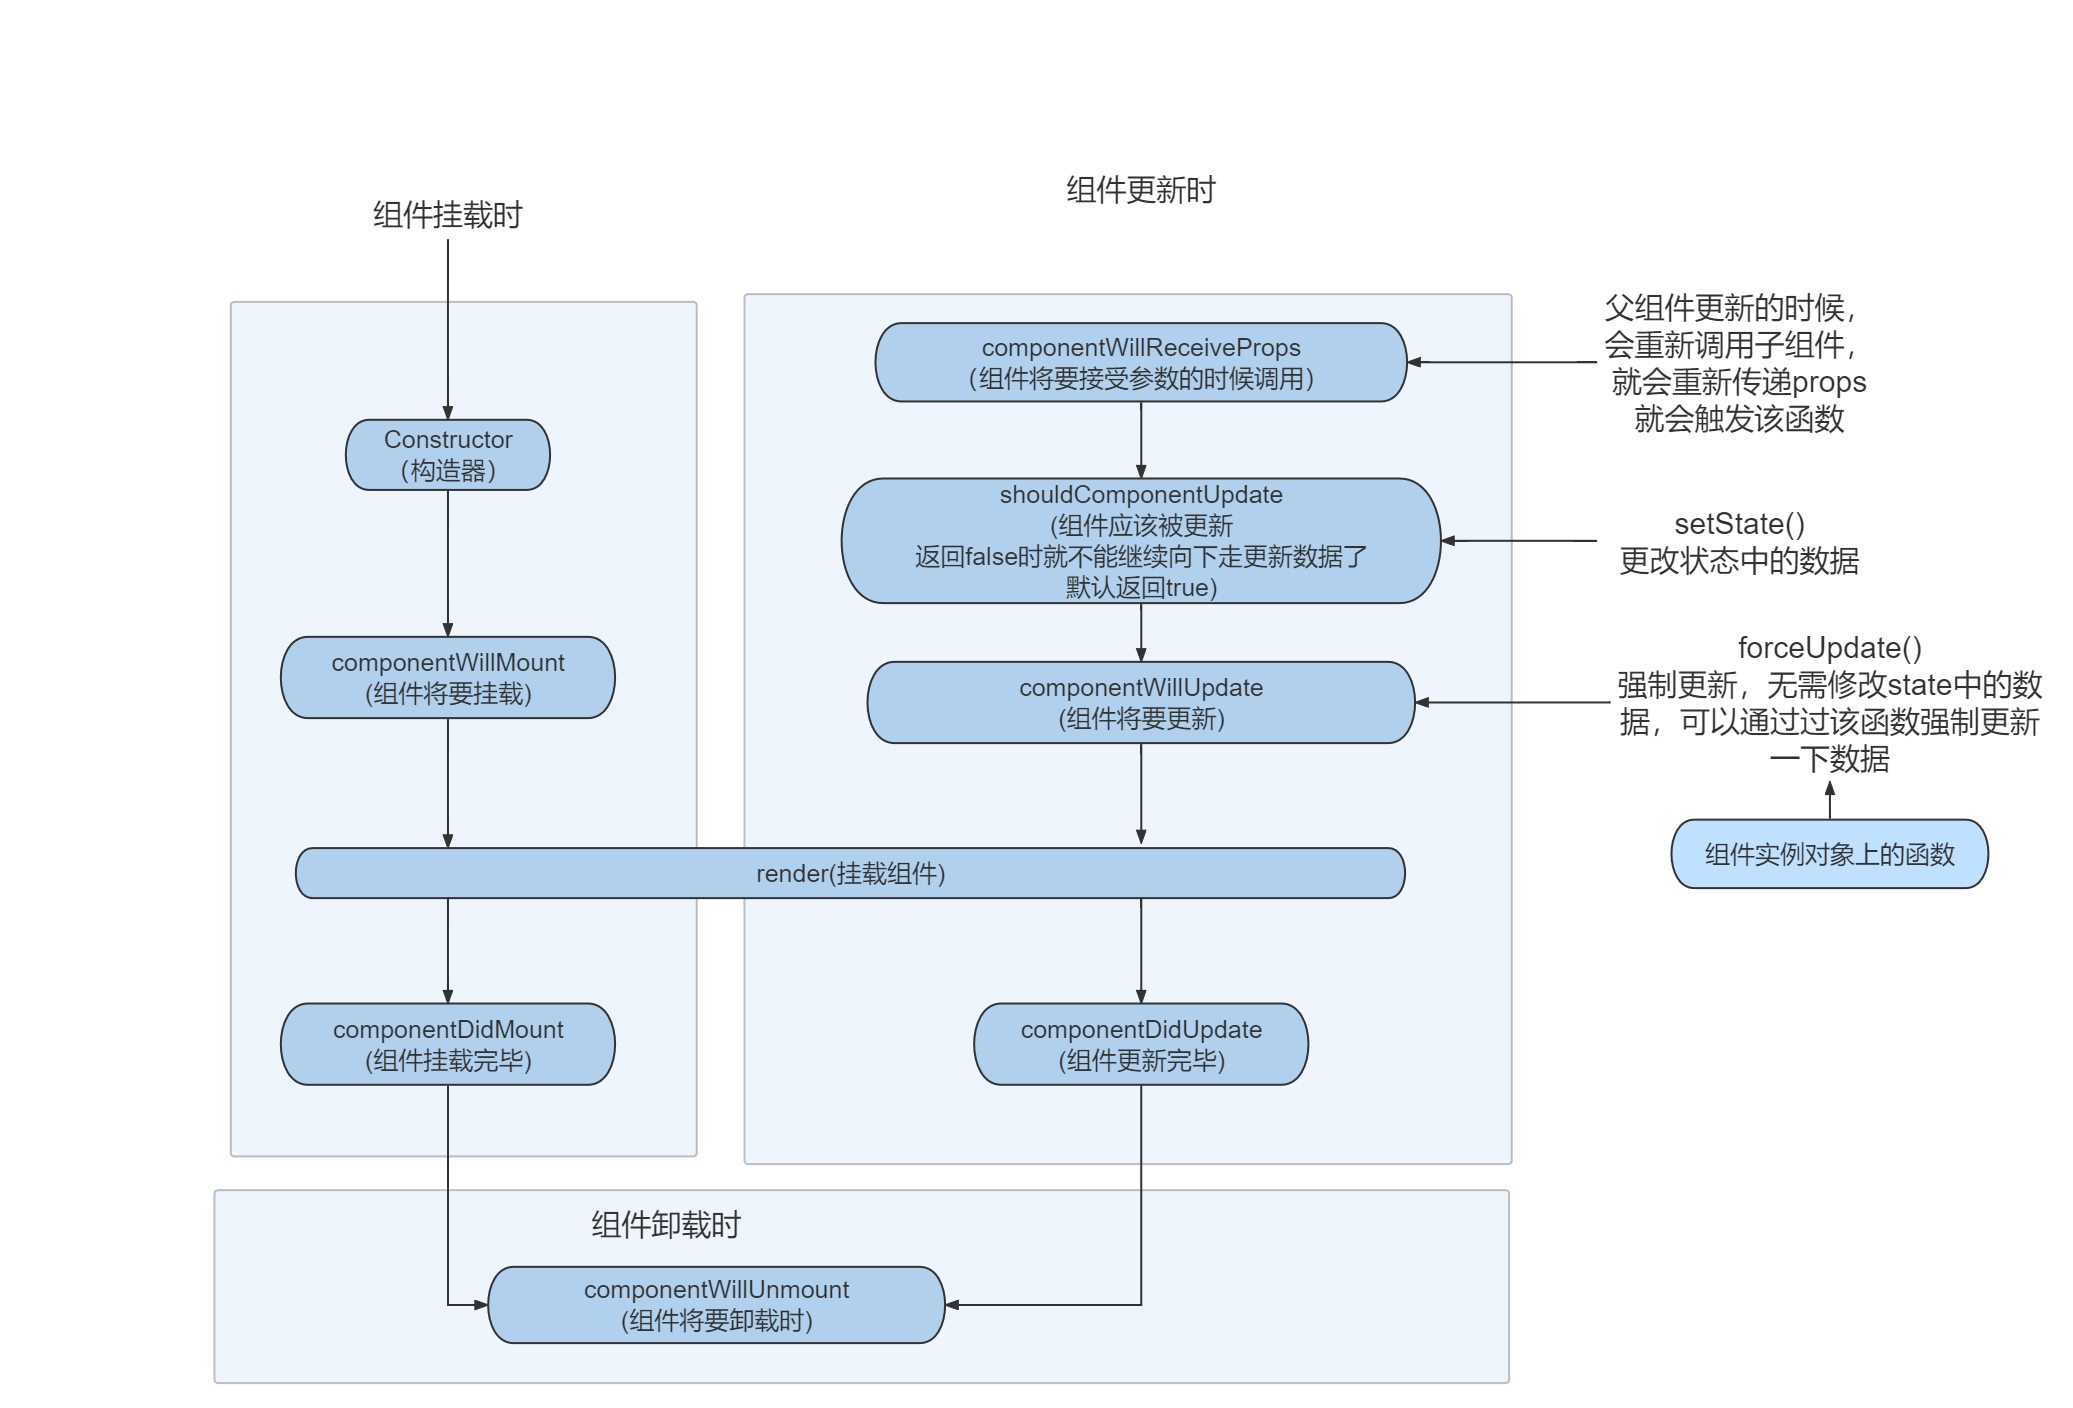
组件的生命周期(旧)
组件从创建到死亡会经历一些特定的阶段,React组件中包含一系列勾子函数(生命周期回调函数), 会在特定的时刻调用。我们在定义组件时,会在特定的生命周期回调函数中,做特定的工作。

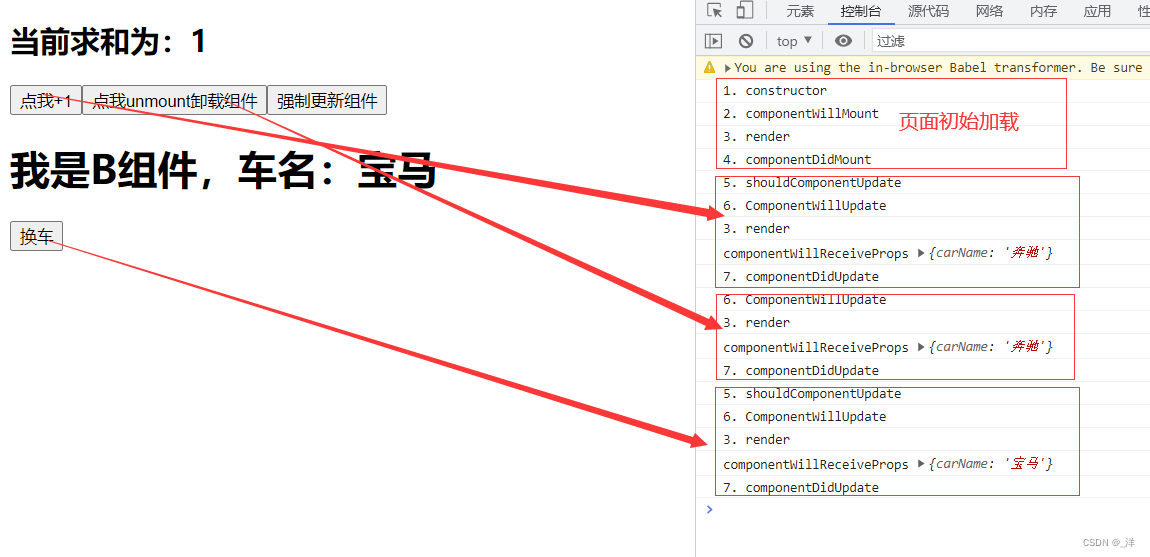
实例:
<!DOCTYPE html>
<html lang="en">
<head>
    <meta charset="UTF-8">
    <meta http-equiv="X-UA-Compatible" content="IE=edge">
    <meta name="viewport" content="width=device-width, initial-scale=1.0">
    <title>字符串ref</title>
</head>
<body>
    <!-- 容器 -->
    <div id="test"></div>

    <script type="text/javascript" src="../js/react.development.js"></script>
    <script type="text/javascript" src="../js/react-dom.development.js"></script>
    <script type="text/javascript" src="../js/babel.min.js"></script>

    <script type="text/babel">
        //  <!-- 1.创建类式组件 -->
        class Count extends React.Component{
            // 1.构造器钩子
            constructor(props){
                super(props)
                console.log('1. constructor');
            }

            state = {
                count: 0,
                carName:'奔驰'
            }

            // 回调函数
            add = ()=>{
                let {count} = this.state
                count+=1
                this.setState({count})
            }
            death = ()=>{
                //  卸载组件
                ReactDOM.unmountComponentAtNode(document.getElementById('test'))
            }
            force = ()=>{
                // 组件实例对象上的函数
                this.forceUpdate()
            }
            changeCar = ()=>{
                this.setState({carName:"宝马"})
            }

            // 2.组件挂载前钩子
            componentWillMount(){
                console.log('2. componentWillMount')
            }
            // 4.组件挂载完钩子
            componentDidMount(){
                console.log('4. componentDidMount')
            }
            // 5.组件是否应该被更新---阀门
            // status中的数据进行更新后会先判断shouldComponentUpdate的返回值是否为true,为true才进行更新
            // shouldComponentUpdate的默认返回值为true
            shouldComponentUpdate(){
                console.log('5. shouldComponentUpdate')
                return true
            }
            // 6.组件将要更新
            componentWillUpdate(){
                console.log('6. ComponentWillUpdate')
                return true
            }
            // 7.组件更新完的钩子
            componentDidUpdate(){
                console.log('7. componentDidUpdate')
            }
            // 9.组件卸载之前进行调用
            componentWillUnmount(){
                console.log('9. componentWillUnmount')
            }
            // 3.render钩子
           render(){
            console.log('3. render')
            let {count}= this.state
             return(
                <div>
                    <h2>当前求和为:{count}</h2>
                    <button onClick ={this.add}>点我+1</button>
                    <button onClick={this.death}>点我unmount卸载组件</button>
                    <button onClick={this.force}>强制更新组件</button>
                    <B carName={this.state.carName}/>
                    <button onClick={this.changeCar}>换车</button>

                </div>
             )
           }
        }
        class B extends React.Component{
            // 组件将要接受props的时候调用
            // 但是初始化渲染的时候即第一次接收参数时不会触发该钩子
            componentWillReceiveProps(props){
                console.log('componentWillReceiveProps',props)
            }
            render(){
                return(
                    <div>
                        <h1>我是B组件,车名:{this.props.carName}</h1>
                    </div>
                )
            }
        }
        // <!--2.渲染虚拟DOM到页面 -->
        ReactDOM.render(<Count/>,document.getElementById('test'))

    </script>
</body>
</html>

小结
初始化阶段:由ReactDOM.render()触发—初次渲染- constructor()
- componentwillMount()
render() =====>必用componentDidMount() =====>常用
一般在这个钩子中做一些初始化的事,例如:开启定时器、发送网络请求、订阅消息
更新阶段:由组件内部this.setSate()或父组件render触发- shouldComponentUpdate()
- componentwillUpdate()
- render()
- componentDidUpdate()
卸载组件:由ReactDOM.unmountComponentAtNode()触发componentwillUnmount()=====>常用
一般在这个钩子中做一些收尾的事,例如:关闭定时器、取消订阅消息
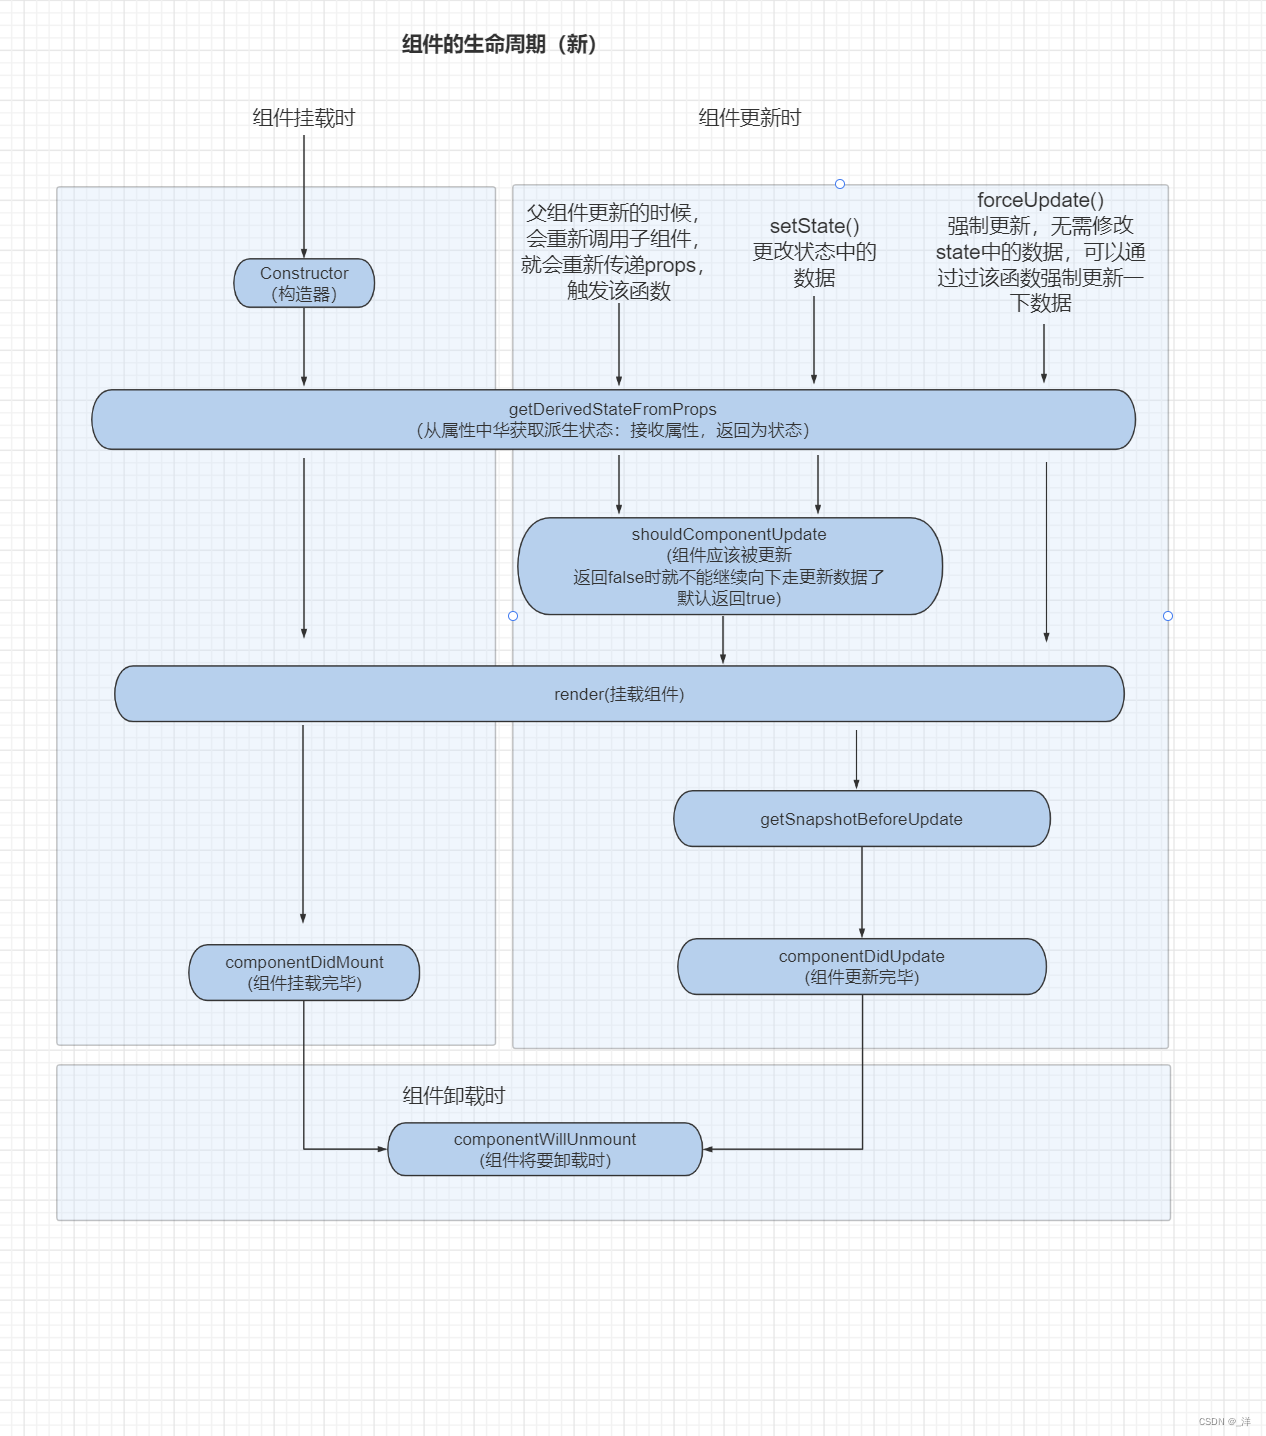
组件的生命周期(新)
componentWillMount()
componentWillUpdate()
componentWillReceiveProps(props)
三个组件分别改名为:
UNSAFE_componentWillMount()
UNSAFE_componentWillUpdate()
UNSAFE_componentWillReceiveProps(props)
可以继续使用。
流程图:

getDerivedStateFromProps
从属性中华获取派生状态
- 使用时间:
getDerivedStateFromProps会在调用 render 方法之前调用,并且在初始挂载及后续更新时都会被调用。 - 调用: 这个勾子不是给实例用的,定需要义在类上(static)
- 参数:
参数1: 可以接收props属性,并将props属性转换成state对象,state的值在任何时候都取决于props
参数2: 可以接收state属性,获取状态中的值。 - 返回值:
getDerivedStateFromProps的返回值是一个状态对象,如果有状态中有同名属性就会替换state中的属性值。 因为在数据更新时也会调用该函数,所以如果后续该属性值进行更新,其值的情况也是取决于getDerivedStateFromProps的返回值。
使用概率比较低。
getSnapshotBeforeUpdate
在更新前获取快照。
该函数必须返回一个快照值(Snapshot),快照值可以是任何数据类型,快照值(return值)会传递给componentDidUpdate作为它的第三个参数。我们一般将需要保存的更新之前的值的变量进行return。
eg:=
getSnapshotBeforeUpdate(){
console.log('getSnapshotBeforeUpdate')
    return 'yang'
}
componentDidUpdate(preProps,preState,snapshotValue){
    console.log('7. componentDidUpdate',preProps,preState,snapshotValue)
}
componentDidUpdate的参数:
preProps:更新前的属性值
preState:更新前的状态值
snapshotValue:快照值(getSnapshotBeforeUpdate的返回值)
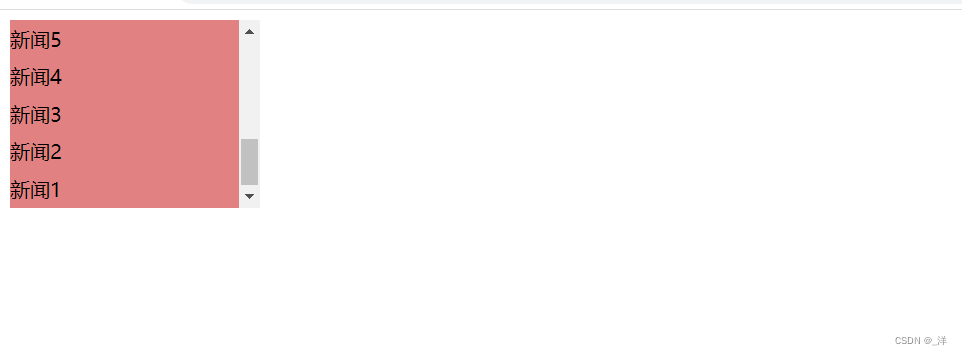
getSnapshotBeforeUpdate案例
<!DOCTYPE html>
<html lang="en">
<head>
    <meta charset="UTF-8">
    <meta http-equiv="X-UA-Compatible" content="IE=edge">
    <meta name="viewport" content="width=device-width, initial-scale=1.0">
    <title>字符串ref</title>
    <style>
        .list{
            width:200px;
            height:150px;
            background-color:lightcoral;
            overflow: auto;
        }
        .news{
            height: 30px;
        }
    </style>
</head>
<body>
    <!-- 容器 -->
    <div id="test"></div>

    <script type="text/javascript" src="../js/17.0.1/react.development.js"></script>
    <script type="text/javascript" src="../js/17.0.1/react-dom.development.js"></script>
    <script type="text/javascript" src="../js/17.0.1/babel.min.js"></script>

    <script type="text/babel">
        class NewsList extends React.Component{
            state = {
                newArr:[]
            }
            componentDidMount(){
                setInterval(()=>{
                    // 获取数据状态
                    const {newArr} = this.state
                    // 模拟一条新闻
                    const news = '新闻'+ (newArr.length + 1)
                    this.setState({newArr:[news,...newArr]})
                },1000)
            }
            getSnapshotBeforeUpdate(){
                return this.refs.list.scrollHeight
            }
            componentDidUpdate(perProp,perState,height){
                // 保留新闻停留位置
                this.refs.list.scrollTop += this.refs.list.scrollHeight - height
            }

            render(){
                return (
                    <div className="list" ref="list">
                        {
                            this.state.newArr.map((n,index)=>{
                                return <div className="news" key={index}>{n}</div>
                            })
                        }
                    </div>
                )
            }
        }

        ReactDOM.render(<NewsList/>,document.getElementById('test'))

    </script>
</body>
</html>

小结
- 初始化阶段:由ReactDOM.render()触发——初次渲染
- constructor()
- getDerivedStateFromProps()
render() =====>必用componentDidMount() =====>常用
一般在这个钩子中做一些初始化的事,例如:开启定时器、发送网络请求、订阅消息
- 更新阶段:由组件内部
this.setSate()或父组件render触发- getDerivedStateFromProps()
- shouldComponentUpdate()
- render()
- getSnapshotBeforeUpdate()
- componentDidUpdate()
- 卸载组件:由
ReactDOM.unmountComponentAtNode()触发componentwillUnmount()=====>常用
一般在这个钩子中做一些收尾的事,例如:关闭定时器、取消订阅消息