一、Vue简介
1.1 简介
Vue (读音 /vju?/,类似于 view) 是一套用于构建用户界面的渐进式的js框架,发布于 2014 年 2 月。与其它大型框架不同的是,Vue 被设计为可以自底向上逐层应用。Vue 的核心库只关注视图层,不仅易于上手,还便于与第三方库(如:vue-router,vue-resource,vuex)或既有项目整合。
1.2 MVVM 模式的实现者——双向数据绑定模式
Model:模型层,在这里表示 JavaScript 对象
View:视图层,在这里表示 DOM(HTML 操作的元素)
ViewModel:连接视图和数据的中间件,Vue.js 就是 MVVM 中的 ViewModel 层的实现者?

这里 核心就是 ViewModel 里面有DOM监听以及数据绑定,View是页面数据展示 Model也就是前面data里定义的,通过Vue来实现各种快捷功能,我们用普通js写的话 得写一大串Js代码;
mvvm设计模式 这里的
第一个m是 model 也就是vm的data属性
第二个v是 view 视图 网页模版
最后vm就是中间vue的 viewmodel 代码体现就是vm对象或者vm实例;
1.3 其它 MVVM 实现者
AngularJS
简单介绍一下,AngularJS诞生于2009年,由Misko Hevery 等人创建,后为Google所收购。是一款优秀的前端JS框架,已经被用于Google的多款产品当中。AngularJS有着诸多特性,最为核心的是:MVVM、模块化、自动化双向数据绑定、语义化标签、依赖注入等等。
ReactJS
React引入了虚拟DOM(Virtual DOM)的机制:在浏览器端用Javascript实现了一套DOM API。基于React进行开发时所有的DOM构造都是通过虚拟DOM进行,每当数据变化时,React都会重新构建整个DOM树,然后React将当前整个DOM树和上一次的DOM树进行对比,得到DOM结构的区别,然后仅仅将需要变化的部分进行实际的浏览器DOM更新。
微信小程序
微信小程序的视图层和数据层就是通过MVVM进行绑定的。
1.4 为什么要使用 Vue.js
轻量级,体积小是一个重要指标。Vue.js 压缩后有只有 20多kb (Angular 压缩后 56kb+,React 压缩后 44kb+)
移动优先。更适合移动端,比如移动端的 Touch 事件
易上手,学习曲线平稳,文档齐全
吸取了 Angular(模块化)和 React(虚拟 DOM)的长处,并拥有自己独特的功能,如:计算属性
开源,社区活跃度高
1.5 Vue.js 的两大核心要素
1.5.1 数据驱动
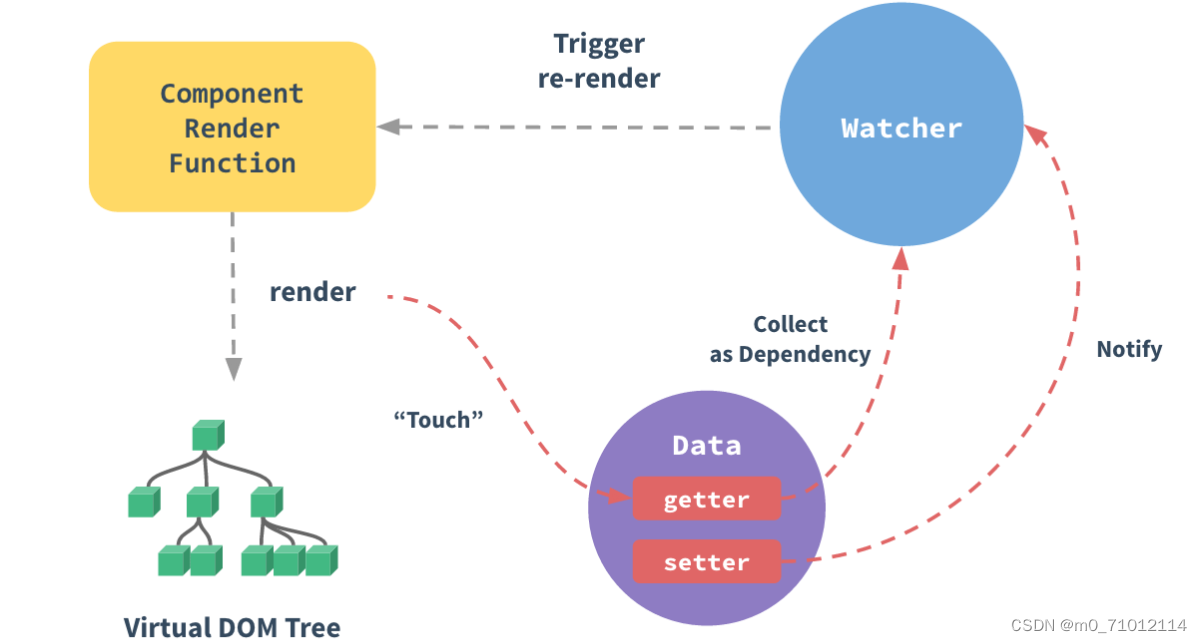
当你把一个普通的 JavaScript 对象传给 Vue 实例的 data 选项,Vue 将遍历此对象所有的属性,并使用 Object.defineProperty 把这些属性全部转为 getter/setter。Object.defineProperty 是 ES5 中一个无法 shim 的特性,这也就是为什么 Vue 不支持 IE8 以及更低版本浏览器。
这些 getter/setter 对用户来说是不可见的,但是在内部它们让 Vue 追踪依赖,在属性被访问和修改时通知变化。这里需要注意的问题是浏览器控制台在打印数据对象时 getter/setter 的格式化并不同,所以你可能需要安装 vue-devtools 来获取更加友好的检查接口。
每个组件实例都有相应的 watcher 实例对象,它会在组件渲染的过程中把属性记录为依赖,之后当依赖项的 setter 被调用时,会通知 watcher 重新计算,从而致使它关联的组件得以更新。
1.5.2 组件化
页面上每个独立的可交互的区域视为一个组件
每个组件对应一个工程目录,组件所需的各种资源在这个目录下就近维护
页面不过是组件的容器,组件可以嵌套自由组合(复用)形成完整的页面
二、Vue的初体验
2.1在页面引入vue的js文件即可。
注意:cdn是一种加速策略,能够快速的提供js文件
?<script src="https://cdn.jsdelivr.net/npm/vue@2.6.12/dist/vue.js"></script>2.2 在页面中绑定vue元素
创建一个div,id是app
<div id="app"></div>2.3 创建vue对象,设计对象的内容
其中该vue对象,绑定了页面中id是app的那个div
<script>
        new Vue({
            el:"#app",
            data:{
                title:"hello vue!",
 ? ? ? ? ? ? ? ? ?args1:"hi!",
 ? ? ? ? ? ? ? ? age:18,
 ? ? ? ? ? ? ? ?flag:true
            }
        });
</script>
# el: element的简称,也就是Vue实例挂载的元素节点,值可以是 CSS 选择符,或实际 HTML 元素,或返回 HTML 元素的函数。
# data: 用于提供数据的对象,里面存放键值对数据。说明:
这里有几点重要说明:
new Vue 我们创建了Vue对象;
el 指定了绑定DOM,接管DOM操作;
data:用于提供数据的对象,里面存放键值对数据
v-model 重点 可以实现数据双向绑定,改变了这里的值,其他地方也根据改变;
{{xxxxx}} 显示数据;
2.4 在页面的元素中使用插值表达式来使用vue对象中的内容
<div id="app">
    {{ title }}
</div>
三、 插值表达式
插值表达式的作用是在View中获得Model中的内容
Model中的内容如下:
new Vue({
        el:"#app",
        data:{
            title:"hello world!"
        },
        methods:{
            sayHello:function(){
                return "hello vue";
            }
        }
    });
3.1 简单使用插值表达式获取数据
<div id="app">
    {{title}}
</div>
此时,页面上将会显示"Hello world!"
3.2 在插值表达式中获取数组中的内容
<div id="app">
    {{[1,2,3,4][2]}}
</div>
此时,页面上会显示“3”,也就是数组中的第三个元素被获取。
3.3 使用插值表达式获取对象中的属性
<div id="app">
    {{ {"name":"xiaoyu","age":20}.age }}
</div>
此时,页面上会显示“20”,也就是对象中age属性的值。
3.4 使用插值表达式调用Vue中的方法
<div id="app">
        {{ sayHello()}}
</div>
此时,页面上会显示“hello vue”,也就是调用了vue对象中的sayHello方法,并展示了方法的返回值。
3.5Vue对象总结?
Vue.js通过加载js,实现对页面的快速渲染。vue封装的js该如何使用? 就必须了解MVVM双向数据绑定模式。Vue将视图层和数据层分离,通过MVVM建立视图层和数据层的连接。其中,插值表达式是一种连接方式,可以通过插值表达式以多种方式,快速的从数据层获取数据并展示在视图层上。数据层Vue对象,也是由很多部分组成,比如之前介绍的el,data,methods等,以及之后要介绍的mount,computed等。
四、Vue的分支 v-if
4.1 v-if
Vue中的分支语句v-if非常好理解,逻辑跟Java中的if-else相同。v-if语句块包含以下内容:
v-if
v-else
v-else-if
接下来以一个简单例子即可理解:
<html>
    <head>
        <meta charset="utf-8">
        <title></title>
    </head>
    <body>
        <div id="app">
            <p v-if="flag">
                今天天气很舒服!
            </p>
            <p v-else-if="rich">
                今天天气很燥热!晚上要去放松一下!
            </p>
            <p v-else="rich">
                晚上只能自嗨!
            </p>
        </div>

    </body>
 ?<script src="https://cdn.jsdelivr.net/npm/vue@2.6.12/dist/vue.js"></script>
    <script>
        new Vue({
            el:'#app',
            data:{
                flag:false,
                rich:false
            },
            methods:{
            }
        });
    </script>
</html>
从这个例子可以看出,vue对象中的data提供了分支的条件。根据条件,如果是true,则v-if的内容就会显示,反之不显示。
4.2 v-show
v-if和v-show之间有着看似相同的效果,但优化上却有区别。先看下面这个例子:
<html>
    <head>
        <meta charset="utf-8">
        <title></title>
    </head>
    <body>
            <p v-show="rich">
                有钱!
            </p>
            <p v-if="rich">
                有钱!
            </p>
            <button type="button" @click="rich=!rich">今晚彩票开奖</button>
        </div>

    </body>
 ?<script src="https://cdn.jsdelivr.net/npm/vue@2.6.12/dist/vue.js"></script>
    <script>
        new Vue({
            el:'#app',
            data:{
                flag:false,
                rich:false
            },
            methods:{

            }
        });
    </script>
</html>
通过点击“今晚彩票开奖”按钮,能切换rich的值,此时发现,v-if和v-show的显示状态都会来回切换。看起来是一样的,但通过查看控制台代码发现,v-show实际会将p标签的css样式的display属性设为none来达到隐藏的效果。?

而v-if是直接在页面上添加和删除p标签来达到效果,因此v-show在反复切换的应用场景下,效率比v-if更高。
五、Vue的循环 v-for
Vue中的循环关键字并没有Java的那么多,只有v-for,但用法上有多种。接下来我们来逐一介绍。
5.1 普通的for循环
我们需要定义数据源,然后通过v-for来遍历数据源,再使用差值表达式输出数据。
<body>
<div id="app">
 ? ?<ul>
 ? ? ? ?<li v-for="item in items">{{item.date}}</li>
 ? ?</ul>
</div>
</body>
 ?<script src="https://cdn.jsdelivr.net/npm/vue@2.6.12/dist/vue.js"></script>
<script>
 ? ?new Vue({
 ? ? ? ?el:'#app',
 ? ? ? ?data:{
 ? ? ? ? ? ?items:[1,2,3,4,5,6]
 ? ? ?  }
 ?  });
</script>
在这个例子中,数据源提供了一个数组。视图层通过v-for来循环输出多个li标签,非常简单。
5.2 带着索引的for
<body>
<div id="app">
 ? ?<ul>
 ? ? ? ?<li v-for=" (a,i)  in  args" :key='i'>{{i}}{{a}}</li>
 ? ?</ul>
</div>
</body>
<script src="https://cdn.bootcss.com/vue/2.6.10/vue.js"></script>
<script>
 ? ?new Vue({
 ? ? ? ?el:'#app',
 ? ? ? ?data:{
 ? ? ? ? ? ?args:[1,2,3,4,5,6]
 ? ? ?  }
 ?  });
</script>
此时的i就是每次循环的循环变量 ,从0开始一直到元素个数-1
5.3 遍历一个对象中的信息: value、name、index
<body>
<div id="app">
 ? ?<ul>
 ? ? ? ?<li v-for="(value,name,index) in student">{{name}}--{{value}}--{{index}}</li>
 ? ?</ul>
</div>
</body>
<script src="https://cdn.bootcss.com/vue/2.6.10/vue.js"></script>
<script>
 ? ?new Vue({
 ?      el:'#app',
 ?      data:{
 ? ? ?      student:{
 ? ? ? ? ?      username:'小鱼',
                age:20,
                girl:'如花'
 ? ? ?      }
 ?      }
    });
</script>
value、name、index 这几个字符可以自己定义,分别表示每次循环内容的值、键、序号。
value: 循环中每条数据的值 小鱼、20、如花
name: 循环中每天数据的键 username、age、girl
index: 循环的序号,从0开始
| 页面效果如下: |
|---|
5.4 遍历对象数组:嵌套的for循环
<body>
<div id="app">
 <table style="border: 1px solid black">
 ? ? ? ? ? ?<tr>
 ? ? ? ? ? ? ? ?<th>姓名</th>
 ? ? ? ? ? ? ? ?<th>年龄</th>
 ? ? ? ? ? ? ? ?<th>联系方式</th>
 ? ? ? ? ? ?</tr>
 ? ? ? ? ? ?<tr v-for="(stu,index) in students" v-bind:key="index">
 ? ? ? ? ? ? ? ?<td>{{stu.name}}</td>
 ? ? ? ? ? ? ? ?<td>{{stu.age}}</td>
 ? ? ? ? ? ? ? ?<td>{{stu.phone}}</td>
 ? ? ? ? ? ?</tr>
 ? ? ? ?</table>
</div>
</body>
 ?<script src="https://cdn.jsdelivr.net/npm/vue@2.6.12/dist/vue.js"></script></script>
<script>
 ? ?new Vue({
 ?      el:'#app',
 ?      data:{
 ? ? ?       students:[
 ? ? ? ? ? ? ?  {
 ? ? ? ? ? ? ? ? ? ?name:'zs',
 ? ? ? ? ? ? ? ? ? ?age:18,
 ? ? ? ? ? ? ? ? ? ?phone:'111'
 ? ? ? ? ? ? ?  },
 ? ? ? ? ? ? ?  {
 ? ? ? ? ? ? ? ? ? ?name:'ls',
 ? ? ? ? ? ? ? ? ? ?age:18,
 ? ? ? ? ? ? ? ? ? ?phone:'222'
 ? ? ? ? ? ? ?  },{
 ? ? ? ? ? ? ? ? ? ?name:'ww',
 ? ? ? ? ? ? ? ? ? ?age:18,
 ? ? ? ? ? ? ? ? ? ?phone:'333'
 ? ? ? ? ? ? ?  }
 ? ? ? ? ?  ]
 ?      }
    });
</script>
可以清楚的看到,此时数据源是一个student数组,通过两层v-for循环,外层遍历数组中的每个student对象,内层v-for遍历每个对象的v、k、i。
六、Vue的属性绑定
Vue提供了多个关键字,能快速的将数据对象中的值绑定在视图层中。
6.1 v-model
通过v-model将标签的value值与vue对象中的data属性值进行绑定。
<html>
    <head>
        <meta charset="utf-8" />
        <title></title>
    </head>
    <body>
        <div id="app">
            <input type="text" v-model="title">
            {{title}}
        </div>
    </body>
 ?<script src="https://cdn.jsdelivr.net/npm/vue@2.6.12/dist/vue.js"></script>
        new Vue({
            el:'#app',
            data:{
                title:"hello vue"
            }

        })
    </script>
</html>此时input标签中加入了“v-model='title'”,表示input的value值与vue对象中的title属性绑定,当在input输入框中输入内容会实时修改title的值。于是{{title}}插值表达式能实时输出input输入框内的值。
| 页面效果如下: |
|---|
 |
?6.2 v-bind
我们知道插值表达式是不能写在html的标签的属性内的,那如果一定要用vue中的属性作为html标签的属性的内容,就可以通过v-bind进行属性绑定。
<html>
    <head>
        <meta charset="utf-8" />
        <title></title>
    </head>
    <body>
        <div id="app">
            <a v-bind:href="link"></a>
        </div>
    </body>
 ?<script src="https://cdn.jsdelivr.net/npm/vue@2.6.12/dist/vue.js"></script>
        new Vue({
            el:'#app',
            data:{
                link:'http://www.baidu.com'
            }
        })
    </script>
</html>
这样,a标签内的href属性就可以使用vue对象中的属性值。
注意: v-bind也可以简写,使用冒号“:”来代替。
<a v-bind:href='link'></a> 等价于 ?<a :href='link'>七、Vue的事件绑定?
关于事件,要把握好三个步骤:设参、传参和接参。
<html>
    <head>
        <meta charset="utf-8" />
        <title></title>
    </head>
    <body>
        <div id="app">
            sum={{sum}}<br/>
            {{sum>10?'总数大于10':'总数不大于10'}}<br/>
            <button type="button" @click="increase(2)">增加</button>
        </div>
    </body>
    <script src="https://cdn.jsdelivr.net/npm/vue/dist/vue.js"></script>
    <script type="text/javascript">
        new Vue({
            el:'#app',
            data:{
                sum:0
            },
            methods:{
                increase:function(s){
                    this.sum+=s
                }
            }
        })
    </script>
</html>
从这里例子中:
设参:
<button type="button" @click="increase(2)">增加</button>传参:?
increase:function(s)?接参:
this.sum+=s注意:increase:function(s){ }函数可以写成increase(s){ }
接下来我们来看一下VUE中如何进行事件绑定。
7.1 v-on
通过配合具体的事件名,来绑定vue中定义的函数
<html>
    <head>
        <meta charset="utf-8" />
        <title></title>
    </head>
    <body>
        <div id="app">
            <input type="text" v-on:click="changeMajor" ?/>
        </div>
    </body>
    <script src="https://cdn.jsdelivr.net/npm/vue/dist/vue.js"></script>
    <script type="text/javascript">
        new Vue({
 ?          el:'#app',
 ?          data:{
 ? ? ?          major:'java'
 ?          },
 ?          methods:{
 ? ? ?          sayHi(){
 ? ? ? ? ?          alert("HELLO VUE!");
 ? ? ?          },
 ? ? ?          changeMajor(){
 ? ? ? ? ?          console.log("change Title")
 ? ? ?          }
 ?          }
    </script>
</html>
此时,该按钮,在点击时将会调用Vue对象中定义的changeMajor方法。
注意: v-on也可以简写,使用"@"替代。
<input type="text" @click="changeMajor" ?/>7.2 事件修饰符
可以使用Vue中定义好的事件修饰符,快速达到效果。查看以下例子:
<html>
    <head>
        <meta charset="utf-8" />
        <title></title>
    </head>
    <body>
        <div id="app">
            <p @mousemove="mm">
                x:{{x}}
                y:{{y}}
                <span @mousemove.stop>鼠标移动到此即停止</span>
            </p>
 ? ? ? ? ? ?<div @click = "doDivClick" style="width: 100px;height: 100px;border: 1px solid black">
 ? ? ? ? ? ?<a @click.stop="doThis" href="https://www.baidu.com">
 ? ? ? ? ? ? ?  百度
 ? ? ? ? ? ?</a>
 ? ? ? ?</div>
        </div>
    </body>
    <script ? <script src="https://cdn.jsdelivr.net/npm/vue@2.6.12/dist/vue.js"></script>
        new Vue({
            el:'#app',
            data:{
                x:0,
                y:0
            },
            methods:{
                mm(event){
                    this.x = event.clientX;
                    this.y = event.clientY;
                },
                stopm(event){
                    event.stopPropagation();
                },
                doThis(){
 ? ? ? ? ? ? ?  alert("执行到了a的click");
 ? ? ? ? ?  },
 ? ? ? ? ?      doDivClick(){
 ? ? ? ? ? ? ?  alert("执行到了div的click");
 ? ? ? ? ?      }
            }
        })
    </script>
</html>
当鼠标经过P标签区域内时,区域内就会显示X和Y轴的坐标,如果经过P标签内的Span标签内时,此时会调用事件属性mousemove.stop预定的效果,鼠标移动的效果将会被取消,X和Y不再显示信息。
7.3计算属性:computed
7.3.1 什么是计算属性
计算属性的重点突出在 属性 两个字上(属性是名词),首先它是个 属性 其次这个属性有 计算 的能力(计算是动词),这里的 计算 就是个函数;简单点说,它就是一个能够将计算结果缓存起来的属性(将行为转化成了静态的属性),仅此而已;
7.3.2 计算属性与方法的区别
<!DOCTYPE html>
<html>
<head>
 ? ?<meta charset="UTF-8">
 ? ?<title>布局篇 计算属性</title>
 ? ?<script src="https://cdn.jsdelivr.net/npm/vue@2.5.21/dist/vue.js"></script>
</head>
<body>
?
<div id="vue">
 ? ?<p>调用当前时间的方法:{{currentTime1()}}</p>
 ? ?<p>当前时间的计算属性:{{currentTime2}}</p>
</div>
?
<script type="text/javascript">
 ? ?var vm = new Vue({
 ? ? ? ?el: '#vue',
 ? ? ? ?data: {
 ? ? ? ? ? ?message: 'Hello Vue'
 ? ? ?  },
 ? ? ? ?methods: {
 ? ? ? ? ? ?currentTime1: function () {
 ? ? ? ? ? ? ? ?return Date.now();
 ? ? ? ? ?  }
 ? ? ?  },
 ? ? ? ?computed: {
 ? ? ? ? ? ?currentTime2: function () {
 ? ? ? ? ? ? ? ?this.message;
 ? ? ? ? ? ? ? ?return Date.now();
 ? ? ? ? ?  }
 ? ? ?  }
 ?  });
</script>
</body>
</html>
methods:定义方法,调用方法使用 currentTime1(),需要带括号
computed:定义计算属性,调用属性使用 currentTime2,不需要带括号;this.message 是为了能够让 currentTime2 观察到数据变化而变化
注意:methods 和 computed 里不能重名
7.3.3 测试效果?
仔细看图中说明,观察其中的差异
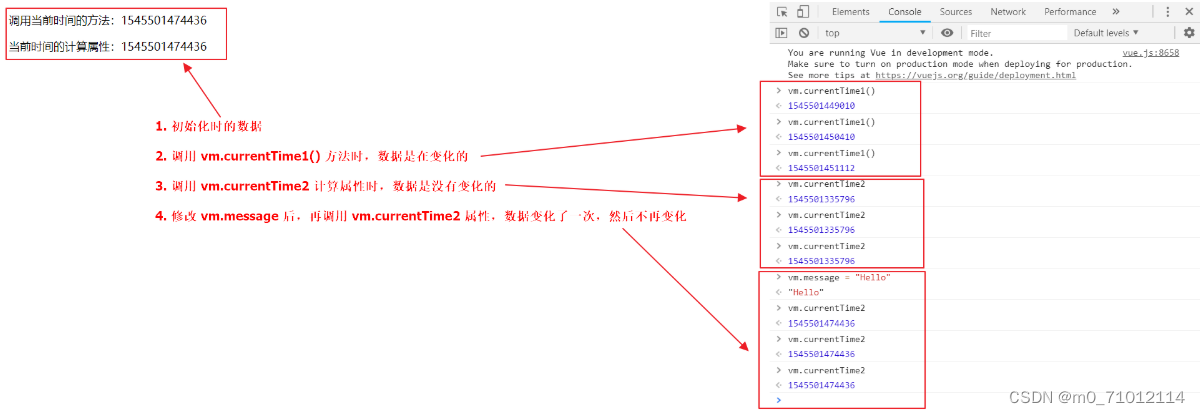
7.3.4 结论
调用方法时,每次都需要进行计算,既然有计算过程则必定产生系统开销,那如果这个结果是不经常变化的呢?此时就可以考虑将这个结果缓存起来,采用计算属性可以很方便的做到这一点;计算属性的主要特性就是为了将不经常变化的计算结果进行缓存,以节约我们的系统开销
八、Vue的组件化
8.1 什么是“组件化”
Vue的组件化设计思想借鉴了Java的面向对象思想。Java认为万物皆对象,在Vue中,万物皆组件。
也就是说,在实际的vue项目中,以及使用了Vue框架的项目中,Vue的对象都会以组件的形式出现,能被反复使用。
要想实现组件化,需要在页面中注册组件:关于注册的方式有两种,分别是全局注册和本地注册。
8.1.1 组件的全局注册
<!DOCTYPE html>
<html lang="en">
<head>
 ? ?<meta charset="UTF-8">
 ? ?<title>vue组件的全局注册</title>
</head>
<body>
 ? ?<div id="app">
 ? ? ? ?<model1></model1>
 ? ? ? ?<model1></model1>
 ? ? ? ?<model1></model1>
 ? ?</div>
 ? ? ? ?<hr/>
 ? ?<div id="app1">
 ? ? ? ?<model1></model1>
 ? ? ? ?<model1></model1>
 ? ? ? ?<model1></model1>
 ? ?</div>
</body>
 ?<script src="https://cdn.jsdelivr.net/npm/vue@2.6.12/dist/vue.js"></script>
<script>
    //通过Vue.component实现组件的全局注册,全局注册后的组件可以被重复使用。
 ? ?Vue.component("model1",{
?
 ? ? ? ?template:"<div><h1>{{title}}</h1><button type='button' @click='btnfn'>点我</button></div>",
 ? ? ? ?data:function(){
 ? ? ? ? ? ?return {
 ? ? ? ? ? ? ? ?title:"hello vue"
 ? ? ? ? ?  }
 ? ? ?  },
 ? ? ? ?methods:{
 ? ? ? ? ? ?btnfn:function(){
 ? ? ? ? ? ? ? ?alert("hello !!!");
 ? ? ? ? ?  }
 ? ? ?  }
 ?  });
 ? ?new Vue({
 ? ? ? ?el:'#app'
 ?  })
 ? ?new Vue({
 ? ? ? ?el:'#app1'
 ?  })
</script>
?
</html>
8.1.2 组件的本地注册
vue的全局注册,也就意味着在页面的任意一个被vue绑定过的div中,都可以使用全局注册了的vue组件。
但是,如果是对vue组件进行本地注册,那么在其他被vue绑定的div中,不能使用该组件。
<!DOCTYPE html>
<html lang="en">
<head>
 ? ?<meta charset="UTF-8">
 ? ?<title>vue组件的本地(局部)注册</title>
</head>
<body>
 ? ?<div id="app">
 ? ? ? ?<model11></model11>
 ? ?</div>
    <hr/>
 ? ?<!--在这里使用组件model11会报错-->
 ? ?<div id="app1">
 ? ? ? ?<model11></model11>
 ? ?</div>
</body>
 ?<script src="https://cdn.jsdelivr.net/npm/vue@2.6.12/dist/vue.js"></script>
<script>
 ? ?new Vue({
 ? ? ? ?el:'#app',
 ? ? ? ?components:{
 ? ? ? ? ? ?"model11":{
?
 ? ? ? ? ? ? ? ?template:"<div><h1>{{title}}</h1><button type='button' @click='btnfn'>点我</button></div>",
 ? ? ? ? ? ? ? ?data:function(){
 ? ? ? ? ? ? ? ? ? ?return {
 ? ? ? ? ? ? ? ? ? ? ? ?title:"hello vue"
 ? ? ? ? ? ? ? ? ?  }
 ? ? ? ? ? ? ?  },
 ? ? ? ? ? ? ? ?methods:{
 ? ? ? ? ? ? ? ? ? ?btnfn:function(){
 ? ? ? ? ? ? ? ? ? ? ? ?alert("hello !!!");
 ? ? ? ? ? ? ? ? ?  }
 ? ? ? ? ? ? ?  }
 ? ? ? ? ?  }
 ? ? ?  }
 ?  })
 ? ?new Vue({
 ? ? ? ?el:'#app1'
 ?  })
</script>
8.1.3 小结
这是一个完整的Vue组件。该组件包含了三个部分:template(html视图层内容)、script(Model层)、style(CSS样式)。这样封装好的组件可以被复用,也可以作为其他组件的组成部分而被封装——Java的面向对象再次体现。
特点1: template标签内,必须有且只能有一个根标签。
特点2: componet中注册的组件中的data,必须是已函数的形式。
如下:
data:function(){
 ? ? return {
 ? ? ? ? ? title:"hello vue"
 ? ? }
 }
8.2 组件的生命周期
Vue中的组件也是有生命周期的。一个Vue组件会经历:初始化、创建、绑定、更新、销毁等阶段,不同的阶段,都会有相应的生命周期钩子函数被调用。
| 组件的生命周期钩子 |
|---|
 |
????生命周期主要有三个阶段:
- 一,初始化显示;(重要勾子 mounted 网页加载完毕触发)
- 二,更新显示;(重要勾子beforeUpdate 数据属性更新前)
- 三,死亡;(重要勾子beforeDestroy vm死亡前)
? ?每个生命周期都会有对应的生命周期的函数,或者叫做勾子函数;
<html>
<head>
 ? ?<meta charset="UTF-8">
 ? ?<title>Title</title>
 ? ?<script src="https://cdn.jsdelivr.net/npm/vue@2.6.12/dist/vue.js"></script>
</head>
<body>
 ? ?<pre>每个 Vue 实例在被创建时都要经过一系列的初始化过程——例如,需要设置数据监听、编译模板、
 ? ? ?  将实例挂载到 DOM 并在数据变化时更新 DOM 等。同时在这个过程中也会运行一些叫做生命周期钩子的函数,
 ? ? ?  这给了用户在不同阶段添加自己的代码的机会。</pre>
 ? ?<div id="app">
 ? ? ? ?<p>{{name}}</p>
 ? ? ? ?<button @click="update">update</button>
 ? ? ? ?<button @click="destroy">destroy</button>
 ? ?</div>
<script type="text/javascript">
 ? ?new Vue({
 ? ? ? ?el:"#app",
 ? ? ? ?data:{
 ? ? ? ? ? ?a:1,
 ? ? ? ? ? ?name:"zs"
 ? ? ?  },
 ? ? ? ?methods:{
 ? ? ? ? ? ?update(){
 ? ? ? ? ? ? ? ?this.name = Math.random() +"---";
 ? ? ? ? ?  },
 ? ? ? ? ? ?destroy(){
 ? ? ? ? ? ? ? ?this.$destroy();
 ? ? ? ? ?  }
 ? ? ?  },
 ? ? ? ?beforeCreate(){
 ? ? ? ? ?console.log("创建vue实例之前");
 ? ? ?  },
 ? ? ? ?created(){
 ? ? ? ? ? ?//
 ? ? ? ? ? ?console.log("vue实例创建成功");
 ? ? ? ? ? ?console.log(this.a);
 ? ? ?  }
 ? ? ? /* created: () => console.log(this.a)*/
 ? ? ?  ,
 ? ? ? ?beforeMount(){
 ? ? ? ? ? ?console.log("vue对象挂载之前");
 ? ? ?  },
 ? ? ? ?mounted(){
 ? ? ? ? ? ?// 只执行一次 ?  页面加载完之后执行 ? ? ? 比如 咱们在 页面加载完毕 发送ajax请求 获取数据
 ? ? ? ? ? ?console.log(" mounted ? 挂载完毕")
 ? ? ?  },
 ? ? ? ?beforeUpdate(){
 ? ? ? ? ? ?// 可执行多次
 ? ? ? ? ? ?console.log("data更新之前执行");
 ? ? ?  },
 ? ? ? ?updated(){
 ? ? ? ? ? ?// 可执行多次
 ? ? ? ? ? ?console.log("data更新之后执行");
 ? ? ?  },
 ? ? ? ?beforeDestroy(){
 ? ? ? ? ? ?// 只执行一次
 ? ? ? ? ? ?console.log("vue实例销毁之前执行");
 ? ? ?  },
 ? ? ? ?destroyed(){
 ? ? ? ? ? ?// 只执行一次
 ? ? ? ? ? ?console.log("vue实例销毁之后执行");
 ? ? ?  }
?
 ?  });
</script>
</body>
</html>
?
九、使用Vue-Cli搭建Vue项目
9.1 什么是vue-cli
cli: Command Line 命令行工具,vue-cli就是vue的命令行工具,也称之为脚手架,使用vue-cli提供的各种命令可以拉取、创建、运行我们需要使用到的框架,比如webpack、Element UI、Element Admin等等。那么要想使用vue-cli命令,需要先安装node.js。
9.2 node.js的介绍及安装
node.js的介绍
node.js提供了前端程序的运行环境,可以把node.js理解成是运行前端程序的服务器。
node.js的安装
从官网下载安装即可: 下载 | Node.js 中文网
| 测试node.js是否安装成功: 在DOS窗口中输入“node -v” 查看版本,如果看到版本,就表示安装成功。 |
|---|
 |
9.3 使用node.js安装vue-cli
使用如下命令安装vue-cli
npm install -g vue-cli ? 安装的是2.9.6 版本 ? ? ------- ? 不装这个
npm install ?-g ? @vue/cli ? ? 安装的是新版本 ? 新版本  支持 vue ui
npm: 使用node.js的命令
install: 安装
vue-cli: 要安装的vue-cli
-g: 全局安装
注意 这里的安装可能需要管理员权限
安装完了之后 可能被windows的安全策略限制 参考
VSCode报错:vue : 无法加载文件 D:\nodejs\node_global\vue.ps1,因为在此系统上禁止运行脚本。_没有咸鱼的梦想的博客-CSDN博客
| 当出现以下界面,表示正在安装: |
|---|
 |
如果使用npm官方镜像速度比较慢,可以使用淘宝镜像来安装:
npm install -g cnpm --registry=https://registry.npm.taobao.org之后使用npm命令时就可以替换成cnpm
cnpm install vue-cli -g
cnpm install
cnpm run dev
9.4创建vue项目
dos命令输入vue ui会进入如下图:
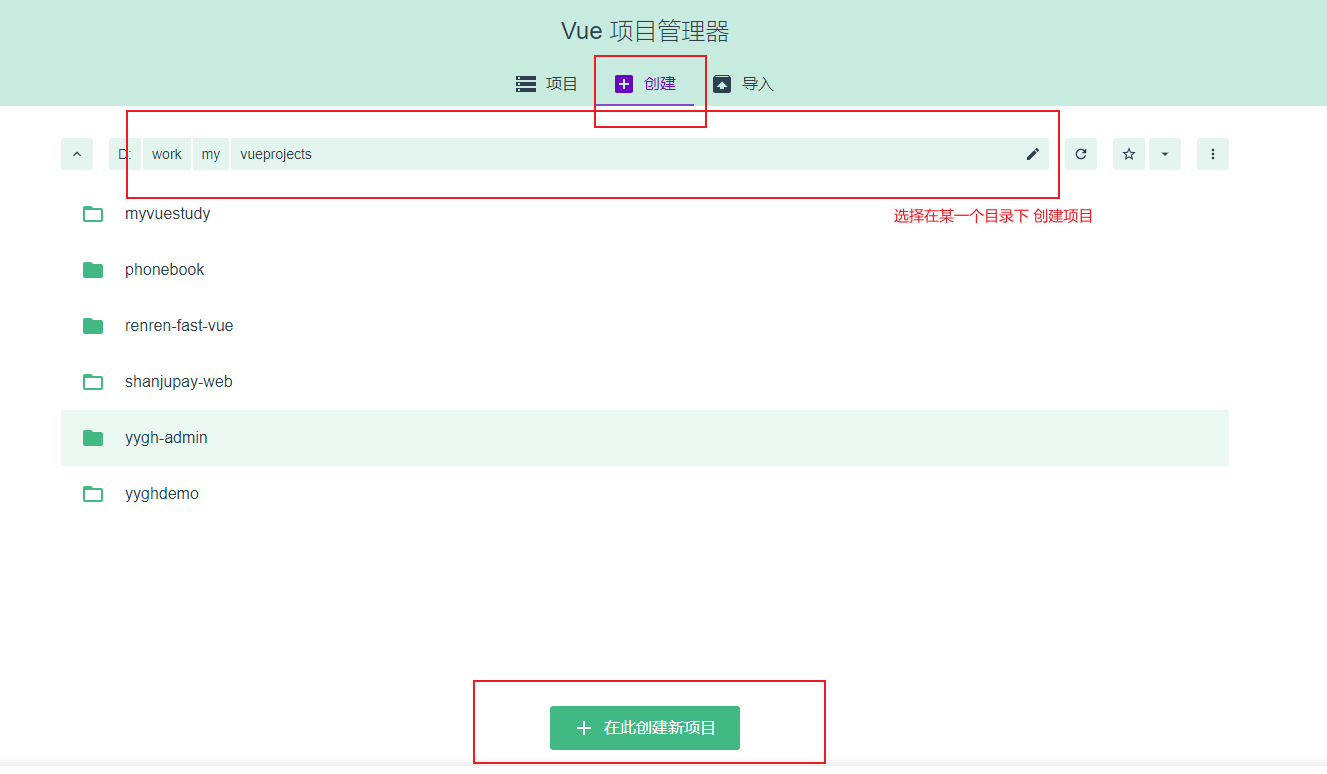


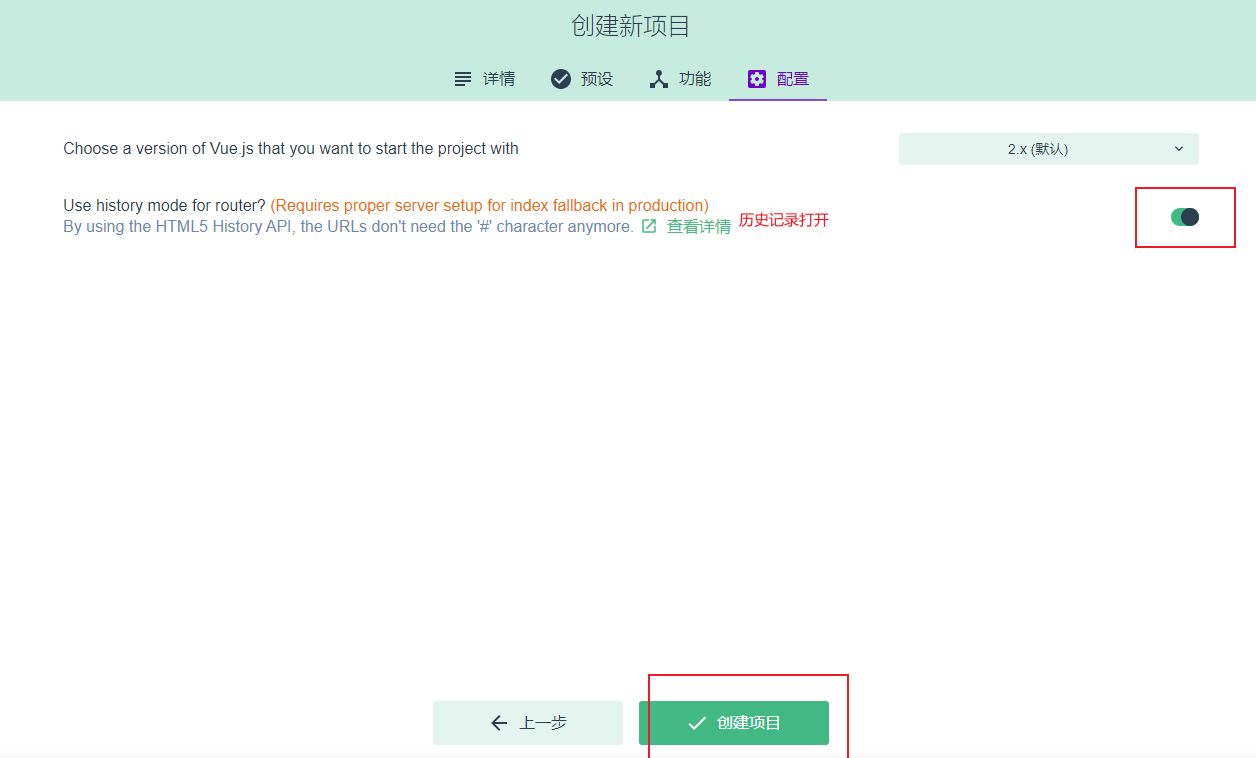
创建项目 不保存预设 然后 后台就开始下载文件
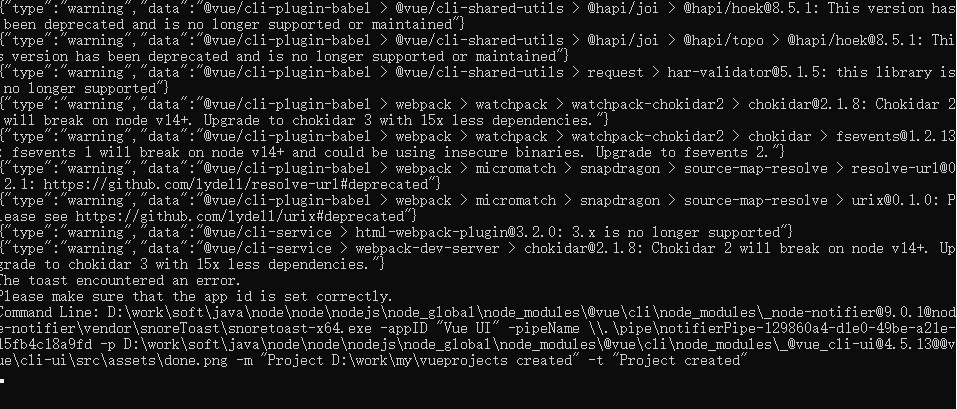
创建好之后 页面跳转到仪表盘

可以在这里 安装一些插件 比如 axios element-ui 等等

这是已经安装的插件
点 添加插件

安装 ajax 插件 axios
然后 可以关掉仪表盘,使用vscode 打开 刚才创建的工程 使用 vue run serve 启动工程,
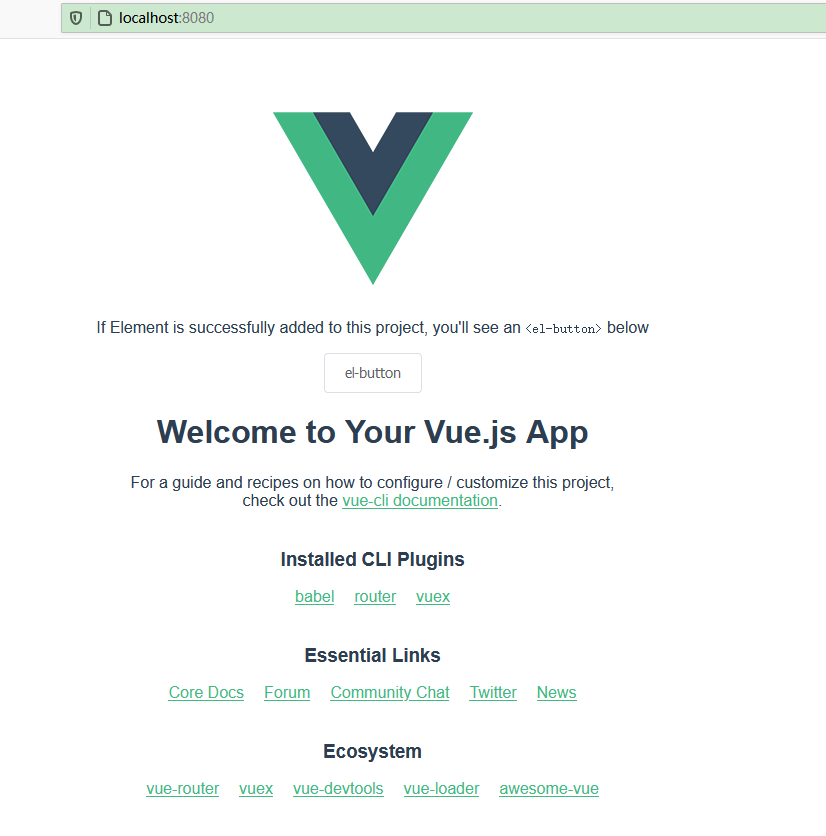
9.4.1配置vue片段
打开VSCode,文件—>首选项—>配置用户代码片段?


输入一下代码:配置完成后新建.vue文件输入vue回车就会生成以下代码。
{
	"Print to console": {
			"prefix": "vue",
			"body": [
					"<!-- $1 -->",
					"<template>",
					"  <div class='$2'>$5</div>",
					"</template>",
					"",
					"<script>",
					"//这里可以导入其他文件(比如:组件,工具js,第三方插件js,json文件,图片文件等等)",
					"//例如:import 《组件名称》 from '《组件路径》';",
					"",
					"  export default {",
					"    //import引入的组件需要注入到对象中才能使用",
					"    components: {},",
					"    props: {},",
					"    data() {",
					"      //这里存放数据",
					"      return {}",
					"    },",
					"    //监听属性 类似于data概念",
					"    computed: {},",
					"    //监控data中的数据变化",
					"    watch: {},",
					"    //方法集合",
					"    methods: {},",
					"    //生命周期 - 创建完成(可以访问当前this实例)",
					"    created() {},",
					"    //生命周期 - 挂载完成(可以访问DOM元素)",
					"    mounted() {},",
					"    beforeCreate() {}, //生命周期 - 创建之前",
					"    beforeMount() {}, //生命周期 - 挂载之前",
					"    beforeUpdate() {}, //生命周期 - 更新之前",
					"    updated() {}, //生命周期 - 更新之后",
					"    beforeDestroy() {}, //生命周期 - 销毁之前",
					"    destroyed() {}, //生命周期 - 销毁完成",
					"    activated() {}, //如果页面有keep-alive缓存功能,这个函数会触发",
					"  }",
					"</script>",
					"<style scoped>",
					" /* @import url(); 引入公共css类 */",
					"$4",
					"</style>"
			],
			"description": "生成vue模板"
	}
}
9.5 使用vue-cli下载项目骨架搭建我们的项目
就像maven一样,vue为我们提供了一些官方项目骨架。使用vue list命令可以列出当前官方提供的骨架,可以使用这些骨架来快速搭建出项目。
vue list完事 用vscode 打开项目文件夹
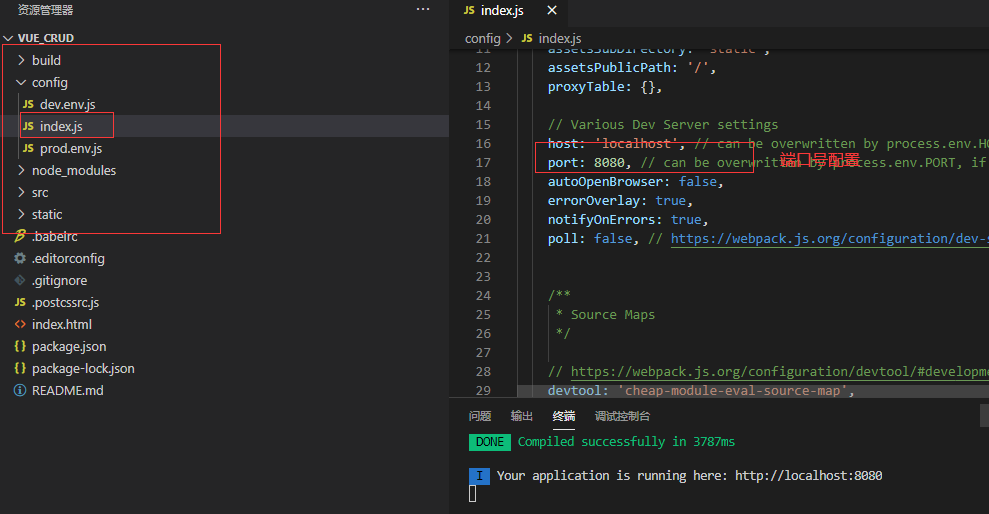
9.6vue工程的组件使用

9.7父组件向子组件传递数据---父子组件之间

父组件

消息订阅与发布组件PubSub
9.8 消息订阅与发布组件PubSub
我们前面讲了父子组件之间通过prop来实现消息传递;但是再其他情况,比如兄弟组件,爷孙组件消息传递时候,就要用到高级的消息订阅与发布;
1.首先我们安装下消息订阅与发布pubsub组件;
npm install --save pubsub-js2.把 pubsub 配置成全局组件 在 main.js 中配置

3.在 父组件中 订阅消息 可以在 mounted 钩子函数中 监听消息
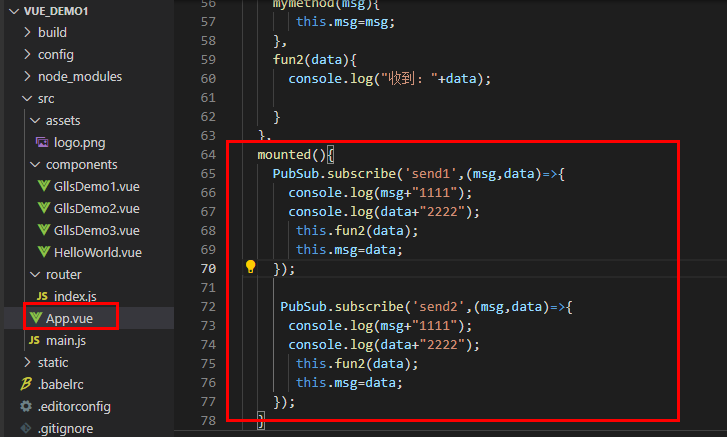
在这里 使用了 箭头函数 => ,在箭头函数中 的 this 代表 当前 vue 对象,如果 使用一般函数 ,那么在这个函数内 this 就代表PubSub对象,所以 在这里 咱们使用 =>箭头函数
在别的组件中 发布消息

注意: 执行上面的案例 会发现 订阅消息的回调函数 执行了两次 , 我们需要在我们每次接受数据pubsub.subscribe的时候,先执行pubsub.unsubscribe操作就好了,就完美解决了,这样你接收以后的callback只执行一次
PubSub.unsubscribe();
PubSub.subscribe(eventName, callback); ? //这样  回调就只执行一次
9.9插槽 slot
父组件向子组件传递标签,通过slot 插槽实现
主要作用:
某一个区块,先占位,然后可以动态的搞个标签进去,方便切换该位置的内容,无需再搞多个页面。
父组件 直接定义标签p 注意 slot 属性

子组件 使用 slot 标签 占位置 注意 slot 标签的name 属性,当父组件没有传对应的插槽(属性值对应)内容时,会显示插槽默认内容

9.10 使用Webpack骨架快速创建项目
常用命令:
npm install
在运行和调试项目前,一般都需要先执行该命令,目的是安装项目运行所需要的环境。
npm run dev
以调试的方式运行项目
npm run build
生成用于项目部署所需的最小资源,生成的内容存放在build文件夹内。
Webpack是一个前端资源的打包工具,它可以将js、image、css等资源当成一个模块进行打包。
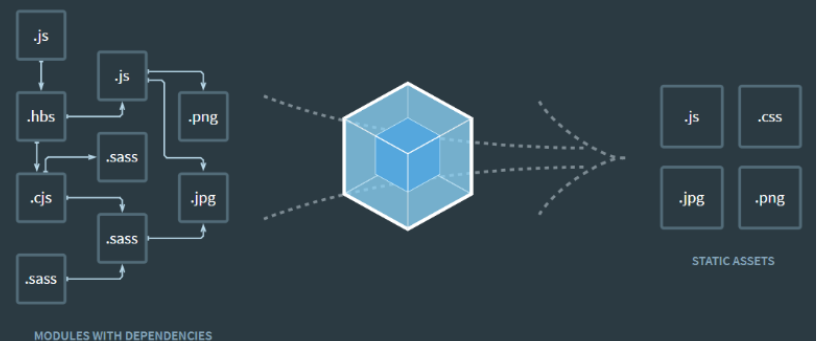
从图中我们可以看出,Webpack可以将js、css、png等多种静态资源进行打包,使用webpack有什么好处呢?
1、模块化开发程序员在开发时可以分模块创建不同的js、css等小文件方便开发,最后使用webpack将这些小文件打包成一个文件,减少了http的请求次数。webpack可以实现按需打包,为了避免出现打包文件过大可以打包成多个文件。
2、编译typescript、ES6等高级js语法随着前端技术的强大,开发中可以使用javascript的很多高级版本,比如:typescript、ES6等,方便开发,webpack可以将打包文件转换成浏览器可识别的js语法。
3、CSS预编译webpack允许在开发中使用Sass和Less等原生CSS的扩展技术,通过sass-loader、less-loader将Sass和Less的语法编译成浏览器可识别的css语法
4.使用vue.js开发大型应用需要使用webpack打包工具
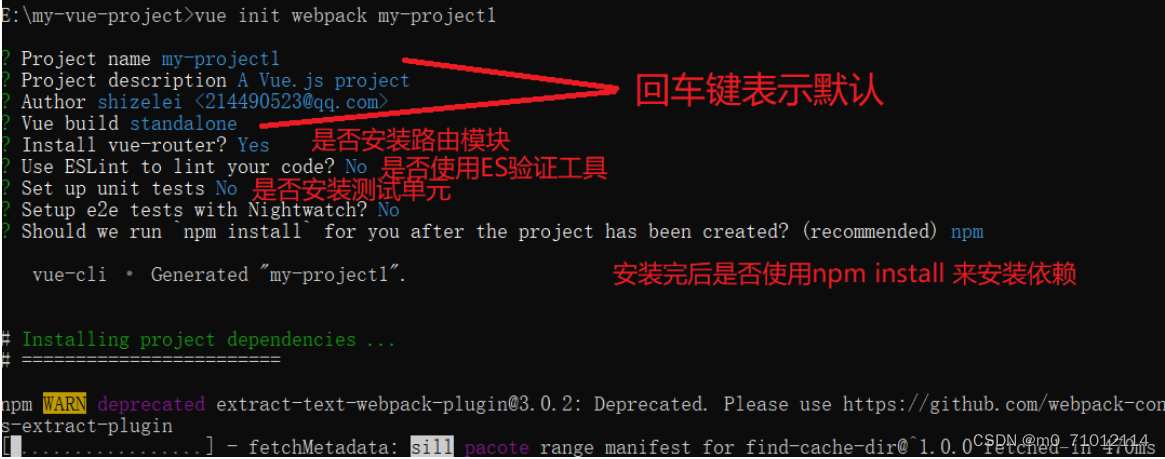
vue init webpack my-project1
webpack: 骨架名称
my-project1: 项目名称?
| 过程中会出现如下界面,需要手动操作。 |
|---|
 |
| 出现如下界面,表示安装成功。 |
|---|
 |
进入到my-project1文件夹内后,使用以下命令来运行项目。
npm run dev
| 访问http://localhost:8081,页面效果如下: |
|---|
 |
?十、Vue-router 路由
10.1 安装路由模块
npm install vue-router --save 10.2 引入路由模块并使用
创建views 文件夹 其下面创建Index.vue 和 Menu1.vue
在main.js中引入路由模块并使用
import Vue from 'vue'
import App from './App'
import router from './router' ?//引入路由模块
?
Vue.config.productionTip = false
?
/* eslint-disable no-new */
new Vue({
 ?el: '#app',
 ?router, //使用路由模块
 ?components: { App },
 ?template: '<App/>'
})
?在 router文件夹下 的index.js 是 路由的配置文件
index.js中:
import Vue from 'vue'
import Router from 'vue-router'
import HelloWorld from '@/components/HelloWorld'
import Index from '@/views/Index'
import Menu1 from '@/views/Menu1'
Vue.use(Router)
?
export default new Router({
 ?routes: [
 ?  {
 ? ? ?path: '/',
 ? ? ?name: 'HelloWorld',
 ? ? ?component: HelloWorld
 ?  },
 ?  {
 ? ? ?path: '/index',
 ? ? ?name: 'Index',
 ? ? ?component: Index
 ?  },
 ?  {
 ? ? ?path: '/menu1',
 ? ? ?name: 'Menu1',
 ? ? ?component: Menu1
 ?  }
  ]
})
?
在App.vue 中的路由写法
 <div class="menu">
 ? ? ?<ul>
 ? ? ? ?<li>
 ? ? ? ? ?<!--<a href="">首页</a>-->
 ? ? ? ? ?<router-link to="/index">首页</router-link>
 ? ? ? ?</li>
 ? ? ? ?<li>
 ? ? ? ? ?<!--<a href="">菜单1</a>-->
 ? ? ? ? ?<router-link to="/menu1">菜单1</router-link>
 ? ? ? ?</li>
 ? ? ?</ul>
 ? ?</div>
 ? ?<div class="content">
 ? ? ?<router-view></router-view>
 ? ?</div>
通过 router-link 向路由配置发送请求 ,结果会在 router-view 显示
10.3嵌套路由
Menu1.vue是在前面创建的views文件夹下 继续嵌套 下级页面 配置嵌套路由,其他代码有vue片段生成
Menu1.vue
<div>
 ? ?  {{msg}}
 ? ? ?<ul>
 ? ? ? ? ?<li>
 ? ? ? ? ? ?<router-link to="/menu1/submenu1">子菜单1</router-link>
 ? ? ? ? ?</li>
 ? ? ? ? ?<li>
 ? ? ? ? ? ?<router-link to="/menu1/submenu2">子菜单2</router-link>
 ? ? ? ? ?</li>
 ? ? ? ?</ul>
?
 ? ? ? ?<div class="content">
 ? ? ? ? ? ? ? ?<router-view></router-view>
 ? ? ?</div>
?
 ?</div>
在路由配置文件src文件夹下router文件夹下的index.js中
{
 ? ? ?path: '/menu1',
 ? ? ?name: 'Menu1',
 ? ? ?component: Menu1,
 ? ? ?children:[ ? // 子路由
 ? ? ?  {
 ? ? ? ? ?path:'/menu1/submenu1', ? ?// 当然  对应的 子组件 得创建好
 ? ? ? ? ?component: () => import('@/views/SubMenu1.vue') ? // 这样就不用在文件上面配置了
 ? ? ?  },
 ? ? ?  {
 ? ? ? ? ?path:'/menu1/submenu2',
 ? ? ? ? ?component: () => import('@/views/SubMenu2.vue')
 ? ? ?  },
 ? ? ?  {
 ? ? ? ? ?path:'',
 ? ? ? ? ?redirect:'/menu1/submenu1' ? ? // 默认显示submenu1
 ? ? ?  }
 ? ?  ]
 ?  },
在views文件夹下创建SubMenu1.vue,其他代码vue片段生成
<template>
 ?<div>子菜单1
 ? ? ?<input type="text" name="sub1input">
 ?</div>
</template>
SubMenu2.vue,其他代码vue片段生成
<template>
  <div>子菜单2
 ? ?  <input type="text" name="sub2input">
  </div>
</template>
10.4路由缓存
当我们 在 子菜单1 和 子菜单2 的 文本输入框输入内容时,发现 跳转之后内容没有了,这种情况也经常遇到
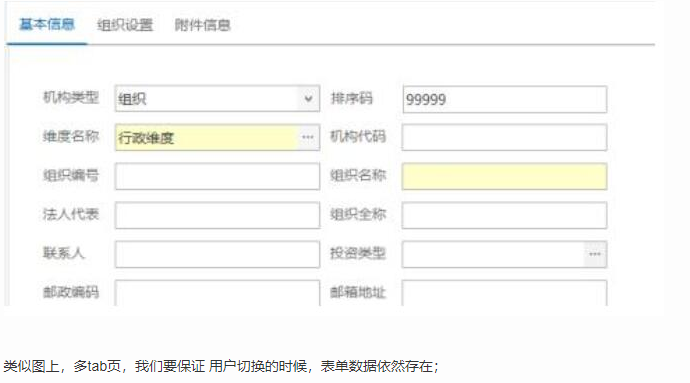
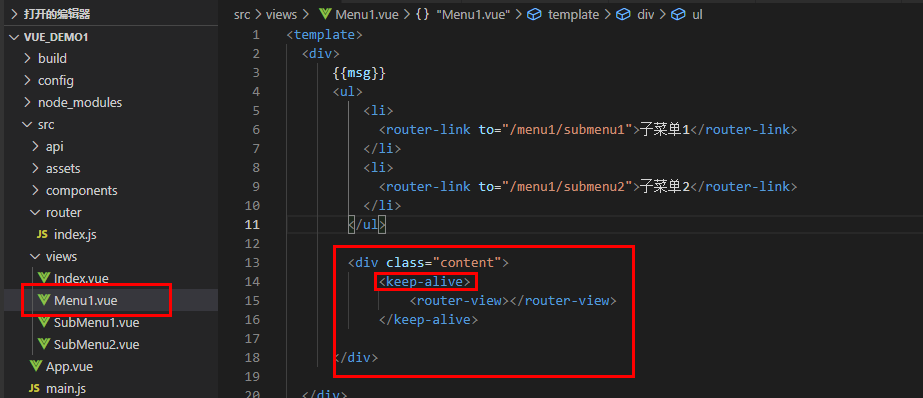
我们切换不同的组件时,希望 组件内输入的内容不要丢失 ,怎么解决?只需要 使用keep-alive 标签

10.5路由传参
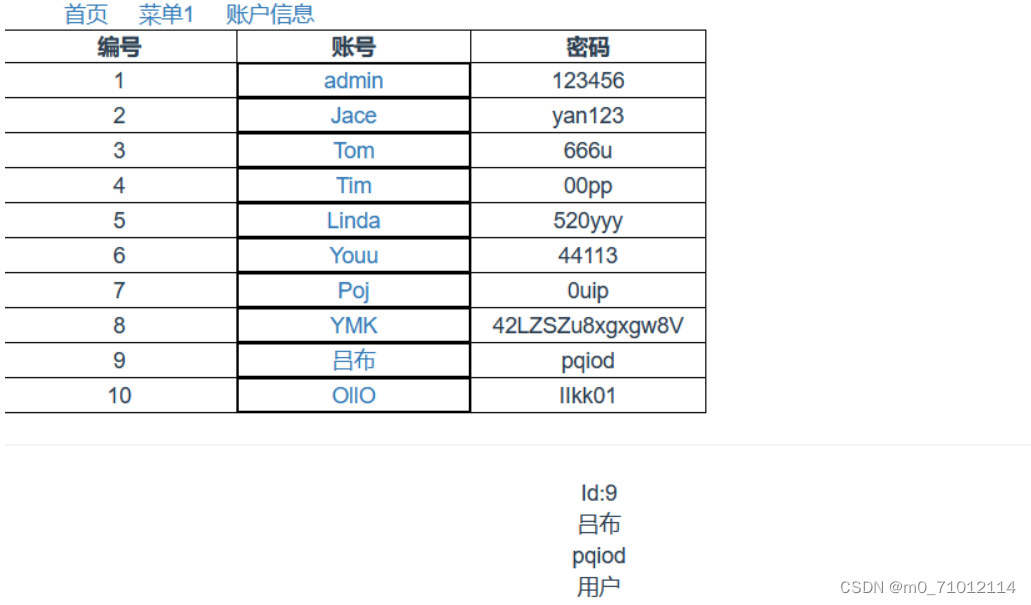
app.vue显示页面的配置:
<template>
 ?<div id="app">
 ? ?<div class="menu">
 ? ? ?<ul>
 ? ? ? ?<li>
 ? ? ? ? ?<router-link to="/">首页</router-link>
 ? ? ? ?</li>
 ? ? ? ? ?<li>
 ? ? ? ? ?<router-link to="/menu1">菜单1</router-link>
 ? ? ? ?</li>
 ? ? ? ?<li>
 ? ? ? ? ?<router-link to="/admin">账户信息</router-link>
 ? ? ? ?</li>
 ? ? ?</ul>
 ? ?</div>
 ? ?<div class="content">
 ? ? ?<router-view></router-view>
 ? ?</div>
 ?</div>
</template>
<script>
export default {
 ?mounted(){
 ? ?this.axios.defaults.headers.common['token'] = 6666;
  }
}
</script>
<style>
ul li{
 ?float: left;
 ?margin-right: 20px;
 ?list-style: none;
}
.content{
 ?clear: both;
}
</style>
注意:上述路由需要再定义个div并在里面写<reouter-view>标签
router文件下index.js中路由配置,这里只设置了账户信息路由
{
 ? ? ?//path对应app.vue文件中账户信息标签to="/admin"
 ? ? ?path: '/admin',
 ? ? ?name: 'index',
 ? ? ?component: () => import ('@/views/Admin.vue'),
 ? ? ?children: [ // 子路由,点击姓名显示详细信息
 ? ? ?  {
 ? ? ? ? ?path:'/admin/adminDetail/:id',
 ? ? ? ? ?component: () => import ('@/views/AdminDetail.vue')
 ? ? ?  }
 ? ?  ]
 ?  },
用户信息组件views文件夹下创建Admin.vue
<template>
 ?<div class="">
 ? ?<table>
 ? ? ?<tr>
 ? ? ? ?<th>编号</th>
 ? ? ? ?<th>账号</th>
 ? ? ? ?<th>密码</th>
 ? ? ?</tr>
 ? ? ?<tr v-for="(admin, index) in admins" v-bind:key="index">
 ? ? ? ?<td>{{ admin.id }}</td>
 ? ? ? ?<router-link :to='`/admin/adminDetail/${admin.id}`'><td>{{ admin.username }}</td></router-link>
 ? ? ? ?<td>{{ admin.password }}</td>
 ? ? ?</tr>
 ? ?</table>
 ? ?<hr>
 ? ?<div class="content">
 ? ? ? ?<router-view></router-view>
 ? ?</div>
 ?</div>
</template>
?
<script>
?
export default {
 ? ?//这里存放数据
 ?data() {
 ? ?return {
 ? ? ?admins: [],
 ?  };
  },
?
 ?//方法集合
 ?methods: {
 ? ?getAdmins() {
 ? ? ?this.axios({
 ? ? ? ?url: "http://localhost:8081/admin/list",
 ? ? ? ?params: {
 ? ? ? ? ?page: 1,
 ? ? ? ? ?limit: 10,
 ? ? ?  },
 ? ?  })
 ? ? ?  .then((res) => {
 ? ? ? ? ?this.admins = res.data.data;
 ? ? ?  })
 ? ? ?  .catch(function (error) {
 ? ? ? ? ?//处理错误情况
 ? ? ? ? ?console.log(error);
 ? ? ?  })
 ? ? ?  .then(function () {
 ? ? ? ? ?//总是会执行
 ? ? ?  });
 ?  },
  },
?
 ?//生命周期 - 挂载完成(可以访问DOM元素)
 ?mounted() {
 ? ?this.axios.defaults.headers.common['token'] = 6666;
 ? ?this.getAdmins(); // 页面加载完成后调用这个函数
  },
};
</script>
<style>
table {
 ?border: 1px solid black;
}
th,
td,
tr {
 ?border: 1px solid black;
 ?text-align: center;
 ?width: 150px;
}
/* @import url(); 引入公共css类 */
</style>
当点击名字时会显示该用户信息,用到嵌套路由,在views下创建AdminDetail.vue文件,代码如下:
<template>
 ?<div class="">
 ?  Id:{{ $route.params.id }}<br />
 ? ?{{ admin.username }}<br />
 ? ?{{ admin.password }}<br />
 ? ?{{ admin.type }}<br />
 ? ?{{ admin.create_time }}<br />
 ?</div>
</template>
?
<script>
export default {
 ?data() {
 ? ?//这里存放数据
 ? ?return {
 ? ? ?admin: {},
 ?  };
  },
 ?//监控data中的数据变化
 ?watch: {
 ? ?$route(value) {
 ? ? ?let id = value.params.id;
 ? ? ?this.getAdminById(id); // 每次点击姓名都会调用该方法
 ?  },
  },
 ?//方法集合
 ?methods: {
 ? ?getAdminById(id) {
 ? ? ?console.log(id);
 ? ? ?this.axios({
 ? ? ? ?url: `http://localhost:8081/admin/adminDetail/${id}`,
 ? ?  })
 ? ? ?  .then((res) => {
 ? ? ? ? ?console.log("响应的id详情");
 ? ? ? ? ?console.log(res.data.data.admin);
 ? ? ? ? ?this.admin = res.data.data.admin;
 ? ? ?  })
 ? ? ?  .catch((error) => {
 ? ? ? ? ?console.log(error);
 ? ? ?  });
 ?  },
  },
 ?//生命周期 - 挂载完成(可以访问DOM元素)
 ?mounted() {
 ? ?let id = this.$route.params.id;
 ? ?this.getAdminById(id);
  },
};
</script>
10.6 编程式路由传参
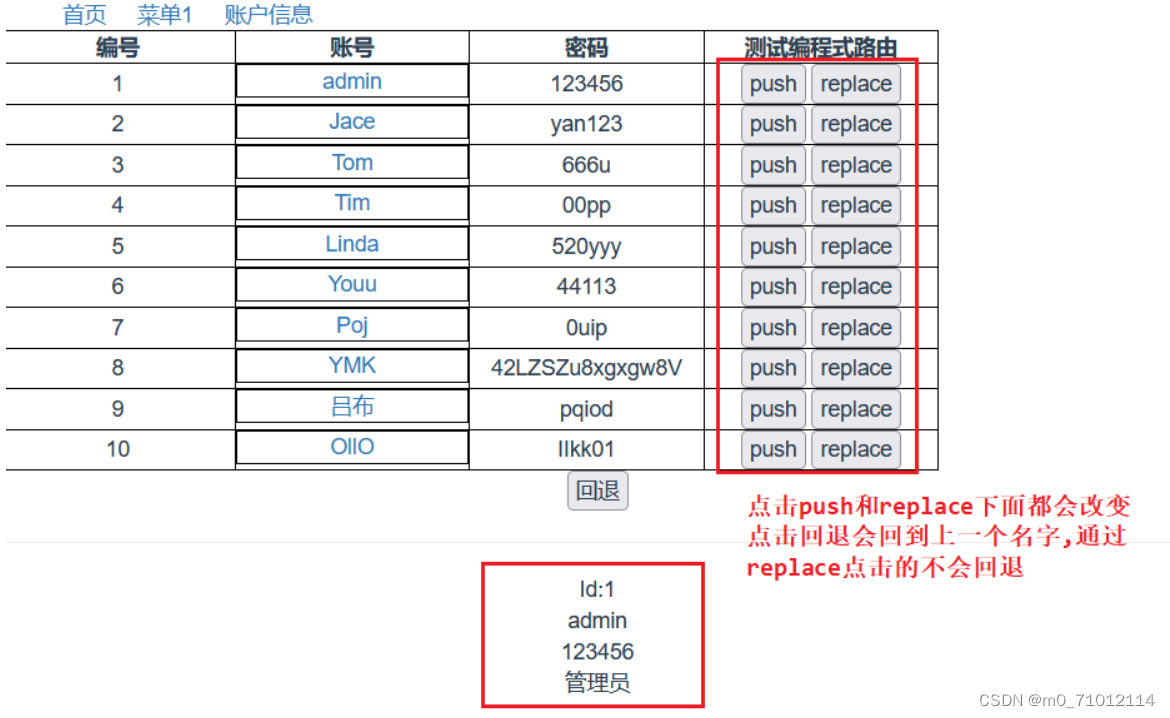
只需要在上面的Admin.vue文件中添加一些代码就行。
<template>
 ?<div class="">
 ? ?<table>
 ? ? ?<tr>
 ? ? ? ?<th>编号</th>
 ? ? ? ?<th>账号</th>
 ? ? ? ?<th>密码</th>
 ? ? ? ?<th>测试编程式路由</th>
 ? ? ?</tr>
 ? ? ?<tr v-for="(admin, index) in admins" v-bind:key="index">
 ? ? ? ?<td>{{ admin.id }}</td>
 ? ? ? ?<router-link :to="`/admin/adminDetail/${admin.id}`"
 ? ? ? ? ?><td>{{ admin.username }}</td></router-link
 ? ? ? ?>
 ? ? ? ?<td>{{ admin.password }}</td>
 ? ? ? ?<td>
 ? ? ? ? ?<button @click="pushShow(admin.id)">push</button>
 ? ? ? ? ?<button @click="replaceShow(admin.id)">replace</button>
 ? ? ? ?</td>
 ? ? ?</tr>
 ? ?</table>
 ? ?<button @click="$router.back()">回退</button>
 ? ?<hr />
 ? ?<div class="content">
 ? ? ?<router-view></router-view>
 ? ?</div>
 ?</div>
</template>
?
<script>
export default {
 ?//这里存放数据
 ?data() {
 ? ?return {
 ? ? ?admins: [],
 ?  };
  },
?
 ?//方法集合
 ?methods: {
 ? ?getAdmins() {
 ? ? ?this.axios({
 ? ? ? ?url: "http://localhost:8081/admin/list",
 ? ? ? ?params: {
 ? ? ? ? ?page: 1,
 ? ? ? ? ?limit: 10,
 ? ? ?  },
 ? ?  })
 ? ? ?  .then((res) => {
 ? ? ? ? ?this.admins = res.data.data;
 ? ? ?  })
 ? ? ?  .catch(function (error) {
 ? ? ? ? ?//处理错误情况
 ? ? ? ? ?console.log(error);
 ? ? ?  })
 ? ? ?  .then(function () {
 ? ? ? ? ?//总是会执行
 ? ? ?  });
 ?  },
 ? ?pushShow(id) {
 ? ? ?console.log(id);
 ? ? ?// 点击时路由带id,通过$router获得id
 ? ? ?this.$router.push(`/admin/adminDetail/${id}`);
 ?  },
 ? ?replaceShow(id) {
 ? ? ?this.$router.replace(`/admin/adminDetail/${id}`);
 ?  },
  },
?
 ?//生命周期 - 挂载完成(可以访问DOM元素)
 ?mounted() {
 ? ?this.axios.defaults.headers.common["token"] = 6666;
 ? ?this.getAdmins(); // 页面加载完成后调用这个函数
  },
};
</script>
<style>
table {
 ?border: 1px solid black;
}
th,
td,
tr {
 ?border: 1px solid black;
 ?text-align: center;
 ?width: 150px;
}
/* @import url(); 引入公共css类 */
</style>
?十一、使用Axios发送请求
11.1 什么是 Axios
Axios 是一个开源的可以用在浏览器端和 NodeJS 的异步通信框架,她的主要作用就是实现 AJAX 异步通信,其功能特点如下:
从浏览器中创建 XMLHttpRequests
从 node.js 创建 http 请求
支持 Promise API
拦截请求和响应
转换请求数据和响应数据
取消请求
自动转换 JSON 数据
客户端支持防御 XSRF(跨站请求伪造)
GitHub:GitHub - axios/axios: Promise based HTTP client for the browser and node.js
11.2 为什么要使用 Axios
由于 Vue.js 是一个 视图层框架 并且作者(尤雨溪)严格准守 SoC (关注度分离原则),所以 Vue.js 并不包含 AJAX 的通信功能,为了解决通信问题,作者单独开发了一个名为 vue-resource 的插件,不过在进入 2.0 版本以后停止了对该插件的维护并推荐了 Axios 框架
11.3 Axios的使用
11.3.1 安装vue axios
npm install --save axios vue-axios11.3.2 在main.js中引入
在项目中使用axios模块
import Vue from 'vue'
import axios from 'axios'
import VueAxios from 'vue-axios'
?
Vue.use(VueAxios, axios)
11.4 发送axios请求
在使用axios时,要注意到配置选项中包含params和data两者
1.params是添加到url的请求字符串中的,用于get请求;
2.而data是添加到请求体(body)中的, 用于post请求;
11.4.1axios使用方法-post
this.$axios({ ?//这种格式,是需要每个参数都弄成对象的
 ? ? ? ?methods: 'POST',
 ? ? ? ?url: '#',
 ? ? ? ?data: {
 ? ? ? ? ?key1: val1,
 ? ? ? ? ?key2: val2
 ? ? ?  },
 ? ? ? ?timeout: 1000,
 ? ? ? ?baseURL:'xxxx'
 ? ? ? ?...//其他相关配置
 ? ?  })
11.4.2axios使用方法-get
 ?this.$axios({
 ? ? ? ?methods: 'get',
 ? ? ? ?url: '#',
 ? ? ? ?params: { ?//注意是params,get请求必须写上params,不能写data
 ? ? ? ? ?key1: val1,
 ? ? ? ? ?key2: val2
 ? ? ?  },
 ? ? ? ?timeout: 1000,
 ? ? ? ?baseURL:'xxxx'
 ? ? ? ?...//其他相关配置
 ? ?  })
注意:
在get请求下,参数需要使用【params】来设置,
而post请求中,是使用data来传递的
11.4.3axios的简化写法
this.$axios.get('url')
this.$axios.post('url')
注意:这种直接没有参数的,就写个url就行了
get请求直接写参数是错误写法,会导致请求无法携带参数
如果get请求有参数,必须使用params:{}括起来
11.4.4axios请求案例
如果带token的话可以在app.vue中的mounted里面设置全局的
 mounted(){
 ?  this.axios.defaults.headers.common['token'] = 6666;
  }
创建一个.vue文件书写一下代码:
<template>
 ?<div class="">
 ? ?<table>
 ? ? ?<tr>
 ? ? ? ?<th>编号</th>
 ? ? ? ?<th>账号</th>
 ? ? ? ?<th>密码</th>
 ? ? ?</tr>
 ? ? ?<tr v-for="(admin, index) in admins" v-bind:key="index">
 ? ? ? ?<td>{{ admin.id }}</td>
        <td>{{ admin.username }}</td>
 ? ? ? ?<td>{{ admin.password }}</td>
 ? ? ?</tr>
 ? ?</table>
 ?</div>
</template>
?
<script>
export default {
 ?data(){
 ? ? ?data() {
 ? ?//这里存放数据
 ? ?return {
 ? ? ?admins: [],
 ?  };
  },
?
  },
 ?methods:{
    getAdmins() {
 ? ? ?this.axios({
 ? ? ? ?methods:"get",
 ? ? ? ?url: "http://localhost:8081/admin/list",
 ? ? ? ?params: {
 ? ? ? ? ?page: 1,
 ? ? ? ? ?limit: 10,
 ? ? ?  },
 ? ?  })
 ? ? ?  .then((res) => {
 ? ? ? ? ?this.admins = res.data.data;
 ? ? ?  })
 ? ? ?  .catch(function (error) {
 ? ? ? ? ?//处理错误情况
 ? ? ? ? ?console.log(error);
 ? ? ?  })
 ? ? ?  .then(function () {
 ? ? ? ? ?//总是会执行
 ? ? ?  });
 ?  }
 ?  },
 ? ? ?mounted() {
 ? ?this.axios.defaults.headers.common['token'] = 6666;
 ? ?this.getAdmins(); // 页面加载完成后调用这个函数
  }, ?
  }
}
</script>
11.4.5 服务端解决跨域问题
<mvc:cors> ?
 ? ?<mvc:mapping path="/"
 ? ? ? ?allowed-origins="*"
 ? ? ? ?allowed-methods="POST, GET, OPTIONS, DELETE, PUT,PATCH"
 ? ? ? ?allowed-headers="Content-Type, Access-Control-Allow-Headers, Authorization, X-Requested-With"
 ? ? ? ?allow-credentials="true" />
</mvc:cors>
在spring-mvc.xml中加入上述这一段。其中,allowed-origins指的是允许的访问源的域名,"*"表示任何人都可以访问,也可以指明具体的域名
11.4.6解决axios无法传递data中的参数问题
原因:默认情况下发送axios时请求头中的内容类型为: (后端没有使用@RequestBody)
Content-Type:application/json;charset=UTF-8而实际服务端需要的是:
Content-Type:application/x-www-form-urlencoded因此,使用axios的qs内置库中的方法进行内容类型的转换。
import Qs from 'qs'
?
this.axios({
    method:'post',
    url:'http://localhost:8081/regist',
    transformRequest: [function (data) {
        return Qs.stringify(data)
    }],
    data:{
        email:this.email
    }
})
.then(function (response) {
    alert(response.data.message)
});
十二、 Vuex状态集中式管理
12.1 什么是Vuex
Vuex 是一个专为 Vue.js 应用程序开发的 状态管理模式。它采用集中式存储管理应用的所有组件的状态,并以相应的规则保证状态以一种可预测的方式发生变化。
12.2步骤
1.先在创建一个没有使用 vuex的组件 MyVuex.vue
<template>
 ?<div class=''>
 ?  vuex
 ? ?<p>当前数字: {{number}} is {{evenOrOdd}}</p>
 ? ?<button v-on:click="jia()">加</button>
 ? ?<button @click="jian()">减</button>
 ?</div>
</template>
<script>
 ?export default {
 ? ?data() {
 ? ? ?//这里存放数据
 ? ? ?return {
 ? ? ? ?number:0
 ? ?  }
 ?  },
 ? ?//监听属性 类似于data概念
 ? ?computed: {
 ? ? ? ?evenOrOdd(){
 ? ? ? ? ? ?return this.number%2==0?'偶数':'奇数'
 ? ? ?  }
 ?  },
 ? ?//方法集合
 ? ?methods: {
 ? ? ? ?jia(){
 ? ? ? ? ? ?this.number++;
 ? ? ?  },
 ? ? ? ?jian(){
 ? ? ? ? ? ?this.number--;
 ? ? ?  }
 ?  },
  }
</script>
?12.3 安装
1.如果不想安装可以在构建项目时勾选此选项:?
?
2.也可以在项目根目录执行如下命令来安装 Vuex
若失败,可使用cnpm
npm install vuex --save修改
main.js文件,导入 Vuex,关键代码如下:
import Vuex from 'vuex'
Vue.use(Vuex);
npm install vuex --save但是 如果项目里 需要多个组件 共享这个 number 的值 ,也就是 number 的变化 很多组件都能感知到 怎么实现,vuex 状态集中式管理 就是解决这个问题的。
首先 安装
修改
main.js文件,导入 Vuex,关键代码如下:
import Vuex from 'vuex'
Vue.use(Vuex);
创建vuex配置文件 在 src 目录下创建一个名为 store 的目录并新建一个名为 index.js 文件用来配置 Vuex,代码如下:
import Vue from 'vue'
import Vuex from 'vuex'
Vue.use(Vuex);
?
export default new Vuex.Store({
 ? ?// 全局 state 对象,用于保存所有组件的公共数据
 ? ?state: {
 ? ? ? ?//在组件中是通过 this.$store.state.number 来获取
 ? ? ? ?number: 0
 ?  },
 ? ?// 实时监听 state 值的最新状态,注意这里的 getters 可以理解为计算属性
 ? ?getters: {
 ? ? ? ?// 在组件中是通过 this.$store.getters.evenOrOdd 来获取
 ? ? ? ?evenOrOdd(state) {
 ? ? ? ? ? ?return state.number % 2 == 0 ? '偶数' : '奇数'
 ? ? ?  }
 ?  },
 ? ?// 定义改变 state 初始值的方法,这里是唯一可以改变 state 的地方,缺点是只能同步执行
 ? ?mutations: {
 ? ? ? ?// 在组件中是通过 this.$store.commit('jia'); 方法来调用 mutations
 ? ? ? ?jia(state) {
 ? ? ? ? ? ?state.number++
 ? ? ?  },
 ? ? ? ?jian(state) {
 ? ? ? ? ? ?state.number--
 ? ? ?  }
 ?  },
 ? ?// 定义触发 mutations 里函数的方法,可以异步执行 mutations 里的函数
 ? ?actions: {
?
 ? ? ? ?// 在组件中是通过 this.$store.dispatch('jia'); 来调用 actions
 ? ? ? ?jia(context) {
 ? ? ? ? ? ?context.commit('jia')
 ? ? ?  },
 ? ? ? ?// 在组件中是通过 this.$store.dispatch('jian'); 来调用 actions
 ? ? ? ?jian({ commit, state }) { ? ?//解构 context 对象  可以拿到对象属性  commit  和  state
 ? ? ? ? ? ?if (state.number > 0) {
 ? ? ? ? ? ? ? ?commit('jian')
 ? ? ? ? ?  }
 ? ? ?  }
 ?  },
 ? ?modules: {
?
 ?  }
})
修改 main.js 增加刚才配置的 store/index.js,关键代码如下:
import Vue from 'vue'
import Vuex from 'vuex'
import store from './store'
?
Vue.use(Vuex);
?
new Vue({
 ?el: '#app',
 ?store
});
修改MyVuex.vue
<p>当前数字: {{$store.state.number}} is {{$store.getters.evenOrOdd}}</p>
 ? ?<button v-on:click="jia()">加</button>
 ? ?<button @click="jian()">减</button>
 ? ?methods: {
 ? ? ? ?jia(){
 ? ? ? ? ? ?// this.$store.commit('jia'); // 同步调用
 ? ? ? ? ? ?this.$store.dispatch('jia'); // 异步调用
 ? ? ?  },
 ? ? ? ?jian(){
 ? ? ? ? ?// this.$store.commit('jian'); // 同步调用
 ? ? ? ? ?this.$store.dispatch('jian'); // 异步调用
 ? ? ?  }
 ?  },
依然 可以实现之前的效果
但是感觉 每次 都写 $.store.xxx.xxx 太长了 ,怎么办?
// 不想每次都写 $store.state.xxx ?  就导入组件然后计算属性 ? ?
//  第一步:在MyVuex.vue中的<script>标签下导入
import { mapState, mapGetters, mapActions } from "vuex";
//计算属性 类似于data概念
computed: {
 ? ?// evenOrOdd(){
 ? ?// ? ? return this.number%2==0?'偶数':'奇数'
 ? ?// }
?
 ? ?// 第二步
 ? ?...mapState(['number']),
 ? ?...mapGetters(['evenOrOdd']) ?// 如果 名字不一致
?
 ? ?//...mapGetters({'evenOrOdd':'evenOrOdd222'}) ?  // 如果 名字不一致  vuex 中的 getters 内部的方法名 为 evenOrOdd222 ? 不建议这样写
},
methods: {

 ? ?// jia(){
 ? ?// ? ? this.number++
 ? ?// },
 ? ?// jian(){
 ? ?// ? ? this.number--
 ? ?// }
?
 ? ?//jia(){
 ? ?// ?  this.$store.dispatch('jia')
 ? ?//},
 ? ?//jian(){
 ? ?// ? ? this.$store.dispatch('jian')
 ? ?//}
 ? ?...mapActions(['jia','jian'])
},
<div>
 ? ? <!-- <p>当前数字 {{$store.state.number}} is {{$store.getters.evenOrOdd}}</p> ? ?  -->
?
 ? ?<!-- // 第三步  -->
 ? ?<p>当前数字: {{number}} is {{evenOrOdd}}</p>
 ? ?<button v-on:click="jia()">加</button>
 ? ?<button @click="jian()">减</button>
</div>
12.4解决浏览器刷新Vuex 数据消失问题
- 问题描述
Vuex 的状态存储是响应式的,当 Vue 组件从 store 中读取状态的时候,若 store 中的状态发生变化,那么相应的组件也会相应地得到高效更新。但是有一个问题就是:vuex 的存储的数据只是在页面的中,相当于我们定义的全局变量,刷新之后,里边的数据就会恢复到初始化状态。但是这个情况有时候并不是我们所希望的。?
- 解决方案
监听页面是否刷新,如果页面刷新了,将 state 对象存入到 sessionStorage 中。页面打开之后,判断 sessionStorage 中是否存在 state 对象,如果存在,则说明页面是被刷新过的,将 sessionStorage 中存的数据取出来给 vuex 中的 state 赋值。如果不存在,说明是第一次打开,则取 vuex 中定义的 state 初始值。
- 修改代码
在 App.vue 中增加监听刷新事件
 ?export default {
 ? ?name: 'App',
 ? ?mounted() {
 ? ? ?window.addEventListener('unload', this.saveState);
 ?  },
 ? ?methods: {
 ? ? ?saveState() {
 ? ? ? ?sessionStorage.setItem('state', JSON.stringify(this.$store.state));
 ? ?  }
 ?  }
  }
修改 store/index.js 中的 state
// 设置刷新浏览器number值不改变
state: sessionStorage.getItem('state') ? JSON.parse(sessionStorage.getItem('state')) : {
 ?user: {
 ? ?name: ''
  }
},
思考: 此时 复制 MyVuex.vue 组件 复制出来一个新的 MyVuex2.vue , 访问这两个 页面 为什么 number 的值 却没有共享?


vuex 和 vuex 2 中 number 的值怎么不一致? 注意 这是两个窗口 相当于是两个人,所以不一致, 再试试在一个窗口 进行页面跳转 就会发现一致了
十三、Vue实战增删改查上传文件
工具:前端VSCode,后端Idea,数据库MySql
13.1前端vue的js配置文件
相关配置.js文件配置
13.1.1src > man.js文件
main.js是项目的入口文件,
项目中所有的页面都会加载main.js,所以main.js,主要有三个作用:
- 实例化Vue。
- 放置项目中经常会用到的插件和CSS样式。例如: 网络请求插件:
axios和vue-resource、图片懒加载插件:vue-lazyload- 存储全局变量。例如(用于的基本信息)
import Vue from 'vue'
import App from './App'
import router from './router'  //引入路由模块
import axios from 'axios'
import VueAxios from 'vue-axios'
import Vuex from 'vuex'
import store from './store'
import ElementUI from 'element-ui'; // 引入element-ui
import 'element-ui/lib/theme-chalk/index.css';  // element-ui的css样式要单独引入

// Vue.prototype.$axios = axios
Vue.config.productionTip = false
Vue.use(VueAxios, axios)
Vue.use(Vuex)
Vue.use(ElementUI);   // 这种方式引入了ElementUI中所有的组件

/* eslint-disable no-new */
new Vue({
  store,
  el: '#app',
  router, //使用路由模块
  components: { App },
  template: '<App/>'
})
13.1.2src > router > index.js文件
该文件用来配置路由,路由用于设定访问路径,并将路径和组件映射起来,路由实际上就是可以理解为指向,就是我在页面上点击一个按钮需要跳转到对应的页面,这就是路由跳转。
import Vue from 'vue'
import Router from 'vue-router'
Vue.use(Router)

export default new Router({
  routes: [
    // 默认跳转登录页面
    {
      path: '/',
      name: 'login',
      component: () => import('@/pages/Login.vue')
    },

    // 跳转home主页面
    {
      path: '/home',
      name: 'home',
      component: () => import('@/pages/Home.vue'),
      children: [

        // 跳转用户信息页面
        {
          path: '/home/adminList',
          component: () => import('@/pages/AdminList.vue'),
          children: [

            // 跳转增加用户页面
            {
              path: '/home/adminAdd',
              component: () => import('@/pages/AdminAdd.vue')
            },

            // 跳转更新用户页面
            {
              path: '/home/adminEdit',
              component: () => import('@/pages/AdminEdit.vue')
            },

            //跳转详情页面
            {
              path: '/home/adminDetail',
              component: () => import('@/pages/AdminDetail.vue')
            }
          ]
        },
      ]
    },
  ]
})
13.1.3src > store > index.js文件
store用于管理状态、共享数据以及在各个组件之间管理外部状态,store是vuex应用的核心,也就是一个容器,包含着应用中大部分的状态,更改store中的状态唯一方法是提交mutation。本案例用来展示用户名。

import Vue from 'vue'
import Vuex from 'vuex'
Vue.use(Vuex);

export default new Vuex.Store({
    // 全局 state 对象,用于保存所有组件的公共数据
    // 设置刷新浏览器username值不改变
    state: sessionStorage.getItem('state') ? JSON.parse(sessionStorage.getItem('state')) : {
        admin:{username:'',}
      },

    // 实时监听state值的最新状态,注意这里的getters可以理解为计算属性
    getters: {
        //上面的username一个计算属性
        getAdmin(state){
            return state.admin;
        }
    },

    // 定义改变state初始值的方法,这里是唯一可以改变state的地方,缺点是只能同步执行
    mutations: {
        // 在组件中是通过this.$store.commit('updateAdmin')方法来调用mutations
        updateAdmin(state,admin){
            //把admin用户放到state中,也就是放到全局里面
            state.admin = admin;
        },
    },

    // 定义触发mutations里函数的方法,可以异步执行mutations里的函数
    actions: {
        // 在组件中是通过 this.$store.dispatch('asyncUpdateAdmin')来调用 actions
        //取出登录成功时存进去的当前用户信息
        asyncUpdateAdmin(context,admin){
            context.commit("updateAdmin",admin)
        },
    },
})
13.1.4src > components >
upload >policy.js文件
该文件用来配置文件上传前端请求后台签名接口,此次上传方式采用前端请求后台签名,然后前端凭借签名上传文件到OSS,不再用后端去上传文件到OSS,让前端来做。
// import request from '@/utils/request'
/**
 * 上传文件时请求后台获取凭证
 */
export function policy(_self){
  return new Promise((resolve,reject) => {

    //请求后台签名接口,拿到签名数据
    _self.axios.get("http://localhost:8080/oss/policy",{}).then(({data}) => {
      resolve(data);
    })
  })
}
13.2前端Vue页面及代码
13.2.1App.vue代码
<template>
  <div id="app">
    <div class="content">
      <router-view></router-view>
    </div>
  </div>
</template>

<script>
//导入组件
export default {
  mounted(){
    // // 监听页面属性 页面刷新调用
    // window.addEventListener('unload', this.saveState);
  },
}
</script>
<style>
</style>
13.2.2登录页面及代码

在src下创建pages文件夹,然后创建Login.vue?
<template>
  <div class="login-box">
    <el-form ref="form" :model="form" :rules="rules" label-width="80px">
        <h3 style="font-family:楷体">欢迎登录</h3>
        <el-form-item label="用户名" prop="username">
            <el-input v-model="form.username" placeholder="请输入用户名"></el-input>
        </el-form-item>
        <el-form-item label="密码" prop="password">
            <el-input type="password" v-model="form.password" placeholder="请输入密码"></el-input>
        </el-form-item>
        <el-form-item>
            <el-button type="primary" @click="onSubmit('form')">登录</el-button>
        </el-form-item>
    </el-form>
  </div>
</template>

<script>
  export default {
    //import引入的组件需要注入到对象中才能使用
    components: {},
    props: {},
    data() {
      //这里存放数据
      return {
        form: {
            username:"",
            password:"",
        },

        // 表单校验
        rules: {
            username:[
                { required:true,message:"请输入用户名",trigger:"blur"},
                {
                    min:3,
                    max:20,
                    message:"长度在3到20个字符",
                    trigger:"blur",
                },
            ],
            password:[
                {required:true,message:"请输入密码",trigger:"blur"},
                {
                    min:3,
                    max:20,
                    message:"长度在3到20个字符",
                    trigger:"blur",
                },
            ],
        },
      };

    },
    //监听属性 类似于data概念
    computed: {},
    //监控data中的数据变化
    watch: {},
    //方法集合
    methods: {
        onSubmit(formName) {
            this.$refs[formName].validate((valid) => {
                var vm = this;
                console.log("这是vm")
                console.log(vm.form.username)
                if(valid) {
                    console.log("表单验证通过");
                    // 发送axios请求
                    this.axios({
                        method:"get",
                        url:"http://localhost:8080/admin/login",

                        params:{
                            // 获取的输入框的username值
                            username:vm.form.username,

                            // 获取的输入框的password值
                            password:vm.form.password,
                        }
                    }).then(function (resp){
                        console.log(resp.data)
                        // debugger
                        if(resp.data.code == 200){
                            //登录成功,要向vuex中存放user对象
                            var admin = resp.data.data.currentAdmin;

                            //登录成功将token放入本地存储
                            var token = resp.data.data.token;
                            window.localStorage.setItem("token",token);

                            //把登陆成功用户信息存到state中
                            console.log(admin)
                            vm.$store.dispatch("asyncUpdateAdmin",admin);

                            vm.$message({
                                message:"登录成功",
                                type:"success",
                            });
                            setTimeout(function(){
                                //跳转到首页
                                vm.$router.push("/home");
                            },2000);
                        } else {
                            vm.$message.error("用户名或密码错误");
                        }
                    });
                } else {
                    console.log("表单验证失败");
                }
            })
        }

    },
  }
</script>
<style scoped>
 /* @import url(); 引入公共css类 */
 .login-box {
    width: 500px;
    height: 300px;
    border:1px solid #dcdfe6;
    margin: 150px auto;
    padding: 20px 50px 20px 30px;
    border-radius: 20px;
    box-shadow: 0px 0px 20px #dcdfe6;
 }
</style>
13.2.3主页面及代码
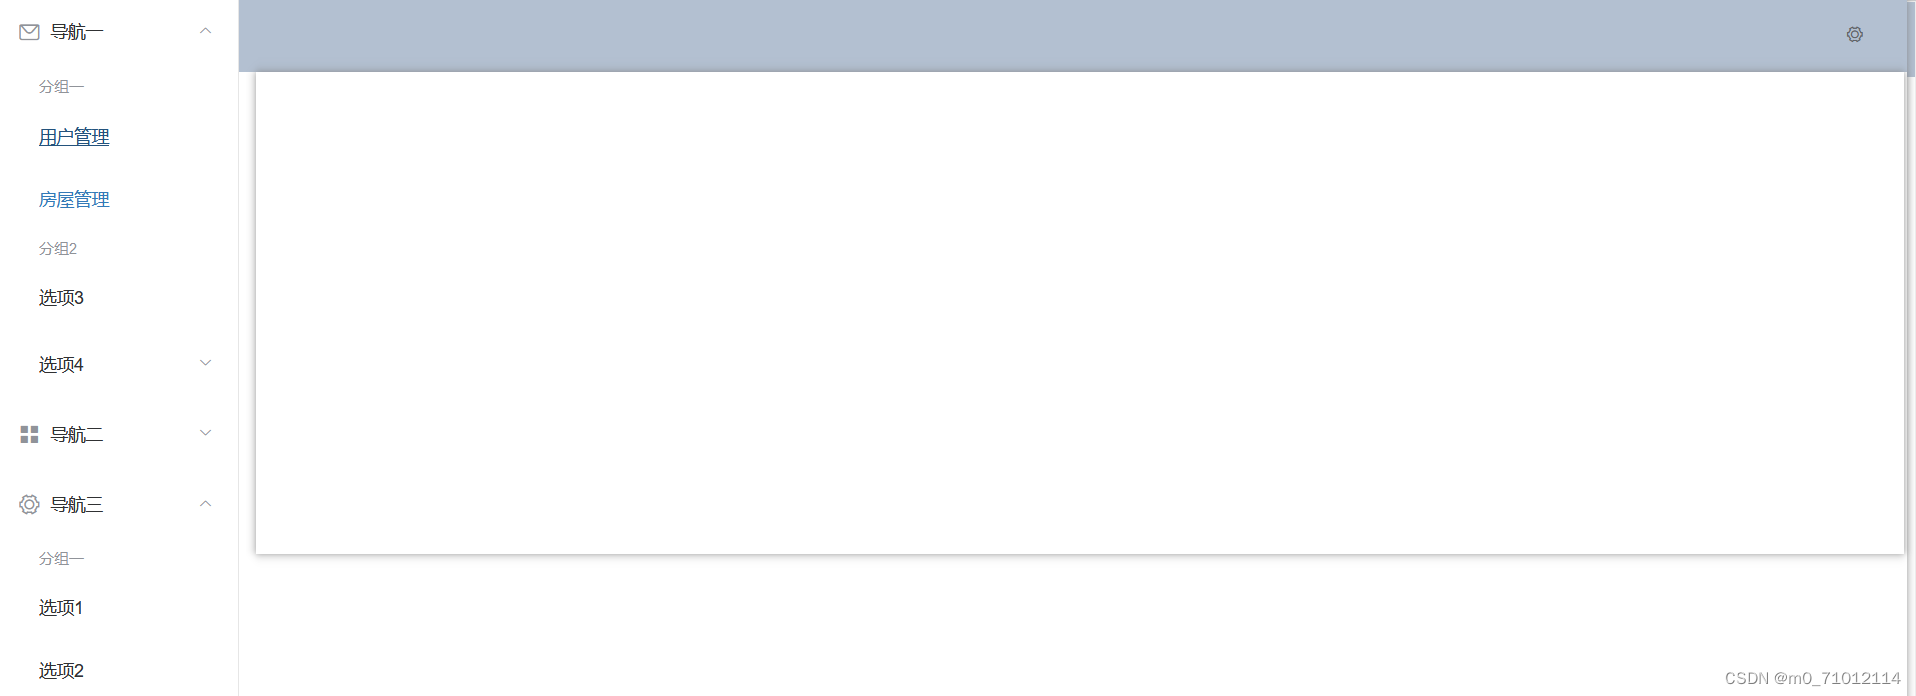
在src下的pages文件夹下面创建Home.vue?
<template>
  <el-container style="height: 703px; border: 1px solid #eee">
    <el-aside width="200px" style="background-color: rgb(238, 241, 246)">
      <el-menu :default-openeds="['1', '3']">
        <el-submenu index="1">
          <template slot="title"
            ><i class="el-icon-message"></i>导航一</template
          >
          <el-menu-item-group>
            <template slot="title">分组一</template>
            <el-menu-item index="1-1">
              <router-link to="/home/adminList">用户管理</router-link>
            </el-menu-item>
            <el-menu-item index="1-2">
              <router-link to="/home/roomList">房屋管理</router-link>
            </el-menu-item>
          </el-menu-item-group>
          <el-menu-item-group title="分组2">
            <el-menu-item index="1-3">选项3</el-menu-item>
          </el-menu-item-group>
          <el-submenu index="1-4">
            <template slot="title">选项4</template>
            <el-menu-item index="1-4-1">选项4-1</el-menu-item>
          </el-submenu>
        </el-submenu>
        <el-submenu index="2">
          <template slot="title"><i class="el-icon-menu"></i>导航二</template>
          <el-menu-item-group>
            <template slot="title">分组一</template>
            <el-menu-item index="2-1">选项1</el-menu-item>
            <el-menu-item index="2-2">选项2</el-menu-item>
          </el-menu-item-group>
          <el-menu-item-group title="分组2">
            <el-menu-item index="2-3">选项3</el-menu-item>
          </el-menu-item-group>
          <el-submenu index="2-4">
            <template slot="title">选项4</template>
            <el-menu-item index="2-4-1">选项4-1</el-menu-item>
          </el-submenu>
        </el-submenu>
        <el-submenu index="3">
          <template slot="title"
            ><i class="el-icon-setting"></i>导航三</template
          >
          <el-menu-item-group>
            <template slot="title">分组一</template>
            <el-menu-item index="3-1">选项1</el-menu-item>
            <el-menu-item index="3-2">选项2</el-menu-item>
          </el-menu-item-group>
          <el-menu-item-group title="分组2">
            <el-menu-item index="3-3">选项3</el-menu-item>
          </el-menu-item-group>
          <el-submenu index="3-4">
            <template slot="title">选项4</template>
            <el-menu-item index="3-4-1">选项4-1</el-menu-item>
          </el-submenu>
        </el-submenu>
      </el-menu>
    </el-aside>

    <el-container>
      <el-header style="text-align: right; font-size: 12px">
        <el-dropdown>
          <i class="el-icon-setting" style="margin-right: 15px"></i>
          <el-dropdown-menu slot="dropdown">
            <el-dropdown-item>查看</el-dropdown-item>
            <el-dropdown-item>新增</el-dropdown-item>
            <el-dropdown-item>删除</el-dropdown-item>
          </el-dropdown-menu>
        </el-dropdown>
        <!-- 取出在store中index.js设置的全局属性admin{username:''} -->
        <!-- <span>{{this.$store.state.admin.username}}</span> -->
        <!-- 因为才计算属性计算了,所以通过getters也可以去到 -->
        <span>{{ this.$store.getters.getAdmin.username }}</span>
      </el-header>

      <el-main>
        <router-view></router-view>
      </el-main>
    </el-container>
  </el-container>
</template>
<script>
export default {
  mounted() {
    //定时刷新token
    setInterval(this.refreshToken, 1000*60*60*24);
  },

  //import引入的组件需要注入到对象中才能使用
  components: {},
  props: {},
  data() {
    //这里存放数据
    return {};
  },

  methods: {
    refreshToken() {
      //发送axios请求,获取新的token
      this.axios({
        url:"http://localhost:8080/admin/refreshToken",
      }).then((res) => {
        // 后端生成新的token,响应回来再存起来
        window.localStorage.setItem("token",res.data.data.token)
      })
    },
  },

  //生命周期 创建之前
  beforeCreate() {
 //从本地存储拿到登录成功之后写回来的token,设置全局的headers携带token
    this.axios.defaults.headers.common["token"] = `${localStorage.getItem("token")}`;
  }
};
</script>
<style scoped>
/* @import url(); 引入公共css类 */
.el-header {
  background-color: #b3c0d1;
  color: #333;
  line-height: 60px;
}
.el-aside {
  color: #333;
}
</style>
注意:当用户登录成功后,后端响应一个token,前端接受token将token存到本地在?beforeCreate()里设置了全局的token,这样就不用每次请求都设置token请求头了。
?13.2.4条件和分页查询页面及代码
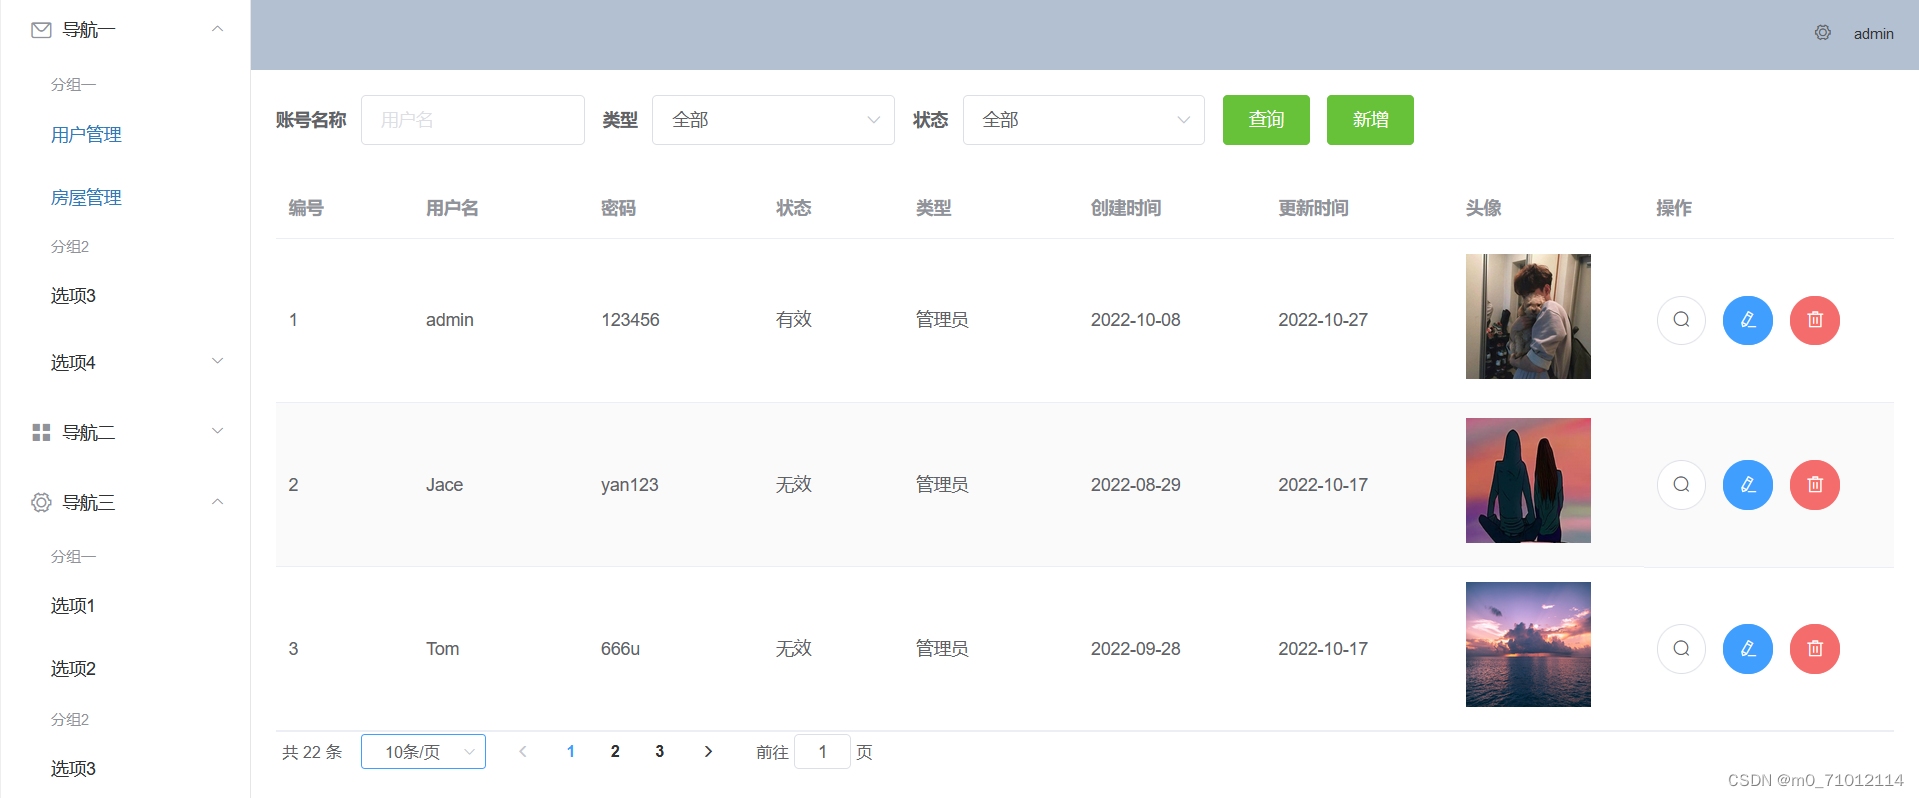
在src下的pages文件夹下面创建AdminList.vue
根据需要自行设置每页显示条数,只需更改data里面的pageSize属性。
<template>
  <div class="">
    <el-form :inline="true" :model="formInline" class="demo-form-inline">
      <el-form-item label="账号名称">
        <el-input v-model="formInline.username" placeholder="用户名"></el-input>
      </el-form-item>
      <el-form-item label="类型">
        <el-select v-model="type" clearable placeholder="请选择">
          <el-option
            v-for="item in types"
            :key="item.value"
            :label="item.label"
            :value="item.value"
          >
          </el-option>
        </el-select>
      </el-form-item>
      <el-form-item label="状态">
        <el-select v-model="flag" clearable placeholder="请选择">
          <el-option
            v-for="item in flags"
            :key="item.value"
            :label="item.label"
            :value="item.value"
          >
          </el-option>
        </el-select>
      </el-form-item>
      <el-form-item>
        <el-button type="success" @click="getAdmins()">查询</el-button>
        <el-button type="success" @click="handleClickAdd()">新增</el-button>
      </el-form-item>
    </el-form>
    <el-table :data="admins" stripe style="width: 100%; height: 100%">
      <el-table-column prop="id" label="编号" width="110"></el-table-column>
      <el-table-column
        prop="username"
        label="用户名"
        width="140"
      ></el-table-column>
      <el-table-column prop="password" label="密码" width="140">
      </el-table-column>
      <el-table-column
        prop="flag"
        label="状态"
        width="112"
        :formatter="formatterFlag"
      >
      </el-table-column>
      <el-table-column prop="type" label="类型" width="140"> </el-table-column>
      <el-table-column prop="createTime" label="创建时间" width="150">
      </el-table-column>
      <el-table-column prop="updateTime" label="更新时间" width="150">
      </el-table-column>
      <el-table-column prop="picture" label="头像" width="150">
        <!-- 图片的显示 -->
        <template slot-scope="scope">
          <el-image
            style="width: 100px; height: 100px"
            :src="scope.row.picture"
            @click="previewPic(scope.row.picture)"
            :preview-src-list="srcList"
          >
          </el-image>
        </template>
      </el-table-column>
      <el-table-column fixed="right" label="操作" width="200">
        <template slot-scope="scope">
          <!-- 查看详情 -->
          <el-button
            @click="handleClickInfo(scope.row)"
            icon="el-icon-search"
            circle
          ></el-button>
          <!-- 编辑 -->
          <el-button
            @click="handleClickEdit(scope.row)"
            type="primary"
            icon="el-icon-edit"
            circle
          ></el-button>
          <!-- 删除 -->
          <el-button
            @click="handleClickDelete(scope.row)"
            type="danger"
            icon="el-icon-delete"
            circle
          ></el-button>
        </template>
      </el-table-column>
    </el-table>

    <el-pagination
      @size-change="handleSizeChange"
      @current-change="handleCurrentChange"
      :current-page="currentPage"
      :page-sizes="[10, 15, 20, 25, 30]"
      :page-size="pageSize"
      :total="total"
      layout="total,sizes,prev,pager,next,jumper"
    >
    </el-pagination>
    <!-- 编辑和添加对话框路由显示 -->
    <router-view></router-view>
  </div>
</template>
<script>
export default {
  //import引入的组件需要注入到对象中才能使用
  components: {},
  props: {},
  data() {
    //这里存放数据,渲染表格
    return {
      srcList: [
        "https://fuss10.elemecdn.com/8/27/f01c15bb73e1ef3793e64e6b7bbccjpeg.jpeg",
      ], // 图片预览集合,里面放链接
      formInline: {
        username: "", //条件查询用户名
        // type: "", // 查询类型
        // flag: "", // 查询状态
      },
      currentPage: 1, // 默认第一页
      pageSize: 3, // 默认每页显示10条
      total: 0, // 总条目数,默认0
      admins: [],

      //下拉框方式搜索账号类型
      types: [
        {
          value: "",
          label: "全部",
        },
        {
          value: "管理员",
          label: "管理员",
        },
        {
          value: "用户",
          label: "用户",
        },
      ],
      type: "",

      //下拉框方式搜索账号状态
      flags: [
        {
          value: "",
          label: "全部",
        },
        {
          value: "1",
          label: "有效",
        },
        {
          value: "2",
          label: "无效",
        },
        {
          value: "3",
          label: "冻结",
        },
      ],
      flag: "",
    };
  },
  //监听属性 类似于data概念
  computed: {},
  //监控data中的数据变化
  watch: {},
  //方法集合
  methods: {
    // 点击图片预览,
    previewPic(url) {
      this.srcList = []; // 清空srcList数组

      //push():在末尾追加一个或多个元素返回新的长度
      //pop():删除并返回数组的最后一个元素
      //shift():删除并返回数组的第一个元素
      this.srcList.push(url);
    },
    //查询用户信息
    getAdmins() {
      console.log(this.flag);
      console.log(this.type);
      this.axios({
        methods: "get",
        url: "http://localhost:8080/admin/list",
        params: {
          page: this.currentPage, // 获取当前页码传给后台
          limit: this.pageSize, // 获取每页条数传给后台
          username: this.formInline.username, // 搜索关键字
          // type: this.formInline.type, // 搜索关键字
          // flag: this.formInline.flag, // 搜索关键字
          type: this.type, // 下拉框方式选择搜索类型
          flag: this.flag, // 下拉框方式选择搜索状态
        },
      })
        .then((res) => {
          if (res.data.code == 0) {
            // 将查询出来的admin集合和总条数赋值给data里面的admins
            this.admins = res.data.data;
            this.total = res.data.count;
            // console.log("查询用户所有信息");
            // console.log(res.data.data);
          } else {
            console.log("用户信息查询失败了!!!");
          }
        })
        .catch(function (error) {
          console.log(error);
        });
    },

    //选择每页条数时触发
    handleSizeChange(val) {
      //每页的size条数变化的时候触发
      console.log(val);
      this.pageSize = val; // 更新pageSize
      this.currentPage = 1;

      //每次改变都再次发送axios方法,请求后台
      this.getAdmins();
    },

    // 点击上/下页时触发
    handleCurrentChange(val) {
      //当前页面变化的时候触发
      this.currentPage = val; // 更新currentPage

      //每次改变都再次发送axios方法,请求后台
      this.getAdmins();
    },

    //数字类型与字符类型转换
    formatterFlag(rows) {
      // 1表示有效  2表示无效  3表示冻结
      return rows.flag == 1 ? "有效" : 2 ? "无效" : "冻结";
    },

    //增加用户
    handleClickAdd() {
      this.$router.push({
        path: "/home/adminAdd",
      });

      //每次改变都再次发送axios方法,请求后台
      this.getAdmins();
    },

    //查看详情
    handleClickInfo(row) {
      this.$router.push({
        path: "/home/adminDetail",
        query: {
          id: row.id,
        },
      });
    },

    //编辑
    handleClickEdit(row) {
      console.log(row);
      //打开编辑页面 前端的页面 跳转的时候可以携带参数
      this.$router.push({
        path: "/home/adminEdit",
        query: {
          id: row.id, // 参数id
        },
      });

      //每次改变都再次发送axios方法,请求后台
      this.getAdmins();
    },

    //删除
    handleClickDelete(row) {
      this.$confirm("此操作将永久删除该文件, 是否继续?", "提示", {
        confirmButtonText: "确定",
        cancelButtonText: "取消",
        type: "warning",
      })
        .then(() => {
          //点击确定删除进入此处
          this.axios({
            methods: "post",
            url: "http://localhost:8080/admin/delete",
            params: {
              id: row.id,
            },
          }).then((res) => {
            if (res.data.code == 200) {
              this.$message({
                type: "success",
                message: "删除成功!",
              });
              this.getAdmins();
            } else {
              this.$message({
                type: "error",
                message: "删除失败!",
              });
            }
          });
        })
        .catch(() => {
          this.$message({
            type: "info",
            message: "已取消删除",
          });
        });
    },
  },

  //生命周期 - 创建完成(可以访问当前this实例)
  created() {},
  //生命周期 - 挂载完成(可以访问DOM元素)
  mounted() {
    //页面加载完成,查询列表信息
    this.getAdmins();
  },
};
</script>
<style scoped>
/* @import url(); 引入公共css类 */
</style>
13.2.5单个文件上传代码
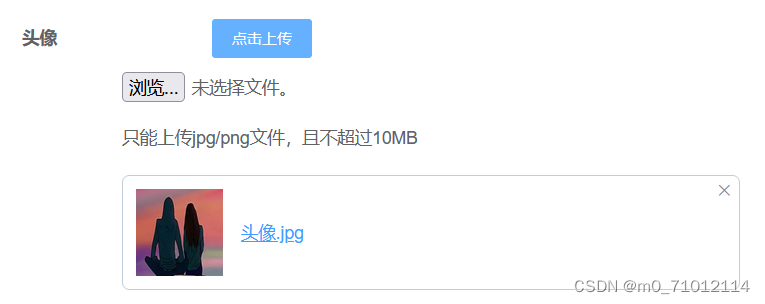
?在src文件夹下创建components文件夹,如果前面policy.js配置文件时已经创建就直接在component是下创建singleUpload.vue.
<template>
  <div class=''>
    <!--:file-list="fileList"带这个参数图片上就不显示文件名,不能点击查看了 -->
    <el-upload
    action="https://ymk1.oss-cn-hangzhou.aliyuncs.com"
    :data="dataObj"
    list-type="picture"
    :multiple="false"
    :show-file-list="showFileList"
    :before-upload="beforeUpload"
    :on-remove="handleRemove"
    :on-success="handleUploadSuccess"
    :on-preview="handlePreview"
    :on-progress="uploadProgress"
    >
      <el-button size="small" type="primary">点击上传</el-button>
      <div slot="tip" class="el-upload_tip">
        只能上传jpg/png文件,且不超过10MB
      </div>
    </el-upload>
    <el-dialog :visible.sync="dialogVisible">
        <!-- 计算属性中fileList第一个元素的url -->
    <img width="100%" :src="fileList[0].url" alt=""/>
    </el-dialog>
  </div>
</template>

<script>
import { policy } from '@/components/upload/policy';
import { getUUID } from '@/utils';
  export default {
    //import引入的组件需要注入到对象中才能使用
    components: {},
    props: {
        //value是AdminAdd.vue中的singleUpload标签里的v-model传过来的
        // v-model是双向绑定的
        value: String,
    },
    data() {
      //这里存放数据
      return {
        dataObj:{
            policy: "",
            signature: "",
            key: "",
            ossaccessKeyId: "",
            dir: "",
            host: "",
        },
        dialogVisible: false,
      }
    },
    //监听属性 类似于data概念
    computed: {

        imageUrl(){
            // value是AdminAdd.vue中的singleUpload标签里的v-model传过来的
            return this.value;
        },

        //图片名字
        imageName(){
            if(this.value != null && this.value !== ""){
                return this.value.substr(this.value.lastIndexOf("/") + 1);
            } else {
                return null;
            }
        },

        //图片列表 返回是个数组
        fileList(){
            return[
                {
                    // name: this.imageName,
                    url: this.imageUrl,
                },
            ];
        },

        showFileList: {
            get: function (){
                return(
                    this.value !== null && this.value !== "" && this.value !== undefined
                );
            },
            set: function (newValue){},
        },
    },
    //监控data中的数据变化
    watch: {},
    //方法集合
    methods: {

        emitInput(val){
            console.log("上传之后的图片地址:"+val)
            this.$emit("input",val);
        },

        //移除图片
        handleRemove(file,fileList){
            this.emitInput("");
        },

        //点击文件列表中已上传的文件时的钩子
        handlePreview(file){
            this.dialogVisible = true;
        },

        // 上传文件之前触发
        beforeUpload(file){
            console.log("......")

            let _self = this;
            return new Promise((resolve,reject) => {
                policy(_self) //调的是
                .then((res) => {
                    // policy 策略
                    _self.dataObj.policy = res.data.policy;
                    // signature 签名
                    _self.dataObj.signature = res.data.signature;
                    // oss acess-key
                    _self.dataObj.ossaccessKeyId = res.data.accessid;
                    // 上传之后的文件 路径+文件名   上传日期/uuid + 文件名
                    _self.dataObj.key = res.data.dir + getUUID() + "_${filename}";
                    // dir 是上传到oss存放的路径
                    _self.dataObj.dir = res.data.dir;
                    // host:http://localhost:8080/oss/policy
                    _self.dataObj.host = res.data.host;
                    resolve(true);
                })
                .catch((err) => {
                    reject(false);
                });
            })
        },

        //上传成功触发 拿到上传的文件的路径,然后回显
        handleUploadSuccess(res,file) {
            console.log("上传成功...");
            console.log(file.name)
            this.showFileList = true;
            this.fileList.pop();
            this.fileList.push({
                name: "success",
                url:
                  this.dataObj.host+
                  "/" +
                  this.dataObj.key.replace("${filename}",file.name),
            });
            // 调用methods中的emitInput(val)方法,将上传后的地址赋值
            this.emitInput(this.fileList[0].url);
        },
    },
  }
</script>
<style scoped>
 /* @import url(); 引入公共css类 */

</style>
13.2.6添加用户页面及代码

在src下的pages文件夹下面创建AdminAdd.vue
该页面是通过点击新增寻找/home/adminAdd路径的路由,可以看到改页面弹出在home页面之上,这是因为在home的路由配置通过children[{}]里面设置了嵌套路由。
<template>
  <div class="">
    <!-- 添加用户对话框 -->
    <el-dialog
      title="添加用户"
      :close-on-click-modal="false"
      :visible.sync="addDialogVisible"
      width="40%"
    >
      <!-- 内容主题 带有变单验证-->
      <el-form
        :model="admin"
        :rules="addAdminFormRules"
        ref="addAdminForm"
        label-position="left"
        label-width="80px"
      >
        <el-form-item label="用户名" prop="username">
          <el-input v-model="admin.username"></el-input>
        </el-form-item>
        <el-form-item label="密码" prop="password">
          <el-input v-model="admin.password"></el-input>
        </el-form-item>
        <el-form-item label="状态" prop="flag">
          <el-select v-model="admin.flag" clearable placeholder="请选择">
            <el-option
              v-for="item in flags"
              :key="item.value"
              :label="item.label"
              :value="item.value"
            >
            </el-option>
          </el-select>
        </el-form-item>
        <el-form-item label="类型" prop="type">
          <el-select v-model="admin.type" clearable placeholder="请选择">
            <el-option
              v-for="item in types"
              :key="item.value"
              :label="item.label"
              :value="item.value"
            >
            </el-option>
          </el-select>
        </el-form-item>
        <el-form-item label="头像" prop="picture">
          <!-- 调用singleUpload.vue页面 -->
          <!-- v-model将上传成功后的地址传给admin.picture -->
          <single-upload v-model="admin.picture"></single-upload>
        </el-form-item>
        <el-form-item label="操作">
          <el-button type="primary" @click="submitForm('addAdminForm')"
            >提交</el-button
          >
          <el-button @click="cancel()">取消</el-button>
        </el-form-item>
      </el-form>
    </el-dialog>
  </div>
</template>

<script>
import SingleUpload from "../components/upload/singleUpload.vue";
export default {
  //import引入的组件需要注入到对象中才能使用
  components: { SingleUpload },
  props: {},
  data() {
    //这里存放数据
    return {
      //添加用户的表单数据
      admin: {},
      imageUrl: "", //图片地址
      //控制添加用户对话框的显示与隐藏
      addDialogVisible: true,

      //添加表单的验证规则对象
      addAdminFormRules: {
        username: [
          { required: true, message: "请输入用户名", trigger: "blur" },
          {
            min: 1,
            max: 10,
            message: "用户名长度在1~10个字符",
            trigger: "blur",
          },
        ],
        password: [
          { required: true, message: "请输入密码", trigger: "blur" },
          { min: 4, max: 15, message: "密码长度在4~15个字符", trigger: "blur" },
        ],
      },

      //下拉框方式添加时选择账号状态
      flags: [
        {
          value: "1",
          label: "有效",
        },
        {
          value: "2",
          label: "无效",
        },
        {
          value: "3",
          label: "冻结",
        },
      ],
      flag: "",

      //下拉框添加时选择账号类型
      types: [
        {
          value: "管理员",
          label: "管理员",
        },
        {
          value: "用户",
          label: "用户",
        },
      ],
      type: "",
    };
  },
  //监听属性 类似于data概念
  computed: {},
  //监控data中的数据变化
  watch: {},
  //方法集合
  methods: {
    //formName可用来校验表单信息
    submitForm(formName) {
      this.$refs[formName].validate((valid) => {
        //当表单验证通过之后才能进入if语句中
        if (valid) {
          this.axios({
            method: "post",
            url: "http://localhost:8080/admin/add",
            data: this.admin,
          })
            .then((res) => {
              debugger;
              console.log("添加用户信息响应数据");
              console.log(res);
              debugger;
              if (res.data.code == 200) {
                // 添加成功给出提示
                this.$message(
                  {
                    type: "success",
                    message: "添加成功!",
                  },
                  1000
                );

                // 通过路由跳转页面
                this.$router.push({
                  path: "/home/adminList",
                });
              } else if (res.data.code == 444) {
                //添加失败给出提示
                this.$message(
                  {
                    type: "error",
                    message: "添加失败",
                  },
                  1000
                );
              }

              // 通过路由跳转页面
              this.$router.push({
                path: "/home/adminList",
              });
            })
            .catch((error) => {
              console.log(error);
            });
        }
      });
    },

    //点击取消路由到adminList页面
    cancel() {
      this.$router.push({
        path: "/home/adminList",
      });
    },
  },
};
</script>
<style scoped>
</style>
13.2.7删除动作及代码

该功能使用的弹出框代码在Home.vue中。
methods中handleClickDelete()方法里.
13.2.8编辑页面及代码

?在src下的pages文件夹下面创建AdminEdit.vue
<!--  -->
<template>
  <div class="">
     <!-- 添加用户对话框 -->
     <el-dialog title="修改用户" :close-on-click-modal="false"  :visible.sync="editDialogVisible" width="40%">
      <!-- 内容主题 带有变单验证-->
    <el-form
      ref="editAdminForm"
      label-position="left"
      label-width="80px"
      :model="admin"
    >
      <el-form-item label="用户名">
        <el-input v-model="admin.username"></el-input>
      </el-form-item>
      <el-form-item label="密码">
        <el-input v-model="admin.password"></el-input>
      </el-form-item>
      <el-form-item label="状态">
        <!-- <el-input v-model="admin.flag"></el-input> -->
        <el-select v-model="admin.flag" clearable placeholder="请选择">
          <el-option
            v-for="item in flags"
            :key="item.value"
            :label="item.label"
            :value="item.value"
          >
          </el-option>
          </el-select>
      </el-form-item>
      <el-form-item label="类型">
        <!-- <el-input v-model="admin.type"></el-input> -->
        <el-select v-model="admin.type" clearable placeholder="请选择">
          <el-option
            v-for="item in types"
            :key="item.value"
            :label="item.label"
            :value="item.value"
          >
          </el-option>
        </el-select>
      </el-form-item>
      <el-form-item label="头像">
         <!-- 调用singleUpload.vue页面 -->
          <!-- v-model将上传成功后的地址传给admin.picture -->
          <single-upload v-model="admin.picture"></single-upload>

      </el-form-item>
      <el-form-item label="操作">
        <el-button type="primary" @click="submitForm('editAdminForm')"
          >提交</el-button
        >
        <el-button @click="cancel()">取消</el-button>
      </el-form-item>
    </el-form>
  </el-dialog>
  </div>
</template>

<script>
// 这里需要引入singleUpload.vue组件,不然<single-upload>用不了
import SingleUpload from '../components/upload/singleUpload.vue';
export default {
  //import引入的组件需要注入到对象中才能使用
  components: {SingleUpload},
  props: {},
  data() {
    //这里存放数据
    return {
      admin: {},

      //控制修改用户对话框的显示与隐藏
      editDialogVisible: true,

      //下拉框方式回显账号状态
      flags: [
        {
          value: "1",
          label: "有效",
        },
        {
          value: "2",
          label: "无效",
        },
        {
          value: "3",
          label: "冻结",
        },
      ],
      flag: "",
      //下拉框回显账号类型
      types: [
        {
          value: "管理员",
          label: "管理员",
        },
        {
          value: "用户",
          label: "用户",
        },
      ],
      type: "",

    };
  },
  //监听属性 类似于data概念
  computed: {},
  //监控data中的数据变化
  watch: {},
  //方法集合
  methods: {
    //通过用户id查询信息回显
    getAdminById(id) {
      this.axios({
        methods: "get",
        url: "http://localhost:8080/admin/adminDetail",
        params: {
          id: id,
        },
      })
        .then((res) => {
          console.log("通过id查用户信息回显");
          console.log(res);
          //要看懂 后台响应回来的数据格式,拿到咱们要取得的数据
          if (res.data.code == 200) {
            this.admin = res.data.data.admin;
          }
        })
        .catch((error) => {
          console.log(error);
        });
    },

    //提交表单信息触发
    submitForm(formName) {
      this.$refs[formName].validate((valid) => {
        if (valid) {
          //发送axios请求
          this.axios.post('http://localhost:8080/admin/update',this.admin)
            .then((res) => {
              console.log("更新提交后台响应的数据");
              console.log(res);
              //要看懂 后台响应回来的数据格式,拿到咱们要取得的数据
              if (res.data.code == 200) {

                // 修改成功给出提示
                this.$message({
                type: "success",
                message: "修改成功!",
              },1000);

                // 通过路由跳转页面
                this.$router.push({
                  path:'/home/adminList'
                })

              } else if(res.data.code == 444){
                this.$message({
                type: "error",
                message: "修改失败!",
              },1000);

              // 通过路由跳转页面
              this.$router.push({
                  path:'/home/adminList'
                })

              }
            })
            .catch((error) => {
              console.log(error);
            });
        } else {
          console.log("error submit!");
          return false;
        }
      });
    },
    cancel() {
      this.$router.push({
        path: "/home/adminList",
      });
    },

  },
  //生命周期 - 挂载完成(可以访问DOM元素)
  mounted() {
    //获取 路由跳转携带的参数
    let id = this.$route.query.id;

    //获取用户详情
    this.getAdminById(id);
  },
};
</script>
<style scoped>
/* @import url(); 引入公共css类 */
</style>
13.3后端相关配置代码
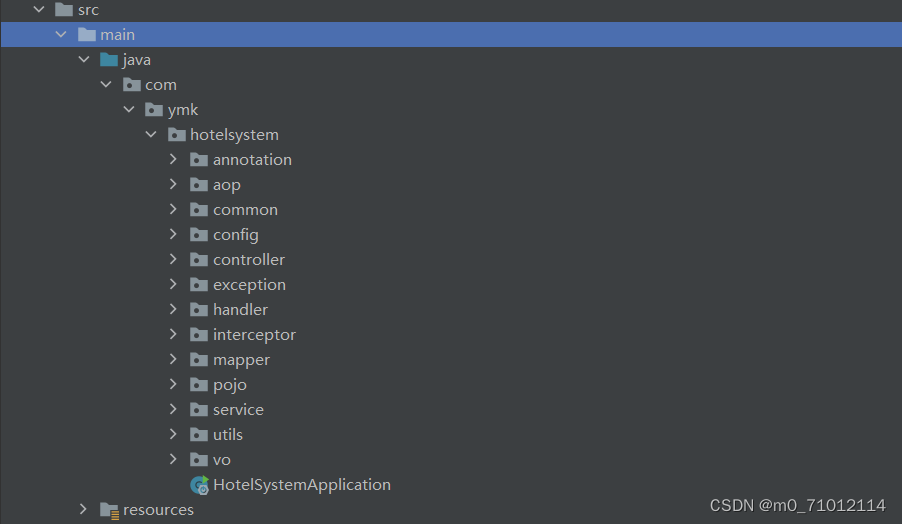
目录?
13.3.1pom.xml文件
<!--—————web开发环境,springMvc相关的依赖 内置tomcat—————-->
        <dependency>
            <groupId>org.springframework.boot</groupId>
            <artifactId>spring-boot-starter-web</artifactId>
        </dependency>

        <!--—————自带热部署插件—————-->
        <dependency>
            <groupId>org.springframework.boot</groupId>
            <artifactId>spring-boot-devtools</artifactId>
            <scope>runtime</scope>
            <optional>true</optional>
        </dependency>

        <!--—————配置类相关的依赖—————-->
        <dependency>
            <groupId>org.springframework.boot</groupId>
            <artifactId>spring-boot-configuration-processor</artifactId>
            <optional>true</optional>
        </dependency>

        <!--—————lombok可以自动生成 get set—————-->
        <dependency>
            <groupId>org.projectlombok</groupId>
            <artifactId>lombok</artifactId>
            <version>1.18.20</version>
            <optional>true</optional>
        </dependency>

        <!--—————测试—————-->
        <dependency>
            <groupId>org.springframework.boot</groupId>
            <artifactId>spring-boot-starter-test</artifactId>
            <scope>test</scope>
        </dependency>

        <!--—————mysql依赖—————-->
        <dependency>
            <groupId>mysql</groupId>
            <artifactId>mysql-connector-java</artifactId>
            <scope>runtime</scope>
        </dependency>

        <!--————— mybatis-plus代码生产器 —————-->
        <dependency>
            <groupId>com.baomidou</groupId>
            <artifactId>mybatis-plus-generator</artifactId>
            <version>3.3.2</version>
        </dependency>

        <!--—————模板 代码生成器使用模板进行生产—————-->
        <dependency>
            <groupId>org.apache.velocity</groupId>
            <artifactId>velocity</artifactId>
            <version>1.7</version>
        </dependency>

        <!--—————mybatis-plus 扩展插件 比如 分页插件依赖—————-->
        <dependency>
            <groupId>com.baomidou</groupId>
            <artifactId>mybatis-plus-extension</artifactId>
            <version>3.4.2</version>
        </dependency>

        <!--—————mysql依赖—————-->
        <dependency>
            <groupId>mysql</groupId>
            <artifactId>mysql-connector-java</artifactId>
            <scope>runtime</scope>
        </dependency>

        <!--—————fastJson依赖—————-->
        <dependency>
            <groupId>com.alibaba</groupId>
            <artifactId>fastjson</artifactId>
            <version>1.2.56</version>
        </dependency>

        <!--————— mybatis-plus插件依赖 —————-->
        <dependency>
            <groupId>com.baomidou</groupId>
            <artifactId>mybatis-plus-boot-starter</artifactId>
            <version>3.4.2</version>
        </dependency>

        <!--————— mybatis-plus代码生产器 —————-->
        <dependency>
            <groupId>com.baomidou</groupId>
            <artifactId>mybatis-plus-generator</artifactId>
            <version>3.3.2</version>
        </dependency>

        <!--—————knife4j 依赖—————-->
        <dependency>
            <groupId>com.github.xiaoymin</groupId>
            <artifactId>knife4j-spring-boot-starter</artifactId>
            <version>2.0.7</version>
        </dependency>

        <!--—————aop依赖—————-->
        <dependency>
            <groupId>org.springframework.boot</groupId>
            <artifactId>spring-boot-starter-aop</artifactId>
        </dependency>

        <!--——————新版本整合oss文件上传——————-->
        <dependency>
            <groupId>com.alibaba.cloud</groupId>
            <artifactId>aliyun-oss-spring-boot-starter</artifactId>
            <version>1.0.0</version>
        </dependency>

        <!--————————整合jwt token————————-->
        <dependency>
            <groupId>com.auth0</groupId>
            <artifactId>java-jwt</artifactId>
            <version>3.4.0</version>
        </dependency>
        <dependency>
            <groupId>io.jsonwebtoken</groupId>
            <artifactId>jjwt</artifactId>
            <version>0.7.0</version>
        </dependency>
13.3.2application.yml文件
# 服务端口号
server:
  port: 8080


spring:
  datasource: # 数据库配置
    driver-class-name: com.mysql.jdbc.Driver
    url: jdbc:mysql://localhost:3306/haiweiaicloud?serverTimezone=GMT%2B8
    username: root
    password: 123456

mybatis-plus:
  configuration:
    log-impl: org.apache.ibatis.logging.stdout.StdOutImpl # 查看sql输出日志

  global-config:
    db-config:
      logic-delete-value: 1  # 逻辑删除   1 代表已被逻辑删除
      logic-not-delete-value: 0 # 逻辑删除   0 代表未被逻辑删除
      id-type: auto  # 整个项目中设置主键自增
  mapper-locations: classpath:mapper/*.xml  # 映射mapper中xml文件

#OSS文件上传配置
alibaba:
  cloud:
    access-key: LTAI5tPsayZbQq9DNzGztFPL
    secret-key: bDWiypa4C2qrUmT8w2zfDsCiJ5ZbUC
    oss:
      endpoint: oss-cn-hangzhou.aliyuncs.com
      bucket: ymk1
13.3.3拦截器及跨域配置
全局拦截器,此代码在interceptor包下,类名MyInterceptor
作用:
? ? ? ? 进行了前置拦截的相关操作,根据token判断用户登录
package com.ymk.hotelsystem.interceptor;

import com.alibaba.fastjson.JSON;
import com.ymk.hotelsystem.annotation.UnInterception;
import com.ymk.hotelsystem.common.CheckResult;
import com.ymk.hotelsystem.common.R;
import com.ymk.hotelsystem.common.SystemConstant;
import com.ymk.hotelsystem.utils.JwtUtils;
import lombok.extern.slf4j.Slf4j;
import org.springframework.http.MediaType;
import org.springframework.web.method.HandlerMethod;
import org.springframework.web.servlet.HandlerInterceptor;
import org.springframework.web.servlet.ModelAndView;

import javax.servlet.http.HttpServletRequest;
import javax.servlet.http.HttpServletResponse;
import java.io.IOException;
import java.io.PrintWriter;
import java.lang.reflect.Method;

/**
 * @Desc 拦截器
 */
@Slf4j
public class MyInterceptor implements HandlerInterceptor {
    /**
     * 前置拦截
     */
    @Override
    public boolean preHandle(HttpServletRequest request, HttpServletResponse response, Object handler) throws Exception {
        System.out.println("拦截器前置拦截"); // 可以在此方法中解决跨域问题

        //当含有自定义请求头时必须进行域减请求
        if ("OPTIONS".equals(request.getMethod())) {//处理预检请求
            System.out.println("preflight 请求");
            return true;
        }


        System.out.println(request.getRequestURI()); // 获取请求的路径
        /**
         * 判断是否登录
         */
        // 方法处理器
        HandlerMethod handlerMethod = (HandlerMethod) handler;
        // 为防止类转换异常可以在这做个判断
        if (handler instanceof HandlerMethod) {

            Method method = handlerMethod.getMethod();
            String methodName = method.getName();
            log.info("====拦截到了方法:{},在该方法执行之前执行====", methodName);

            // 通过方法,可以获取该方法上的自定义注解,然后通过注解来判断该方法是否要被拦截
            // @UnInterception 是自定义注解
            UnInterception unInterception = method.getAnnotation(UnInterception.class);
            if (null != unInterception) {
                return true;
            }

            //判断用户有没有登录,一般登录之后的用户都有一个对应的token
            String token = request.getHeader("token");
            System.out.println("获取请求头token:" + token);
            if (null == token || "".equals(token)) {
                log.info("用户未登录,没有权限执行...请登录");

                //token为空时将信息响应到前端
                R r = R.error().message(SystemConstant.JWT_ERRCODE_NULL + ":用户未登录");
                print(response, r);
                return false;
            } else {
                // 校验token 的逻辑
                CheckResult checkResult = JwtUtils.validateJWT(token);

                if (checkResult.isSuccess()) {
                    //token令牌校验通过
                    return true;
                } else {
                    // 解析失败时将分情况通过switch响应前端
                    switch (checkResult.getErrCode()) {
                        case SystemConstant.JWT_ERRCODE_FAIL: {
                            System.out.println("签名校验不通过");
                            R r = R.error().message(SystemConstant.JWT_ERRCODE_FAIL + ":签名校验不通过");
                            print(response, r);
                            break;
                        }
                        case SystemConstant.JWT_ERRCODE_EXPIRE: {
                            System.out.println("签名已过期");
                            R r = R.error().message(SystemConstant.JWT_ERRCODE_EXPIRE + ":签名已过期");
                            print(response, r);
                            break;
                        }

                    }
                    // token校验失败返回false 拦截
                    return false;
                }
            }
        }
        // 返回true才会继续执行,返回false则取消了当前请求
        return true;
    }

    /**
     * 当token解析失败时向前端响应
     *
     * @param response
     * @param r
     */
    public void print(HttpServletResponse response, R r) {
        // 响应json数据
        response.setContentType(MediaType.APPLICATION_JSON_UTF8_VALUE);
        PrintWriter writer = null;
        try {
            writer = response.getWriter();
            // 把java 对象转为 json串
            String jsonString = JSON.toJSONString(r);
            // 响应回去的数据是json 格式
            writer.print(jsonString);
            writer.flush();
            writer.close();
        } catch (IOException e) {
            e.printStackTrace();
        }
    }

    /**
     * 后置拦截
     */
    @Override
    public void postHandle(HttpServletRequest request, HttpServletResponse response, Object handler, ModelAndView modelAndView) throws Exception {
        log.info("执行完方法后执行(Controller方法调用之后),但是此时还没进行视图渲染");
    }

    /**
     * 最终拦截
     */
    @Override
    public void afterCompletion(HttpServletRequest request, HttpServletResponse response, Object handler, Exception ex) throws Exception {
        log.info("整个请求都处理完毕,DispatcherServlet也渲染了对应的视图了,此时可以做一些清理工作");
    }
}
下面代码在config包下,类名MyMvcConfig
作用:?
? ? ? ? 解决跨域,设置不需要拦截的路径
package com.ymk.hotelsystem.config;

import com.ymk.hotelsystem.interceptor.MyInterceptor;
import org.springframework.context.annotation.Configuration;
import org.springframework.web.servlet.config.annotation.CorsRegistry;
import org.springframework.web.servlet.config.annotation.InterceptorRegistry;
import org.springframework.web.servlet.config.annotation.WebMvcConfigurer;

/**
 * @Desc MVC相关的一个配置
 */
@Configuration // 声明配置类
public class MyMvcConfig implements WebMvcConfigurer {
    /**
     * 跨域解决
     */
    @Override
    public void addCorsMappings(CorsRegistry registry) {
        // registry 解决跨域问题
        registry.addMapping("/**")
                .allowedOrigins("*") // 允许任何的域
                .allowCredentials(true) // 允许携带cookie
                .allowedMethods("GET","POST","PUT","DELETE","HEAD","PATCH","OPTIONS","TRACE","CONNECT") // 允许的请求方法
                .allowedHeaders("*"); // 允许头

    }

    /**
     * 配置拦截器
     */
    @Override
    public void addInterceptors(InterceptorRegistry registry) {
        registry.addInterceptor(new MyInterceptor())
                //访问doc.html时有关路径不拦截
                .excludePathPatterns("/webjars/**","/swagger-resources/**","/doc.html") // 不用拦截的路径
                .addPathPatterns("/**"); // 拦截所有路径
    }
}下面代码在annotation包下,注解名UnInterception,该自定义注解是用来指定某个方法不需要被拦截。只能写在方法上。
package com.ymk.hotelsystem.annotation;

/**
 * @Desc 自定义注解
 */
import java.lang.annotation.ElementType;
import java.lang.annotation.Retention;
import java.lang.annotation.RetentionPolicy;
import java.lang.annotation.Target;

/**
 * 该注解用来指定某个方法不用拦截
 */
@Target(ElementType.METHOD) // 只能写在方法上
@Retention(RetentionPolicy.RUNTIME)
public @interface UnInterception {
}
13.3.4全局异常和自定义异常
下面代码在exception包下,类名GlobalExceptionHandler
作用:
? ? ? ? 全局异常处理
package com.ymk.hotelsystem.exception;

import com.ymk.hotelsystem.common.R;
import lombok.extern.slf4j.Slf4j;
import org.springframework.http.HttpStatus;
import org.springframework.web.bind.MissingServletRequestParameterException;
import org.springframework.web.bind.annotation.ControllerAdvice;
import org.springframework.web.bind.annotation.ExceptionHandler;
import org.springframework.web.bind.annotation.ResponseBody;
import org.springframework.web.bind.annotation.ResponseStatus;

/**
 * @Desc 全局异常处理器
 */
@ControllerAdvice
@ResponseBody
@Slf4j
public class GlobalExceptionHandler {
    /**
     * 拦截业务异常,返回业务异常信息
     * @param ex
     * @return
     */
    @ExceptionHandler(BusinessErrorException.class)
    @ResponseStatus(value = HttpStatus.INTERNAL_SERVER_ERROR)
    public R handleBusinessError(BusinessErrorException ex){
        String code = ex.getCode();
        String message = ex.getMessage();
        return R.error().code(Integer.parseInt(code)).message(message);
    }

    /**
     * 空指针异常
     * @param ex NullPointerException
     * @return
     */
    @ExceptionHandler(NullPointerException.class)
    @ResponseStatus(value = HttpStatus.INTERNAL_SERVER_ERROR)
    public R handleTypeMismatchException(NullPointerException ex) {
        log.error("空指针异常,{}", ex.getMessage());
        return R.error().message("空指针异常了");
    }

    /**
     * 缺少请求参数异常
     * @param ex MissingServletRequestParameterException
     * @return
     */
    @ExceptionHandler(MissingServletRequestParameterException.class)
    @ResponseStatus(value = HttpStatus.BAD_REQUEST)
    public R handleHttpMessageNotReadableException(MissingServletRequestParameterException ex){
        log.error("缺少请求参数,{}", ex.getMessage());
        return R.error().message("缺少必要的请求参数");
    }

    /**
     * 系统异常 预期以外异常
     * @param ex
     * @return
     * 项目中,我们一般都会比较详细的去拦截一些常见异常,拦截Exception 虽然可以一劳永逸,
     * 但是不利于我们去排查或者定位问题。实际项目中,可以把拦截 Exception 异常写在 GlobalExceptionHandler
     * 最下面,如果都没有找到,最后再拦截一下 Exception 异常,保证输出信息友好。
     */
    @ExceptionHandler(Exception.class)
    @ResponseStatus(value = HttpStatus.INTERNAL_SERVER_ERROR)
    public R handleUnexpectedServer(Exception ex){
        log.error("系统异常:", ex);
        return R.error().message("系统发生异常,请联系管理员");
    }
}
?下面代码在common包下,枚举类名BusinessMsgEnum
作用:????????
? ? ? ? 自定义异常状态码及提示信息
package com.ymk.hotelsystem.common;

/**
 * @Desc
 */

/**
 * 业务异常提示信息枚举类
 */
public enum BusinessMsgEnum {
    /** 参数异常 */
    PARMETER_EXCEPTION("102","参数异常"),
    /** 等待超时 */
    SERVICE_TIME_OUT("103","服务调用超时"),
    /** 参数过大 */
    PARMETER_BIG_EXCEPTION("102","输入的图片数量不能超过50张"),
    /** 500 :一劳永逸的提示也可以在这定义 */
    UNEXPECTED_EXCEPTION("500","异常发生异常,请联系管理员!");

    // 还可以定义更多的也无异常
    /**
     * 消息码
     */
    private String code;
    /**
     * 消息内容
     */
    private String msg;

    private BusinessMsgEnum(String code, String msg) {
        this.code = code;
        this.msg = msg;
    }
    public String getCode() {
        return code;
    }
    public void setCode(String code) {
        this.code = code;
    }
    public String getMsg() {
        return msg;
    }
    public void setMsg(String msg) {
        this.msg = msg;
    }
}
下面代码在exception包下,类名BusinessErrorException
作用:
????????自定义异常
package com.ymk.hotelsystem.exception;

import com.ymk.hotelsystem.common.BusinessMsgEnum;

/**
 * @Desc 自定义异常
 */
public class BusinessErrorException extends RuntimeException{
    /**
     * 异常码
     */
    private String code;
    /**
     * 异常提示信息
     */
    private String message;

    public BusinessErrorException(BusinessMsgEnum businessMsgEnum){
        this.code = businessMsgEnum.getCode();
        this.message = businessMsgEnum.getMsg();
    }
    public String getCode() {
        return code;
    }
    public void setCode(String code) {
        this.code = code;
    }
    @Override
    public String getMessage() {
        return message;
    }
    public void setMessage(String message) {
        this.message = message;
    }
}
13.3.5JWT生成及Token认证
下面代码在common包下,类名SystemConstant
作用:
? ? ? ? JWTUtil工具类解析token设置的状态码,和JWT相关属性
package com.ymk.hotelsystem.common;

/**
 * @Desc  jwtUtil工具类用到的
 */
public class SystemConstant {
    /**
     * token
     */
    public static final int JWT_ERRCODE_NULL = 4000;  // token不存在
    public static final int JWT_ERRCODE_EXPIRE = 4001; // token已过期
    public static final int JWT_ERRCODE_FAIL= 4002;    //验证不通过

    /**
     * JWT
     */
    public static final String JWT_SECERT = "8677df7fc3a34e26a61c034d5ec8245d";
    public static final long JWT_TTL = 60 * 60 * 1000;
}
?下面代码在common包下,类名CheckResult
作用:
? ? ? ? 用来验证JWT
package com.ymk.hotelsystem.common;

import io.jsonwebtoken.Claims;

/**
 * @Desc 验证JWT用到的
 */
public class CheckResult {

    private int errCode;

    private boolean success;

    private Claims claims;

    public int getErrCode(){
        return errCode;
    }

    public void setErrCode(int errCode){
        this.errCode = errCode;
    }

    public boolean isSuccess(){
        return success;
    }

    public void setSuccess(boolean success){
        this.success = success;
    }

    public Claims getClaims(){
        return claims;
    }

    public void setClaims(Claims claims){
        this.claims = claims;
    }
}
下面代码在utils包下,类名JwtUtils
作用:
????????前端发送认证请求,比如用户名密码,认证成功后后台生成一个token 发送给前端,前端存储到localstorage,以后每次请求都带这个token发送到后台去验证。
????????
package com.ymk.hotelsystem.utils;

import com.sun.org.apache.xerces.internal.impl.dv.util.Base64;
import com.ymk.hotelsystem.common.CheckResult;
import com.ymk.hotelsystem.common.SystemConstant;
import io.jsonwebtoken.*;

import javax.crypto.SecretKey;
import javax.crypto.spec.SecretKeySpec;
import java.util.Date;

/**
 * @Desc 前端发送认证请求,比如用户名密码,认证荣国后后台生成一个token
 * 发送给前端,前端存储到localstorage,以后每次请求都带这个token发送到后台去验证
 */
public class JwtUtils {

    /**
     * 签发JWT
     *
     * @param id
     * @param subject
     * @param ttlMillis
     * @return
     */
    public static String createJwt(String id, String subject, long ttlMillis) {
        SignatureAlgorithm signatureAlgorithm = SignatureAlgorithm.HS256;
        long nowMillis = System.currentTimeMillis();
        Date now = new Date(nowMillis);
        SecretKey secretKey = generalKey();
        JwtBuilder builder = Jwts.builder()
                .setId(id)
                // 主题 一般是用户名
                .setSubject(subject)
                // 签发者
                .setIssuer("ymk")
                // 签发日期
                .setIssuedAt(now)
                // 签发算法以及密钥
                .signWith(signatureAlgorithm, secretKey);

        if (ttlMillis >= 0) {
            // 当前时间+有效时间
            long expMillis = nowMillis + ttlMillis;
            // 过期时间
            Date expDate = new Date(expMillis);
            // 设置过期时间
            builder.setExpiration(expDate);
        }
        return builder.compact();
    }

    /**
     * 生成加密key
     *
     * @return
     */
    public static SecretKey generalKey() {
        byte[] encodeKey = Base64.decode(SystemConstant.JWT_SECERT);
        SecretKey key = new SecretKeySpec(encodeKey, 0, encodeKey.length, "AES");
        return key;
    }

    /**
     * 验证JWT
     * @param jwtStr
     * @return
     */
    public static CheckResult validateJWT(String jwtStr) {
        CheckResult checkResult = new CheckResult();
        Claims claims = null;
        try {
            claims = parseJwt(jwtStr);
            checkResult.setSuccess(true);
            checkResult.setClaims(claims);
        } catch (ExpiredJwtException e) {
            checkResult.setErrCode(SystemConstant.JWT_ERRCODE_EXPIRE);
            checkResult.setSuccess(false);
        } catch (SignatureException e) {
            checkResult.setErrCode(SystemConstant.JWT_ERRCODE_FAIL);
            checkResult.setSuccess(false);
        } catch (Exception e) {
            checkResult.setErrCode(SystemConstant.JWT_ERRCODE_FAIL);
            checkResult.setSuccess(false);
        }
        return checkResult;
    }

    /**
     * 解析JWT字符串
     *
     * @param jwt
     * @return
     * @throws Exception
     */
    public static Claims parseJwt(String jwt) throws Exception {
        SecretKey secretKey = generalKey();
        return Jwts.parser()
                .setSigningKey(secretKey)
                .parseClaimsJws(jwt)
                .getBody();
    }


    public static void main(String[] args) {
        // 后端生成token
        String sc = createJwt("1", "jack", SystemConstant.JWT_TTL);
        System.out.println(sc);

        //后端验证token
        CheckResult checkResult = validateJWT(sc);
        System.out.println(checkResult.isSuccess());
        System.out.println(checkResult.getErrCode());
        Claims claims = checkResult.getClaims();
        System.out.println(claims);
        System.out.println(claims.getId());
        System.out.println(claims.getSubject());

        // 刷新token 重新生成token
        Claims claims2 = validateJWT(sc).getClaims();
        String sc2 = createJwt(claims2.getId(), claims2.getSubject(), SystemConstant.JWT_TTL);
        System.out.println(sc2);
    }
}
13.3.6后端响应前端封装的格式
下面代码在common包下,枚举类名ResultCodeEnum
作用:
? ? ? ? 设置响应后端的一些操作是否成功和状态码以及信息
package com.ymk.hotelsystem.common;

import lombok.Getter;

@Getter // get方法
public enum ResultCodeEnum {
    //枚举值
    SUCCESS(true,"操作成功",200),
    UNKNOWN_REASON(false,"操作失败",999),
    BAD_SQL_GRAMMAR(false,"sql语法错误",520),
    ERROR(false,"操作失败",444);

    private Boolean success;
    private String message;
    private Integer code;

    ResultCodeEnum(Boolean success, String message, Integer code) {
        this.success = success;
        this.message = message;
        this.code = code;
    }
}
下面代码在common包下,类名R
作用:
????????后端返回给前端的 一个封装的数据结构
package com.ymk.hotelsystem.common;

import lombok.Data;

import java.util.HashMap;
import java.util.Map;

/**
 * 后端返回给前端的 一个 封装的 数据结构
 */
@Data
public class R {
    private Integer code; // 响应的状态码

    private String message; // 响应的信息

    private Boolean success; // 是否成功

    //封装响应的数据
    private Map<Object,Object> data = new HashMap<>();

    public R() {}

    // 返回成功的结果
    public static R ok(){
        R r = new R();
        r.setSuccess(ResultCodeEnum.SUCCESS.getSuccess());
        r.setCode(ResultCodeEnum.SUCCESS.getCode());
        r.setMessage(ResultCodeEnum.SUCCESS.getMessage());
        return r;
    }
    // 返回失败的结果
    public static R error(){
        R r = new R();
        r.setSuccess(ResultCodeEnum.ERROR.getSuccess());
        r.setCode(ResultCodeEnum.ERROR.getCode());
        r.setMessage(ResultCodeEnum.ERROR.getMessage());
        return r;
    }

    public static R setResult(ResultCodeEnum resultCodeEnum){
        R r = new R();
        r.setSuccess(resultCodeEnum.getSuccess());
        r.setCode(resultCodeEnum.getCode());
        r.setMessage(resultCodeEnum.getMessage());
        return r;
    }

    //创建一个R对象去调success方法,然后把失败或成功的值传进去
    public R success(Boolean success){
        this.setSuccess(success);
        return this;
    }

    public R message(String message){
        this.setMessage(message);
        return this;
    }

    public R code(Integer code){
        this.setCode(code);
        return this;
    }

    public R data(Object key,Object value){
        this.data.put(key,value);
        return this;
    }

    public R data(Map<Object,Object> map){
        this.setData(map);
        return this;
    }
}
下面的代码在common包下,类名LayuiPageVo<T>
作用:
? ? ? ? 用来封装Layui渲染表格时接受后台响应的信息
package com.ymk.hotelsystem.common;

import lombok.AllArgsConstructor;
import lombok.Data;
import lombok.NoArgsConstructor;

import java.util.List;

/**
 * @Desc
 */
@Data//set,get,toString方法
@AllArgsConstructor//有参构造
@NoArgsConstructor//无参构造
public class LayuiPageVo<T> {

    private Integer code; // 0 表示成功
    private String msg;
    private Long count;

    private List<T> data;
}
13.3.7AOP切面配置
下面代码在aop包下,类名LogAspectHandler
作用:
? ? ? ? 通过JointPoint 对象来获取一个签名,然后利用签名可以获取请求的包名、方法名,也可以用来记录一些信息,比如获取请求的url和ip
package com.ymk.hotelsystem.aop;

import lombok.extern.slf4j.Slf4j;
import org.aspectj.lang.JoinPoint;
import org.aspectj.lang.Signature;
import org.aspectj.lang.annotation.Aspect;
import org.aspectj.lang.annotation.Before;
import org.aspectj.lang.annotation.Pointcut;
import org.springframework.stereotype.Component;
import org.springframework.web.context.request.RequestContextHolder;
import org.springframework.web.context.request.ServletRequestAttributes;

import javax.servlet.http.HttpServletRequest;

/**
 * @Desc
 */
@Aspect
@Component
@Slf4j
public class LogAspectHandler {
    /**
     * 定义一个切面,拦截com.ymk.controller包和子包下的所用方法
     */
    @Pointcut("execution(* com.ymk.hotelsystem.controller..*.*(..))")
    public void pointCut() {
    }

    @Pointcut("@annotation(org.springframework.web.bind.annotation.GetMapping)")
    public void annotationCut() {
    }

    /**
     * 在上面定义的切面方法之前执行该方法
     * @param joinPoint jointPoint
     * JointPoint 对象很有用,可以用它来获取一个签名,然后利用签名可以获取请求的包名、方法名,
     * 包括参数(通过 `joinPoint.getArgs()` 获取)等等。
     */
    @Before("pointCut()") // 前置通知
    public void doBefore(JoinPoint joinPoint) {
        log.info("====doBefore方法进入了====");

        // 获取签名
        Signature signature = joinPoint.getSignature();
        // 获取切入的包名
        String declaringTypeName = signature.getDeclaringTypeName();
        // 获取即将执行的方法名
        String funcName = signature.getName();
        log.info("即将执行方法为: {},属于{}包", funcName, declaringTypeName);

        // 也可以用来记录一些信息,比如获取请求的url和ip
        ServletRequestAttributes attributes = (ServletRequestAttributes) RequestContextHolder.getRequestAttributes();
        HttpServletRequest request = attributes.getRequest();
        // 获取请求url
        String url = request.getRequestURL().toString();
        // 获取请求ip
        String ip = request.getRemoteAddr();
        log.info("用户请求的url为:{},ip地址为:{}", url, ip);
    }
}
13.3.8Knife4j配置
下面代码在config包下,类名Knife4jConfiguration
作用:
? ? ? ? 前端和后端的联系,通过访问localhost:8080/doc.html可展示在线的 API 接口文档,进行测试接口数据
package com.ymk.hotelsystem.config;

import org.springframework.context.annotation.Bean;
import org.springframework.context.annotation.Configuration;
import springfox.documentation.builders.ApiInfoBuilder;
import springfox.documentation.builders.PathSelectors;
import springfox.documentation.builders.RequestHandlerSelectors;
import springfox.documentation.spi.DocumentationType;
import springfox.documentation.spring.web.plugins.Docket;
import springfox.documentation.swagger2.annotations.EnableSwagger2WebMvc;

/**
 * @Desc Knife4j配置
 */
@Configuration // 声明配置类
@EnableSwagger2WebMvc
public class Knife4jConfiguration {
    @Bean(value = "defaultApi2")
    public Docket defaultApi2() {
        Docket docket=new Docket(DocumentationType.SWAGGER_2)
                .apiInfo(new ApiInfoBuilder()
                        //.title("swagger-bootstrap-ui-demo RESTful APIs")
                        .description("# swagger-bootstrap-ui-demo RESTful APIs")
                        .termsOfServiceUrl("http://www.xx.com/")
                        .contact("xx@qq.com")
                        .version("1.0")
                        .build())
                //分组名称
                .groupName("2.X版本")
                .select()
                //这里指定Controller扫描包路径
                .apis(RequestHandlerSelectors.basePackage("com.ymk.demo22.controller"))
                .paths(PathSelectors.any())
                .build();
        return docket;
    }
}
13.3.9Jackson为空数据变空串
下面代码在config包下,类名JacksonConfig
作用:
????????向前端响应json数据的时候将为空的数据会变成空串。
package com.ymk.hotelsystem.config;

import com.fasterxml.jackson.core.JsonGenerator;
import com.fasterxml.jackson.databind.JsonSerializer;
import com.fasterxml.jackson.databind.ObjectMapper;
import com.fasterxml.jackson.databind.SerializerProvider;
import org.springframework.boot.autoconfigure.condition.ConditionalOnMissingBean;
import org.springframework.context.annotation.Bean;
import org.springframework.context.annotation.Configuration;
import org.springframework.context.annotation.Primary;
import org.springframework.http.converter.json.Jackson2ObjectMapperBuilder;

import java.io.IOException;

/**
 * @Desc Jackson配置
 */
@Configuration //声明配置类
public class JacksonConfig {
    //此配置 向前端响应json数据的时候 为空的数据会变成空串
    @Bean
    @Primary // 简单的说 就是 当Spring 容器扫描到某个接口有多个bean时,如果某个bean上有@Primary 注解 则这个bean 会被优先选用
    @ConditionalOnMissingBean(ObjectMapper.class)
    public ObjectMapper jacksonObjectMapper(Jackson2ObjectMapperBuilder builder){
        ObjectMapper objectMapper = builder.createXmlMapper(false).build();
        objectMapper.getSerializerProvider().setNullValueSerializer(new JsonSerializer<Object>() {
            @Override
            public void serialize(Object o, JsonGenerator jsonGenerator, SerializerProvider serializerProvider) throws IOException {
                jsonGenerator.writeString("");
            }
        });
        return objectMapper;
    }
}
13.3.10MybatisPlus
乐观锁、逻辑删除、分页插件
下面代码在config包下,类名MybatisPlusConfig
作用:
????????配置一些插件,该类配置了分页插件、乐观锁插件、逻辑删除相关的bean
package com.ymk.hotelsystem.config;

import com.baomidou.mybatisplus.annotation.DbType;
import com.baomidou.mybatisplus.core.injector.DefaultSqlInjector;
import com.baomidou.mybatisplus.core.injector.ISqlInjector;
import com.baomidou.mybatisplus.extension.plugins.MybatisPlusInterceptor;
import com.baomidou.mybatisplus.extension.plugins.inner.OptimisticLockerInnerInterceptor;
import com.baomidou.mybatisplus.extension.plugins.inner.PaginationInnerInterceptor;
import org.mybatis.spring.annotation.MapperScan;
import org.springframework.context.annotation.Bean;
import org.springframework.context.annotation.Configuration;

/**
 * @Desc 配置一些插件
 */
@Configuration
@MapperScan("com.ymk.hotelsystem.mapper")
public class MybatisPlusConfig {

    @Bean
    public MybatisPlusInterceptor optimisticLockerInterceptor() {
        MybatisPlusInterceptor interceptor = new MybatisPlusInterceptor();

        // 分页插件
        PaginationInnerInterceptor paginationInnerInterceptor = new PaginationInnerInterceptor(DbType.MYSQL);
        interceptor.addInnerInterceptor(paginationInnerInterceptor); // 添加分页拦截器 --- 分页插件

        // 乐观锁插件
        OptimisticLockerInnerInterceptor optimisticLockerInnerInterceptor = new OptimisticLockerInnerInterceptor();
        interceptor.addInnerInterceptor(optimisticLockerInnerInterceptor); // 添加乐观锁拦截器 --- 乐观锁插件

        return interceptor;
    }

    //逻辑删除相关的bean
    @Bean
    public ISqlInjector sqlInjector(){
        return new DefaultSqlInjector();
    }
}
下面代码在handler包下,类名MyMetaObjectHandler
作用:
? ? ? ? 设置插入和修改时的填充自动填充某些字段的值、添加逻辑删除的默认值、逻辑上未删除的默认值。
package com.ymk.hotelsystem.handler;

import com.baomidou.mybatisplus.core.handlers.MetaObjectHandler;
import lombok.extern.slf4j.Slf4j;
import org.apache.ibatis.reflection.MetaObject;
import org.springframework.stereotype.Component;

import java.time.LocalDate;
import java.time.LocalDateTime;
import java.util.Date;

/**
 * @Desc 自动填充 某些 字段的值
 */
@Component
@Slf4j
public class MyMetaObjectHandler implements MetaObjectHandler {
    @Override
    public void insertFill(MetaObject metaObject) {
        log.info("start insert fill....");// 添加时填充
        this.setFieldValByName("createTime",new Date(),metaObject);
        this.setFieldValByName("updateTime",new Date(),metaObject);
//        this.setFieldValByName("createTime", LocalDate.now(),metaObject);
//        this.setFieldValByName("updateTime",LocalDate.now(),metaObject);

        // 添加 乐观锁的 默认值是1
        this.setFieldValByName("version",1,metaObject);

        // 0 表示逻辑上未删除的
        this.setFieldValByName("deleted", 0, metaObject);
    }

    @Override
    public void updateFill(MetaObject metaObject) {
        log.info("start update fill....");// 修改时填充
        this.setFieldValByName("updateTime",new Date(),metaObject);
    }
}
13.4后端操作代码
13.4.1实体类pojo
下面代码在pojo包下,类名Admin
作用:
? ? ? ? 对应数据库中的t_admin表,字段与Admin属性一一对应。
?
package com.ymk.hotelsystem.pojo;

import com.baomidou.mybatisplus.annotation.*;
import com.fasterxml.jackson.annotation.JsonFormat;
import lombok.AllArgsConstructor;
import lombok.Data;
import lombok.NoArgsConstructor;

import java.util.Date;

/**
 * @Desc
 */
@Data
@AllArgsConstructor
@NoArgsConstructor
@TableName("t_admin") //指定数据库中的表名
public class Admin {

    @TableId(type = IdType.AUTO) //使用数据库中的自增策略
    private Integer id;

    private String username;

    private String password;

    private Integer flag;

    private String type;

    private String picture;


    @JsonFormat(pattern="yyyy-MM-dd")
    @TableField(value = "create_time",fill = FieldFill.INSERT)
    private Date createTime;

    @JsonFormat(pattern="yyyy-MM-dd")
    @TableField(value = "update_time",fill = FieldFill.INSERT_UPDATE) // 添加和修改都会赋值
    private Date updateTime;

    @TableField(fill = FieldFill.INSERT)
    @Version
    private Integer Version;

    @TableLogic
    @TableField(fill = FieldFill.INSERT)
    private Integer deleted;

}
13.4.2controller
下面代码在controller包下,类名OssController
作用:
? ? ? ? 因为不再需要后端去上传到OSS上了,现在交给了前端,前端上传oss请求,后端响应凭证,然后前端拿着凭证上传OSS。
package com.ymk.hotelsystem.controller;

import com.aliyun.oss.OSS;
import com.aliyun.oss.common.utils.BinaryUtil;
import com.aliyun.oss.model.MatchMode;
import com.aliyun.oss.model.PolicyConditions;
import com.ymk.hotelsystem.annotation.UnInterception;
import com.ymk.hotelsystem.common.R;
import org.springframework.beans.factory.annotation.Value;
import org.springframework.web.bind.annotation.RequestMapping;
import org.springframework.web.bind.annotation.RestController;

import javax.annotation.Resource;
import java.text.SimpleDateFormat;
import java.util.Date;
import java.util.LinkedHashMap;
import java.util.Map;

/**
 * @Desc 前端上传oss请求,后端响应凭证
 */
@RestController
public class OssController {
    @Resource
    OSS ossClient;

    @Value("${alibaba.cloud.oss.endpoint}")
    private String endpoint;

    @Value("${alibaba.cloud.oss.bucket}")
    private String bucket;

    @Value("${alibaba.cloud.access-key}")
    private String accessId;

    @RequestMapping("/oss/policy")
    @UnInterception
    public R policy() {

        //host的格式为bucketname.endpoint
        String host = "https://" + bucket + "." + endpoint;
        //callbackUrl为上传回调服务器的URL,将下面的IP和Port配置为自己的真实信息
//    String callbackUrl = "http://88.88.88.8888";
        String format = new SimpleDateFormat("yyyy-MM-dd").format(new Date());

        //用户上传文件是指定的前缀
        String dir = format + "/";

        Map<Object,Object> respMap = null;
        try {
            long expireTime = 30;
            long expireEndTime = System.currentTimeMillis() + expireTime * 1000;
            Date expiration = new Date(expireEndTime);
            PolicyConditions policyConds = new PolicyConditions();
            policyConds.addConditionItem(PolicyConditions.COND_CONTENT_LENGTH_RANGE, 0, 1048576000);
            policyConds.addConditionItem(MatchMode.StartWith, PolicyConditions.COND_KEY, dir);

            String postPolicy = ossClient.generatePostPolicy(expiration, policyConds);
            byte[] binaryData = postPolicy.getBytes("utf-8");
            String encodedPolicy = BinaryUtil.toBase64String(binaryData);
            String postSignature = ossClient.calculatePostSignature(postPolicy);

            respMap = new LinkedHashMap<Object, Object>();
            respMap.put("accessid", accessId);
            respMap.put("policy", encodedPolicy);
            respMap.put("signature", postSignature);
            respMap.put("dir", dir);
            respMap.put("host", host);
            respMap.put("expire", String.valueOf(expireEndTime / 1000));
        } catch (Exception e) {
            System.out.println(e.getMessage());
        }
        return R.ok().data(respMap);
    }
}
下面代码在controller包下,类名AdminController
作用:
? ? ? ? 接受前端用户请求
package com.ymk.hotelsystem.controller;

import com.alibaba.fastjson.JSON;
import com.alibaba.fastjson.JSONObject;
import com.ymk.hotelsystem.annotation.UnInterception;
import com.ymk.hotelsystem.common.CheckResult;
import com.ymk.hotelsystem.common.LayuiPageVo;
import com.ymk.hotelsystem.common.SystemConstant;
import com.ymk.hotelsystem.utils.JwtUtils;
import com.ymk.hotelsystem.utils.OssUtil;
import com.ymk.hotelsystem.common.R;
import com.ymk.hotelsystem.pojo.Admin;
import com.ymk.hotelsystem.service.AdminService;
import io.jsonwebtoken.Claims;
import lombok.extern.slf4j.Slf4j;
import org.springframework.beans.factory.annotation.Autowired;
import org.springframework.web.bind.annotation.*;
import org.springframework.web.multipart.MultipartFile;

import javax.servlet.http.HttpServletRequest;
import java.io.IOException;
import java.io.InputStream;
import java.util.HashMap;
import java.util.Map;

/**
 * @Author 闫梦坤
 * @Date 2022/10/16 23:43
 * @Desc
 */
@RestController
@Slf4j
@RequestMapping("/admin")
public class AdminController {
    @Autowired
    private AdminService adminService;

    /**
     * 管理员登录
     * @param username
     * @param password
     * @return
     */
    @UnInterception
    @GetMapping("/login")
    public R login(String username, String password){
        log.info("控制层接受账号密码:"+username+":"+password);
        Admin admin = adminService.findByLogin(username, password);

        Map<Object, Object> map = new HashMap<>();
        if (admin != null){
            //生成token发送给前端
            String token = JwtUtils.createJwt(String.valueOf(admin.getId()),admin.getUsername(), SystemConstant.JWT_TTL);
            map.put("currentAdmin",admin);
            map.put("token",token);
            return R.ok().data(map);
        } else {
            return R.error().message(SystemConstant.JWT_ERRCODE_NULL+"");
        }
    }

    /**
     * 分页加模糊查询
     * @param map
     * @return
     */
    @RequestMapping("/list")
    public LayuiPageVo<Admin> adminList(@RequestParam Map<String,Object> map){
        System.out.println(map);
        LayuiPageVo<Admin> adminLayuiPageVo = adminService.adminList(map);
        return  adminLayuiPageVo;
    }

    /**
     * 新增账号
     * @param admin
     * @return
     */
    @PostMapping("/add")
    public R adminAdd(@RequestBody Admin admin){
        log.info("添加用户接受的值:"+admin);
        Integer result = adminService.adminAdd(admin);
        log.info("增加受影响行数:"+result);
        if (result > 0){
            return R.ok().message("新增成功");
        } else {
            return R.error().message("系统繁忙,请您稍后尝试");
        }
    }

    @PostMapping("/update")
    public R adminEdit(@RequestBody Admin admin){
        log.info("修改用户接受的值:"+admin);
        Integer result = adminService.adminEdit(admin);
        if (result>0){
            return R.ok().message("修改成功");
        } else {
            return R.error().message("修改失败,请重试");
        }
    }

    /**
     * 删除用户
     * @param id
     * @return
     */
    @PostMapping("/delete")
    public R adminDelete(Integer id){
        System.out.println("删除账号的id:"+id);
        Integer result = adminService.adminDelete(id);
        if (result>0){
            return R.ok().message("删除成功");
        } else {
            return R.error().message("删除失败");
        }
    }


    /**
     * 通过id查询用户
     */
    @GetMapping("/adminDetail")
    public R findAdminById(Integer id){
        log.info("接受的查询id:"+id);
        Admin admin = adminService.findAdminById(id);
        Map<Object, Object> map = new HashMap<>();
        map.put("admin",admin);
        return R.ok().data(map);
    }

    /**
     * 重新生成token
     * 前端页面设置每一段时间刷新token,
     * 并向后端发送axios请求来获取新的token
     * @return
     */
    @RequestMapping("/refreshToken")
    public R refreshToken(HttpServletRequest request){
        String token = request.getHeader("token");
        System.out.println("刷新获得旧的token:"+token);
        CheckResult checkResult = JwtUtils.validateJWT(token);
        Claims claims = checkResult.getClaims();
        //生成一个新的token
        String newToken = JwtUtils.createJwt(claims.getId(), claims.getSubject(), SystemConstant.JWT_TTL);
        return R.ok().data("token",newToken);
    }
}
13.4.3service
AdminService接口
package com.ymk.hotelsystem.service;

import com.ymk.hotelsystem.common.LayuiPageVo;
import com.ymk.hotelsystem.pojo.Admin;

import java.util.Map;

/**
 * @Author 闫梦坤
 * @Date 2022/10/16 23:41
 * @Desc
 */
public interface AdminService {
    /**
     * 管理员登录
     * @param username
     * @param password
     * @return
     */
    Admin findByLogin(String username, String password);

    /**
     * 分页加条件查询
     * @param map
     * @return
     */
    LayuiPageVo<Admin> adminList(Map<String,Object> map);

    /**
     * 增加账号
     * @param admin
     * @return
     */
    Integer adminAdd(Admin admin);

    /**
     * 修改账号信息
     * @param admin
     * @return
     */
    Integer adminEdit(Admin admin);

    /**
     * 删除用户
     * @param id
     * @return
     */
    Integer adminDelete(Integer id);


    /**
     * 通过id查询用户
     * @param id
     * @return
     */
    Admin findAdminById(Integer id);
}
AdminServiceImpl实现类
package com.ymk.hotelsystem.service.impl;

import com.baomidou.mybatisplus.core.conditions.query.QueryWrapper;
import com.baomidou.mybatisplus.core.conditions.update.UpdateWrapper;
import com.baomidou.mybatisplus.extension.plugins.pagination.Page;
import com.ymk.hotelsystem.common.LayuiPageVo;
import com.ymk.hotelsystem.mapper.AdminMapper;
import com.ymk.hotelsystem.pojo.Admin;
import com.ymk.hotelsystem.service.AdminService;
import org.springframework.beans.factory.annotation.Autowired;
import org.springframework.stereotype.Service;

import java.util.Map;

/**
 * @Desc
 */
@Service("adminService")
public class AdminServiceImpl implements AdminService {

    @Autowired
    private AdminMapper adminMapper;

    /**
     * 管理员登录
     * @param username
     * @param password
     * @return
     */
    @Override
    public Admin findByLogin(String username, String password) {
        QueryWrapper<Admin> queryWrapper = new QueryWrapper<>();
        queryWrapper.eq("username", username).eq("password", password);
        return adminMapper.selectOne(queryWrapper);
    }

    /**
     * 分页加条件查询
     * @param map
     * @return
     */
    @Override
    public LayuiPageVo<Admin> adminList(Map<String, Object> map) {
        //加上空字符串变成字符串再转成Integer类型
        Integer page = Integer.parseInt(map.get("page")+"");
        Integer limit = Integer.parseInt(map.get("limit")+"");

        Page<Admin> adminPage = new Page<>(page,limit);
        QueryWrapper<Admin> queryWrapper = new QueryWrapper<>();
        // 通过遍历的方式将map集合中不参加模糊查询的键值过滤,将模糊查询放到条件构造器中
        for (Map.Entry<String, Object> entry : map.entrySet()) {
            if (!entry.getKey().equals("token") && !entry.getKey().equals("page") && !entry.getKey().equals("limit")){
                queryWrapper.like(entry.getKey(), entry.getValue());
            }
        }

        adminPage = adminMapper.selectPage(adminPage, queryWrapper);
        //把mybatis的分页数据封装到 layui 的分页数据结构中
        LayuiPageVo<Admin> layuiPageVo = new LayuiPageVo<>();
        layuiPageVo.setCode(0);// layui 默认0 是正确的状态码
        layuiPageVo.setMsg("分页列表数据"); //提示信息
        layuiPageVo.setCount(adminPage.getTotal()); // 总记录数
        layuiPageVo.setData(adminPage.getRecords()); // 分页的列表数据
        return layuiPageVo;
    }

    /**
     * 新增用户
     * @param admin
     * @return
     */
    @Override
    public Integer adminAdd(Admin admin) {
        int insert = adminMapper.insert(admin);
        return insert;
    }

    /**
     * 修改用户信息
     * @param admin
     * @return
     */
    @Override
    public Integer adminEdit(Admin admin) {
        UpdateWrapper<Admin> updateWrapper = new UpdateWrapper<>();
        updateWrapper.eq("id",admin.getId());
        int update = adminMapper.update(admin, updateWrapper);
        return update;
    }

    /**
     * 删除用户
     * @param id
     * @return
     */
    @Override
    public Integer adminDelete(Integer id) {
        int i = adminMapper.deleteById(id);
        return i;
    }


    /**
     * 通过id查询用户
     * @param id
     * @return
     */
    @Override
    public Admin findAdminById(Integer id) {
        Admin admin = adminMapper.selectById(id);
        return admin;
    }
}
13.4.4mapper
AdminMapper接口
package com.ymk.hotelsystem.mapper;

import com.baomidou.mybatisplus.core.mapper.BaseMapper;
import com.ymk.hotelsystem.pojo.Admin;
import org.springframework.stereotype.Repository;

/**
 * @Desc
 */
@Repository
public interface AdminMapper extends BaseMapper<Admin> {
}