在做这个仿蘑菇街的项目中,对于tabbar的封装十分重要,是这个项目的一个整体基调
思路
我们想要做这个tabbar,先分析一下,我们该如何入手。我们可以新建一个tabbar文件夹,然后新建一个组件TabBar,因为考虑到组件的复用性,所以我们可以在组件中添加slot插槽,向插槽中去插入我们的item。接着新建一个TabBarItm组件,里面存放每一个小的item,这个项目中,我们可以先放入两个插槽,一个存放图标,一个存放字体。所以大致布局如下
代码实现
TabBar.vue中
<template>
<div class="tab-bar">
  <slot></slot>
</div>
</template>

<script>
export default {
  name: 'TabBar'
};
</script>

<style scoped>
.tab-bar {
  display: flex;
  background-color: #f6f6f6;
  position: fixed;
  left: 0;
  right: 0;
  bottom: 0;
  box-shadow: 0px -3px 1px rgba(100, 100, 100, 0.3);
}
</style>
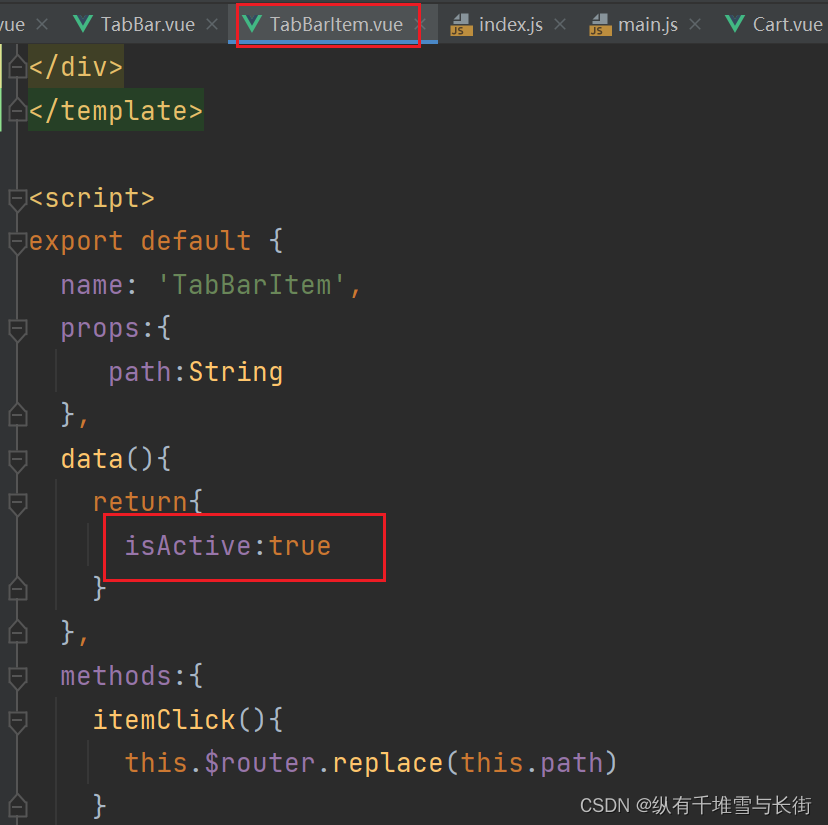
TabBarItem.vue中
(因为要有选择的选中显示的图片,所以我们使用了v-if和v-else属性。其中isActive属性的ture或者false,是用来判断是否显示的)
<template>
<div class="tab-bar-item">
<div v-if="!isActive">
<!-- 可以保证在替换的时候不会替换掉其他属性-->
<slot name="item-icon"></slot>
</div>
<div v-else>
<slot name="item-icon-active"></slot>
</div>
<div :class="{active:isActive}">
<slot name="item-text"></slot>
</div>
</div>
</template>
<script>
export default {
name: 'TabBarItem',
data(){
return{
isActive:true
}
}
};
</script>
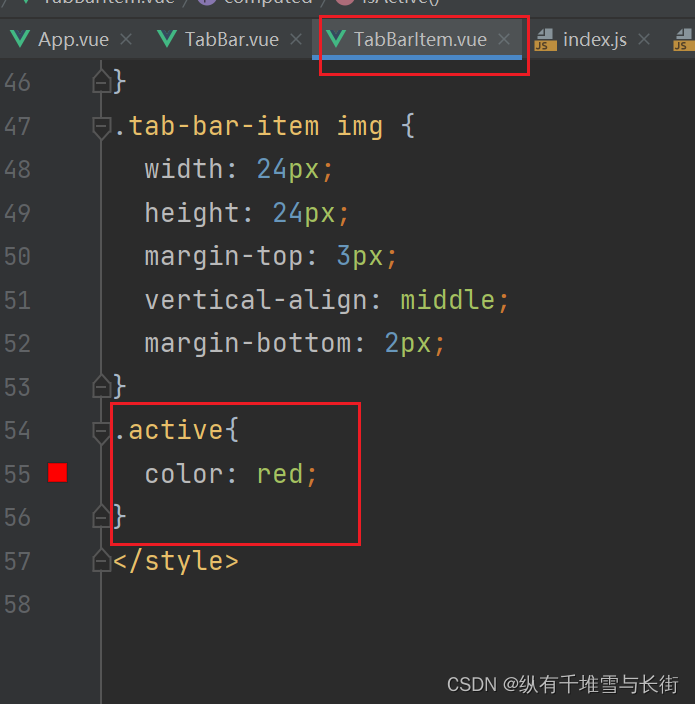
<style scoped>
.tab-bar-item {
flex: 1;
text-align: center;
height: 49px;
font-size: 14px;
}
.tab-bar-item img {
width: 24px;
height: 24px;
margin-top: 3px;
vertical-align: middle;
margin-bottom: 2px;
}
.active{
color: red;
}
</style>
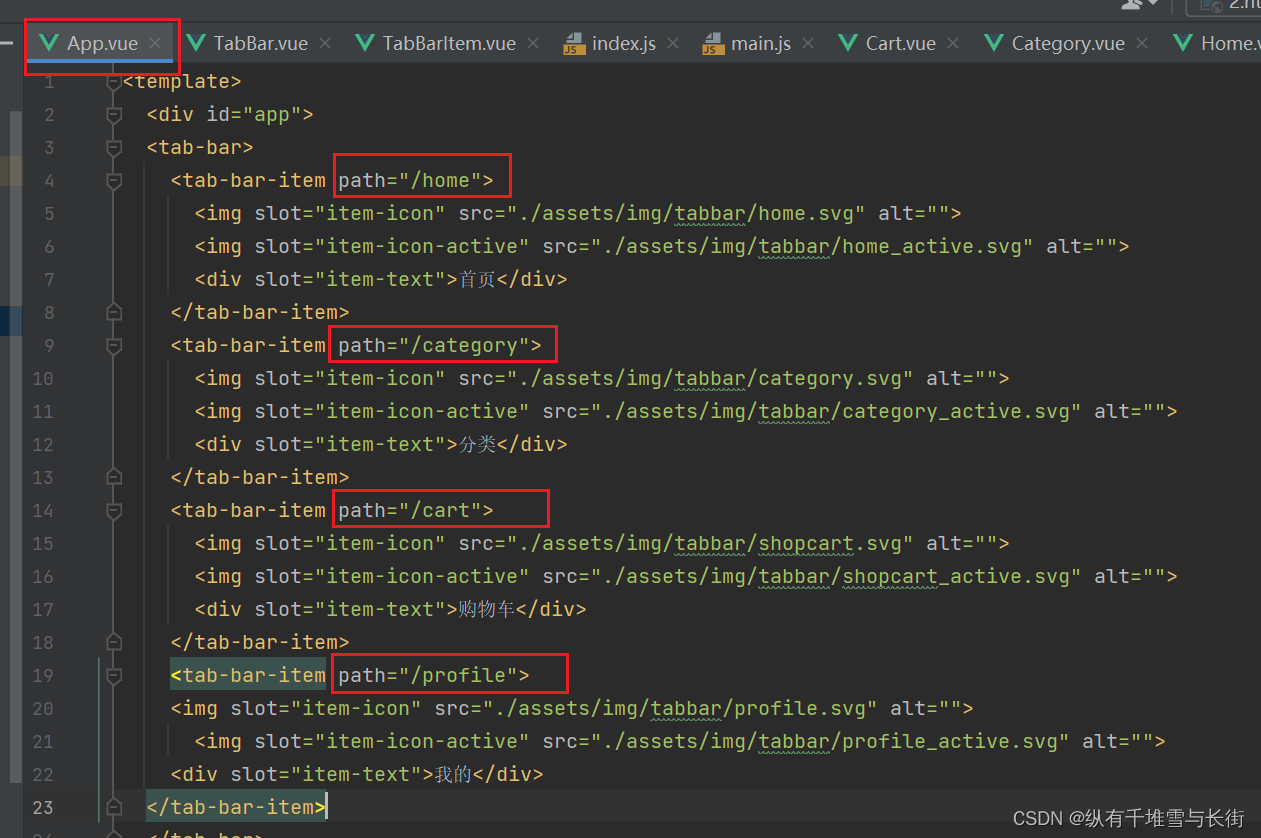
主要的内容放到了app.vue中
<template>
  <div id="app">
  <tab-bar>
    <tab-bar-item>
      <img slot="item-icon" src="./assets/img/tabbar/home.svg" alt="">
      <img slot="item-icon-active" src="./assets/img/tabbar/home_active.svg" alt="">
      <div slot="item-text">首页</div>
    </tab-bar-item>
    <tab-bar-item>
      <img slot="item-icon" src="./assets/img/tabbar/category.svg" alt="">
      <img slot="item-icon-active" src="./assets/img/tabbar/category_active.svg" alt="">
      <div slot="item-text">分类</div>
    </tab-bar-item>
    <tab-bar-item>
      <img slot="item-icon" src="./assets/img/tabbar/shopcart.svg" alt="">
      <img slot="item-icon-active" src="./assets/img/tabbar/shopcart_active.svg" alt="">
      <div slot="item-text">购物车</div>
    </tab-bar-item>
    <tab-bar-item>
    <img slot="item-icon" src="./assets/img/tabbar/profile.svg" alt="">
      <img slot="item-icon-active" src="./assets/img/tabbar/profile_active.svg" alt="">
    <div slot="item-text">我的</div>
  </tab-bar-item>
  </tab-bar>
    <router-view/>
  </div>
</template>

<script>
import TabBar from './components/tabbar/TabBar';
import TabBarItem from './components/tabbar/TabBarItem';
export default {
  name: 'App',
  components:{
    TabBar,
    TabBarItem
  }
}
</script>

<style>
@import "assets/css/base.css";
.tab-bar-item img {
  width: 24px;
  height: 24px;
  margin-top: 3px;
  vertical-align: middle;
  margin-bottom: 2px;
}
</style>
其中,我们再详细解释一下上述代码。
app.vue是主组件,是页面入口文件,是vue页面资源的首加载项。所以我们从app.vue中进入该项目,用
    <tab-bar-item>
      <img slot="item-icon" src="./assets/img/tabbar/home.svg" alt="">
      <img slot="item-icon-active" src="./assets/img/tabbar/home_active.svg" alt="">
      <div slot="item-text">首页</div>
    </tab-bar-item>
    <tab-bar-item>
      <img slot="item-icon" src="./assets/img/tabbar/category.svg" alt="">
      <img slot="item-icon-active" src="./assets/img/tabbar/category_active.svg" alt="">
      <div slot="item-text">分类</div>
    </tab-bar-item>
    <tab-bar-item>
      <img slot="item-icon" src="./assets/img/tabbar/shopcart.svg" alt="">
      <img slot="item-icon-active" src="./assets/img/tabbar/shopcart_active.svg" alt="">
      <div slot="item-text">购物车</div>
    </tab-bar-item>
    <tab-bar-item>
    <img slot="item-icon" src="./assets/img/tabbar/profile.svg" alt="">
      <img slot="item-icon-active" src="./assets/img/tabbar/profile_active.svg" alt="">
    <div slot="item-text">我的</div>
  </tab-bar-item>
去替换TabBar里面的slot
<template>
<div class="tab-bar">
  <slot></slot>
</div>
</template>
用每一个
     <img slot="item-icon" src="./assets/img/tabbar/profile.svg" alt="">
      <img slot="item-icon-active" src="./assets/img/tabbar/profile_active.svg" alt="">
    <div slot="item-text">我的</div>
去替换TabBarItem.vue中的slot(其中这里面有3个插槽,有一个是选中状态下的图片。之所以用div包裹住是因为可以在替换的时候不去替换掉其他的属性)
<template>
<div class="tab-bar-item">
  <div v-if="!isActive">
<!--    可以保证在替换的时候不会替换掉其他属性-->
    <slot  v-if="!isActive" name="item-icon"></slot>
  </div>
<div v-else>
  <slot  name="item-icon-active"></slot>
</div>
  <div :class="{active:isActive}">
    <slot  name="item-text"></slot>
  </div>
</div>
</template>
TabBarItem和路由的结合
每个item都要和路由的跳转结合起来
路由的配置如下:
import Vue from 'vue'
import Router from 'vue-router'


const  Home=()=>import('../views/home/Home')
const  Cart=()=>import('../views/cart/Cart')
const  Category=()=>import('../views/category/Category')
const  Profile=()=>import('../views/profile/Profile')
//安装插件
Vue.use(Router)


//创建路由对象
const  routes=[
  {
    path:'',
    redirect:'/home'
  },
  {
    path: '/home',
    component:Home
  },
  {
    path: '/cart',
    component:Cart
  },
  {
    path: '/category',
    component:Category
  },
  {
    path: '/profile',
    component:Profile
  },


]
const router=new Router({
routes,
})
export default router
//导出router
切换效果的实现:
我们需要监听TabBarItem的点击,然后进行路由的跳转
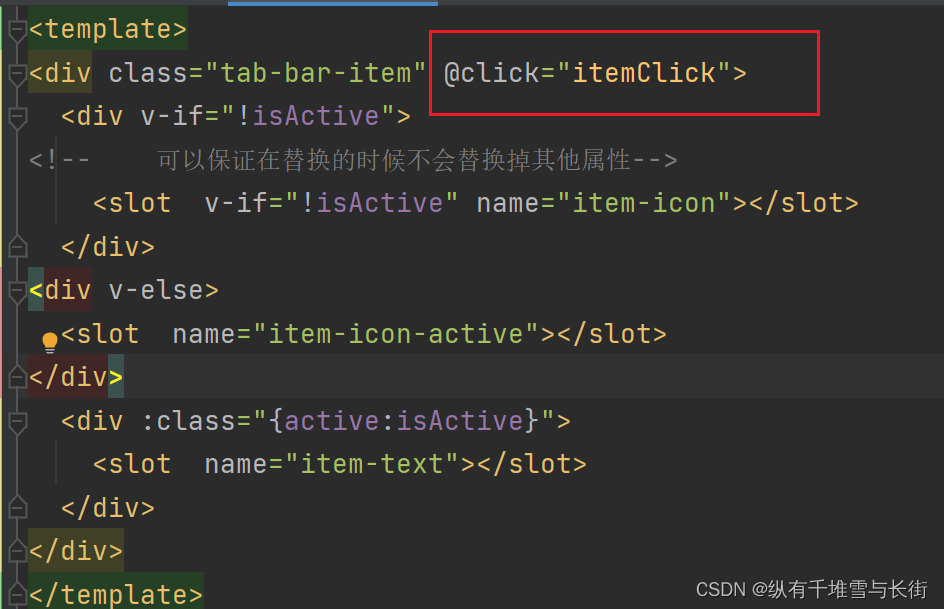
对应的点击事件:

那么我们要传入的路径如下:
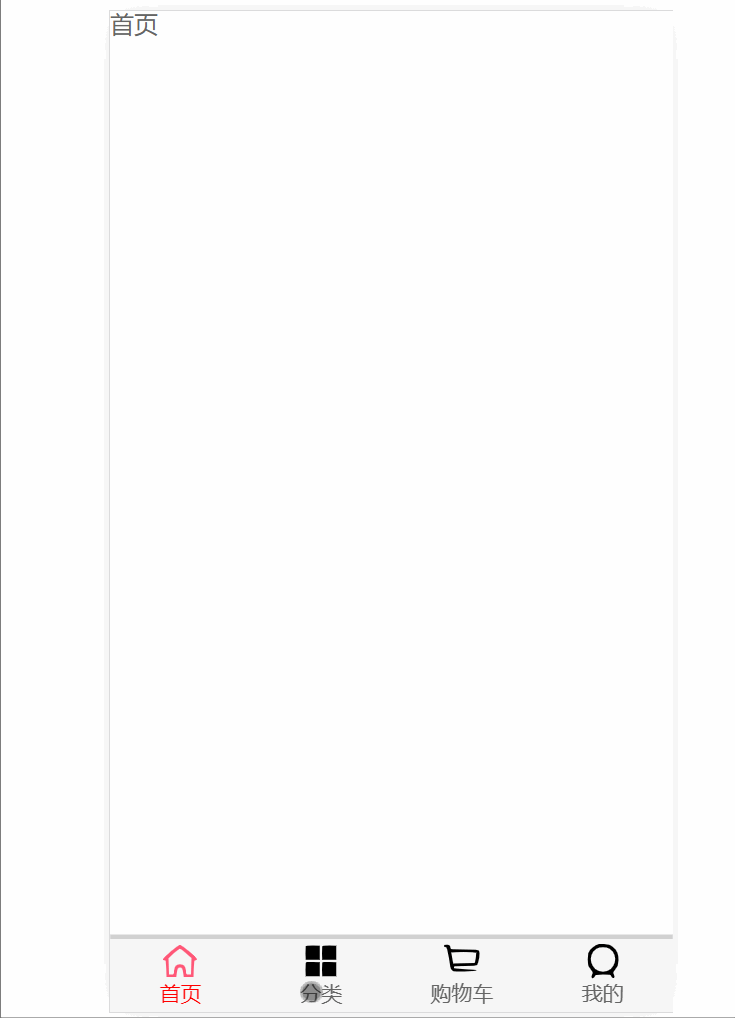
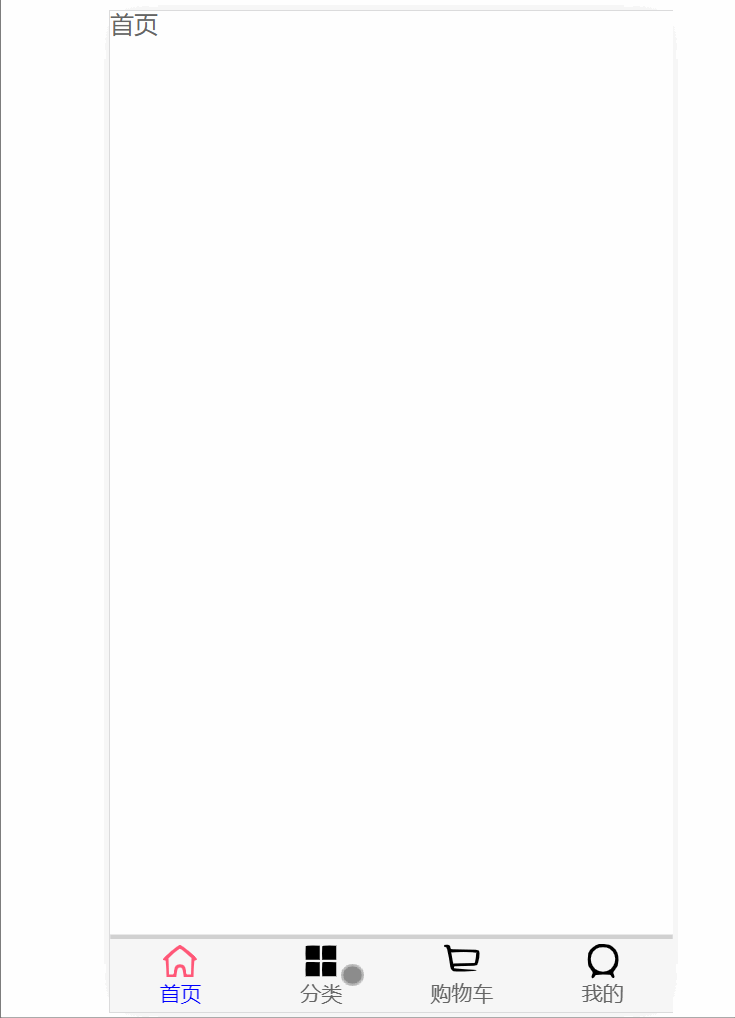
实现的效果如下:
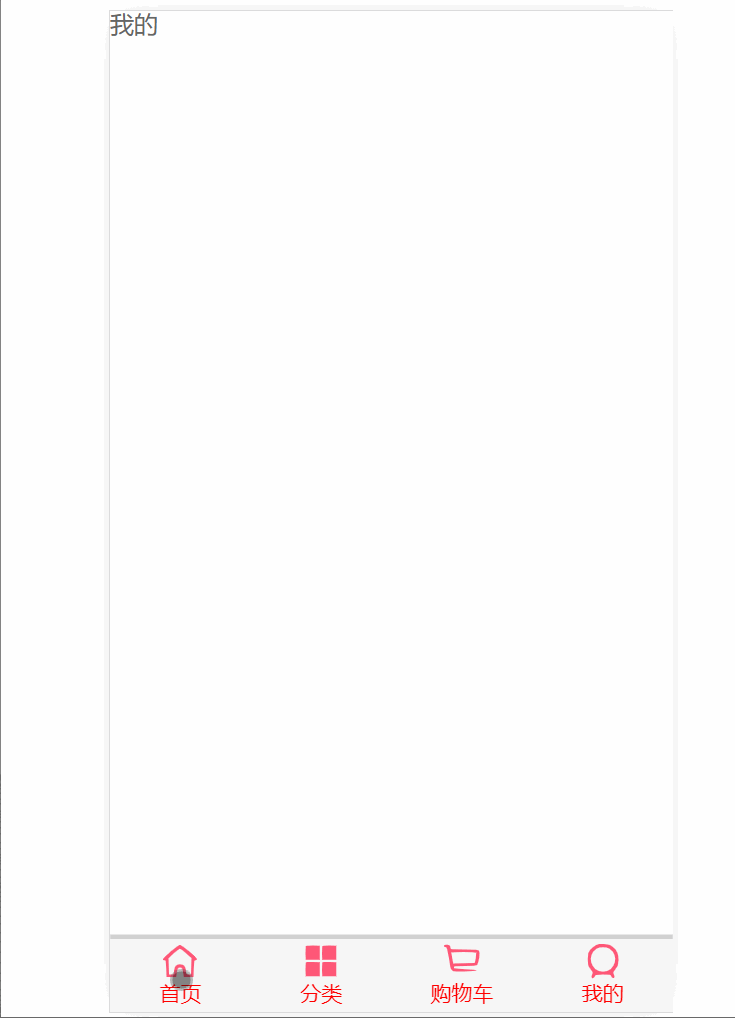
此时,我们直接在导航中输入localhost,页面会默认出现首页两个字(如果没有的话,需要检查一下app.vue中有没有router-view这个占位符)
http://localhost:8080/#/home
路径中一直有个#号,我们不想用这个#号,可以将路由文件中的mode改成history模式
const router=new Router({
  routes,
  mode:'history'
})
TabBarItem的颜色动态控制
因为TabBarItem中的isActive这个变量直接写死了,所以我们就不能动态控制了。
我们可以如下处理:

其中,我们该怎么理解this.$route.path.indexOf(this.path)!==-1这个式子呢?
this. $route指的是哪一个路由处于活跃状态哪一个就是this. $route,我们就可以拿到处于活跃路由(活跃路由只有一个)的path值,也就是this. $route.path。用来判断这个路由里面有没有我这个item的path,也就是this. $route.path.indexOf(this.path),包含的话那这个式子的值就不为-1,此时这个式子就会return true
效果为:
文字的颜色动态变化
因为想要封装的更加彻底,所以文字颜色我们不能写死。让别人能够不进入组件的内部,直接动态的传入一个颜色就可以
所以我们可以在App.vue中动态的传入颜色
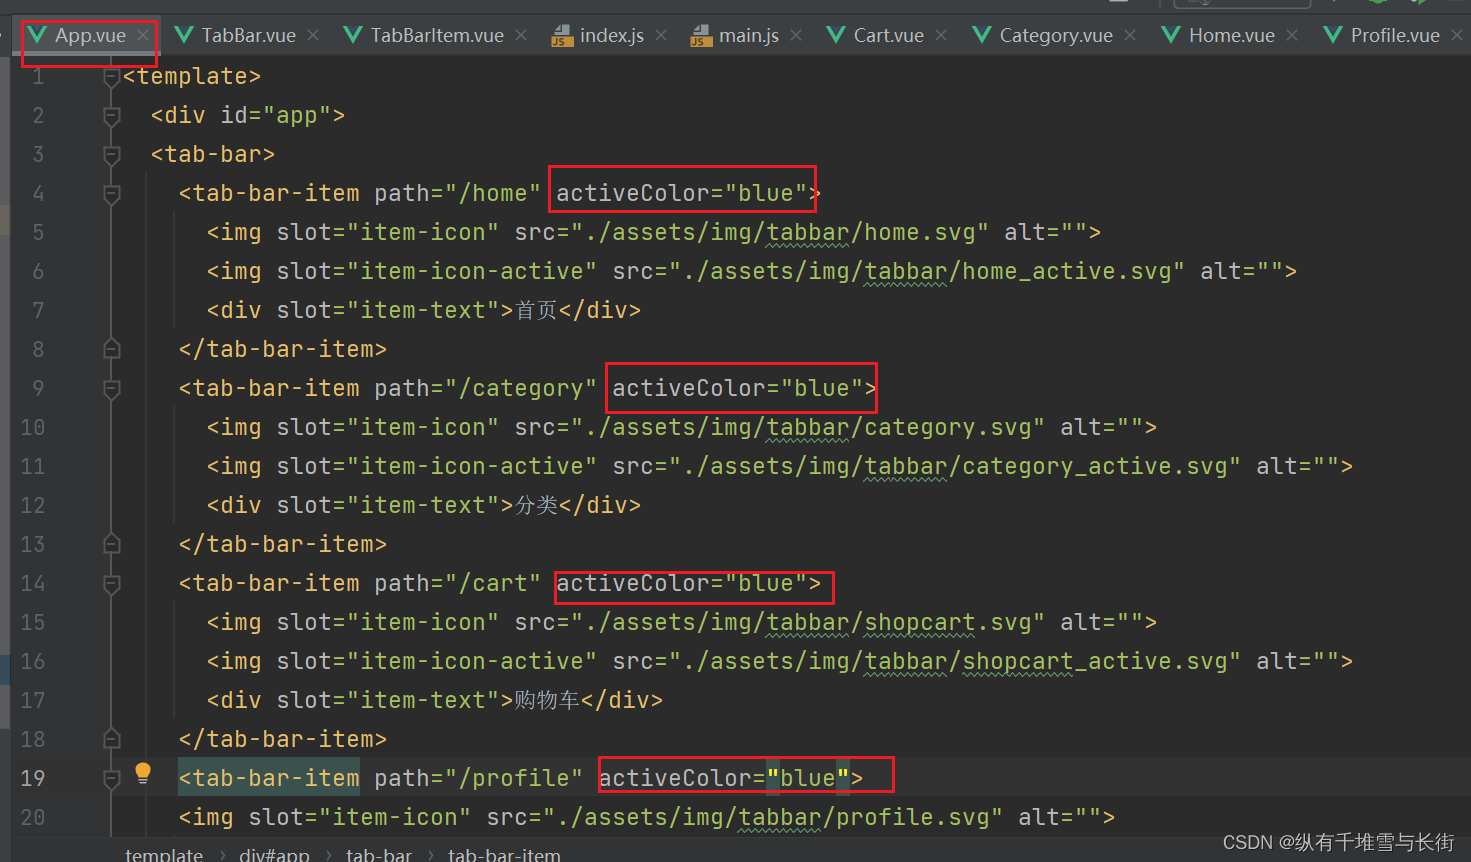
然后在TabBarItem中
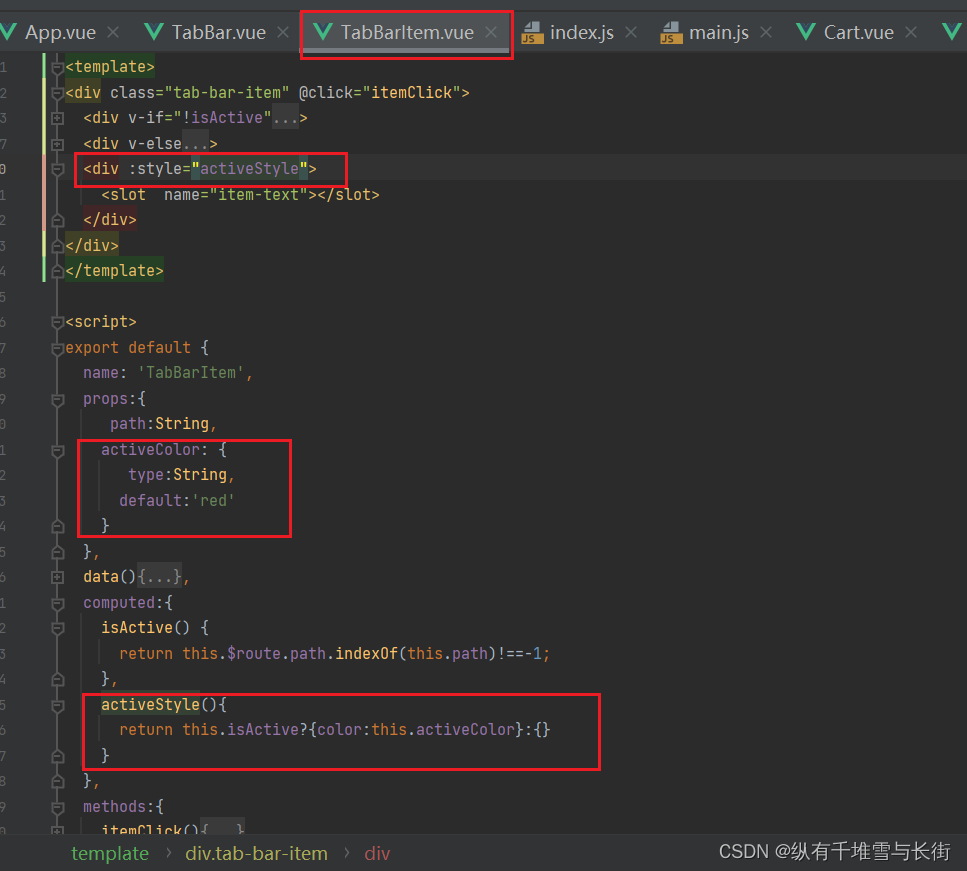
根据activeStyle方法判断字体颜色:首先判断是不是处于活跃状态,是的话就将颜色变为活跃时的颜色(通过接收的参数activeColor这个值)不是的话就是一个空对象。
效果:
总结
TabBar实现思路:
- 如果在下方有一个单独的TabBar组件,你如何封装
- 自定义TabBar组件,在APP中使用
- 让TabBar出于底部,并且设置相关的样式
- TabBar中显示的内容由外界决定
- 定义插槽
- flex布局平分TabBar
- 自定义TabBarItem,可以传入 图片和文字
- 定义TabBarItem,并且定义两个插槽:图片、文字。
- 给两个插槽外层包装div,用于设置样式。
- 填充插槽,实现底部TabBar的效果
- 传入 高亮图片
- 定义另外一个插槽,插入active-icon的数据
- 定义一个变量isActive,通过v-show来决定是否显示对应的icon
- TabBarItem绑定路由数据
- 安装路由:npm install vue-router ―save
- 完成router/index.js的内容,以及创建对应的组件
- main.js中注册router
- APP中加入< router-view>组件
- 点击item跳转到对应路由,并且动态决定isActive
- 监听item的点击,通过this. $router.replace()替换路由路径
- 通过this. $route.path.indexOf(this.link) !== -1来判断是否是active
- 动态计算active样式
- 封装新的计算属性:this.isActive ? {‘color’: ‘red’} : {}