前言:
什么是redux?redux和vuex一样,都被统称为状态管理库,是核心数据存贮与分发、监听数据改变的核心所在。
可以简单说下redux和vuex的区别:
相同点
- state 共享数据
- 流程一致:定义全局state,触发,修改state
- 原理相似,通过全局注入store。
不同点
-
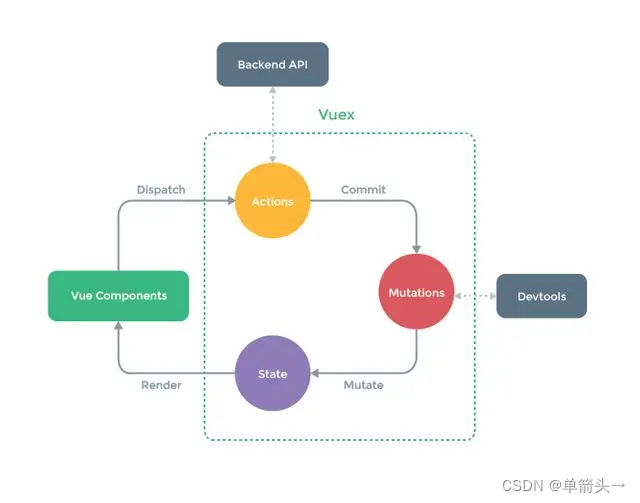
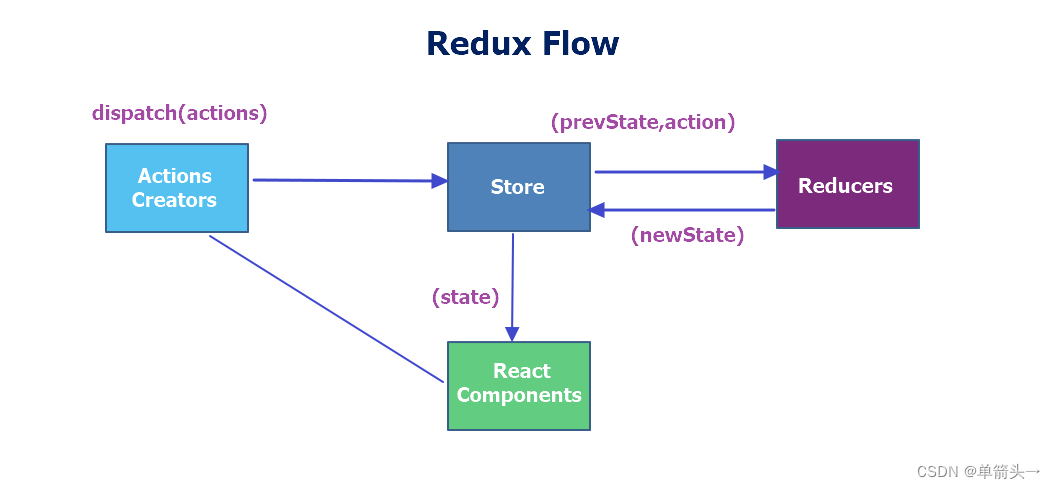
vuex定义了state、getter、mutation、action四个对象;redux定义了state、reducer、action。
-
vuex触发方式有两种commit同步和dispatch异步;redux同步和异步都使用dispatch
-
vuex中state统一存放,方便理解;reduxstate依赖所有reducer的初始值
-
vuex有getter,目的是快捷得到state;redux没有这层,react-redux mapStateToProps参数做了这个工作。
-
vuex中mutation只是单纯赋值(很浅的一层);redux中reducer只是单纯设置新state(很浅的一层)。他俩作用类似,但书写方式不同
-
vuex中action有较为复杂的异步ajax请求;redux中action中可简单可复杂,简单就直接发送数据对象({type:xxx, your-data}),复杂需要调用异步ajax(依赖redux-thunk插件)。
-
Redux 使用的是不可变数据,而Vuex的数据是可变的。Redux每次都是用新的state替换旧的state,而Vuex是直接修改
-
Redux 在检测数据变化的时候,是通过 diff 的方式比较差异的,而Vuex其实和Vue的原理一样,是通过 getter/setter来比较的
vuex 数据交互 思维图:

redux数据交互思维图:

接下来详细说说redux:
配置总共分为三部分
一.actions:负责收集并向reduces提交state的变化,自身可分为两部分actions类型和actions函数创建
(1)actions —type 常量类型,主负责向reduces
(2)actions —fn 函数创建 组件中触发提交函数
二.reducers 更新state状态,可根据state数据类型拆分成单个reducer,把reducers细化,后面通过集合构建出最终的大state
三.全局只需要有一个store,不需要像网站中资料介绍的在每一个组件一样去初始化一个store,一个项目集合在这初始化一次就可以;
- store.dispatch() // 提交
- store.sbuscribe() // 组件中监听reducer的变化,即state的变化回调
- store.getState() // 获取state的值,通常和store.sbuscribe() 结合使用
源码部分:
目录配置

actions:
index.js
/* actions 类型
* TYPE_GET_LIST 这是一个关于点击类型获取列表的定义
*/
import {TYPE_GET_LIST,IS_LOGIN} from "./type"


/* actions 创建函数
*actions 创建函数和actions是两个概念
*/
export function getType(opt){
  return {type: TYPE_GET_LIST, opt}
}
export function isLogin(flag){
  return {type: IS_LOGIN, flag}
}
type.js
/* actions 类型type */
export const TYPE_GET_LIST = "TYPE_GET_LIST";
export const IS_LOGIN = "IS_LOGIN";

/* 其他常量 */
export const otherType = {
  TO_DO: "TO_DO"
}
reducers
index.js
/**
 * redux 管理入口
 */
import {combineReducers} from "redux"
import userBasketReducer from './userReducer';
import {TYPE_GET_LIST, IS_LOGIN} from "../actions/type"

/* 不同数据结构的单个state */
function typeInfo(state={}, action) {
  console.log(state, action, "这个是tyInfo的信息");
  switch (action.type) {
    case TYPE_GET_LIST: return Object.assign({}, state, {typeInfo: action.opt});
    default: return state;
  }
};
function isLogin(state=false, action) {
  console.log(state, action);
  switch (action.type) {
    case IS_LOGIN: return Object.assign({}, state, {isLogin: action.flag});
    case ....; //
    default: return state;
  }
};

// 汇总成一个大的state,供全局使用
const reducers = combineReducers({
  userBasket: userBasketReducer,
  typeInfo,
  isLogin
});

export default reducers;
store
import { createStore } from 'redux'
import reducers from '../reducers'
const store = createStore(reducers)

export default store;
至此,一个完整的redux搭建成功,需要拓展什么样的业务只需要根据自己的业务定义常量函数名和创建函数就可以了,然后通过在组件中dispatch分发的方式提交,就能直接挂载到state对象上供组件间相互使用。
接下来看看如何在组件中使用:
如何提交:
在组件中引入store库,和函数创建的方法
import {isLogin} from "../../redux/actions"
import store from "../../redux/store";

// 提交
store.dispatch(isLogin({flag: true})) // 登录成功赋值更新已登录逻辑
如何动态获取监听改变的值监听,全局监听state的值
import store from "../../redux/store";
store.subscribe(() => {
			const { selectedFolderId } = store.getState().selectedFolderId;
			this.setState({
				checkFolderId: selectedFolderId
			});
	});
Redux 将组件区分为 容器组件 和 UI 组件
- 前者会处理逻辑
- 后者只负责显示和交互,内部不处理逻辑,状态完全由外部掌控
Provider
借助顶级组件Provider, 我们都将顶层组件包裹在Provider组件之中,这样的话,所有组件就都可以在react-redux的控制之下了,但是store必须作为参数放到Provider组件中去
import store from "../../redux/store";
<Provider store = {store}>
    <App />
<Provider>
这个组件的目的是让所有组件都能够访问到Redux中的数据。
connect 的使用:
connect(mapStateToProps, mapDispatchToProps)(MyComponent)
mapStateToProps 把Redux中的数据映射到React中的props中去。
如:
    const mapStateToProps = (state) => {
      return {
      	// prop : state.xxx  | 意思是将state中的某个数据映射到props中
        foo: state.bar
      }
    }
组件中:
class Foo extends Component {
    constructor(props){
        super(props);
    }
    render(){
        return(
        	// 这样子渲染的其实就是state.bar的数据了
            <div>this.props.foo</div>
        )
    }
}
Foo = connect()(Foo);
export default Foo;
mapDispatchToProps 把各种dispatch也变成了props让你可以直接使用
const mapDispatchToProps = (dispatch) => { // 默认传递参数就是dispatch
  return {
    onClick: () => {
      dispatch({
        type: 'increatment'
      });
    }
  };
}
class Foo extends Component {
    constructor(props){
        super(props);
    }
    render(){
        return(

             <button onClick = {this.props.onClick}>点击increase</button>
        )
    }
}
Foo = connect()(Foo);
export default Foo;
可以直接通过this.props.onClick,来调用dispatch,这样子就不需要在代码中来进行store.dispatch了
如果哪儿不懂可以留言我会快速回复,拆分的比较细,有些地方可能没必要拆分,完全是为了自己练习和做个笔记,也方便大家阅读,不足之处请指教互相交流学习