目录
一、Vue的简介
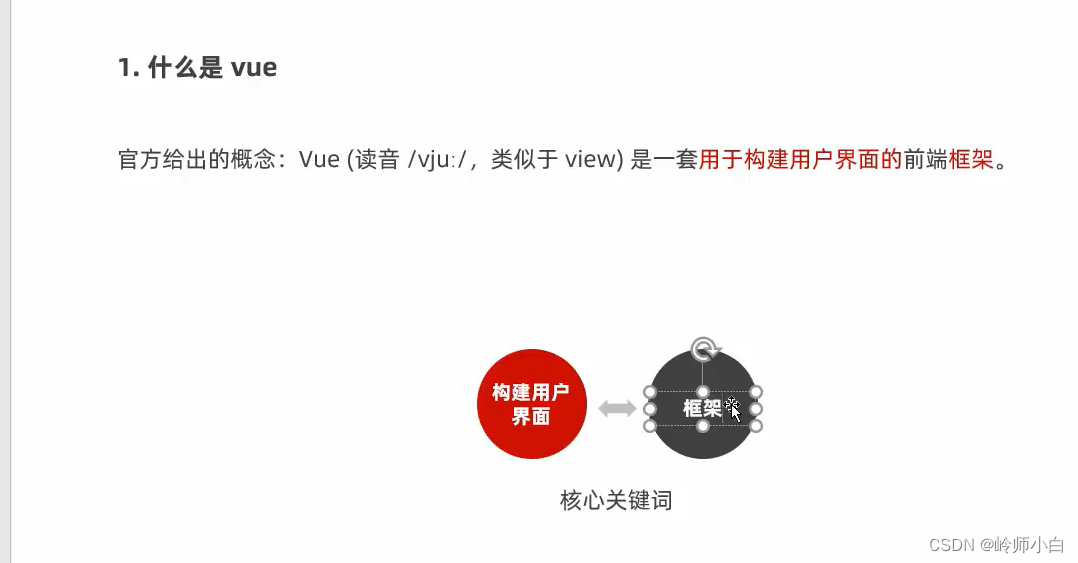
1、什么是vue
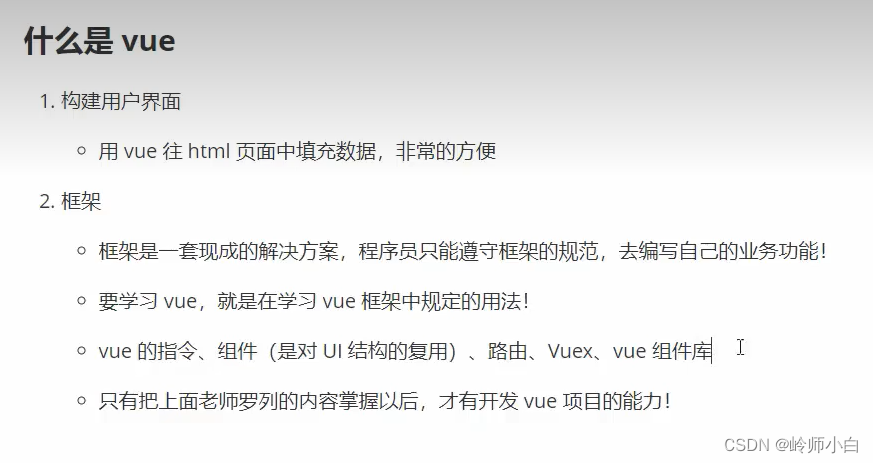
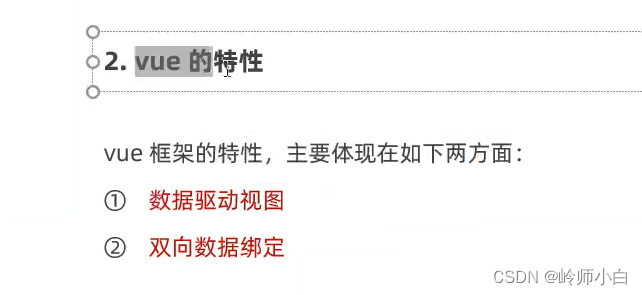
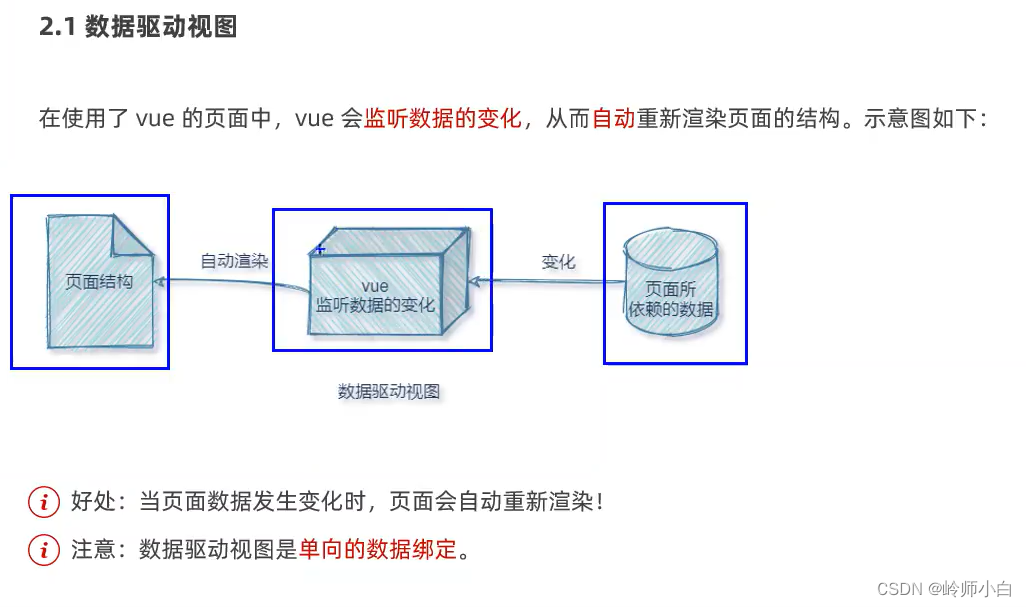
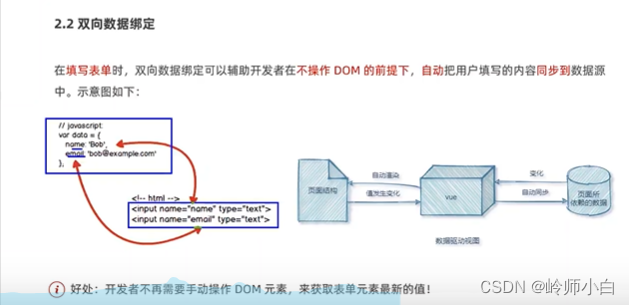
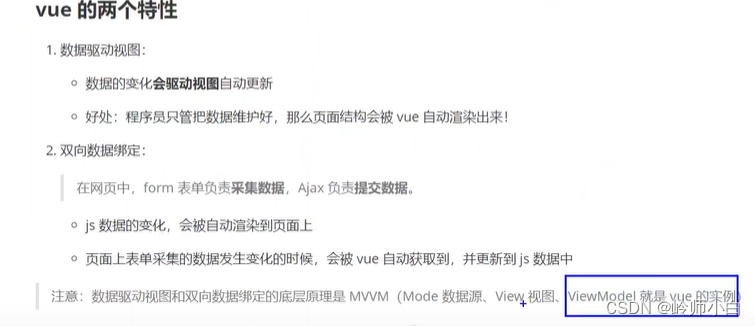
?2、vue 的特性(数据驱动视图、双向数据绑定)
?
?
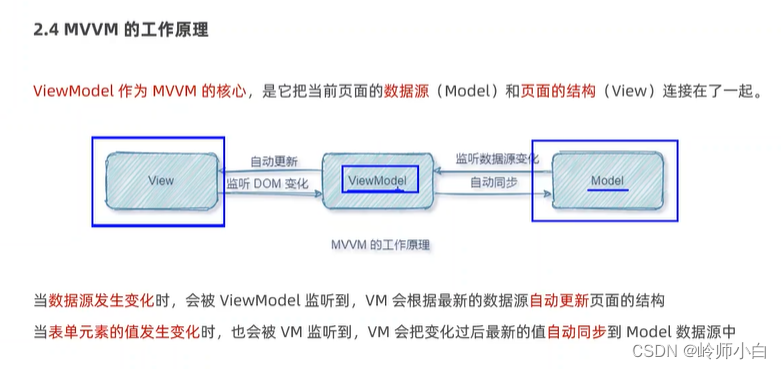
?3、MVVM及其工作原理
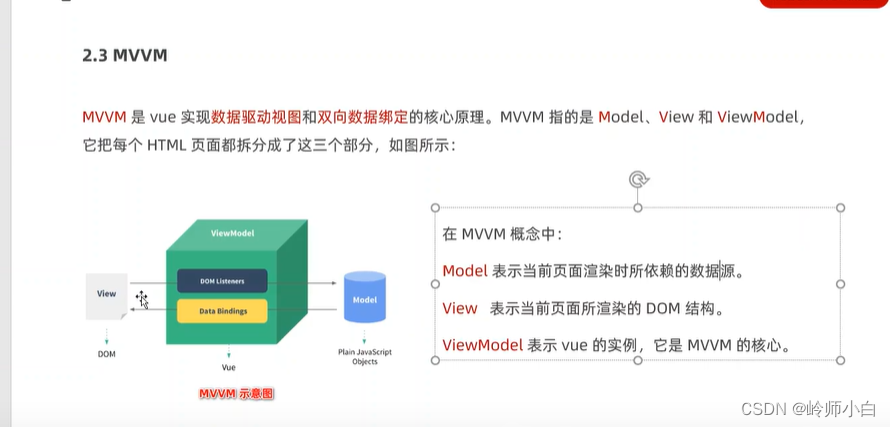
?
?
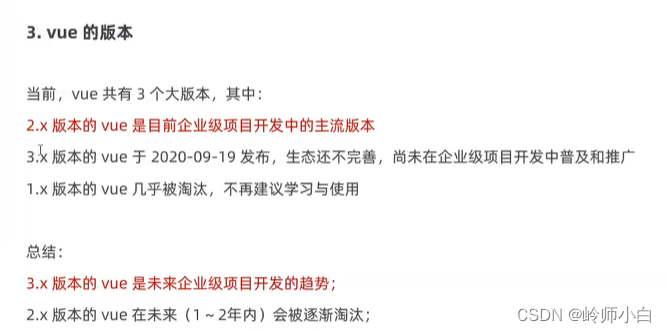
?
?二、Vue的基本实用
1、基本使用步骤
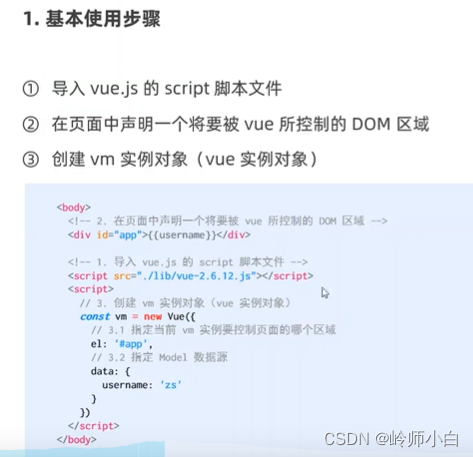
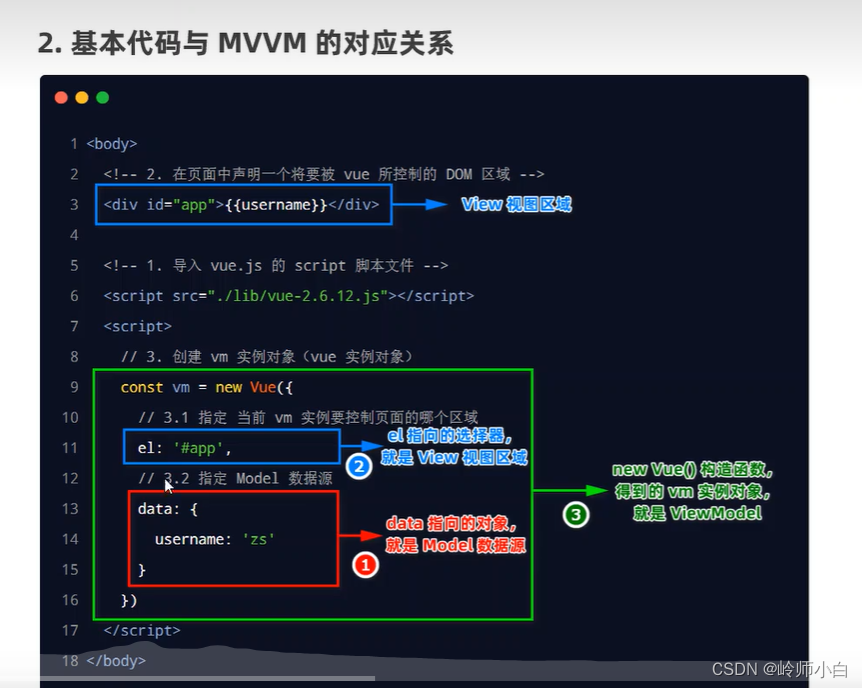
<!DOCTYPE html>
<html lang="en">
<head>
    <meta charset="UTF-8">
    <meta http-equiv="X-UA-Compatible" content="IE=edge">
    <meta name="viewport" content="width=device-width, initial-scale=1.0">
    <title>Document</title>
</head>
<body>

    <!-- 希望Vue能够控制下面这个div,帮我们在把数据填充到div内部 -->
    <div id="app">{{username}}</div>

    <!-- 导入Vue的库文件 ,在window全局就有了Vue这个构造函数-->
    <script src="./lib/vue-2.6.12.js"></script>

    <!-- 创建Vue的实例对象 -->
    <script>
        // 创建Vue的实例对象
        const vm = new Vue({
            // el(element)属性是固定的写法,表示当前vm实例要控制界面上的哪个区域,接收的值是一个选择器
            el:'#app',
            // data对象就是要渲染到页面上的数据
            data:{
                username: 'lisi'
            }
        })
    </script>
</body>
</html>
?2、配置Vue的调试工具
详细安装看另外文档(Edge版本)

3、指令与过滤器
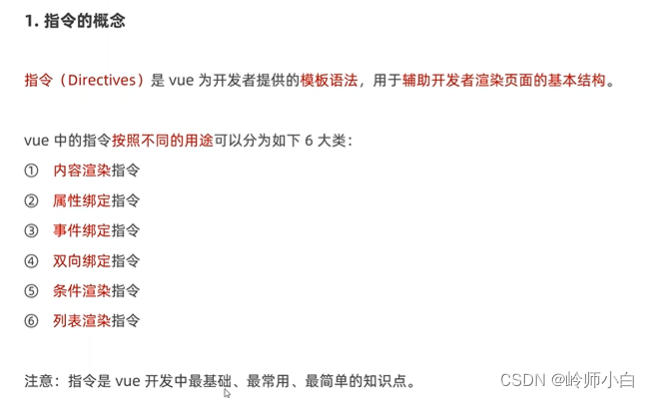
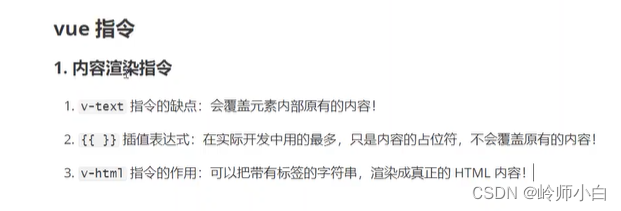
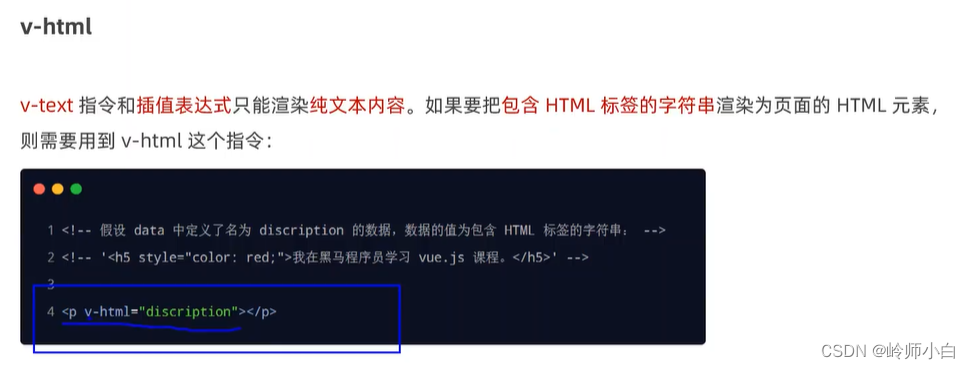
3.1内容渲染指令

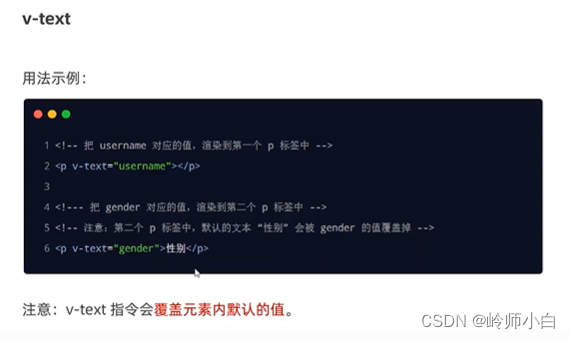
?
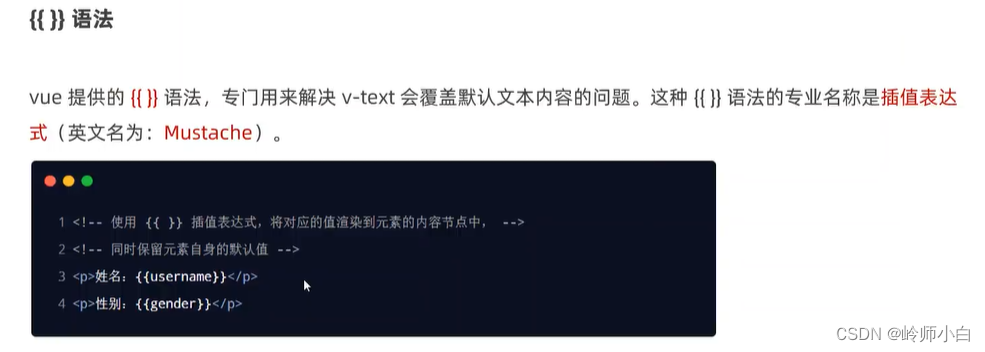
?
?
?
<!DOCTYPE html>
<html lang="en">
<head>
    <meta charset="UTF-8">
    <meta http-equiv="X-UA-Compatible" content="IE=edge">
    <meta name="viewport" content="width=device-width, initial-scale=1.0">
    <title>Document</title>
</head>
<body>

    <!-- 希望Vue能够控制下面这个div,帮我们在把数据填充到div内部 -->
    <div id="app">
        <p v-text="username"></p>
        <!-- 缺点v-text标签会覆盖元素内部原有的内容 -->
        <p v-text="gender">性别:</p>
        <!-- 分割线 -->
        <hr>
        <p>姓名: {{username}}</p>
        <p>性别: {{gender}}</p>
        <!-- 分割线 -->
        <hr>
        <div v-text="info"></div>
        <div>{{info}}</div>
        <!-- v-html可以把带有标签的字符串渲染成真正的字符串 -->
        <div v-html="info"></div>

    </div>

    <!-- 导入Vue的库文件 ,在window全局就有了Vue这个构造函数-->
    <script src="./lib/vue-2.6.12.js"></script>

    <!-- 创建Vue的实例对象 -->
    <script>
        // 创建Vue的实例对象
        const vm = new Vue({
            // el(element)属性是固定的写法,表示当前vm实例要控制界面上的哪个区域,接收的值是一个选择器
            el:'#app',
            // data对象就是要渲染到页面上的数据
            data:{
                username: 'zhangsan',
                gender:'女',
                info: '<h4 style="color:red;font-weight:bold;">欢迎大家来学习Vue.js</h4>'
            }
        })
    </script>
</body>
</html>
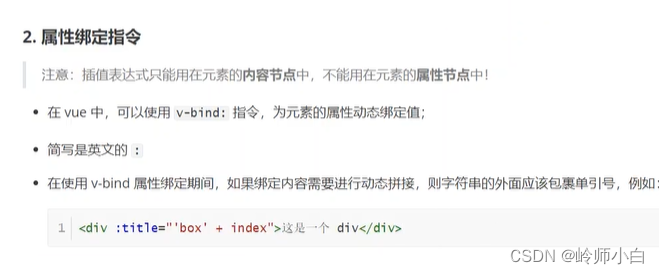
?4、属性绑定指令
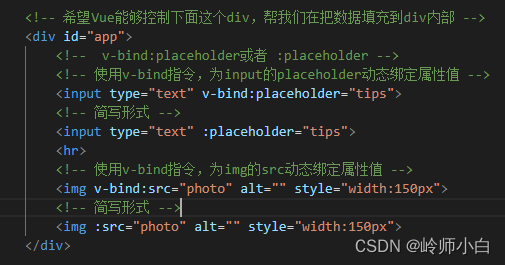
如果需要为元素的属性动态绑定属性值,则需要用到v-bind属性绑定指令(简写形式的是直接打冒号:)
?
<!DOCTYPE html>
<html lang="en">
<head>
    <meta charset="UTF-8">
    <meta http-equiv="X-UA-Compatible" content="IE=edge">
    <meta name="viewport" content="width=device-width, initial-scale=1.0">
    <title>Document</title>
</head>
<body>

    <!-- 希望Vue能够控制下面这个div,帮我们在把数据填充到div内部 -->
    <div id="app">
        <!--  v-bind:placeholder或者 :placeholder -->
        <!-- 使用v-bind指令,为input的placeholder动态绑定属性值 -->
        <input type="text" v-bind:placeholder="tips">
        <!-- 简写形式 -->
        <input type="text" :placeholder="tips">
        <hr>
        <!-- 使用v-bind指令,为img的src动态绑定属性值 -->
        <img v-bind:src="photo" alt="" style="width:150px">
        <!-- 简写形式 -->
        <img :src="photo" alt="" style="width:150px">
    </div>

    <!-- 导入Vue的库文件 ,在window全局就有了Vue这个构造函数-->
    <script src="./lib/vue-2.6.12.js"></script>

    <!-- 创建Vue的实例对象 -->
    <script>
        // 创建Vue的实例对象
        const vm = new Vue({
            // el(element)属性是固定的写法,表示当前vm实例要控制界面上的哪个区域,接收的值是一个选择器
            el:'#app',
            // data对象就是要渲染到页面上的数据
            data:{
                tips:'请输入用户名',
                photo:'https://v2.cn.vuejs.org/images/logo.svg'
            }
        })
    </script>
</body>
</html>
?
?5、使用Javascript表达式
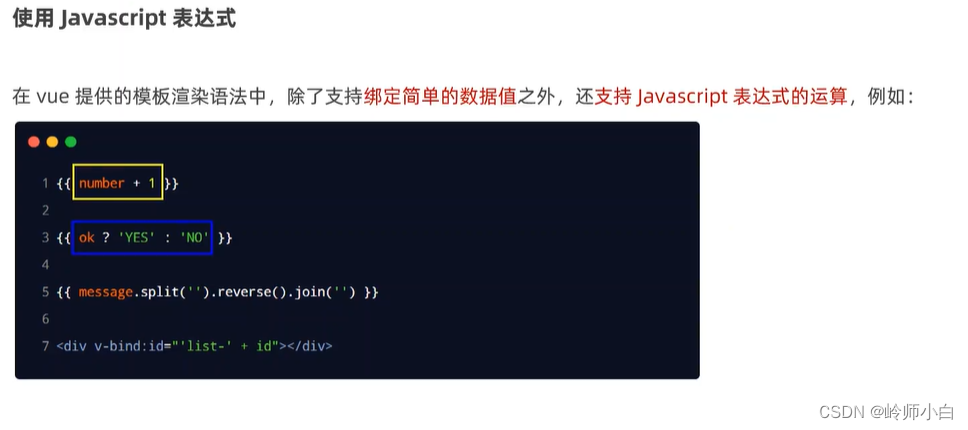
<div>1 + 2 的结果是:{{1+2}}</div>
<div>{{tips}}反转的结果是:{{tips.split('').reverse().join('')}}</div>
<div v-bind:title="'box'+index">这是一个div</div>
?6、事件绑定指令
? <!-- 在绑定事件处理函数的时候,可以使用()传递参数 -->
? ? ? ? <!-- v-on:的指令可以被简写为@ -->
? ? ? ? <!-- 简写形式把v-on:简写为@符号 -->
详细用法可以搜索:click、input、keyip的区别
v-on:click
v-on:input
v-on:keyup:@keyup是一些按键松开的操作,比如@keyup.enter表示按下回车键松开后触发@keyup.left表示鼠标左键按下松开后触发@keyup.right表示鼠标按下右键松开后触发@keyup.delete表示按下删除键松开后触发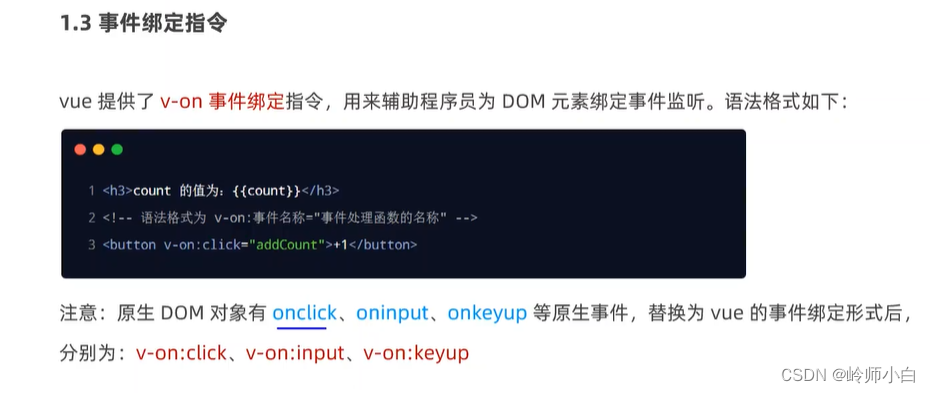
<!DOCTYPE html>
<html lang="en">
<head>
    <meta charset="UTF-8">
    <meta http-equiv="X-UA-Compatible" content="IE=edge">
    <meta name="viewport" content="width=device-width, initial-scale=1.0">
    <title>Document</title>
</head>
<body>

    <!-- 希望Vue能够控制下面这个div,帮我们在把数据填充到div内部 -->
    <div id="app">
        <p>count的值是{{count}}</p>
        <!-- 在绑定事件处理函数的时候,可以使用()传递参数 -->
        <!-- v-on:的指令可以被简写为@ -->
        <!-- 简写形式把v-on:简写为@符号 -->
        <button v-on:click="add(2)">+1</button>
        <button @click="add(2)">+1</button>
        <!-- 如果事件处理函数中的代码足够简单,只有一行代码,则可以简写到行内 -->
        <button @click="count += 1">+1</button>

        <button v-on:click="sub">-1</button>
        <button @click="sub">-1</button>


    </div>

    <!-- 导入Vue的库文件 ,在window全局就有了Vue这个构造函数-->
    <script src="./lib/vue-2.6.12.js"></script>

    <!-- 创建Vue的实例对象 -->
    <script>
        // 创建Vue的实例对象
        const vm = new Vue({
            // el(element)属性是固定的写法,表示当前vm实例要控制界面上的哪个区域,接收的值是一个选择器
            el:'#app',
            // data对象就是要渲染到页面上的数据
            data:{
                count:0
            },
            // methods的作用,就是定义事件的处理函数
            methods:{
                add:function(n){
                    console.log("ok")
                    // 打印的话可以看到count字段
                    console.log(vm)
                    console.log(this)
                    // true
                    console.log(vm==this)
                    // vm.count++
                    // this.count++
                    this.count+=n
                },
                // 简写
                sub(){
                    console.log("delete")
                    this.count--
                }

            }
        })
    </script>
</body>
</html>
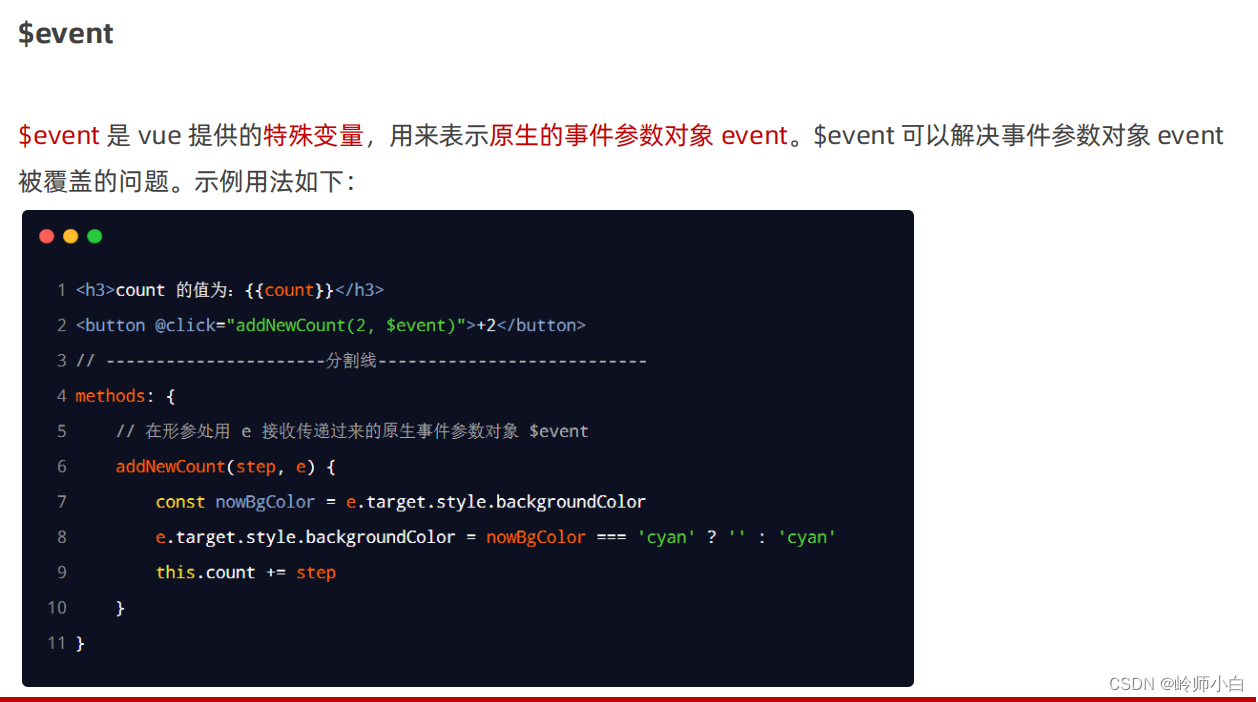
7、事件对象
$event的应用场景:如果默认的事件对象e被覆盖了,则可以手动传递一个$event
<!DOCTYPE html>
<html lang="en">
<head>
    <meta charset="UTF-8">
    <meta http-equiv="X-UA-Compatible" content="IE=edge">
    <meta name="viewport" content="width=device-width, initial-scale=1.0">
    <title>Document</title>
</head>
<body>

    <!-- 希望Vue能够控制下面这个div,帮我们在把数据填充到div内部 -->
    <div id="app">
        <p>count 的值是:{{count}}</p>
        <!-- 如果count是偶数,则按钮背景变成红色,否则,取消背景颜色 -->
        <!-- vue提供了内置变量,名字叫做$event,它就是原生DOM的事件对象e -->
        <!-- 不传参数默认e -->
        <!-- <button @click="add">+N</button> -->
        <button @click="add(1,$event)">+N</button>
    </div>

    <!-- 导入Vue的库文件 ,在window全局就有了Vue这个构造函数-->
    <script src="./lib/vue-2.6.12.js"></script>

    <!-- 创建Vue的实例对象 -->
    <script>
        // 创建Vue的实例对象
        const vm = new Vue({
            // el(element)属性是固定的写法,表示当前vm实例要控制界面上的哪个区域,接收的值是一个选择器
            el:'#app',
            // data对象就是要渲染到页面上的数据
            data:{
                count:0
            },
            methods:{
                // 没有传参打e默认传整个事件
                add(n,e){
                    this.count+=n
                    console.log(e)

                    // 判断this.count的值是否为偶数
                    if(this.count%2===0){
                        // 偶数
                        e.target.style.backgroundColor = 'red'
                    }else{
                        e.target.style.backgroundColor = ''

                    }
                }

            }
        })
    </script>
</body>
</html>
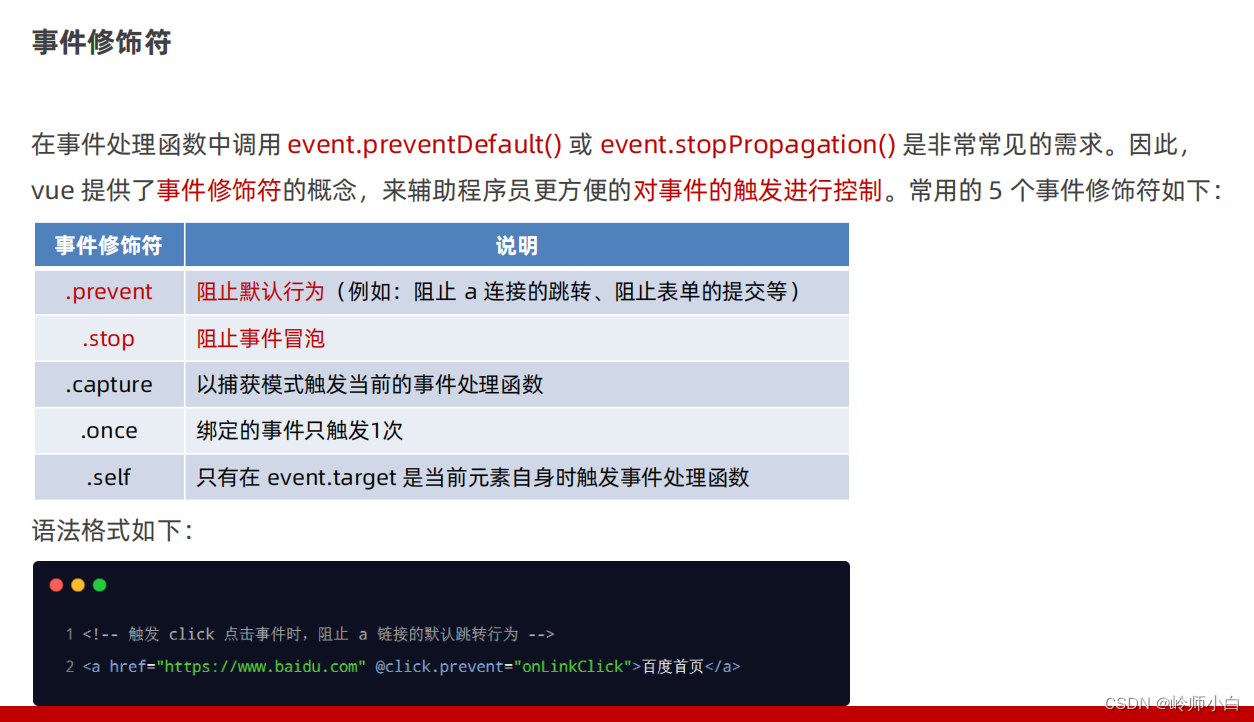
?8、事件修饰符
?9、按键修饰符
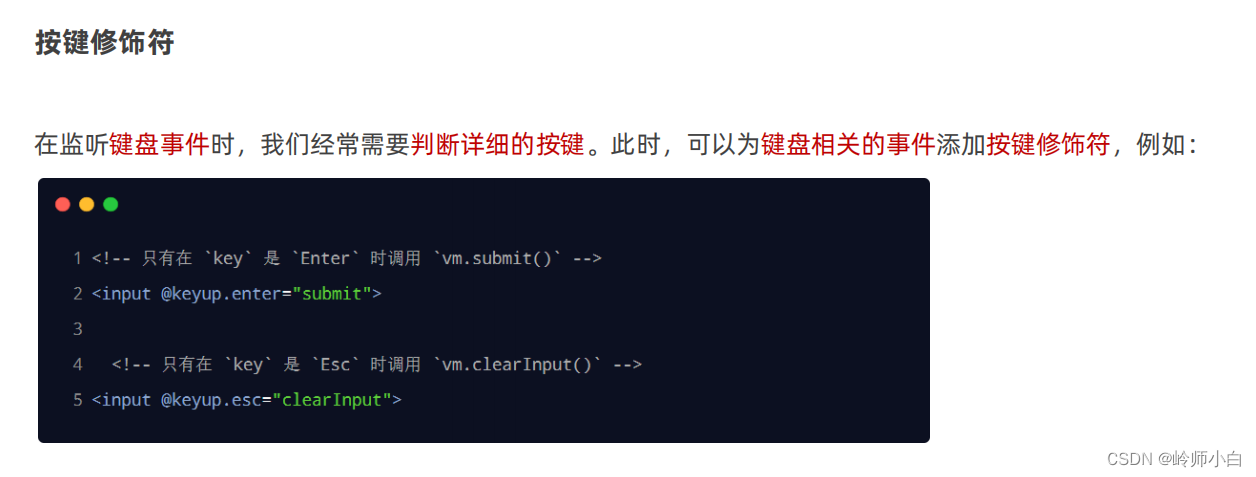
?清空
 clearInput(e){
     e.target.value=''
     console.log("触发了clearInput方法")
  }
10、双向数据绑定指令
v-bind是属于单向绑定
v-model属于双向绑定
看代码
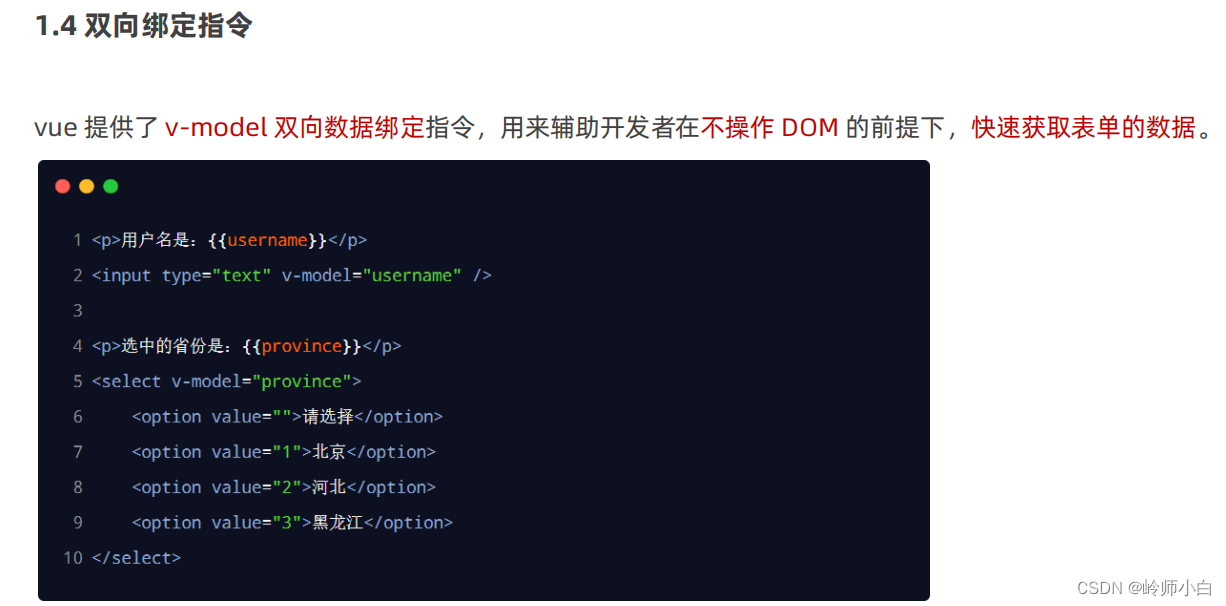
<!DOCTYPE html>
<html lang="en">
<head>
    <meta charset="UTF-8">
    <meta http-equiv="X-UA-Compatible" content="IE=edge">
    <meta name="viewport" content="width=device-width, initial-scale=1.0">
    <title>Document</title>
</head>
<body>

    <!-- 希望Vue能够控制下面这个div,帮我们在把数据填充到div内部 -->
    <div id="app">
        <p>用户的名字是:{{username}}</p>
        <input type="text" v-model="username">
        <hr>
        <!--这个不能实时更新 属于单项绑定 -->
        <input type="text" :value="username">
        <hr>
        <!-- v-model只能和表单属性使用 比如:input输入框 、textarea文字框、select -->
        <!-- <div v-model="username"></div> -->
        <p>{{city}}</p>
        <select v-model="city">
            <option value="请选择城市">请选择城市</option>
            <option value="北京">北京</option>
            <option value="上海">上海</option>
            <option value="广州">广州</option>

        </select>
    </div>

    <!-- 导入Vue的库文件 ,在window全局就有了Vue这个构造函数-->
    <script src="./lib/vue-2.6.12.js"></script>

    <!-- 创建Vue的实例对象 -->
    <script>
        // 创建Vue的实例对象
        const vm = new Vue({
            // el(element)属性是固定的写法,表示当前vm实例要控制界面上的哪个区域,接收的值是一个选择器
            el:'#app',
            // data对象就是要渲染到页面上的数据
            data:{
                username: 'lisi',
                city:'请选择城市'
            }
        })
    </script>
</body>
</html>
11、v-model的修饰符
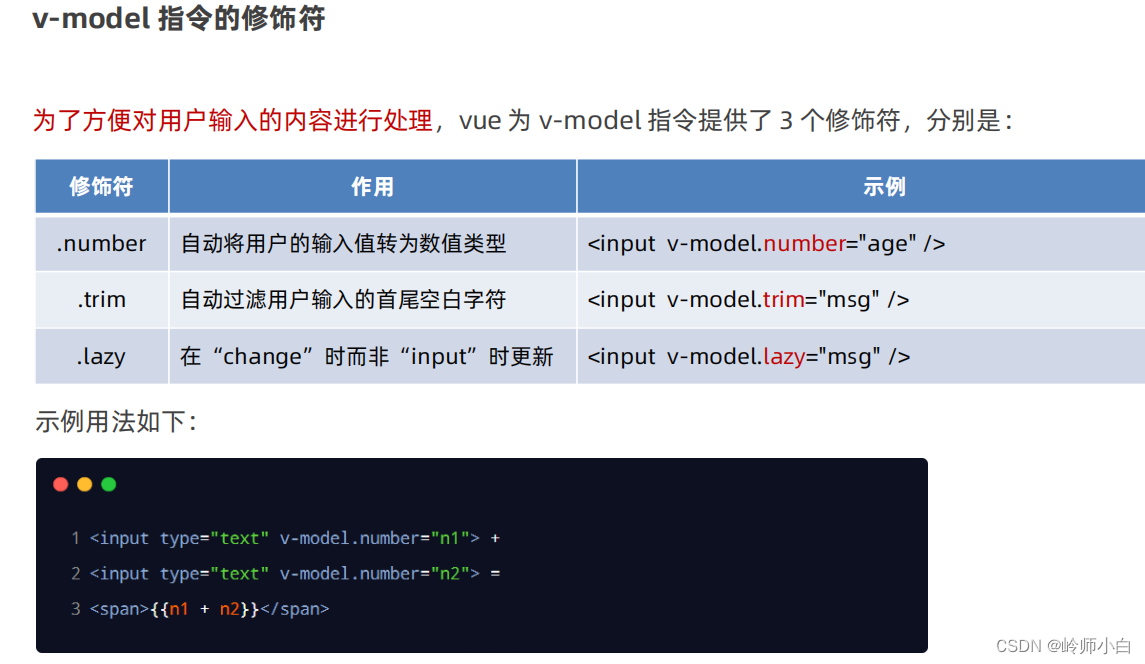
<!DOCTYPE html>
<html lang="en">
<head>
    <meta charset="UTF-8">
    <meta http-equiv="X-UA-Compatible" content="IE=edge">
    <meta name="viewport" content="width=device-width, initial-scale=1.0">
    <title>Document</title>
</head>
<body>

    <!-- 希望Vue能够控制下面这个div,帮我们在把数据填充到div内部 -->
    <div id="app">
        <!-- input输入的字符串 -->
        <input type="text" v-model="n1"> + <input type="text" v-model="n2"> = <span>{{n1 + n2}}</span>
        <!-- 正确写法 -->
        <input type="text" v-model.number="n1"> + <input type="text" v-model.number="n2"> = <span>{{n1 + n2}}</span>
        <hr>
                <!-- 去除前后的空格 -->
        <input type="text" v-model.trim="username">
        <button @click="showName">获取用户名</button>
        <hr>
        <input type="text" v-model="username">
    </div>

    <!-- 导入Vue的库文件 ,在window全局就有了Vue这个构造函数-->
    <script src="./lib/vue-2.6.12.js"></script>

    <!-- 创建Vue的实例对象 -->
    <script>
        // 创建Vue的实例对象
        const vm = new Vue({
            // el(element)属性是固定的写法,表示当前vm实例要控制界面上的哪个区域,接收的值是一个选择器
            el:'#app',
            // data对象就是要渲染到页面上的数据
            data:{
                username: 'lisi',
                n1: 1,
                n2: 2
            },
            methods: {
                showName(){
                    // console.log('用户名是:"${this.username}"')
                    // 这里是反引号在数字1旁边
                    console.log(`用户名是:"${this.username}"`)

                }
            },
        })
    </script>
</body>
</html>
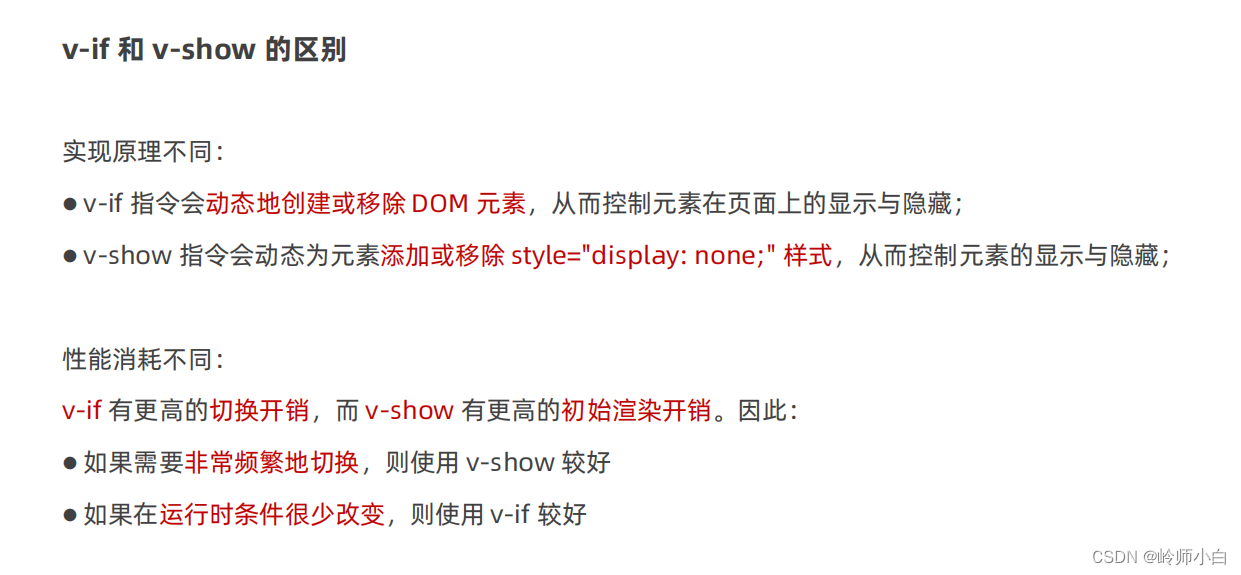
12、条件渲染指令
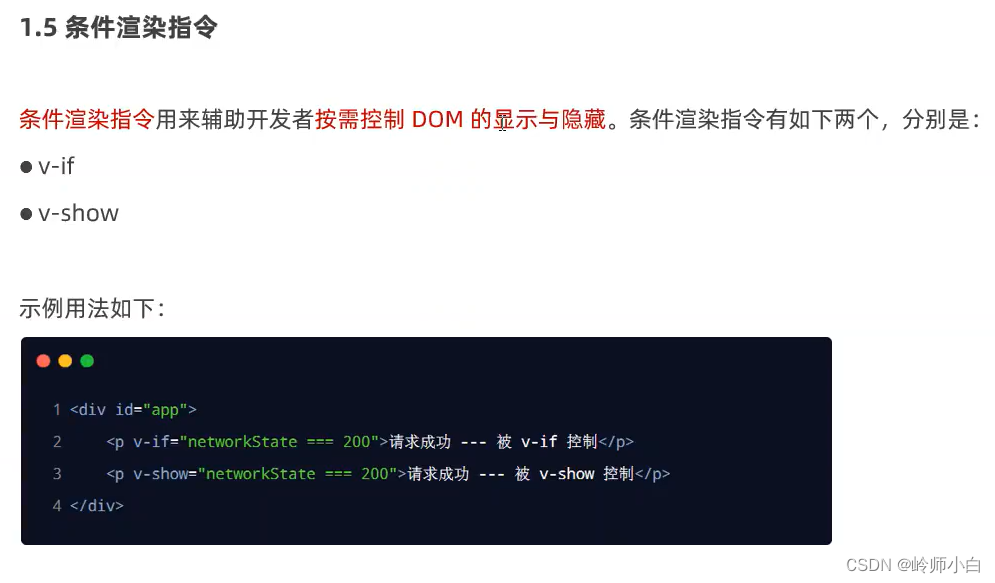
?
?
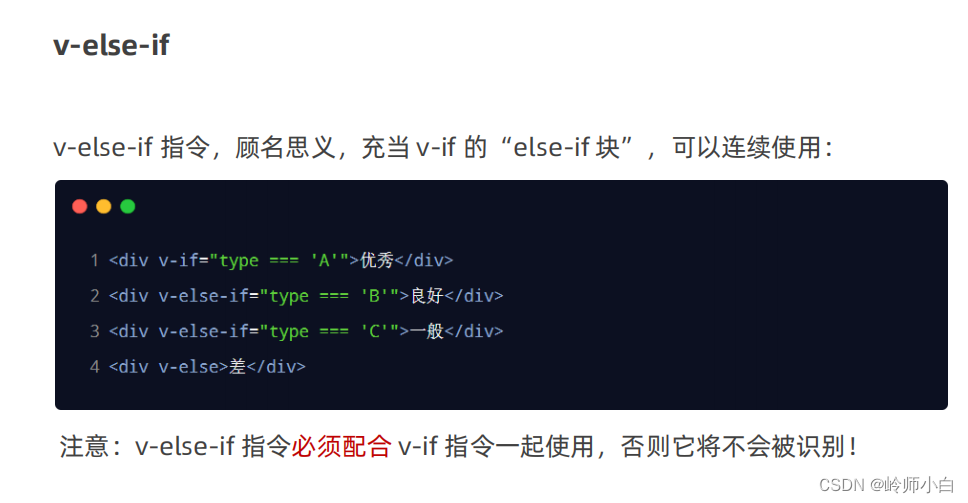
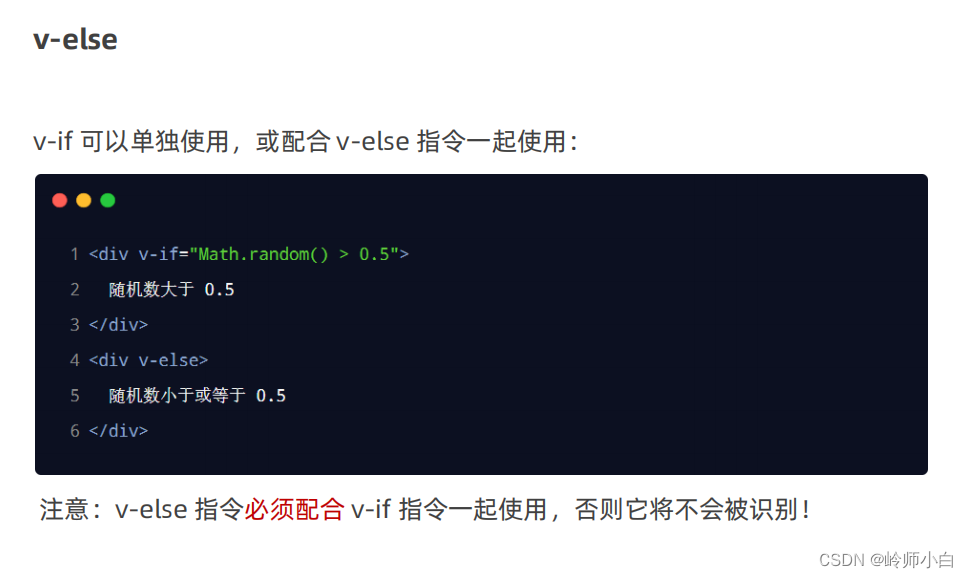
?12.1 v-if配套指令
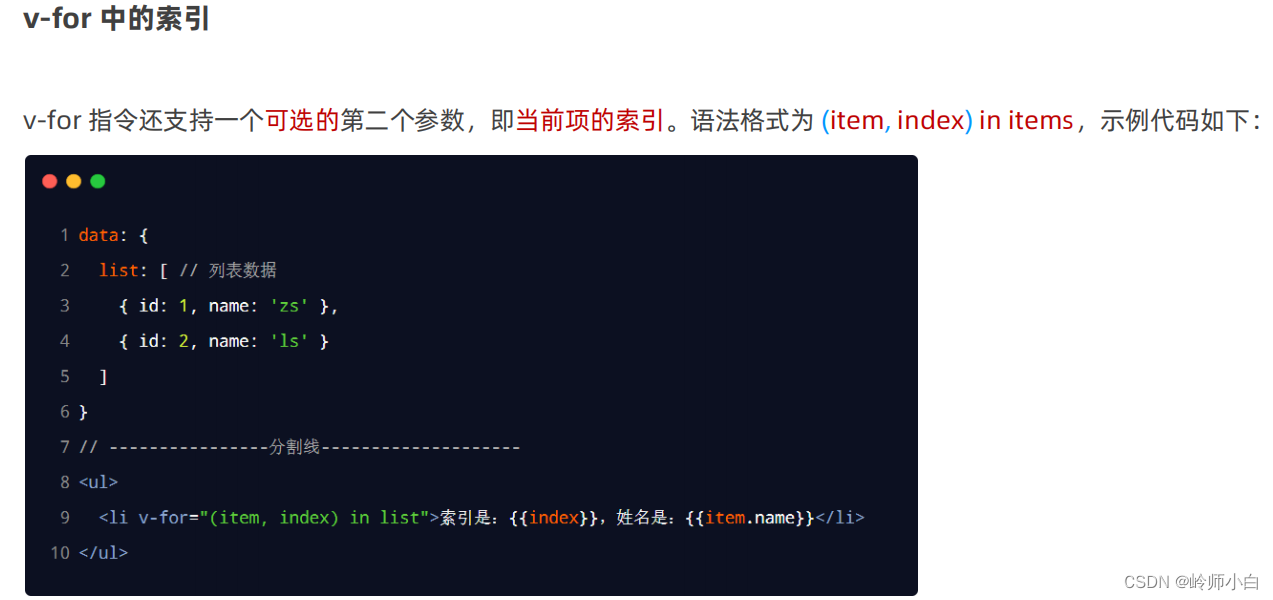
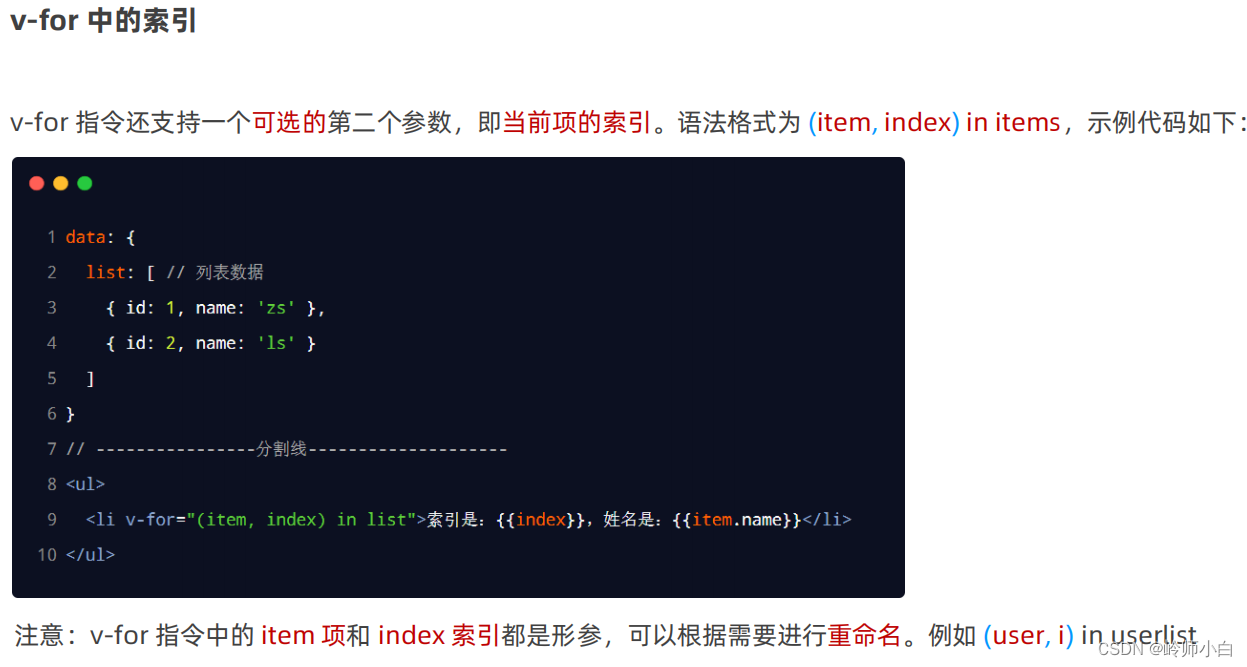
?13、列表渲染指令 v-for
?
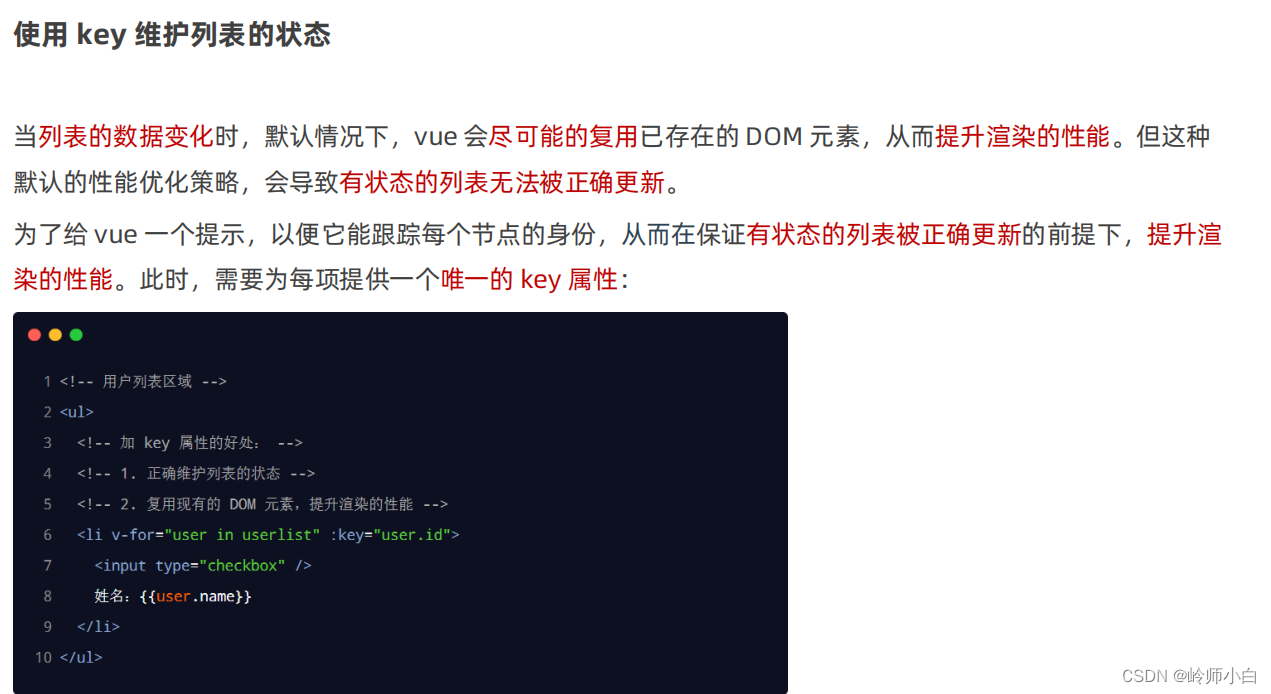
?unshift() 方法可向数组的开头添加一个或更多元素,并返回新的长度。
?将新项添加到数组末尾,请使用 push() 方法。
<!DOCTYPE html>
<html lang="en">

<head>
  <meta charset="UTF-8">
  <meta name="viewport" content="width=device-width, initial-scale=1.0">
  <title>Document</title>
</head>

<body>
  <!-- 在页面中声明一个将要被 vue 所控制的 DOM 区域 -->
  <div id="app">

    <!-- 添加用户的区域 -->
    <div>
      <input type="text" v-model="name">
      <button @click="addNewUser">添加</button>
    </div>

    <!-- 用户列表区域 -->
    <ul>
      <li v-for="(user, index) in userlist" :key="user.id">
        <input type="checkbox" />
        姓名:{{user.name}}
      </li>
    </ul>
  </div>

  <script src="./lib/vue-2.6.12.js"></script>
  <script>
    const vm = new Vue({
      el: '#app',
      data: {
        // 用户列表
        userlist: [
          { id: 1, name: 'zs' },
          { id: 2, name: 'ls' }
        ],
        // 输入的用户名
        name: '',
        // 下一个可用的 id 值
        nextId: 3
      },
      methods: {
        // 点击了添加按钮
        addNewUser() {
          // unshift() 方法可向数组的开头添加一个或更多元素,并返回新的长度。
          // 将新项添加到数组末尾,请使用 push() 方法。
          this.userlist.push({ id: this.nextId, name: this.name })
          this.name = ''
          this.nextId++
        }
      },
    })
  </script>
</body>

</html>
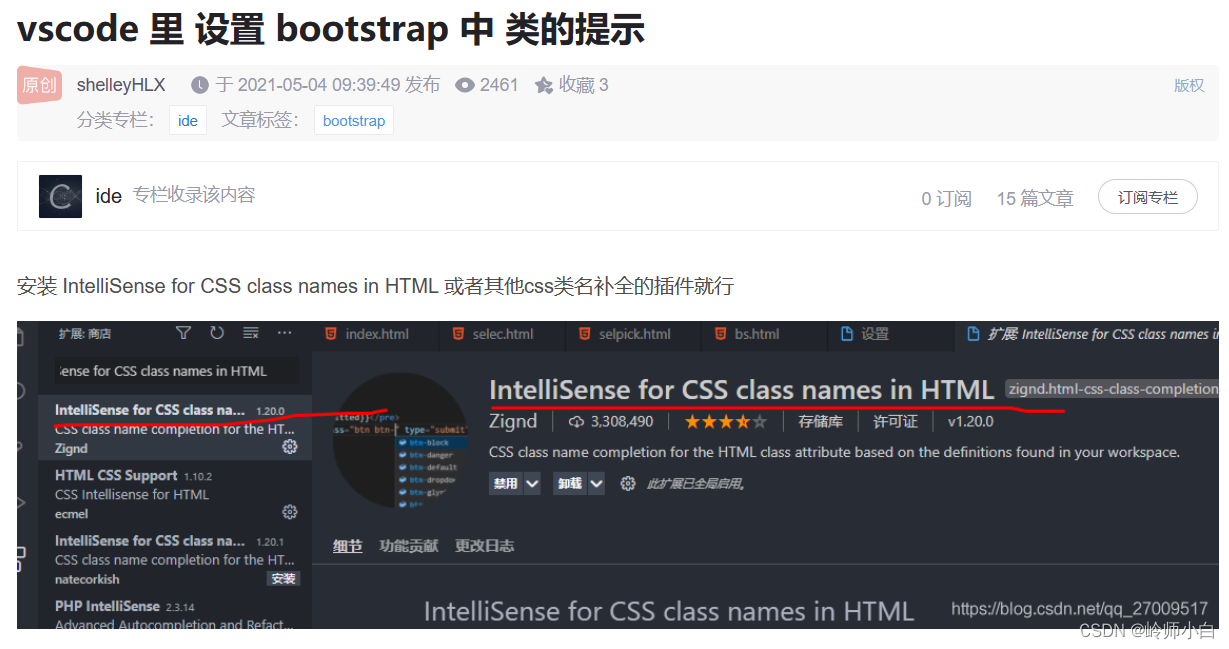
三、插件下载样式提示:
?vue提示
四、案例演示
品牌列表案例1.0(不含过滤器)
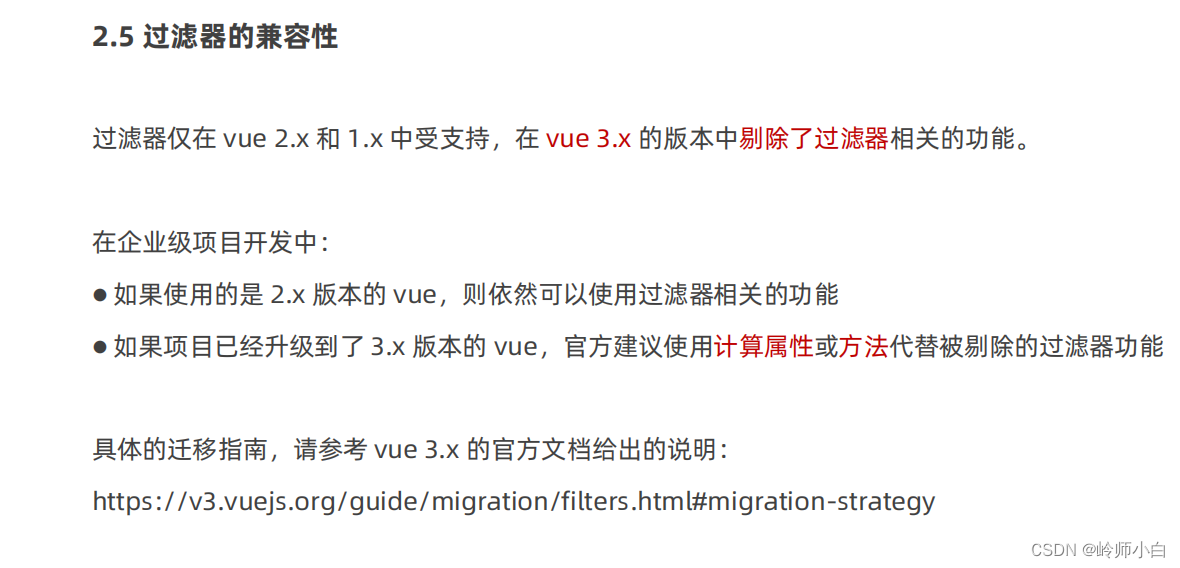
注:过滤器在Vue3.0中没有了
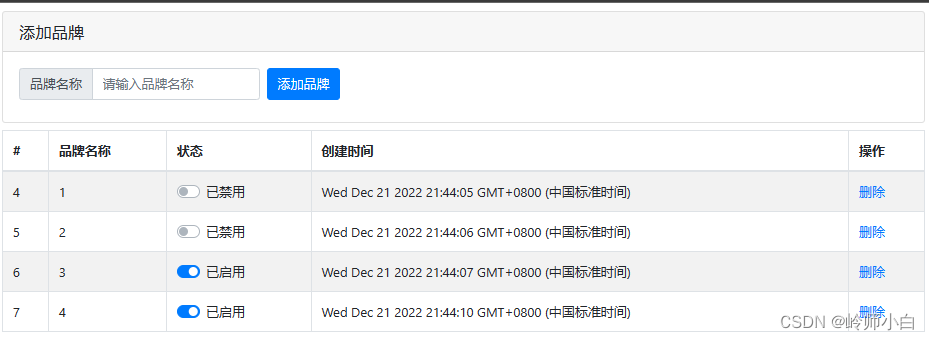
查看一些label的for属性
     <!-- label根据id,所以id要不一样 -->
     <!-- 使用v-if结合 v-else实现按需渲染 -->
 <label class="custom-control-label" :for="'cb'+item.id" v-if="item.status">已启用</label>
  <label class="custom-control-label" :for="'cb'+item.id" v-else>已禁用</label>
<!DOCTYPE html>
<html lang="en">
  <head>
    <meta charset="UTF-8" />
    <meta name="viewport" content="width=device-width, initial-scale=1.0" />
    <title>Document</title>
    <!-- 导入 bootstrap 的样式表 -->
    <!-- https://v4.bootcss.com/docs/components/forms/#switches -->
    <link rel="stylesheet" href="./lib/bootstrap.css" />

    <style>
      :root {
        font-size: 13px;
      }

      body {
        padding: 8px;
      }
    </style>
  </head>
  <body>
    <div id="app">
      <!-- 卡片区域 -->
      <div class="card">
        <h5 class="card-header">添加品牌</h5>
        <div class="card-body">
          <!-- 添加品牌的表单 -->
          <!-- from表单元素有submit事件 得阻止表单的提交行为 不然点击button就会刷新网页 -->
          <form class="form-inline" @submit.prevent="add">
            <div class="input-group mb-2 mr-sm-2">
              <div class="input-group-prepend">
                <div class="input-group-text">品牌名称</div>
              </div>
              <!-- 文本输入框 -->
              <input type="text" class="form-control" placeholder="请输入品牌名称"
              v-model.trim="brand" />
            </div>

            <!-- 提交表单的按钮 -->
            <button type="submit" class="btn btn-primary mb-2" >添加品牌</button>
          </form>
        </div>
      </div>

      <!-- 品牌列表 -->
      <table class="table table-bordered table-striped mt-2">
        <thead>
          <tr>
            <th>#</th>
            <th>品牌名称</th>
            <th>状态</th>
            <th>创建时间</th>
            <th>操作</th>
          </tr>
        </thead>
        <!-- 表格的主体区域 -->
        <tbody>
          <!-- TODO:循环渲染表格的每一行数据 -->
          <tr v-for="item in list" :key="item.id">
            <td>{{item.id}}</td>
            <td>{{item.name}}</td>
            <td>
              <div class="custom-control custom-switch">
                <!-- 使用v-model 可以实现双向绑定-->
                <input type="checkbox" class="custom-control-input" :id="'cb'+item.id"
                v-model="item.status">
                <!-- label根据id,所以id要不一样 -->
                <!-- 使用v-if结合 v-else实现按需渲染 -->
                <label class="custom-control-label" :for="'cb'+item.id" v-if="item.status">已启用</label>
                <label class="custom-control-label" :for="'cb'+item.id" v-else>已禁用</label>


              </div>
            </td>
            <td>{{item.time}}</td>
            <td>
              <a href="javascript:;" @click="remove(item.id)">删除</a>
            </td>
          </tr>
        </tbody>
      </table>
    </div>
    <script src="./lib/vue-2.6.12.js"></script>
    <script>
      const vm = new Vue({
        el:'#app',
        data:{
          // 用户输入的品牌的名称
          brand:'',
          // nextId 是下一个,可用的id
          nextId: 4,
          // 品牌列表的数据
          list:[
            {id:1,name:'宝马',status:true,time:new Date()},
            {id:2,name:'奔驰',status:false,time:new Date()},
            {id:3,name:'奥迪',status:true,time:new Date()},

          ]
        },
        methods: {
          remove(id){
            console.log(id)
             this.list= this.list.filter(item=>item.id !==id)

          },
        //   组织表单的默认提交行为后,触发add方法
          add(){
            // 如果判断到brand的值为空字符串,则return出去
            if(this.brand==='') return alert("必须填写品牌名称")

            // 如果没有被return出去,应该执行添加的逻辑
            // 1.先把要添加的品牌对象,整理出来
            // 2.往this.list数组中push步骤1中得到的对象
            // 3.清空this.brand;让nextId 自增+1
          const obj={
            id:this.nextId,
            name:this.brand,
            status:true,
            time:new Date()
          }
          // unshift() 方法可向数组的开头添加一个或更多元素,并返回新的长度。
          // 将新项添加到数组末尾,请使用 push() 方法。
          this.list.push(obj)
          this.brand=''
          this.nextId++

          console.log(this.brand)
          }
        },
      })
    </script>
  </body>
</html>
品牌列表案例2.0(含过滤器)
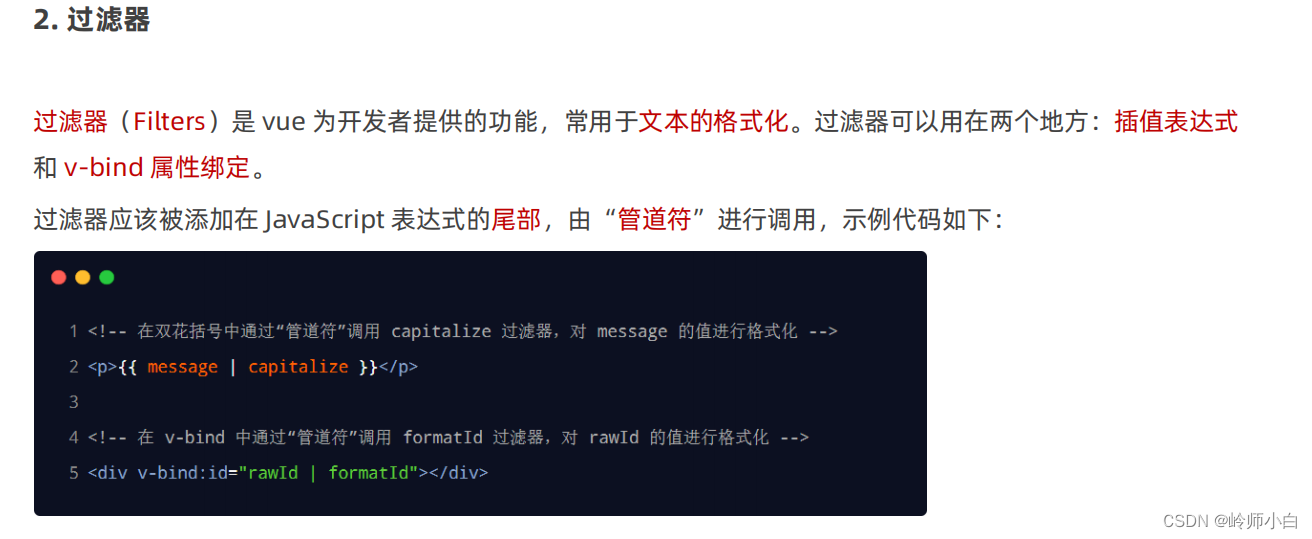
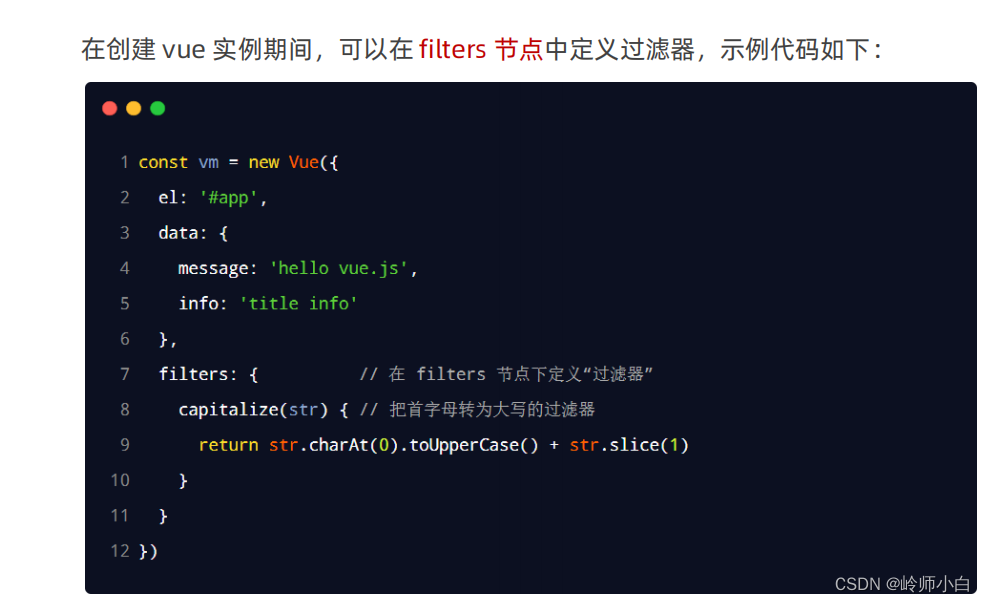
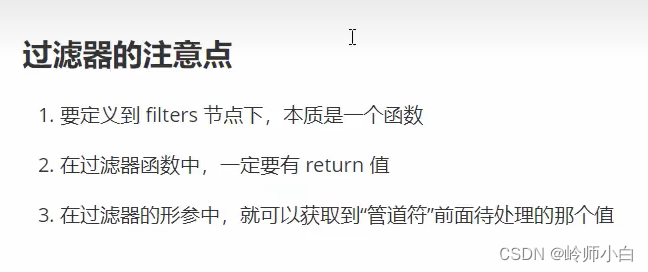
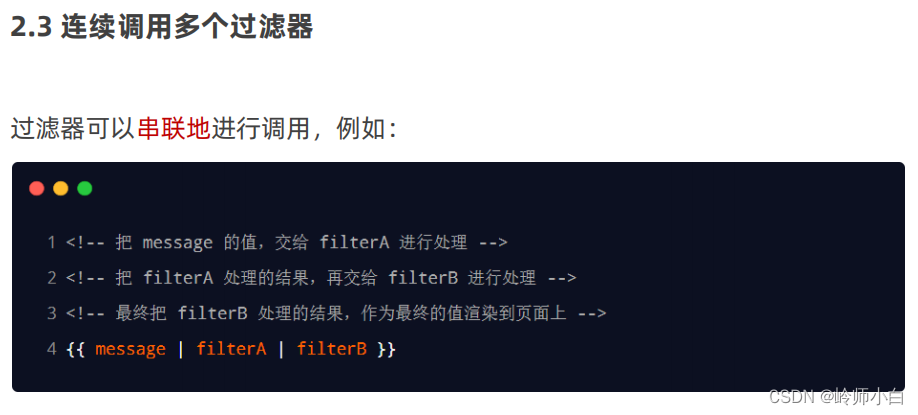
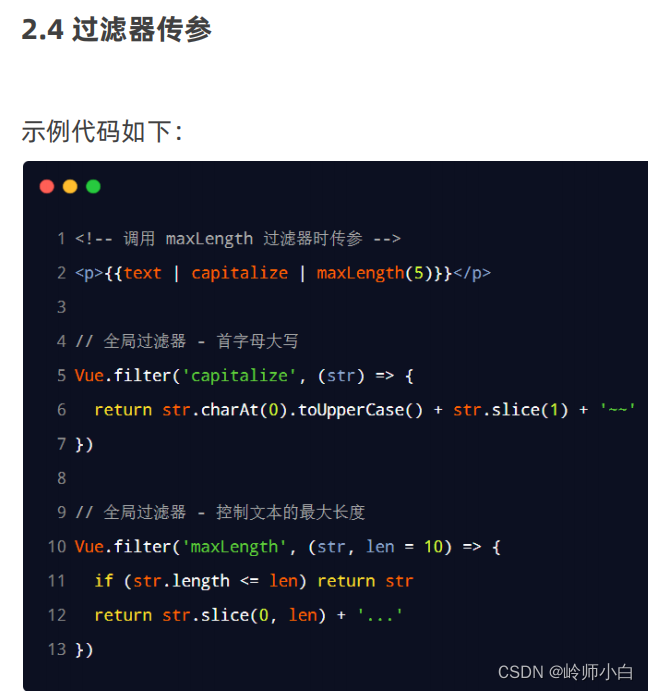
过滤器
?
 ?
?
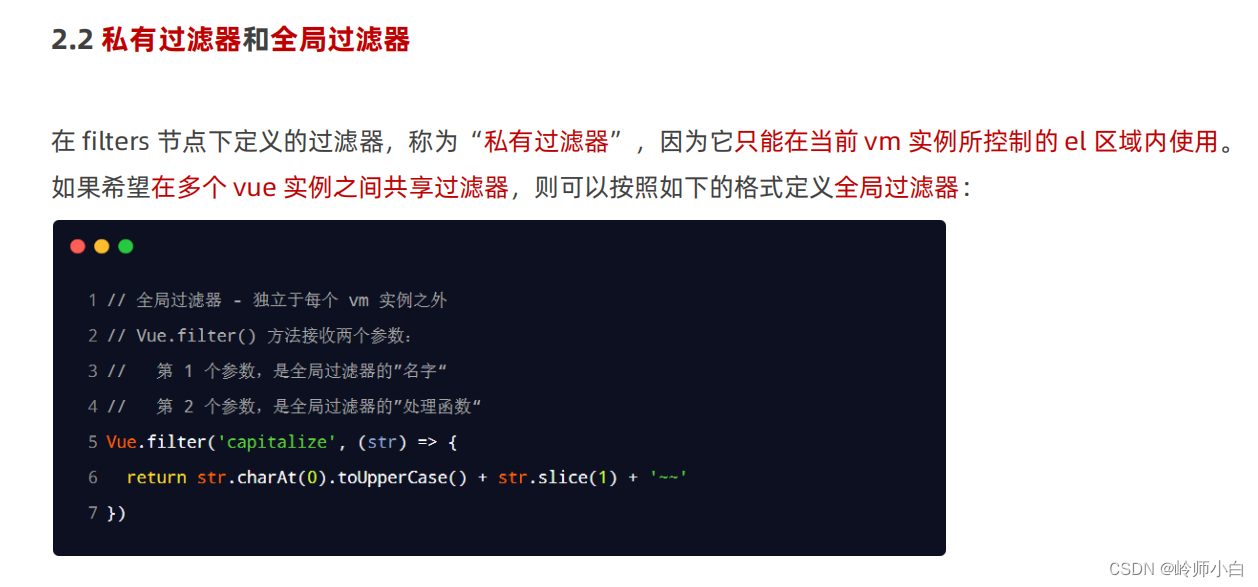
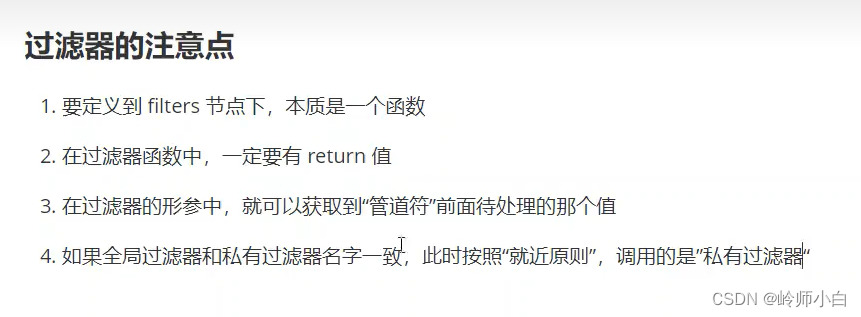
?私有过滤器何全局过滤器
?
?
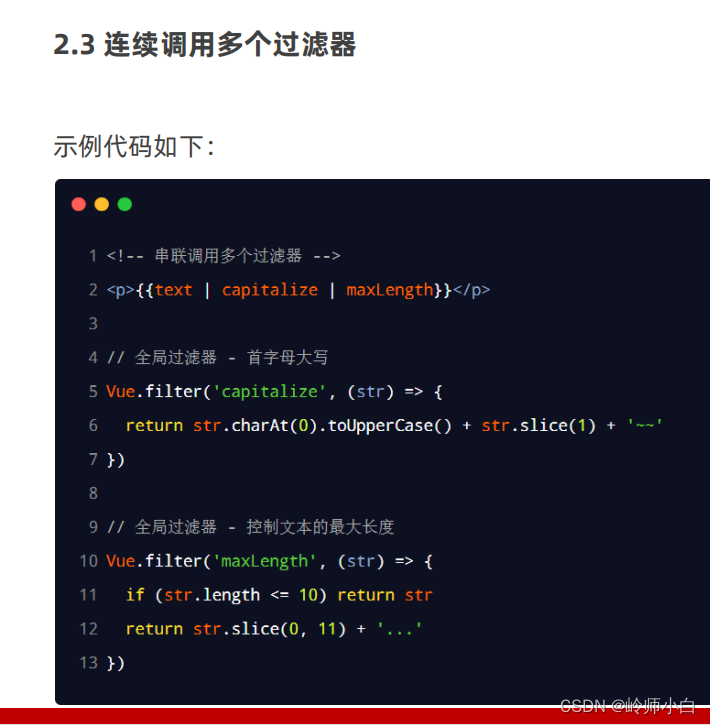 ?
?
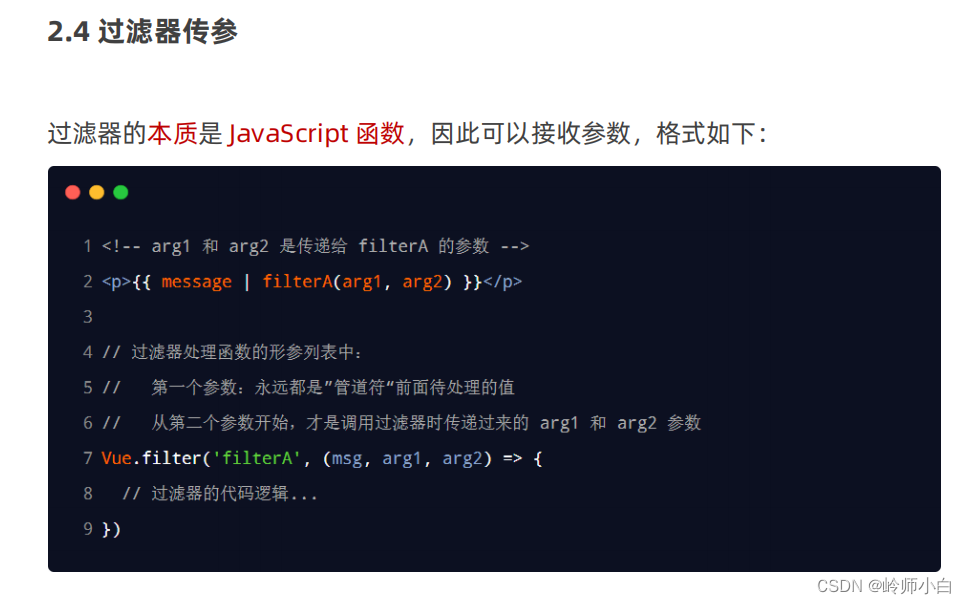 ?
?
?
?
?
<!DOCTYPE html>
<html lang="en">
  <head>
    <meta charset="UTF-8" />
    <meta name="viewport" content="width=device-width, initial-scale=1.0" />
    <title>Document</title>
    <!-- 导入 bootstrap 的样式表 -->
    <!-- https://v4.bootcss.com/docs/components/forms/#switches -->
    <link rel="stylesheet" href="./lib/bootstrap.css" />

    <style>
      :root {
        font-size: 13px;
      }

      body {
        padding: 8px;
      }
    </style>
  </head>
  <body>
    <div id="app">
      <!-- 卡片区域 -->
      <div class="card">
        <h5 class="card-header">添加品牌</h5>
        <div class="card-body">
          <!-- 添加品牌的表单 -->
          <!-- from表单元素有submit事件 得阻止表单的提交行为 不然点击button就会刷新网页 -->
          <form class="form-inline" @submit.prevent="add">
            <div class="input-group mb-2 mr-sm-2">
              <div class="input-group-prepend">
                <div class="input-group-text">品牌名称</div>
              </div>
              <!-- 文本输入框 -->
              <input type="text" class="form-control" placeholder="请输入品牌名称"
              v-model.trim="brand" />
            </div>

            <!-- 提交表单的按钮 -->
            <button type="submit" class="btn btn-primary mb-2" >添加品牌</button>
          </form>
        </div>
      </div>

      <!-- 品牌列表 -->
      <table class="table table-bordered table-striped mt-2">
        <thead>
          <tr>
            <th>#</th>
            <th>品牌名称</th>
            <th>状态</th>
            <th>创建时间</th>
            <th>操作</th>
          </tr>
        </thead>
        <!-- 表格的主体区域 -->
        <tbody>
          <!-- TODO:循环渲染表格的每一行数据 -->
          <tr v-for="item in list" :key="item.id">
            <td>{{item.id}}</td>
            <td>{{item.name}}</td>
            <td>
              <div class="custom-control custom-switch">
                <!-- 使用v-model 可以实现双向绑定-->
                <input type="checkbox" class="custom-control-input" :id="'cb'+item.id"
                v-model="item.status">
                <!-- label根据id,所以id要不一样 -->
                <!-- 使用v-if结合 v-else实现按需渲染 -->
                <label class="custom-control-label" :for="'cb'+item.id" v-if="item.status">已启用</label>
                <label class="custom-control-label" :for="'cb'+item.id" v-else>已禁用</label>


              </div>
            </td>
            <td>{{item.time | dateFormat}}</td>
            <td>
              <a href="javascript:;" @click="remove(item.id)">删除</a>
            </td>
          </tr>
        </tbody>
      </table>
    </div>
    <script src="./lib/vue-2.6.12.js"></script>
    <!-- 只要导入dayjs的库文件,在window全局,就可以使用dayjs()方法 -->
    <script src="./lib/dayjs.min.js"></script>
    <script>
        // 声明格式化事件的全局过滤器
        Vue.filter('dateFormat',function(time){
            // 1.对time进行格式化处理,得到YYYY-MM-DD HH:mm:ss
            // 2.把格式化的结果,return出去

            // 直接调用dayjs()得到的是当前时间
            // dayjs(给定的日期时间)得到指定的日期
            const dtStr =  dayjs(time).format('YYYY-MM-DD HH:mm:ss A')
            return dtStr
        })
      const vm = new Vue({
        el:'#app',
        data:{
          // 用户输入的品牌的名称
          brand:'',
          // nextId 是下一个,可用的id
          nextId: 4,
          // 品牌列表的数据
          list:[
            {id:1,name:'宝马',status:true,time:new Date()},
            {id:2,name:'奔驰',status:false,time:new Date()},
            {id:3,name:'奥迪',status:true,time:new Date()},

          ]
        },
        methods: {
          remove(id){
            console.log(id)
             this.list= this.list.filter(item=>item.id !==id)

          },
        //   组织表单的默认提交行为后,触发add方法
          add(){
            // 如果判断到brand的值为空字符串,则return出去
            if(this.brand==='') return alert("必须填写品牌名称")

            // 如果没有被return出去,应该执行添加的逻辑
            // 1.先把要添加的品牌对象,整理出来
            // 2.往this.list数组中push步骤1中得到的对象
            // 3.清空this.brand;让nextId 自增+1
          const obj={
            id:this.nextId,
            name:this.brand,
            status:true,
            time:new Date()
          }
          // unshift() 方法可向数组的开头添加一个或更多元素,并返回新的长度。
          // 将新项添加到数组末尾,请使用 push() 方法。
          this.list.push(obj)
          this.brand=''
          this.nextId++

          console.log(this.brand)
          }
        },
      })
    </script>
  </body>
</html>
