沉寂了近一年之后,三维可视化工具箱WxGL终于又有版本更新了:从0.6.4升级到0.7.0(现在安装的话也可能是0.7.2),并且承诺自0.7.0版本开始向后兼容。在正式发布docs之前,我设计了几个乒乓球和篮球的小例子,算是预热。请安装下载WxGL,抢先体验一下吧。
1. 安装和依赖关系
WxGL模块使用pip命令安装。
pip install wxgl
WxGL依赖pyopengl等模块,如果当前运行环境没有安装这些模块,安装程序将会自动安装它们。如果安装过程出现问题,或者安装完成后无法正常使用,请手动安装WxGL的依赖模块。
- pyopengl - 推荐版本:3.1.5或更高
- numpy - 推荐版本:1.18.2或更高
- scipy - 推荐版本:1.4.1或更高
- matplotlib - 推荐版本:3.1.2或更高
- pillow - 推荐版本:8.2.0或更高
- wxpython - 推荐版本:4.0.7.post2或更高
- freetype - 推荐版本:2.2.0或更高
2. 快速体验
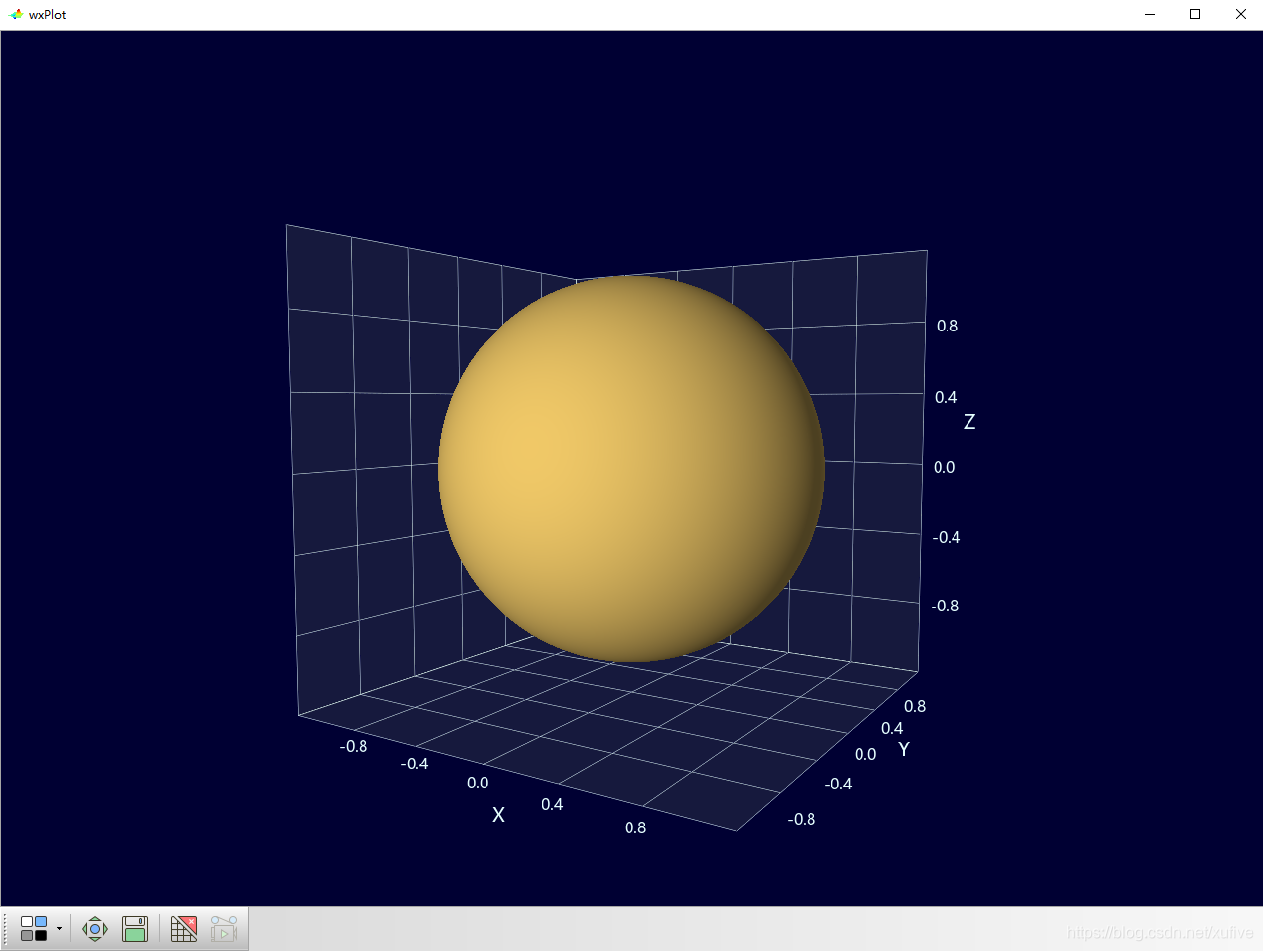
WxGL提供了类似Matplotlib风格2D/3D绘图函数,并且自动选择2D/3D模式,无需用户设置。如果熟悉Matplotlib的话,几分钟就可以学会。我们先从绘制一只乒乓球开始。
>>> import wxgl.wxplot as plt
>>> plt.sphere((0,0,0), 1, color='#ffd56e')
>>> plt.show()

寥寥几行代码,使用sphere函数画出了一个中心位于坐标系原点、半径为1的纯色球体。现在看上去还不太像乒乓球,没关系,我们再给它加上一个品牌logo试试看。下面这个双鱼的logo是从网上搜到的,并无意为其广告,侵删,特此声明。

熟悉NumPy的话,下面这段代码也容易理解:在仰角0至pi/8、方位角-pi/2至-pi/4的球面上,使用mesh函数为乒乓球贴上双鱼logo图片。
>>> import numpy as np
>>> r = 1
>>> lats, lons = np.mgrid[np.pi/8:0:200j, -np.pi/2:-np.pi/4:400j]
>>> xs = r * np.cos(lats)*np.cos(lons)
>>> ys = r * np.cos(lats)*np.sin(lons)
>>> zs = r * np.sin(lats)
>>> plt.sphere((0,0,0), r, color='#ffd56e')
>>> plt.mesh(xs, ys, zs, texture=r'D:\XufiveGithub\wxgl\res\df.png')
>>> plt.show()

现在看起来有点像乒乓球了,并且还可以随意地拖拽旋转。
3. 一起来玩NBA篮球
在开始动手之前,需要先准备两样东西:篮球的纹理、NBA的标志。下面的图片来自网络,侵删。


画球体不难,想要画出篮球表面的那几道黑黑的线条,就有些困难了。我们不妨先想象一个网格,就像一个网兜那样包裹在篮球表面,网格的每一点都有xyz坐标。只要选择那些在黑色线条上的网格,并把它们涂成黑色,就可以达成所愿了。下面的代码使用了两个半球合成一个球体。
>>> r = 0.75/(2*np.pi) # 篮球周长0.75米, 黑色线条4毫米宽
>>> lats, lons = np.mgrid[np.pi/2:-np.pi/2:1000j, -np.pi/2:np.pi/2:1000j]
>>> xs = r * np.cos(lats)*np.cos(lons)
>>> ys = r * np.cos(lats)*np.sin(lons)
>>> zs = r * np.sin(lats)
>>> yj, xi = np.mgrid[0:1000:1, 0:1000:1]
>>> yj, xi = yj-500, xi-500
>>> yj, xi = (yj*yj)/(250*250), (xi*xi)/(400*400)
>>> cs = np.zeros((1000,1000,4))
>>> cs[((yj+xi)>0.97)&((yj+xi)<1.03)] = np.array([0.2,0.2,0.2,1])
>>> cs[(zs>-0.002)&(zs<0.002)] = np.array([0.2,0.2,0.2,1])
>>> cs[(xs>-0.002)&(xs<0.002)] = np.array([0.2,0.2,0.2,1])
>>> cs = np.uint8(cs*255)
>>> plt.mesh(xs, ys, zs, texture=r'D:\XufiveGithub\wxgl\res\halfball.jpg')
>>> plt.mesh(-xs, ys, zs, texture=r'D:\XufiveGithub\wxgl\res\halfball.jpg')
>>> plt.mesh(xs, ys, zs, texture=cs)
>>> plt.mesh(-xs, ys, zs, texture=cs)
>>> plt.show()
居然真的成功了!窗口弹出的一瞬间,就象见到乔丹、科比和大鲨鱼,很是激动了一阵子。

好了,是时候加上我们喜欢的logo了。虽然已经是2021年了,但我总是回忆起2002年的NBA全明星赛。
>>> r = 0.75/(2*np.pi) # 篮球周长0.75米, 黑色线条4毫米宽
>>> lats, lons = np.mgrid[np.pi/2:-np.pi/2:1000j, -np.pi/2:np.pi/2:1000j]
>>> xs = r * np.cos(lats)*np.cos(lons)
>>> ys = r * np.cos(lats)*np.sin(lons)
>>> zs = r * np.sin(lats)
>>> yj, xi = np.mgrid[0:1000:1, 0:1000:1]
>>> yj, xi = yj-500, xi-500
>>> yj, xi = (yj*yj)/(250*250), (xi*xi)/(400*400)
>>> cs = np.zeros((1000,1000,4))
>>> cs[((yj+xi)>0.97)&((yj+xi)<1.03)] = np.array([0.2,0.2,0.2,1])
>>> cs[(zs>-0.002)&(zs<0.002)] = np.array([0.2,0.2,0.2,1])
>>> cs[(xs>-0.002)&(xs<0.002)] = np.array([0.2,0.2,0.2,1])
>>> cs = np.uint8(cs*255)
>>> plt.mesh(xs, ys, zs, texture=r'D:\XufiveGithub\wxgl\res\halfball.jpg')
>>> plt.mesh(-xs, ys, zs, texture=r'D:\XufiveGithub\wxgl\res\halfball.jpg')
>>> plt.mesh(xs, ys, zs, texture=cs)
>>> plt.mesh(-xs, ys, zs, texture=cs)
>>> lats, lons = np.mgrid[np.pi/5:np.pi/32:500j, -np.pi/8:np.pi/8:500j]
>>> xs = r * np.cos(lats)*np.cos(lons)
>>> ys = r * np.cos(lats)*np.sin(lons)
>>> zs = r * np.sin(lats)
>>> plt.mesh(xs, ys, zs, texture=r'D:\XufiveGithub\wxgl\res\nba2002.png')
>>> plt.show()

至此,终于可以随心所欲地制作自己喜欢的篮球了,甚至可以把自己喜欢的球星印在篮球上。不过,要是能让篮球转起来就更好了。嗯,这很容易,WxGL提供了很多方式实现这个愿望。下面的代码实现了非常复杂的动作。
# -*- coding: utf-8 -*-

import numpy as np
from wxgl import wxplot as plt

# 生成篮球网格
r_bk = 0.75/(2*np.pi) # 篮球周长0.75米
lats, lons = np.mgrid[np.pi/2:-np.pi/2:1000j, -np.pi/2:np.pi/2:1000j]
xs = r_bk * np.cos(lats)*np.cos(lons)
ys = r_bk * np.cos(lats)*np.sin(lons)
zs = r_bk * np.sin(lats)

# 生成椭圆
yj, xi = np.mgrid[0:1000:1, 0:1000:1]
yj, xi = yj-500, xi-500
yj, xi = (yj*yj)/(250*250), (xi*xi)/(400*400)

# 生成篮球表面的黑色线条
cs = np.zeros((1000,1000,4))
cs[((yj+xi)>0.97)&((yj+xi)<1.03)] = np.array([0.2,0.2,0.2,1])
cs[(zs>-0.002)&(zs<0.002)] = np.array([0.2,0.2,0.2,1])
cs[(xs>-0.002)&(xs<0.002)] = np.array([0.2,0.2,0.2,1])
cs = np.uint8(cs*255)

# 篮球旋转函数:绕Z轴旋转,步长1°
rotate = lambda i:(i%360,(0,0,1))

# 画篮球和表面的黑色线条
plt.mesh(xs, ys, zs, texture=r'D:\XufiveGithub\wxgl\res\halfball.jpg', rotate=rotate, order='R')
plt.mesh(-xs, ys, zs, texture=r'D:\XufiveGithub\wxgl\res\halfball.jpg', rotate=rotate, order='R')
plt.mesh(xs, ys, zs, texture=cs, rotate=rotate, order='R')
plt.mesh(-xs, ys, zs, texture=cs, rotate=rotate, order='R')

# 画NBA2002的Logo
lats, lons = np.mgrid[np.pi/5:np.pi/32:500j, -np.pi/8:np.pi/8:500j]
xs = r_bk * np.cos(lats)*np.cos(lons)
ys = r_bk * np.cos(lats)*np.sin(lons)
zs = r_bk * np.sin(lats)
plt.mesh(xs, ys, zs, texture=r'D:\XufiveGithub\wxgl\res\nba2002.png', rotate=rotate, order='R')

# 计算乒乓球半径和旋转函数
r_pp = r_bk/6 # 半径是篮球的1/6
rotate = lambda i:(i%360,(1,0,0)) # 绕x轴旋转,步长1°
translate = lambda i:(0,-(r_pp+r_bk),0)

# 画乒乓球
plt.sphere((0,0,0), r_pp, color='#ffd56e', rotate=rotate, translate=translate, order='RT')

# 画双鱼Logo
lats, lons = np.mgrid[np.pi/8:0:200j, -np.pi/2:-np.pi/4:400j]
xs = r_pp * np.cos(lats)*np.cos(lons)
ys = r_pp * np.cos(lats)*np.sin(lons)
zs = r_pp * np.sin(lats)
plt.mesh(xs, ys, zs, texture=r'D:\XufiveGithub\wxgl\res\df.png', rotate=rotate, translate=translate, order='RT')

plt.show()
篮球沿垂直的轴线在自转,乒乓球沿水平轴线绕着篮球公转,够炫吧?关于WxGL更多的技巧,将在后续的文章中介绍,敬请关注。
