Python爬虫常用库总结:requests、beautifulsoup、selenium、xpath总结

记得安装快速第三方库,Python经常需要安装第三方库,原始的下载速度很慢,使用国内的镜像就很快啦
pip3 install -i https://pypi.tuna.tsinghua.edu.cn/simple 包名
官方网址:
requests
requests官方文档 https://docs.python-requests.org/zh_CN/latest/

进行爬虫,首先要对网址进行请求,这个时候就要用刀我们的requests模块了。requests是python的一个HTTP客户端库,跟urllib,urllib2类似。与urllib,urllib2相比,requests模块语法更加简单。正如他的官网所说:
requests模块介绍
发送http请求,获取响应数据
requests模块是一个第三方模块,需要在你的python(虚拟)环境中额外安装
pip/pip3 install requests
requests基础
requests模块发送get请求
#https://beishan.blog.csdn.net/
import requests
# 目标url
url = 'https://www.baidu.com'
# 向目标url发送get请求
response = requests.get(url)
# 打印响应内容
print(response.text)
response响应对象
观察上边代码运行结果发现,有好多乱码;这是因为编解码使用的字符集不同早造成的;我们尝试使用下边的办法来解决中文乱码问题
import requests
url = 'https://www.baidu.com'
# 向目标url发送get请求
response = requests.get(url)
# 打印响应内容
# print(response.text)
print(response.content.decode()) # 注意这里!
- response.text是requests模块按照chardet模块推测出的编码字符集进行解码的结果
- 网络传输的字符串都是bytes类型的,所以response.text = response.content.decode(‘推测出的编码字符集’)
- 我们可以在网页源码中搜索
charset,尝试参考该编码字符集,注意存在不准确的情况
response.text 和response.content的区别
- response.text
- 类型:str
- 解码类型: requests模块自动根据HTTP 头部对响应的编码作出有根据的推测,推测的文本编码
- response.content
- 类型:bytes
- 解码类型: 没有指定
解决中文乱码
通过对response.content进行decode,来解决中文乱码
response.content.decode()默认utf-8response.content.decode("GBK")- 常见的编码字符集
- utf-8
- gbk
- gb2312
- ascii (读音:阿斯克码)
- iso-8859-1
response响应对象的其它常用属性或方法
#https://beishan.blog.csdn.net/
# 1.2.3-response其它常用属性
import requests

# 目标url
url = 'https://www.baidu.com'

# 向目标url发送get请求
response = requests.get(url)

# 打印响应内容
# print(response.text)
# print(response.content.decode()) 			# 注意这里!
print(response.url)							# 打印响应的url
print(response.status_code)					# 打印响应的状态码
print(response.request.headers)				# 打印响应对象的请求头
print(response.headers)						# 打印响应头
print(response.request._cookies)			# 打印请求携带的cookies
print(response.cookies)						# 打印响应中携带的cookies
requests实操
requests模块发送请求
发送带header的请求
我们先写一个获取百度首页的代码
import requests
url = 'https://www.baidu.com'
response = requests.get(url)
print(response.content.decode())
# 打印响应对应请求的请求头信息
print(response.request.headers)
从浏览器中复制User-Agent,构造headers字典;完成下面的代码后,运行代码查看结果
import requests

url = 'https://www.baidu.com'

headers = {"User-Agent": "Mozilla/5.0 (Windows NT 10.0; Win64; x64) AppleWebKit/537.36 (KHTML, like Gecko) Chrome/54.0.2840.99 Safari/537.36"}

# 在请求头中带上User-Agent,模拟浏览器发送请求
response = requests.get(url, headers=headers)

print(response.content)

# 打印请求头信息
print(response.request.headers)
发送带参数的请求
我们在使用百度搜索的时候经常发现url地址中会有一个
?,那么该问号后边的就是请求参数,又叫做查询字符串
在url携带参数,直接对含有参数的url发起请求
import requests

headers = {"User-Agent": "Mozilla/5.0 (Windows NT 10.0; Win64; x64) AppleWebKit/537.36 (KHTML, like Gecko) Chrome/54.0.2840.99 Safari/537.36"}

url = 'https://www.baidu.com/s?wd=python'

response = requests.get(url, headers=headers)
通过params携带参数字典
? 1.构建请求参数字典
? 2.向接口发送请求的时候带上参数字典,参数字典设置给params
import requests

headers = {"User-Agent": "Mozilla/5.0 (Windows NT 10.0; Win64; x64) AppleWebKit/537.36 (KHTML, like Gecko) Chrome/54.0.2840.99 Safari/537.36"}

# 这是目标url
# url = 'https://www.baidu.com/s?wd=python'

# 最后有没有问号结果都一样
url = 'https://www.baidu.com/s?'

# 请求参数是一个字典 即wd=python
kw = {'wd': 'python'}

# 带上请求参数发起请求,获取响应
response = requests.get(url, headers=headers, params=kw)

print(response.content)
- 从浏览器中复制User-Agent和Cookie
- 浏览器中的请求头字段和值与headers参数中必须一致
- headers请求参数字典中的Cookie键对应的值是字符串
import requests

url = 'https://github.com/USER_NAME'

# 构造请求头字典
headers = {
    # 从浏览器中复制过来的User-Agent
    'User-Agent': 'Mozilla/5.0 (Windows NT 10.0; Win64; x64) AppleWebKit/537.36 (KHTML, like Gecko) Chrome/67.0.3396.87 Safari/537.36',
    # 从浏览器中复制过来的Cookie
    'Cookie': 'xxx这里是复制过来的cookie字符串'
}

# 请求头参数字典中携带cookie字符串
resp = requests.get(url, headers=headers)

print(resp.text)
超时参数timeout的使用
在平时网上冲浪的过程中,我们经常会遇到网络波动,这个时候,一个请求等了很久可能任然没有结果。
在爬虫中,一个请求很久没有结果,就会让整个项目的效率变得非常低,这个时候我们就需要对请求进行强制要求,让他必须在特定的时间内返回结果,否则就报错。
-
超时参数timeout的使用方法
response = requests.get(url, timeout=3) -
timeout=3表示:发送请求后,3秒钟内返回响应,否则就抛出异常
import requests


url = 'https://twitter.com'
response = requests.get(url, timeout=3)     # 设置超时时间
requests发送post请求的方法
-
response = requests.post(url, data) -
data参数接收一个字典 -
requests模块发送post请求函数的其它参数和发送get请求的参数完全一致
BeautifulSoup
BeautifulSoup官方文档 https://beautifulsoup.readthedocs.io/zh_CN/v4.4.0/
Beautiful Soup 是一个可以从HTML或XML文件中提取数据的Python库.它能够通过你喜欢的转换器实现惯用的文档导航,查找,修改文档的方式.Beautiful Soup会帮你节省数小时甚至数天的工作时间.

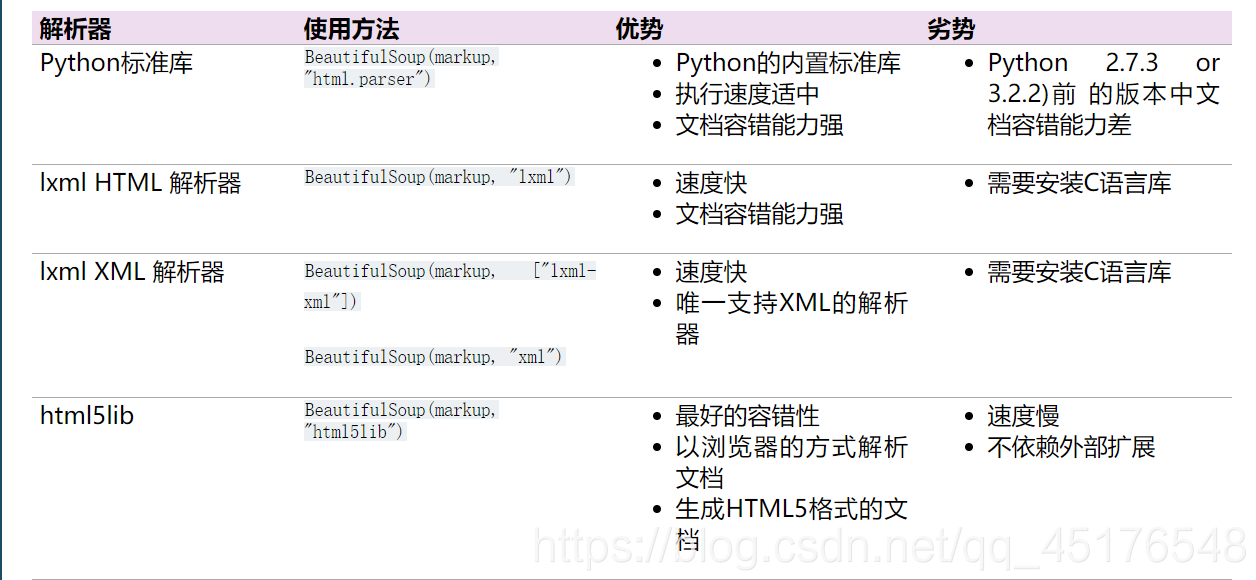
常见解释器的优缺点
常用操作
安装方法
pip3 install -i https://pypi.tuna.tsinghua.edu.cn/simple beautifulsoup4
导入即可
from bs4 import BeautifulSoup
html_doc = """
<html><head><title>The Dormouse's story</title></head>
<body>
<p class="title"><b>The Dormouse's story</b></p>

<p class="story">Once upon a time there were three little sisters; and their names were
<a href="http://example.com/elsie" class="sister" id="link1">Elsie</a>,
<a href="http://example.com/lacie" class="sister" id="link2">Lacie</a> and
<a href="http://example.com/tillie" class="sister" id="link3">Tillie</a>;
and they lived at the bottom of a well.</p>

<p class="story">...</p>
"""
soup = BeautifulSoup(html_doc,"lxml")
几个简单的浏览结构化数据的方法
soup.title
<title>The Dormouse's story</title>
soup.title.name
'title'
soup.title.string
"The Dormouse's story"
soup.title.text
"The Dormouse's story"
soup.title.parent.name
'head'
soup.p
<p class="title"><b>The Dormouse's story</b></p>
soup.p.name
'p'
soup.p["class"]
['title']
soup.a
<a class="sister" href="http://example.com/elsie" id="link1">Elsie</a>
soup.find("a")
<a class="sister" href="http://example.com/elsie" id="link1">Elsie</a>
soup.find_all("a")
[<a class="sister" href="http://example.com/elsie" id="link1">Elsie</a>,
 <a class="sister" href="http://example.com/lacie" id="link2">Lacie</a>,
 <a class="sister" href="http://example.com/tillie" id="link3">Tillie</a>]
从文档中找到所有的< a>标签的链接
for link in soup.find_all("a"):
    print(link.get("href"))
http://example.com/elsie
http://example.com/lacie
http://example.com/tillie
在文档中获取所有的文字内容
print(soup.get_text())
The Dormouse's story

The Dormouse's story
Once upon a time there were three little sisters; and their names were
Elsie,
Lacie and
Tillie;
and they lived at the bottom of a well.
...
?
通过标签和属性获取
- Tag有很多方法和属性,在 遍历文档树 和 搜索文档树 中有详细解释.现在介绍一下tag中最重要的属性: name和attributes
soup = BeautifulSoup('<b class="boldest">Extremely bold</b>')
tag  = soup.b
tag
<b class="boldest">Extremely bold</b>
type(tag)
bs4.element.Tag
Name属性
- 每个tag都有自己的名字,通过 .name 来获取:
tag.name
'b'
- 如果改变了tag的name,那将影响所有通过当前Beautiful Soup对象生成的HTML文档
tag.name = "blockquote"
tag
<blockquote class="boldest">Extremely bold</blockquote>
多个属性
- 一个tag可能有很多个属性.tag 有一个 “class” 的属性,值为 “boldest” . tag的属性的操作方法与字典相同:
tag["class"]
['boldest']
tag.attrs
{'class': ['boldest']}
- tag的属性可以被添加,删除或修改. 再说一次, tag的属性操作方法与字典一样
tag["class"] = "verybold"
tag["id"] = 1
tag
<blockquote class="verybold" id="1">Extremely bold</blockquote>
del tag["class"]
tag
<blockquote id="1">Extremely bold</blockquote>
多值属性
css_soup = BeautifulSoup('<p class="body strikeout"></p>')
css_soup.p['class']
['body', 'strikeout']
css_soup = BeautifulSoup('<p class="body"></p>')
css_soup.p['class']
['body']
可以遍历的字符串
- 字符串常被包含在tag内.Beautiful Soup用 NavigableString 类来包装tag中的字符串:
tag.string
'Extremely bold'
type(tag.string)
bs4.element.NavigableString
-
一个 NavigableString 字符串与Python中的Unicode字符串相同,
并且还支持包含在遍历文档树 和 搜索文档树 中的一些特性.
通过 unicode() 方法可以直接将 NavigableString 对象转换成Unicode字符串: -
tag中包含的字符串不能编辑,但是可以被替换成其他的字符串,用replace_with()方法
tag.string.replace_with("No longer bold")
tag
<blockquote id="1">No longer bold</blockquote>
注释及特殊字符串
- 文档的注释部分
markup = "<b><!--Hey, buddy. Want to buy a used parser?--></b>"
soup = BeautifulSoup(markup)
comment = soup.b.string
comment
'Hey, buddy. Want to buy a used parser?'
type(comment)
bs4.element.Comment
- Comment 对象是一个特殊类型的 NavigableString 对象:
comment
'Hey, buddy. Want to buy a used parser?'
但是当它出现在HTML文档中时, Comment 对象会使用特殊的格式输出:
print(soup.prettify())
<html>
 <body>
  <b>
   <!--Hey, buddy. Want to buy a used parser?-->
  </b>
 </body>
</html>
from bs4 import CData
cdata = CData("A CDATA block")
comment.replace_with(cdata)
print(soup.b.prettify())
<b>
 <![CDATA[A CDATA block]]>
</b>
遍历文档树
html_doc = """
<html><head><title>The Dormouse's story</title></head>
    <body>
<p class="title"><b>The Dormouse's story</b></p>

<p class="story">Once upon a time there were three little sisters; and their names were
<a href="http://example.com/elsie" class="sister" id="link1">Elsie</a>,
<a href="http://example.com/lacie" class="sister" id="link2">Lacie</a> and
<a href="http://example.com/tillie" class="sister" id="link3">Tillie</a>;
and they lived at the bottom of a well.</p>

<p class="story">...</p>
"""
from bs4 import BeautifulSoup
soup = BeautifulSoup(html_doc,"html.parser")
子节点
一个Tag可能包含多个字符串或其它的Tag,这些都是这个Tag的子节点.Beautiful Soup提供了许多操作和遍历子节点的属性.
soup.head
<head><title>The Dormouse's story</title></head>
soup.title
<title>The Dormouse's story</title>
这是个获取tag的小窍门,可以在文档树的tag中多次调用这个方法.下面的代码可以获取标签中的第一个标签:
soup.body.b
<b>The Dormouse's story</b>
通过点取属性的方式只能获得当前名字的第一个tag:
soup.a
<a class="sister" href="http://example.com/elsie" id="link1">Elsie</a>
find_all方法
如果想要得到所有的标签,或是通过名字得到比一个tag更多的内容的时候,就需要用到 Searching the tree 中描述的方法,比如: find_all()
soup.find_all("a")
[<a class="sister" href="http://example.com/elsie" id="link1">Elsie</a>,
 <a class="sister" href="http://example.com/lacie" id="link2">Lacie</a>,
 <a class="sister" href="http://example.com/tillie" id="link3">Tillie</a>]
.contents和.children
head_tag = soup.head
head_tag
<head><title>The Dormouse's story</title></head>
head_tag.contents
[<title>The Dormouse's story</title>]
head_tag.contents[0]
<title>The Dormouse's story</title>
head_tag.contents[0].contents
["The Dormouse's story"]
selenium

selenium官方文档 https://www.selenium.dev/selenium/docs/api/py/api.html
selenium介绍
chrome浏览器的运行效果
在下载好chromedriver以及安装好selenium模块后,执行下列代码并观察运行的过程
from selenium import webdriver

# 如果driver没有添加到了环境变量,则需要将driver的绝对路径赋值给executable_path参数
# driver = webdriver.Chrome(executable_path='/home/worker/Desktop/driver/chromedriver')

# 如果driver添加了环境变量则不需要设置executable_path
driver = webdriver.Chrome()

# 向一个url发起请求
driver.get("http://www.itcast.cn/")

# 把网页保存为图片,69版本以上的谷歌浏览器将无法使用截图功能
# driver.save_screenshot("itcast.png")

print(driver.title) # 打印页面的标题

# 退出模拟浏览器
driver.quit() # 一定要退出!不退出会有残留进程!
phantomjs无界面浏览器的运行效果
PhantomJS 是一个基于Webkit的“无界面”(headless)浏览器,它会把网站加载到内存并执行页面上的 JavaScript。下载地址:http://phantomjs.org/download.html
from selenium import webdriver

# 指定driver的绝对路径
driver = webdriver.PhantomJS(executable_path='/home/worker/Desktop/driver/phantomjs')
# driver = webdriver.Chrome(executable_path='/home/worker/Desktop/driver/chromedriver')

# 向一个url发起请求
driver.get("http://www.itcast.cn/")

# 把网页保存为图片
driver.save_screenshot("itcast.png")

# 退出模拟浏览器
driver.quit() # 一定要退出!不退出会有残留进程!
无头浏览器与有头浏览器的使用场景
- 通常在开发过程中我们需要查看运行过程中的各种情况所以通常使用有头浏览器
- 在项目完成进行部署的时候,通常平台采用的系统都是服务器版的操作系统,服务器版的操作系统必须使用无头浏览器才能正常运行
selenium的作用和工作原理
利用浏览器原生的API,封装成一套更加面向对象的Selenium WebDriver API,直接操作浏览器页面里的元素,甚至操作浏览器本身(截屏,窗口大小,启动,关闭,安装插件,配置证书之类的)
selenium的安装以及简单使用
以edge浏览器为例 参见这个blog哦,驱动chrome浏览器同理
selenium驱动edge浏览器
- chromedriver环境的配置
- windows环境下需要将 chromedriver.exe 所在的目录设置为path环境变量中的路径
- linux/mac环境下,将 chromedriver 所在的目录设置到系统的PATH环境值中
selenium的简单使用
接下来我们就通过代码来模拟百度搜索
import time
from selenium import webdriver

# 通过指定chromedriver的路径来实例化driver对象,chromedriver放在当前目录。
# driver = webdriver.Chrome(executable_path='./chromedriver')
# chromedriver已经添加环境变量
driver = webdriver.Chrome()

# 控制浏览器访问url地址
driver.get("https://www.baidu.com/")

# 在百度搜索框中搜索'python'
driver.find_element_by_id('kw').send_keys('python')
# 点击'百度搜索'
driver.find_element_by_id('su').click()

time.sleep(6)
# 退出浏览器
driver.quit()
webdriver.Chrome(executable_path='./chromedriver')中executable参数指定的是下载好的chromedriver文件的路径driver.find_element_by_id('kw').send_keys('python')定位id属性值是’kw’的标签,并向其中输入字符串’python’driver.find_element_by_id('su').click()定位id属性值是su的标签,并点击- click函数作用是:触发标签的js的click事件
值是’kw’的标签,并向其中输入字符串’python’
driver.find_element_by_id('su').click()定位id属性值是su的标签,并点击- click函数作用是:触发标签的js的click事件
使用xpath来提取数据,爬取数据的简单语法。
lxml
requests官方文档 https://lxml.de/
pip install lxml
- 导入模块
from lxml import etree
- 利用xpath获取text或者href内容
/li/a/@href 这样取的应该是href的内容
/li/a/text() 这样取得是text内容
etree的使用
h=etree.HTML(response.text)#response.text是网页的源码
h.xpath('//img')  #寻找所有的img结点,
h.xpath('//div').xpath('.//img')#寻找所有div下的所有img结点
xpath的语法
符号
XPath 使用路径表达式在 XML 文档中选取节点。节点是通过沿着路径或者 step 来选取的。
| 表达式 | 描述 |
|---|---|
| / | 从根节点选取 |
| // | 从匹配选择的当前节点选择文档中的节点,而不考虑它们的位置。 |
| . | 选取当前节点。 |
| . . | 选取当前节点的父节点。 |
| @ | 选取属性。 |
| | | 在两个中结点中选择 |
| () | 用()来包含| |
| * | 包含所有元素 |
| not | 取反 |
实例
| 路径表达式 | 结果 |
|---|---|
| bookstore | 选取 bookstore 元素的所有子节点。 |
| /bookstore | 选取根元素 bookstore。注释:假如路径起始于正斜杠( / ),则此路径始终代表到某元素的绝对路径! |
| bookstore/book | 选取属于 bookstore 的子元素的所有 book 元素。 |
| //book | 选取所有 book 子元素,而不管它们在文档中的位置。 |
| bookstore//book | 选择属于 bookstore 元素的后代的所有 book 元素,而不管它们位于 bookstore 之下的什么位置。 |
| //@lang | 选取名为 lang 的所有属性。 |
| //*[@class] | 选取带有class属性的所有元素 |
| //div[@*] | 匹配任意属性的div元素 |
| //a[not(@class)] | 匹配没有class属性的a元素 |
谓语
带谓语的路径表达式
| 路径表达式 | 结果 |
|---|---|
| /bookstore/book[1] | 选取属于 bookstore 子元素的第一个 book 元素。 |
| /bookstore/book[last()] | 选取属于 bookstore 子元素的最后一个 book 元素。 |
| /bookstore/book[last()-1] | 选取属于 bookstore 子元素的倒数第二个 book 元素。 |
| /bookstore/book[position()< 3] | 选取最前面的两个属于 bookstore 元素的子元素的 book 元素。 |
| //title[@lang] | 选取所有拥有名为 lang 的属性的 title 元素。 |
| //title[@lang=‘eng’] | 选取所有 title 元素,且这些元素拥有值为 eng 的 lang 属性。 |
| /bookstore/book[price>35.00] | 选取 bookstore 元素的所有 book 元素,且其中的 price 元素的值须大于 35.00。 |
| /bookstore/book[price>35.00]/title | 选取 bookstore 元素中的 book 元素的所有 title 元素,且其中的 price 元素的值须大于 35.00。 |

到这里就结束了,如果对你有帮助你。当然学无止境,这些只是爬虫的基础,更多姿势需要你自己去探索呦。https://beishan.blog.csdn.net/