1 什么是pyc文件
1.1 什么是pyc文件
1、pyc文件:是由Python文件经过编译后所生成的文件,它是一种字节码 byte code,因此我们直接查看就是乱码的,也对源码起到一定的保护作用,但是这种字节码byte code是可以反编译的,后面会介绍!
我们都知道计算机是不认识你在代码里写的那一行行字母的,计算机只认二进制,也只执行二进制文件,我们写的代码是需要编译器编译成二进制的。(参考)
对于Python来说你写的Python代码在执行python xxx.py时会由Python解析器翻译成PyCodeObject对象,俗称字节码(byte code),然后交由Python虚拟机来执行字节码(PS:字节码才是可执行的)。
在这个过程中这些字节码都是在内存中的,众所周知Python的运行性能不如编译性语言(比如C语言,JAVA …),所以Python在程序执行结束后会把字节码写入到硬盘中,保存为.pyc文件,目的是下一次再执行python xxx.py程序时,Python会先在目录下找xxx.pyc文件来执行,因为.pyc文件里保存的是字节码,所以就节省了Python解析器把xxx.py翻译成字节码的时间,所以就提高了性能。
总结就是.pyc文件是一个可执行的字节码文件,目的是节省Python解析器翻译时间,提高运行效率。其实性能只会提高那么一丢丢,大型项目.py文件很多的话,猿人学Python测试过节省的时间就多一点。
2、我们同样可以像执行py文件一样来执行pyc文件,例如:
python test.pypython test.pyc
注意:
必须保证编译成pyc文件的python解释器版本和现在执行的python解释器版本保持一致,否则会报错,如下我导入deepsocial.pyc文件中的模块是报错:ImportError: bad magic number in 'deepsocial': b'B\r\r\n'
    from deepsocial import *
ImportError: bad magic number in 'deepsocial': b'B\r\r\n'
1.2 pyc文件是怎么生成的,有什么好处
从上面的介绍我们已经知道pyc的好处主要是:
- 由于
pyc源码的不可见,因此可以起到保护代码安全性的作用,但也不是绝对的,因为pyc文件是可以被反编译 pyc文件可以提高代码的执行效率
pyc的内容与python的版本相关,不同版本编译的pyc文件不一样
2 把python的py文件编译成pyc文件
下面我测试的文件目录结构:
(yolov4) shl@zhihui-mint:~/shl_res/5_new_project$ tree test/
test/
├── deepsocial.py
└── scripts
    └── run.py

1 directory, 2 files
(yolov4) shl@zhihui-mint:~/shl_res/5_new_project$
2.1 使用python内置库py_compile把单个py文件编译成pyc文件
1、使用py_compile把单个py文件编译成pyc文件
(yolov4) shl@zhihui-mint:~/shl_res/5_new_project/test$ ls
deepsocial.py  scripts
(yolov4) shl@zhihui-mint:~/shl_res/5_new_project/test$ python
Python 3.6.12 |Anaconda, Inc.| (default, Sep  8 2020, 23:10:56)
[GCC 7.3.0] on linux
Type "help", "copyright", "credits" or "license" for more information.
>>> import py_compile
>>> py_compile.compile("./deepsocial.py")
'./__pycache__/deepsocial.cpython-36.pyc'
>>>
生成文件如下:
(yolov4) shl@zhihui-mint:~/shl_res/5_new_project/test$ tree
.
├── deepsocial.py
├── __pycache__
│   └── deepsocial.cpython-36.pyc
└── scripts
    └── run.py

2 directories, 3 files
(yolov4) shl@zhihui-mint:~/shl_res/5_new_project/test$
2.2 使用python内置库compileall把多个py文件编译成pyc文件
2.2.1 使用python -m compileall命令把多个py文件编译成pyc文件
1、首先来查看python -m compileall有哪些参数
(yolov4) shl@zhihui-mint:~/shl_res/5_new_project/test$ python -m compileall -h
usage: compileall.py [-h] [-l] [-r RECURSION] [-f] [-q] [-b] [-d DESTDIR]
                     [-x REGEXP] [-i FILE] [-j WORKERS]
                     [FILE|DIR [FILE|DIR ...]]

Utilities to support installing Python libraries.

positional arguments:
  FILE|DIR              zero or more file and directory names to compile; if
                        no arguments given, defaults to the equivalent of -l
                        sys.path

optional arguments:
  -h, --help            show this help message and exit
  -l                    don't recurse into subdirectories
  -r RECURSION          control the maximum recursion level. if `-l` and `-r`
                        options are specified, then `-r` takes precedence.
  -f                    force rebuild even if timestamps are up to date
  -q                    output only error messages; -qq will suppress the
                        error messages as well.
  -b                    use legacy (pre-PEP3147) compiled file locations
  -d DESTDIR            directory to prepend to file paths for use in compile-
                        time tracebacks and in runtime tracebacks in cases
                        where the source file is unavailable
  -x REGEXP             skip files matching the regular expression; the regexp
                        is searched for in the full path of each file
                        considered for compilation
  -i FILE               add all the files and directories listed in FILE to
                        the list considered for compilation; if "-", names are
                        read from stdin
  -j WORKERS, --workers WORKERS
                        Run compileall concurrently
(yolov4) shl@zhihui-mint:~/shl_res/5_new_project/test$
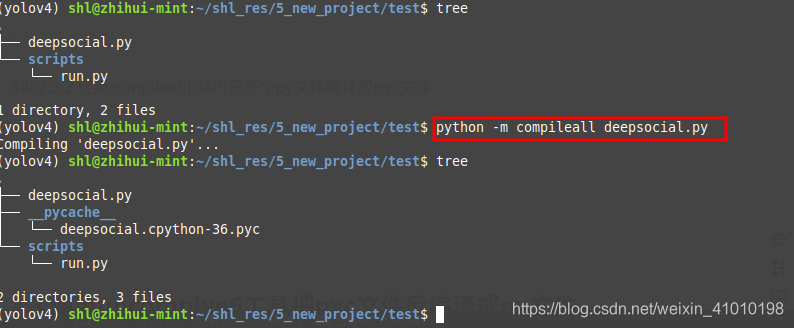
2、把单个py文件生成pyc文件,例如
python -m compileall deepsocial.py

3、递归的把当前目录下所有的py文件都生成对应的pyc文件
python -m compileall .
注意:
后面有一个点., 表示当前目录!

2.2.2 使用compileall的API把多个py文件编译成pyc文件
如下,是通过调用compileall的API接口,递归的把指定目录下所有的py文件都生成对应的pyc文件!
>>> import compileall
>>> compileall.compile_dir("/home/shl/shl_res/5_new_project/test")
Listing '/home/shl/shl_res/5_new_project/test'...
Compiling '/home/shl/shl_res/5_new_project/test/deepsocial.py'...
Listing '/home/shl/shl_res/5_new_project/test/scripts'...
Compiling '/home/shl/shl_res/5_new_project/test/scripts/run.py'...
True
>>>

3 使用uncomplye6工具把pyc文件反编译成py文件
只有pyc文件可以运行程序,但是是不能获取程序源码的。同时如果python的版本和pyc版本使用的不同,那么程序会闪退。对pyc文件进行反编译需要用到python第三方库包uncompyle。
3.1 使用uncomplye6工具安装
3.1.1 uncomplye6介绍
1、uncomplye6介绍
uncomplye6继承了decompyle、uncompyle 和uncompyle2。uncompyle6可将python字节码转换回等效的python源代码,它接受python 1.3版到3.8版的字节码。
2、uncomplye6的github地址
- uncomplye6 github地址:https://github.com/rocky/python-uncompyle6
3.1.2 uncomplye6安装
1、pip安装
pip install uncomplye6
2、从源码安装
git clone https://github.com.cnpmjs.org/rocky/python-uncompyle6.git
编译:
$cd python-uncompyle6
$pip install -e .  # set up to run from source tree
                    # Or if you want to install instead
$python setup.py install # may need sudo
3.2 使用uncomplye6工具把pyc反编译为py文件的具体使用
3.2.1 查看uncomplye6的参数
1、安装好uncomplye6后,可以使用uncomplye6 -h从
(yolov4) shl@zhihui-mint:~/shl_res/5_new_project/DeepSOCIAL$ python -V
Python 3.6.12 :: Anaconda, Inc.
(yolov4) shl@zhihui-mint:~/shl_res/5_new_project/DeepSOCIAL$ uncompyle6 -V
uncompyle6 3.7.4
(yolov4) shl@zhihui-mint:~/shl_res/5_new_project/DeepSOCIAL$ uncompyle6 -h

Usage:
  uncompyle6 [OPTIONS]... [ FILE | DIR]...
  uncompyle6 [--help | -h | --V | --version]

Examples:
  uncompyle6      foo.pyc bar.pyc       # decompile foo.pyc, bar.pyc to stdout
  uncompyle6 -o . foo.pyc bar.pyc       # decompile to ./foo.pyc_dis and ./bar.pyc_dis
  uncompyle6 -o /tmp /usr/lib/python1.5 # decompile whole library

Options:
  -o <path>     output decompiled files to this path:
                if multiple input files are decompiled, the common prefix
                is stripped from these names and the remainder appended to
                <path>
                  uncompyle6 -o /tmp bla/fasel.pyc bla/foo.pyc
                    -> /tmp/fasel.pyc_dis, /tmp/foo.pyc_dis
                  uncompyle6 -o /tmp bla/fasel.pyc bar/foo.pyc
                    -> /tmp/bla/fasel.pyc_dis, /tmp/bar/foo.pyc_dis
                  uncompyle6 -o /tmp /usr/lib/python1.5
                    -> /tmp/smtplib.pyc_dis ... /tmp/lib-tk/FixTk.pyc_dis
  --compile | -c <python-file>
                attempts a decompilation after compiling <python-file>
  -d            print timestamps
  -p <integer>  use <integer> number of processes
  -r            recurse directories looking for .pyc and .pyo files
  --fragments   use fragments deparser
  --verify      compare generated source with input byte-code
  --verify-run  compile generated source, run it and check exit code
  --syntax-verify compile generated source
  --linemaps    generated line number correspondencies between byte-code
                and generated source output
  --encoding  <encoding>
                use <encoding> in generated source according to pep-0263
  --help        show this message

Debugging Options:
  --asm     | -a        include byte-code       (disables --verify)
  --grammar | -g        show matching grammar
  --tree={before|after}
  -t {before|after}     include syntax before (or after) tree transformation
                        (disables --verify)
  --tree++ | -T         add template rules to --tree=before when possible

Extensions of generated files:
  '.pyc_dis' '.pyo_dis'   successfully decompiled (and verified if --verify)
    + '_unverified'       successfully decompile but --verify failed
    + '_failed'           decompile failed (contact author for enhancement)

(yolov4) shl@zhihui-mint:~/shl_res/5_new_project/DeepSOCIAL$
3.2.2 使用uncompyle6命令把pyc反编译成py文件
1、首先我们可以去下载一个pyc文件(我正式因为看不到它的源码,才去搞的这个)
wget https://github.com.cnpmjs.org/DrMahdiRezaei/DeepSOCIAL/blob/master/deepsocial.pyc
2、使用uncompyle6命令把pyc反编译成py文件
uncompyle6 deepsocial.pyc > deepsocial.py
或
uncompyle6 -o deepsocial.py deepsocial.pyc
输出的deepsocial.py文件开头会多一段这样的注释:
# uncompyle6 version 3.7.4
# Python bytecode 3.7 (3394)
# Decompiled from: Python 3.6.12 |Anaconda, Inc.| (default, Sep  8 2020, 23:10:56)
# [GCC 7.3.0]
# Embedded file name: deepsocial.py
# Compiled at: 2021-03-06 05:54:51
# Size of source mod 2**32: 14036 bytes
说明:
uncompyle6 version 3.7.4:uncompyle6工具的版本是3.7.4Python bytecode 3.7:deepsocial.pyc字节码byte code文件是使用python3.7生成的,因此要执行pyc文件,必须要python的版本也是3.7版本才可以!Decompiled from: Python 3.6.12:我解码pyc使用的是python版本是3.6.12
3、将当前文件夹中所有的 pyc 文件反编译成后缀名为.pyc_dis 的源文件
uncompile -o . *.pyc
参考:https://www.yuanrenxue.com/tricks/what-is-pyc-file.html # 对pyc文件解释比较清楚
参考:https://www.php.cn/python-tutorials-416352.html # 把py文件生成pyc文件