写在前面的话
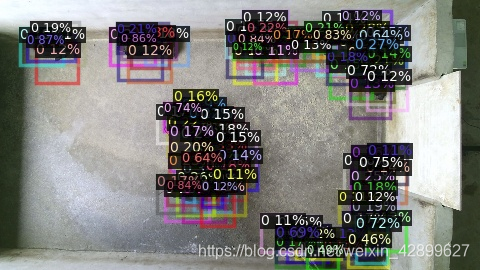
我最近在使用 facebook 开发的 detectron2 深度学习库进行实验,在跑检测框的可视化的时候,发现框很多很乱,而且很多置信度很低的检测框也画了出来,这看起来很难受,于是我就想着设定一个置信度阈值(score_threshold)来进行检测框筛选,使得可视化更直观,更加灵活.
初始的demo

增加置信度阈值后的demo

demo.py 完整代码
from detectron2.utils.visualizer import  ColorMode
from detectron2.data import MetadataCatalog, DatasetCatalog
from detectron2.engine.defaults import DefaultPredictor
from detectron2.utils.visualizer import Visualizer
from swint.config import add_swint_config
import random
import cv2
from detectron2.config import get_cfg
import os
import pig_dataset

pig_test_metadata = MetadataCatalog.get("pig_coco_test")
dataset_dicts = DatasetCatalog.get("pig_coco_test")

cfg = get_cfg()
add_swint_config(cfg)
cfg.merge_from_file("./configs/SwinT/retinanet_swint_T_FPN_3x.yaml")
cfg.MODEL.WEIGHTS = os.path.join(cfg.OUTPUT_DIR, "model_0019999.pth")
predictor = DefaultPredictor(cfg)

for d in random.sample(dataset_dicts,3):
    im = cv2.imread(d["file_name"])
    output = predictor(im)
    v = Visualizer(im[:,:,::-1],metadata=pig_test_metadata,
                   scale=0.5,instance_mode=ColorMode.IMAGE_BW)
    '''画框的函数(增加一个置信度阈值参数)!!!'''
    out = v.draw_instance_predictions(output["instances"].to("cpu"),0.5)#阈值=0.5
    cv2.namedWindow("pig",0)
    cv2.resizeWindow("pig",600,400)
    cv2.imshow("pig", out.get_image()[:, :, ::-1])
    #cv2.imwrite("demo-%s"%os.path.basename(d["file_name"]), out.get_image()[:, :, ::-1])

    cv2.waitKey(3000)
    cv2.destroyAllWindows()
设置置信度阈值(score_thredshold)部分代码
 if score_threshold != None:
     top_id = np.where(scores.numpy()>score_threshold)[0].tolist()
     scores = torch.tensor(scores.numpy()[top_id])
     boxes.tensor = torch.tensor(boxes.tensor.numpy()[top_id])
     classes = [classes[ii] for ii in top_id]
     labels = [labels[ii] for ii in top_id]
draw_instance_predictions 函数完整代码(修改后)
只需要把上面的代码复制粘帖到if predictions.has("pred_masks"):之前就可以了
这个函数的位置是在 detectron2/utils/visualizer.py 里面(pycharm直接Ctrl+B可以直接访问)
    def draw_instance_predictions(self, predictions, score_threshold=None):
        """
        Draw instance-level prediction results on an image.

        Args:
            score_threshold: 置信度阈值(新增的参数)
            predictions (Instances): the output of an instance detection/segmentation
                model. Following fields will be used to draw:
                "pred_boxes", "pred_classes", "scores", "pred_masks" (or "pred_masks_rle").

        Returns:
            output (VisImage): image object with visualizations.
        """
        boxes = predictions.pred_boxes if predictions.has("pred_boxes") else None
        scores = predictions.scores if predictions.has("scores") else None
        classes = predictions.pred_classes if predictions.has("pred_classes") else None
        labels = _create_text_labels(classes, scores, self.metadata.get("thing_classes", None))
        keypoints = predictions.pred_keypoints if predictions.has("pred_keypoints") else None

        '''新增的部分代码'''
        if score_threshold != None:
            top_id = np.where(scores.numpy()>score_threshold)[0].tolist()
            scores = torch.tensor(scores.numpy()[top_id])
            boxes.tensor = torch.tensor(boxes.tensor.numpy()[top_id])
            classes = [classes[ii] for ii in top_id]
            labels = [labels[ii] for ii in top_id]

        if predictions.has("pred_masks"):
            masks = np.asarray(predictions.pred_masks)
            masks = [GenericMask(x, self.output.height, self.output.width) for x in masks]
        else:
            masks = None

        if self._instance_mode == ColorMode.SEGMENTATION and self.metadata.get("thing_colors"):
            colors = [
                self._jitter([x / 255 for x in self.metadata.thing_colors[c]]) for c in classes
            ]
            alpha = 0.8
        else:
            colors = None
            alpha = 0.5

        if self._instance_mode == ColorMode.IMAGE_BW:
            self.output.img = self._create_grayscale_image(
                (predictions.pred_masks.any(dim=0) > 0).numpy()
                if predictions.has("pred_masks")
                else None
            )
            alpha = 0.3

        self.overlay_instances(
            masks=masks,
            boxes=boxes,
            labels=labels,
            keypoints=keypoints,
            assigned_colors=colors,
            alpha=alpha,
        )
        return self.output