大家好,我是小小明,今天我将教大家如何反编译exe文件。
这次以最近写的一篇gui《Python一键自动整理归类文件,GUI窗口程序拿来即用》为例进行演示。
地址:https://blog.csdn.net/as604049322/article/details/119619221
打包成单文件所使用的命令为:
pyinstaller -Fw --icon=h.ico auto_organize_gui.py --add-data="h.ico;/"
打包成文件夹所使用的命令为:
pyinstaller -w --icon=h.ico auto_organize_gui.py --add-data="h.ico;."
不管是哪种打包方式都会留下一个exe文件。
文章目录
首先我们需要从exe文件中抽取出其中的pyc文件:
🏆抽取pyinstaller打包的exe中的pyc文件
提取pyc文件有两种方法:
- 通过 pyinstxtractor.py 脚本提取pyc文件
- 通过 pyi-archive_viewer 工具提取pyc文件
🛬pyinstxtractor.py 脚本提取pyc文件
pyinstxtractor.py 脚本可以在github项目python-exe-unpacker中下载,地址:
https://github.com/countercept/python-exe-unpacker
下载该项目后把其中的pyinstxtractor.py脚本文件复制到与exe同级的目录。
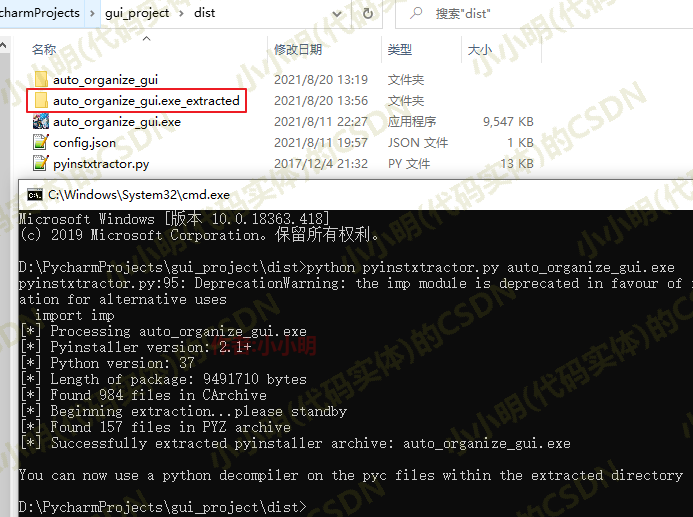
然后进入exe所在目录的cmd执行:
python pyinstxtractor.py auto_organize_gui.exe
执行后便得到exe文件名加上_extracted后缀的文件夹:
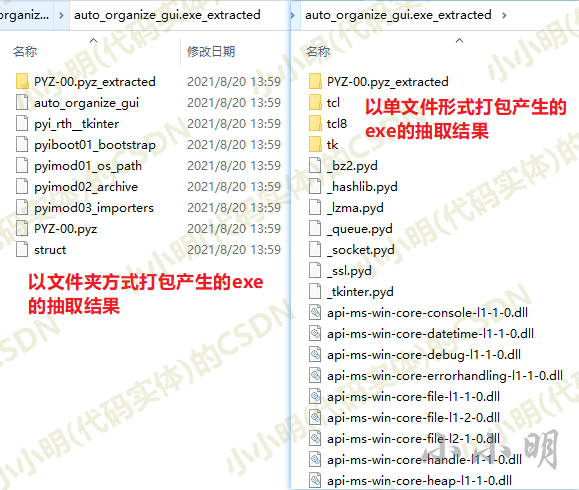
对两种打包方式产生的exe提取出的文件结构稍有区别:
🛬pyi-archive_viewer 工具提取pyc文件
pyi-archive_viewer是PyInstaller自己提供的工具,它可以直接提取打包结果exe中的pyc文件。
详细介绍可参考官方文档:
https://pyinstaller.readthedocs.io/en/stable/advanced-topics.html#using-pyi-archive-viewer
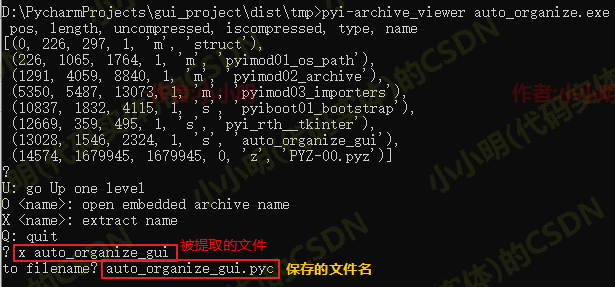
执行pyi-archive_viewer [filename]即可查看 exe 内部的文件结构:
pyi-archive_viewer auto_organize.exe
操作命令:
U: go Up one level
O <name>: open embedded archive name
X <name>: extract name
Q: quit
然后可以提取出指定需要提取的文件:
要提取其他被导入的pyc文件,则需要先打开PYZ-00.pyz:
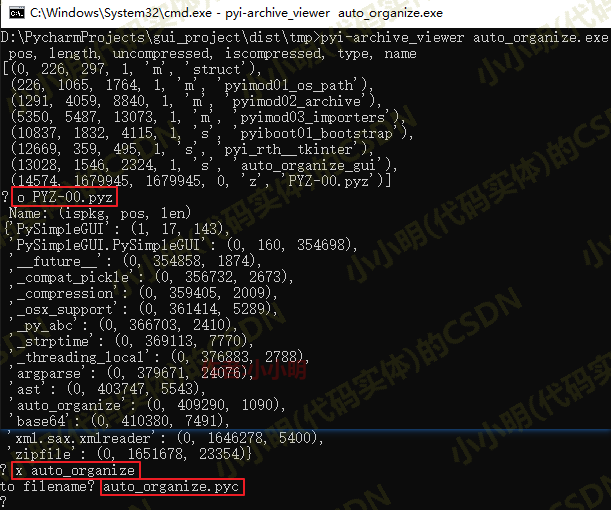
很显然,使用PyInstaller的pyi-archive_viewer 工具操作起来比较麻烦,一次只能提取一个文件,遇到子模块还需执行一次打开操作。所以后面我也只使用pyinstxtractor.py 脚本来提取pyc文件。
🏆反编译pyc文件为py脚本
有很多对pyc文件进行解密的网站,例如:
- https://tool.lu/pyc/
不过我们直接使用 uncompyle6 库进行解码,使用pip可以直接安装:
pip install uncompyle6
uncompyle6可以反编译.pyc后缀结尾的文件,两种命令形式:
uncompyle6 xxx.pyc>xxx.pyuncompyle6 -o xxx.py xxx.pyc
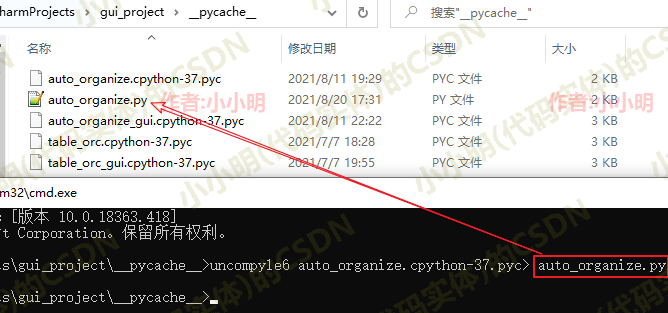
以前面编码过程中生成的缓存为例进行演示:
uncompyle6 auto_organize.cpython-37.pyc>auto_organize.py
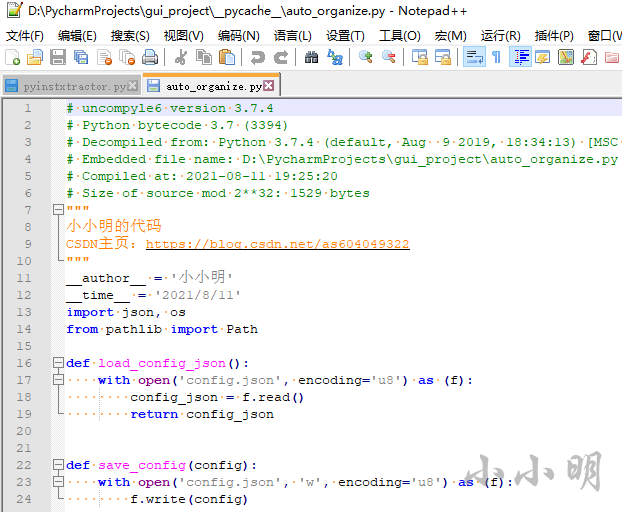
执行后便直接将.pyc文件反编译成python脚本了:
从编译结果看注释也被保留了下来:
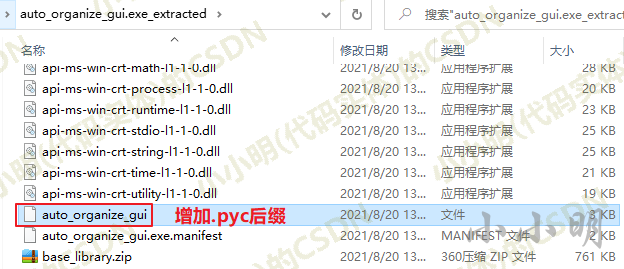
对于不是pyc后缀结尾的文件,使用uncompyle6反编译时会报出must point to a Python source that can be compiled, or Python bytecode (.pyc, .pyo)的错误。
所以我们需要先对提取出的内容人工修改后缀:
🛬运行入口pyc文件反编译
对于从pyinstaller提取出来的pyc文件并不能直接反编译,入口运行类共16字节的 magic 和 时间戳被去掉了。
如果直接进行反编译,例如执行uncompyle6 auto_organize_gui.exe_extracted/auto_organize_gui.pyc
会报出如下错误:ImportError: Unknown magic number 227 in auto_organize_gui.exe_extracted\auto_organize_gui.pyc
使用支持16进制编辑的文本编辑器查看一探究竟,这里我使用UltraEdit32:
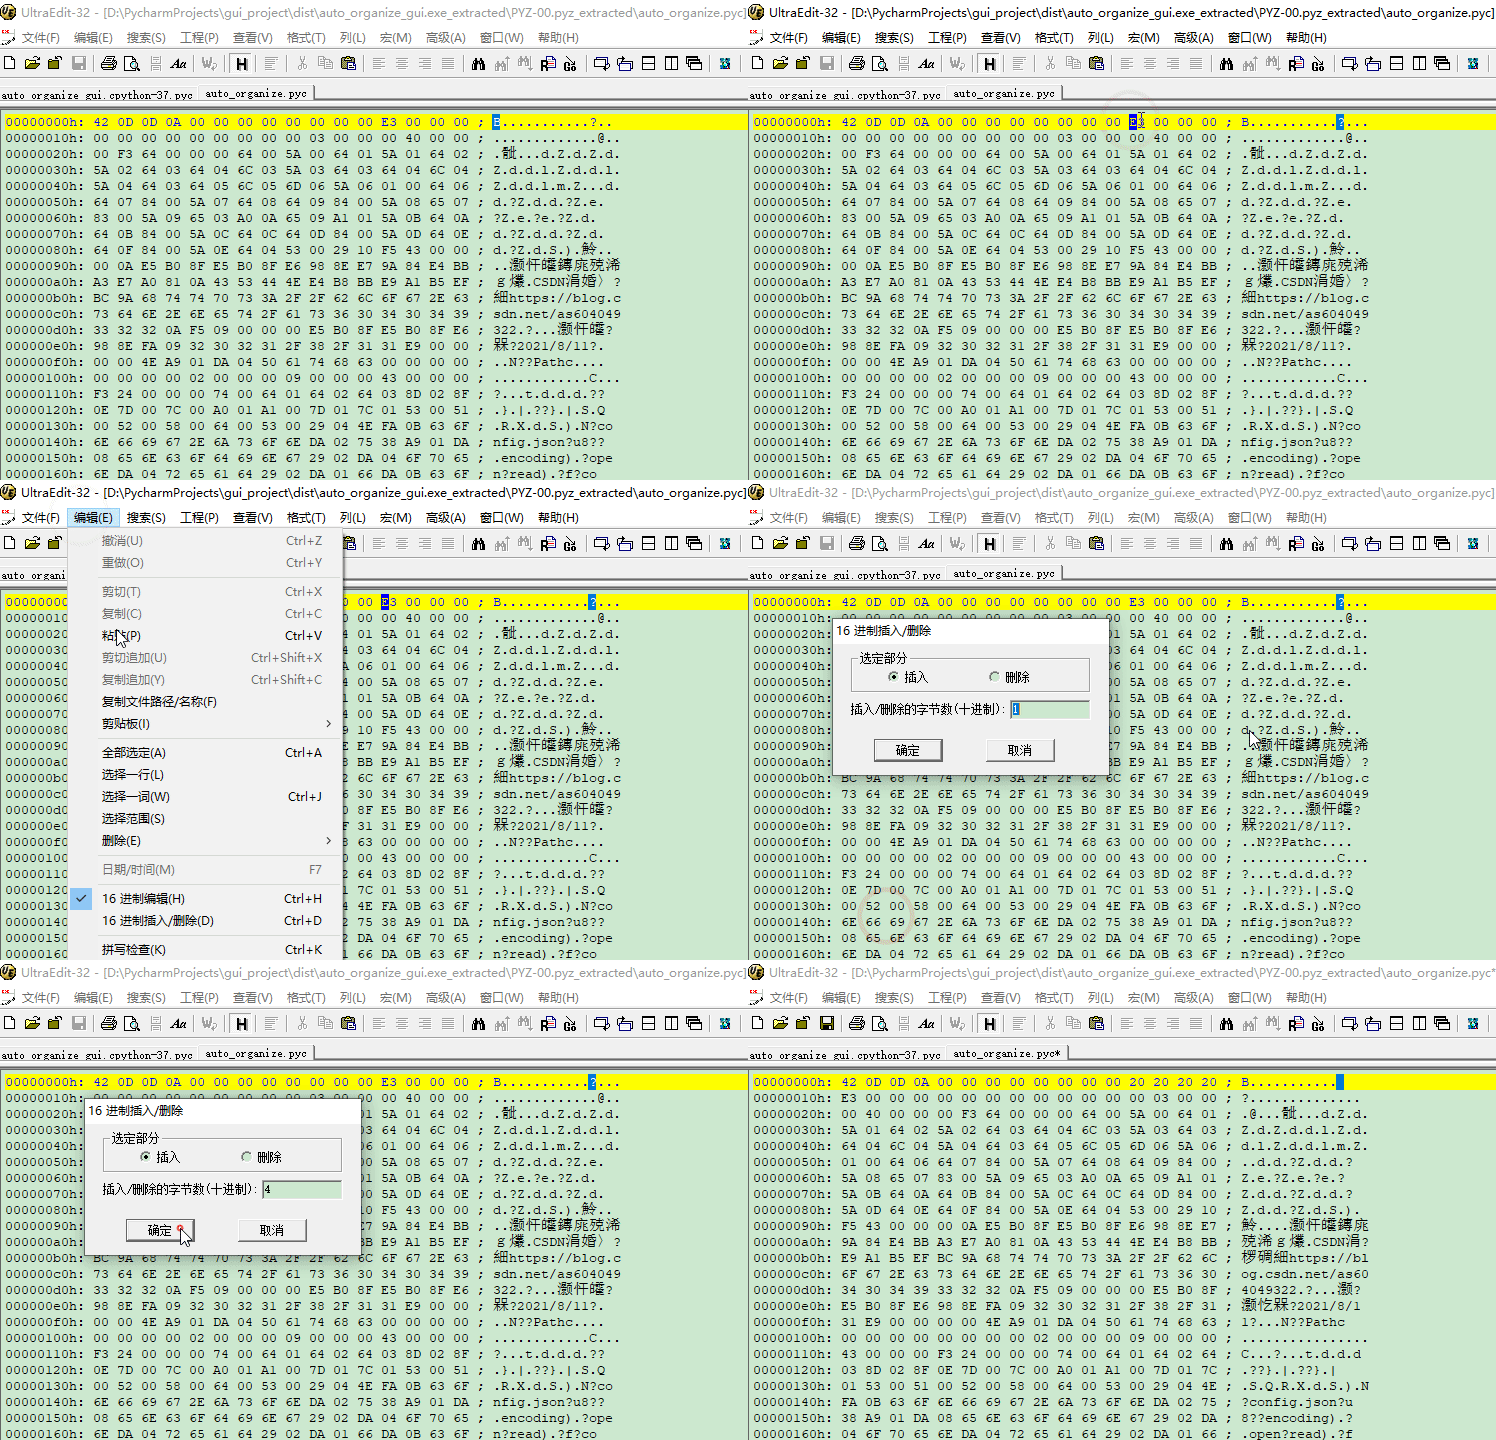
分别打开正常情况下编译出的pyc和从pyinstaller提取出来的pyc文件进行对比:
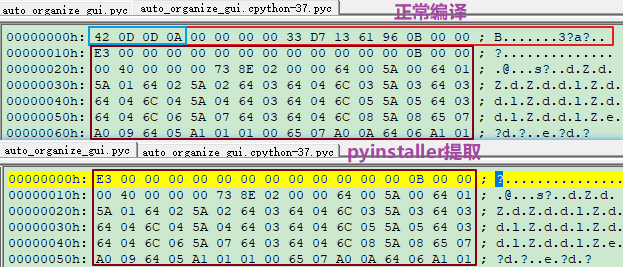
可以看到前16个字节都被去掉了,其中前四个字节是magic,这四个字节会随着系统和python版本发生变化,必须一致。后四个字节包括时间戳和一些其他的信息,都可以随意填写。
我们先通过UltraEdit32向pyinstaller提取的文件添加头信息:
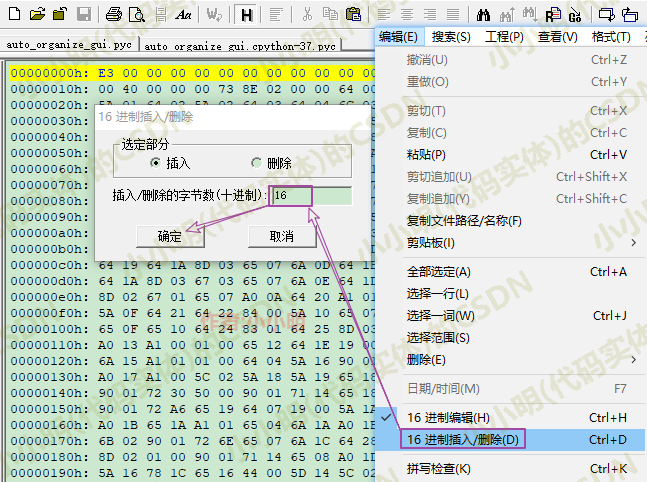
选择开头插入16个字节后,只需要替换前4个字节为当前环境下的magic:
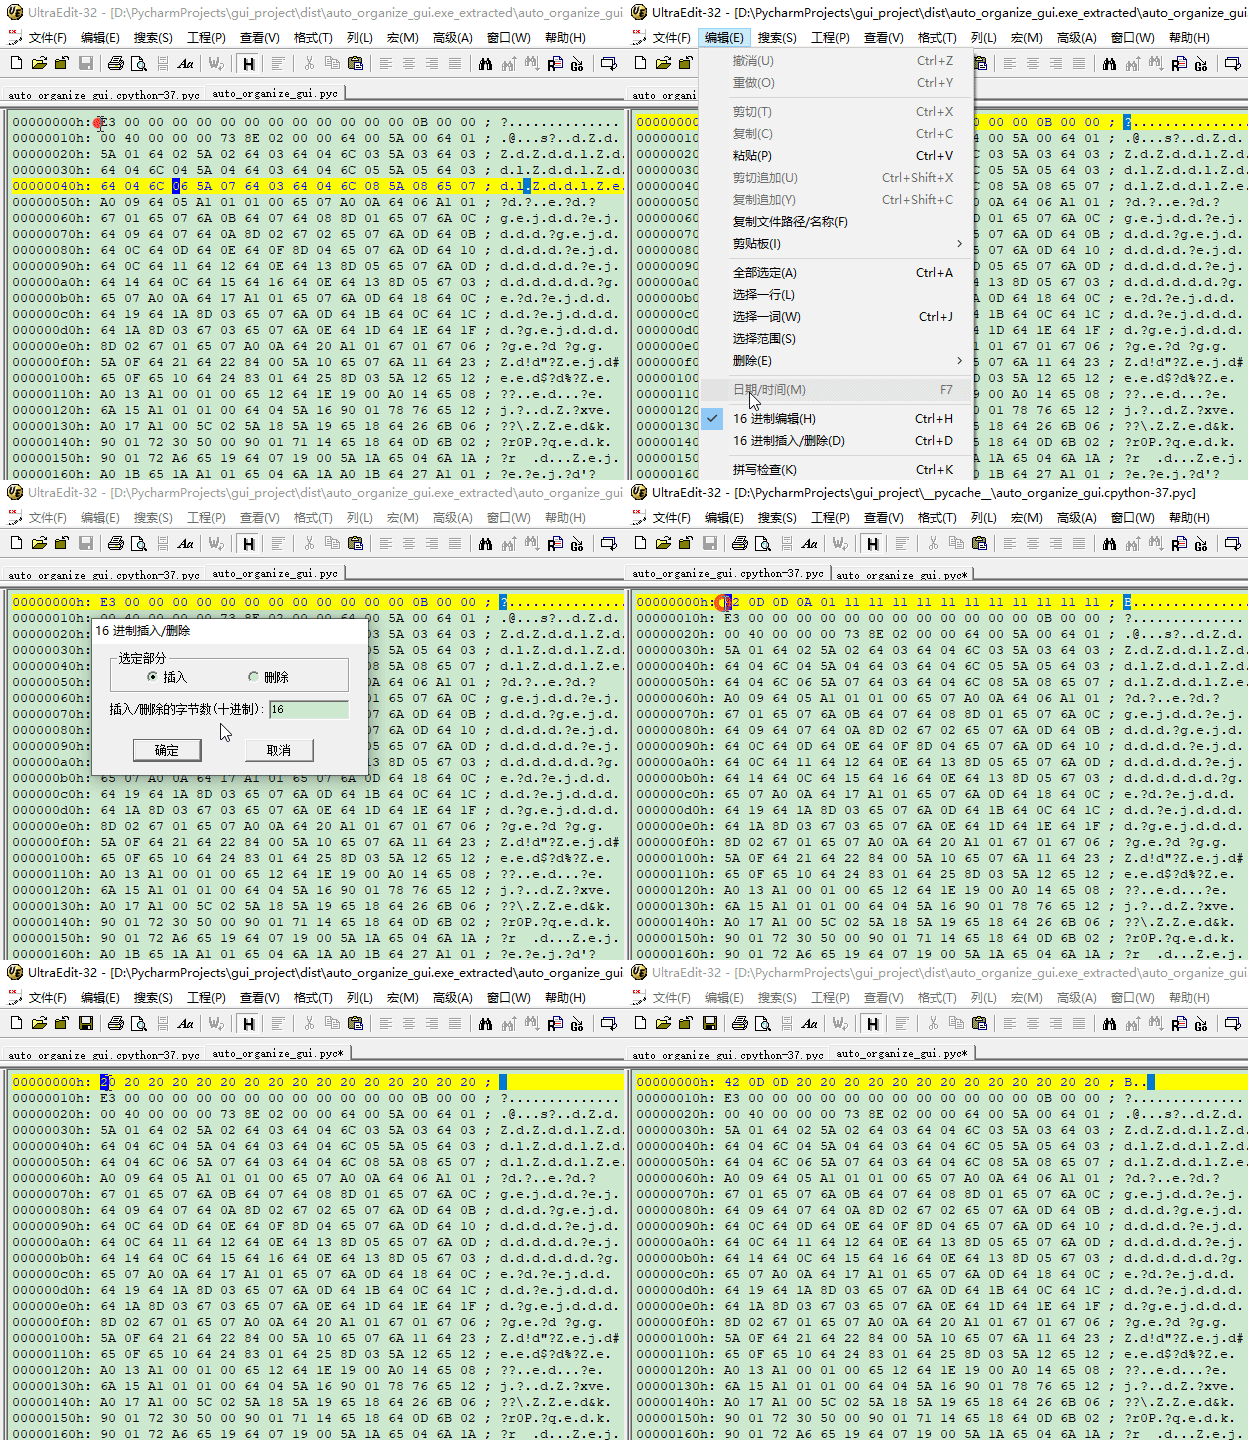
然后执行:
uncompyle6 auto_organize_gui.exe_extracted/auto_organize_gui.pyc>auto_organize_gui.py
执行后可以看到文件已经顺利的被反编译:
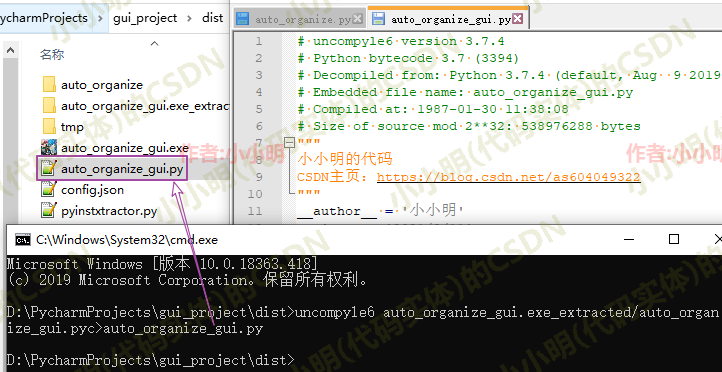
🛬依赖性pyc文件反编译
考虑再反编译导入的其他依赖文件:
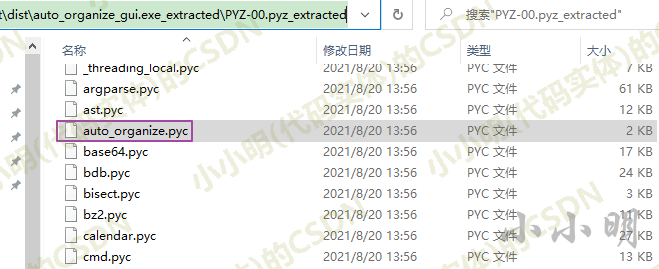
先用UltraEdit32打开查看一下:

可以看到对于非入口运行的pyc文件是从12字节开始缺4个字节。
这里我们选择第13个字节再插入四个字节即可:
然后再执行:
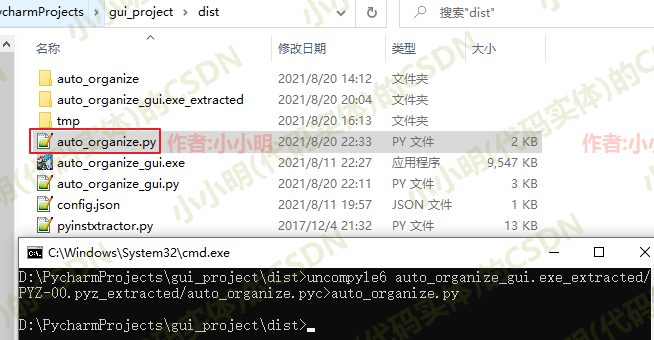
uncompyle6 auto_organize_gui.exe_extracted/PYZ-00.pyz_extracted/auto_organize.pyc > auto_organize.py
然后成功的反编译出依赖的文件:
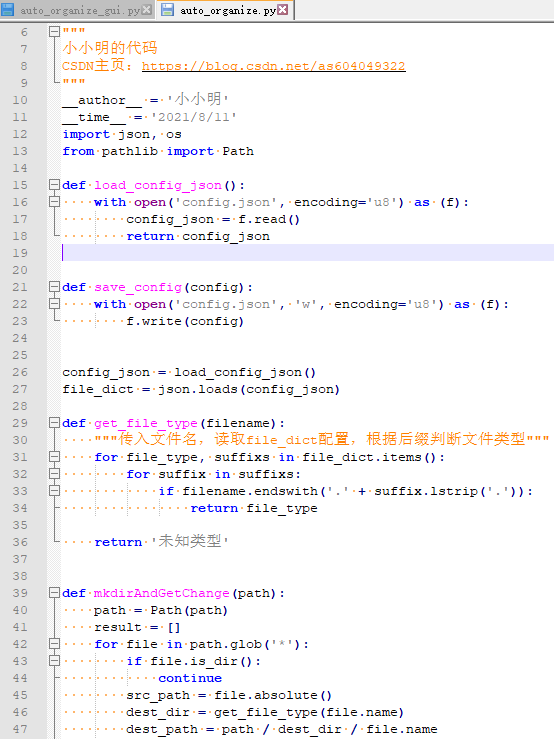
代码与原文件几乎完全一致:
🏆批量反编译一个exe中的所有python脚本
如果一个exe需要被反编译的python脚本只有3个以内的文件,我们都完全可以人工来操作。但是假如一个exe涉及几十个甚至上百个python脚本需要反编译的时候,人工操作未免工作量过于巨大,我们考虑将以上过程用python实现,从而达到批量反编译的效果。
🛬提取exe中的pyc
import os
import sys
import pyinstxtractor

exe_file = r"D:/PycharmProjects/gui_project/dist/auto_organize_gui.exe"
sys.argv = ['pyinstxtractor', exe_file]
pyinstxtractor.main()
# 恢复当前目录位置
os.chdir("..")
[*] Processing D:/PycharmProjects/gui_project/dist/auto_organize_gui.exe
[*] Pyinstaller version: 2.1+
[*] Python version: 37
[*] Length of package: 9491710 bytes
[*] Found 984 files in CArchive
[*] Beginning extraction...please standby
[*] Found 157 files in PYZ archive
[*] Successfully extracted pyinstaller archive: D:/PycharmProjects/gui_project/dist/auto_organize_gui.exe

You can now use a python decompiler on the pyc files within the extracted directory
🛬预处理pyc文件修护校验头
def find_main(pyc_dir):
    for pyc_file in os.listdir(pyc_dir):
        if not pyc_file.startswith("pyi-") and pyc_file.endswith("manifest"):
            main_file = pyc_file.replace(".exe.manifest", "")
            result = f"{pyc_dir}/{main_file}"
            if os.path.exists(result):
                return main_file

pyc_dir = os.path.basename(exe_file)+"_extracted"
main_file = find_main(pyc_dir)
main_file
读取从pyz目录抽取的pyc文件的前4个字节作基准:
pyz_dir = f"{pyc_dir}/PYZ-00.pyz_extracted"
for pyc_file in os.listdir(pyz_dir):
    if pyc_file.endswith(".pyc"):
        file = f"{pyz_dir}/{pyc_file}"
        break
with open(file, "rb") as f:
    head = f.read(4)
list(map(hex, head))
['0x42', '0xd', '0xd', '0xa']
校准入口类:
import shutil
if os.path.exists("pycfile_tmp"):
    shutil.rmtree("pycfile_tmp")
os.mkdir("pycfile_tmp")
main_file_result = f"pycfile_tmp/{main_file}.pyc"
with open(f"{pyc_dir}/{main_file}", "rb") as read, open(main_file_result, "wb") as write:
    write.write(head)
    write.write(b"\0"*12)
    write.write(read.read())
校准子类:
pyz_dir = f"{pyc_dir}/PYZ-00.pyz_extracted"
for pyc_file in os.listdir(pyz_dir):
    pyc_file_src = f"{pyz_dir}/{pyc_file}"
    pyc_file_dest = f"pycfile_tmp/{pyc_file}"
    print(pyc_file_src, pyc_file_dest)
    with open(pyc_file_src, "rb") as read, open(pyc_file_dest, "wb") as write:
        write.write(read.read(12))
        write.write(b"\0"*4)
        write.write(read.read())
🛬开始反编译
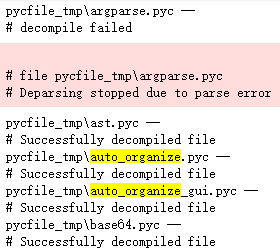
from uncompyle6.bin import uncompile

if not os.path.exists("py_result"):
    os.mkdir("py_result")
for pyc_file in os.listdir("pycfile_tmp"):
    sys.argv = ['uncompyle6', '-o',
                f'py_result/{pyc_file[:-1]}', f'pycfile_tmp/{pyc_file}']
    uncompile.main_bin()
🛬完整代码
#!/usr/bin/env python
# coding: utf-8

# 提取exe中的pyc
import os
import sys
import pyinstxtractor
from uncompyle6.bin import uncompile
import shutil


# 预处理pyc文件修护校验头
def find_main(pyc_dir):
    for pyc_file in os.listdir(pyc_dir):
        if not pyc_file.startswith("pyi-") and pyc_file.endswith("manifest"):
            main_file = pyc_file.replace(".exe.manifest", "")
            result = f"{pyc_dir}/{main_file}"
            if os.path.exists(result):
                return main_file


def uncompyle_exe(exe_file, complie_child=False):
    sys.argv = ['pyinstxtractor', exe_file]
    pyinstxtractor.main()
    # 恢复当前目录位置
    os.chdir("..")

    pyc_dir = os.path.basename(exe_file)+"_extracted"
    main_file = find_main(pyc_dir)

    pyz_dir = f"{pyc_dir}/PYZ-00.pyz_extracted"
    for pyc_file in os.listdir(pyz_dir):
        if pyc_file.endswith(".pyc"):
            file = f"{pyz_dir}/{pyc_file}"
            break
    else:
        print("子文件中没有找到pyc文件,无法反编译!")
        return
    with open(file, "rb") as f:
        head = f.read(4)

    if os.path.exists("pycfile_tmp"):
        shutil.rmtree("pycfile_tmp")
    os.mkdir("pycfile_tmp")
    main_file_result = f"pycfile_tmp/{main_file}.pyc"
    with open(f"{pyc_dir}/{main_file}", "rb") as read, open(main_file_result, "wb") as write:
        write.write(head)
        write.write(b"\0"*12)
        write.write(read.read())

    if os.path.exists("py_result"):
        shutil.rmtree("py_result")
    os.mkdir("py_result")
    sys.argv = ['uncompyle6', '-o',
                f'py_result/{main_file}.py', main_file_result]
    uncompile.main_bin()

    if not complie_child:
        return
    for pyc_file in os.listdir(pyz_dir):
        if not pyc_file.endswith(".pyc"):
            continue
        pyc_file_src = f"{pyz_dir}/{pyc_file}"
        pyc_file_dest = f"pycfile_tmp/{pyc_file}"
        print(pyc_file_src, pyc_file_dest)
        with open(pyc_file_src, "rb") as read, open(pyc_file_dest, "wb") as write:
            write.write(read.read(12))
            write.write(b"\0"*4)
            write.write(read.read())

    os.mkdir("py_result/other")
    for pyc_file in os.listdir("pycfile_tmp"):
        if pyc_file==main_file+".pyc":
            continue
        sys.argv = ['uncompyle6', '-o',
                    f'py_result/other/{pyc_file[:-1]}', f'pycfile_tmp/{pyc_file}']
        uncompile.main_bin()
调用:
exe_file = r"D:/PycharmProjects/gui_project/dist/auto_organize_gui.exe"
uncompyle_exe(exe_file, True)
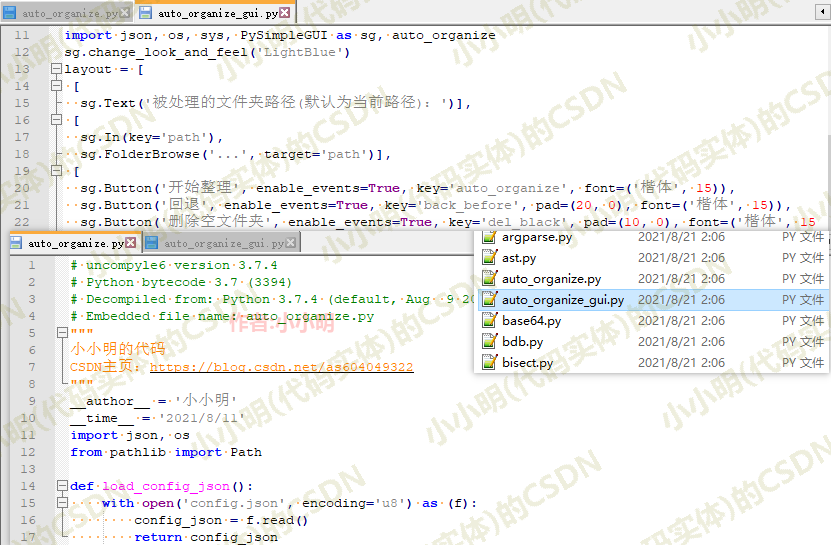
可以看到已经完美的反编译出exe其中的python脚本:
🏆如何防止自己打包的exe被反编译呢?
只需在打包命令后面加上--key命令即可,例如文章开头的命令可以更换为:
pyinstaller -Fw --icon=h.ico auto_organize_gui.py --add-data="h.ico;/" --key 123456
123456是你用来加密的密钥,可以随意更换。
该加密参数依赖tinyaes,可以通过以下命令安装:
pip install tinyaes
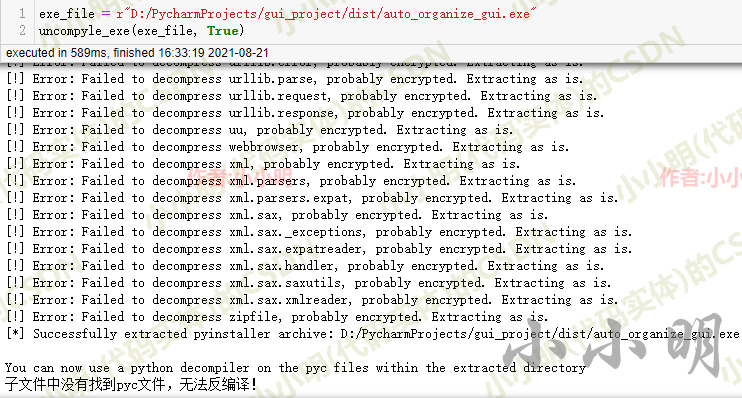
打包后再次执行反编译:
exe_file = r"D:/PycharmProjects/gui_project/dist/auto_organize_gui.exe"
uncompyle_exe(exe_file, True)
结果只有入口脚本反编译成功,被依赖的脚本均被加密,无法直接被反编译:
可以看到抽取的中间结果变成了.pyc.encrypted格式,无法直接被反编译:
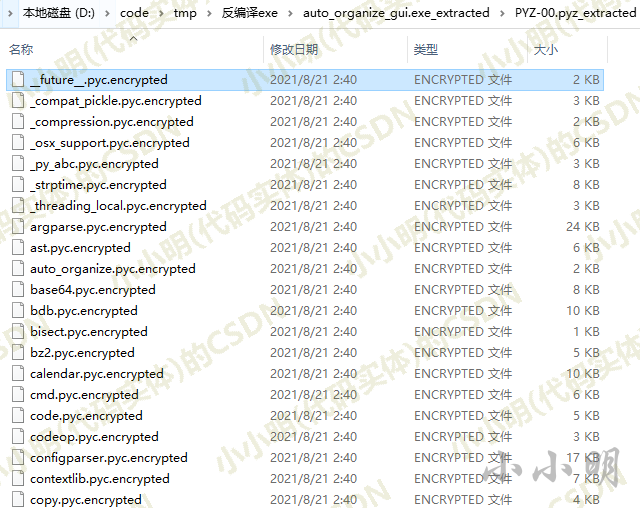
可以看到,常规手段就无法直接反编译了。这个时候还想反编译就需要底层的逆向分析研究了,或者pyinstaller的源码完整研究一遍,了解其加密处理的机制,看看有没有破解的可能。
