前言
sass项目视频地址:https://www.bilibili.com/video/BV1uA411b77M
搭建虚拟环境链接:https://blog.csdn.net/weixin_45859193/article/details/115408555
采用django3.2.6版本,以untitled7为根目录创建的项目名为web,在web项目中的view.py编写所有视图,templates文件存放模板标记语言、script存放脚本测试,数据库采用sqlite3, ModelForm美化标签相关操作在form文件中,static存放第三方库及静态文件
urls.py如下:
from django.conf.urls import url, include

urlpatterns = [
    url(r"^web/", include("web.urls"))
]
web/urls.py如下:
from django.conf.urls import url
from web import views

urlpatterns = [
	# ModelForm美化相关
    url(r'register/', views.register, name="register"),
    url(r'radio/', views.radio, name="radio"),
    # 图片验证码相关
    url(r'login/', views.login, name="login"),
    url(r'image_code/', views.image_code, name="image_code"),
]
一、ModelForm美化
概述:搭配通过django中自行通过ModelForm渲染标签时使用bootstrap样式。
示例:创建一个用户表结构示例。
models.py如下:
class UserInfo(models.Model):
    username = models.CharField(verbose_name="用户名", max_length=32)
    email = models.EmailField(verbose_name="邮箱", max_length=32)
    phone = models.CharField(verbose_name="手机号", max_length=32)
    password = models.CharField(verbose_name="密码", max_length=32)
通过sqllite3创建控制台输入:
python manage.py makemigrations
python manage.py migrate
BootStrapForm类(重写django渲染标签样式)如下:
class BootStrapForm(object):
    bootstrap_class_exclude = []

    # 初始化方法
    def __init__(self, *args, **kwargs):
        super().__init__(*args, **kwargs)
        # 每个字段的字段名和字段值
        for name, field in self.fields.items():
            if name in self.bootstrap_class_exclude:
                continue
            old_class = field.widget.attrs.get('class', "")
            field.widget.attrs['class'] = '{} form-control'.format(old_class)
            field.widget.attrs['placeholder'] = '请输入{}'.format(field.label)
视图函数如下:
from django.shortcuts import render
from django.core.validators import RegexValidator
from django import forms
from web import models
from web.form.bootstarp import BootStrapForm


class RegisterModelForm(BootStrapForm, forms.ModelForm):
	# 这里如果想排除某个字段可以使用 bootstrap_class_exclude = [字段]
	bootstrap_class_exclude = []
    # 重写字段规则
    phone = forms.CharField(label="手机号", validators=[RegexValidator(r'^(1[3|5|6|8]\d{9}$)', "手机号格式错误")])
    password = forms.CharField(label="密码", widget=forms.PasswordInput())
    code = forms.CharField(label="验证码")

    class Meta:
        model = models.UserInfo
        fields = "__all__"


def register(request):
    form = RegisterModelForm()
    return render(request, "register.html", {"form": form})
html模板如下:
<!DOCTYPE html>
<html lang="en">
<head>
    <meta charset="UTF-8">
    <title>Title</title>
    <link rel="stylesheet" href="https://stackpath.bootstrapcdn.com/bootstrap/4.1.3/css/bootstrap.min.css">
</head>
<style>
    .account {
        width: 600px;
        margin: 0 auto;
    }
</style>
<body>
<div class="account">
    <h1>注册</h1>
    {% for field in form %}
        {% if field.name == 'code' %}
            <div class="form-group">
                <label for="{{ field.id_for_label }}">{{ field.label }}</label>
                <div style="display: flex;justify-content: space-between;flex-direction: row-reverse">
                    <div class="col-xs-5">
                        <input id="btnSms" class="btn btn-info" type="button" value="获取验证码">
                    </div>
                    <div class="col-xs-5">
                        {{ field }}
                        <span class="error-msg"></span>
                    </div>
                </div>
            </div>
        {% else %}
           <div class="form-group">
            <label for="{{ field.id_for_label }}">{{ field.label }}</label>
            {{ field }}
           <span class="error-msg"></span>
        </div>
        {% endif %}
    {% endfor %}
    <button type="button" class="btn btn-info">登录</button>
</div>
</body>
</html>
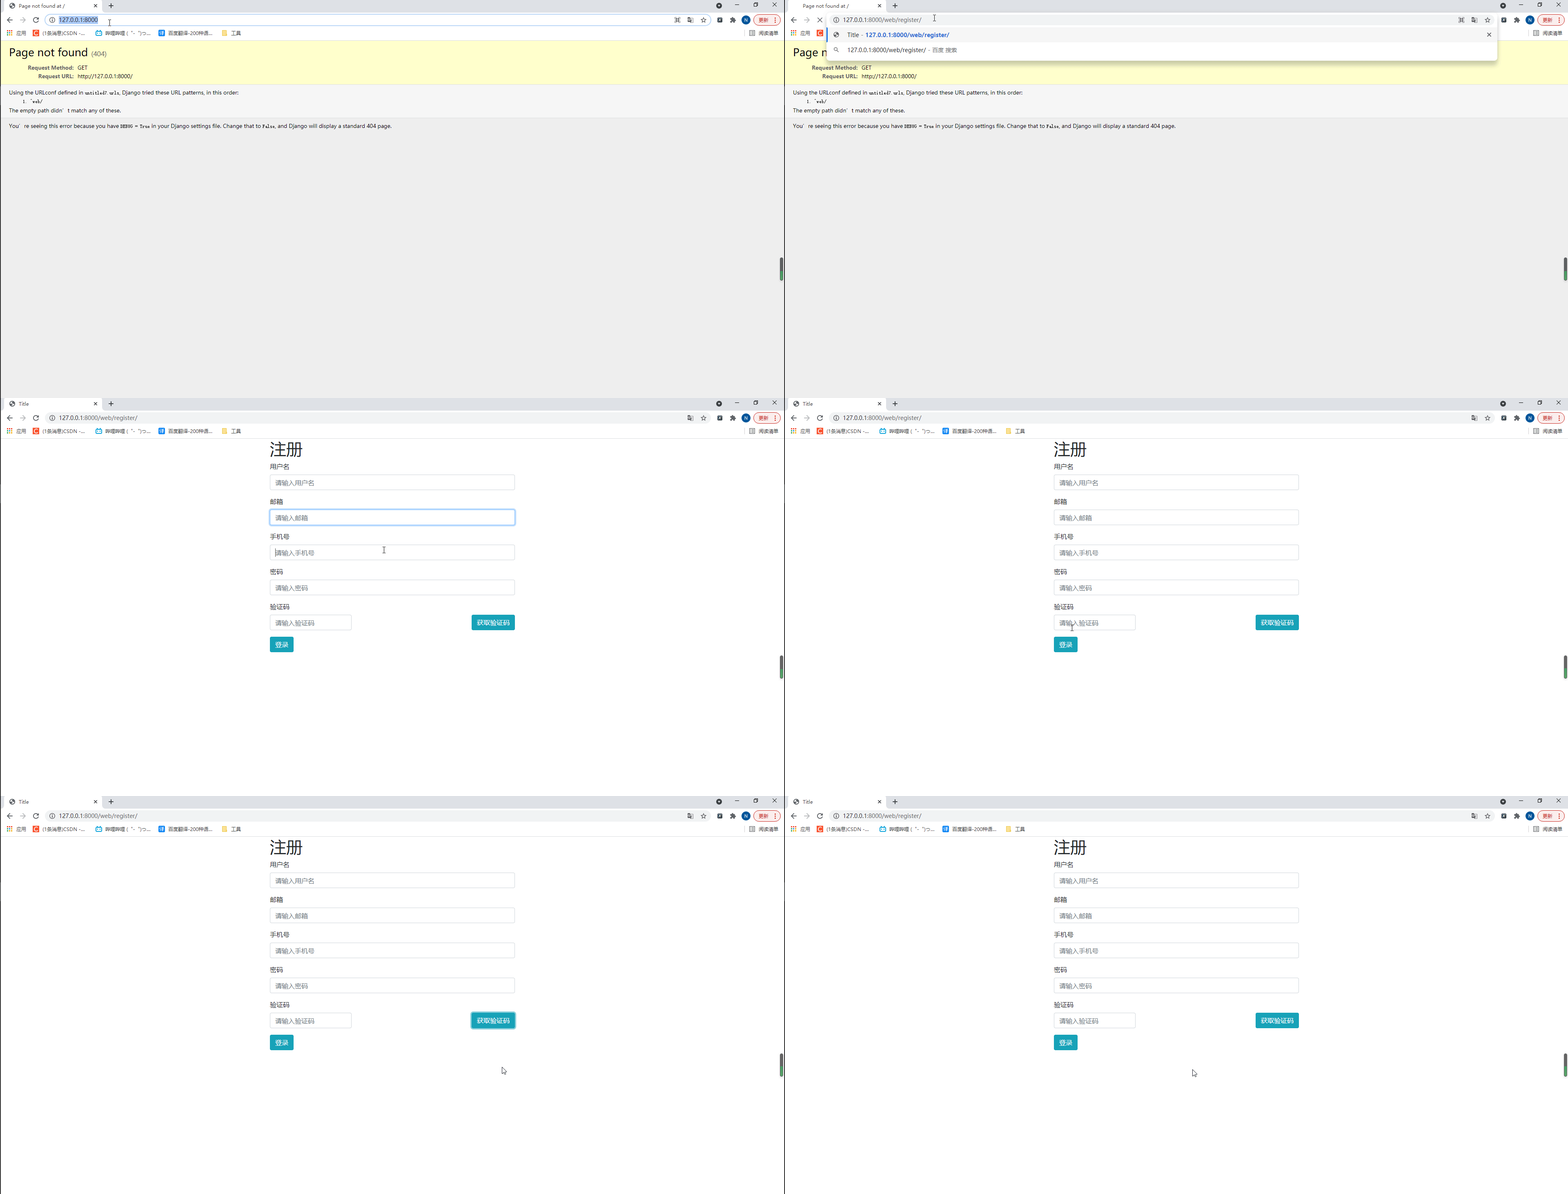
此时访问路由如下:

概述:对于标签而言是通过django.widgets.forms中通过模板标记语言渲染出来的,但是如果我们想用自己的也可以通过重写的方式修改标签样式,这里拿select、radio标签来展示。
为了方便展示我们创建一个项目表。
models.py如下:
class Project(models.Model):
    COLOR_CHOICES = (
        (1, '#56b8eb'),
        (2, '#f28033'),
        (3, '#ebc656'),
        (4, '#a2d148'),
        (5, '#20BFA4'),
        (6, '#7461c2'),
        (7, '#20bfa3'),
    )
    name = models.CharField(verbose_name='项目名', max_length=32)
    color = models.SmallIntegerField(verbose_name='颜色', choices=COLOR_CHOICES, default=1)
    desc = models.CharField(verbose_name='项目描述', max_length=255, null=True, blank=True)
    priority_choices = (
        ("danger", "高"),
        ("warning", "中"),
        ("success", "低"),
    )
    priority = models.CharField(verbose_name='优先级', max_length=12, choices=priority_choices, default='danger')
通过sqllite3创建控制台输入:
python manage.py makemigrations
python manage.py migrate
1.自定义radio标签样式
进入django.forms生成的函数RadioSelect源码:
class RadioSelect(ChoiceWidget):
    input_type = 'radio'
    template_name = 'django/forms/widgets/radio.html'
    option_template_name = 'django/forms/widgets/radio_option.html'
模板指向django中template文件夹下的html。
我们先查看radio.html如下:
{% include "django/forms/widgets/multiple_input.html" %}
multiple_input.html如下:
{% with id=widget.attrs.id %}<ul{% if id %} id="{{ id }}"{% endif %}{% if widget.attrs.class %} class="{{ widget.attrs.class }}"{% endif %}>{% for group, options, index in widget.optgroups %}{% if group %}
  <li>{{ group }}<ul{% if id %} id="{{ id }}_{{ index }}"{% endif %}>{% endif %}{% for option in options %}
    <li>{% include option.template_name with widget=option %}</li>{% endfor %}{% if group %}
  </ul></li>{% endif %}{% endfor %}
</ul>{% endwith %}
这些都是django的模板标记语言,大概就是通过widget来生成ul和li标签,如果我们要修改可以根据以上模板标记语言修改。
radio_option.html如下:
{% include "django/forms/widgets/input_option.html" %}
input_option.html如下:
{% if widget.wrap_label %}<label{% if widget.attrs.id %} for="{{ widget.attrs.id }}"{% endif %}>{% endif %}{% include "django/forms/widgets/input.html" %}{% if widget.wrap_label %} {{ widget.label }}</label>{% endif %}
大致就是这样,我们现在开始重写。
创建widgets.py如下:
from django.forms import RadioSelect


class ColorRadioSelect(RadioSelect):
    # template_name = 'django/forms/widgets/radio.html'
    # option_template_name = 'django/forms/widgets/radio_option.html'
    template_name = 'widgets/color_radio/radio.html'
    option_template_name = 'widgets/color_radio/radio_option.html'
此时在该项目中的template创建widgets/color_radio文件夹下的两个radio.html、radio_option.html用于重写。
radio.html如下:
{% with id=widget.attrs.id %}
    <div{% if id %} id="{{ id }}"{% endif %}{% if widget.attrs.class %} class="{{ widget.attrs.class }}"{% endif %}>
        {% for group, options, index in widget.optgroups %}
            {% for option in options %}
                <label {% if option.attrs.id %} for="{{ option.attrs.id }}"{% endif %} >
                    {% include option.template_name with widget=option %}
                </label>
            {% endfor %}
        {% endfor %}
    </div>
{% endwith %}
这里将ul和li标签改成了div和label 标签。
radio_option.html如下:
{% include "django/forms/widgets/input.html" %}
<span class="cycle" style="background-color:{{ option.label }}"></span>
这里没有进行修改,只是在原基础上增加了一个span标签。
自此radio的重写完成,那么现在开始写表单和视图。
结合上面的ModelForm表单美化(BootStrapForm函数:通过bootstarp的样式美化标签)。
project.py如下:
from django import forms
from web.form.bootstarp import BootStrapForm
from web import models
from .widgets import ColorRadioSelect


class ProjectModelForm(BootStrapForm, forms.ModelForm):
    bootstrap_class_exclude = ['color']

    def __init__(self, request, *args, **kwargs):
        super().__init__(*args, **kwargs)
        self.request = request

    class Meta:
        model = models.Project
        fields = ["name","color","desc"]
        widgets = {
            'desc': forms.Textarea,
            'color': ColorRadioSelect(attrs={'class': 'color-radio'}),
        }
通过init函数可以看到,该函数也支持传入request参数,并且这里排除了color(即radio标签,我们用自己的方式)。
view.py如下:
from web.form.project import ProjectModelForm
def radio(request):
    form = ProjectModelForm(request)
    return render(request, "radio.html", {"form": form})
radio.html如下:
{% load static %}
<!DOCTYPE html>
<html lang="en">
<head>
    <meta charset="UTF-8">
    <title>Title</title>
    <link rel="stylesheet" href="{% static 'plugin/bootstrap-3.3.7-dist/css/bootstrap.min.css' %} ">
</head>
<style>
     .account {
        width: 600px;
        margin: 0 auto;
    }
    .color-radio label {
            margin-left: 0;
            padding-left: 0;
        }

        .color-radio input[type="radio"] {
            display: none;
        }

        .color-radio input[type="radio"] + .cycle {
            display: inline-block;
            height: 25px;
            width: 25px;
            border-radius: 50%;
            border: 2px solid #dddddd;
        }

        .color-radio input[type="radio"]:checked + .cycle {
            border: 2px solid black;
        }
</style>
<body>
    <div class="account">
        {% for field in form %}
            <div class="form-group">
                <label for="{{ field.id_for_label }}">{{ field.label }}</label>
                {{ field }}
               <span class="error-msg"></span>
            </div>
        {% endfor %}
    </div>
</body>
</html>
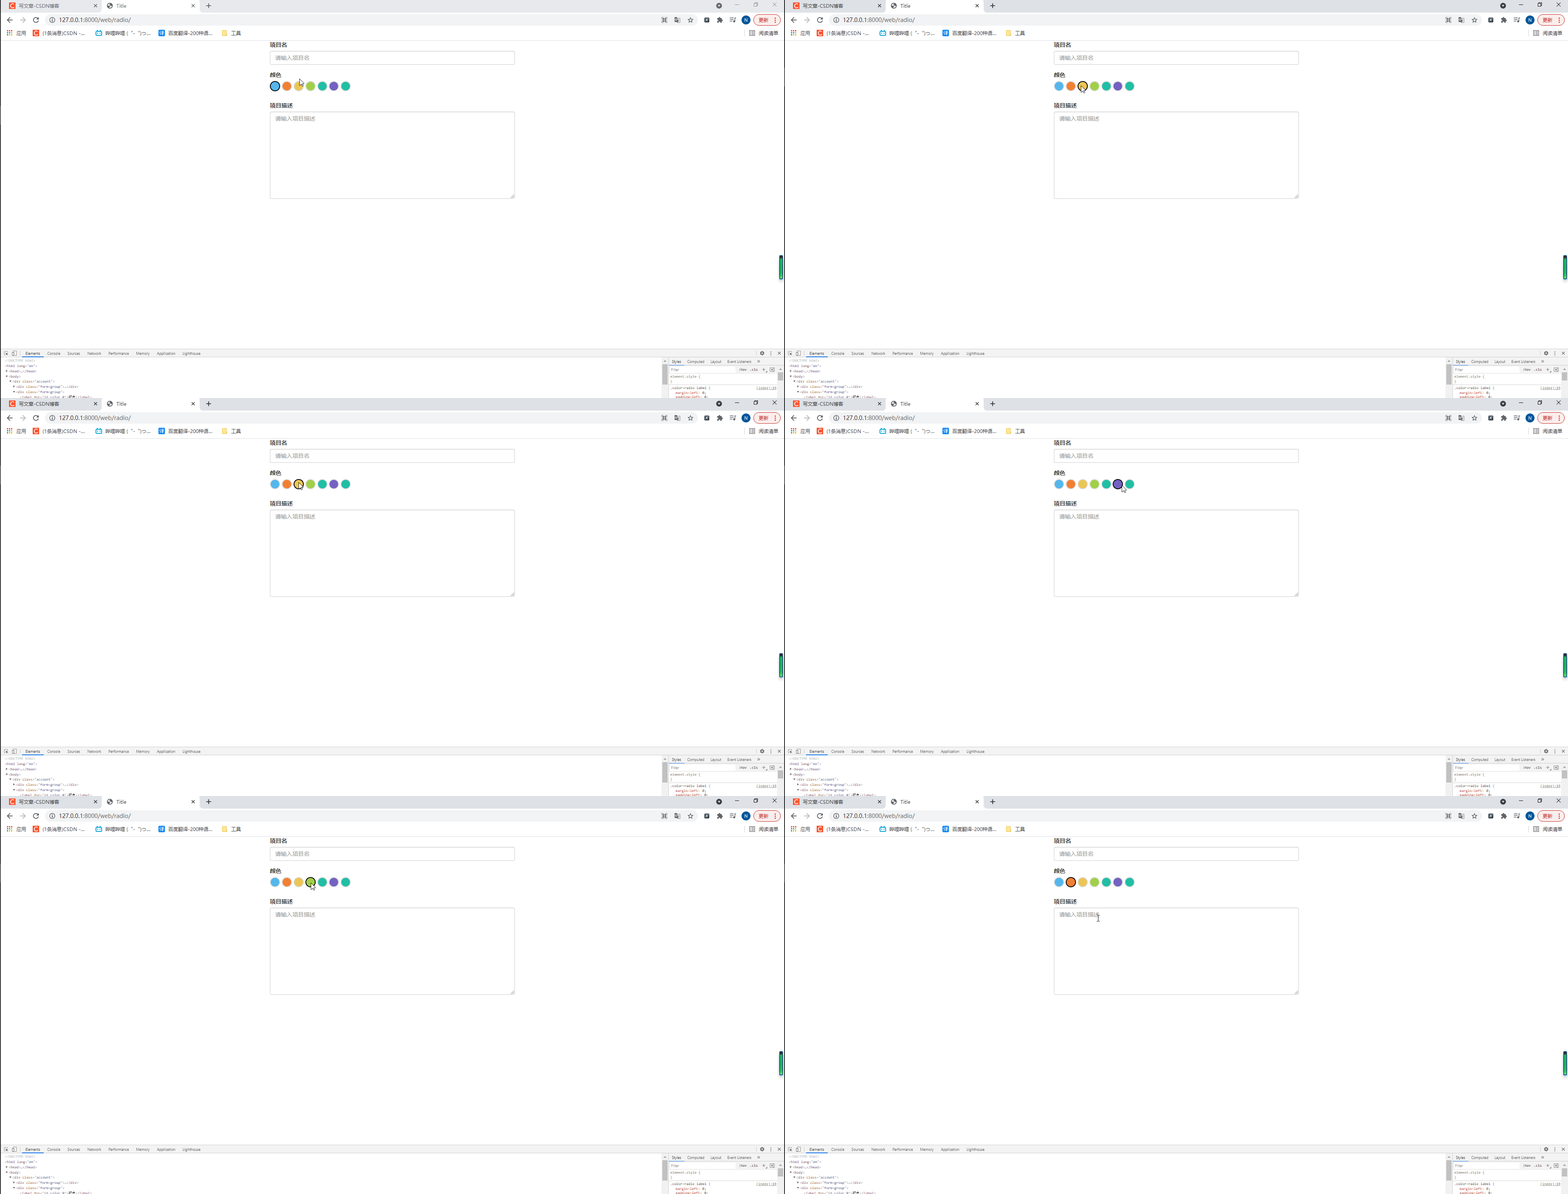
此时访问重写radio的路由如下:

2.自定义select标签样式
对于select标签而言,我们不能通过样式的形式去修改,所以需要其他库bootstrap-select、font-awesome图标库、jquery。
下载这些库的链接:https://gitee.com/miaojiaxi/s25day01/tree/master/web/static/
bootstrap-select官网:https://www.bootstrapselect.cn/
全部安装完成后,我们进入django.forms生成的标签函数Select查看美化select标签的源码:
class Select(ChoiceWidget):
    input_type = 'select'
    template_name = 'django/forms/widgets/select.html'
    option_template_name = 'django/forms/widgets/select_option.html'
    add_id_index = False
    checked_attribute = {'selected': True}
    option_inherits_attrs = False
因为和radio一样,且内部select.html不用重写,只用将select中的option标签,所以我们只用重写option_template_name即可,那么我们先查看一下源码select_option.html如下:
<option value="{{ widget.value|stringformat:'s' }}"{% include "django/forms/widgets/attrs.html" %}>{{ widget.label }}</option>
在widgets/color_radio文件夹下创建select.html用于重写select_option.html如下:
<option value="{{ widget.value|stringformat:'s' }}" data-content="<i class='fa fa-circle text-{{ widget.value|stringformat:'s' }}'></i> {{ widget.label }}"
    {% include "django/forms/widgets/attrs.html" %}>
</option>
通过bootstrap-select库的帮助用data-content = “标签(font-awesome图标库)”,实现了添加图标,而图标样式则为数据库中表字段。
修改一下之前的widgets.pt如下:
from django.forms import RadioSelect, Select


class ColorRadioSelect(RadioSelect):
    # template_name = 'django/forms/widgets/radio.html'
    # option_template_name = 'django/forms/widgets/radio_option.html'
    template_name = 'widgets/color_radio/radio.html'
    option_template_name = 'widgets/color_radio/radio_option.html'


class ColorSelect(Select):
    option_template_name = 'widgets/color_radio/select.html'
然后在修改project.py如下:
from django import forms
from web.form.bootstarp import BootStrapForm
from web import models
from .widgets import ColorRadioSelect, ColorSelect


class ProjectModelForm(BootStrapForm, forms.ModelForm):
	# 排除color数据库的标签美化
    bootstrap_class_exclude = ['color']

    def __init__(self, request, *args, **kwargs):
        super().__init__(*args, **kwargs)
        # ModelForm可以通过重写传request参数
        self.request = request

    class Meta:
        model = models.Project
        fields = "__all__"
        widgets = {
            'desc': forms.Textarea,
             # 自定义radio标签美化
            'color': ColorRadioSelect(attrs={'class': 'color-radio'}),
             # 自定义select标签美化
            "priority": ColorSelect(attrs={'class': 'selectpicker', "data-live-search": "true"}),
        }
最后将我们用到的库导入即可。
radio.html如下:
{% load static %}
<!DOCTYPE html>
<html lang="en">
<head>
    <meta charset="UTF-8">
    <title>Title</title>
    <link rel="stylesheet" href="{% static 'plugin/bootstrap-3.3.7-dist/css/bootstrap.min.css' %} ">
    <script src="{% static 'js/jquery-3.5.1.js' %}"></script>
    <script src="{% static 'plugin/bootstrap-3.3.7-dist/js/bootstrap.min.js' %}"></script>
    <script src="{% static 'plugin/bootstrap-select/js/bootstrap-select.min.js' %}"></script>
    <link rel="stylesheet" href="{% static 'plugin/font-awesome-4.7.0/css/font-awesome.min.css' %}">
    <link rel="stylesheet" href="{% static 'plugin/bootstrap-select/css/bootstrap-select.min.css' %}">
</head>
<style>
     .account {
        width: 600px;
        margin: 0 auto;
    }
    .color-radio label {
            margin-left: 0;
            padding-left: 0;
        }

        .color-radio input[type="radio"] {
            display: none;
        }

        .color-radio input[type="radio"] + .cycle {
            display: inline-block;
            height: 25px;
            width: 25px;
            border-radius: 50%;
            border: 2px solid #dddddd;
        }

        .color-radio input[type="radio"]:checked + .cycle {
            border: 2px solid black;
        }
</style>
<body>
    <div class="account">
        {% for field in form %}
            <div class="form-group">
                <label for="{{ field.id_for_label }}">{{ field.label }}</label>
                {{ field }}
               <span class="error-msg"></span>
            </div>
        {% endfor %}
    </div>
</body>
</html>
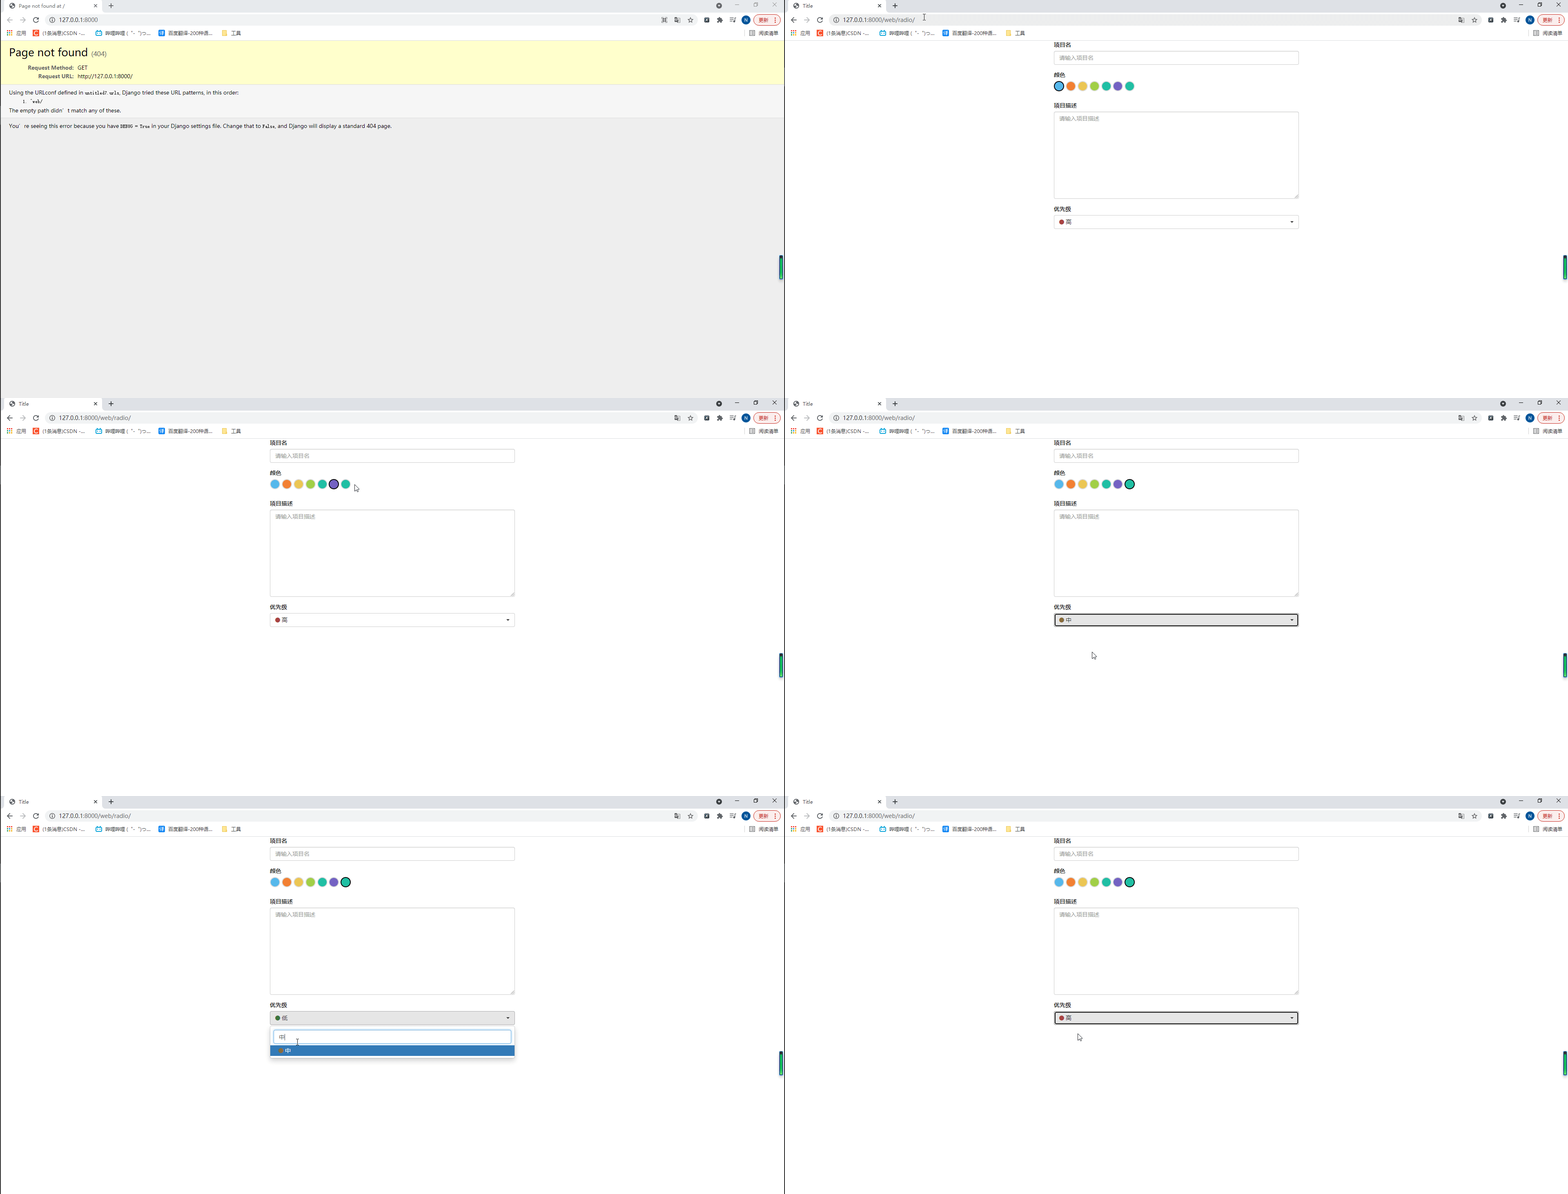
此时访问路由如下:

三、django离线脚本
概述:通过在django没有启动的情况下去执行某些操作,一般多用于爬虫或其他需要离线调用操作。
示例:创建一个init_test.py测试redis的连接。
import os
import sys
import django

base_dir = os.path.dirname(os.path.dirname(os.path.abspath(__file__)))
sys.path.append(base_dir)
os.environ.setdefault("DJANGO_SETTINGS_MODULE", "untitled7.settings")

django.setup()
# 注意这里导入库必须等django启动了才行
import redis

# 直接连接redis
conn = redis.Redis(host='127.0.0.1', port=6379, password='密码', encoding='utf-8')
# 设置键值:15131255089="9999" 且超时时间为10秒(值写入到redis时会自动转字符串)
conn.set('15131255089', 9999, ex=10)
# 根据键获取值:如果存在获取值(获取到的是字节类型);不存在则返回None
value = conn.get('15131255089')
print(value)
打印
b'9999'
四、pillow生成验证码
概述:用于检查用户是否为机器人而生成的验证码识别。
示例:创建image_code.py结合表单验证实现用户登录验证码点击切换。
Monaco.ttf字体(放到项目的根目录下)访问:https://gitee.com/miaojiaxi/s25day01/tree/master/utils
安装pillow
pip3 install pillow
image_code.py如下:
import random
from PIL import Image, ImageDraw, ImageFont, ImageFilter


def check_code(width=120, height=30, char_length=5, font_file='Monaco.ttf', font_size=28):
    code = []
    img = Image.new(mode='RGB', size=(width, height), color=(255, 255, 255))
    draw = ImageDraw.Draw(img, mode='RGB')

    def rndChar():
        """
        生成随机字母
        :return:
        """
        return chr(random.randint(65, 90))

    def rndColor():
        """
        生成随机颜色
        :return:
        """
        return (random.randint(0, 255), random.randint(10, 255), random.randint(64, 255))

    # 写文字
    font = ImageFont.truetype(font_file, font_size)
    for i in range(char_length):
        char = rndChar()
        code.append(char)
        h = random.randint(0, 4)
        draw.text([i * width / char_length, h], char, font=font, fill=rndColor())

    # 写干扰点
    for i in range(40):
        draw.point([random.randint(0, width), random.randint(0, height)], fill=rndColor())

    # 写干扰圆圈
    for i in range(40):
        draw.point([random.randint(0, width), random.randint(0, height)], fill=rndColor())
        x = random.randint(0, width)
        y = random.randint(0, height)
        draw.arc((x, y, x + 4, y + 4), 0, 90, fill=rndColor())

    # 画干扰线
    for i in range(5):
        x1 = random.randint(0, width)
        y1 = random.randint(0, height)
        x2 = random.randint(0, width)
        y2 = random.randint(0, height)

        draw.line((x1, y1, x2, y2), fill=rndColor())

    img = img.filter(ImageFilter.EDGE_ENHANCE_MORE)
    return img, ''.join(code)


if __name__ == '__main__':
    image_object, code = check_code()
    print(code)
    with open('code.png', 'wb') as f:
        image_object.save(f, format='png')
生成验证码视图函数如下:
def image_code(request):
    image_object, code = check_code()
    # 通过session保存验证码进行验证
    request.session['image_code'] = code
    # 超时时间
    request.session.set_expiry(60)

    # 保存在内存中
    stream = BytesIO()
    image_object.save(stream, 'png')

    return HttpResponse(stream.getvalue())
用户登录(login)视图函数如下:
class LoginForm(BootStrapForm, forms.ModelForm):
    username = forms.CharField(label="用户名")
    password = forms.CharField(label="密码", widget=forms.PasswordInput())
    code = forms.CharField(label="图片验证码")

    class Meta:
        model = models.UserInfo
        fields = ["username", "password", "code"]


def login(request):
    form = LoginForm()
    return render(request, "login.html", {"form": form})
用户渲染标签login.html如下:
<!DOCTYPE html>
<html lang="en">
<head>
    <meta charset="UTF-8">
    <title>Title</title>
    <link rel="stylesheet" href="https://stackpath.bootstrapcdn.com/bootstrap/4.1.3/css/bootstrap.min.css">
</head>
<style>
    .account {
        width: 600px;
        margin: 0 auto;
    }
</style>
<body>
<div class="account">
    <form action="{% url 'login' %}" method="post" novalidate>
        {% csrf_token %}
        {% for field in form %}
            {% if field.name == 'code' %}
                <div class="form-group">
                    <label for="{{ field.id_for_label }}">{{ field.label }}</label>
                    <div style="display: flex;justify-content: space-between">
                        <div class="col-xs-7">
                            {{ field }}
                        </div>
                        <div class="col-xs-5">
                            <img src="{% url 'image_code' %}" id="imageCode" title="点击更换图片">
                        </div>
                    </div>
                </div>
            {% else %}
                <div class="form-group">
                    <label for="{{ field.id_for_label }}">{{ field.label }}</label>
                    {{ field }}
                </div>
            {% endif %}
        {% endfor %}
        <div class="form-group">
            <input id="btnSubmit" type="submit" class="btn btn-primary" value="登 录">
        </div>


    </form>
</div>
</body>
<script>
    (() => {
        document.getElementById("imageCode").onclick = function () {
            // 找到str属性
            var oldSrc = document.getElementById("imageCode")
            // 每次执行这个属性加上一个?(相当于刷新)
            oldSrc.src += "?"
        }
    })()

</script>
</html>
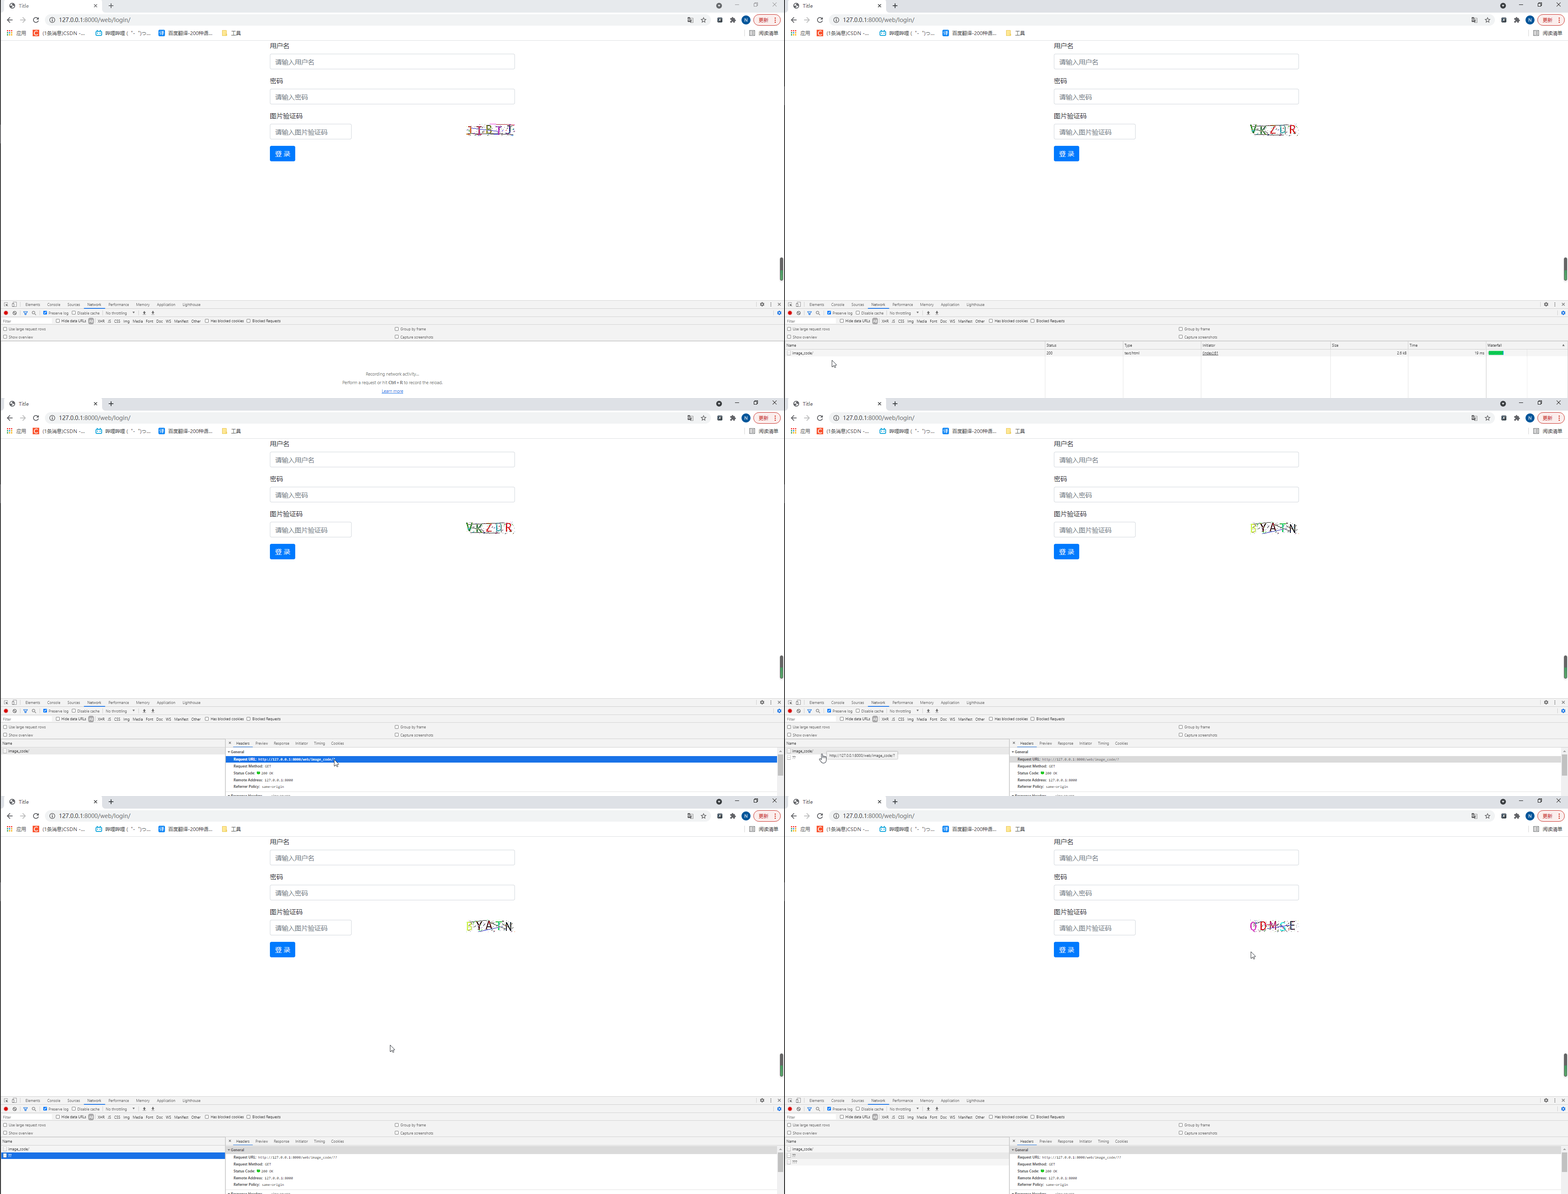
此时访问路由如下:
