目标检测 YOLOv5 - 数据增强
flyfish
版本 YOLOv5:v5
原始代码 YOLOv5
源码镜像(可以快速打开)
本文所
描述的数据增强包含一下12个超参数,参数存储在hyp.scratch.yaml文件中
# hsv_h: 0.015  # image HSV-Hue augmentation (fraction)
# hsv_s: 0.7  # image HSV-Saturation augmentation (fraction)
# hsv_v: 0.4  # image HSV-Value augmentation (fraction)
# degrees: 0.0  # image rotation (+/- deg)
# translate: 0.1  # image translation (+/- fraction)
# scale: 0.5  # image scale (+/- gain)
# shear: 0.0  # image shear (+/- deg)
# perspective: 0.0  # image perspective (+/- fraction), range 0-0.001
# flipud: 0.0  # image flip up-down (probability)
# fliplr: 0.5  # image flip left-right (probability)
# mosaic: 1.0  # image mosaic (probability)
# mixup: 0.0  # image mixup (probability)
一 Hue、Saturation、Value
# hsv_h: 0.015  # image HSV-Hue augmentation (fraction)
# hsv_s: 0.7  # image HSV-Saturation augmentation (fraction)
# hsv_v: 0.4  # image HSV-Value augmentation (fraction)
代码实现
import numpy as np
import cv2
def augment_hsv(img, hgain=0.015, sgain=0.7, vgain=0.4):
    r = np.random.uniform(-1, 1, 3) * [hgain, sgain, vgain] + 1  # random gains
    hue, sat, val = cv2.split(cv2.cvtColor(img, cv2.COLOR_BGR2HSV))
    dtype = img.dtype  # uint8

    x = np.arange(0, 256, dtype=np.int16)
    lut_hue = ((x * r[0]) % 180).astype(dtype)
    lut_sat = np.clip(x * r[1], 0, 255).astype(dtype)
    lut_val = np.clip(x * r[2], 0, 255).astype(dtype)

    img_hsv = cv2.merge((cv2.LUT(hue, lut_hue), cv2.LUT(sat, lut_sat), cv2.LUT(val, lut_val))).astype(dtype)
    cv2.cvtColor(img_hsv, cv2.COLOR_HSV2BGR, dst=img)  # no return needed

path="/coco128/images/train2017/000000000641.jpg"
original_img = cv2.imread(path)
cv2.imshow("original:",original_img)
cv2.waitKey(0)
augment_hsv(original_img)
cv2.imshow("augment_hsv:",original_img)
cv2.waitKey(0)
原图

增强结果


二 degrees、translate、scale、perspective
# degrees: 0.0  # image rotation (+/- deg)
# translate: 0.1  # image translation (+/- fraction)
# scale: 0.5  # image scale (+/- gain)
# shear: 0.0  # image shear (+/- deg)
# perspective: 0.0  # image perspective (+/- fraction), range 0-0.001
源码实现
import math
import random
import numpy as np
import cv2

def random_perspective(img, degrees=10, translate=.1, scale=.1, shear=10, perspective=0.0,
                       border=(0, 0)):

    height = img.shape[0] + border[0] * 2  # shape(h,w,c)
    width = img.shape[1] + border[1] * 2

    # Center
    C = np.eye(3)
    C[0, 2] = -img.shape[1] / 2  # x translation (pixels)
    C[1, 2] = -img.shape[0] / 2  # y translation (pixels)

    # Perspective
    P = np.eye(3)
    P[2, 0] = random.uniform(-perspective, perspective)  # x perspective (about y)
    P[2, 1] = random.uniform(-perspective, perspective)  # y perspective (about x)

    # Rotation and Scale
    R = np.eye(3)
    a = random.uniform(-degrees, degrees)
    # a += random.choice([-180, -90, 0, 90])  # add 90deg rotations to small rotations
    s = random.uniform(1 - scale, 1 + scale)
    # s = 2 ** random.uniform(-scale, scale)
    R[:2] = cv2.getRotationMatrix2D(angle=a, center=(0, 0), scale=s)

    # Shear
    S = np.eye(3)
    S[0, 1] = math.tan(random.uniform(-shear, shear) * math.pi / 180)  # x shear (deg)
    S[1, 0] = math.tan(random.uniform(-shear, shear) * math.pi / 180)  # y shear (deg)

    # Translation
    T = np.eye(3)
    T[0, 2] = random.uniform(0.5 - translate, 0.5 + translate) * width  # x translation (pixels)
    T[1, 2] = random.uniform(0.5 - translate, 0.5 + translate) * height  # y translation (pixels)

    # Combined rotation matrix
    M = T @ S @ R @ P @ C  # order of operations (right to left) is IMPORTANT
    if (border[0] != 0) or (border[1] != 0) or (M != np.eye(3)).any():  # image changed
        if perspective:
            img = cv2.warpPerspective(img, M, dsize=(width, height), borderValue=(114, 114, 114))
        else:  # affine
            img = cv2.warpAffine(img, M[:2], dsize=(width, height), borderValue=(114, 114, 114))

    return img


path="/coco128/images/train2017/000000000641.jpg"
original_img = cv2.imread(path)
img=random_perspective(original_img, degrees=50, translate=0., scale=.0, shear=0, perspective=0,
                       border=(0, 0))
cv2.imshow("random_perspective_degrees:",img)
cv2.waitKey(0)

img=random_perspective(original_img, degrees=0, translate=0.5, scale=.0, shear=0, perspective=0,
                       border=(0, 0))
cv2.imshow("random_perspective_translate:",img)
cv2.waitKey(0)

img=random_perspective(original_img, degrees=0, translate=0.0, scale=0.9, shear=0, perspective=0,
                       border=(0, 0))
cv2.imshow("random_perspective_scale:",img)
cv2.waitKey(0)

img=random_perspective(original_img, degrees=0, translate=0.0, scale=0, shear=20, perspective=0,
                       border=(0, 0))
cv2.imshow("random_perspective_shear:",img)
cv2.waitKey(0)

img=random_perspective(original_img, degrees=0, translate=0.0, scale=0, shear=0, perspective=0.001,
                       border=(0, 0))
cv2.imshow("random_perspective_perspective:",img)
cv2.waitKey(0)
增强结果
shear

degrees

translate

scale

perspective

三 flip up-down、flip left-right
代码实现
import numpy as np
import cv2

path="/coco128/images/train2017/000000000641.jpg"
original_img = cv2.imread(path)
img = np.flipud(original_img)
cv2.imshow("flip up-down:",img)
cv2.waitKey(0)

img = np.fliplr(original_img)
cv2.imshow("flip left-right:",img)
cv2.waitKey(0)
增强结果
flip up-down

flip left-right

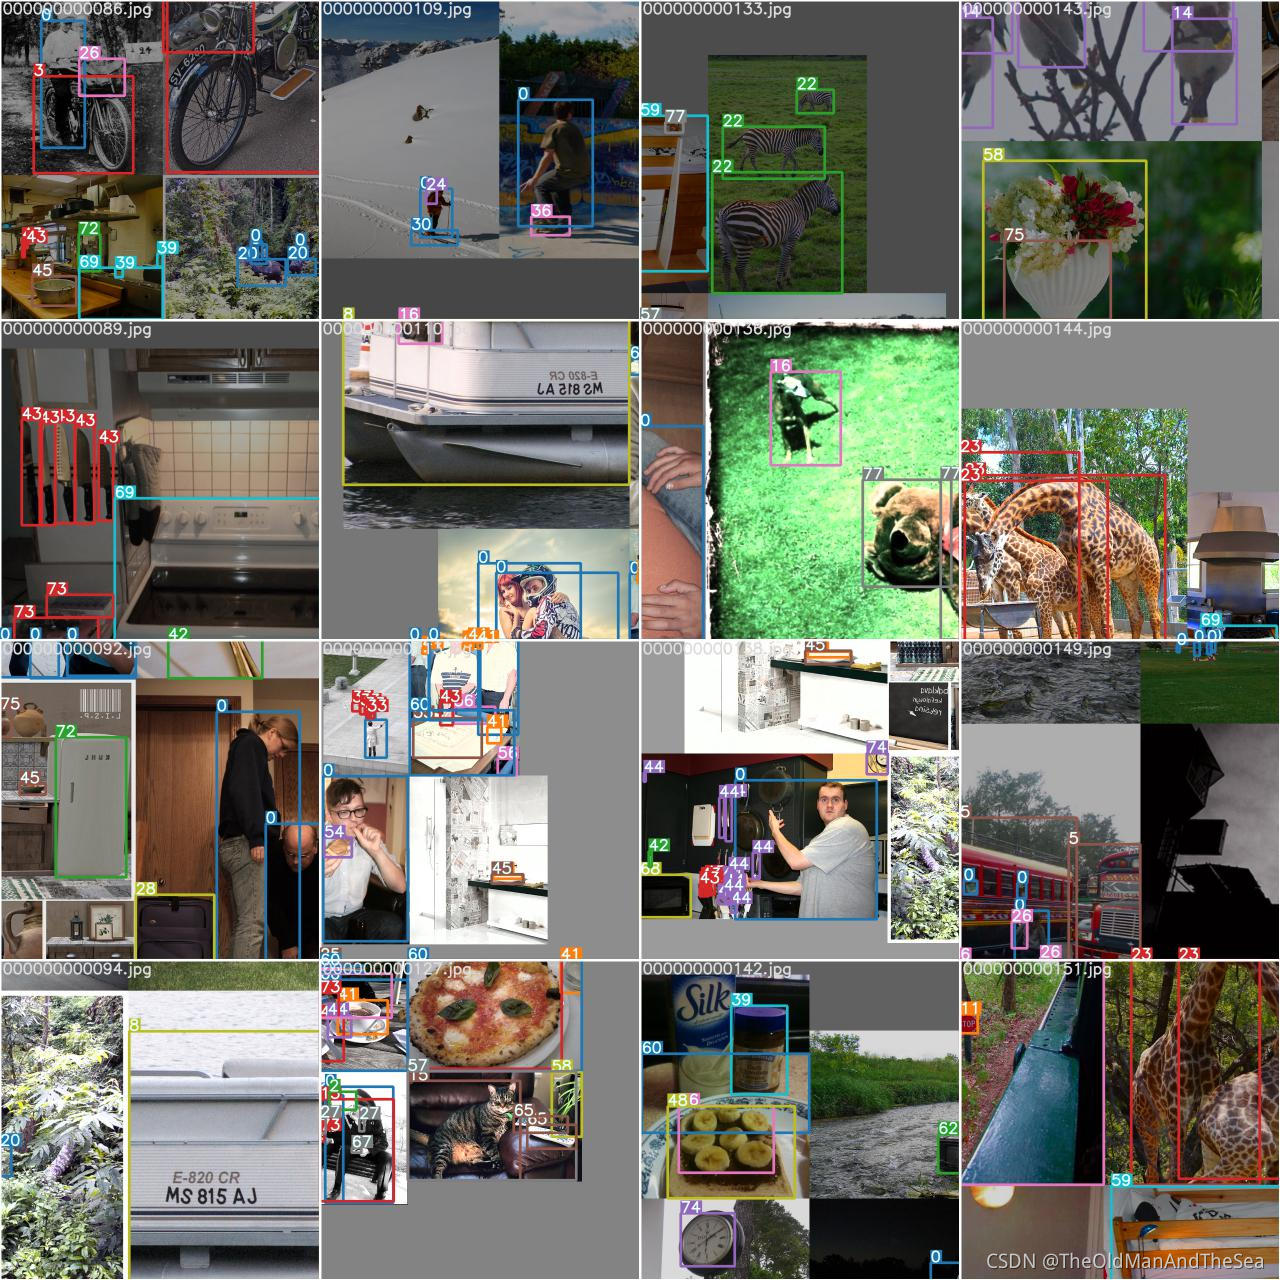
四 mosaic
四张图像拼成一张图像
下面的16张图像是一个batch-size
实例1

实例2

五 mixup
在YOLOv5中只有启用了mosaic才有机会启用mixup
MixUp


想要实现数据增强,只需要更改配置文件即可完成
例如想要图片有50%的概率上下翻转和左右翻转
只需要在hyp.scratch.yaml文件中,设置flipud和fliplr的数值即可
flipud: 0.5  # image flip up-down (probability)
fliplr: 0.5  # image flip left-right (probability)
