基础知识
01 基础知识:快速入门
1、第一个程序
有别于Hello World!的第一个程序odd.py
from datetime import datetiem

odds = [ 1,  3,  5,  7,  9, 11, 13, 15, 17, 19,
        21, 23, 25, 27, 29, 31, 33, 35, 37, 39,
        41, 43, 45, 47, 49, 51, 53, 55, 57, 59 ]

right_this_minute = datetime.today().minute

if right_this_minute in odds:
    print("This minute seems a little odd.")
else:
    print("Not an odd minute.")
fn+F5(Win10)弹出警告窗口,提示把新代码保存到一个文件或进行检查

确定,另存为odd.py
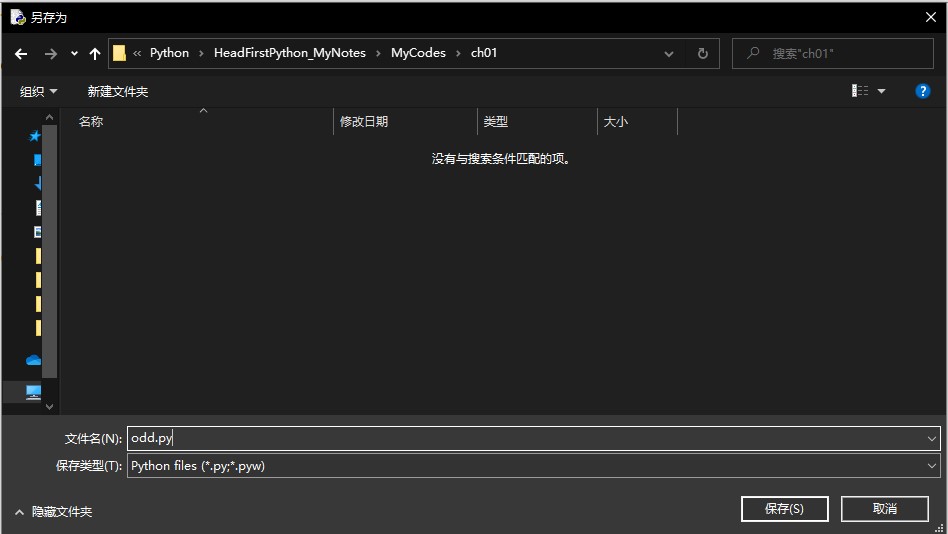
保存后,接着会自动运行程序,但这里提示出错
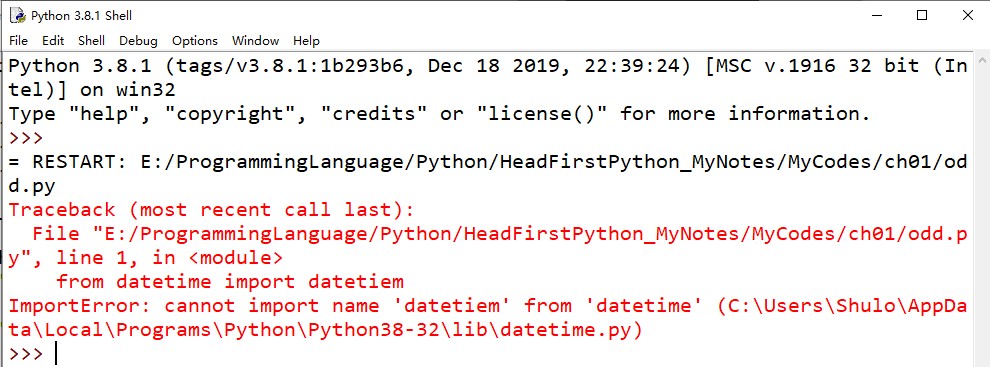
第一行有错误,检查发现datetiem子模块名拼写错误,修正为datetime

from datetime import datetime

odds = [ 1,  3,  5,  7,  9, 11, 13, 15, 17, 19,
        21, 23, 25, 27, 29, 31, 33, 35, 37, 39,
        41, 43, 45, 47, 49, 51, 53, 55, 57, 59 ]

right_this_minute = datetime.today().minute

if right_this_minute in odds:
    print("This minute seems a little odd.")
else:
    print("Not an odd minute.")
按下fn+F5(Win10)代码顺利运行
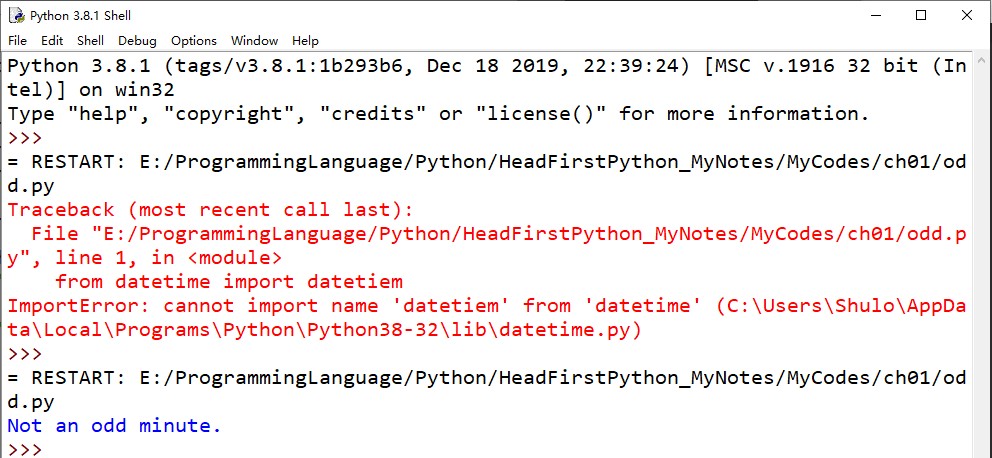
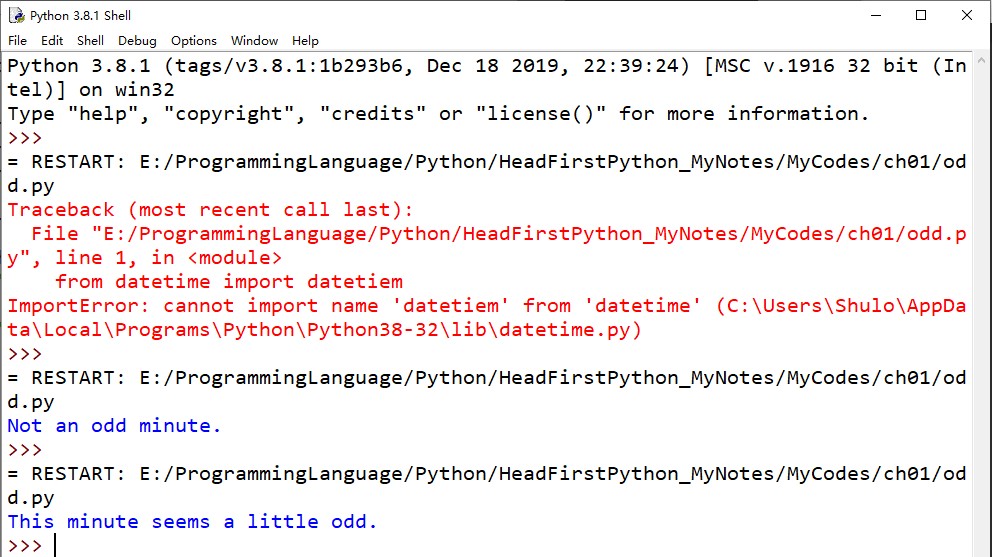
等待一分钟后再次按下fn+F5(Win10),运行结果:
2、标准库认识
在odd.py文件中添加三行代码:
from datetime import datetime
from os import getcwd

odds = [ 1,  3,  5,  7,  9, 11, 13, 15, 17, 19,
        21, 23, 25, 27, 29, 31, 33, 35, 37, 39,
        41, 43, 45, 47, 49, 51, 53, 55, 57, 59 ]

right_this_minute = datetime.today().minute

where_am_I = getcwd()
print(where_am_I)

if right_this_minute in odds:
    print("This minute seems a little odd.")
else:
    print("Not an odd minute.")
运行结果:

在Python Shell中练习:
先配置一下,之后在Python Shell中就可以使用快捷键清屏
创建文件
在 Python\X\Lib\idlelib 目录下创建ClearWindow.py(其中 X 是 Python 版本号)
class ClearWindow:
    menudefs = [
        ('options', [None,
                     ('Clear Shell Window', '<<clear-window>>'),
                     ]), ]

    def __init__(self, editwin):
        self.editwin = editwin
        self.text = self.editwin.text
        self.text.bind("<<clear-window>>", self.clear_window2)

        self.text.bind("<<undo>>", self.undo_event)  # add="+" doesn't work

    def undo_event(self, event):
        text = self.text

        text.mark_set("iomark2", "iomark")
        text.mark_set("insert2", "insert")
        self.editwin.undo.undo_event(event)

        # fix iomark and insert
        text.mark_set("iomark", "iomark2")
        text.mark_set("insert", "insert2")
        text.mark_unset("iomark2")
        text.mark_unset("insert2")

    def clear_window2(self, event):  # Alternative method
        # work around the ModifiedUndoDelegator
        text = self.text
        text.undo_block_start()
        text.mark_set("iomark2", "iomark")
        text.mark_set("iomark", 1.0)
        text.delete(1.0, "iomark2 linestart")
        text.mark_set("iomark", "iomark2")
        text.mark_unset("iomark2")
        text.undo_block_stop()
        if self.text.compare('insert', '<', 'iomark'):
            self.text.mark_set('insert', 'end-1c')
        self.editwin.set_line_and_column()

    def clear_window(self, event):
        # remove undo delegator
        undo = self.editwin.undo
        self.editwin.per.removefilter(undo)

        # clear the window, but preserve current command
        self.text.delete(1.0, "iomark linestart")
        if self.text.compare('insert', '<', 'iomark'):
            self.text.mark_set('insert', 'end-1c')
        self.editwin.set_line_and_column()

        # restore undo delegator
        self.editwin.per.insertfilter(undo)
编辑已有文件
在 Python\X\Lib\idlelib 目录下编辑 config-extensions.def(IDLE 扩展配置文件)
在该文件最后增加如下内容:
[ClearWindow]
enable=1
enable_editor=0
enable_shell=1
[ClearWindow_cfgBindings]
clear-window=<Control-Key-w>
其中w可以根据自己喜好进行修改,必须是小写字母。
启动Python Shell,在Options菜单下会出现Clear Shell Window Ctrl+W

执行一些Python语句:

按下组合键 ctrl+w,清除屏幕:

标准库练习:


3、使用 if/elif/else 语句完成判定:
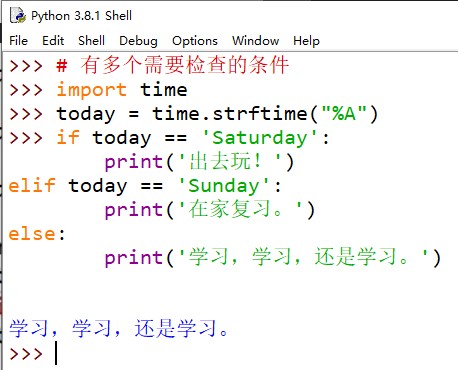
4、代码组:
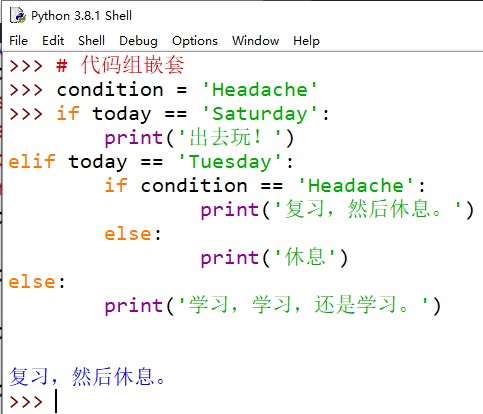
要点1
- Python 提供了一个内置 IDE,名为 IDLE,允许创建,编辑和运行 Python 代码,你要做的就是输入代码,保存然后按fn+F5。
- IDLE 与 Python 解释器交互,解释器会为你自动完成编译 → \rightarrow →链接 → \rightarrow →运行过程。这使你能够集中精力编写你的代码。
- 解释器从上到下运行(存储在一个文件中的)代码,一次执行一行。Python 中没有
main()函数/方法的概念。- Python 提供了一个强大的标准库,允许你访问大量可重用的模块(
datetime只是其中一个例子)。- 编写 Python 程序时,可以使用一组标准数据结构。列表是其中之一,这与数组的概念很类似。
- 不需要声明一个变量的类型。在 Python 中为一个变量赋值时,它会自动取相应数据的类型。
- 可以用
if/elif/else语句完成判定。if,elif和else关键字放在代码块前面,在 Python 中代码块被称为“代码组”。- 代码组很容易发现,因为它们总是缩进的。缩进是 Python 提供的唯一的代码分组机制。
- 除了缩进,代码组前面还可以有一个冒号(:)。这是 Python 语言的一个语法要求。
5、在 Shell 里执行代码
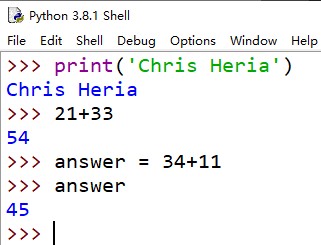
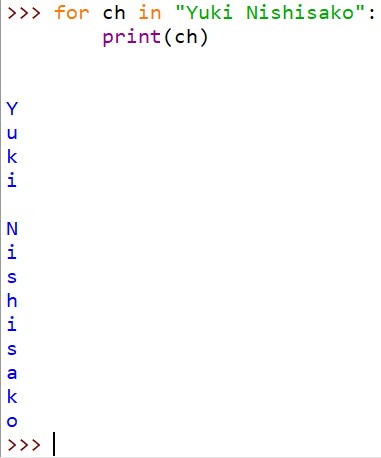
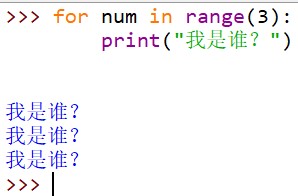
6、for 循环
例1
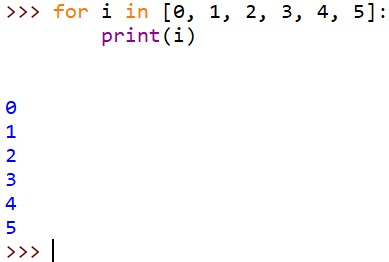
例2
例3
7、使代码暂停后再执行

执行 time.sleep(5) 后需要等待
5
s
5s
5s 的时间才会出现命令提示符>>>
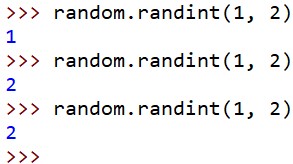
8、生成随机整数
导入模块

shell 可以帮助罗列模块中的函数名

shell 可以将帮助文档直接显示

randint 函数的上手使用
9、odd2.py
from datetime import datetime

import random
import time

odds = [ 1,  3,  5,  7,  9, 11, 13, 15, 17, 19,
        21, 23, 25, 27, 29, 31, 33, 35, 37, 39,
        41, 43, 45, 47, 49, 51, 53, 55, 57, 59 ]

for i in range(5):
    right_this_minute = datetime.today().minute
    if right_this_minute in odds:
        print("This minute seems a little odd.")
    else:
        print("Not an odd minute.")
    wait_time = random.randint(1, 60)
    time.sleep(wait_time)

要点2
- 想要确定解决某个特定问题所需要的代码时,Python 程序员通常更倾向于在 shell 上试验代码段。
- 如果看到 >>> 提示符,就说明你在 Python Shell 中。继续:可以输入一个 Python 语句,看看这个语句运行时会发生什么。
- shell 拿到你的代码行,把它发送到解释器,再由解释器执行这个代码。所有结果会返回到 shell,然后显示在屏幕上。
for循环可以用来迭代固定次数。如果能提前知道需要循环多少次,就可以使用for。- 如果你不能提前知道要迭代多少次,可以使用 Python 的
while循环(我们还没有具体介绍,不过别担心,稍后就会看到while循环的实际使用)。for循环可以迭代处理任意的序列(如列表或字符串),也可以执行固定的次数(利用range函数)。- 如果需要让程序的执行暂停指定的秒数,可以使用标准库
time模块提供的sleep函数。- 可以从一个模块导入一个特定的函数。例如,
from time import sleep会导入sleep函数,这样无需限定就可以直接调用这个函数。- 如果只是导入一个模块(例如
import time),就需要用模块名对这个模块中函数的使用加以限定,如time.sleep()。random模块有一个非常有用的函数,名为randint,它会生成指定范围内的一个随机整数。- shell 提供了在 >>> 提示窗口中使用的两个交互式函数,
dir函数会列出一个对象的属性,help允许访问 Python 文档。
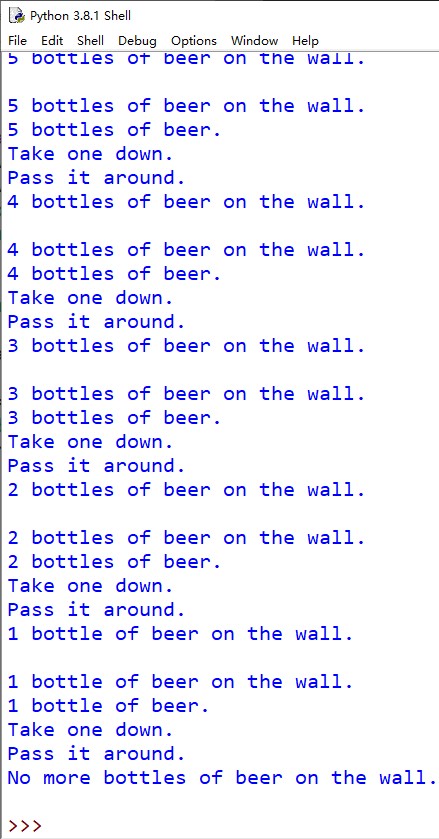
10、beersong.py
word = "bottles"

for beer_num in range(99, 0, -1):
    print(beer_num, word, "of beer on the wall.")
    print(beer_num, word, "of beer.")
    print("Take one down.")
    print("Pass it around.")

    if beer_num == 1:
        print("No more bottles of beer on the wall.")
    else:
        new_num = beer_num - 1

        if new_num == 1:
            word = "bottle"
        print(new_num, word, "of beer on the wall.")
    print()
部分运行结果:
help(range)
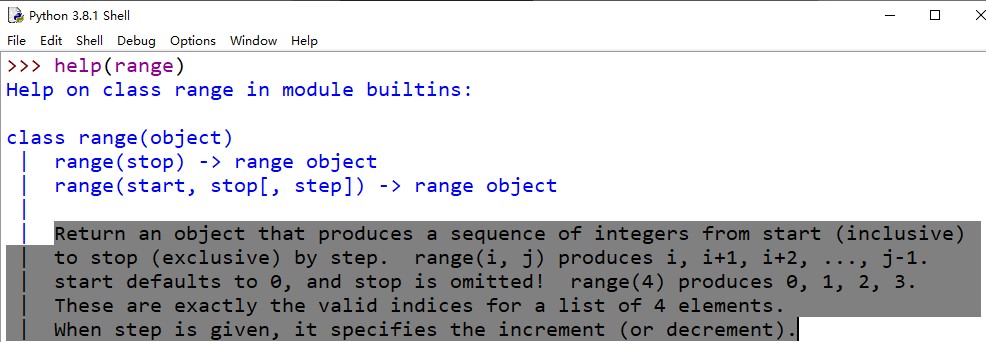
来看看三个参数
START 值允许你控制范围从哪里开始3
从文档中得知,使用
range函数时,需要指定一个范围结束值。如果不提供其他值,range默认使用 0 0 0作为开始值。如果设置了开始值,就必须再提供一个结束值。这样一来,range就会成为一个多参数调用。我们的代码中调用
range(5)时就使用了这个参数。PS:生成的范围不包含结束值,所以这个结束值是一个上限,但不包含在范围内。指定开始和结束值时,还可以(可选)指定一个步长值。默认步长为 1 1 1,
range会按 1 1 1个步长生成各个值;也就是说, 0 , 1 , 2 , 3 , 4 0, 1, 2, 3, 4 0,1,2,3,4,依次类推。还可以将step设置为一个负值来调整所生成的范围的方向。
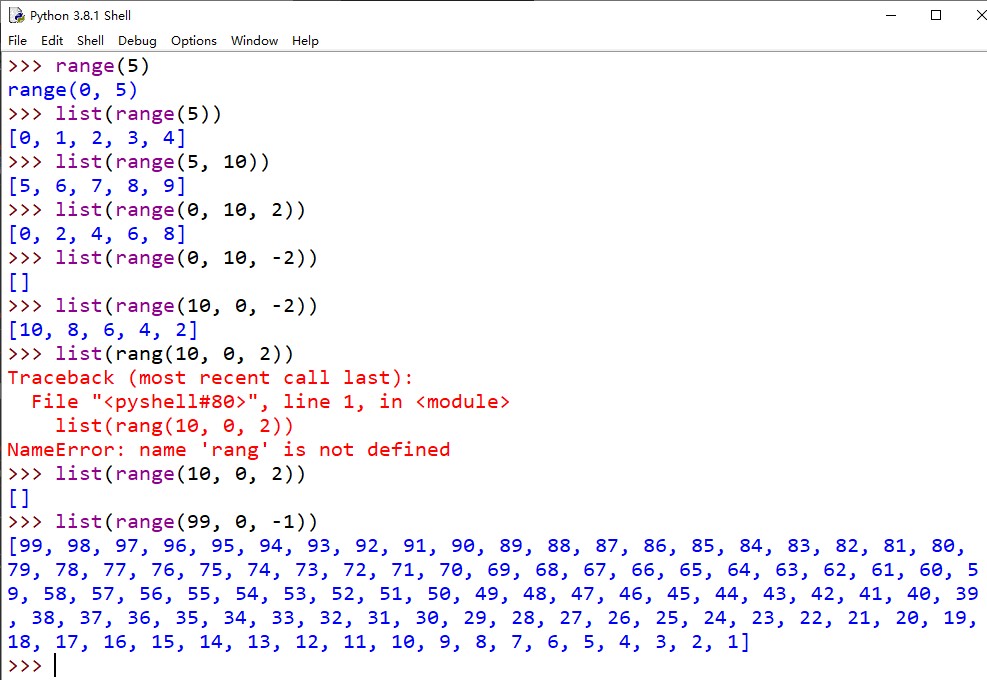
range 练习
11、解释代码含义
我的尝试:
word = "bottles"
# 将值"bottles"(一个字符串)赋给一个名为"word"的新变量。

for beer_num in range(99, 0, -1):
    # 将 99,98, ……,1 逐个赋给名为"beer_num"的新变量
    print(beer_num, word, "of beer on the wall.")
    # 在屏幕上输出语句:beer_num(具体的数值) bottles of beer on the wall.
    print(beer_num, word, "of beer.")
    # 在屏幕上输出语句:beer_num(具体的数值) bottles of beer.
    print("Take one down.")
    # 在屏幕上输出语句:Take one down.
    print("Pass it around.")
    # 在屏幕上输出语句:Pass it around.

    if beer_num == 1:
        # 判断变量"beer_num"的值是否等于"1"
        print("No more bottles of beer on the wall.")
        # 变量"beer_num"的值等于1时,在屏幕上输出语句:No more bottles of beer on the wall.
    else:
        # 变量"beer_num"的值不等于"1"时执行此代码组
        new_num = beer_num - 1
        # 变量"beer_num"的值减1,将差赋给一个名为"new_num"的新变量

        if new_num == 1:
            # 判断变量"new_num"的值是否等于1
            word = "bottle"
            # 给变量"word"重新赋值"bottle"
        print(new_num, word, "of beer on the wall.")
        # # 在屏幕上输出语句:new_num(具体数值) bottles(new_num的值为1时,这里将是bottle) of beer on the wall.
    print()
书中给出的解答:
word = "bottles"
# 将值"bottles"(一个字符串)赋给一个名为"word"的新变量。

for beer_num in range(99, 0, -1):
    # 循环指定的次数,从99倒数到0。使用“beer_num”作为循环迭代变量。
    print(beer_num, word, "of beer on the wall.")
    print(beer_num, word, "of beer.")

    print("Take one down.")
    print("Pass it around.")
    # 这 4 个 print 函数调用显示当前迭代的歌词
    # “99 bottles of beer on the wall.
    # 99 bottles of beer.
    # Take one down.
    # Pass it around.”

    if beer_num == 1:
        # 查看是否是最后一轮……如果是,
        print("No more bottles of beer on the wall.")
        # 结束歌词
    else:
        # 否则……
        new_num = beer_num - 1
        # 把下一瓶啤酒的编号记在另一个变量“new_num”中。

        if new_num == 1:
            # 如果要喝我们的最后一瓶啤酒……
            word = "bottle"
            # 修改“word”变量的值,使最后一行歌词没有错误。
        print(new_num, word, "of beer on the wall.")
        # 写完这一次迭代的歌词
    print()
    # 这次迭代的最后,打印一个空行。所有迭代都完成时,终止程序
要点4
- 要花些时间来习惯缩进。每个刚接触 Python 的程序员都对缩进有些怨言,不过别担心:很快你就会习惯,甚至都不会察觉自己正在缩进。
- 有一件事是绝对不能做的,这就是在缩进 Python 代码时混用制表符和空格。为了避免将来出现麻烦,千万不要这么做。
- 调用
range函数可以有多个参数。这些参数允许你控制生成范围的开始和结束值,以及步长值。range函数的步长值还可以指定为一个负值,这会改变生成范围的方向。
Head First Python: 第2版/(美)保罗.巴里(Paul Barry)著;乔莹等译.——北京:中国电力出版社,2017.12(2018.4重印) P19 ??
Head First Python: 第2版/(美)保罗.巴里(Paul Barry)著;乔莹等译.——北京:中国电力出版社,2017.12(2018.4重印) P36 ??
Head First Python: 第2版/(美)保罗.巴里(Paul Barry)著;乔莹等译.——北京:中国电力出版社,2017.12(2018.4重印) P41 ??
Head First Python: 第2版/(美)保罗.巴里(Paul Barry)著;乔莹等译.——北京:中国电力出版社,2017.12(2018.4重印) P45 ??