前言
在学习前后端分离的web开发过程中,发现现有的教程基本围绕vue2.x进行,而vue3.x正式发布已有一段时间,相比于vue2,新版本增加了一系列新特性:
- Performance:性能优化
- Tree-shaking support:支持摇树优化
- Composition API:组合API
- Fragment,Teleport,Suspense:新增的组件
- Better TypeScript support:更好的TypeScript支持
- Custom Renderer API:自定义渲染器
故此该文章围绕vue3展开,结合python的flask框架,旨在为web开发新手的迅速上手提供些许可能的帮助
版本说明
本项目用到的工具版本如下:
- @vue/cli 4.5.14
- yarn 1.22.17
- Flask 1.1.2
- Python 3.7.3
- vscode
正文
前端
新建一个项目文件夹vue_flask,在终端中打开
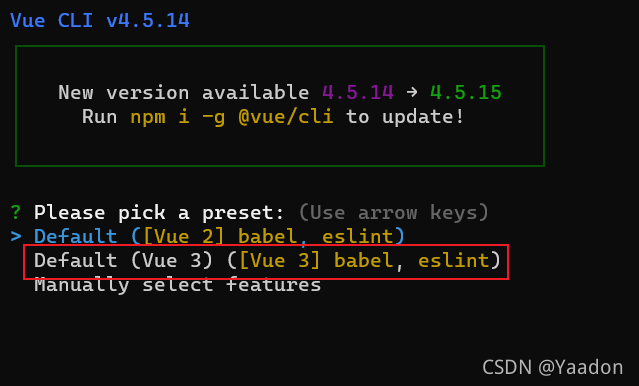
利用vue-cli迅速搭建前端环境
vue create frontend
选择Vue3版本的预设即可

等待配置完成后
cd frontend
yarn serve
打开http://localhost:8080/可以看到前端的环境已经正常搭建完成了(CTRL+C停止服务)

在vscode中打开我们创建的项目文件夹vue_flask,修改frontend/src/components/HelloWorld.vue文件以完成一个最简单和后端交互例子(这里服务接口为/test,方式为GET,服务器后端会返回一个字符串)
HelloWorld.vue
<template>
  <div class="hello">
    <h1>{{ msg }}</h1>
    <button @click="test()">CheckThis</button>
    <li>{{ text }}</li>
    <!-- <p>
      For a guide and recipes on how to configure / customize this project,<br>
      check out the
      <a href="https://cli.vuejs.org" target="_blank" rel="noopener">vue-cli documentation</a>.
    </p>
    <h3>Installed CLI Plugins</h3>
    <ul>
      <li><a href="https://github.com/vuejs/vue-cli/tree/dev/packages/%40vue/cli-plugin-babel" target="_blank" rel="noopener">babel</a></li>
      <li><a href="https://github.com/vuejs/vue-cli/tree/dev/packages/%40vue/cli-plugin-eslint" target="_blank" rel="noopener">eslint</a></li>
    </ul>
    <h3>Essential Links</h3>
    <ul>
      <li><a href="https://vuejs.org" target="_blank" rel="noopener">Core Docs</a></li>
      <li><a href="https://forum.vuejs.org" target="_blank" rel="noopener">Forum</a></li>
      <li><a href="https://chat.vuejs.org" target="_blank" rel="noopener">Community Chat</a></li>
      <li><a href="https://twitter.com/vuejs" target="_blank" rel="noopener">Twitter</a></li>
      <li><a href="https://news.vuejs.org" target="_blank" rel="noopener">News</a></li>
    </ul>
    <h3>Ecosystem</h3>
    <ul>
      <li><a href="https://router.vuejs.org" target="_blank" rel="noopener">vue-router</a></li>
      <li><a href="https://vuex.vuejs.org" target="_blank" rel="noopener">vuex</a></li>
      <li><a href="https://github.com/vuejs/vue-devtools#vue-devtools" target="_blank" rel="noopener">vue-devtools</a></li>
      <li><a href="https://vue-loader.vuejs.org" target="_blank" rel="noopener">vue-loader</a></li>
      <li><a href="https://github.com/vuejs/awesome-vue" target="_blank" rel="noopener">awesome-vue</a></li>
    </ul> -->
  </div>
</template>

<script>
import axios from 'axios'
export default {
  name: 'HelloWorld',
  props: {
    msg: String
  },
  data(){
    return{
      text: 'null'
    }
  },
  methods: {
    test(){
      axios.get('test')
            .then(res=>{
              this.text = res.data;
            })
            .catch(err=>{
              this.text = 'error' + err;
            })
      // this.text = 'nice!'
    },
  }
}
</script>

<!-- Add "scoped" attribute to limit CSS to this component only -->
<style scoped>
h3 {
  margin: 40px 0 0;
}
ul {
  list-style-type: none;
  padding: 0;
}
li {
  display: inline-block;
  margin: 0 10px;
}
a {
  color: #42b983;
}
</style>
由于我们用到了axios这一HTTP库,这里还需要安装一下
在frontend文件夹内使用yarn可以很方便的安装
yarn add axios
完成后编译生成部署文件
yarn build
一切正常的话即可在frontend/dist下看到生成的部署文件
到这里前端工作人员即可将部署文件交付给后端人员,前端任务到此结束
后端
在项目文件夹vue_flask下新建后端文件夹back_end,并在该新建文件夹下创建templates、static文件夹和app.py
flask会自动在当前文件夹下搜索templates和static文件夹,分别访问html模板和js、css、img的静态资源
将前端生成的index.html复制到templates下,js、css和img复制到static下,另外favicon.ico也需放入static/img下
修改index.html文件定位到改变位置的favicon.ico

修改为

编写如下的app.py文件
from flask import Flask, render_template
import json

app=Flask(__name__, static_url_path='')

@app.route('/test', methods=['GET'])
def test():
    return json.dumps('hello world!')

@app.route('/')
def hello_world():
    return render_template("index.html")

if __name__ == '__main__':
    app.run(host="127.0.0.1", port="8080")
static_url_path指定了在html模板中使用静态资源时的相对地址。默认为/static
在终端中运行
python app.py
大功告成!
稍加修饰后
