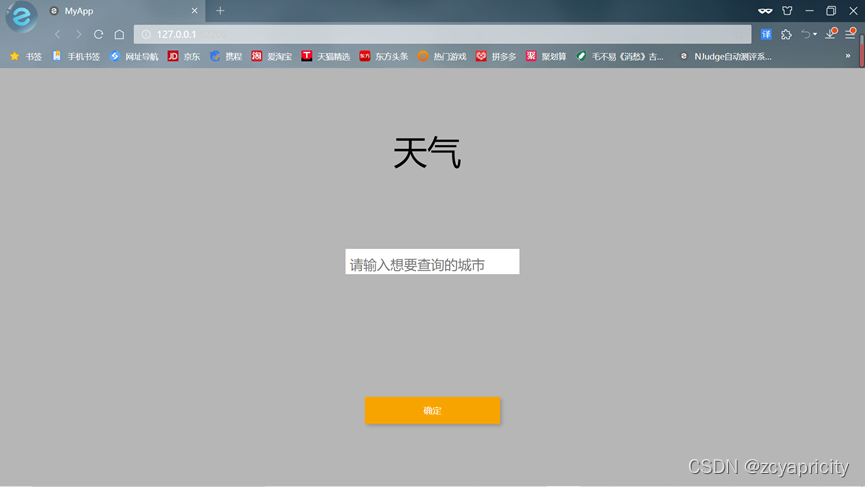
这个是建立在已经爬好的数据之上的,所以要做的就是把网页设计的好看一点,实现搜索就好
制作网页我首先考虑了Djiango框架
(至于Djiango是啥,点开此网址了解Django 简介 | 菜鸟教程 (runoob.com))
但是,由于本人技术不到位也没有去学,所以找了半天之后发现了可以直接用python代码写网页,用某位大神写好的remi库。这个库可以直接在pycharm的终端里用pip来安装。

这样,一个完整的remi库就装好了。
接下来,看代码学习如何使用remi库设计一个网页的外观(我写的比较丑,请学会之后多加优化)
import urllib.request
import gzip
import remi.gui as gui
import self as self
from remi import start, App


class MyApp(App):
    def __init__(self, *args):
        super(MyApp, self).__init__(*args)

    def main(self):
        global city #建立全局变量
        #设定网页的背景大小和颜色
        self.container = gui.VBox(width='100%', height='100%', style={'background': '#b6b6b6'})
        #设置文本框和文本大小
        self.lbl = gui.Label('天气', width='9%', height='0%', style={"white-space": "pre"})
        self.lbl.css_font_size = '50px'
        #设置可编辑文本框
        self.sr = gui.TextInput(hint='请输入想要查询的城市', width=250, height='15px',
                                style={'margin': '0px auto', 'padding-top': '20px', 'padding-left': '5px',
                                       'font-size': '20px', 'line-height': '5px', 'text-align': 'left',
                                       'border': '1px solid white', 'background': 'white'})
        #设置按钮
        self.bt = gui.Button('确定', width=200, height=40, style={'margin': '3px', 'background-color': 'orange'})

        #将所有的组件都添加到网页中
        self.bt.onclick.do(self.on_button_pressed)
        self.container.append(self.lbl)
        self.container.append(self.sr)
        self.container.append(self.bt)

        return self.container
这样基本上第一个可以搜索的界面就已经实现好啦~
接下来就开始向网页中添加具体的功能
   #主要功能实现函数
    def on_button_pressed(self, widget):
        global city
        city = self.sr.get_text()
        city_name = city
        urllib.parse.quote(city_name)
        #连接改网站的API
        url = 'http://wthrcdn.etouch.cn/weather_mini?city=' + urllib.parse.quote(city_name)
        weather_data = urllib.request.urlopen(url).read()
        weather_data = gzip.decompress(weather_data).decode('utf-8')
        weather_dict = eval(weather_data)
        #设置要显示具体城市天气的界面
        self.container1 = gui.VBox(width='50%', height='100%', style={'background': '#b6b6b6'})
        self.container2 = gui.VBox(width='50%', height='100%', style={'background': 'white'})
        #将组件加入到网页中
        self.container.append(self.container1)
        self.container.append(self.container2)
        #如果城市查找不到,给出提示
        if weather_dict.get('desc') == 'invilad-citykey':
            self.ct = gui.Label('您输入的城市未录入', width='100%', height='50%', style={"white-space": "pre"})
        #当查找到相应城市的时候,输出城市对应的信息
        self.ct = gui.Label('您查询的城市:' + weather_dict['data']['city'], width='100%', height='0%')
        self.ct.css_font_size = '30px'

        self.jt = gui.Label('今天的天气:' + '温度' + weather_dict['data']['wendu'] + '℃', width='100%', height='5px')
        self.gm = gui.Label('感冒指数:' + weather_dict['data']['ganmao'], width='100%', height='5px')
        self.container1.append(self.ct)
        self.container1.append(self.jt)
        self.container1.append(self.gm)
        for each in weather_dict['data']['forecast']:
            self.rq = gui.Label(each['date'], width='20%', height=15)
            self.rq.css_font_size = '15px'
            self.tq = gui.Label('天气 :' + each['type'], width='20%', height=15)
            self.h = gui.Label(each['high'], width='20%', height=15)
            self.l = gui.Label(each['low'], width='20%', height=15)
            self.fx = gui.Label('风向 :' + each['fengxiang'], width='20%', height=15)
            self.fl = gui.Label('风力 :' + each['fengli'][-5:-3], width='20%', height=15)
            self.container2.append(self.rq)
            self.container2.append(self.tq)
            self.container2.append(self.h)
            self.container2.append(self.l)
            self.container2.append(self.fx)
            self.container2.append(self.fl)

        self.container.remove_child(self.lbl)
        self.container.remove_child(self.sr)
        self.container.remove_child(self.bt)


# 启动服务器
start(MyApp)
两段代码和在一起,就是一个完整但是也不完整的网页啦!
因为缺少服务器,所以该网页只能在运行此代码时可以显示。
当然,你也可以为自己的网页加上服务器,这就要去找大神们写的经验文章去学习,我只能写道这里了。
不过,提醒一下,尽量用Google浏览器来运行(不要问为什么,问就是好用)
来看看最终的效果吧~

?查询页面

显示天气的页面?