为了表示对作者的尊重,引用了该作者的代码,这里贴出他的地址:
1.环境
windows
python3.6
PyQt5
requests
2.安装
pip install -i https://pypi.tuna.tsinghua.edu.cn/simple pyqt5
pip install -i https://pypi.tuna.tsinghua.edu.cn/simple pyqt5-tools
3.代码
代码用的作者的代码:GitHub - lovesoo/test_demo: Testing Using Python Demo. 使用Python测试脚本demo。
由于作者的源码给出的读取天气的api有点问题,所以找到了下面的地址:用python实现查询天气的功能_Zyong139064359的博客-CSDN博客_python 查询天气
如果想要其他城市的代号,可以参考:python实现天气功能查询_James_bobo的博客-CSDN博客_python 查询天气
对于相应的api解析部分的代码,我修改了下:?
# coding:utf-8
# demo py
import sys
import Weather
from PyQt5.QtWidgets import QApplication, QDialog
import requests


class MainDialog(QDialog):
    def __init__(self, parent=None):
        super(QDialog, self).__init__(parent)
        self.ui = Weather.Ui_Dialog()
        self.ui.setupUi(self)

    def queryWeather(self):
        cityName = self.ui.comboBox.currentText()
        cityCode = self.getCode(cityName)

        r = requests.get("http://wthrcdn.etouch.cn/weather_mini?citykey={}".format(cityCode))
        print(r)
        print(r.json())

        if r.json().get('status') == 1000:
            weatherMsg = '城市:{}\n日期:{}\n天气:{}\n温度:{}-{}\n风力:{}\n\n{}'.format(
                r.json()['data']['city'],
                r.json()['data']['forecast'][0]['date'],
                r.json()['data']['forecast'][0]['type'],
                # int(r.json()['data']['pm25']),
                # r.json()['data']['quality'],
                r.json()['data']['forecast'][0]['low'],
                r.json()['data']['forecast'][0]['high'],
                # r.json()['data']['shidu'],
                r.json()['data']['forecast'][0]['fengli'],
                r.json()['data']['ganmao'],
            )
        else:
            weatherMsg = '天气查询失败,请稍后再试!'

        self.ui.textEdit.setText(weatherMsg)

    def getCode(self, cityName):
        cityDict = {"北京": "101010100",
                    "上海": "101020100",
                    "天津": "101030100"}

        return cityDict.get(cityName, '101010100')

    def clearText(self):
        self.ui.textEdit.clear()


if __name__ == '__main__':
    myapp = QApplication(sys.argv)
    myDlg = MainDialog()
    myDlg.show()
    sys.exit(myapp.exec_())
4.结果
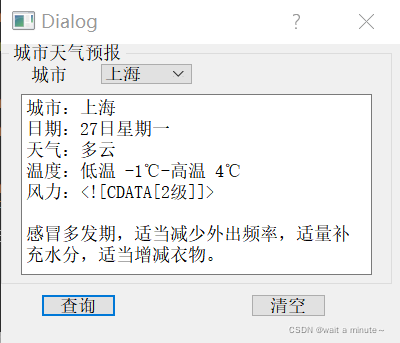
运行demo代码:
