Flask框架基础Jinja2模板-- 潘登同学的flask学习笔记
文章目录
return
from flask import Flask

# 创建对象
app = Flask(__name__)
# 路由地址
@app.route("/")

def index():
    return "<h3>HELLO</h3><p>内容<P>"
这样可以返回HTML的代码效果,可是会显得很臃肿,耦合度高,效果无法及时查看,有错也不能及时发现
解决方案:模板
模板 Template
MVT 设计模式中的 T , Template
M全拼为Model,与MVC中的M功能相同,负责和数据库交互,进行数据处理V全拼为View,与MVC中的C功能相同,接收请求,进行业务处理,返回应答。T全拼为Template,与MVC中的V功能相同,负责封装构造要返回的html。
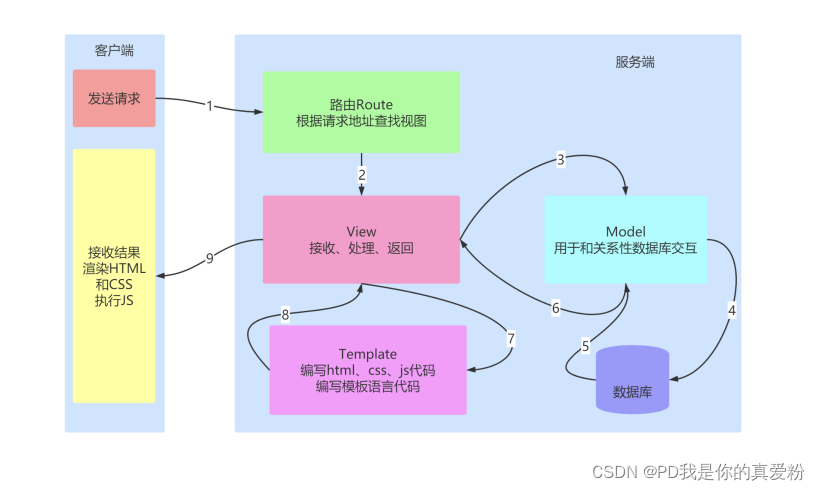
模板的使用
模板的业务逻辑:
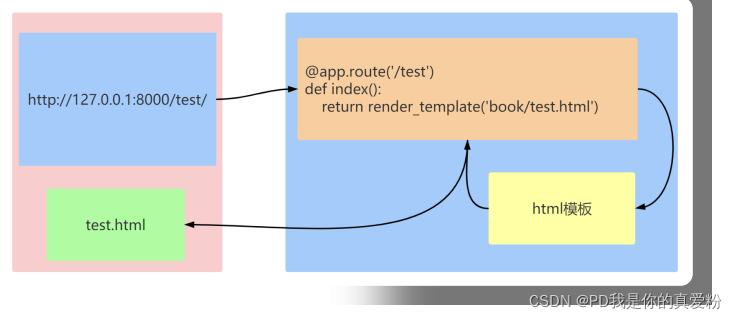
创建步骤
- 1.在
应用同级目录下创建模板文件夹templates. 文件夹名称固定写法 - 2.在
templates文件夹下, 创建应用同名文件夹. 例,Book - 3.在
应用同名文件夹下创建网页模板文件. 例 :index.html
那个index.html爱写啥写啥,这里主要是Python操作
from flask import Flask,render_template

# 创建对象
app = Flask(__name__)
# 可以通过template_folder可以修改模板文件夹的位置
# app = Flask(__name__, template_folder="qwer")

# 路由地址
@app.route("/")

def index():
    return render_template("./06Jinja2模板/index.html")

if __name__ == "__main__":
    app.config.from_pyfile("./setting.py")
    app.run()
模板的传参
在python语句的return中加入要传递的参数
def index():
    return render_template("./06Jinja2模板/index.html",
    info="Flask模板")
到模板中对变量进行处理,采用的是Jinja语法
<p>模板的内容--{{ info }}</p>
可以看到这其实与Vue框架下, 对变量的处理很类似
采用键值对字典的形式向函数传参
@app.route("/user/")

def user():
    content = {
        "uname":"pd",
        "age":19,
        "height":185,
        "hobby":{
            "finance":"quantify",
            "sports":"riding",
            "it":"Python",
            },
    }
    return render_template("./06Jinja2模板/index.html",**content)
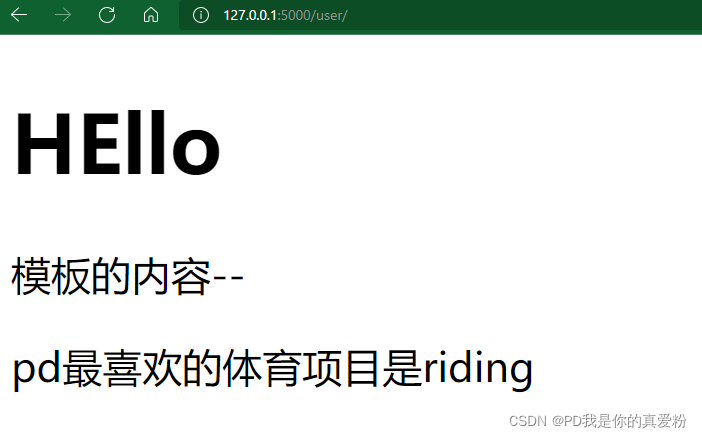
对于值是字典的hobby,在模板调用参数的时候除了使用Python本身的[],get()方法外, 还可以使用Jinja语法中的链式调用
<p>{{ unam }}最喜欢的体育项目是{{ hobby.sports }}</p>
模板中使用 url_for() 函数
新建一个index1.html模板
<!DOCTYPE html>
<html lang="en">
<head>
    <meta charset="UTF-8">
    <meta http-equiv="X-UA-Compatible" content="IE=edge">
    <meta name="viewport" content="width=device-width, initial-scale=1.0">
    <title>用户主页</title>
    <style>
        a{
            float:right;
        }
    </style>
</head>
<body>
    <!-- 当然可以加路径参数、查询参数 -->
    <a href="{{ url_for(index) }}">回到首页</a>

    <h1>{{ uname }}: {{ age }}</h1>
    <p>最喜欢的金融课目是{{ hobby.finance }}</p>
    <p>最喜欢的体育项目是{{ hobby.sports }}</p>
    <p>最喜欢的编程语言是{{ hobby.it }}</p>
</body>
</html>
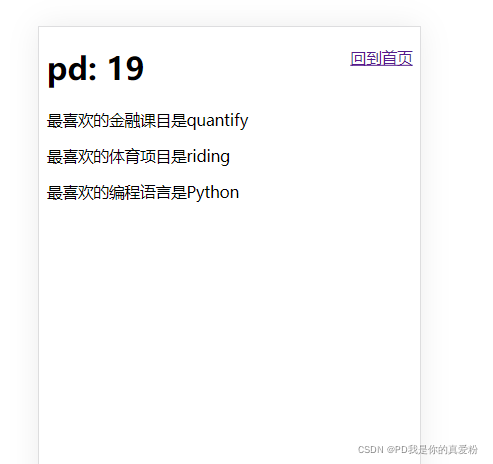
将python中的跳转路径改一改, 然后进入http://127.0.0.1:5000/user/
过滤器使用
细节: 在Jinja模板中的注释要用{# 这些是注释内容 #}来写
新建html2.index,
    <h1>过滤器的使用</h1>
    过滤前的数据: {{ param }}
    <br>
    过滤后的数据: {{ param | int }}
    {# 这样写会报错
    过滤后的数据: {{ int(param) }} #}
@app.route("/test_filter/")

def test_filter():
    return render_template("./06Jinja2模板/index2.html",param=10.65)
Jinja模板中的自带的过滤器
- default: 如果不传参的话,自动显示某个值
刚才的html2.index中新增, python中故意不传参,检验default效果;
如果不写 boolean=True 传递的None、空字符串、空列表都会被过滤;
    <br>
    过滤前的用户名: {{ uname }}
    <br>
    过滤后的用户名: {{ uname | default("用户1",boolean=True) }}
    <br>
    简写方式: {{ uname or "用户1" }}
- safe: 转义字符过滤器
(如果开启了全局转义(默认开启),那么safe过滤器会将变量关掉转义)
    <br>
    转义前的数据是: {{ info }}
    <br>
    转义后的数据是: {{ info | safe }}
def test_filter():
    info = "<script>console.log('HELLO');</script>"
    return render_template("./06Jinja2模板/index2.html",param=10.65,info=info)
- escape: 转义字符过滤器
对某一个字符串进行转义,将<转义成<;默认是转义的,但是有时候会通过autoescape 标签对一大段的东西关闭转义;操作语法为 {% autoescape true/false%}
{% autoescape false %}  {# 关闭转义 #}
    {{ info | escape }}的写法是--{{ info }}
{% endautoescape %}
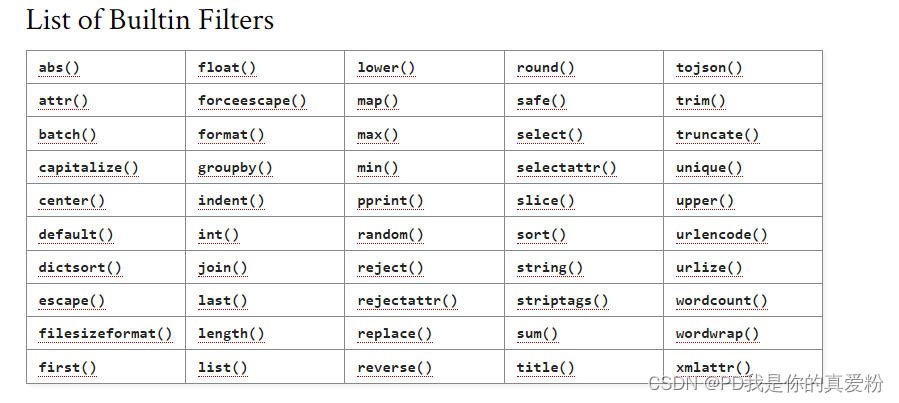
其他过滤器:
自定义过滤器
过滤器本质上就是一个函数,如果在模版中调用这个过滤器,那么就会将这个变量的值作为第一个参数传给过滤器这个函数,然后函数的返回值会作为这个过滤器的返回值。
@app.template_filter('过滤器名称')
#将模版设置为自动加载模式
app.config['TEMPLATES_AUTO_RELOAD']=True
@app.template_filter('cut')
def cut(value):
    value=value.replace("爱", '恨')
    return value


@app.route("/def_filter/")
def def_filter():
    info = "我好爱你, 你到底爱不爱我"
    return render_template("./06Jinja2模板/index3.html",info=info)
新建一个index3.html模板
 <h1>我能说反话哦!!!</h1>
    你说的: {{ info }}<br>
    我说的: {{ info | cut }}
实例:自定义事件过滤器
-
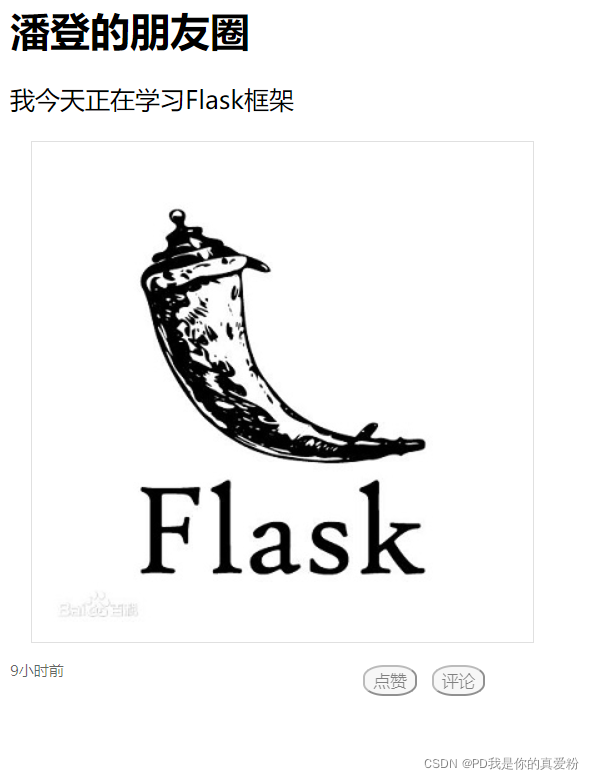
需求: 判断一条朋友圈是多久之前发送的
-
业务逻辑: 用当前时间-数据库中存放数据的时间
<!DOCTYPE html>
<html lang="en">
<head>
    <meta charset="UTF-8">
    <meta http-equiv="X-UA-Compatible" content="IE=edge">
    <meta name="viewport" content="width=device-width, initial-scale=1.0">
    <title>朋友圈</title>
    <style>
        .container{
            width:25%;
            position:relative;
        }
        p{
            font-size:20px;
        }
        img{
            border:1px solid #e0e0e0;
            margin-left:17px;
        }
        .time{
            float:left;
            font-size: 12px;
            color:rgba(0,0,0,0.6);
            position: absolute;
            top:450px;
        }
        .container ul{
            float:right;
            position: absolute;
            top:450px;
            right:0;
        }
        .container ul li{
            float:left;
            list-style:none;
            margin-left:12px;
        }
        .container ul li button{
            border-radius: 40%;
            opacity:0.5;
        }

    </style>
</head>
<body>
    <h1>{{ uname }}的朋友圈</h1>
    <div class="container">
        <p>我今天正在学习Flask框架</p>
        <img src="https://www.w3cschool.cn/attachments/image/20181226/1545802618390094.jpg" alt="">
        <p class="time">{{ time | handle_time }}</p>
        <ul>
            <li><button>点赞</button></li>
            <li><button>评论</button></li>
        </ul>
    </div>
</body>
</html>
# 自定义函数
@app.template_filter('handle_time')
def handle_time(value):
    """
       time距离现在的时间间隔
       1. 如果时间间隔小于1分钟以内,那么就显示“刚刚”
       2. 如果是大于1分钟小于1小时,那么就显示“xx分钟前”
       3. 如果是大于1小时小于24小时,那么就显示“xx小时前”
       4. 如果是大于24小时小于30天以内,那么就显示“xx天前”
       5. 否则就是显示具体的时间 2030/10/20 16:15
    """
    # 获取当前时间
    now = datetime.now()
    # 相差时间转为秒
    temp = (now - value).total_seconds()
    if temp < 60:
        return "刚刚"
    elif temp >= 60 and temp <= 3600:
        return f'{ int(temp / 60) }分钟前'
    elif temp >= 3600 and temp <= 3600*24:
        return f'{ int(temp / 60 / 60) }小时前'
    elif temp >= 3600*24 and temp <= 3600*24*30:
        return f'{ int(temp / 60 / 60 / 24) }天前'
    else:
        return value.strftime('%Y/%m/%d %H:%M')

# 路由处理
@app.route("/pyq/")

def pyq():
    uname = "潘登"
    # 2022/1/10 10:51:00
    time = datetime(2022, 1, 10, 10, 51, 0)
    return render_template("./06Jinja2模板/index4.html",time=time,uname=uname)
选择结构
所有的控制语句都是放在 {% ... %} 中,并且有一个语句 {% endxxx %} 来进行结束!
{% if uname == 'pd' %}
<p>潘登</p>
{% else %}
<p>你不是潘登,快奏凯</p>
{% endif %}

{% if age >= 18 %}
    <p>{{ age }}岁,成年人,可以通宵打游戏</p>
{% else %}
    <p>{{ age }}岁,未成年人,可以通宵学习</p>
{% endif %}
实现登录的不同显示
新建一个index5.html模板
<!DOCTYPE html>
<html lang="en">
<head>
    <meta charset="UTF-8">
    <meta http-equiv="X-UA-Compatible" content="IE=edge">
    <meta name="viewport" content="width=device-width, initial-scale=1.0">
    <title>Document</title>
</head>
<body>
    <div class="nav">
        <ul>
            <li>
                <a href="">中国大陆</a>
            </li>
            {% if not userid%}
            <li>
                <a href="{{ url_for('login',userid='pandeng') }}">亲,请登录</a>
            </li>
            {% else %}
            <li>
                <a href="{{ url_for('user',userid='pandeng') }}">{{ userid }},用户中心</a>
            </li>
            {% endif %}
            <li>
                <a href="">免费注册</a>
            </li>
        </ul>
    </div>
</body>
</html>
from flask import Flask,render_template,request

# 创建对象
app = Flask(__name__)
# 路由地址
@app.route("/")

def index():
    return render_template("./06Jinja2模板/index5.html")

@app.route("/login/")

def login():
    userid = request.args.get('userid')
    return render_template("./06Jinja2模板/index5.html",userid=userid)

@app.route("/user/<string:userid>")

def user(userid):
    return f'尊敬的{userid},您好!!!'

if __name__ == "__main__":
    app.config.from_pyfile("./setting.py")
    app.run()
循环结构
- 商品展示
<style>
    .things li{
        float:left;
        list-style: none;
        margin:0 20px;
    }
</style>


<div class="things">
    {% for item in items %}
        <li>{{ item }}</li>
    {% endfor %}
</div>
def index():
    items = ['Python',"HTML", "CSS", "Javascript", "SQL"]
    return render_template("./06Jinja2模板/index5.html", items=items)
- 反向遍历用过滤器 reverse
<ul>
   {% for user in users|reverse %}
       <li>{{ user}}</li>
   {% else %}
        <li>没有任何用户</li>
   {% endfor %}
</ul>
- Jinja中for循环包含的变量
| 变量 | 描述 |
|---|---|
| loop.index | 当前迭代的索引(从1开始) |
| loop.index0 | 当前迭代的索引(从0开始) |
| loop.first | 是否是第一次迭代,返回True或False |
| loop.last | 是否是最后一次迭代,返回True或False |
| loop.length | 序列的长度 |
loop就是固定写法;
总结
在 jinja2 中的 for 循环,跟 python 中的 for 循环基本上是一模一样的也是 for...in... 的形式。并且也可以遍历所有的序列以及迭代器;
唯一不同的是, jinja2 中的 for 循环没有 break 和 continue 语句
循环操作:九九乘法表
<!DOCTYPE html>
<html lang="en">

<head>
    <meta charset="UTF-8">
    <meta http-equiv="X-UA-Compatible" content="IE=edge">
    <meta name="viewport" content="width=device-width, initial-scale=1.0">
    <title>九九乘法表</title>
    <style>
        .container {
            width: 990px;
            height: 300ox;
            position: relative;
        }

        .container::after {
            content: "";
            display: block;
            clear: both;
        }

        ul {
            float: left;
            margin: 0;
            padding: 0;
            position: relative;
        }
        ul .none{
            border: none;
        }
        ul li {
            width: 94px;
            height: 23px;
            border: 1px solid rgb(0, 0, 0);
            list-style: none;
            padding: 0 8px;
            box-sizing: border-box;
        }
    </style>
</head>

<body>
    <div class="container">
        <h1>九九乘法表</h1>
        {% for i in range(1,10) %}
        <ul>
            {% for j in range(1,10) %}
            {% if i > j %}
                <li class="none"></li>
            {% else %}
            <li>{{ i }} * {{ j }} = {{ i*j }}</li>
            {% endif %}
            {% endfor %}
        </ul>
        {% endfor %}
    </div>
</body>

</html>
@app.route("/list99/")
def list99():
    return render_template("./06Jinja2模板/index6.html")
模板中的宏
模板中的宏就是在模板中创建了一些函数,与python中的类似,可以传递参数,但是不能有返回值;
可以将一些经常使用到的代码片段放到宏中,然后再把一些不固定的值抽出来当成一个变量;
<!-- 在body外定义 -->
{% macro inp(type,name='',value='')%}
    <input type="{{ type }}" name="{{ name}}" value="{{value}}">
{% endmacro %}

<!-- 在body中调用即可 -->
{{ input('text')}}
{{ input('password', "pwd")}}
注意 实际开发中,不会把宏在一个页面内定义 并直接使用一般把宏定义放到一个专门的文件夹中,方便进行统一管理之后,哪一个页面需要使用某个宏,需要导入宏才能使用
- 存放宏
在templates子集目录下,创建宏的存放目录macros,将刚才的代码写入inp.html
- 导入宏方式
{% from "./macros/inp.html" import inp %}
{% from "./macros/inp.html" import inp with context %}
<!-- 下面这种写法,如果在宏中涉及了参数变量(从主逻辑传过来的,如:info,userid等)而模板中需要调用这些参数进行动态显示时,需要加with content -->
注意 导入宏的时候,不要以相对路径去寻找,都要以 templates 作为绝对路径去找(就是不要将index,html视作现在的位置,而是要把templates当做现在的位置)
导入模板 include
在templates子集目录下,创建模板的存放目录common,新建header.html与footer.html
在一个想导入模板的index.html下,导入模板
<!-- 在body中导入 -->
    {% include "common/header.html" %}
    <!-- 主要内容 -->
    {% include "common/footer.html" %}
with content方法 与前面的宏一致
在模板中定义变量
set与with
可以使用 set 语句来定义变量
{% set uname='pandeng'%}
    <p>{{ uname }}</p>
with 语句定义的变量,只能在 with 语句块中使用,超过了这个代码
块,就不能再使用了
{% with age=19 %}
    <p>{{ age }}</p>
{% endwith %}
<!-- 也可以用with与set结合使用,效果上下一致 -->
{% with %}
    {% set age = 19 %}
    <p>{{ age }}</p>
{% endwith %}
静态资源引入
静态文件:css文件 js文件 图片文件等文件
加载静态文件使用的是 url_for 函数。然后第一个参数需要为 static ,第二个参数需要为一个关键字参数 filename='路径'
新建一个与templates同级的文件夹static
然后在模板中引用,注意地址就是/static/(+图片名)
<img src="/static/FLASK.jpg" alt="">

<!-- 也可以用url_for来写(推荐) -->
<img src="{{ url_for('static', filename='img/FLASK.jpg') }}" alt="">
<!-- 也可以映入JS、CSS -->
<img src="{{ url_for('static', filename='js/test.js') }}" alt="">

<link rel="stylesheet" href="{{ url_for('static/css', filename='css/test.css') }}">
与render_template一样,static虽然是默认的,但是也可以修改;则url_for处也要改
app = Flask(__name__, static_folder='static_plus')
模板继承
- 为什么需要模版继承
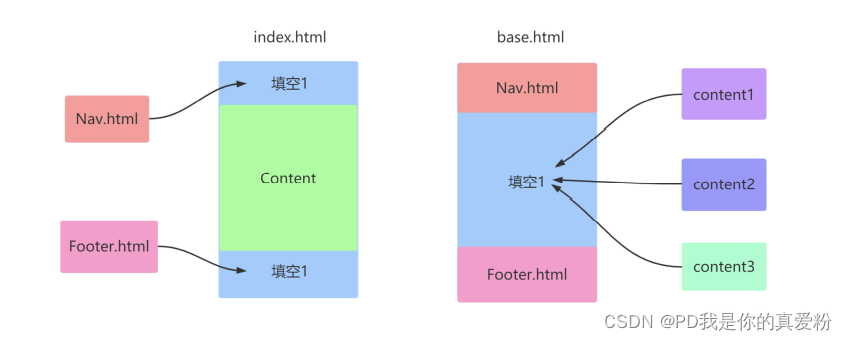
模版继承可以把一些公用的代码单独抽取出来放到一个父模板中以后子模板直接继承就可以使用了。这样可以重复的利用代码,并且以后修改起来也比较方便
- include与继承的区别
- 模版继承语法
使用 extends 语句,来指明继承的父模板。父模板的路径,也是相对于 templates 文件夹下的绝对路径
在templates 文件夹下,新建base.html文件,
通过{% block content %} {% endblock %} 来挖出空隙给子模板
<!DOCTYPE html>
<html lang="en">
<head>
    <meta charset="UTF-8">
    <meta http-equiv="X-UA-Compatible" content="IE=edge">
    <meta name="viewport" content="width=device-width, initial-scale=1.0">
    <title>父模板</title>
</head>
<body>
    <div class="header">
        <h1>头部信息</h1>
    </div>
    {% block content %}
    <div class="container">主体内容</div>
    {% endblock %}
    <div class="footer">
        <h1>底部信息</h1>
    </div>
</body>
</html>
在子模板中调用,子模板所有内容都不要了,包括head等内容,直接{% extends "base.html" %} 导入即可,再以相同的方式{% block content %} {% endblock %}写入内容即可
注意: content不是定死的,只要保持一致即可
{% extends "base.html" %}

{% block content %}
    <p>这个是继承了父模板的子模板</p>
{% endblock %}
如果再懒一点,内容也大量重复,子模板通过{{ super() }}也可以继承父模板的内容;可以通过{{ super() }}的调用位置来控制呈现位置
{% extends "base.html" %}

{% block content %}
    <p>这个是继承了父模板的子模板</p>
    {{ super() }}
{% endblock %}
可以不止挖一个空隙, 在父模板中;在子模板中也不一定要调用;
<body>
    <div class="header">
        <h1>头部信息</h1>
    </div>
    {% block content %}
    <div class="container">主体内容</div>
    {% endblock %}
    <div class="footer">
        <h1>底部信息</h1>
    </div>
    {% block lastfooter %}

    {% endblock %}
</body>
在子模板中也可以自己调用自己的功能,通过{{ self. footer() }}来调用
{% extends "base.html" %}

{% block lastfooter %}
    <p>小功能</p>
{% endblock %}

{% block content %}
    自己写的:<p>这个是继承了父模板的子模板</p>
    自己调自己的:{{ self. lastfooter() }}
    super来的:{{ super() }}
{% endblock %}
注意 这里与python的继承不一致的就是这里的字模板不能新建方法,也就是说父模板没有挖出空给你,你自己不能新增一些空来,否则会显示不出来,但不会报错
