1新建虚拟环境
conda create -n tensorflow_delf python=3.8(新建)
conda activate tensorflow_delf(激活)
conda deactivate(关闭)
2 安装tensorflow
将下载好的tensorflow安装包tensorflow_gpu-2.6.0-cp38-cp38-win_amd64.whl拷贝至D:\Program Files\Anaconda3\envs\tensorflow_delf\Lib\site-packages
进入目录,安装tensorflow:pip install tensorflow_gpu-2.6.0-cp38-cp38-win_amd64.whl
3 安装protobuf
pip install protobuf(安装tensorflow时已经自动安装)
下载protoc编译器(protoc-3.20.0-win64.zip,与protobuf版本对应)
解压后,将bin文件夹添加至环境变量


测试:打开cmd终端或Anaconda promot,输入protoc --version

安装成功。
4 安装python库依赖
pip install matplotlib
pip install numpy
pip install scikit-image
pip install scipy
5 下载models,网址:https://github.com/tensorflow/models,将modal文件夹拷贝至D:\Program Files\Anaconda3\envs\tensorflow_delf中
(1)安装nets
进入 models/research/slim/ 文件夹,
pip install -e .(注意:最后的.)

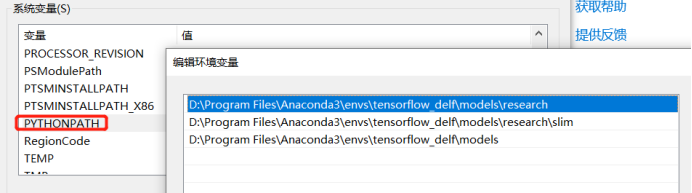
(2)通过编辑PYTHONPATH设置object_detection模块:
新建PYTHONPATH环境变量,添加 tensorflow/models/research/ 和 models/research/slim/文件夹的绝对路径
然后,编译delf的protobufs
进入 tensorflow/models/research/delf/ 文件夹
protoc delf/protos/.proto --python_out=.
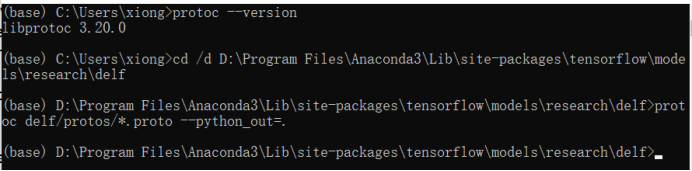
正常情况是不输出东西,如果编译出错,可能是proto版本的问题,则安装新的版本。
最后,安装DELF包
进入 tensorflow/models/research/delf/ 文件夹
pip install -e .
测试:import delf


出现错误:tensorflow.python.framework.errors_impl.AlreadyExistsError:Another metric with the same name already exists.
解决方案:tensorflow和keras的版本有问题
pip install keras==2.6.0

安装成功
(3)安装object_detection库
首先安装其他依赖库
pip install --user Cython
pip install --user contextlib2
pip install --user pillow
pip install --user lxml
pip install --user jupyter
pip install --user matplotlib
pip install tensorflow_io
pip install pyyaml
然后编译Protobuf
Tensorflow对象检测API使用Protobufs配置模型和训练参数。在使用框架之前,必须编译Protobuf库。这应该通过从tensorflow / models / research /目录运行以下命令来完成:
进入 tensorflow/models/research/ 文件夹
protoc object_detection/protos/.proto --python_out=.
最后,测试
python object_detection/builders/model_builder_test.py

6 Quick start:delf extaction and matching
Dateset&Delf model
(1)下载数据集
在tensorflow/models/research/delf/delf/python/examples/下新建data文件夹,进入data文件夹,再在data文件夹里新建oxford5k_images 和 oxford5k_features文件夹,把数据集解压到oxford5k_images里,以上是官方介绍。在examples下建一个文件夹test_images,选两张图片,重命名为image_1.jpg和image_2.jpg。
新建一个list_images.txt(models/research/delf/delf/python/examples/文件夹下新建)放两张图片的URL,添加URL
可以采用命令行方式:
进入models/research/delf/delf/python/examples/文件夹
echo test_images/image_1.jpg >> list_images.txt
echo test_images/image_2.jpg >> list_images.txt
也可以直接在list_images.txt写两行:
test_images/image_1.jpg
test_images/image_2.jpg
(2)下载测试集:http://storage.googleapis.com/delf/delf_gld_20190411.tar.gz
解压至…\examples\parameters中
(3)测试
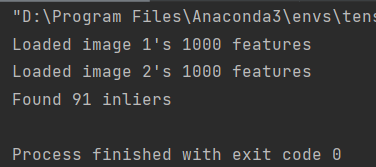
在Pycharm打开extract_features.py运行提取特征点

运行match_images.py生成匹配结果

本文参考:https://www.freesion.com/article/7613884366/