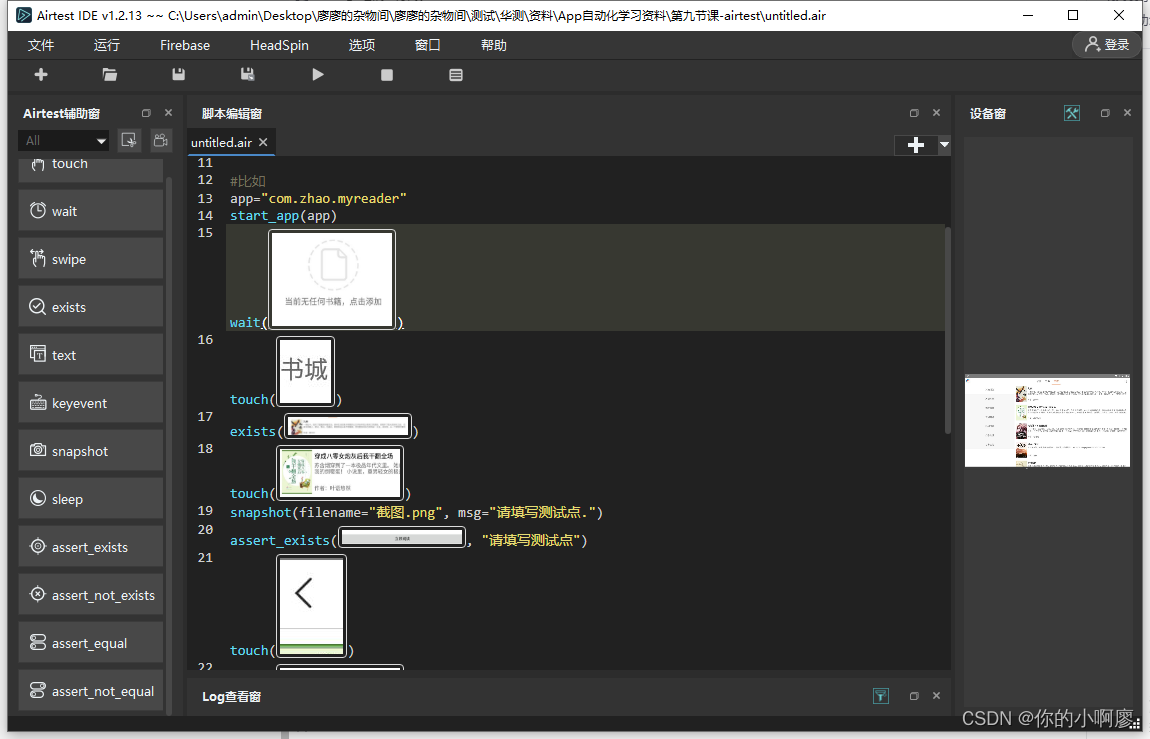
?、使?airtestIDE?成脚本,使?脚本运?
- 前提内容
start_app()  #这个是一种打开指定app的一种方式,括号内使用的是包名
stop_app()#这是一种退出app指令;括号内使用包名

#比如
app="com.zhao.myreader"
start_app(app)
stop_app(app)
- 使?airtestIDE?成以下脚本:


然后我们复制AirtestIDE里面的脚本到pychar
前提条件:
1、pychar虚拟环境安装两个包
安装的时候可能超时导致无法安装,这时我们可以添加获取时间 --default-timeout=1000

pip install airtest
pip --default-timeout=1000 install airtest
pip  install pocoui
pip --default-timeout=1000  install pocoui
安装完后我们讲代码复制过来
# -*- encoding=utf8 -*-
__author__ = "admin"

from airtest.core.api import *

#需要导入刚刚下载的包


auto_setup(__file__)


#start_app()  #这个是一种打开指定app的一种方式,括号内使用的是包名
#stop_app()#这是一种退出app指令;括号内使用包名


#比如
app="com.zhao.myreader"
start_app(app)
wait(Template(r"tpl1650527755974.png", record_pos=(-0.003, 0.044), resolution=(1600, 900)))
touch(Template(r"tpl1650527777844.png", record_pos=(0.053, -0.236), resolution=(1600, 900)))
exists(Template(r"tpl1650527872238.png", record_pos=(0.142, -0.166), resolution=(1600, 900)))
touch(Template(r"tpl1650527916708.png", record_pos=(-0.064, -0.045), resolution=(1600, 900)))
snapshot(filename="截图.png", msg="请填写测试点.")
assert_exists(Template(r"tpl1650528271139.png", record_pos=(0.249, 0.252), resolution=(1600, 900)), "请填写测试点")
touch(Template(r"tpl1650528281340.png", record_pos=(-0.467, -0.23), resolution=(1600, 900)))
swipe(Template(r"tpl1650528373743.png", record_pos=(-0.346, 0.149), resolution=(1600, 900)), vector=[0.0008, 0.0007])
#assert_not_exists(Template(r"tpl1650529276387.png", record_pos=(-0.152, -0.047), resolution=(1600, 900)), "该页面不存在这本书")   断言不存在系统 就不会往下走了


touch(Template(r"tpl1650528466292.png", record_pos=(0.473, -0.229), resolution=(1600, 900)))
touch(Template(r"tpl1650528481771.png", record_pos=(-0.433, -0.186), resolution=(1600, 900)))
text("大佬")
touch(Template(r"tpl1650528509046.png", record_pos=(0.383, -0.19), resolution=(1600, 900)))
assert_exists(Template(r"tpl1650528543089.png", record_pos=(0.005, 0.009), resolution=(1600, 900)), "请填写测试点")
stop_app(app)
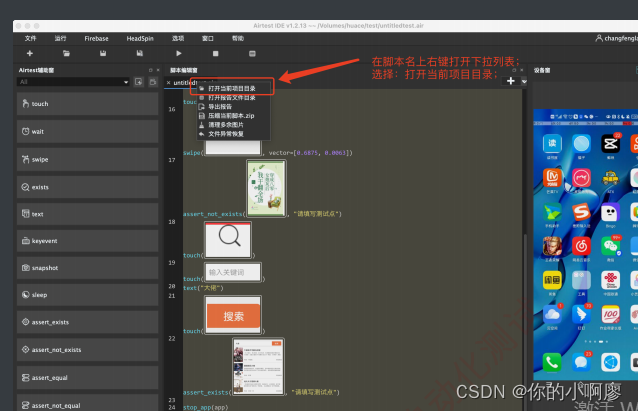
会发现所以的图?变成了数据;此时我们需要将图?的路径指引过来;

在打开的项??录中将所有的图??件复制并粘贴到Pycharm新建的项?的根?录下即可;

5、配置脚本运?环境 AndroidUiautomationPoco AndroidUiautomationPoco ;即可运?脚本

最后我们再如何我们下载配置好的包
form poco.drivers.android.uiautomation imoort AndroidUiautomationPoco
AndroidUiautomationPoco()

解决错误
我遇到一个问题就是报这个错误:
No module named poco.drivers
其原因就是我把pocpiu 安装到了实际环境去了 然后虚拟环境没有安装上
所以我们安装的时候一定要看清楚犯我这样的错
