文章目录
learn from 《PyQt5 快速开发与实战》
https://doc.qt.io/qtforpython/index.html
https://www.riverbankcomputing.com/static/Docs/PyQt5
1. 窗口绘图类
1.1 QPainter
- 在
QWidget上执行绘图操作 - 在
QWidget.paintEvent()中完成,绘制方法必须在QtGui.QPainter对象的begin()和end()之间
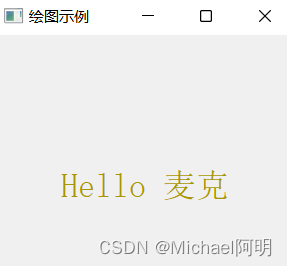
绘制文字
# _*_ coding: utf-8 _*_
# @Time : 2022/5/6 9:26
# @Author : Michael
# @File : painter1.py
# @desc :
import sys

from PyQt5.QtGui import QPainter, QColor, QFont
from PyQt5.QtWidgets import QWidget, QApplication
from PyQt5.QtCore import Qt

class drawing_demo(QWidget):
    def __init__(self):
        super().__init__()
        self.setWindowTitle("绘图示例")
        self.resize(300, 300)
        self.text = "Hello 麦克"

    def paintEvent(self, event): # 函数名不能变
        painter = QPainter(self)
        painter.begin(self)  # 开始绘制, 需要传入 self
        self.drawText(event, painter) # 自定义绘制
        painter.end()

    def drawText(self, event, painter):
        painter.setPen(QColor(168, 150, 3)) # 设置画笔颜色
        painter.setFont(QFont("SimSun", 20))  # 设置字体
        painter.drawText(event.rect(), Qt.AlignCenter, self.text)

if __name__ == '__main__':
    app = QApplication(sys.argv)
    demo = drawing_demo()
    demo.show()
    sys.exit(app.exec_())
绘制点
# _*_ coding: utf-8 _*_
# @Time : 2022/5/6 9:56
# @Author : Michael
# @File : draw_point.py
# @desc :
import math

from PyQt5.QtGui import QPainter
from PyQt5.QtWidgets import QWidget, QApplication
from PyQt5.QtCore import Qt


class drawPoint(QWidget):
    def __init__(self):
        super(drawPoint, self).__init__()
        self.setWindowTitle("绘制点")
        self.resize(500, 300)

    def paintEvent(self, event):
        painter = QPainter()
        painter.begin(self)  # 必须加 self 参数
        self.drawpoint(painter)
        painter.end()

    def drawpoint(self, painter):
        painter.setPen(Qt.red)
        size = self.size()
        print('size,', size)
        for i in range(1000):
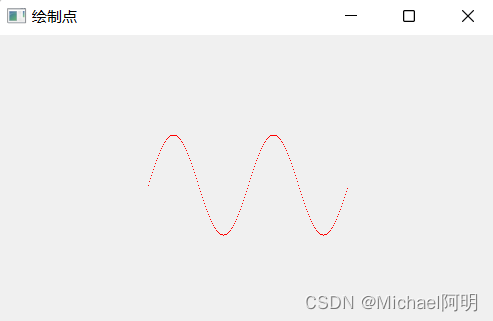
            # 绘制正弦函数曲线
            x = int(100*(-1+2.0*i/1000)+size.width()/2)
            y = int(-50*math.sin((x-size.width()/2)*math.pi/50)+size.height()/2)
            painter.drawPoint(x, y)
if __name__ == '__main__':
    import sys
    app = QApplication(sys.argv)
    main = drawPoint()
    main.show()
    sys.exit(app.exec_())
只要点击窗口或者窗口大小发生变化,就会进行重绘
1.2 QPen
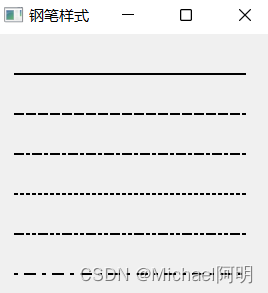
钢笔,用于绘制曲线,直线,轮廓等
# _*_ coding: utf-8 _*_
# @Time : 2022/5/6 22:28
# @Author : Michael
# @File : qpen_demo.py
# @desc :
import sys

from PyQt5.QtGui import QPainter, QPen
from PyQt5.QtWidgets import QWidget, QApplication
from PyQt5.QtCore import Qt


class qpenDemo(QWidget):
    def __init__(self):
        super(qpenDemo, self).__init__()
        self.setGeometry(300, 300, 280, 270)
        self.setWindowTitle("钢笔样式")

    def paintEvent(self, event):  # paintEvent 名字大小写需要一致,重写父类的方法
        painter = QPainter()
        painter.begin(self)  # 需要加入self
        self.drawlines(painter)
        painter.end()

    def drawlines(self, painter):
        pen = QPen(Qt.black, 2, Qt.SolidLine)

        painter.setPen(pen)
        painter.drawLine(20, 40, 250, 40)
        # 参数 线的起点终点 x1, y1 -> x2, y2, 且最终笔在 x2, y2

        pen.setStyle(Qt.DashLine)
        painter.setPen(pen)
        painter.drawLine(20, 80, 250, 80)

        pen.setStyle(Qt.DashDotLine)
        painter.setPen(pen)
        painter.drawLine(20, 120, 250, 120)

        pen.setStyle(Qt.DotLine)
        painter.setPen(pen)
        painter.drawLine(20, 160, 250, 160)

        pen.setStyle(Qt.DashDotDotLine)
        painter.setPen(pen)
        painter.drawLine(20, 200, 250, 200)

        pen.setStyle(Qt.CustomDashLine)
        pen.setDashPattern([1, 4, 5, 4])
        painter.setPen(pen)
        painter.drawLine(20, 240, 250, 240)
if __name__ == '__main__':
    app = QApplication(sys.argv)
    ex = qpenDemo()
    ex.show()
    sys.exit(app.exec_())
setDashPattern
The pattern must be specified as an even number of positive entries
where the entries 1, 3, 5… are the dashes and 2, 4, 6… are the spaces.
1.3 QBrush
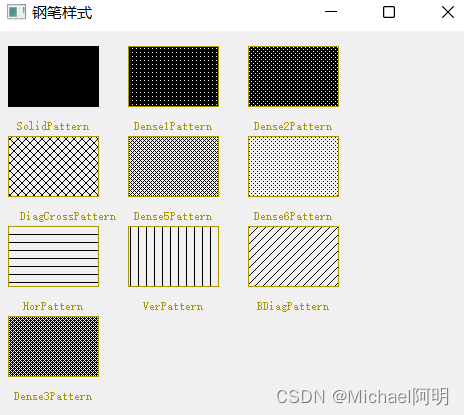
- 用于填充形状,有预定义、纹理图案、过渡3种类型
# _*_ coding: utf-8 _*_
# @Time : 2022/5/6 22:58
# @Author : Michael
# @File : qbrush_demo.py
# @desc :

import sys

from PyQt5.QtGui import QPainter, QPen, QBrush, QColor, QFont
from PyQt5.QtWidgets import QWidget, QApplication
from PyQt5.QtCore import Qt, QRect


class qpenDemo(QWidget):
    def __init__(self):
        super(qpenDemo, self).__init__()
        self.setGeometry(300, 300, 280, 270)
        self.setWindowTitle("钢笔样式")

    def paintEvent(self, event):  # paintEvent 名字大小写需要一致,重写父类的方法
        painter = QPainter()
        painter.begin(self)  # 需要加入self
        self.drawlines(painter)
        painter.end()

    def drawlines(self, painter):
        brush = QBrush(Qt.SolidPattern)
        painter.setBrush(brush)
        painter.drawRect(10, 15, 90, 60)
        painter.setPen(QColor(168, 150, 3))  # 设置画笔颜色
        painter.setFont(QFont("SimSun", 7))  # 设置字体
        painter.drawText(QRect(10, 65, 90, 60), Qt.AlignCenter, 'SolidPattern')

        brush.setStyle(Qt.Dense1Pattern)
        painter.setBrush(brush)
        painter.drawRect(130, 15, 90, 60)
        painter.setPen(QColor(168, 150, 3))
        painter.setFont(QFont("SimSun", 7))
        painter.drawText(QRect(130, 65, 90, 60), Qt.AlignCenter, 'Dense1Pattern')

        brush.setStyle(Qt.Dense2Pattern)
        painter.setBrush(brush)
        painter.drawRect(250, 15, 90, 60)
        painter.setPen(QColor(168, 150, 3))
        painter.setFont(QFont("SimSun", 7))
        painter.drawText(QRect(250, 65, 90, 60), Qt.AlignCenter, 'Dense2Pattern')

        brush.setStyle(Qt.Dense3Pattern)
        painter.setBrush(brush)
        painter.drawRect(10, 285, 90, 60)
        painter.setPen(QColor(168, 150, 3))
        painter.setFont(QFont("SimSun", 7))
        painter.drawText(QRect(10, 335, 90, 60), Qt.AlignCenter, 'Dense3Pattern')

        brush.setStyle(Qt.DiagCrossPattern)
        painter.setBrush(brush)
        painter.drawRect(10, 105, 90, 60)
        painter.setPen(QColor(168, 150, 3))
        painter.setFont(QFont("SimSun", 7))
        painter.drawText(QRect(10, 155, 120, 60), Qt.AlignCenter, 'DiagCrossPattern')

        brush.setStyle(Qt.Dense5Pattern)
        painter.setBrush(brush)
        painter.drawRect(130, 105, 90, 60)
        painter.setPen(QColor(168, 150, 3))
        painter.setFont(QFont("SimSun", 7))
        painter.drawText(QRect(130, 155, 90, 60), Qt.AlignCenter, 'Dense5Pattern')

        brush.setStyle(Qt.Dense6Pattern)
        painter.setBrush(brush)
        painter.drawRect(250, 105, 90, 60)
        painter.setPen(QColor(168, 150, 3))
        painter.setFont(QFont("SimSun", 7))
        painter.drawText(QRect(250, 155, 90, 60), Qt.AlignCenter, 'Dense6Pattern')

        brush.setStyle(Qt.HorPattern)
        painter.setBrush(brush)
        painter.drawRect(10, 195, 90, 60)
        painter.setPen(QColor(168, 150, 3))
        painter.setFont(QFont("SimSun", 7))
        painter.drawText(QRect(10, 245, 90, 60), Qt.AlignCenter, 'HorPattern')

        brush.setStyle(Qt.VerPattern)
        painter.setBrush(brush)
        painter.drawRect(130, 195, 90, 60)
        painter.setPen(QColor(168, 150, 3))
        painter.setFont(QFont("SimSun", 7))
        painter.drawText(QRect(130, 245, 90, 60), Qt.AlignCenter, 'VerPattern')

        brush.setStyle(Qt.BDiagPattern)
        painter.setBrush(brush)
        painter.drawRect(250, 195, 90, 60)
        painter.setPen(QColor(168, 150, 3))
        painter.setFont(QFont("SimSun", 7))
        painter.drawText(QRect(250, 245, 90, 60), Qt.AlignCenter, 'BDiagPattern')

if __name__ == '__main__':
    app = QApplication(sys.argv)
    ex = qpenDemo()
    ex.show()
    sys.exit(app.exec_())
1.4 QPixmap
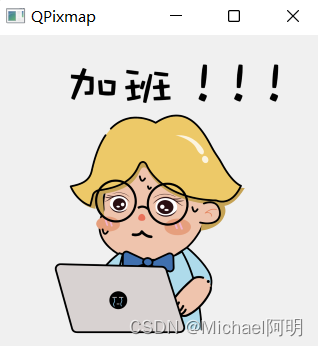
- 显示图像用的
# _*_ coding: utf-8 _*_
# @Time : 2022/5/6 23:20
# @Author : Michael
# @File : qpixmap.py
# @desc :
import sys

from PyQt5.QtGui import QPixmap
from PyQt5.QtWidgets import QApplication, QWidget, QLabel, QVBoxLayout

if __name__ == '__main__':
    app = QApplication(sys.argv)
    win = QWidget()
    label1 = QLabel()
    label1.setPixmap(QPixmap('logo.png'))
    vbox = QVBoxLayout()
    vbox.addWidget(label1)
    win.setLayout(vbox)
    win.setWindowTitle('QPixmap')
    win.show()
    sys.exit(app.exec_())
2. 拖拽与剪贴板
2.1 拖拽
- 允许拖拽的控件,需要设置
QWidget.setDragEnabled()为True
MIME介绍 :https://baike.baidu.com/item/MIME/2900607?fr=aladdin
DragEnterEvent,当执行一个拖曳控件操作,并且鼠标指针进入该控件时,这个事件将被触发,在这个事件中可以获得被操作的窗口控件,还可以有条件地接受或拒绝该拖曳操作
DragMoveEvent,在拖曳操作进行时会触发该事件
DragLeaveEvent,当执行一个拖曳控件操作,并且鼠标指针离开该控件时,这个事件将被触发
DropEvent,当拖曳操作在目标控件上被释放时,这个事件将被触发
# _*_ coding: utf-8 _*_
# @Time : 2022/5/6 23:36
# @Author : Michael
# @File : drag_demo.py
# @desc :
from PyQt5.QtWidgets import QComboBox, QWidget, QFormLayout, QLabel, QLineEdit, QApplication


class combo(QComboBox):
    def __init__(self, title, parent):
        super(combo, self).__init__(parent)
        self.setAcceptDrops(True)
    def dragEnterEvent(self, e):  # 重写dragEnterEvent方法
        print(e, e.mimeData().text())
        if e.mimeData().hasText():
            e.accept()
        else:
            e.ignore()

    def dropEvent(self, e):
        self.addItem(e.mimeData().text())

class Example(QWidget):
    def __init__(self):
        super(Example, self).__init__()
        self.initUI()

    def initUI(self):
        layout = QFormLayout()

        label = QLabel('把左边的文本拖拽到右边的下拉框中')
        layout.addRow(label)
        edit1 = QLineEdit("我是一个文本框")
        edit1.setDragEnabled(True)
        com = combo('button', self)
        layout.addRow(edit1, com)

        self.setLayout(layout)
        self.setWindowTitle('拖拽')
if __name__ == '__main__':
    import sys
    app = QApplication(sys.argv)
    ex = Example()
    ex.show()
    sys.exit(app.exec_())
选中一些文字,按住 Ctrl 移动鼠标到 下拉列表处

2.2 剪贴板 QClipboard
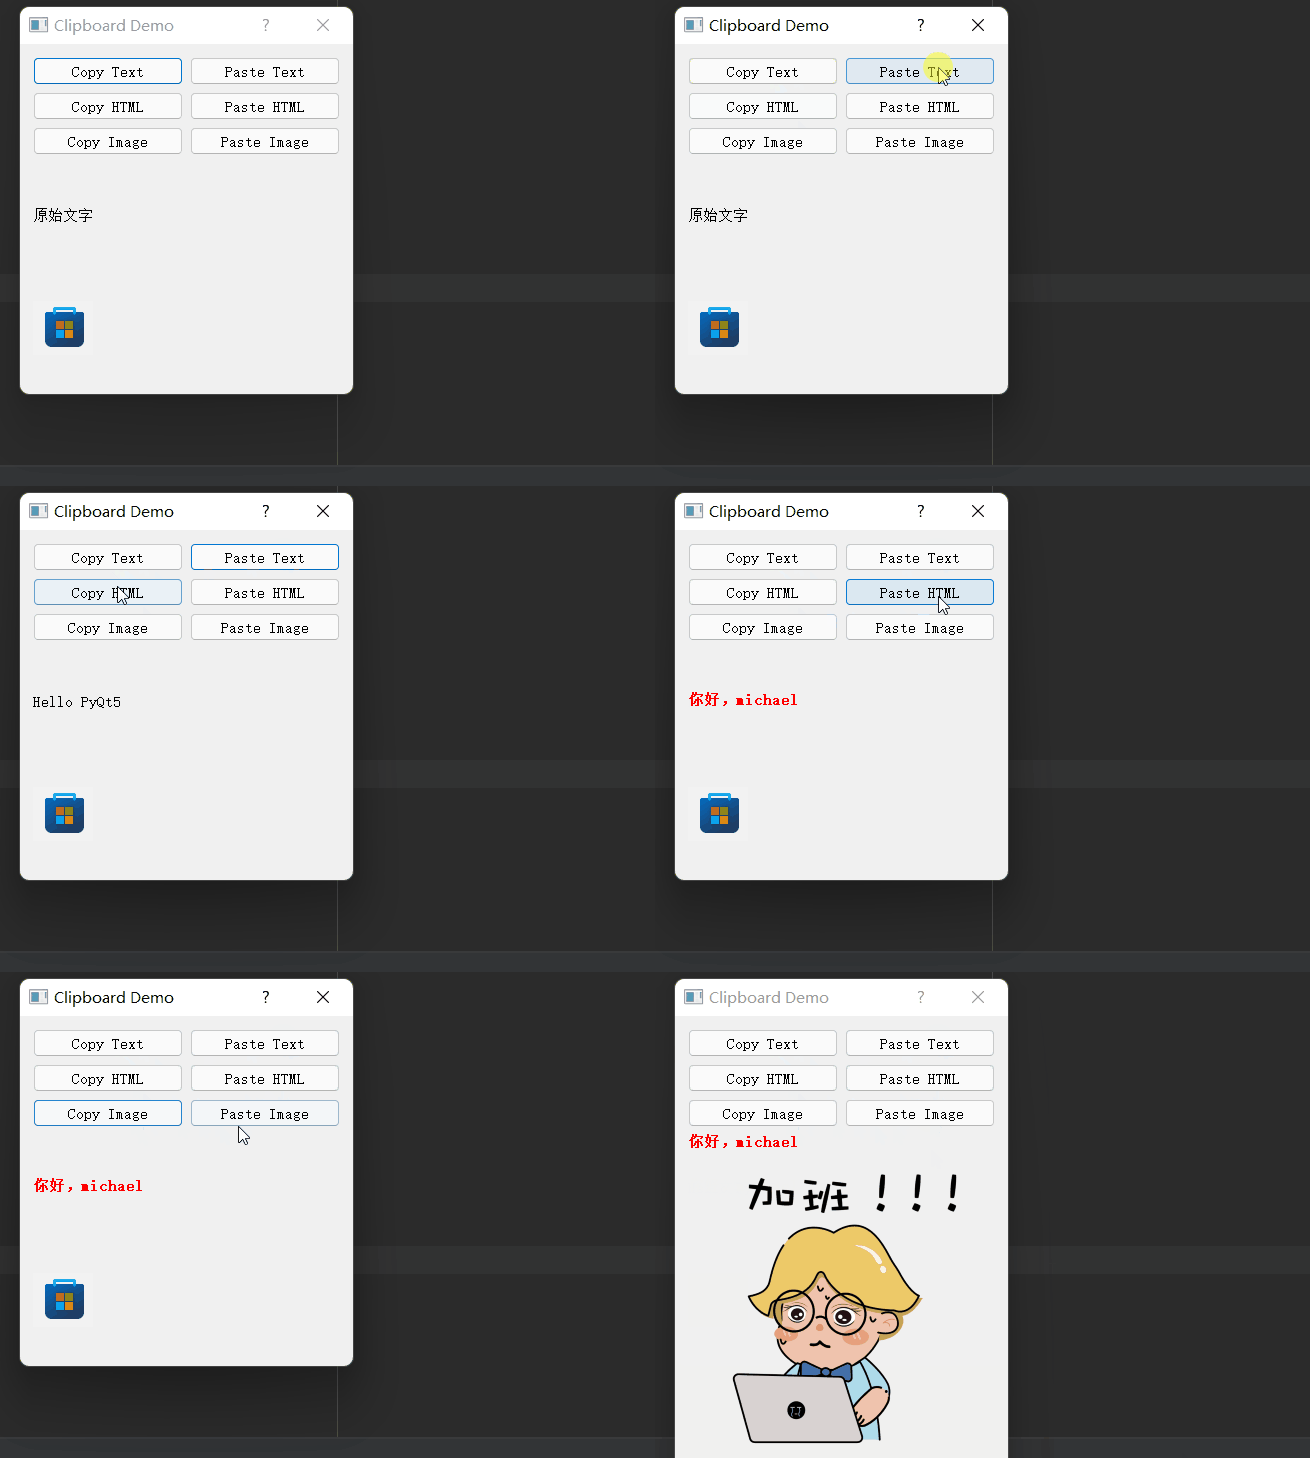
QApplication类有一个静态方法clipboard(), 它返回对剪贴板对象的引用- 任何类型的
MimeData都可以从 剪贴板 复制或粘贴
常用信号:dataChanged 剪贴板内容发生变化时 发射信号
# _*_ coding: utf-8 _*_
# @Time : 2022/5/7 9:38
# @Author : Michael
# @File : clipboard_demo.py
# @desc :
import sys

from PyQt5.QtCore import QMimeData
from PyQt5.QtGui import QPixmap
from PyQt5.QtWidgets import QDialog, QPushButton, QLabel, QGridLayout, QApplication


class myForm(QDialog):
    def __init__(self):
        super().__init__()

        textCopyButton = QPushButton("&Copy Text")
        textPasteButton = QPushButton("Paste &Text")
        htmlCopyButton = QPushButton("C&opy HTML")
        htmlPasteButton = QPushButton("Paste &HTML")
        imageCopyButton = QPushButton("Co&py Image")
        imagePasteButton = QPushButton("Paste &Image")

        self.textlabel = QLabel('原始文字')
        self.imagelabel = QLabel()
        self.imagelabel.setPixmap(QPixmap('../store.png'))

        layout = QGridLayout()
        layout.addWidget(textCopyButton, 0, 0)
        layout.addWidget(textPasteButton, 0, 1)
        layout.addWidget(htmlCopyButton, 1, 0)
        layout.addWidget(htmlPasteButton, 1, 1)
        layout.addWidget(imageCopyButton, 2, 0)
        layout.addWidget(imagePasteButton, 2, 1)
        layout.addWidget(self.textlabel, 3, 0, 1, 2)
        layout.addWidget(self.imagelabel, 4, 0, 1, 2)
        self.setLayout(layout)

        self.setWindowTitle("Clipboard Demo")
        textCopyButton.clicked.connect(self.copyText)
        textPasteButton.clicked.connect(self.pasteText)
        htmlCopyButton.clicked.connect(self.copyHtml)
        htmlPasteButton.clicked.connect(self.pasteHtml)
        imageCopyButton.clicked.connect(self.copyImage)
        imagePasteButton.clicked.connect(self.pasteImage)

    def copyText(self):
        clipboard = QApplication.clipboard()
        clipboard.setText("Hello PyQt5")

    def pasteText(self):
        clipboard = QApplication.clipboard()
        self.textlabel.setText(clipboard.text())

    def copyHtml(self):
        mimeData = QMimeData()
        mimeData.setHtml("<b><font color=red>你好,michael</font></b>")
        clipboard = QApplication.clipboard()
        clipboard.setMimeData(mimeData)

    def pasteHtml(self):
        clipboard = QApplication.clipboard()
        mimeData = clipboard.mimeData()
        if mimeData.hasHtml():
            self.textlabel.setText(mimeData.html())

    def copyImage(self):
        clipboard = QApplication.clipboard()
        clipboard.setPixmap(QPixmap('logo.png'))

    def pasteImage(self):
        clipboard = QApplication.clipboard()
        self.imagelabel.setPixmap(clipboard.pixmap())

if __name__ == '__main__':
    app = QApplication(sys.argv)
    w = myForm()
    w.show()
    sys.exit(app.exec_())
3. 日历与时间
3.1 QCalendar
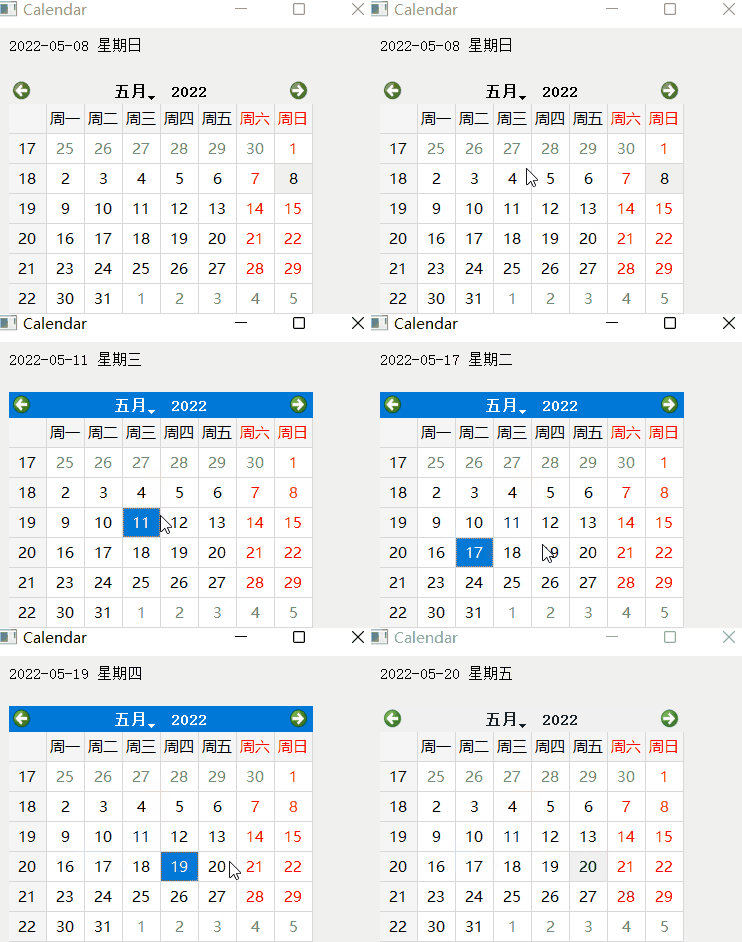
- 日历控件,基于月的视图
# _*_ coding: utf-8 _*_
# @Time : 2022/5/8 19:40
# @Author : Michael
# @File : calendar_demo.py
# @desc :
from PyQt5.QtCore import QDate
from PyQt5.QtWidgets import QWidget, QCalendarWidget, QLabel, QApplication


class CalendarDemo(QWidget):
    def __init__(self):
        super(CalendarDemo, self).__init__()
        self.initUI()

    def initUI(self):
        self.cal = QCalendarWidget(self)
        self.cal.setGridVisible(True)
        self.cal.move(20, 50)
        self.cal.setMinimumDate(QDate(2000, 1, 1))
        self.cal.setMaximumDate(QDate(2100, 12, 31))
        self.cal.clicked[QDate].connect(self.showDate)
        self.label1 = QLabel(self)
        date = self.cal.selectedDate()
        self.label1.setText(date.toString('yyyy-MM-dd dddd'))
        self.label1.move(20, 10)
        self.setGeometry(300, 300, 300, 300)
        self.setWindowTitle('Calendar')

    def showDate(self, date):
        self.label1.setText(date.toString('yyyy-MM-dd dddd'))

if __name__ == '__main__':
    import sys
    app = QApplication(sys.argv)
    w = CalendarDemo()
    w.show()
    sys.exit(app.exec_())
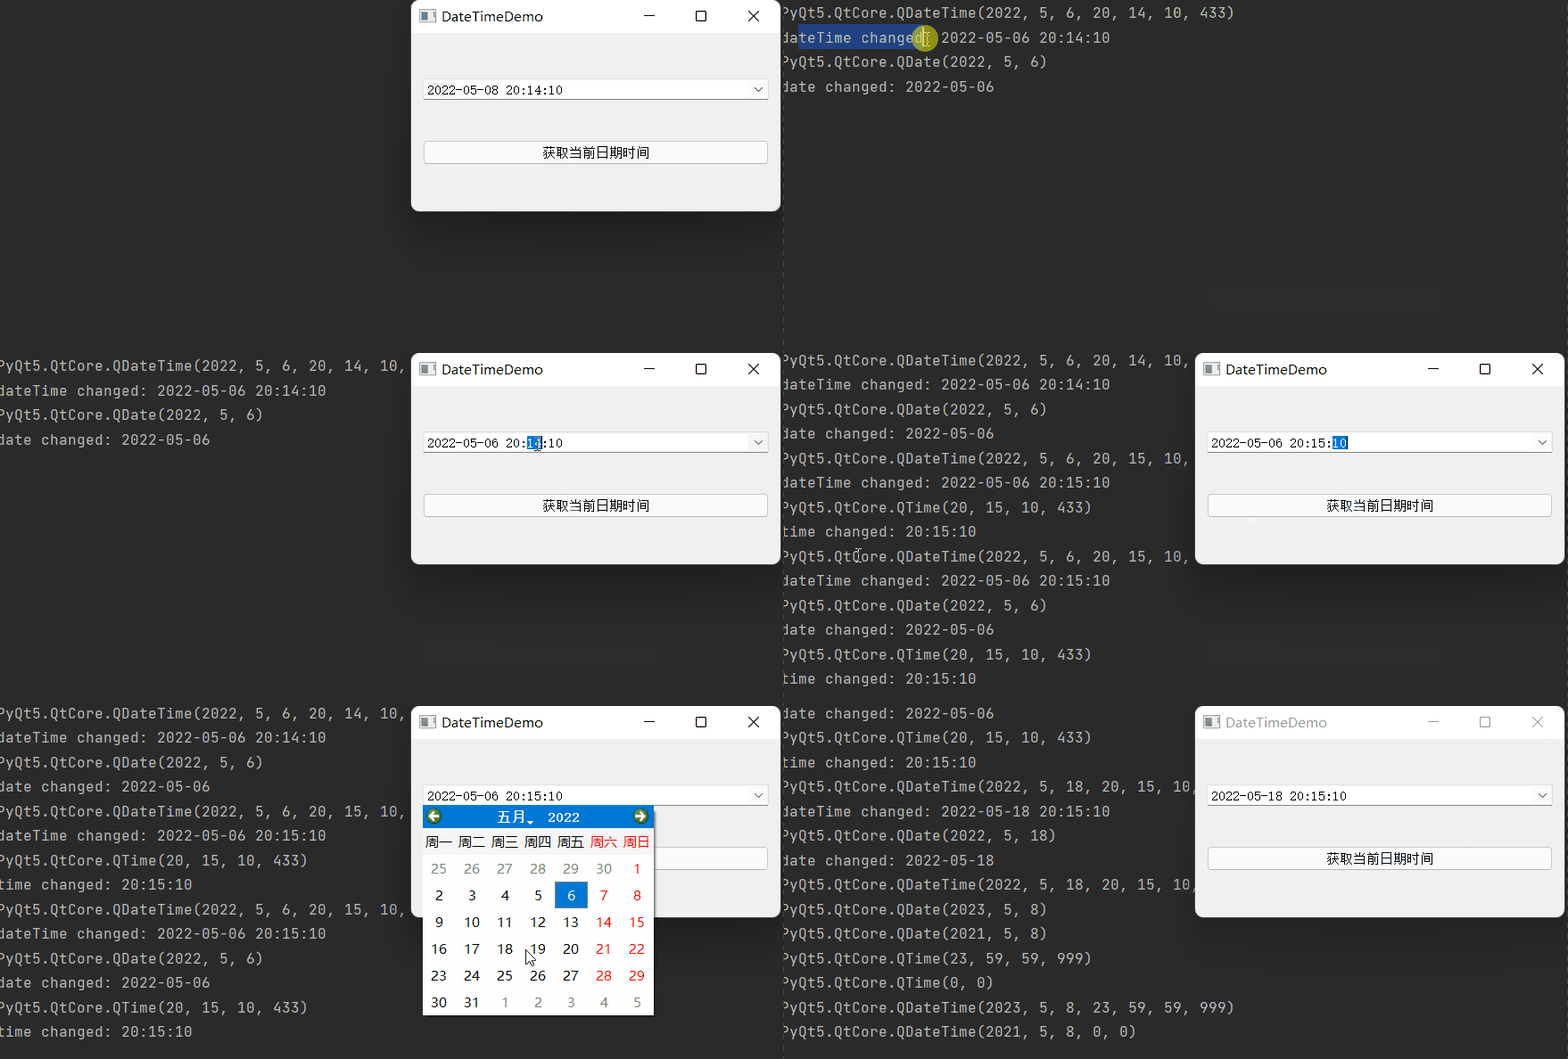
3.2 QDateTimeEdit
- 一个允许用户编辑日期时间的控件
4. 菜单栏、工具栏、状态栏
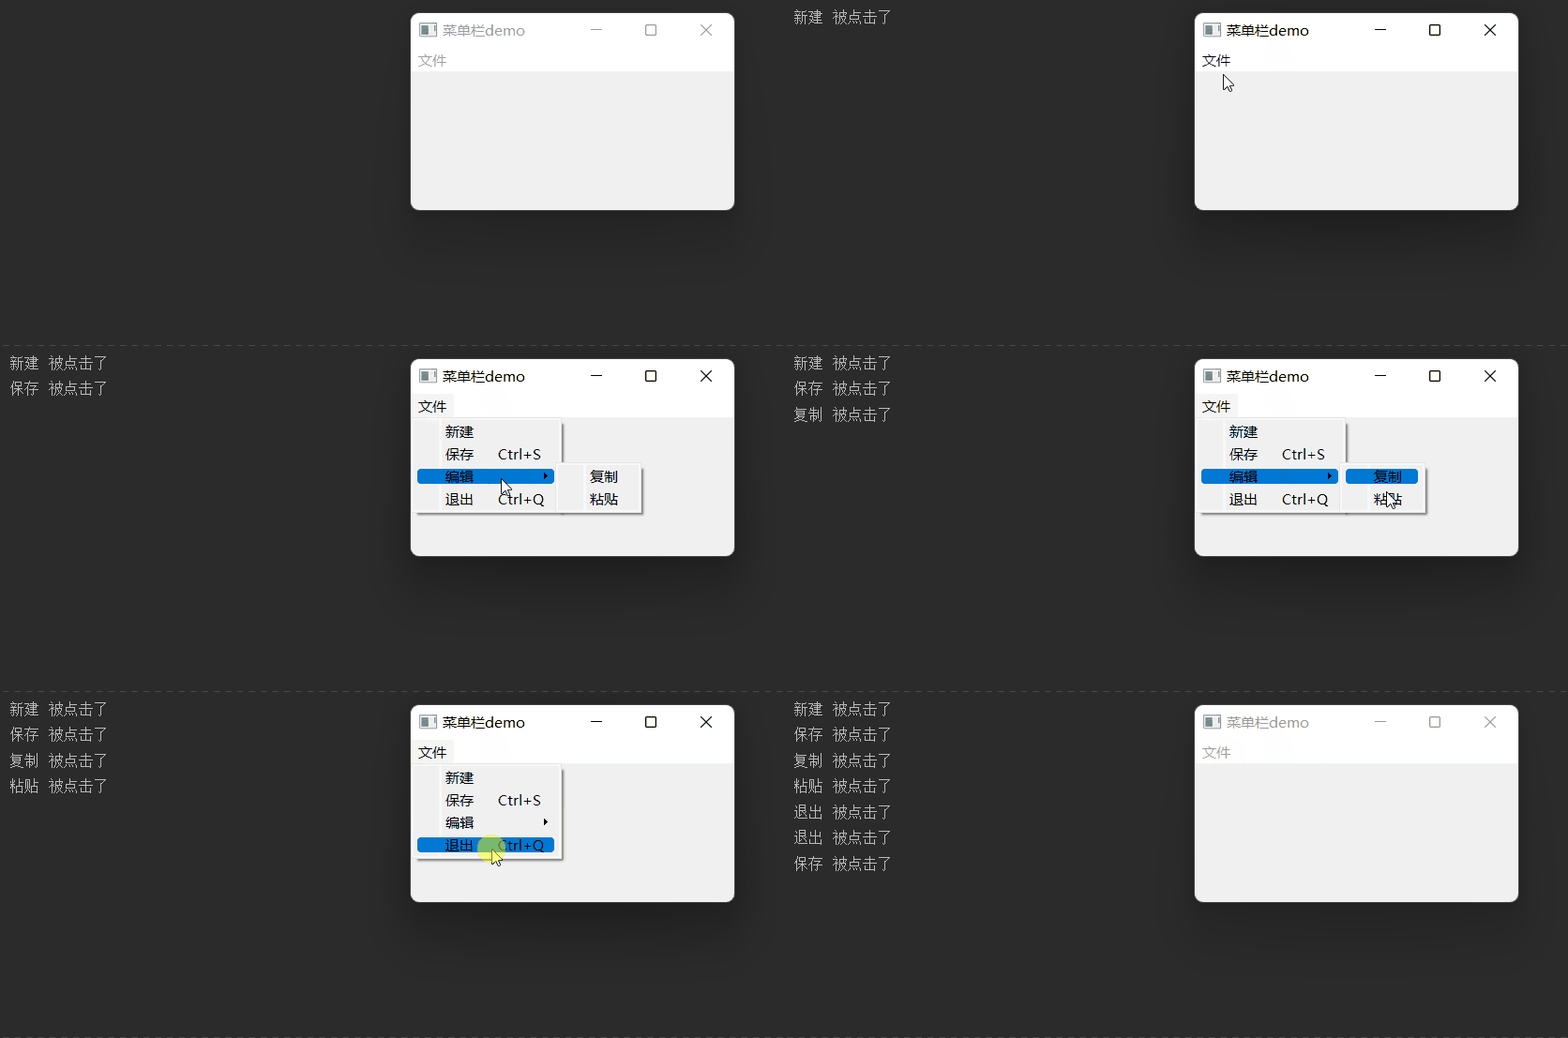
4.1 菜单栏 QMenuBar
# _*_ coding: utf-8 _*_
# @Time : 2022/5/8 20:24
# @Author : Michael
# @File : menubar_demo.py
# @desc :
from PyQt5.QtWidgets import QMainWindow, QHBoxLayout, QAction, QApplication


class MenuBarDemo(QMainWindow):
    def __init__(self):
        super(MenuBarDemo, self).__init__()
        layout = QHBoxLayout()
        bar = self.menuBar() # 获取菜单栏

        file = bar.addMenu('文件') # 创建菜单栏文件菜单
        file.addAction('新建') # 在文件菜单中添加新建菜单

        save = QAction('保存', self) # 创建保存菜单
        save.setShortcut('Ctrl+S') # 设置快捷键
        file.addAction(save) # 在文件菜单中添加保存菜单

        edit = file.addMenu('编辑') # 在文件菜单中创建编辑菜单
        edit.addAction('复制') # 在编辑菜单中添加复制菜单
        edit.addAction('粘贴') # 在编辑菜单中添加粘贴菜单

        quit = QAction('退出', self) # 创建退出菜单
        quit.setShortcut('Ctrl+Q') # 设置快捷键
        file.addAction(quit) # 在文件菜单中添加退出菜单

        file.triggered[QAction].connect(self.processTrigger) # 菜单触发事件

        self.setLayout(layout)
        self.setWindowTitle('菜单栏demo')
    def processTrigger(self, q):
        print(q.text(), '被点击了')

if __name__ == '__main__':
    import sys
    app = QApplication(sys.argv)
    win = MenuBarDemo()
    win.show()
    sys.exit(app.exec_())
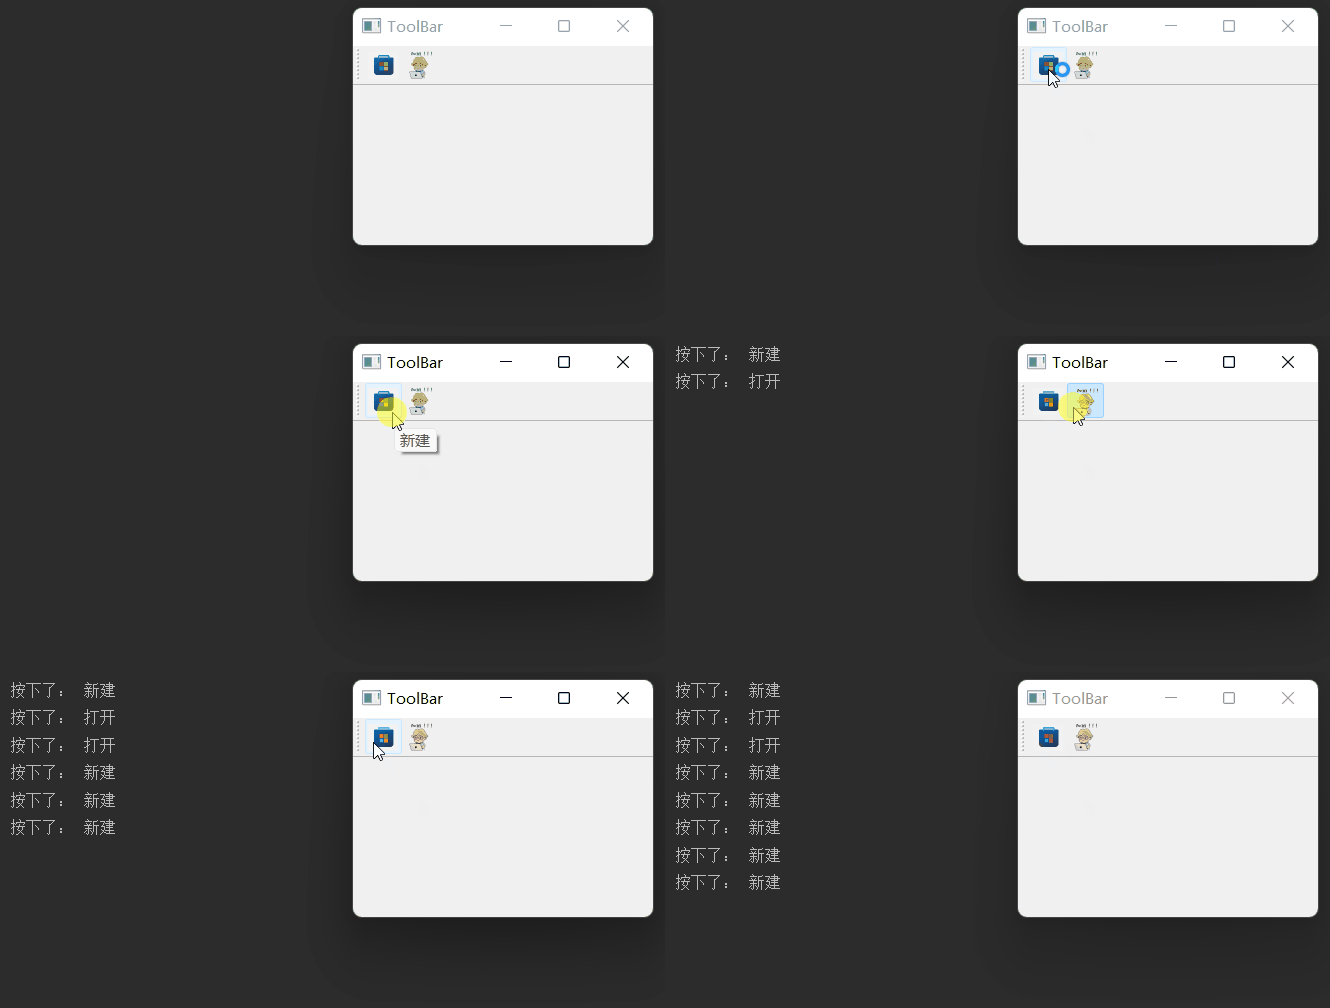
4.2 工具栏 QToolBar
工具栏通常可移动,位于菜单栏下方
# _*_ coding: utf-8 _*_
# @Time : 2022/5/8 20:36
# @Author : Michael
# @File : toolbar_demo.py
# @desc :
from PyQt5.QtGui import QIcon
from PyQt5.QtWidgets import QMainWindow, QVBoxLayout, QAction, QApplication


class ToolBarDemo(QMainWindow):
    def __init__(self):
        super(ToolBarDemo, self).__init__()
        self.setWindowTitle('ToolBar')
        self.resize(300, 200)

        layout = QVBoxLayout()
        toolbar = self.addToolBar('文件')
        new = QAction(QIcon('../store.png'), '新建', self)
        toolbar.addAction(new)
        toolbar.actionTriggered[QAction].connect(self.toolbuttonPressed)
        open = QAction(QIcon('logo.png'), '打开', self)
        toolbar.addAction(open)

        self.setLayout(layout)

    def toolbuttonPressed(self, q):
        print("按下了:", q.text())

if __name__ == '__main__':
    import sys
    app = QApplication(sys.argv)
    main = ToolBarDemo()
    main.show()
    sys.exit(app.exec_())
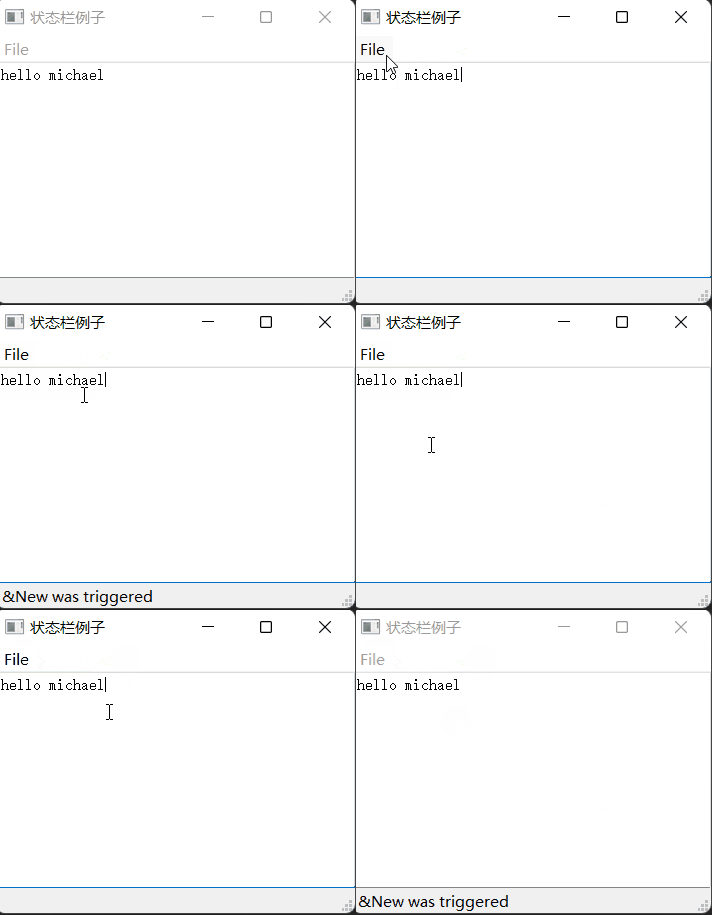
4.3 状态栏 QStatusBar
MainWindow 对象 底部保留有一个水平状态栏,显示永久 or 临时 信息
# _*_ coding: utf-8 _*_
# @Time : 2022/5/8 20:53
# @Author : Michael
# @File : statusBar_demo.py
# @desc :
from PyQt5.QtWidgets import QMainWindow, QAction, QTextEdit, QStatusBar, QApplication


class StatusBarDemo(QMainWindow):
    def __init__(self):
        super(StatusBarDemo, self).__init__()

        bar = self.menuBar()
        file = bar.addMenu('&File')
        file.addAction('&New')
        file.triggered[QAction].connect(self.processTrigger)

        self.setCentralWidget(QTextEdit())
        self.status_bar = QStatusBar()

        self.setWindowTitle("状态栏例子")
        self.setStatusBar(self.status_bar)

    def processTrigger(self, q):
        if q.text() == '&New':
            self.status_bar.showMessage(q.text() + ' was triggered', 3000)
if __name__ == '__main__':
    import sys
    app = QApplication(sys.argv)
    main = StatusBarDemo()
    main.show()
    sys.exit(app.exec_())
5. QPrinter
其本质上也是一个绘图设备 QPaintDevice
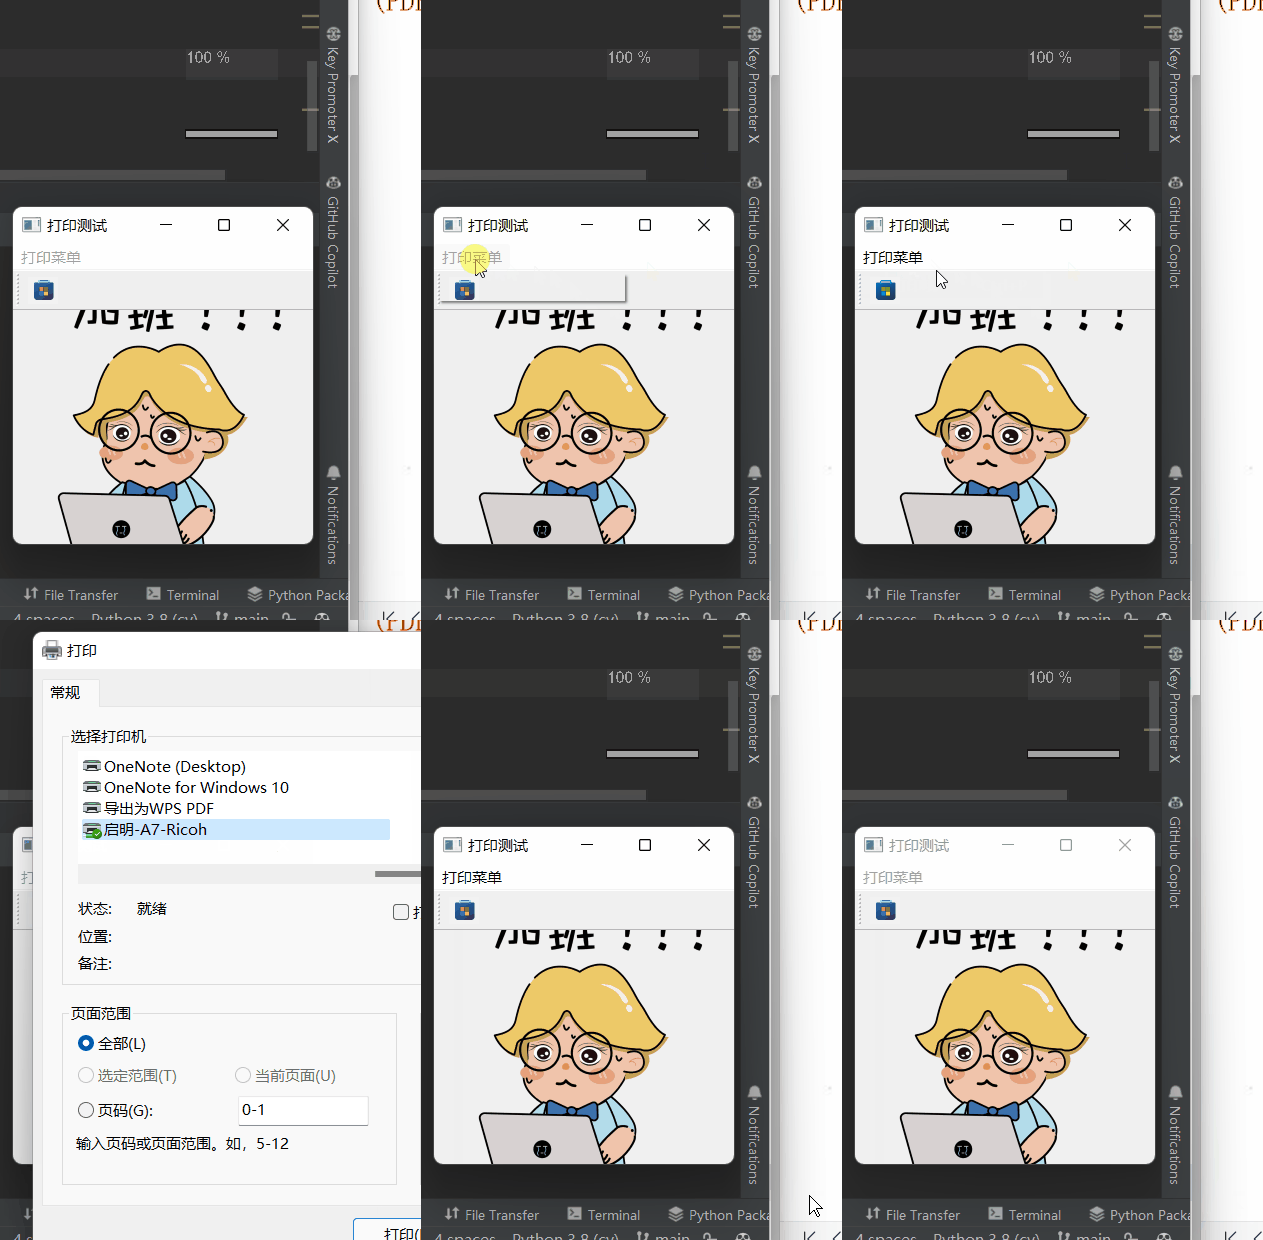
# _*_ coding: utf-8 _*_
# @Time : 2022/5/8 21:14
# @Author : Michael
# @File : qprinter.py
# @desc :
from PyQt5.QtGui import QImage, QPixmap, QIcon, QPainter
from PyQt5.QtPrintSupport import QPrinter, QPrintDialog
from PyQt5.QtWidgets import QMainWindow, QLabel, QSizePolicy, QAction, QApplication
from PyQt5.QtCore import Qt, QPoint


class printer_demo(QMainWindow):
    def __init__(self):
        super(printer_demo, self).__init__()
        self.setWindowTitle(self.tr("打印测试"))  # tr 函数用于以后翻译为其他语言
        self.imageLabel = QLabel()
        self.imageLabel.setSizePolicy(QSizePolicy.Ignored, QSizePolicy.Ignored)
        self.setCentralWidget(self.imageLabel)

        self.image = QImage()
        self.createActions()
        self.createMenus()
        self.createToolBars()

        if self.image.load('logo.png'):
            self.imageLabel.setPixmap(QPixmap.fromImage(self.image))
            self.resize(self.image.width(), self.image.height())
    def createActions(self):
        self.printAct = QAction(QIcon('../store.png'), self.tr("打印哦"), self)
        self.printAct.setShortcut('Ctrl+P')
        self.printAct.setStatusTip(self.tr("打印图像"))
        self.printAct.triggered.connect(self.printImage)

    def createMenus(self):
        printmenu = self.menuBar().addMenu(self.tr("打印菜单"))
        printmenu.addAction(self.printAct) #

    def createToolBars(self):
        printToolBar = self.addToolBar(self.tr("打印!"))
        printToolBar.addAction(self.printAct)

    def printImage(self):
        printer = QPrinter()
        printDialog = QPrintDialog(printer, self)
        if printDialog.exec_():
            print('打印中...')
            painter = QPainter(printer)
            rect = painter.viewport()
            print(rect)
            size = self.image.size()
            print(size)
            size.scale(rect.size(), Qt.KeepAspectRatio)
            print('after scale: ', size)
            painter.setViewport(rect.x(), rect.y(), size.width(), size.height())
            painter.setWindow(self.image.rect())
            print(self.image.rect())
            painter.drawImage(QPoint(0, 0), self.image)
if __name__ == '__main__':
    import sys
    app = QApplication(sys.argv)
    window = printer_demo()
    window.show()
    sys.exit(app.exec_())
