用pygame编写单人RPG小游戏(一)
介绍
RPG(Role-Playing Game),角色扮演游戏 是游戏类型的一种,玩家在游戏中负责扮演英雄角色在一个写实或虚构世界中活动1。
Pygame框架,也叫作Pygame库 使得开发2D图形程序变得很容易2。当你明白了Pygame是如何工作的,以及它提供了哪些功能,你会发现编写视频游戏程序,只不过是点亮像素,让漂亮的图片出现在屏幕上以响应键盘和鼠标输入而已2。
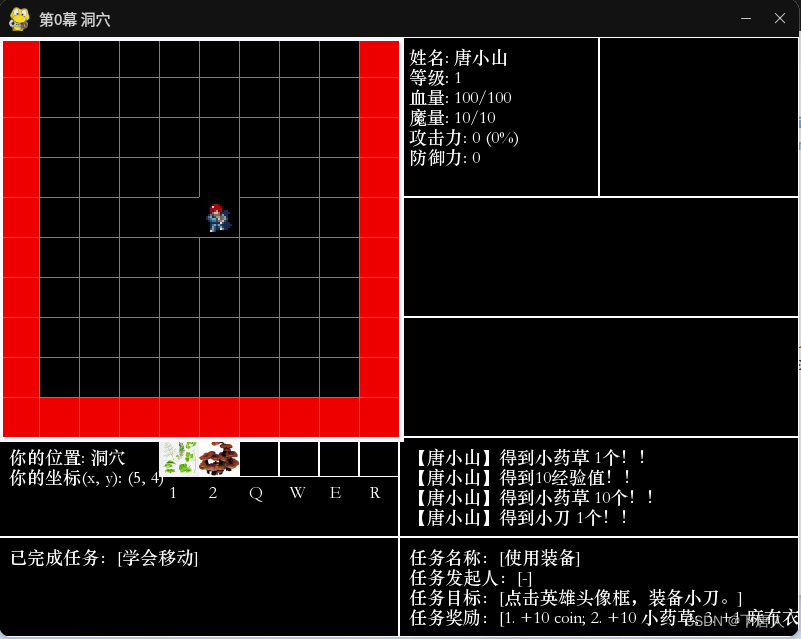
本文作者结合参考书的学习和自己的实践经验,开发了《唐小山的世界》小游戏。在本游戏中,英雄唐小山不小心掉到一个洞穴里3。想要离开洞穴,需要打败各种怪物使自己变强,最终打败看守洞口的Boss怪赢得游戏的胜利,如下图所示。本文将逐步介绍这个游戏是如何实现的。

一、构建游戏地图界面
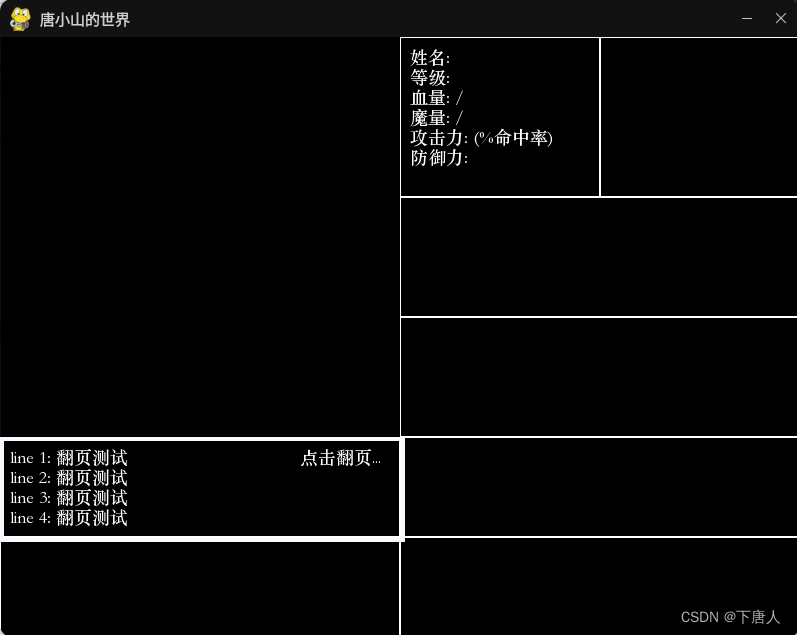
游戏屏幕的宽高设置为800 x 600像素,将这个屏幕划分成九个部分,如下图所示。
 这个界面实现的原理是让pygame进入主循环,然后不断地在屏幕上画9个矩形。这九个矩形的
left, top, width, height可以设置为常量。
然后要建立9个列表(list),分别负责在9个消息框中打印。
然后要实现鼠标移动到这9个框上时高亮显示该信息框2,信息过多的时候鼠标点击翻页。
为了实现这个框架,我们需要建立一个游戏运行程序run.py,和5个游戏模块GameConst.py、Game.py、Player.py、Hero.py、Narration.py。
GameConst模块用来存放游戏相关的常量。
Game模块包括Game类,其中包含运行游戏、显示游戏屏幕、打印消息、响应玩家鼠标移动和点击的方法。
Player模块包含Player类,其中包含处理英雄角色数据的方法,如显示英雄属性、给消息框增加内容。
Hero模块包含Hero类,其中包含英雄角色的属性(如姓名)。
Narration模块包括显示文字形式的游戏剧本的函数。
run.py程序
run.py的代码如下:
import pygame, sys
import Game, GameConst, Player, Hero
from pygame.locals import *

def main():
	# 建立游戏对象,设置游戏窗体,显示和打印各种信息的操作
	# fps = [6, 12],6稍微慢了点(要按很长时间才反应),12稍微快了点(按一次键反应多次)
	game = Game.Game(GameConst.fps, GameConst.window_width, GameConst.window_height, '唐小山的世界')

	# 建立玩家对象,追踪玩家相关操作,记录玩家数据
	player = Player.Player()

	# 建立英雄对象
	hero = Hero.Hero()

	# 主循环
	while True:
		# 事件处理
		for event in pygame.event.get():
			if event.type == QUIT:	# 退出
				pygame.quit()
				sys.exit()
			elif event.type == MOUSEMOTION:	# 记录玩家鼠标位置
				player.mouseX, player.mouseY = event.pos

		if player.game_process < GameConst.WALKING_ON_THE_MAP and player.game_process >= 0:
			# 游戏介绍流程
			game.display_introduction(hero, player, game)
		elif player.game_process >= GameConst.WALKING_ON_THE_MAP and player.game_process < 90:
			# 在地图上行走,更新精灵,刷新技能
			game.display_map(player, game)

		# 处理鼠标移动事件
		game.respond_to_mouse_motion(player, game)

		# 处理鼠标单击事件
		b1, b2, b3 = pygame.mouse.get_pressed()
		game.respond_to_click(b1, b2, b3, player, game)

		# 将game.DISPLAYSURF对象绘制到屏幕上
		pygame.display.update()

		# 生成游戏时间控制
		game.tick()

if __name__ == '__main__':
	while True:
		main()
首先建立了Game对象、Player对象和Hero对象。数据都存放在这些对象中,这些对象通过方法传递到其他模块中,对这些对象中的数据进行读写。
游戏的主循环主要包括对玩家鼠标移动时位置进行跟踪,然后根据player对象中的game_process变量的值判断游戏进度,如果刚开始则显示过场动画,如果在地图上则显示消息。
最后是鼠标点击事件的响应,b1、b2、b3均为0,左键单击时b1为1,右键单击时b3为1,同时按下左键和右键则b2为1。
GameConst.py模块
GameConst.py的代码如下:
# 游戏的帧率,每秒钟刷新9次
fps = 9

# 游戏屏幕的宽和高
window_width = 800
window_height = 600

# 消息框中的文字大小
FontSize = 18
FontHeight = 20
TextMargin = 10

# 9个消息框的参数:left, top, width, height
MapBox = (0, 0, 400, 400)
MsgBox1 = (0, 400, 400, 100)
MsgBox2 = (0, 500, 400, 100)
MsgBox3 = (400, 0, 200, 160)
MsgBox4 = (600, 0, 200, 160)
MsgBox5 = (400, 160, 400, 120)
MsgBox6 = (400, 280, 400, 120)
MsgBox7 = (400, 400, 400, 100)
MsgBox8 = (400, 500, 400, 100)

# 过场信息的消息框
MsgBoxF1 = (0, 0, 800, 600)

# 游戏状态常量
# 英雄胜利/失败,小于0
HERO_WIN = -2
HERO_LOST = -1
# 英雄动作,1~10
WALKING_ON_THE_MAP = 7
HERO_ATTACKING = 9
# 显示英雄属性面板,大于90
HERO_PROPERTIES_PANEL = 91
SKILLS_PANEL = 93
可以看到,在这里定义了一些常量,使用的时候只要在run.py中用import导入本模块,就可以直接使用这些常量:
>>> import GameConst
>>> GameConst.WALKING_ON_THE_MAP
7
Game.py模块
Game.py的代码如下:
import pygame, sys, os, random
import RGB, GameConst, Narration, Player, Hero

class Game():
	def __init__(self, fps, window_width, window_height, caption):
		pygame.init()

		# 设置帧率
		self.__f = fps
		self.__c = pygame.time.Clock()

		# 设置窗口和字体
		self.window_width = window_width
		self.window_height = window_height
		self.DISPLAYSURF = pygame.display.set_mode((self.window_width, self.window_height))
		self.FONT1 = pygame.font.SysFont('stzhongsong', 18)

		# 设置窗口标题
		self.__caption = caption
		pygame.display.set_caption(caption)

		# 9个消息框
		self.message_1 = []
		self.message_2 = []
		self.message_3 = []
		self.message_4 = []
		self.message_5 = []
		self.message_6 = []
		self.message_7 = []
		self.message_8 = []
		self.message_F1 = []

	# 设置一些get/set方法,作为对象的属性
	def _getd(self): return self.DISPLAYSURF
	def _setd(self, value): self.DISPLAYSURF = value
	screen = property(_getd, _setd)

	def _getf(self): return self.__f
	def _setf(self, value): self.__f = value
	FPS = property(_getf, _setf)

	def _getc(self): return self.__c
	def _setc(self, value): self.__c = value
	fpsClock = property(_getc, _setc)

	def _getcaption(self): return self.__caption
	def _setcaption(self, value): self.__caption = value
	caption = property(_getcaption, _setcaption)

	def tick(self):
		''' 自动的暂停,控制帧速率 '''
		self.fpsClock.tick(self.FPS)

	def fill(self, color):
		self.DISPLAYSURF.fill(color)

	def print_text(self, font, x, y, text, color=RGB.White, shadow=True):
		''' 使用选定的字体font,在(x, y)位置开始以颜色color打印文本text。'''
		imgText = font.render(text, True, color)
		self.DISPLAYSURF.blit(imgText, (x, y))

	def print_message_F1(self):
		''' 在过场动画信息框内打印消息。'''
		s = self.message_F1
		left, top, width, height = GameConst.MsgBoxF1
		for i, v in enumerate(s):
			self.print_text(self.FONT1, left+GameConst.TextMargin, top+GameConst.TextMargin+i*GameConst.FontHeight, v, RGB.White)

	def print_message_1(self):
		''' 在位置信息框内打印消息。'''
		s = self.message_1[0:4] # 如果消息过多,则显示前4条,鼠标点击消息框接着显示之后的。
		left, top, width, height = GameConst.MsgBox1
		for i, v in enumerate(s):
			self.print_text(self.FONT1, left+GameConst.TextMargin, top+GameConst.TextMargin+i*GameConst.FontHeight, v, RGB.White)
		if len(self.message_1) > 4:
			self.print_text(self.FONT1, left+300, top+GameConst.TextMargin, '点击翻页...', RGB.White)

	def print_message_2(self):
		''' 在战斗提示信息框内打印消息。'''
		s = self.message_2[0:4]
		left, top, width, height = GameConst.MsgBox2
		for i, v in enumerate(s):
			self.print_text(self.FONT1, left+GameConst.TextMargin, top+GameConst.TextMargin+i*GameConst.FontHeight, v, RGB.White)
		if len(self.message_2) > 4:
			self.print_text(self.FONT1, left+300, top+GameConst.TextMargin, '点击翻页...', RGB.White)

	def print_message_3(self):
		''' 在角色属性框内打印消息。'''
		s = self.message_3
		for i, v in enumerate(s):
			left, top, width, height = GameConst.MsgBox3
			self.print_text(self.FONT1, left+GameConst.TextMargin, top+GameConst.TextMargin+i*GameConst.FontHeight, v, RGB.White)

	def print_message_4(self):
		''' 在怪属性框内打印消息。'''
		s = self.message_4
		for i, v in enumerate(s):
			left, top, width, height = GameConst.MsgBox4
			self.print_text(self.FONT1, left+GameConst.TextMargin, top+GameConst.TextMargin+i*GameConst.FontHeight, v, RGB.White)

	def print_message_5(self):
		''' 在英雄攻击信息框内打印消息。'''
		s = self.message_5
		for i, v in enumerate(s):
			left, top, width, height = GameConst.MsgBox5
			self.print_text(self.FONT1, left+GameConst.TextMargin, top+GameConst.TextMargin+i*GameConst.FontHeight, v, RGB.White)

	def print_message_6(self):
		''' 在怪攻击信息框内打印消息。'''
		s = self.message_6
		for i, v in enumerate(s):
			left, top, width, height = GameConst.MsgBox6
			self.print_text(self.FONT1, left+GameConst.TextMargin, top+GameConst.TextMargin+i*GameConst.FontHeight, v, RGB.White)

	def print_message_7(self):
		''' 在拾到东西信息框内打印消息。'''
		s = self.message_7[0:4]
		left, top, width, height = GameConst.MsgBox7
		for i, v in enumerate(s):
			self.print_text(self.FONT1, left+GameConst.TextMargin, top+GameConst.TextMargin+i*GameConst.FontHeight, v, RGB.White)
		if len(self.message_7) > 4:
			self.print_text(self.FONT1, left+300, top+GameConst.TextMargin, '点击翻页...', RGB.White)

	def print_message_8(self):
		''' 在英雄升级信息框内打印消息。'''
		s = self.message_8[0:4]
		left, top, width, height = GameConst.MsgBox8
		for i, v in enumerate(s):
			self.print_text(self.FONT1, left+GameConst.TextMargin, top+GameConst.TextMargin+i*GameConst.FontHeight, v, RGB.White)
		if len(self.message_8) > 4:
			self.print_text(self.FONT1, left+300, top+GameConst.TextMargin, '点击翻页...', RGB.White)

	def display_introduction(self, hero, player, game):
		''' 显示过场动画的内容。'''
		self.fill(RGB.Black)
		Narration.display_introduction(hero, player, game)

	def display_map(self, player, game):
		self.fill(RGB.Black)

		# 位置信息框
		pygame.draw.rect(self.DISPLAYSURF, RGB.Black, GameConst.MsgBox1, 0)
		pygame.draw.rect(self.DISPLAYSURF, RGB.White, GameConst.MsgBox1, 1)

		# 战斗提示框
		pygame.draw.rect(self.DISPLAYSURF, RGB.Black, GameConst.MsgBox2, 0)
		pygame.draw.rect(self.DISPLAYSURF, RGB.White, GameConst.MsgBox2, 1)

		# 角色属性框
		pygame.draw.rect(self.DISPLAYSURF, RGB.Black, GameConst.MsgBox3, 0)
		pygame.draw.rect(self.DISPLAYSURF, RGB.White, GameConst.MsgBox3, 1)

		# 怪属性框
		pygame.draw.rect(self.DISPLAYSURF, RGB.Black, GameConst.MsgBox4, 0)
		pygame.draw.rect(self.DISPLAYSURF, RGB.White, GameConst.MsgBox4, 1)

		# 英雄攻击信息框
		pygame.draw.rect(self.DISPLAYSURF, RGB.Black, GameConst.MsgBox5, 0)
		pygame.draw.rect(self.DISPLAYSURF, RGB.White, GameConst.MsgBox5, 1)

		# 怪攻击信息框
		pygame.draw.rect(self.DISPLAYSURF, RGB.Black, GameConst.MsgBox6, 0)
		pygame.draw.rect(self.DISPLAYSURF, RGB.White, GameConst.MsgBox6, 1)

		# 拾到东西信息框
		pygame.draw.rect(self.DISPLAYSURF, RGB.Black, GameConst.MsgBox7, 0)
		pygame.draw.rect(self.DISPLAYSURF, RGB.White, GameConst.MsgBox7, 1)

		# 帮助信息框
		pygame.draw.rect(self.DISPLAYSURF, RGB.Black, GameConst.MsgBox8, 0)
		pygame.draw.rect(self.DISPLAYSURF, RGB.White, GameConst.MsgBox8, 1)

		if player.game_process >= GameConst.WALKING_ON_THE_MAP and player.game_process < 90:
			# 打印位置信息
			player.pageup_test(game)	# 测试翻页
			self.print_message_1()

			# 显示战斗开始的信息
			self.print_message_2()

			# 显示英雄属性的信息
			player.display_attribution(game)
			self.print_message_3()

			# 显示怪属性的信息
			self.print_message_4()

			# 英雄攻击的数据信息
			self.print_message_5()

			# 怪攻击的数据信息
			self.print_message_6()

			# 捡到东西的提示信息
			self.print_message_7()

			# 辅助和额外事件的提示信息
			self.print_message_8()

	def respond_to_click(self, b1, b2, b3, player, game):
		x, y = player.mouseX, player.mouseY
		# 右键单击事件的响应
		if b3:
			# 如果游戏进度处于过场动画介绍,则跳过
			if player.game_process < GameConst.WALKING_ON_THE_MAP and player.game_process >= 0:
				player.game_process = GameConst.WALKING_ON_THE_MAP
		# 左键单击事件的响应
		elif b1:
			# 如果游戏进度处于过场动画,继续播放下一个场景
			if player.game_process < GameConst.WALKING_ON_THE_MAP and player.game_process >= 0:
				player.game_process += 1
			# 如果游戏进度处于地图,则显示9个信息框的内容
			elif player.game_process == GameConst.WALKING_ON_THE_MAP:
				# 点击翻页
				MsgBox1 = pygame.Rect(GameConst.MsgBox1)
				if MsgBox1.collidepoint(x, y):
					if len(self.message_1) > 4:
						self.message_1 = self.message_1[4:]
				# 点击翻页
				MsgBox2 = pygame.Rect(GameConst.MsgBox2)
				if MsgBox2.collidepoint(x, y):
					if len(self.message_2) > 4:
						self.message_2 = self.message_2[4:]
				# 点击翻页
				MsgBox7 = pygame.Rect(GameConst.MsgBox7)
				if MsgBox7.collidepoint(x, y):
					if len(self.message_7) > 4:
						self.message_7 = self.message_7[4:]
				# 点击翻页
				MsgBox8 = pygame.Rect(GameConst.MsgBox8)
				if MsgBox8.collidepoint(x, y):
					if len(self.message_8) > 4:
						self.message_8 = self.message_8[4:]

	def respond_to_mouse_motion(self, player, game):
		x, y = player.mouseX, player.mouseY
		# 如果游戏进度处于地图,则跟随鼠标的移动,高亮某个信息框
		if player.game_process >= GameConst.WALKING_ON_THE_MAP and player.game_process <= GameConst.HERO_ATTACKING:
			# 如果鼠标点与地图框碰撞,则高亮该框
			MapBox = pygame.Rect(GameConst.MapBox)
			if MapBox.collidepoint(x, y):
				left, top, width, height = GameConst.MapBox
				pygame.draw.rect(self.DISPLAYSURF, RGB.GhostWhite, (left, top, width+5, height+5), 4)
			# 如果鼠标点与位置信息框碰撞,则高亮该框
			MsgBox1 = pygame.Rect(GameConst.MsgBox1)
			if MsgBox1.collidepoint(x, y):
				left, top, width, height = GameConst.MsgBox1
				pygame.draw.rect(self.DISPLAYSURF, RGB.GhostWhite, (left, top, width+5, height+5), 4)
			# 如果鼠标点与战斗提示信息框碰撞,则高亮该框
			MsgBox2 = pygame.Rect(GameConst.MsgBox2)
			if MsgBox2.collidepoint(x, y):
				left, top, width, height = GameConst.MsgBox2
				pygame.draw.rect(self.DISPLAYSURF, RGB.GhostWhite, (left, top, width+5, height+5), 4)
			# 如果鼠标点与角色属性框碰撞,则高亮该框
			MsgBox3 = pygame.Rect(GameConst.MsgBox3)
			if MsgBox3.collidepoint(x, y):
				left, top, width, height = GameConst.MsgBox3
				pygame.draw.rect(self.DISPLAYSURF, RGB.GhostWhite, (left, top, width+5, height+5), 4)
			# 如果鼠标点与怪属性框碰撞,则高亮该框
			MsgBox4 = pygame.Rect(GameConst.MsgBox4)
			if MsgBox4.collidepoint(x, y):
				left, top, width, height = GameConst.MsgBox4
				pygame.draw.rect(self.DISPLAYSURF, RGB.GhostWhite, (left, top, width+5, height+5), 4)
			# 如果鼠标点与英雄攻击信息框碰撞,则高亮该框
			MsgBox5 = pygame.Rect(GameConst.MsgBox5)
			if MsgBox5.collidepoint(x, y):
				left, top, width, height = GameConst.MsgBox5
				pygame.draw.rect(self.DISPLAYSURF, RGB.GhostWhite, (left, top, width+5, height+5), 4)
			# 如果鼠标点与怪攻击信息框碰撞,则高亮该框
			MsgBox6 = pygame.Rect(GameConst.MsgBox6)
			if MsgBox6.collidepoint(x, y):
				left, top, width, height = GameConst.MsgBox6
				pygame.draw.rect(self.DISPLAYSURF, RGB.GhostWhite, (left, top, width+5, height+5), 4)
			# 如果鼠标点与拾到东西信息框碰撞,则高亮该框
			MsgBox7 = pygame.Rect(GameConst.MsgBox7)
			if MsgBox7.collidepoint(x, y):
				left, top, width, height = GameConst.MsgBox7
				pygame.draw.rect(self.DISPLAYSURF, RGB.GhostWhite, (left, top, width+5, height+5), 4)
			# 如果鼠标点与英雄升级信息框碰撞,则高亮该框
			MsgBox8 = pygame.Rect(GameConst.MsgBox8)
			if MsgBox8.collidepoint(x, y):
				left, top, width, height = GameConst.MsgBox8
				pygame.draw.rect(self.DISPLAYSURF, RGB.GhostWhite, (left, top, width+5, height+5), 4)
这里首先设置了一些get/set方法,作为类的property。注意property的名字不能和类成员变量的名字相同。如果要把类的成员变量做成property,可以把成员变量前面加两个下划线,以示区别。如:
	self.__caption = caption
	def _getcaption(self): return self.__caption
	def _setcaption(self, value): self.__caption = value
	caption = property(_getcaption, _setcaption)
接着用display_map()方法把消息框显示在地图上,原理是画矩形,矩形的位置、宽高已经在GameConst模块中定义好了。在这里画了两个矩形,一个填充,一个描边。
pygame.draw.rect(self.DISPLAYSURF, RGB.Black, GameConst.MsgBox1, 0) # 0 - 填充
pygame.draw.rect(self.DISPLAYSURF, RGB.White, GameConst.MsgBox1, 1) # 1 - 线条宽度为1
接着是用print_text在矩形框中打印消息。由于每个消息框最多容纳4行文字,所以增加了翻页功能,原理是打印时只打印前四行,鼠标在消息框上点击时将前4行文字从列表中删除。
if len(self.message_1) > 4:
	self.message_1 = self.message_1[4:]
最后在respond_to_mouse_motion方法中处理对玩家鼠标移动的响应。在这里实现了鼠标移动到某消息框上,高亮该框。原理是在游戏主循环中不断检测鼠标位置,鼠标的位置可以视为一个点,如果它与代表消息框的某个矩形碰撞,则在消息框的周围画个高亮的矩形。
x, y = player.mouseX, player.mouseY
MapBox = pygame.Rect(GameConst.MapBox)
if MapBox.collidepoint(x, y):
	left, top, width, height = GameConst.MapBox
	pygame.draw.rect(self.DISPLAYSURF, RGB.GhostWhite, (left, top, width+5, height+5), 4)
Player.py模块
Player.py的代码如下:
import pygame, sys, RGB, random, GameConst, re

class Player():
	def __init__(self):
		# 记录鼠标的位置
		self.__x = 0
		self.__y = 0
		# 设置一个变量,跟踪游戏进度
		self.__p = 0 # game process
		# 与游戏进度相对应的英雄状态
		self.__status = GameConst.WALKING_ON_THE_MAP

	def _getstatus(self): return self.__status
	def _setstatus(self, value): self.__status = value
	status = property(_getstatus, _setstatus)

	def _getp(self): return self.__p
	def _setp(self, value): self.__p = value
	game_process = property(_getp, _setp)

	def _getmousex(self): return self.__x
	def _setmousex(self, value): self.__x = value
	mouseX = property(_getmousex, _setmousex)

	def _getmousey(self): return self.__y
	def _setmousey(self, value): self.__y = value
	mouseY = property(_getmousey, _setmousey)

	def display_attribution(self, game):
		''' 在角色属性框显示英雄属性。'''
		game.message_3 = []
		game.message_3.append('姓名: ')
		game.message_3.append('等级: ')
		game.message_3.append('血量: /')
		game.message_3.append('魔量: /')
		game.message_3.append('攻击力: (%命中率)')
		game.message_3.append('防御力: ')

	def pageup_test(self, game):
		''' 在角色属性框显示英雄属性。'''
		game.message_1 = []
		game.message_1.append('line 1: 翻页测试')
		game.message_1.append('line 2: 翻页测试')
		game.message_1.append('line 3: 翻页测试')
		game.message_1.append('line 4: 翻页测试')
		game.message_1.append('line 5: 翻页测试')
		game.message_1.append('line 6: 翻页测试')
mouseX和mouseY用来记录鼠标的位置,game_process和status用来记录游戏进度和玩家的状态。
Hero.py模块
Hero.py的代码如下:
import GameConst, random

class Hero():
	def __init__(self):
		self.__name = '唐小山'

	def _getname(self): return self.__name
	def _setname(self, value): self.__name = value
	name = property(_getname, _setname)

	def speaking(self, s):
		return '【{}】'.format(self.name) + s
这样,这个游戏基本的框架就搭建起来了,接下来就是往模块里增加更多内容。以上示例的运行结果如下。

源代码已经上传到GitCode: class1 · master · 下唐人 / magic_tower_chapter_0 · GitCode
