python学习笔记-19. pytest测试框架(2)
文章目录
前言
一、pycharm中使用pytest
1. pycharm中配置pytest
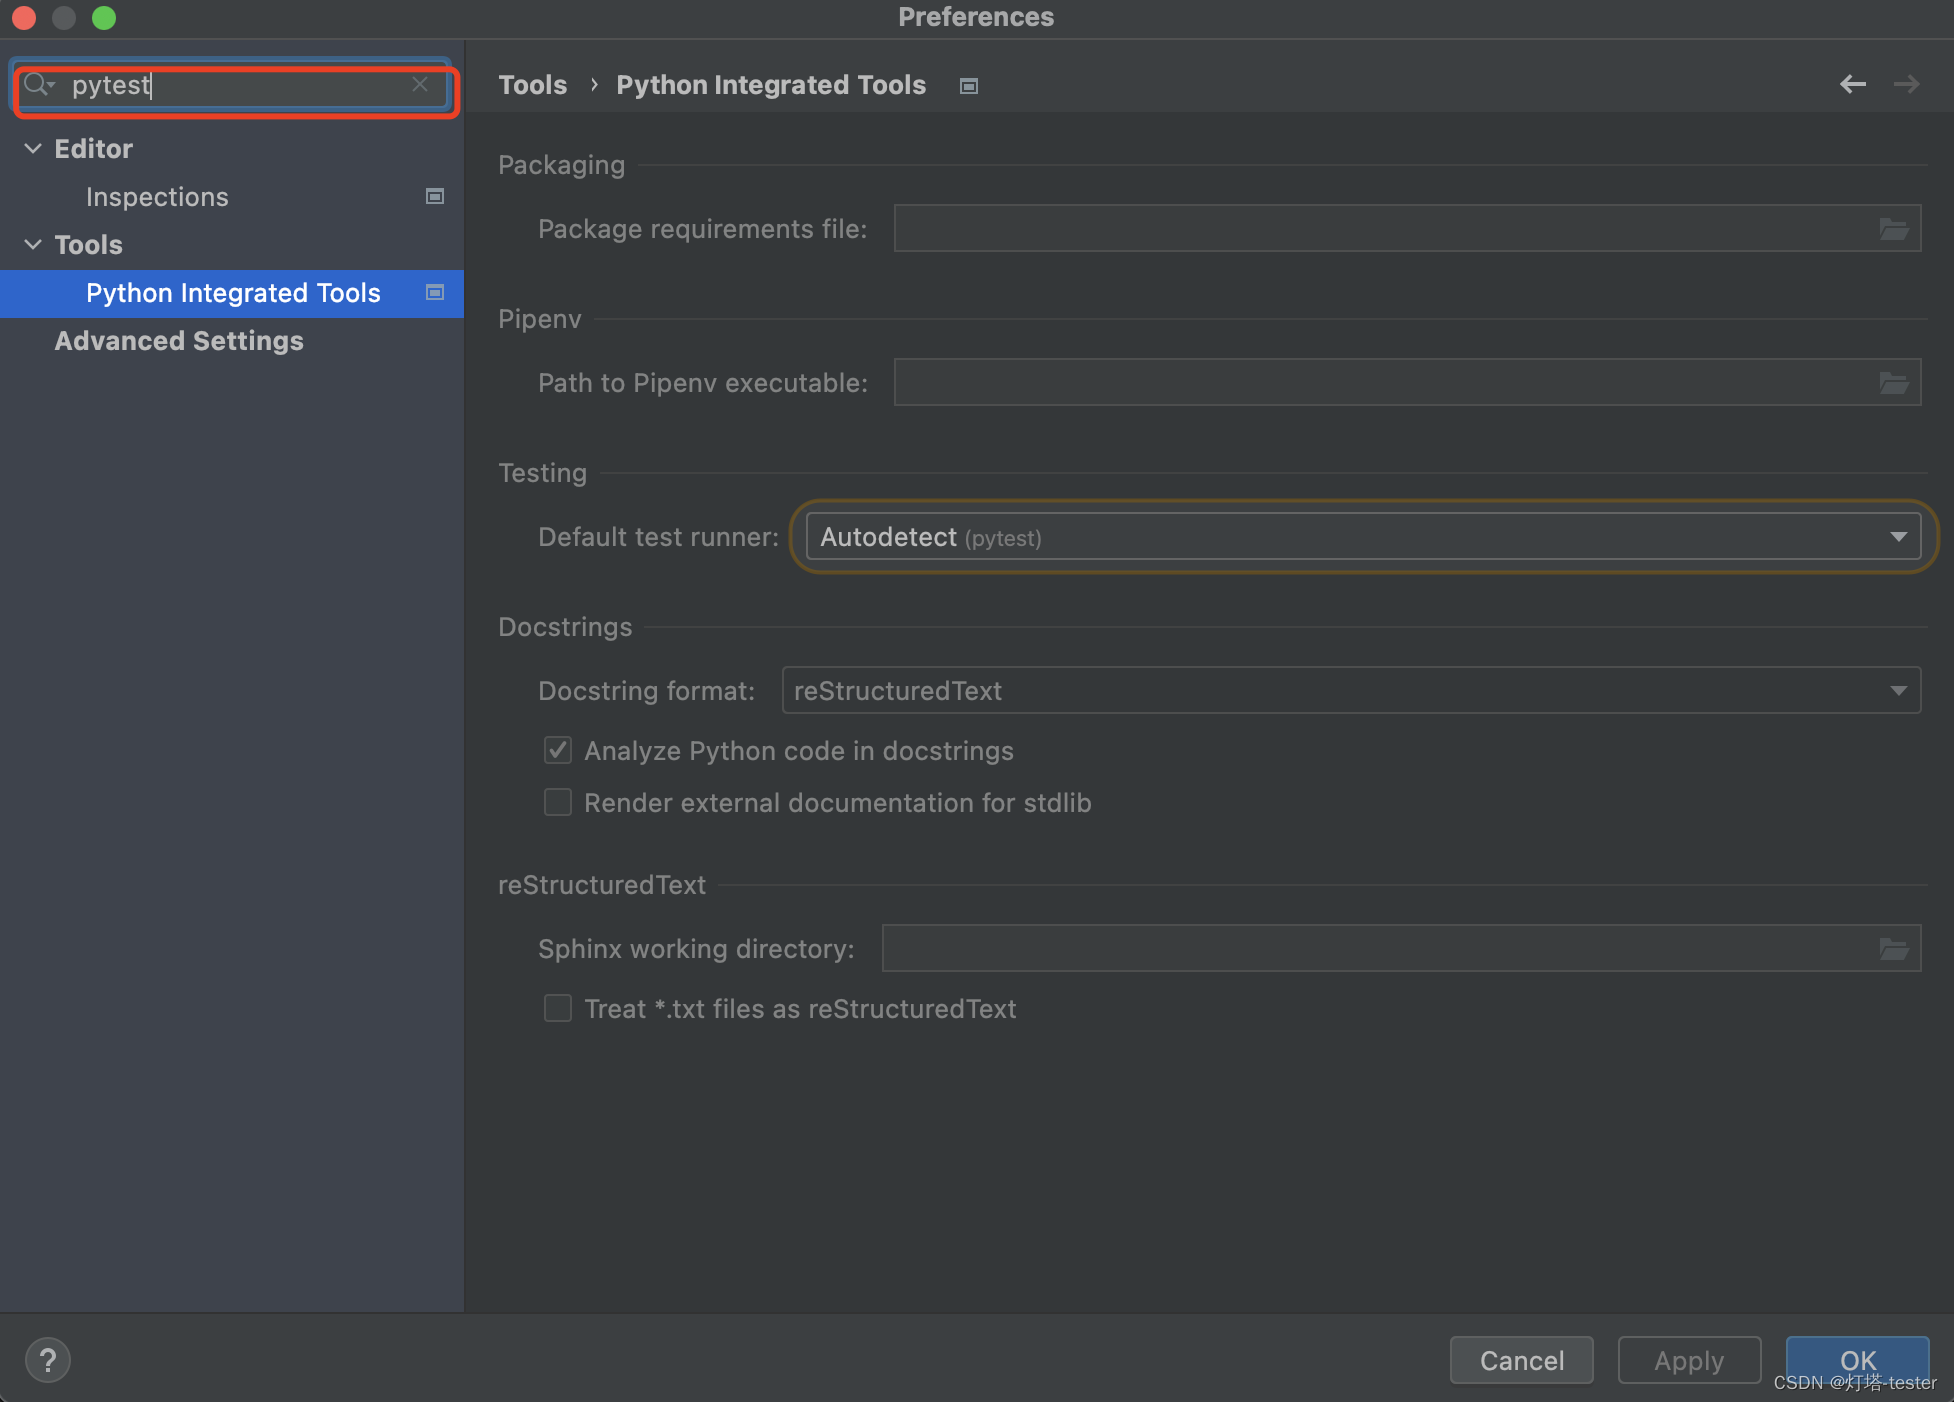
pycharm中Preferences中搜索pytest

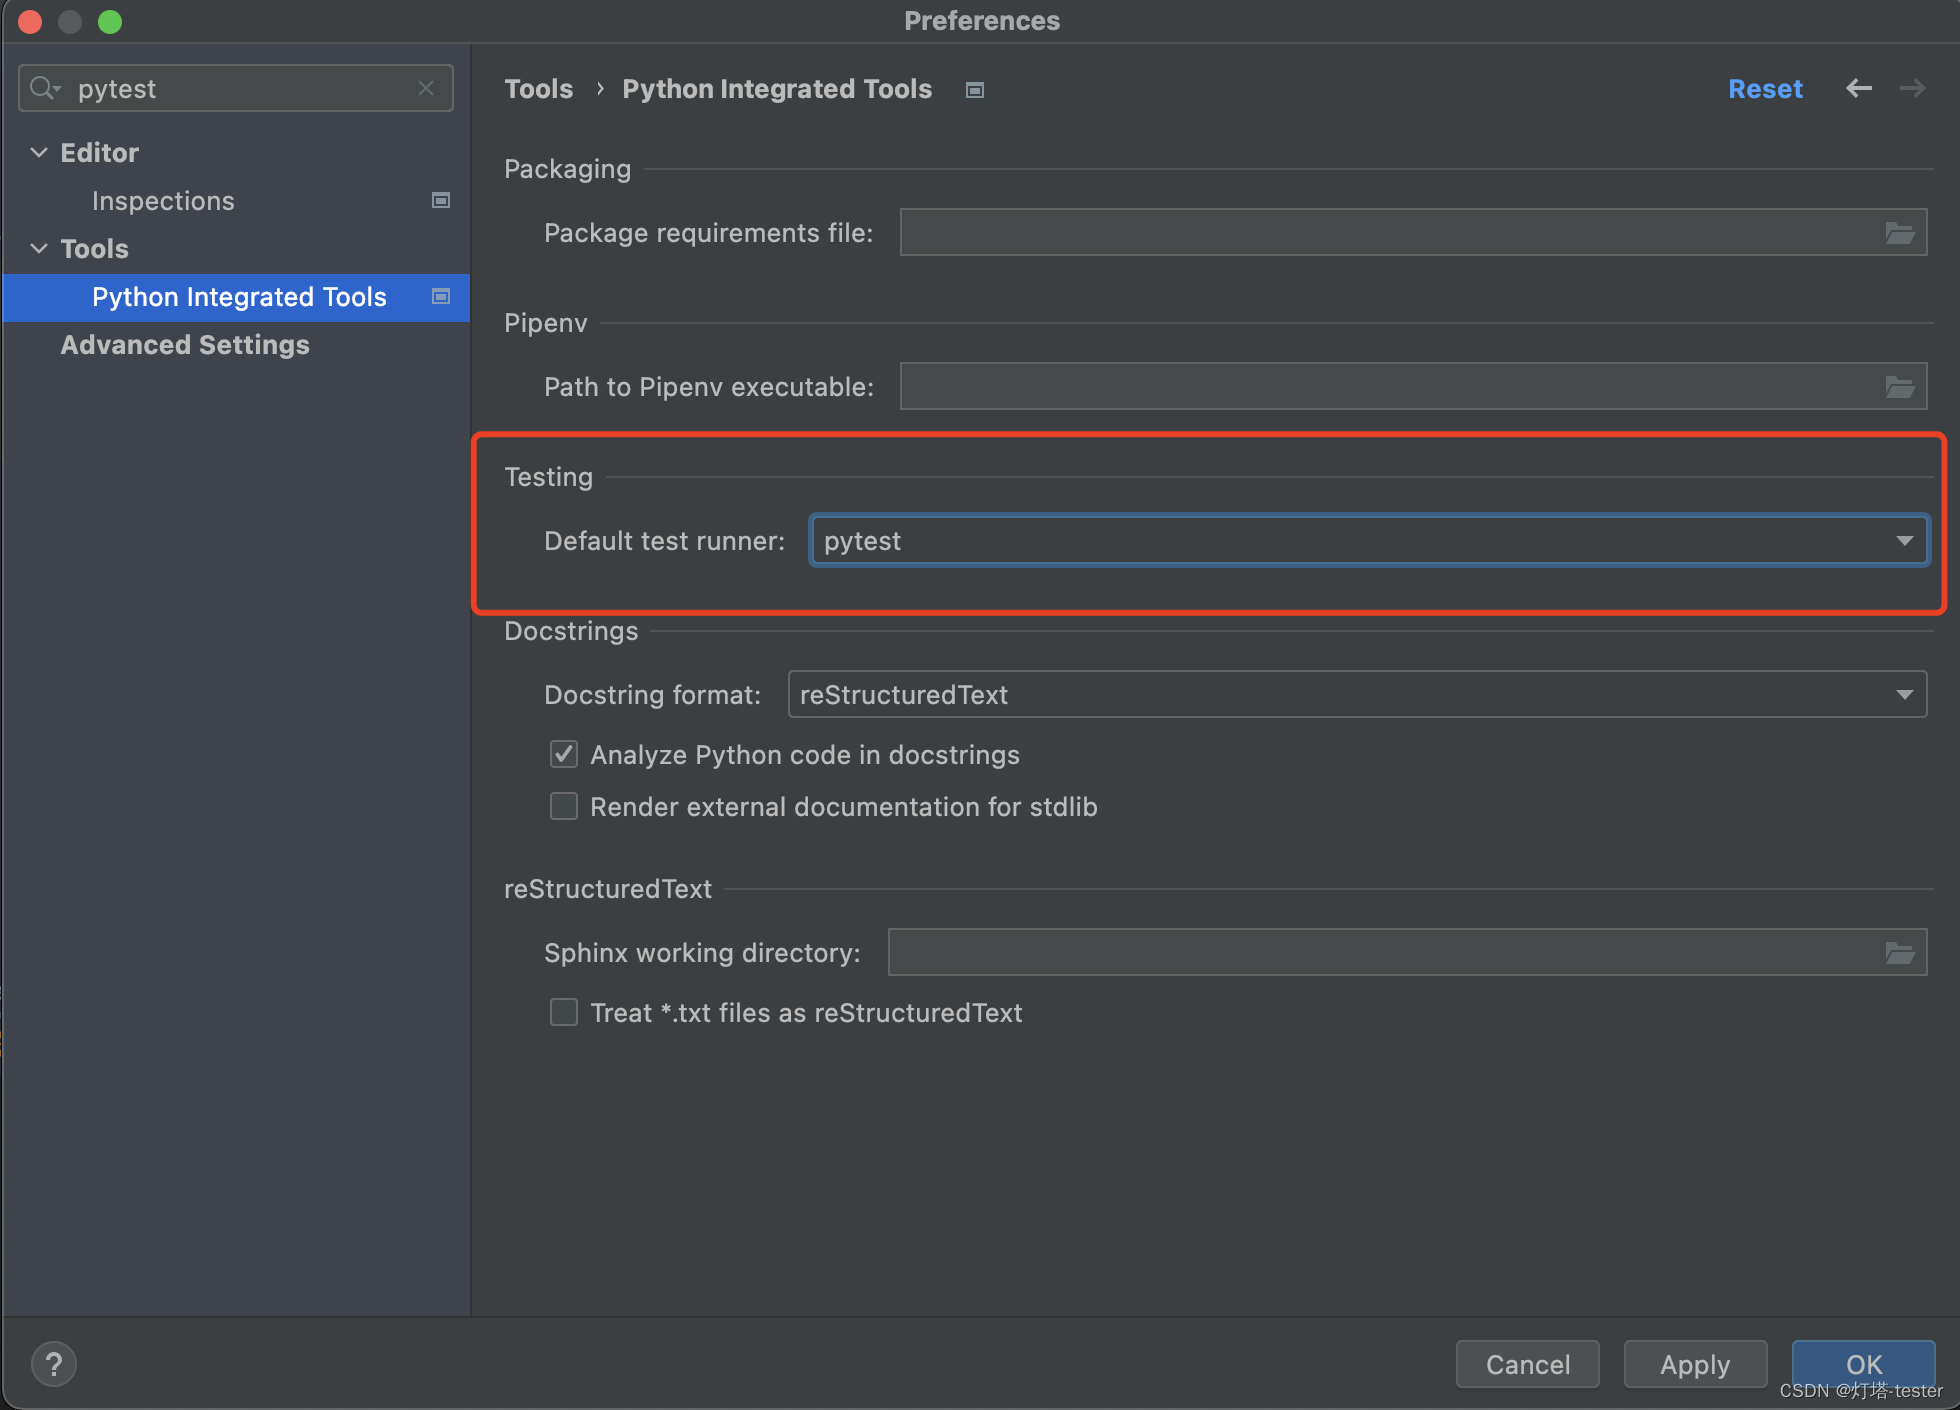
python Integrated tools中的Default test runner修改为pytest,如下:

配置完成后编写脚本文件
import pytest

class TestDemo1():
    def test_case001(self):
        print("this is class case001")
        x = 'this'
        print("test case is continue")
        pytest.assume('h' in x)

    def test_case005(self):
        print("this is class case005")
        x = 'this'
        assert 'i' in x

    def test_case006(self):
        print("this is class case006")
        x = 'this'
        assert 's' in x

def test_case007():
    print("this is class case007")
    x = 'this'
    assert 'h' in x

# 调用pytest.main()方法,执行当前模块的所有用例
# main方法中可以使用命令行使用pytest的参数
if __name__ == '__main__':
    pytest.main("-v -x TestDemo1")
二、pytest框架结构
类似unittests中的setUp和tearDown
- 模块级(setup_module/teardown_module), 模块的开始和结束执行,全局的
- 函数级(setup_function/teardown_function), 只对函数用例生效(类之外的方法)
- 类级(setup_class/teardown_class), 只在类中前后运行一次
- 方法级(setup_method/teardown_method), 方法的开始和结束时执行,该方法优先级高于setup/teardown,同时存在时setup/teardown方法不会被执行
- 类中(setup/teardown), 类方法调用的开始与结束执行
import pytest


def setup_module():
    print("this is setup_module method")


def teardown_module():
    print("this is teardown_module method")


def setup_function():
    print("this is setup_function method")


def teardown_function():
    print("this is teardown_function method")


def test_case001():
    print("this is test case001")


class Test_demo():
    def setup_class(self):
        print("this is setup_class method")

    def setup_method(self):
        print("this is setup_method method")

    def setup(self):
        print("执行:setup method")

    def teardown_class(self):
        print("this is teardown_class method")

    def teardown_method(self):
        print("this is teardown_method method")

    def teardown(self):
        print("执行: teardown method")

    def test_case002(self):
        print("start do case002 method")
        x = 'this'
        pytest.assume('h' in x)

    def test_case003(self):
        print("start do case003 method")
        x = 'this'
        pytest.assume('h' in x)

    def test_case004(self):
        print("start do case004 method")
        x = 'this'
        pytest.assume('h' in x)

if __name__ == '__main__':
    pytest.main()
执行结果如下:
============================= test session starts ==============================
collecting ... collected 1 item

test_demo3.py::Test_demo::test_case002

============================== 1 passed in 0.07s ===============================

Process finished with exit code 0
this is setup_module method
this is setup_class method
this is setup_method method
PASSED                            [100%]start do case002 method
this is teardown_method method
this is teardown_class method
this is teardown_module method
三、pytest-fixture使用
1. fixture定义和简单使用
pytest-fixture用来setup和teardown无法处理的情况,case执行的前提条件是不一致的情况。
使用方法:在方法前面添加@pytest.fixture()注解
步骤:
- 定义一个需要前置执行的方法,login,方法前添加pytest.fixture()注解
- 在需要执行前置操作的用例中传入定义的函数名称
- 不需要执行前置操作的用例不传入定义的函数即可
代码如下:
import pytest

@pytest.fixture()
def login():
	print("这是登录方法。")

def test_case001(login):
	print("test_case001,需要登录")
	pass

def test_case002():
	print("test_case002,无需登录")
	pass

def test_case003(login):
	print("test_case003,需要登录")
	pass

if __name__ == '__main__':
	pytest.main()
执行结果如下:
============================= test session starts ==============================
collecting ... collected 3 items

test_demo3.py::test_case001 这是登录方法。
PASSED                                       [ 33%]test_case001

test_demo3.py::test_case002 PASSED                                       [ 66%]test_case002

test_demo3.py::test_case003 这是登录方法。
PASSED                                       [100%]test_case003


============================== 3 passed in 0.01s ===============================
2. conftest.py使用
conftest.py这个文件用于进行数据共享,在不同位置起着不同的范围共享作用,系统执行到参数时会先从当前文件查找是否存在这个变量,不存在则会去conftest.py文件查找是否存在该变量。
通常pytest.fixture不放在用例模块中,通常放在项目目录下的conftest.py模块中,用例模块无需导入,可以直接使用conftest中定义的方法作为入参。
conftest.py使用注意:
- conftest文件名不能更换
- conftest.py与运行的用例需要在同一个package下,并且有__init__.py文件
- 使用时无需import导入,pytest会自动查找
- 全局的配置和前期的工作都可以写在该文件,放在某个包下面。
项目中创建文件:conftest.py
import pytest

@pytest.fixture()
def login():
    print("这是登录方法。")
用例文件
import pytest


def test_case001(login):
    print("test_case001,需要登录")
    pass


def test_case002():
    print("test_case002,无需登录")
    pass


def test_case003(login):
    print("test_case003,需要登录")
    pass


if __name__ == '__main__':
    pytest.main()
直接运行用例模块即可,无需额外进行导入操作
3. yield的使用
yield可以根据scope定义的作用域,在开始和结束时调用定义的方法
import pytest

# fixture的scope表示作用域
@pytest.fixture(scope="module")
def open():
	print("打开浏览器")
	# scope为module,在模块开始前执行yield前的代码块,在模块全部执行完成后执行yield后的代码块
	yield

	print("执行teardown")
	print("关闭浏览器")

def test_case001(open):
	print("this is testcase001")
	raise NameError
	pass
def test_case002(opem):
	print("this is testcase002")
	pass

if __name__ == '__main__':
	pytest.main()
4. autouse使用
在@pytest.fixture()中添加autouse=True,则该方法会被所有的测试用例引用,无需在测试用例的入参中传入方法名
import pytest


# fixture的scope表示作用域
@pytest.fixture(autouse=True)
def open():
    print("打开浏览器")
    yield

    print("执行teardown")
    print("关闭浏览器")


def test_case001():
    print("this is testcase001")
    raise NameError
    pass


def test_case002():
    print("this is testcase002")
    pass

def test_case003():
    print("this is testcase003")
    pass


if __name__ == '__main__':
    pytest.main()
5. fixture带参数传入
fixture中传入参数params=[]
import pytest


# fixture的scope表示作用域
@pytest.fixture(params=[1, 2, 3, 'a'])
def test_data(request):
    return request.param

def test_case001(test_data):
    print("\ntest data :%s"% test_data)


if __name__ == '__main__':
    pytest.main()
三、mark相关使用
1. mark.parametrize传递参数
@pytest.mark.parametrize第一个参数为传入的参数名称,第二个为对应的参数的值
import pytest

# @pytest.mark.parametrize
@pytest.mark.parametrize("test_input,expected",[("3+5",8),("2+5",7),("7+5",30)])
def test_eval(test_input, expected):
	assert eval(test_input) == expected
执行结果如下:
============================= test session starts ==============================
collecting ... collected 3 items

test_demo3.py::test_eval[3+5-8]
test_demo3.py::test_eval[2+5-7]
test_demo3.py::test_eval[7+5-30] PASSED                                   [ 33%]PASSED                                   [ 66%]FAILED                                  [100%]
test_demo3.py:2 (test_eval[7+5-30])
12 != 30

Expected :30
Actual   :12
<Click to see difference>

test_input = '7+5', expected = 30

    @pytest.mark.parametrize("test_input,expected",[("3+5",8),("2+5",7),("7+5",30)])
    def test_eval(test_input, expected):
>   	assert eval(test_input) == expected
E    AssertionError: assert 12 == 30
E     +  where 12 = eval('7+5')

test_demo3.py:5: AssertionError


========================= 1 failed, 2 passed in 0.07s ==========================
也可以组合传值
import pytest
# 组合传值
@pytest.mark.parametrize("x",[1,2])
@pytest.mark.parametrize("y",[4,5,6])
def test_foo(x, y):
	print(f"测试数据组合为x:{x} , y:{y}")
执行结果如下:
============================= test session starts ==============================
collecting ... collected 6 items

test_demo3.py::test_foo[4-1] PASSED                                      [ 16%]测试数据组合为x:1 , y:4

test_demo3.py::test_foo[4-2] PASSED                                      [ 33%]测试数据组合为x:2 , y:4

test_demo3.py::test_foo[5-1] PASSED                                      [ 50%]测试数据组合为x:1 , y:5

test_demo3.py::test_foo[5-2] PASSED                                      [ 66%]测试数据组合为x:2 , y:5

test_demo3.py::test_foo[6-1] PASSED                                      [ 83%]测试数据组合为x:1 , y:6

test_demo3.py::test_foo[6-2] PASSED                                      [100%]测试数据组合为x:2 , y:6


============================== 6 passed in 0.02s ===============================
- 也可以传入方法,@pytest.mark.parametrize中indirect=True可以使传入的第一个参数字符串当成函数来执行
import pytest

test_user_data = ['zhangsan', 'lisi']
@pytest.fixture(scope="module")
def login_r(request):
    user = request.param
    print(f"\n 打开首页准备登录,登录用户:{user}")
    return user

@pytest.mark.parametrize("login_r", test_user_data, indirect=True)
def test_login(login_r):
    a = login_r
    print(f"测试用例中login的返回值:{a}")
    assert a != ""
2. mark.skip使用
使用@pytest.mark.skip(“desc”),放在用例前,用来跳过该测试用例,skip也可以添加条件来执行跳过
import pytest


@pytest.mark.skip("001用例不执行")
def test_case001():
    print("this is testcase001")

def test_case002():
    print("this is testcase002")
    pass

if __name__ == '__main__':
    pytest.main()
执行结果如下:
============================= test session starts ==============================
collecting ... collected 2 items

test_demo3.py::test_case001 SKIPPED (001用例不执行)                      [ 50%]
Skipped: 001用例不执行

test_demo3.py::test_case002 PASSED                                       [100%]this is testcase002


========================= 1 passed, 1 skipped in 0.01s =========================
3. mark.xfail
使用mark.xfail,可以使用例直接标记为成功,结果显示XPASS
import pytest


@pytest.mark.xfail
def test_case001():
    print("this is testcase001")

def test_case002():
    print("this is testcase002")
    pass

if __name__ == '__main__':
    pytest.main()
skip与xfail的区别:
- skip使用场景
- 调试时不想运行这个case
- 标记无法再某些平台运行的测试功能
- 在某些版本中执行,其他版本中跳过
- 当前的外部资源不可用时跳过
- 使用skipif,满足条件才执行,否则就跳过
- xfail使用场景
- 功能测试尚未完成或修复的错误
- 其他原因,该用例应该失败
4. 使用mark自定义
自定义测试用例标签
import pytest

@pytest.mark.search
def test_case001():
	print("testcase001")
	raise NameError
	pass

@pytest.mark.search
def test_case002():
	print("testcase002")
	pass

@pytest.mark.search
def test_case003():
	print("testcase003")

@pytest.mark.login
def test_case004():
	print("testcase004")
	pass

@pytest.mark.login
def test_case005():
	print("testcase005")
	pass

if __name__ == '__main__':
	pytest.main()
使用pytest -m tagname执行即可
四、并发执行测试用例
使用pytest-xdist可以多线程执行,安装方法:
pip install pytest-xdist
执行如下:
# -n后的数值即为线程数
pytest test-demo.py -n 3
五、测试报告的生成
通过pytest-html生成测试报告,安装名称
pip install pytest-html
测试报告生成命令:
pytest -v -s --html=report.html --self-contained-html
总结
使用@pytest.fixture()注解,定义测试用例执行时的前置操作和后置操作,使用yield关键字,根据作用域准确控制后置操作。
`
