Qt for Python 教程:https://doc.qt.io/qtforpython/tutorials/index.html
官方文档示例:https://doc.qt.io/qtforpython/examples/index.html
Qt for Python 提供了一系列带有演练指南的教程,以帮助新用户入门。
其中一些文档是从 C++ 移植到 Python 的,涵盖了一系列主题,从 "小部件 ( 也叫 控件 )?" 的基本使用,到展示如何 设计应用程序的分步教程。
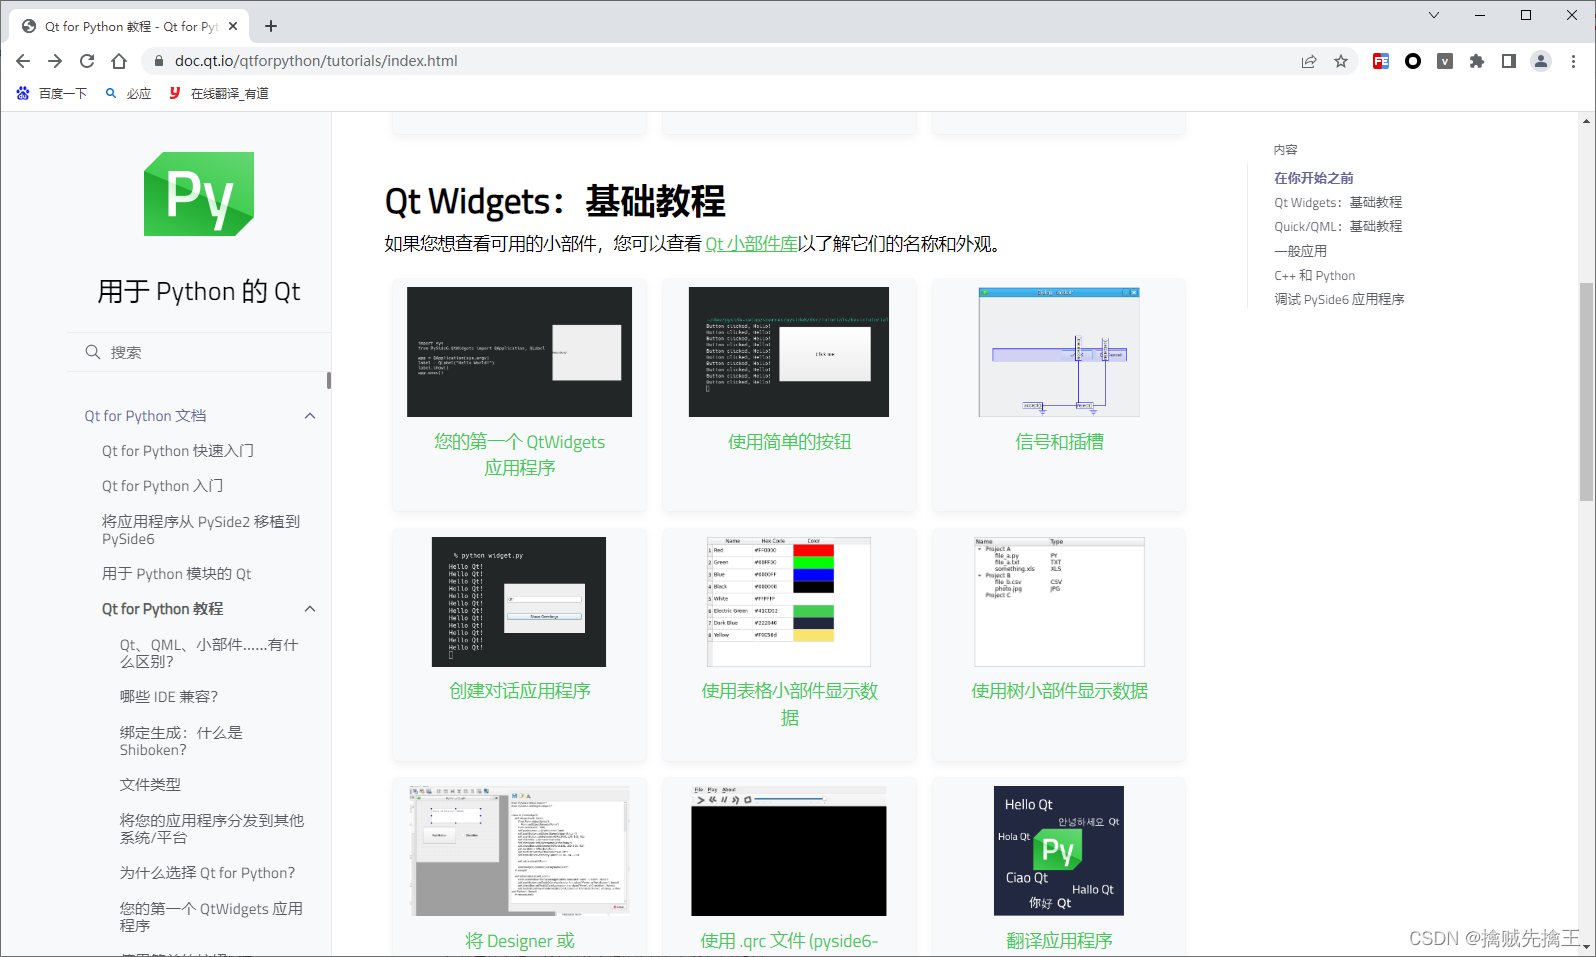
1、Qt Widgets:基础教程
widget:中文翻译为 "控件、组件、部件?"。
如果想查看可用的 部件,可以查看?( PySide6.QtWidgets:https://doc.qt.io/qtforpython/PySide6/QtWidgets/index.html#module-PySide6.QtWidgets?)?
第一个 QtWidgets 应用程序
:https://doc.qt.io/qtforpython/tutorials/basictutorial/widgets.html
与任何其他编程框架一样,从传统的 “Hello World” 程序开始。以下是 PySide6 中 Hello World 应用程序的简单示例:
import sys
from PySide6.QtWidgets import QApplication, QLabel

app = QApplication(sys.argv)  # app = QApplication([])

label = QLabel("Hello World!")
# This HTML approach will be valid too!
label = QLabel("<font color=red size=40>Hello World!</font>")

label.resize(300, 150)
label.show()
app.exec()
解释:
- 使用 PySide6 的 控件 应用程序,必须始终从 PySide6.QtWidgets 模块导入适当的类开始。
- 导入后,首先创建一个 QApplication 实例。由于 Qt 可以从命令行接收参数,所以可以将所有参数传递给 QApplication 对象。如果不需要传递任何参数则可以传递 []
- 创建应用程序对象后,我们创建了一个?QLabel 对象。QLabel是一个可以呈现文本(简单或丰富,如 html)和 图像的 控件
- 创建完标签后,调用标签的?show() 方法 进行显示。
- 最后,调用 app.exec()进入 Qt 主循环,开始执行Qt代码
所有的控件 都是?PySide6.QtWidgets 的 子类
按钮
:https://doc.qt.io/qtforpython/tutorials/basictutorial/clickablebutton.html
展示如何使用 Qt for Python 处理?信号和插槽。Signals and slots?是 Qt 的一项功能,它可以让您的 图形控件 与其他 图形控件? 或您的 python 代码进行通信。
应用程序创建了一个按钮来记录单击的?按钮,你好!每次单击时都会向 python 控制台发送消息。
# -*- coding: utf-8 -*-

import sys
from PySide6.QtWidgets import QApplication, QPushButton
from PySide6.QtCore import Slot


@Slot()
def say_hello():
    print("Button clicked, Hello!")


if __name__ == '__main__':
    # 创建 Qt Application
    app = QApplication(sys.argv)

    # 创建 一个按钮控件
    button = QPushButton("Click me")

    # 按钮的 "信号clicked" 连接到 "槽函数say_hello"
    button.clicked.connect(say_hello)
    button.show()
    # Run the main Qt loop
    app.exec()
    pass
@Slot?() 是一个将 函数 标识为 槽 的装饰器。
示例:
# -*- coding: utf-8 -*-

import sys
from PySide6 import QtCore, QtWidgets, QtGui


def main():
    app = QtWidgets.QApplication([])
    widget = QtWidgets.QWidget()

    def show_msg():
        QtWidgets.QMessageBox.information(widget, '信息提示框', 'Ok 弹出测试信息')

    btn = QtWidgets.QPushButton('测试点击按钮', widget)
    btn.clicked.connect(show_msg)
    widget.resize(500, 500)
    widget.show()
    sys.exit(app.exec())
    pass


if __name__ == "__main__":
    main()
    pass
示例:
# -*- coding: utf-8 -*-

import sys
import random
from PySide6 import QtCore, QtWidgets, QtGui


def main():
    my_app = QtWidgets.QApplication()  # 实例化一个应用

    main_window = QtWidgets.QMainWindow()  # 实例化一个主窗口
    main_window.resize(500, 400)  # 设置窗口大小
    main_window.move(300, 310)  # 移动窗口距离屏幕左上角的位置。
    main_window.setWindowTitle('这是标题')  # 设置窗口标题。

    # 在主窗口中添加一个文本框,并指定父窗口 是 main_window
    text_edit = QtWidgets.QPlainTextEdit(main_window)
    text_edit.setPlaceholderText('默认输入内容……')  # 设置文本框内的默认内容。
    text_edit.move(10, 25)
    text_edit.resize(300, 350)

    btn_1 = QtWidgets.QPushButton('btn_1', main_window)  # 在主窗口中添加一个按钮
    btn_1.move(350, 50)
    btn_1.clicked.connect(lambda x: text_edit.appendPlainText("点击按钮次"))  # 给按钮绑定调用函数。

    btn_2 = QtWidgets.QPushButton('btn_2', main_window)  # 在主窗口中添加一个按钮

    def say_hello():
        text_edit.appendPlainText("Button clicked, Hello!")

    btn_2.clicked.connect(say_hello)
    btn_2.move(100, 100)

    main_window.show()  # 显示窗口
    my_app.exec()  # 使窗口保持显示状态。


if __name__ == "__main__":
    main()
    pass
示例:
# -*- coding: utf-8 -*-

import sys
import random
from PySide6 import QtCore, QtWidgets, QtGui


class MyWidget(QtWidgets.QWidget):
    def __init__(self):
        super().__init__()

        self.hello = ["Hello 111", "Hello 222", "Hello 333"]

        self.button = QtWidgets.QPushButton("Click me!")
        self.text = QtWidgets.QLabel("Hello World")
        self.text.setAlignment(QtCore.Qt.AlignCenter)

        self.layout = QtWidgets.QVBoxLayout(self)
        self.layout.addWidget(self.text)
        self.layout.addWidget(self.button)

        self.button.clicked.connect(self.magic)

    @QtCore.Slot()
    def magic(self):
        self.text.setText(random.choice(self.hello))


def main():
    app = QtWidgets.QApplication([])
    widget = MyWidget()
    widget.resize(800, 600)
    widget.show()
    sys.exit(app.exec())


if __name__ == "__main__":
    main()
    pass
信号、插槽
:https://doc.qt.io/qtforpython/tutorials/basictutorial/signals_and_slots.html
信号 即 事件,槽函数 即 事件处理函数。槽 用于建立 "事件" 和 "槽函数" 的关联关系。
由于 Qt 的性质,QObjects 需要一种通信方式,这就是这种机制成为Qt 核心特性的原因。
信号与插槽简单比喻:可以想象和家里的灯互动,来类比和理解?Signal 和 Slots 。当你移动电灯开关(信号)时,您会得到一个结果,可能是您的灯泡打开/关闭(插槽)。
在开发界面时,您可以通过单击按钮的效果来获得一个真实的示例:“单击”将是信号,而插槽将是单击该按钮时发生的情况,例如关闭窗口,保存文档等.
所有继承自 QObject 的子类,以及其子类之一的?QWidget类 都可以包含信号和插槽。当一个对象以可能对其他对象感兴趣的方式改变其状态时,信号由对象发出。这就是对象进行通信的全部内容
可以将任意数量的信号连接到单个插槽,并且可以将信号连接到任意数量的插槽。甚至可以将一个信号直接连接到另一个信号。(这将在第一个信号发出时立即发出第二个信号。)
Qt 的 控件 有许多预定义的信号和槽。例如,?QAbstractButton(Qt 中按钮的基类)有一个clicked()?信号,QLineEdit(单行输入字段)有一个名为 clear()?的槽。因此,可以通过在QLineEdit 的右侧?放置一个 QToolButton 并将其 clicked() 信号连接到插槽 "clear()"?来实现带有清除文本的按钮的文本输入字段。这是使用信号的connect()方法完成的:
button = QToolButton()
line_edit = QLineEdit()
button.clicked.connect(line_edit.clear)
connect() 返回一个 QMetaObject.Connection 对象,可以与 disconnect() 方法一起使用来断开连接。信号也可以连接到自由函数:
import sys
from PySide6.QtWidgets import QApplication, QPushButton


def func():
    print("The 'function' has been called!")


app = QApplication()
button = QPushButton("Call function")
button.clicked.connect(func)
button.show()
sys.exit(app.exec())
信号 类
在 Python 中编写类时,信号被声明为 class 的类级变量QtCore.Signal()。基于 QWidget 的按钮控件发送?clicked() 信号 伪代码:
from PySide6.QtCore import Qt, Signal
from PySide6.QtWidgets import QWidget

class Button(QWidget):

    clicked = Signal(Qt.MouseButton)

    ...

    def mousePressEvent(self, event):
        self.clicked.emit(event.button())
Signal 的?构造函数 接受一个元组或 Python 类型和 C 类型的列表:
signal1 = Signal(int)  # Python types
signal2 = Signal(QUrl)  # Qt Types
signal3 = Signal(int, str, int)  # more than one type
signal4 = Signal((float,), (QDate,))  # optional types
Signal 的?构造函数 还可以接收 name 定义信号名称的命名参数。如果没有传递任何内容,则新信号将与分配给它的变量具有相同的名称。
# TODO
signal5 = Signal(int, name='rangeChanged')
# ...
rangeChanged.emit(...)
另一个有用的选项 Signal 是参数名称,对于 QML 应用程序按名称引用发出的值很有用:
sumResult = Signal(int, arguments=['sum'])Connections {
target: ...
function onSumResult(sum) {
// do something with 'sum'
}插槽 类
QObject 派生类中的插槽应由装饰器?@QtCore.Slot() 指示 。同样,要定义签名,只需传递与类相似的 QtCore.Signal() 类型。
@Slot(str)
def slot_function(self, s):
    ...
Slot() 也接受一个 name 和一个 result 关键字。result关键字定义将返回的类型,可以是 C 或 Python 类型。关键字的 name 行为方式为?Signal()。如果没有作为名称传递,则新插槽将与正在装饰的函数具有相同的名称。
重载不同类型的 信号 和 槽
实际上可以使用具有不同参数类型列表的相同名称的信号和槽。这是 Qt 5 的遗留问题,不推荐用于新代码。在 Qt 6 中,不同类型的信号具有不同的名称。
import sys
from PySide6.QtWidgets import QApplication, QPushButton
from PySide6.QtCore import QObject, Signal, Slot


class Communicate(QObject):
    # create two new signals on the fly: one will handle
    # int type, the other will handle strings
    speak = Signal((int,), (str,))

    def __init__(self, parent=None):
        super(Communicate, self).__init__(parent)

        self.speak[int].connect(self.say_something)
        self.speak[str].connect(self.say_something)

    # define a new slot that receives a C 'int' or a 'str'
    # and has 'say_something' as its name
    @Slot(int)
    @Slot(str)
    def say_something(self, arg):
        if isinstance(arg, int):
            print("This is a number:", arg)
        elif isinstance(arg, str):
            print("This is a string:", arg)


if __name__ == "__main__":
    app = QApplication(sys.argv)
    someone = Communicate()

    # emit 'speak' signal with different arguments.
    # we have to specify the str as int is the default
    someone.speak.emit(10)
    someone.speak[str].emit("Hello everybody!")
示例:获取网页 html
:https://www.52pojie.cn/thread-1570807-1-1.html
import sys
import httpx
from PySide6.QtCore import *
from PySide6.QtWidgets import *


class HtmlWorker(QThread):
    completed = Signal(httpx.Response)
    failed = Signal(object)

    def set_url(self, url):
        self.url = url

    def run(self):
        try:
            resp = httpx.get(self.url, follow_redirects=True)
        except BaseException as be:
            self.failed.emit(be)
        else:
            self.completed.emit(resp)


class MainWindow(QMainWindow):

    def __init__(self):
        super(MainWindow, self).__init__()
        self.output = None
        self.btn = None
        self.edit = None
        self.setWindowTitle('PySide6 Demo')
        rect = self.screen().geometry()
        size = self.size()
        self.setGeometry(QStyle.alignedRect(Qt.LayoutDirection.LeftToRight, Qt.AlignCenter, size, rect))

        self.htmlWorker = HtmlWorker()
        self.htmlWorker.completed.connect(self.show_message)
        self.htmlWorker.failed.connect(self.show_error)

        # ui
        widget = QWidget()
        self.setCentralWidget(widget)

        layout = QVBoxLayout()
        layout.addLayout(self.set_input_layout())
        layout.addWidget(self.set_output_widget())
        widget.setLayout(layout)

    def set_input_layout(self):
        self.edit = QLineEdit()
        self.btn = QPushButton('&Show Html')

        layout = QHBoxLayout()
        layout.addWidget(self.edit)
        layout.addWidget(self.btn)

        self.edit.returnPressed.connect(self.btn.click)
        self.btn.clicked.connect(self.fetch_html)
        return layout

    def set_output_widget(self):
        self.output = QTextEdit()
        return self.output

    @Slot()
    def fetch_html(self):
        if self.htmlWorker.isRunning():
            return
        url = self.edit.text()
        if not url:
            return
        self.output.clear()
        if not url.startswith('http'):
            url = 'https://' + url
        self.htmlWorker.set_url(url)
        self.htmlWorker.start()

    @Slot(httpx.Response)
    def show_message(self, resp):
        self.output.setPlainText(resp.text)

    @Slot(object)
    def show_error(self, err):
        QMessageBox.warning(self, 'error', str(err))


if __name__ == '__main__':
    app = QApplication(sys.argv)
    win = MainWindow()
    win.show()
    sys.exit(app.exec())
菜单栏
示例:
# -*- coding: utf-8 -*-

"""PySide6 Active Qt Viewer example"""

import sys
from PySide6.QtAxContainer import QAxSelect, QAxWidget
from PySide6.QtGui import QAction
from PySide6.QtWidgets import (
    QApplication, QDialog,
    QMainWindow, QMessageBox, QToolBar
)


class MainWindow(QMainWindow):

    def __init__(self):
        super().__init__()

        toolBar = QToolBar()
        self.addToolBar(toolBar)
        fileMenu = self.menuBar().addMenu("&File")
        loadAction = QAction("Load...", self, shortcut="Ctrl+L", triggered=self.load)
        fileMenu.addAction(loadAction)
        toolBar.addAction(loadAction)
        exitAction = QAction("E&xit", self, shortcut="Ctrl+Q", triggered=self.close)
        fileMenu.addAction(exitAction)

        aboutMenu = self.menuBar().addMenu("&About")
        aboutQtAct = QAction("About &Qt", self, triggered=qApp.aboutQt)
        aboutMenu.addAction(aboutQtAct)
        self.axWidget = QAxWidget()
        self.setCentralWidget(self.axWidget)

    def load(self):
        axSelect = QAxSelect(self)
        if axSelect.exec() == QDialog.Accepted:
            clsid = axSelect.clsid()
            if not self.axWidget.setControl(clsid):
                QMessageBox.warning(self, "AxViewer", f"Unable to load {clsid}.")


if __name__ == '__main__':
    app = QApplication(sys.argv)
    mainWin = MainWindow()
    availableGeometry = mainWin.screen().availableGeometry()
    mainWin.resize(availableGeometry.width() / 3, availableGeometry.height() / 2)
    mainWin.show()
    sys.exit(app.exec())
创建 对话框 应用程序
:https://doc.qt.io/qtforpython/tutorials/basictutorial/dialog.html
创建一个自定义类?Form ,并继承 QDialog 。添加?__init()__方法,然后调用 QDialog 的 init 方法。?setWindowTitle() 方法只是设置对话框窗口的标题。在 main()中,创建一个Form 对象,然后调用 show() 方法 进行显示。
# -*- coding: utf-8 -*-

import sys
from PySide6 import QtCore, QtWidgets, QtGui


class Form(QtWidgets.QDialog):

    def __init__(self, parent=None):
        super(Form, self).__init__(parent)
        self.setWindowTitle("My Form")

        # 创建组件
        self.edit = QtWidgets.QLineEdit("Write my name here..")
        self.button = QtWidgets.QPushButton("Show Greetings")
        # 连接 greetings 槽函数 和 按钮单击信号
        self.button.clicked.connect(self.btn_clicked)

        # 创建布局并添加组件
        self.layout = QtWidgets.QVBoxLayout(self)  # 指定布局的 父窗口是当前窗口

        # 也可以这样设置布局,因为 Form 继承自 QtWidgets.QDialog
        # QtWidgets 有个 setLayout 方法设置布局
        # layout111 = QtWidgets.QVBoxLayout()
        # self.setLayout(layout111)

        self.layout.addWidget(self.edit)
        self.layout.addWidget(self.button)

    def btn_clicked(self):
        print(f"Hello {self.edit.text()}")


if __name__ == '__main__':
    app = QtWidgets.QApplication([])
    my_form = Form()
    my_form.resize(800, 600)
    my_form.show()
    sys.exit(app.exec())
    pass
使用 表格控件 显示数据
:https://doc.qt.io/qtforpython/tutorials/basictutorial/tablewidget.html
如果要显示排列在表格中的数据,可以使用 aQTableWidget来执行此操作,而无需处理太多配置。
注意:使用 aQTableWidget并不是在表格中显示信息的唯一路径。还可以创建数据模型,然后使用QTableView显示。
# -*- coding: utf-8 -*-

import sys
from PySide6 import QtWidgets
from PySide6.QtGui import QColor

colors = [
    ("Red", "#FF0000"),
    ("Green", "#00FF00"),
    ("Blue", "#0000FF"),
    ("Black", "#000000"),
    ("White", "#FFFFFF"),
    ("Electric Green", "#41CD52"),
    ("Dark Blue", "#222840"),
    ("Yellow", "#F9E56d")
]


def get_rgb_from_hex(code):
    code_hex = code.replace("#", "")
    rgb = tuple(int(code_hex[i:i + 2], 16) for i in (0, 2, 4))
    return QColor.fromRgb(rgb[0], rgb[1], rgb[2])


def main():
    app = QtWidgets.QApplication()
    table = QtWidgets.QTableWidget()
    table.setRowCount(len(colors))
    table.setColumnCount(len(colors[0]) + 1)
    table.setHorizontalHeaderLabels(["Name", "Hex Code", "Color"])
    for i, (name, code) in enumerate(colors):
        item_name = QtWidgets.QTableWidgetItem(name)
        item_code = QtWidgets.QTableWidgetItem(code)
        item_color = QtWidgets.QTableWidgetItem()
        item_color.setBackground(get_rgb_from_hex(code))
        table.setItem(i, 0, item_name)
        table.setItem(i, 1, item_code)
        table.setItem(i, 2, item_color)
    table.resize(500, 500)
    table.show()
    sys.exit(app.exec())


if __name__ == '__main__':
    main()
    pass
使用 树 控件 显示数据
:https://doc.qt.io/qtforpython/tutorials/basictutorial/treewidget.html
注意:使用 aQTreeWidget并不是在树中显示信息的唯一路径。还可以创建数据模型,然后使用?QTreeView 显示。
# -*- coding: utf-8 -*-

import sys
from PySide6 import QtWidgets


def main():
    data = {
        "Project A": ["file_a.py", "file_a.txt", "something.xls"],
        "Project B": ["file_b.csv", "photo.jpg"],
        "Project C": []
    }
    app = QtWidgets.QApplication()
    tree = QtWidgets.QTreeWidget()
    tree.setColumnCount(2)
    tree.setHeaderLabels(["Name", "Type"])

    items = []
    for key, values in data.items():
        item = QtWidgets.QTreeWidgetItem([key])
        for value in values:
            ext = value.split(".")[-1].upper()
            child = QtWidgets.QTreeWidgetItem([value, ext])
            item.addChild(child)
        items.append(item)

    tree.insertTopLevelItems(0, items)
    tree.show()
    sys.exit(app.exec())


if __name__ == '__main__':
    main()
    pass
使用?Designer 或 QtCreator 的.ui文件与QUiLoader和pyside6-uic?
:https://doc.qt.io/qtforpython/tutorials/basictutorial/uifiles.html
使用 Qt Designer 可以为?Qt for Python 项目创建基于 Qt Widgets 的图形界面。 Qt Designer是一个图形 UI 设计工具,它可以作为独立的二进制文件 ( pyside6-designer) 使用,也可以嵌入到 Qt Creator IDE中。使用 Qt Designer 描述了 它在Qt Creator中的使用。
设计好的图形界面存储在.ui文件中,这是一种基于 XML 的格式。pyside6-uic 工具将在项目构建时将其转换为填充小部件实例的 Python 或 C++ 代码。
文件?mainwindow.ui如下所示
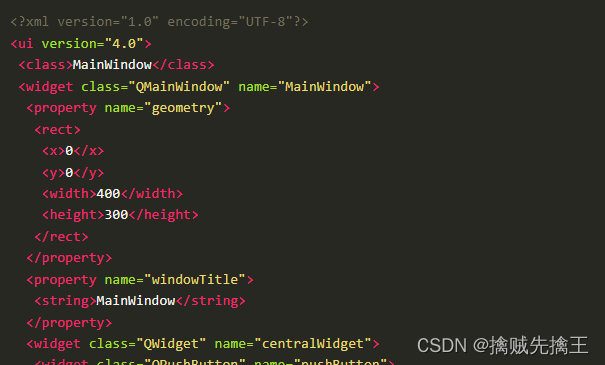
下面说明如何在 Python 中使用这个 ui 文件。
方法 1: ui代码?转成 Python代码
与UI 文件?交互的标准方法是 "?生成 Python 类 "。这要归功于pyside6-uic工具。
在控制台上运行以下命令:pyside6-uic mainwindow.ui > ui_mainwindow.py
命令的所有输出重定向到一个名为 ui_mainwindow.py 的文件,该文件将直接导入:from ui_mainwindow import Ui_MainWindow
完整代码:
import sys
from PySide6.QtWidgets import QApplication, QMainWindow
from PySide6.QtCore import QFile
from ui_mainwindow import Ui_MainWindow

class MainWindow(QMainWindow):
    def __init__(self):
        super(MainWindow, self).__init__()
        self.ui = Ui_MainWindow()
        self.ui.setupUi(self)

if __name__ == "__main__":
    app = QApplication(sys.argv)

    window = MainWindow()
    window.show()

    sys.exit(app.exec())
self.ui = Ui_MainWindow()
self.ui.setupUi(self)
这两行代码?负责从 UI 文件加载生成的 python 类
每次对UI 文件进行更改时,都必须再次运行pyside6-uic。
示例:
# -*- coding: utf-8 -*-

from PySide6.QtCore import (
    QCoreApplication, QDate, QDateTime, QLocale,
    QMetaObject, QObject, QPoint, QRect,
    QSize, QTime, QUrl, Qt
)
from PySide6.QtGui import (
    QBrush, QColor, QConicalGradient, QCursor,
    QFont, QFontDatabase, QGradient, QIcon,
    QImage, QKeySequence, QLinearGradient, QPainter,
    QPalette, QPixmap, QRadialGradient, QTransform
)
from PySide6.QtWebEngineWidgets import QWebEngineView
from PySide6.QtWidgets import (
    QApplication, QMainWindow, QMenuBar, QPushButton,
    QSizePolicy, QStatusBar, QWidget, QPlainTextEdit
)


class Ui_MainWindow(object):
    def setupUi(self, MainWindow):
        if not MainWindow.objectName():
            MainWindow.setObjectName(u"MainWindow")
        MainWindow.resize(700, 567)
        self.centralwidget = QWidget(MainWindow)
        self.centralwidget.setObjectName(u"centralwidget")
        self.plainTextEdit = QPlainTextEdit(self.centralwidget)  # 添加的文本框
        self.plainTextEdit.setObjectName(u"plainTextEdit")
        self.plainTextEdit.setGeometry(QRect(90, 40, 521, 311))
        self.pushButton = QPushButton(self.centralwidget)  # 添加的按钮
        self.pushButton.setObjectName(u"pushButton")
        self.pushButton.setGeometry(QRect(330, 410, 75, 24))
        MainWindow.setCentralWidget(self.centralwidget)
        self.menubar = QMenuBar(MainWindow)
        self.menubar.setObjectName(u"menubar")
        self.menubar.setGeometry(QRect(0, 0, 700, 22))
        MainWindow.setMenuBar(self.menubar)
        self.statusbar = QStatusBar(MainWindow)
        self.statusbar.setObjectName(u"statusbar")
        MainWindow.setStatusBar(self.statusbar)

        self.retranslateUi(MainWindow)  # 调用下面的retranslateUi(self, MainWindow)函数。

        QMetaObject.connectSlotsByName(MainWindow)

    # setupUi

    def retranslateUi(self, MainWindow):
        MainWindow.setWindowTitle(
            QCoreApplication.translate("MainWindow", u"\u81ea\u5b9a\u4e49\u7684\u6807\u9898\u680f", None))
        self.plainTextEdit.setPlaceholderText(QCoreApplication.translate("MainWindow", u"\u8bf7\u8f93\u5165", None))
        self.pushButton.setText(QCoreApplication.translate("MainWindow", u"\u70b9\u51fb", None))
    # retranslateUi


# ================== 上面为 自动生成 的代码 ============================
# ================== 下面代码 使其显示出来  ============================
app = QApplication()
main_window = QMainWindow()

auto_ui_window = Ui_MainWindow()  # 实例化部件
auto_ui_window.setupUi(main_window)  # 调用setupUi()方法,并传入 主窗口 参数。

# 给按钮绑定调用函数。
# auto_ui_window.pushButton.clicked.connect(lambda x: print('点击了按钮'))
auto_ui_window.pushButton.clicked.connect(lambda x: auto_ui_window.plainTextEdit.appendPlainText("点击按钮"))

main_window.show()
app.exec()
pass
方法 2:直接加载 ui 代码
要直接加载 UI 文件,需要?QtUiTools?模块中的一个类:from PySide6.QtUiTools import QUiLoader
QUiLoader 可以动态加载 ui文件并立即使用它:
# -*- coding: utf-8 -*-

from PySide6.QtCore import QFile, QIODevice
from PySide6.QtUiTools import QUiLoader

ui_file = QFile("mainwindow.ui")
ui_file.open(QFile.ReadOnly)

loader = QUiLoader()
window = loader.load(ui_file)
window.show()
完整代码:
# -*- coding: utf-8 -*-

import sys
from PySide6.QtUiTools import QUiLoader
from PySide6.QtWidgets import QApplication
from PySide6.QtCore import QFile, QIODevice

if __name__ == "__main__":
    app = QApplication(sys.argv)

    ui_file_name = "mainwindow.ui"
    ui_file = QFile(ui_file_name)
    if not ui_file.open(QIODevice.ReadOnly):
        print(f"Cannot open {ui_file_name}: {ui_file.errorString()}")
        sys.exit(-1)
    loader = QUiLoader()
    window = loader.load(ui_file)
    ui_file.close()
    if not window:
        print(loader.errorString())
        sys.exit(-1)
    window.show()

    sys.exit(app.exec())
使用.qrc文件
:https://doc.qt.io/qtforpython/tutorials/basictutorial/qrcfiles.html
Qt 资源系统是一种在应用程序中存储二进制文件的机制。这些文件将被嵌入到应用程序中,并且可以 QFile通过QIcon使用QPixmap 以:/。最常见的用途是自定义图像、图标、字体等。
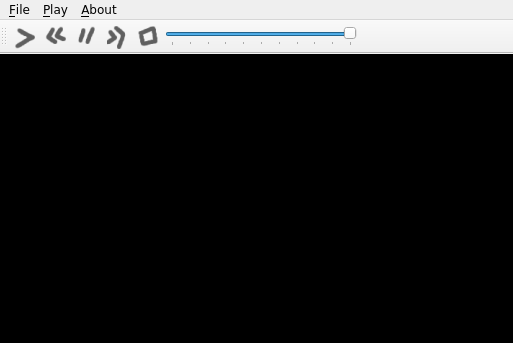
在本教程中,将自定义图像加载为按钮图标。以?Qt 中的多媒体播放器示例。
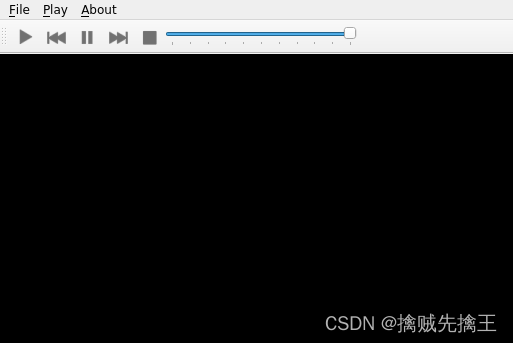
将有关资源的信息添加到.qrc?文件中:
把 图标 添加到?
</ui>
<!DOCTYPE RCC><RCC version="1.0">
<qresource>
    <file>icons/play.png</file>
    <file>icons/pause.png</file>
    <file>icons/stop.png</file>
    <file>icons/previous.png</file>
    <file>icons/forward.png</file>
</qresource>
</RCC>
生成 Python 文件
现在 icons.qrc 文件准备好了,使用 pyside6-rcc 工具生成一个 Python 类。
运行命令:pyside6-rcc icons.rc -o rc_icons.py
-o 选项允许您指定输出文件名,在本例中为rc_icons.py。
修改代码:
from PySide6.QtGui import QIcon, QKeySequence
playIcon = self.style().standardIcon(QStyle.SP_MediaPlay)
previousIcon = self.style().standardIcon(QStyle.SP_MediaSkipBackward)
pauseIcon = self.style().standardIcon(QStyle.SP_MediaPause)
nextIcon = self.style().standardIcon(QStyle.SP_MediaSkipForward)
stopIcon = self.style().standardIcon(QStyle.SP_MediaStop)
改为
from PySide6.QtGui import QIcon, QKeySequence, QPixmap
playIcon = QIcon(QPixmap(":/icons/play.png"))
previousIcon = QIcon(QPixmap(":/icons/previous.png"))
pauseIcon = QIcon(QPixmap(":/icons/pause.png"))
nextIcon = QIcon(QPixmap(":/icons/forward.png"))
stopIcon = QIcon(QPixmap(":/icons/stop.png"))这可确保使用新图标而不是应用程序主题提供的默认图标。请注意,这些行不是连续的,而是位于文件的不同部分。在所有导入之后,在主 Python 文件的顶部添加以下导入:import rc_icons
类 的构造函数:
def __init__(self):
    super(MainWindow, self).__init__()

    self.playlist = QMediaPlaylist()
    self.player = QMediaPlayer()

    toolBar = QToolBar()
    self.addToolBar(toolBar)

    fileMenu = self.menuBar().addMenu("&File")
    openAction = QAction(QIcon.fromTheme("document-open"),
                         "&Open...", self, shortcut=QKeySequence.Open,
                         triggered=self.open)
    fileMenu.addAction(openAction)
    exitAction = QAction(QIcon.fromTheme("application-exit"), "E&xit",
                         self, shortcut="Ctrl+Q", triggered=self.close)
    fileMenu.addAction(exitAction)

    playMenu = self.menuBar().addMenu("&Play")
    playIcon = QIcon(QPixmap(":/icons/play.png"))
    self.playAction = toolBar.addAction(playIcon, "Play")
    self.playAction.triggered.connect(self.player.play)
    playMenu.addAction(self.playAction)

    previousIcon = QIcon(QPixmap(":/icons/previous.png"))
    self.previousAction = toolBar.addAction(previousIcon, "Previous")
    self.previousAction.triggered.connect(self.previousClicked)
    playMenu.addAction(self.previousAction)

    pauseIcon = QIcon(QPixmap(":/icons/pause.png"))
    self.pauseAction = toolBar.addAction(pauseIcon, "Pause")
    self.pauseAction.triggered.connect(self.player.pause)
    playMenu.addAction(self.pauseAction)

    nextIcon = QIcon(QPixmap(":/icons/forward.png"))
    self.nextAction = toolBar.addAction(nextIcon, "Next")
    self.nextAction.triggered.connect(self.playlist.next)
    playMenu.addAction(self.nextAction)

    stopIcon = QIcon(QPixmap(":/icons/stop.png"))
    self.stopAction = toolBar.addAction(stopIcon, "Stop")
    self.stopAction.triggered.connect(self.player.stop)
    playMenu.addAction(self.stopAction)

    # many lines were omitted
执行?python main.py 来运行应用程序,检查新的图标集
为 控件 应用程序 设置 样式
:https://doc.qt.io/qtforpython/tutorials/basictutorial/widgetstyling.html
Qt Widgets 应用程序根据平台使用默认主题。在某些情况下需要修改 Qt 主题的配置让应用程序以不同的方式显示。可以位控件提供自定义样式。
# -*- coding: utf-8 -*-

import sys
from PySide6.QtCore import Qt
from PySide6.QtWidgets import QApplication, QLabel

if __name__ == "__main__":
    app = QApplication()
    w = QLabel("This is a placeholder text")
    w.setAlignment(Qt.AlignCenter)
    w.resize(300, 150)
    w.show()
    sys.exit(app.exec())
可以使用类似 CSS 的语法为 应用程序设置样式。有关详细信息,请参阅 Qt 样式表参考:https://doc.qt.io/qt-5/stylesheet-reference.html
QLabel 可以通过设置它的一些 CSS 属性来设置不同的样式,例如:background-color 和 font-family,示例:
# -*- coding: utf-8 -*-

import sys
from PySide6.QtCore import Qt
from PySide6.QtWidgets import QApplication, QLabel

if __name__ == "__main__":
    app = QApplication()
    w = QLabel("This is a placeholder text")
    w.setAlignment(Qt.AlignCenter)
    w.setStyleSheet("""
            background-color: #262626;
            color: #FFFFFF;
            font-family: Titillium;
            font-size: 18px;
            """)
    w.resize(300, 150)
    w.show()
    sys.exit(app.exec())
上面代码中单独设置每个 UI 元素的样式需要做很多工作。更简单的替代方法是使用 Qt 样式表,它是一个或多个 .qss 文件,用于定义应用程序中 UI 元素的样式。
更多示例可以在 (??Qt 样式表示例:?https://doc.qt.io/qt-5/stylesheet-examples.html?)?文档页面中找到。
Qt 样式表
qss文件与 CSS 文件非常相似,但您需要指定 Widget 组件以及可选的对象名称:
QLabel {
    background-color: red;
}

QLabel#title {
    font-size: 20px;
}
第一个样式为应用程序中的所有 QLabel 对象定义背景颜色,而后一个样式仅设置标题对象的样式。程序中可以通过?setObjectName(str) 函数,为任何 Qt 对象设置对象名称,例如:对于 label = QLabel("Test") ,设置?label.setObjectName("title")。
一旦你的应用程序有了一个qss文件,你可以通过读取文件并使用 QApplication.setStyleSheet(str)函数来应用它:
if __name__ == "__main__":
    app = QApplication()

    w = Widget()
    w.show()

    with open("style.qss", "r") as f:
        _style = f.read()
        app.setStyleSheet(_style)

    sys.exit(app.exec())
通过 qss,可以让 程序代码 和 样式 分开设计,这样的设计不会导致 代码和样式混淆到一块,也可以很方便的 启用或禁用 样式。
示例:
# -*- coding: utf-8 -*-

import sys
from PySide6.QtCore import Qt
from PySide6.QtWidgets import *


_style = """
QListWidget {
    color: #FFFFFF;
    background-color: #33373B;
}

QListWidget::item {
    height: 50px;
}

QListWidget::item:selected {
    background-color: #2ABf9E;
}

QLabel {
    background-color: #FFFFFF;
    qproperty-alignment: AlignCenter;
}

QPushButton {
    background-color: #2ABf9E;
    padding: 20px;
    font-size: 18px;
}
"""


class Widget(QWidget):
    def __init__(self, parent=None):
        super(Widget, self).__init__(parent)

        menu_widget = QListWidget()
        for i in range(10):
            item = QListWidgetItem(f"Item {i}")
            item.setTextAlignment(Qt.AlignCenter)
            menu_widget.addItem(item)

        text_widget = QLabel("标签")
        button = QPushButton("按钮")

        content_layout = QVBoxLayout()
        content_layout.addWidget(text_widget)
        content_layout.addWidget(button)
        main_widget = QWidget()
        main_widget.setLayout(content_layout)

        layout = QHBoxLayout()
        layout.addWidget(menu_widget, 1)
        layout.addWidget(main_widget, 4)
        self.setLayout(layout)


if __name__ == "__main__":
    app = QApplication()

    w = Widget()
    w.show()

    # with open("style.qss", "r") as f:
    #     _style = f.read()
    #     app.setStyleSheet(_style)
    app.setStyleSheet(_style)
    sys.exit(app.exec())
2、Quick/QML:基础教程
第一个 QtQuick/QML 应用程序
:
QML?是一种声明性语言,可让您比使用传统语言更快地开发应用程序。由于其声明性,它非常适合设计应用程序的 UI。在 QML 中,用户界面被指定为具有属性的对象树。在本教程中,我们将展示如何使用 PySide6 和 QML 制作一个简单的“Hello World”应用程序。
PySide6/QML 应用程序至少包含两个不同的文件——一个包含用户界面 QML 描述的文件,以及一个加载 QML 文件的 python 文件。为了方便起见,让我们将这两个文件保存在同一个目录中。
这是一个简单的 QML 文件,名为view.qml:
import QtQuick

Rectangle {
    id: main
    width: 200
    height: 200
    color: "green"

    Text {
        text: "Hello World"
        anchors.centerIn: main
    }
}我们首先导入QtQuick,这是一个 QML 模块。
对于以前使用过 HTML 或 XML 文件的人来说,其余的 QML 代码非常简单。基本上,我们正在创建一个大小为200*200的绿色矩形,并添加一个文本元素,内容为“Hello World”。该代码使文本在对象中居中显示,在本例中为 Rectangle。anchors.centerIn:?mainid:?main
现在,让我们看看代码在 PySide6 上的样子。让我们称之为main.py:
import sys
from PySide6.QtWidgets import QApplication
from PySide6.QtQuick import QQuickView

if __name__ == "__main__":
    app = QApplication()
    view = QQuickView()

    view.setSource("view.qml")
    view.show()
    sys.exit(app.exec())
Python-QML 集成
:https://doc.qt.io/qtforpython/tutorials/qmlintegration/qmlintegration.html
QML 应用教程
:https://doc.qt.io/qtforpython/tutorials/qmlapp/qmlapplication.html
QML、SQL 和 PySide 集成教程
:https://doc.qt.io/qtforpython/tutorials/qmlsqlintegration/qmlsqlintegration.html
3、一般应用
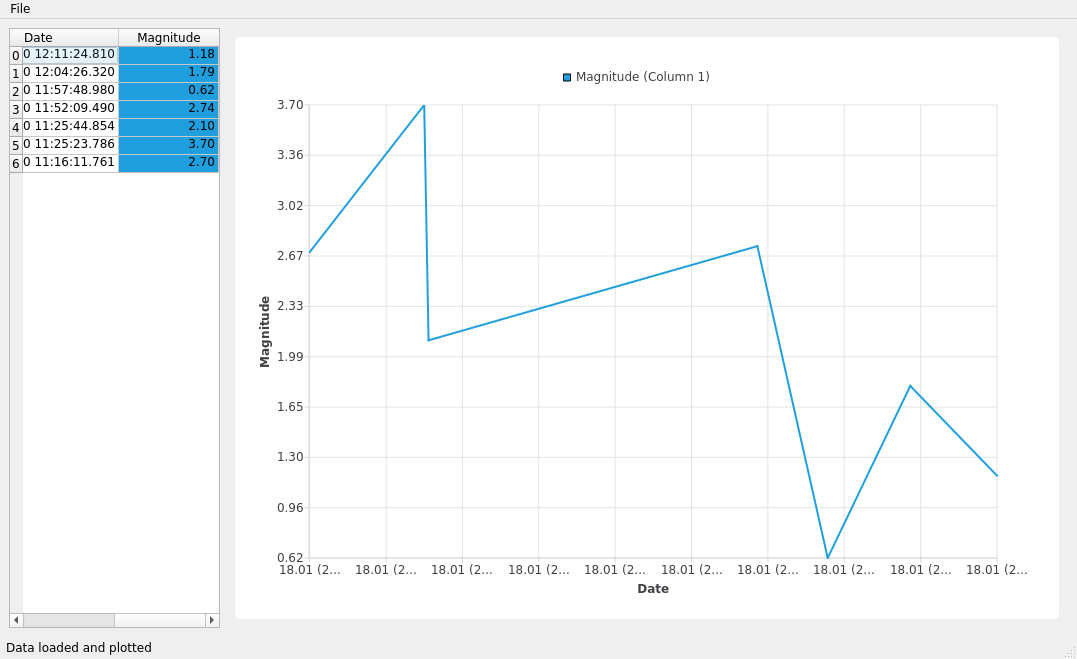
数据可视化工具教程
:https://doc.qt.io/qtforpython/tutorials/datavisualize/index.html
学习如何在折线图中可视化来自 CSV 的数据。
您可以从 下载源代码?https://doc.qt.io/qtforpython/_downloads/06ada84b04e72c9468651471cc91b026/datavisualize.tar.bz2?。
综合教程
:https://doc.qt.io/qtforpython/tutorials/expenses/expenses.html
学习以下概念:
-
以编程方式创建用户界面
-
布局、控件
-
重载 Qt 类
-
连接信号和插槽
-
与 QWidgets 交互
要求:
-
应用程序的简单窗口(QMainWindow)。
-
用于跟踪费用的表(QTableWidget)。
-
添加费用信息的两个输入字段(QLineEdit)。
-
用于向表格添加信息、绘制数据、清除表格和退出应用程序的按钮 (?QPushButton?)。
-
避免无效数据输入的验证步骤。
-
用于可视化将嵌入图表视图 (?QChartView?)的费用数据 (?QChart?) 的图表。
# -*- coding: utf-8 -*-

import sys
from PySide6.QtCore import Qt, Slot
from PySide6.QtGui import QAction, QPainter
from PySide6.QtWidgets import (
    QApplication, QHeaderView, QHBoxLayout, QLabel, QLineEdit,
    QMainWindow, QPushButton, QTableWidget, QTableWidgetItem,
    QVBoxLayout, QWidget
)
from PySide6.QtCharts import QChartView, QPieSeries, QChart


class Widget(QWidget):
    def __init__(self):
        QWidget.__init__(self)
        self.items = 0

        # Example data
        self._data = {
            "Water": 24.5, "Electricity": 55.1, "Rent": 850.0,
            "Supermarket": 230.4, "Internet": 29.99, "Bars": 21.85,
            "Public transportation": 60.0, "Coffee": 22.45, "Restaurants": 120
        }

        # Left
        self.table = QTableWidget()
        self.table.setColumnCount(2)
        self.table.setHorizontalHeaderLabels(["Description", "Price"])
        self.table.horizontalHeader().setSectionResizeMode(QHeaderView.Stretch)

        # Chart
        self.chart_view = QChartView()
        self.chart_view.setRenderHint(QPainter.Antialiasing)

        # Right
        self.description = QLineEdit()
        self.price = QLineEdit()
        self.add = QPushButton("Add")
        self.clear = QPushButton("Clear")
        self.quit = QPushButton("Quit")
        self.plot = QPushButton("Plot")

        # Disabling 'Add' button
        self.add.setEnabled(False)

        self.right = QVBoxLayout()
        self.right.addWidget(QLabel("Description"))
        self.right.addWidget(self.description)
        self.right.addWidget(QLabel("Price"))
        self.right.addWidget(self.price)
        self.right.addWidget(self.add)
        self.right.addWidget(self.plot)
        self.right.addWidget(self.chart_view)
        self.right.addWidget(self.clear)
        self.right.addWidget(self.quit)

        # QWidget Layout
        self.layout = QHBoxLayout()

        # self.table_view.setSizePolicy(size)
        self.layout.addWidget(self.table)
        self.layout.addLayout(self.right)

        # Set the layout to the QWidget
        self.setLayout(self.layout)

        # Signals and Slots
        self.add.clicked.connect(self.add_element)
        self.quit.clicked.connect(self.quit_application)
        self.plot.clicked.connect(self.plot_data)
        self.clear.clicked.connect(self.clear_table)
        self.description.textChanged[str].connect(self.check_disable)
        self.price.textChanged[str].connect(self.check_disable)

        # Fill example data
        self.fill_table()

    @Slot()
    def add_element(self):
        des = self.description.text()
        price = self.price.text()

        try:
            price_item = QTableWidgetItem(f"{float(price):.2f}")
            price_item.setTextAlignment(Qt.AlignRight)

            self.table.insertRow(self.items)
            description_item = QTableWidgetItem(des)

            self.table.setItem(self.items, 0, description_item)
            self.table.setItem(self.items, 1, price_item)

            self.description.setText("")
            self.price.setText("")

            self.items += 1
        except ValueError:
            print("Wrong price", price)

    @Slot()
    def check_disable(self, s):
        if not self.description.text() or not self.price.text():
            self.add.setEnabled(False)
        else:
            self.add.setEnabled(True)

    @Slot()
    def plot_data(self):
        # Get table information
        series = QPieSeries()
        for i in range(self.table.rowCount()):
            text = self.table.item(i, 0).text()
            number = float(self.table.item(i, 1).text())
            series.append(text, number)

        chart = QChart()
        chart.addSeries(series)
        chart.legend().setAlignment(Qt.AlignLeft)
        self.chart_view.setChart(chart)

    @Slot()
    def quit_application(self):
        QApplication.quit()

    def fill_table(self, data=None):
        data = self._data if not data else data
        for desc, price in data.items():
            description_item = QTableWidgetItem(desc)
            price_item = QTableWidgetItem(f"{price:.2f}")
            price_item.setTextAlignment(Qt.AlignRight)
            self.table.insertRow(self.items)
            self.table.setItem(self.items, 0, description_item)
            self.table.setItem(self.items, 1, price_item)
            self.items += 1

    @Slot()
    def clear_table(self):
        self.table.setRowCount(0)
        self.items = 0


class MainWindow(QMainWindow):
    def __init__(self, widget):
        QMainWindow.__init__(self)
        self.setWindowTitle("Tutorial")

        # Menu
        self.menu = self.menuBar()
        self.file_menu = self.menu.addMenu("File")

        # Exit QAction
        exit_action = QAction("Exit", self)
        exit_action.setShortcut("Ctrl+Q")
        exit_action.triggered.connect(self.exit_app)

        self.file_menu.addAction(exit_action)
        self.setCentralWidget(widget)

    @Slot()
    def exit_app(self, checked):
        QApplication.quit()


if __name__ == "__main__":
    # Qt Application
    app = QApplication(sys.argv)
    # 创建 my_widget
    my_widget = Widget()
    # QMainWindow using QWidget as central widget
    window = MainWindow(my_widget)
    window.resize(800, 600)
    window.show()

    # Execute application
    sys.exit(app.exec())
