在前文《多方位玩转“地平线新发布AIoT开发板——旭日X3派(Sunrise x3 Pi)” 插电!开机!轻松秒杀!》中,我们已经成功了使用了这个开发板。
深度相机目前在多个应用得到了广泛的应用,如果能在上面运行起来深度相机的话,那这个开发板岂不是能应用在更多的场景上😃。
我在这个板子上对深度相机所需的SDK进行了编译,SDK版本为:Intel? RealSense? SDK 2.0 (v2.50.0)。
一 预编译包
我编译这个SDK花费了5.6个小时,为了方便各位后续使用,各位可以直接下载编译好的文件,包含C++和Python的库,相关文件我已经上传至百度云(提取码:awe4 )。
在提供的这些文件中,压缩包built_realsense.zip为这些文件夹的集合。
- 文件夹lib、include和bin的内容都要放在
/usr/local文件夹下 - 文件夹python3的内容注意要放在
/usr/lib/python3/dist-packages/里面

这里我只提供了编译好的一些库,并没有测试,有问题的话欢迎各位指出。
二 自己编译SDK
编译所需要的文件已经放在百度云(提取码:li0f )中,在编译前请提前下载
编译前需要注意以下几点:
- 由于编译过程需要联网,然而开发板的有线网默认为静态地址,因此要强行关掉有线网的连接,关闭指令为
sudo nmcli device disconnect eth0,eth0为网络名,可以利用sudo nmcli dev查看。 - 依赖一些包,在安装前要安装上
sudo apt-get install libxrandr-dev libxinerama-dev libxcursor-dev libxi-dev libusb-dev。 - 所需SDK依赖GLFW库,源码包已放在上述的百度云中,也可以从https://github.com/glfw/glfw/releases/download/3.3.7/glfw-3.3.7.zip中下载,之后参考博客《Ubuntu18.04安装glfw3.3》的方式进行安装。
以上内容是我编译过程中记录的一些笔记,可能对丢失一些库,但是这些都会在系统上提示,根据需求安装即可。
下面开始编译Realsense的SDK,下面是操作步骤:
- 解压
librealsense-2.50.0.zip,进入文件夹cd librealsense-2.50.0,并创建编译文件夹mkdir build。 - 编译过程参考《Running pyrealsense2 on JetsonNano》,这里提到了利用RSUSB方法进行编译,我个人理解为是在编译过程中要将深度相机连接到开发板上(不确定是否正确啊)。我使用的cmake指令为:
cmake ../ -DFORCE_RSUSB_BACKEND=ON -DBUILD_PYTHON_BINDINGS:bool=true -DPYTHON_EXECUTABLE=/usr/bin/python3 -DCMAKE_BUILD_TYPE=release,切记安装过程要联网。 - cmake过程中会下载一些依赖的代码文件,有错误的话一定要根据需求修改,防止后续make的时候出错,导致白白编译。
- cmake成功之后就要使用make进行编译,因为系统内存只有2G,因此如果想一遍成的话,在build文件夹下输入
make即可,切记不能使用多线程编译,内存不够(我没成功创建虚拟内存,似乎系统内核删除了虚拟内存的分配功能)。如果想更快的话,可以动态的输入make -j2,这样在内存不够的地方再改回make即可。 - 编译成功之后,输入
sudo make install将编译好的库复制到系统中。
本方法编译的结果包含C++库和Python函数包👏
三 使用Realsense
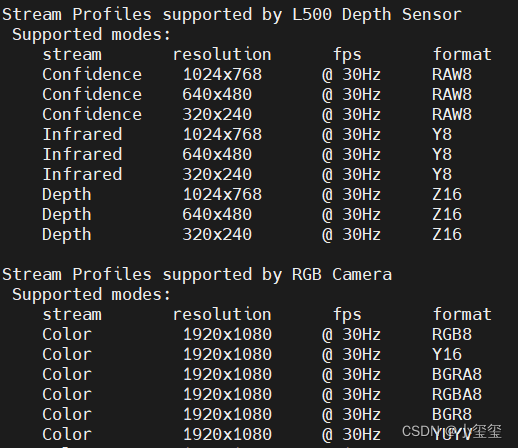
在使用前,一定要输入sudo rs-enumerate-devices查看设备支持的分辨率以及连接信息。
下面为设备连接信息,可以看到,当前设备识别的USB接口为3.2接口,这样就可以获取更大分辨率的RGBD图像了。
Device info:
    Name                          :     Intel RealSense L515
    Serial Number                 :     f0211269
    Firmware Version              :     01.05.08.01
    Recommended Firmware Version  :     01.05.08.01
    Physical Port                 :     2-1-2
    Debug Op Code                 :     15
    Product Id                    :     0B64
    Camera Locked                 :     YES
    Usb Type Descriptor           :     3.2
    Product Line                  :     L500
    Asic Serial Number            :     0003a9d3dada
    Firmware Update Id            :     0003a9d3dada
同时记录,彩色相机和深度相机支持的配置,方便后续相机分辨率的设置。

下面提供获取RGBD数据的python代码
from hobot_vio import libsrcampy as srcampy
import cv2
import numpy as np
import time
import pyrealsense2.pyrealsense2 as rs

# 这里把前面的HDMI可视化部分的代码贴上
# 复制类class ImageShow(object)

pipeline = rs.pipeline()
config = rs.config()
## 这里根据前面sudo rs-enumerate-devices的输出进行配置
config.enable_stream(rs.stream.depth, 1024, 768, rs.format.z16, 30)
config.enable_stream(rs.stream.color, 1920, 1080, rs.format.rgb8, 30)
align_to = rs.stream.color
alignedFs = rs.align(align_to)
profile = pipeline.start(config)

#######################################
## 下面是获取内参的方式
frames = pipeline.wait_for_frames()
depth = frames.get_depth_frame()
color = frames.get_color_frame()
# 获取内参
depth_profile = depth.get_profile()
print('depth_profile:', depth_profile)
# <pyrealsense2.video_stream_profile: 1(0) 640x480 @ 30fps 1>
print(type(depth_profile))
# <class 'pyrealsense2.pyrealsense2.stream_profile'>
print('fps:', depth_profile.fps())
# 30
print(depth_profile.stream_type())
# stream.depth
print('', depth_profile.unique_id)
# <bound method PyCapsule.unique_id of <pyrealsense2.video_stream_profile: 1(0) 640x480 @ 30fps 1>>
color_profile = color.get_profile()
print(depth_profile.fps())
print(depth_profile.stream_index())
color_intrin = cvsprofile.get_intrinsics()
print(color_intrin)
# width: 640, height: 480, ppx: 318.482, ppy: 241.167, fx: 616.591, fy: 616.765, model: 2, coeffs: [0, 0, 0, 0, 0]
depth_intrin = dvsprofile.get_intrinsics()
print(depth_intrin)
extrin = depth_profile.get_extrinsics_to(color_profile)
print(extrin)

depth_sensor = profile.get_device().first_depth_sensor()
depth_scale = depth_sensor.get_depth_scale()
print('depth scale: ', depth_scale)

####################
# 视频流展示
im_show = ImageShow()
while True:
    # 获取图片帧
    frameset = pipeline.wait_for_frames()
    aligned_frames = alignedFs.process(frameset)

    color_frame = aligned_frames.get_color_frame()
    depth_frame = aligned_frames.get_depth_frame()

    if not depth_frame or not color_frame:
        continue

    depth_img = np.asanyarray(depth_frame.get_data())
    color_img = np.asanyarray(color_frame.get_data())

    color_img = cv2.cvtColor(color_img, cv2.COLOR_RGB2BGR)
    depth_bgr = cv2.applyColorMap(cv2.convertScaleAbs(depth_img, alpha=0.03), cv2.COLORMAP_JET)
    show_img = np.hstack([color_img, depth_bgr])
    im_show.show(show_img)
im_show.close()
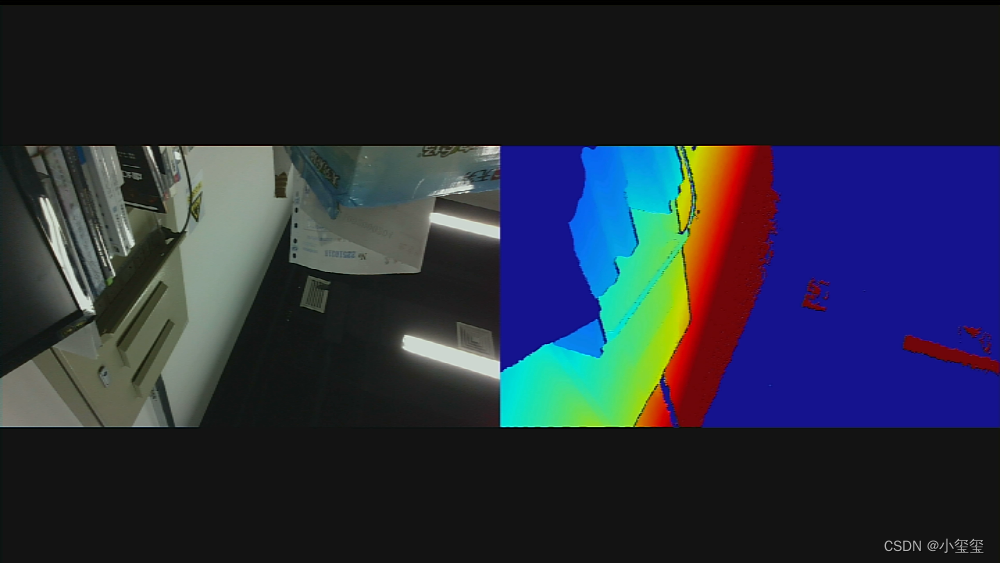
跑起来之后,在显示屏上的展示效果如下,能够有效地获取目标的RGBD数据。

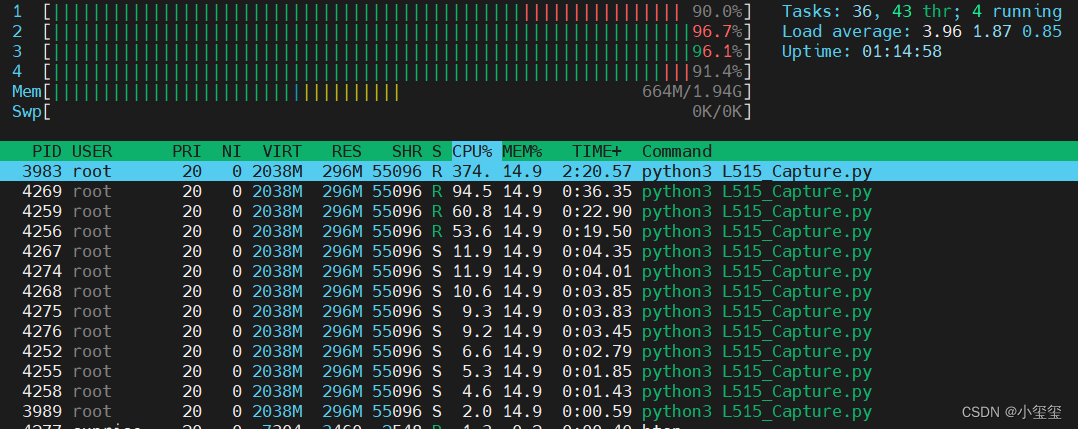
但是,比较危险的一点,在整体的展示过程中,内存耗用200M,CPU几乎占满,这样很难继续做其他的工作(这也与RGBD分辨率为1920*1080有关,而且获取数据这个过程存在大量的线程)。希望后续这个板子能从硬件上对这个SDK进行一个适配,以腾出更多的计算空间给下游算法。

四 小结
花费亿点时间,终于完成了realsense的SDK编译与使用,这意味着这个新板子可应用在更多的场景。希望后续能够对这个问题进行适配,降低CPU占用,给核心算法留点计算空间→_→。