前言
最近,想学习下flask部署算法,想到前段时间基于efficientnet弄了个猫狗分类,故就拿它来练手吧。
一、模型训练
Efficientnet分类任务的训练及测试代码可参考我的另一篇文章:Efficientnet训练和测试
二、flask页面设计
这部分在网上的下了一些开源的代码,因为本人不太会写前端的东西(嫌麻烦),链接如下:flask页面,个人感觉这个页面设计挺好的。
三、接口设计
这里话不多说,直接上代码:
from flask import Flask,jsonify,render_template,request
import re
from PIL import Image
import base64,io
import cv2
import numpy as np
import torch,argparse,torchvision
device="cuda" if torch.cuda.is_available() else "cpu"

app=Flask(__name__)

#参数设置
def parser_opt():
    parser=argparse.ArgumentParser()
    parser.add_argument("--weights",type=str,default="./weight/cat_dog/best.pth",help="model path")
    parser.add_argument("--imgsz",type=int,default=224,help="test image size")
    opt=parser.parse_known_args()[0]
    return opt
class Test_model():
    def __init__(self,opt):
        self.imgsz=opt.imgsz #测试图片尺寸
        self.model=(torch.load(opt.weights)).to(device) #加载模型
        self.model.eval()
        self.class_name=["cat","dog"] #类别信息

    # 补边为正方形
    def expend_img(self, img,mode="RGB", fill_pix=0):
        '''
        :param img: 图片数据
        :param mode: 图片格式,如RGB或者BGR等
        :param fill_pix: 填充像素,默认为灰色,自行更改
        :return:
        '''
        if mode=="RGB":
            w, h = img.size
            padd_length = int(abs(w - h) / 2)  # 要填充的长度
            box = (padd_length, 0) if w < h else (0, padd_length)  # 填充位置
            new_img = Image.new("RGB", (max(h, w), max(h, w)), color=(fill_pix,fill_pix,fill_pix))  # 创建背景图(黑)
            new_img.paste(img, box)
        else:
            h, w = img.shape[:2]  # 获取图像的宽高
            if h >= w:  # 左右填充
                padd_width = int(h - w) // 2
                padd_h, padd_b, padd_l, padd_r = 0, 0, padd_width, padd_width  # 获取上下左右四个方向需要填充的像素

            elif h < w:  # 上下填充
                padd_high = int(w - h) // 2
                padd_h, padd_b, padd_l, padd_r = padd_high, padd_high, 0, 0

            new_img = cv2.copyMakeBorder(img, padd_h, padd_b, padd_l, padd_r, borderType=cv2.BORDER_CONSTANT,
                                         value=[fill_pix, fill_pix, fill_pix])

        return new_img

    # 单张图
    def pred_one(self, img,mode="RGB"):
        data_transorform = torchvision.transforms.Compose([
            torchvision.transforms.Resize((self.imgsz,self.imgsz)),
            torchvision.transforms.CenterCrop((self.imgsz,self.imgsz)),
            torchvision.transforms.ToTensor(),
            torchvision.transforms.Normalize(mean=[0.485, 0.456, 0.406], std=[0.229, 0.224, 0.225])
        ])
        if mode=="RGB":
            new_img = self.expend_img(img)  # 补边
        else:
            img = cv2.cvtColor(np.asarray(img), cv2.COLOR_RGB2BGR)
            new_img = self.expend_img(img)  # 补边
            new_img = Image.fromarray(cv2.cvtColor(new_img, cv2.COLOR_BGR2RGB))
        img = data_transorform(new_img)  # 转换
        img = torch.reshape(img, (-1, 3, self.imgsz, self.imgsz)).to(device)  # 维度转换[B,C,H,W]
        pred = self.model(img)
        # print(pred)
        _, pred = torch.max(pred, 1)

        outputs = self.class_name[pred]

        return outputs
#base转PIL
def base64_to_pil(img_base64,mode="RGB"):
    """
    Convert base64 image data to PIL image
    """
    image_data = re.sub('^data:image/.+;base64,', '', img_base64)  # base64格式的图片
    if mode=="RGB":
        pil_image = Image.open(io.BytesIO(base64.b64decode(image_data))) #base64转PIL
        return pil_image
    elif mode=="BGR":
        mat_image=base64.b64decode(image_data)
        mat_image=cv2.imdecode(np.fromstring(mat_image,np.uint8),cv2.COLOR_RGB2BGR)
        return mat_image


@app.route('/',methods=["GET"])
def index():
    return render_template("index.html")

@app.route("/predict",methods=["GET","POST"])
def predict():
    if request.method=="POST":
        img=base64_to_pil(request.json)
        pred=test_img.pred_one(img)
        return jsonify(result=pred)

if __name__ == '__main__':
    opt = parser_opt()
    test_img = Test_model(opt)
    app.run(port=3000,debug=True)
其中需要注意的是,在一些函数中有个参数mode,这个根据自己的实际需求去设定,最好从图片的预处理耗时和推理效果进行对比。
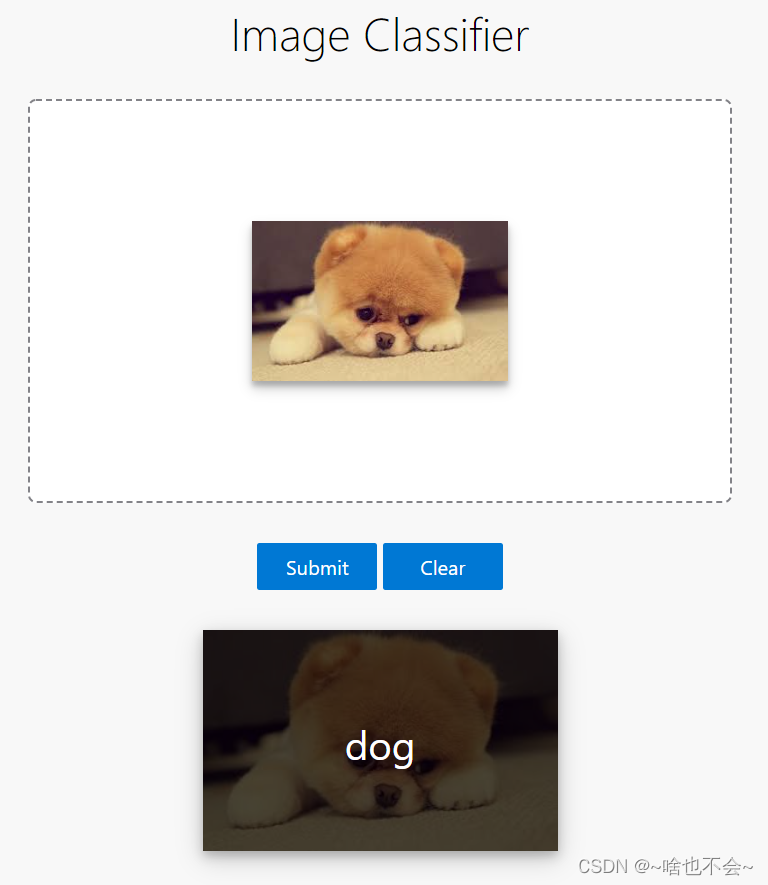
四、效果展示

五、扩充部分(图片互转)
这里记录了一些图片互想转换的方式,如PIL->base64等,代码如下:
import cv2
import numpy as np
from PIL import Image
import base64,io
import time

#base64->PIL
def base64_2_pil(imgpath):
    '''
    :param imgpath: 图片路径
    :return:
    '''
    with open(imgpath,"rb") as f:
        # 将图片编码为base64格式
        img_base64=base64.b64encode(f.read())
    pil_image=Image.open(io.BytesIO(base64.b64decode(img_base64)))
    #pil图像显示
    # pil_image.show()
    #pil图像保存
    # pil_image.save("./2.jpg")
    return pil_image

#pil->base64
def pil_2_base64(imgpath):
    '''
    :param imgpath: 图片路径
    :return:
    '''
    image=Image.open(imgpath)
    img_buff=io.BytesIO()
    image.save(img_buff,format="JPEG")
    img_str=base64.b64encode(img_buff.getvalue())
    return img_str

#opencv->base64
def opencv_base64(imgpath):
    '''
    :param imgpath: 图片路径
    :return:
    '''
    img=cv2.imread(imgpath)
    #将mat矩阵转换为base格式
    img_str=base64.b64encode(cv2.imencode(".jpg",img)[1].tostring())
    return img_str

#base64->opencv
def base64_opencv(imgpath):
    '''
    :param imgpath: 图片路径
    :return:
    '''
    with open(imgpath,"rb") as f:
        #编码为base64格式
        img_base64=base64.b64encode(f.read())
    #base64转换为opencv(二选一)
    # image=cv2.imdecode(np.fromstring(base64.b64decode(img_base64),np.uint8),cv2.IMREAD_COLOR)
    image=cv2.imdecode(np.fromstring(base64.b64decode(img_base64),np.uint8),cv2.COLOR_RGB2BGR)
    #图片展示
    # cv2.imshow("1",image)
    # cv2.waitKey(0)
    return image

#pil->opencv
def pil_opencv(imgpath):
    '''
    :param imgpath: 图片路径
    :return:
    '''
    #pil读取图片
    pil_img=Image.open(imgpath)
    #转换为opencv格式
    img=cv2.cvtColor(np.asarray(pil_img),cv2.COLOR_RGB2BGR)
    return img

def opencv_pil(imgpath):
    '''
    :param imgpath: 图片路径
    :return:
    '''
    #opencv读取图片
    img=cv2.imread(imgpath)
    #转换为pil格式
    pil_img=Image.fromarray(cv2.cvtColor(img,cv2.COLOR_BGR2RGB))
    # pil_img.show()
    return pil_img


if __name__ == '__main__':
    imgpath=r"./1.jpg"
    # base64->pil
    base64_2_pil(imgpath)
    #pil->base64
    pil_2_base64(imgpath)
    #opencv->base64
    opencv_base64(imgpath)
    # base64->opencv
    base64_opencv(imgpath)
    #pil->opencv
    pil_opencv(imgpath)
    #opencv->pil
    opencv_pil(imgpath)
总结
以上就是这篇文章的全部内容,如有bug或有问题的,请在评论区交流或者加入qq群:995760755交流。