?? 之前我已经写过了以篇博客,写了一个很简易的GUI界面,在经过了几天对PyQt的学习之后,我对之前的页面进行了优化和美化,同时新增输出识别物体名称及相应数量的功能。
? 本机配置:
pyCharm:PyCharm 2022.1.3 (Community Edition)
python 3.6.9
PyQt:  Qt5 Version Number is: 5.9.5
       PyQt5 Version is: 5.10.1
       Sip Version is: 4.19.7
本例适用于PyQt5
查看PyQt版本,新建check.py,复制以下内容:
from PyQt5.QtWidgets import QApplication
from PyQt5.QtCore import QT_VERSION_STR
from PyQt5.Qt import PYQT_VERSION_STR
from sip import SIP_VERSION_STR

if __name__=='__main__':
    import sys
    app=QApplication(sys.argv)
    print("Qt5 Version Number is: {0}".format(QT_VERSION_STR))
    print("PyQt5 Version is: {}".format(PYQT_VERSION_STR))
    print("Sip Version is: {}".format(SIP_VERSION_STR))

    sys.exit(app.exec_())
运行:
终端运行
python3 check.py
或
pyCharm 运行本文件
打开Qt-designer,添加控件如图,本例名称为yolov3Gui.ui,保存在在darknet文件夹下:
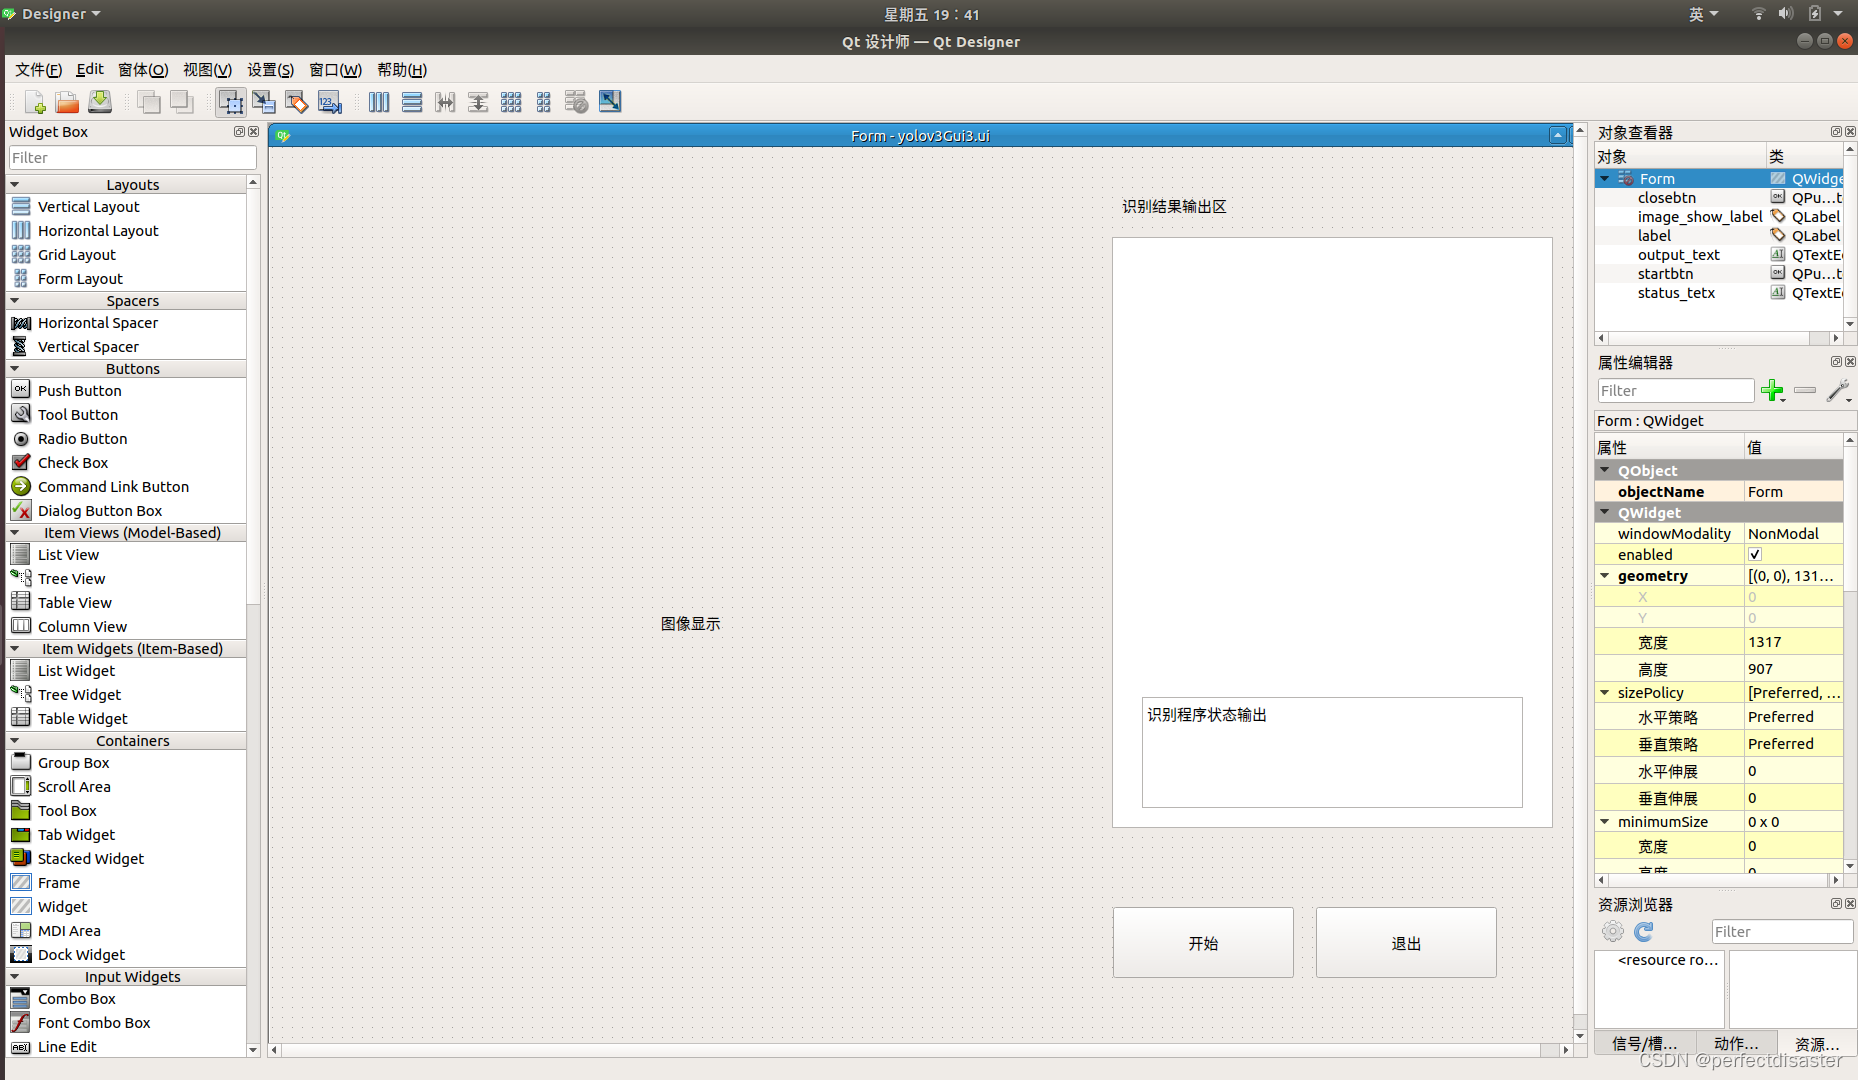
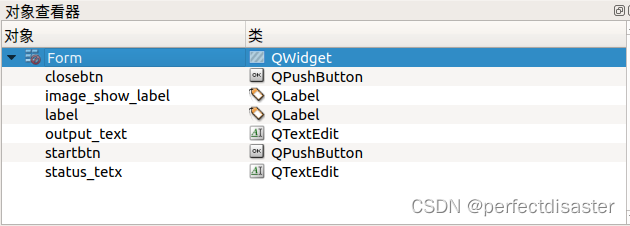
修改控件名称如下:(这里status_text打错了,后边也就将错就错了)
将ui文件转化为py文件
终端输入:
pyuic5 -o yolov3Gui.py yolov3Gui. ui
或使用PyUIC转化
转化的py文件如下:(修改:将startbtn和closebtn宽度均修改为71以完成后续将其变为圆形的操作)
# -*- coding: utf-8 -*-

# Form implementation generated from reading ui file 'yolov3Gui3.ui'
#
# Created by: PyQt5 UI code generator 5.9.2
#
# WARNING! All changes made in this file will be lost!

from PyQt5 import QtCore, QtGui, QtWidgets

class Ui_Form(object):
    def setupUi(self, Form):
        Form.setObjectName("Form")
        Form.resize(1317, 907)
        self.output_text = QtWidgets.QTextEdit(Form)
        self.output_text.setGeometry(QtCore.QRect(840, 90, 441, 591))
        self.output_text.setObjectName("output_text")
        self.status_tetx = QtWidgets.QTextEdit(Form)
        self.status_tetx.setGeometry(QtCore.QRect(870, 550, 381, 111))
        self.status_tetx.setObjectName("status_tetx")
        self.startbtn = QtWidgets.QPushButton(Form)
        self.startbtn.setGeometry(QtCore.QRect(841, 760, 71, 71))
        self.startbtn.setObjectName("startbtn")
        self.label = QtWidgets.QLabel(Form)
        self.label.setGeometry(QtCore.QRect(850, 50, 111, 16))
        self.label.setObjectName("label")
        self.image_show_label = QtWidgets.QLabel(Form)
        self.image_show_label.setGeometry(QtCore.QRect(40, 90, 751, 771))
        self.image_show_label.setObjectName("image_show_label")
        self.closebtn = QtWidgets.QPushButton(Form)
        self.closebtn.setGeometry(QtCore.QRect(1044, 760, 71, 71))
        self.closebtn.setObjectName("closebtn")

        self.retranslateUi(Form)
        self.closebtn.clicked.connect(Form.close)
        QtCore.QMetaObject.connectSlotsByName(Form)

    def retranslateUi(self, Form):
        _translate = QtCore.QCoreApplication.translate
        Form.setWindowTitle(_translate("Form", "Form"))
        self.status_tetx.setHtml(_translate("Form", "<!DOCTYPE HTML PUBLIC \"-//W3C//DTD HTML 4.0//EN\" \"http://www.w3.org/TR/REC-html40/strict.dtd\">\n"
"<html><head><meta name=\"qrichtext\" content=\"1\" /><style type=\"text/css\">\n"
"p, li { white-space: pre-wrap; }\n"
"</style></head><body style=\" font-family:\'Ubuntu\'; font-size:11pt; font-weight:400; font-style:normal;\">\n"
"<p style=\" margin-top:0px; margin-bottom:0px; margin-left:0px; margin-right:0px; -qt-block-indent:0; text-indent:0px;\">识别程序状态输出</p></body></html>"))
        self.startbtn.setText(_translate("Form", "开始"))
        self.label.setText(_translate("Form", "识别结果输出区"))
        self.image_show_label.setText(_translate("Form", "                                                                                                     图像显示"))
        self.closebtn.setText(_translate("Form", "退出"))
在darknet文件夹下新建detect.py文件,复制以下内容:
import argparse
import os
import glob
import random
import darknet
import time
import cv2
import numpy as np
import darknet


'''def parser():
    parser = argparse.ArgumentParser(description="YOLO Object Detection")
    parser.add_argument("--input", type=str, default="",
                        help="image source. It can be a single image, a"
                        "txt with paths to them, or a folder. Image valid"
                        " formats are jpg, jpeg or png."
                        "If no input is given, ")
    parser.add_argument("--batch_size", default=1, type=int,
                        help="number of images to be processed at the same time")
    parser.add_argument("--weights", default="yolov4.weights",
                        help="yolo weights path")
    parser.add_argument("--dont_show", action='store_true',
                        help="windown inference display. For headless systems")
    parser.add_argument("--ext_output", action='store_true',
                        help="display bbox coordinates of detected objects")
    parser.add_argument("--save_labels", action='store_true',
                        help="save detections bbox for each image in yolo format")
    parser.add_argument("--config_file", default="./cfg/yolov4.cfg",
                        help="path to config file")
    parser.add_argument("--data_file", default="./cfg/coco.data",
                        help="path to data file")
    parser.add_argument("--thresh", type=float, default=.25,
                        help="remove detections with lower confidence")
    return parser.parse_args()'''
def parser():
    parser = argparse.ArgumentParser(description="YOLO Object Detection")
    parser.add_argument("--input", type=str, default="",
                        help="image source. It can be a single image, a"
                        "txt with paths to them, or a folder. Image valid"
                        " formats are jpg, jpeg or png."
                        "If no input is given, ")
    parser.add_argument("--batch_size", default=1, type=int,
                        help="number of images to be processed at the same time")
    parser.add_argument("--weights", default="myData/backup/my_yolov3_last.weights",#修改为自己的路径
                        help="yolo weights path")
    parser.add_argument("--dont_show", action='store_true',
                        help="windown inference display. For headless systems")
    parser.add_argument("--ext_output", action='store_true',
                        help="display bbox coordinates of detected objects")
    parser.add_argument("--save_labels", action='store_true',
                        help="save detections bbox for each image in yolo format")
    parser.add_argument("--config_file", default="./cfg/my_yolov3.cfg",
                        help="path to config file")
    parser.add_argument("--data_file", default="./cfg/my_data.data",
                        help="path to data file")
    parser.add_argument("--thresh", type=float, default=.25,
                        help="remove detections with lower confidence")
    return parser.parse_args()

def check_arguments_errors(args):
    assert 0 < args.thresh < 1, "Threshold should be a float between zero and one (non-inclusive)"
    if not os.path.exists(args.config_file):
        raise(ValueError("Invalid config path {}".format(os.path.abspath(args.config_file))))
    if not os.path.exists(args.weights):
        raise(ValueError("Invalid weight path {}".format(os.path.abspath(args.weights))))
    if not os.path.exists(args.data_file):
        raise(ValueError("Invalid data file path {}".format(os.path.abspath(args.data_file))))
    if args.input and not os.path.exists(args.input):
        raise(ValueError("Invalid image path {}".format(os.path.abspath(args.input))))


def check_batch_shape(images, batch_size):
    """
        Image sizes should be the same width and height
    """
    shapes = [image.shape for image in images]
    if len(set(shapes)) > 1:
        raise ValueError("Images don't have same shape")
    if len(shapes) > batch_size:
        raise ValueError("Batch size higher than number of images")
    return shapes[0]


def load_images(images_path):
    """
    If image path is given, return it directly
    For txt file, read it and return each line as image path
    In other case, it's a folder, return a list with names of each
    jpg, jpeg and png file
    """
    input_path_extension = images_path.split('.')[-1]
    if input_path_extension in ['jpg', 'jpeg', 'png']:
        return [images_path]
    elif input_path_extension == "txt":
        with open(images_path, "r") as f:
            return f.read().splitlines()
    else:
        return glob.glob(
            os.path.join(images_path, "*.jpg")) + \
            glob.glob(os.path.join(images_path, "*.png")) + \
            glob.glob(os.path.join(images_path, "*.jpeg"))


def prepare_batch(images, network, channels=3):
    width = darknet.network_width(network)
    height = darknet.network_height(network)

    darknet_images = []
    for image in images:
        image_rgb = cv2.cvtColor(image, cv2.COLOR_BGR2RGB)
        image_resized = cv2.resize(image_rgb, (width, height),
                                   interpolation=cv2.INTER_LINEAR)
        custom_image = image_resized.transpose(2, 0, 1)
        darknet_images.append(custom_image)

    batch_array = np.concatenate(darknet_images, axis=0)
    batch_array = np.ascontiguousarray(batch_array.flat, dtype=np.float32)/255.0
    darknet_images = batch_array.ctypes.data_as(darknet.POINTER(darknet.c_float))
    return darknet.IMAGE(width, height, channels, darknet_images)


def image_detection(image_path,network, class_names, class_colors, thresh):
    # Darknet doesn't accept numpy images.
    # Create one with image we reuse for each detect
    width = darknet.network_width(network)
    height = darknet.network_height(network)
    darknet_image = darknet.make_image(width, height, 3)

    image = cv2.imread(image_path)
    image_rgb = cv2.cvtColor(image, cv2.COLOR_BGR2RGB)
    image_resized = cv2.resize(image_rgb, (width, height),
                               interpolation=cv2.INTER_LINEAR)

    darknet.copy_image_from_bytes(darknet_image, image_resized.tobytes())
    detections = darknet.detect_image(network, class_names, darknet_image, thresh=thresh)
    darknet.free_image(darknet_image)
    image = darknet.draw_boxes(detections, image_resized, class_colors)
    return cv2.cvtColor(image, cv2.COLOR_BGR2RGB), detections
    #return cv2.cvtColor(image, cv2.COLOR_BGR2RGB)


def batch_detection(network, images, class_names, class_colors,
                    thresh=0.25, hier_thresh=.5, nms=.45, batch_size=4):
    image_height, image_width, _ = check_batch_shape(images, batch_size)
    darknet_images = prepare_batch(images, network)
    batch_detections = darknet.network_predict_batch(network, darknet_images, batch_size, image_width,
                                                     image_height, thresh, hier_thresh, None, 0, 0)
    batch_predictions = []
    for idx in range(batch_size):
        num = batch_detections[idx].num
        detections = batch_detections[idx].dets
        if nms:
            darknet.do_nms_obj(detections, num, len(class_names), nms)
        predictions = darknet.remove_negatives(detections, class_names, num)
        images[idx] = darknet.draw_boxes(predictions, images[idx], class_colors)
        batch_predictions.append(predictions)
    darknet.free_batch_detections(batch_detections, batch_size)
    return images, batch_predictions


def image_classification(image, network, class_names):
    width = darknet.network_width(network)
    height = darknet.network_height(network)
    image_rgb = cv2.cvtColor(image, cv2.COLOR_BGR2RGB)
    image_resized = cv2.resize(image_rgb, (width, height),
                                interpolation=cv2.INTER_LINEAR)
    darknet_image = darknet.make_image(width, height, 3)
    darknet.copy_image_from_bytes(darknet_image, image_resized.tobytes())
    detections = darknet.predict_image(network, darknet_image)
    predictions = [(name, detections[idx]) for idx, name in enumerate(class_names)]
    darknet.free_image(darknet_image)
    return sorted(predictions, key=lambda x: -x[1])


def convert2relative(image, bbox):
    """
    YOLO format use relative coordinates for annotation
    """
    x, y, w, h = bbox
    height, width, _ = image.shape
    return x/width, y/height, w/width, h/height


def save_annotations(name, image, detections, class_names):
    """
    Files saved with image_name.txt and relative coordinates
    """
    file_name = name.split(".")[:-1][0] + ".txt"
    with open(file_name, "w") as f:
        for label, confidence, bbox in detections:
            x, y, w, h = convert2relative(image, bbox)
            label = class_names.index(label)
            f.write("{} {:.4f} {:.4f} {:.4f} {:.4f}\n".format(label, x, y, w, h))


def batch_detection_example():
    args = parser()
    check_arguments_errors(args)
    batch_size = 3
    random.seed(3)  # deterministic bbox colors
    network, class_names, class_colors = darknet.load_network(
        args.config_file,
        args.data_file,
        args.weights,
        batch_size=batch_size
    )
    image_names = ['data/horses.jpg', 'data/horses.jpg', 'data/eagle.jpg']
    images = [cv2.imread(image) for image in image_names]
    images, detections,  = batch_detection(network, images, class_names,
                                           class_colors, batch_size=batch_size)
    for name, image in zip(image_names, images):
        cv2.imwrite(name.replace("data/", ""), image)
    print(detections)

def get_files(dir, suffix):

    res = []

    for root, directory, files in os.walk(dir):

        for filename in files:

            name, suf = os.path.splitext(filename)

            if suf == suffix:

                #res.append(filename)

                res.append(os.path.join(root, filename))
    return res
def bbox2points_zs(bbox):
    """
    From bounding box yolo format
    to corner points cv2 rectangle
    """
    x, y, w, h = bbox
    xmin = int(round(x - (w / 2)))
    xmax = int(round(x + (w / 2)))
    ymin = int(round(y - (h / 2)))
    ymax = int(round(y + (h / 2)))
    return xmin, ymin, xmax, ymax

def main():
    args = parser()
    check_arguments_errors(args)
    input_dir = '/home/yourdarknet'
    config_file = '/home/your/darknet/cfg/my_yolov3.cfg'#修改为自己的路径
    data_file = '/home/your/darknet/cfg/my_data.data'
    weights = '/home/your/darknet/myData/backup/my_yolov3_last.weights'
    random.seed(3)  # deterministic bbox colors
    network, class_names, class_colors = darknet.load_network(
        config_file,
        data_file,
        weights,
        batch_size=args.batch_size
    )
    src_width = darknet.network_width(network)
    src_height = darknet.network_height(network)

    #生成保存图片路径文件夹
    save_dir = os.path.join(input_dir, 'object_result')
    # 去除首位空格
    save_dir=save_dir.strip()
    # 去除尾部 \ 符号
    save_dir=save_dir.rstrip("\\")
    # 判断路径是否存在 # 存在     True # 不存在   False
    isExists=os.path.exists(save_dir)
    # 判断结果
    if not isExists:
        # 如果不存在则创建目录 # 创建目录操作函数
        os.makedirs(save_dir)

        print(save_dir+' 创建成功')
    else:
        # 如果目录存在 则不创建,并提示目录已存在
        print(save_dir + ' 目录已存在')

    image_list = get_files(input_dir, '.jpg')
    total_len = len(image_list)
    index = 0
    #while True:
    for i in range(0, total_len):
        image_name = image_list[i]
        src_image = cv2.imread(image_name)
        cv2.imshow('src_image', src_image)
        cv2.waitKey(1)

        prev_time = time.time()
        image, detections = image_detection(
            image_name, network, class_names, class_colors, args.thresh)
        #'''
        file_name, type_name = os.path.splitext(image_name)
        #print(file_name)
        #print(file_name.split(r'/'))
        print(''.join(file_name.split(r'/')[-1]) + 'bbbbbbbbb')
        cut_image_name_list = file_name.split(r'/')[-1:] #cut_image_name_list is list
        save_dir_image = os.path.join(save_dir ,cut_image_name_list[0])
        if not os.path.exists(save_dir_image):
            os.makedirs(save_dir_image)
        cut_image_name = ''.join(cut_image_name_list) #list to str
        object_count = 0


        for label, confidence, bbox in detections:
            cut_image_name_temp = cut_image_name + "_{}.jpg".format(object_count)
            object_count += 1
            xmin, ymin, xmax, ymax = bbox2points_zs(bbox)
            print("aaaaaaaaa x,{} y,{} w,{} h{}".format(xmin, ymin, xmax, ymax))
            xmin_coordinary = (int)(xmin * src_image.shape[1] / src_width-0.5)
            ymin_coordinary = (int)(ymin * src_image.shape[0] / src_height-0.5)
            xmax_coordinary = (int)(xmax * src_image.shape[1] / src_width+0.5)
            ymax_coordinary = (int)(ymax * src_image.shape[0] / src_height+0.5)
            if xmin_coordinary>src_image.shape[1]:
                xmin_coordinary = src_image.shape[1]
            if ymin_coordinary>src_image.shape[0]:
                ymin_coordinary = src_image.shape[0]
            if xmax_coordinary>src_image.shape[1]:
                xmax_coordinary = src_image.shape[1]
            if ymax_coordinary>src_image.shape[0]:
                ymax_coordinary = src_image.shape[0]

            if xmin_coordinary < 0:
                xmin_coordinary = 0
            if ymin_coordinary < 0:
                ymin_coordinary = 0
            if xmax_coordinary < 0:
                xmax_coordinary = 0
            if ymax_coordinary < 0:
                ymax_coordinary = 0

            print("qqqqqqqq   x,{} y,{} w,{} h{}".format(xmin_coordinary, ymin_coordinary, xmax_coordinary, ymax_coordinary))
            out_iou_img = np.full((ymax_coordinary - ymin_coordinary, xmax_coordinary - xmin_coordinary, src_image.shape[2]), 114, dtype=np.uint8)
            out_iou_img[:,:] = src_image[ymin_coordinary:ymax_coordinary,xmin_coordinary:xmax_coordinary]
            cv2.imwrite(os.path.join(save_dir_image,cut_image_name_temp),out_iou_img)
        #'''
        #if args.save_labels:
        #if True:
            #save_annotations(image_name, image, detections, class_names)
        darknet.print_detections(detections, args.ext_output)
        fps = int(1/(time.time() - prev_time))
        print("FPS: {}".format(fps))
        if not args.dont_show:
            #cv2.imshow('Inference', image)
            cv2.waitKey(1)
            #if cv2.waitKey() & 0xFF == ord('q'):
                #break
        index += 1

if __name__ == "__main__":
    # unconmment next line for an example of batch processing
    # batch_detection_example()
    main()
在darknet文件夹下新建Callyolov3.py文件,复制以下内容:
import sys
from PyQt5.QtGui import *
from PyQt5.QtWidgets import *
from PyQt5.QtCore import *
from yolov3Gui3 import Ui_Form
import cv2
from PIL import Image
import random
import string
from detect import image_detection, parser, check_arguments_errors
import darknet
from collections import Counter


class yolov3Gui(QMainWindow, Ui_Form):
    def __init__(self):
        super(yolov3Gui, self).__init__()
        self.openfile_name_image = ''
        self.image = None
        self.setupUi(self)
        self.startbtn.clicked.connect(self.select_image)
        self.startbtn.clicked.connect(self.detect)
        self.startbtn.clicked.connect(self.status)

    def status(self):
        # if self.startbtn.isChecked():
        self.status_tetx.clear()
        self.status_tetx.setText("start to output")

    def detect(self):
        self.image_show_label.clear()
        if self.image is None:
            print('没有选择图片')
        elif self.image is not None:
            # 检测图片
            predictions = run_detect(self.openfile_name_image)
            # 读取检测之后的图片
            img = cv2.imread('img/result/' + self.openfile_name_image.split('/')[-1])
            # img = cv2.resize(img, (400, 300), interpolation=cv2.INTER_AREA)
            img = cv2.resize(img, (751, 771), interpolation=cv2.INTER_AREA)
            img = cv2.cvtColor(img, cv2.COLOR_BGR2RGB)
            # cv2.imshow('test', img)
            # cv2.waitKey(20)
            # 将图片放在标签self.img_show_label中
            a = QImage(img.data, img.shape[1], img.shape[0], img.shape[1] * 3, QImage.Format_RGB888)
            self.image_show_label.setPixmap(QPixmap.fromImage(a))
            self.output_text.clear()
            '''for label, confidence, bbox in preditions:
                self.output_text.setText(label + '  numbers:  ' + confidence )
            print(preditions)
            print(label)'''
            i = len(predictions)
            labels = []
            for n in range(i):
                labels.append(predictions[n][0])
            result = Counter(labels)
            self.output_text.setText(str(result))
            # print(result)
            # print(labels)
            # self.output_text.setText(predictions[n][o] + "\n")
            # print(predictions[n][0])
        pass

    def select_image(self):
        # temp为选择文件的路径  这里打开的是这个main.py函数的同级目录下的img文件夹
        temp, _ = QFileDialog.getOpenFileName(self, "选择照片文件", r"./img/")
        if temp is not None:
            self.openfile_name_image = temp
        #     读取选择的图片
        self.image = cv2.imread(self.openfile_name_image)
        # print(self.openfile_name_image)


def run_detect(path):
    try:
        image = Image.open(path)
    except:
        print('Open Error! Try again!')
    else:
        # 这里是我模型检测函数,替换成自己的即可,这个函数返回的就是检测好的图片,然后保存在本地的同级目录下的img/result
        '''args = darknet_images.parser()
            darknet_images.check_arguments_errors(args)'''
        # args = detect.parser()
        args = parser()
        # detect.check_arguments_errors(args)
        check_arguments_errors(args)

        random.seed(3)  # deterministic bbox colors
        network, class_names, class_colors = darknet.load_network(
            args.config_file,
            args.data_file,
            args.weights,
            batch_size=args.batch_size
        )
        img_path = path
        # r_image = darknet_images.image_detection(img_path,network, class_names, class_colors, args.thresh)
        # img = cv2.imread(img_path)
        # r_image = detect.image_detection(img_path,network, class_names, class_colors, args.thresh)
        r_image, predictions = image_detection(img_path, network, class_names, class_colors, args.thresh)
        # r_image.save('img/result/' + path.split('/')[-1])
        cv2.imwrite('img/result/' + path.split('/')[-1], r_image)
        return predictions


if __name__ == '__main__':
    app = QApplication(sys.argv)
    yG = yolov3Gui()
    yG.setWindowTitle("yolov3Gui")
    qssStyle = """
                    #startbtn{
                    background-color:orange;
                    border-radius:35px;
                    border:2px groover gray;
                    }
                    #closebtn{
                    background-color:orange;
                    border-radius:35px;
                    border:2px groover gray;
                    }
                    #output_text{
                    background-color:gray;
                    }
                    #image_show_label{
                    background-color:gray;
                    }
                    #status_tetx{
                    background-color:gray;
                    }
                 """
    yG.setStyleSheet(qssStyle)
    yG.show()
    sys.exit(app.exec_())
本例运行前需在检测目录,也就算darknet文件夹中新新建img文件夹,在img文件夹下新建result文件夹,之后返回darknet文件夹运行本例,即终端输入:
mkdir img
cd img
mkdir result
cd ..
python3 Callyolov3.py
运行结果如图: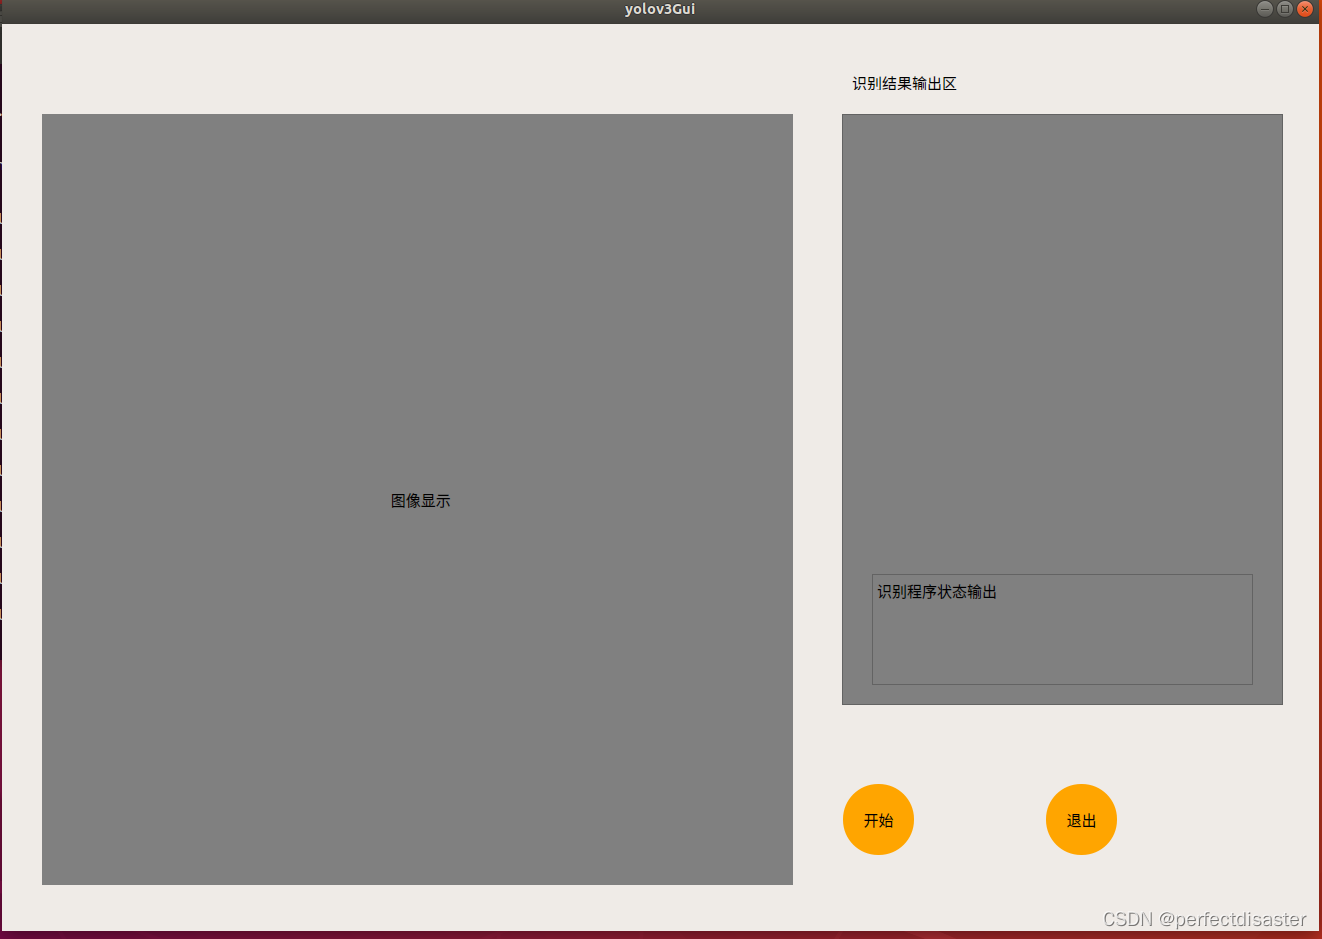
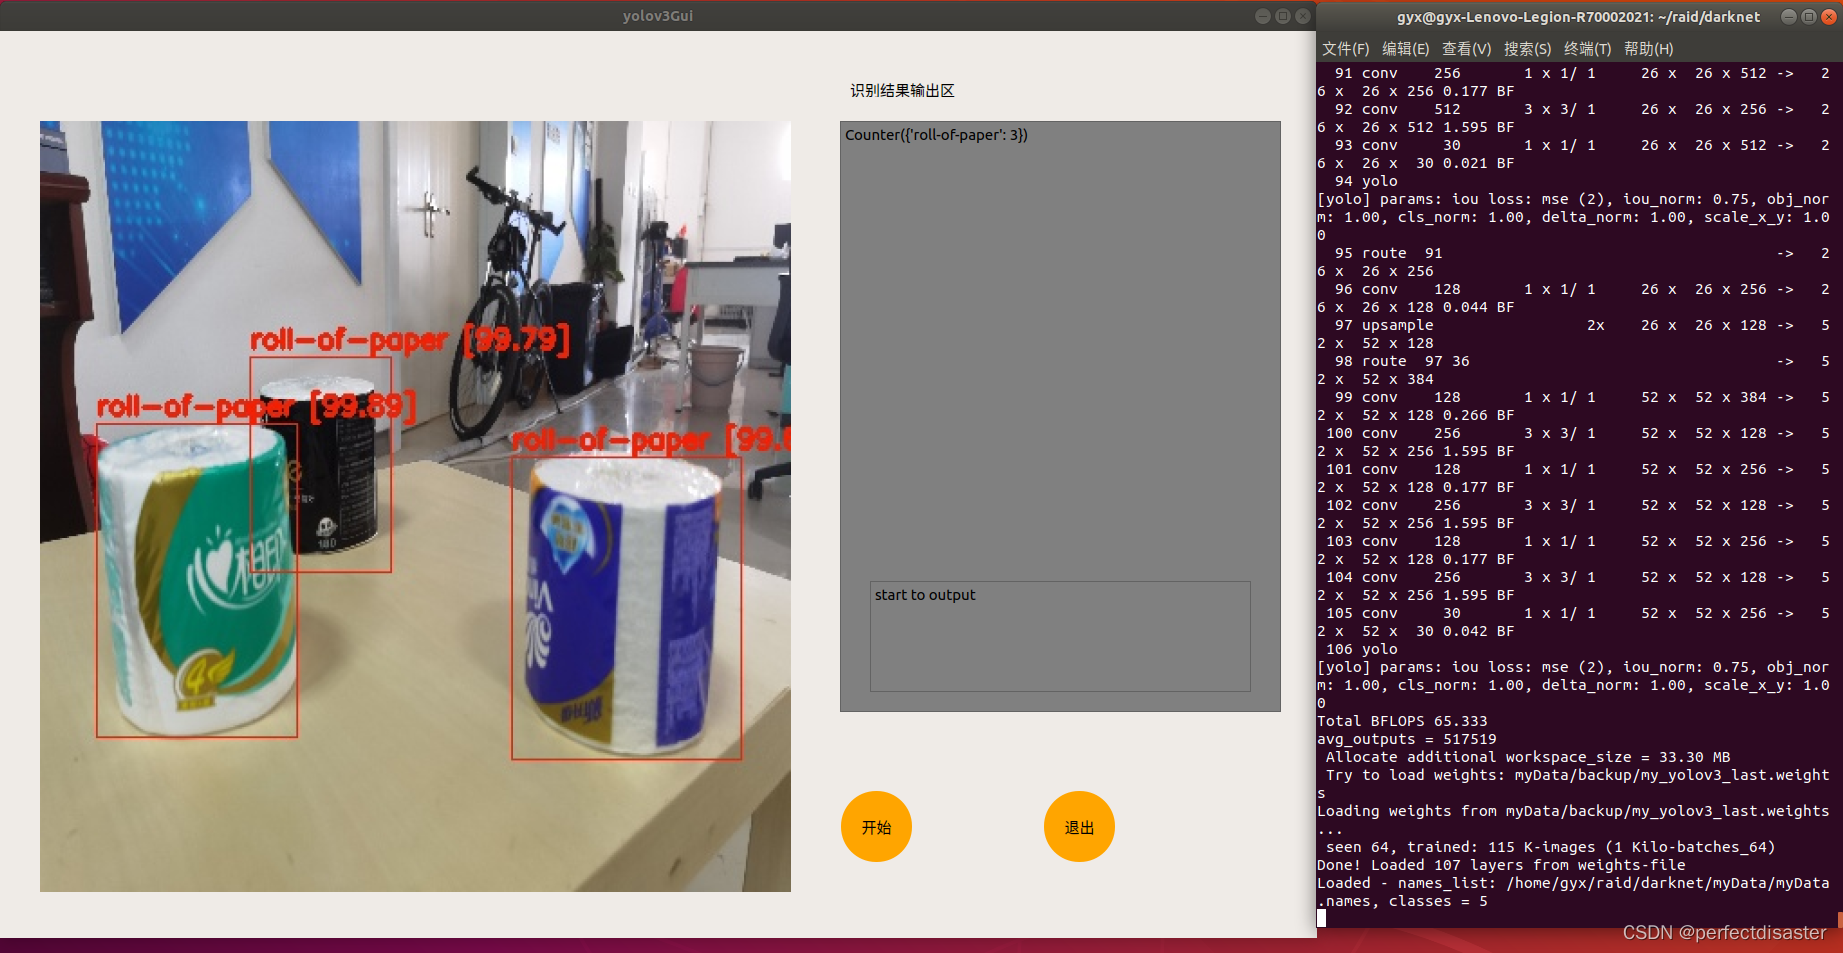
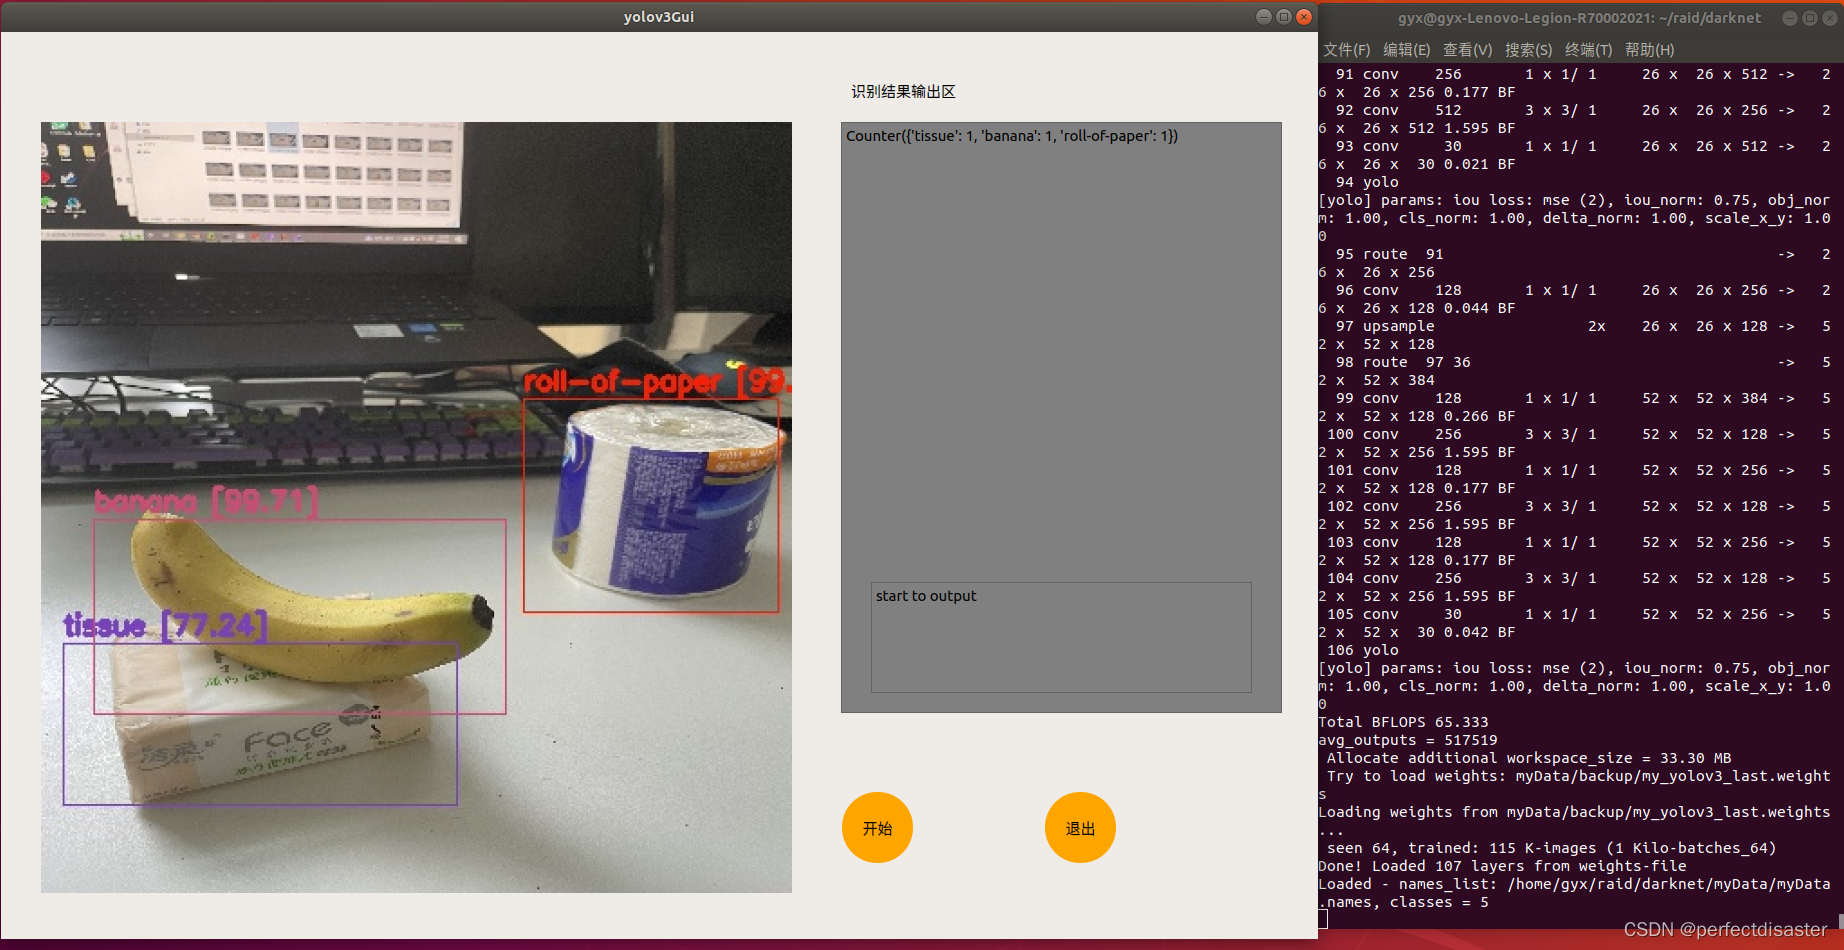
本例在博主的上一篇关于yolov3的GUI界面编程的基础上加以美化,并新增了输出物品的label和number的功能,接下来准备做视频流和摄像头检测的GUI界面,如果各位有好的idea或博主有错误的地方也欢迎大家在评论区留言,大家互相帮助,共同进步!
2022.7.15更新:输出文本优化形式,将输出的output_text中的counters删除,更改格式为:
"label: " + label + " number: " + number,以下是更改后的yolov3Gui程序,大体并未改变,只对其中detect函数进行部分修改:
import sys
from PyQt5.QtGui import *
from PyQt5.QtWidgets import *
from PyQt5.QtCore import *
from yolov3Gui3 import Ui_Form
import cv2
from PIL import Image
import random
import string
from detect import image_detection, parser, check_arguments_errors
import darknet
from collections import Counter


class yolov3Gui(QMainWindow, Ui_Form):
    def __init__(self):
        super(yolov3Gui, self).__init__()
        self.openfile_name_image = ''
        self.image = None
        self.setupUi(self)
        self.startbtn.clicked.connect(self.select_image)
        self.startbtn.clicked.connect(self.detect)
        self.startbtn.clicked.connect(self.status)

    def status(self):
        # if self.startbtn.isChecked():
        self.status_tetx.clear()
        self.status_tetx.setText("start to output")

    def detect(self):
        #self.image_show_label.clear()
        if self.image is None:
            print('没有选择图片')
        elif self.image is not None:
            # 检测图片
            #self.image_show_label.clear()
            predictions = run_detect(self.openfile_name_image)
            # 读取检测之后的图片
            img = cv2.imread('img/result/' + self.openfile_name_image.split('/')[-1])
            # img = cv2.resize(img, (400, 300), interpolation=cv2.INTER_AREA)
            img = cv2.resize(img, (751, 771), interpolation=cv2.INTER_AREA)
            img = cv2.cvtColor(img, cv2.COLOR_BGR2RGB)
            # cv2.imshow('test', img)
            # cv2.waitKey(20)
            # 将图片放在标签self.img_show_label中
            a = QImage(img.data, img.shape[1], img.shape[0], img.shape[1] * 3, QImage.Format_RGB888)
            self.image_show_label.setPixmap(QPixmap.fromImage(a))
            self.output_text.clear()
            '''for label, confidence, bbox in preditions:
                self.output_text.setText(label + '  numbers:  ' + confidence )
            print(preditions)
            print(label)'''
            i = len(predictions)
            labels = []
            for n in range(i):
                labels.append(predictions[n][0])
            result = Counter(labels)
            #listVal = list(result)
            text = ''
            for key,value in result.items():#修改部分
                #print("label: " + key + " number: " + str(value) + '\n')
                text = text + "label: " + key + " number: " + str(value) + '\n'
            #print(text)
            self.output_text.setText(text)
            # print(result)
            # print(labels)
            # self.output_text.setText(predictions[n][o] + "\n")
            # print(predictions[n][0])
        pass

    def select_image(self):
        # temp为选择文件的路径  这里打开的是这个main.py函数的同级目录下的img文件夹
        temp, _ = QFileDialog.getOpenFileName(self, "选择照片文件", r"./img/")
        if temp is not None:
            self.openfile_name_image = temp
        #     读取选择的图片
        self.image = cv2.imread(self.openfile_name_image)
        # print(self.openfile_name_image)
        '''a = QImage(self.image.data, self.image.shape[1], self.image.shape[0], self.image.shape[1] * 3, QImage.Format_RGB888)
        self.image_show_label.setPixmap(QPixmap.fromImage(a))'''


def run_detect(path):
    try:
        image = Image.open(path)
    except:
        print('Open Error! Try again!')
    else:
        # 这里是我模型检测函数,替换成自己的即可,这个函数返回的就是检测好的图片,然后保存在本地的同级目录下的img/result
        '''args = darknet_images.parser()
            darknet_images.check_arguments_errors(args)'''
        # args = detect.parser()
        args = parser()
        # detect.check_arguments_errors(args)
        check_arguments_errors(args)

        random.seed(3)  # deterministic bbox colors
        network, class_names, class_colors = darknet.load_network(
            args.config_file,
            args.data_file,
            args.weights,
            batch_size=args.batch_size
        )
        img_path = path
        # r_image = darknet_images.image_detection(img_path,network, class_names, class_colors, args.thresh)
        # img = cv2.imread(img_path)
        # r_image = detect.image_detection(img_path,network, class_names, class_colors, args.thresh)
        r_image, predictions = image_detection(img_path, network, class_names, class_colors, args.thresh)
        # r_image.save('img/result/' + path.split('/')[-1])
        cv2.imwrite('img/result/' + path.split('/')[-1], r_image)
        return predictions


if __name__ == '__main__':
    app = QApplication(sys.argv)
    yG = yolov3Gui()
    yG.setWindowTitle("yolov3Gui")
    qssStyle = """
                    #startbtn{
                    background-color:orange;
                    border-radius:35px;
                    border:2px groover gray;
                    }
                    #closebtn{
                    background-color:orange;
                    border-radius:35px;
                    border:2px groover gray;
                    }
                    #output_text{
                    background-color:gray;
                    }
                    #image_show_label{
                    background-color:gray;
                    }
                    #status_tetx{
                    background-color:gray;
                    }
                 """
    yG.setStyleSheet(qssStyle)
    yG.show()
    sys.exit(app.exec_())
修改后效果如图: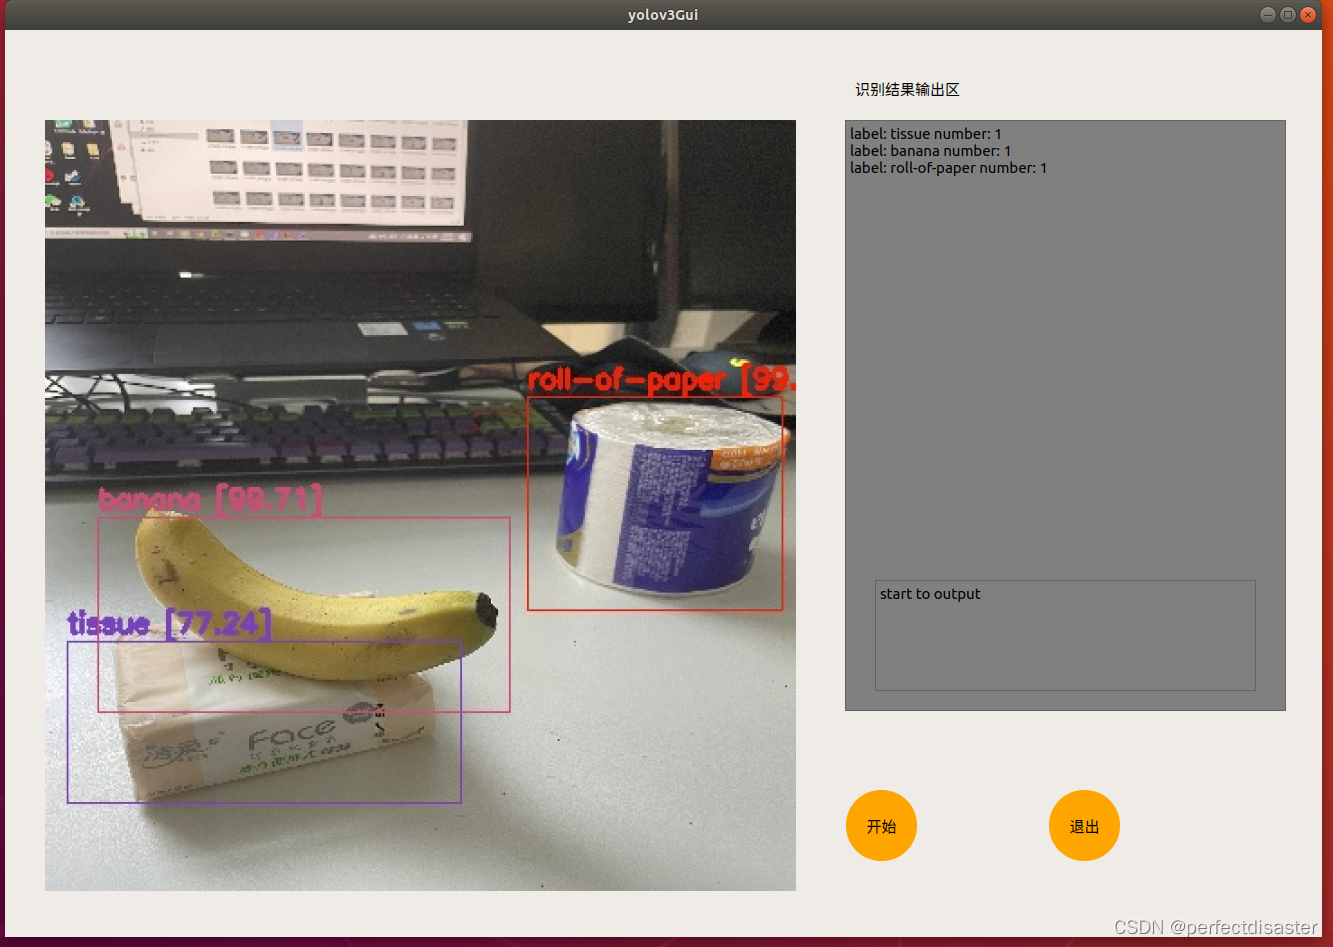
接下来可能进行的修改:
1.解决out of memory问题
2.实现视频流和摄像头检测