前引:
大二第一次尝试写一个小项目,边学边写,最后写了一个小系统,用来查询和领养校园猫咪并配备了管理员的功能,第一次做完了一个完整的小项目后来用做我的程序设计设计实践和数据库大作业,写一篇博客也算是纪念一下,系统功能比较少,页面和代码都不成熟(纯小白,不喜勿喷),有需要的话自取,源码在我的GitHub里![]() https://github.com/NieYFeng/Cat-adoption-aid-system
https://github.com/NieYFeng/Cat-adoption-aid-system
系统概述:
需求分析
?系统需求分析
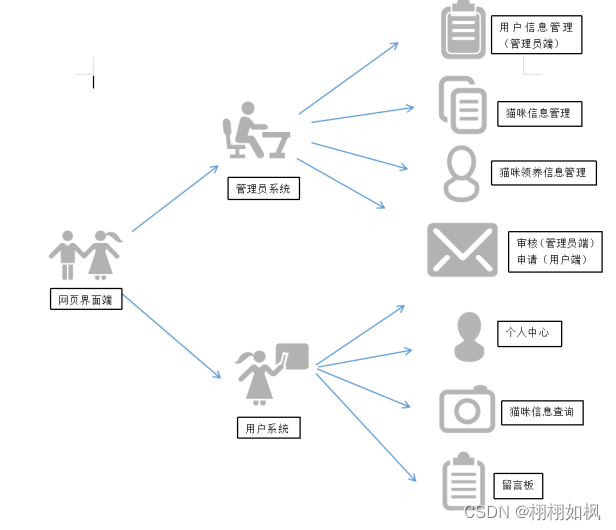
通过对学校小猫咪的各项数据的收集与调查,我们设计的系统需求分析图如下图:
功能性需求分析
?管理员需求分析
管理员需要做的事情有:
- 系统用户信息管理
- 猫咪信息管理
- 宠物领养管理
- 信息审核

?用户需求分析
用户需要获得的信息有:
- 个人中心
- 猫咪信息查看
- 猫咪领养申请
- 留言板

非功能性需求分析
(1)注册/登录设计
(2)管理员和用户在浏览网页的时候有数据记录
(3)方便可靠性,系统维护
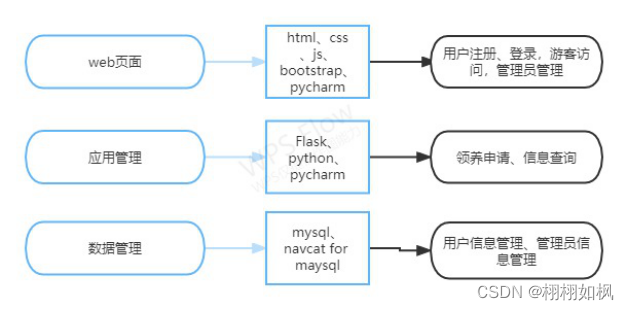
系统总体设计
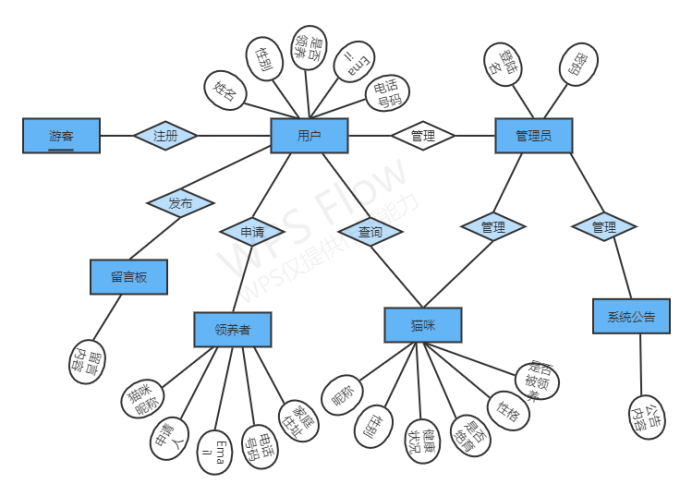
数据库设计
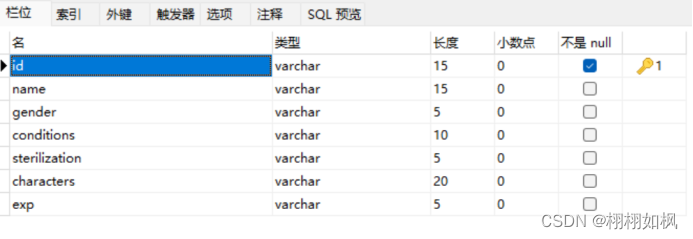
猫咪信息表

用户信息表

管理员处猫咪信息表
登录信息表

申请表
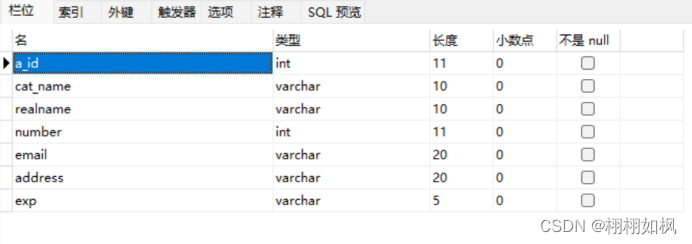
留言管理

系统的实现与测试
功能的实现
1 用户注册/登录

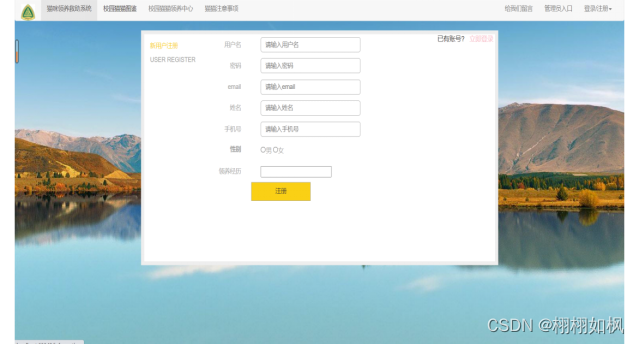
2 游客访问界面

3 猫咪信息查询
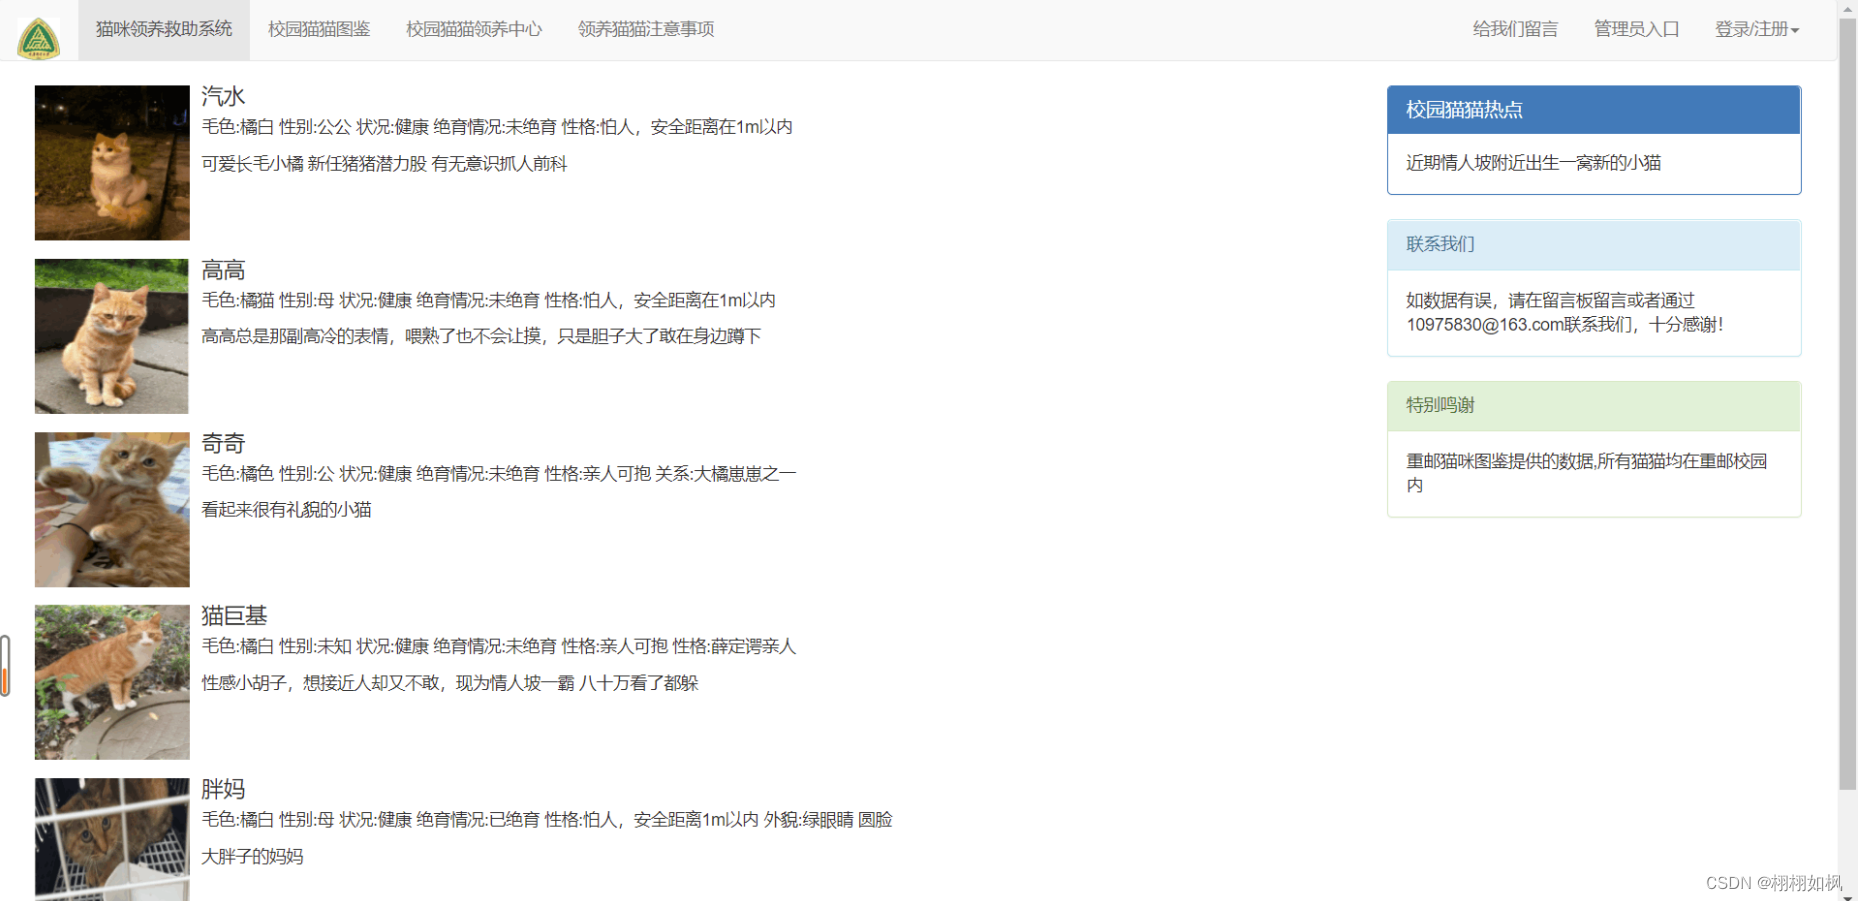
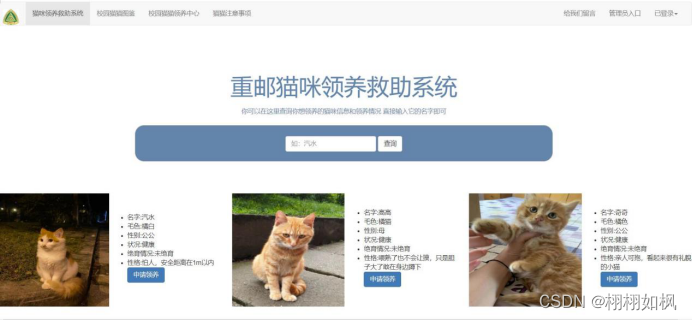
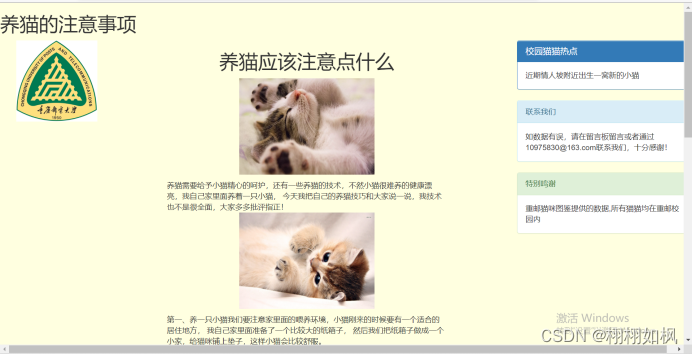
4 领养申请

5? 留言板

6 管理员界面(部分)

部分代码:
用户登录
<head>
    <meta charset="utf-8" />
    <title>猫咪领养系统登录</title>
    <link rel="stylesheet" href="/static/plugins/bootstrap-3.4.1/css/bootstrap.css">
    <style>
        li {
            list-style: none;
        }

        body {
            margin: 0;
            padding: 0;
            box-sizing: border-box;
            background-image: url(../static/img/猫咪.jpeg);
            /* background-image: url(./static/img/猫咪.jpeg); */
            background-repeat: no-repeat;
            /*这里的100% auto 表示将背景图片的长度100%显示,高度自适应*/
            background-size: 100% auto;
        }

        #maxbox {
            margin: 0 auto;
            margin-top: 200px;
            padding: 20px, 50px;
            /*这里的90表示以不透明度90%显示*/
            background-color:#00000060;

            text-align: center;
            width: 600px;
            height: 400px;
            border-radius: 10px;
        }

        #maxbox h1 {
            padding: 0;
            padding-top: 60px;
            color: white;
            font-size: 30px;
            padding-bottom: 4px;
            border-bottom: solid 1px white;
        }

        #maxbox h2 {
            font-weight: 700;
        }

        #maxbox .inputbox {
            margin-top: 30px;

        }

        #maxbox .inputText {
            margin-top: 20px;

        }

        #maxbox .inputText span {
            color: white;
            font-size: 18px;


        }

        #maxbox .inputText input {
            border: 0;
            padding: 6px;
            border-bottom: 1px solid white;
            /*这里的00表示不透明度为0,即透明显示*/
            background-color: #FFFFFF50;
            color: white;
        }

        #maxbox .inputbox .inputButton {
            margin: 0;
            border: 0;
            margin-top: 20px;
            width: 145px;
            height: 25px;
            /*给这个按钮变为圆角边角*/
            border-radius: 25px;
            color: white;
            background-color: #3498db;
        }

        #sign_up {
            margin-top: 50px;
            color: white;
            font-size: 17px;
        }

        #sign_up a {
            color: #3498db;
        }

    </style>

</head>

<body>
    <div class="navbar navbar-default">
    <div class="container-fluid">
        <!-- Brand and toggle get grouped for better mobile display -->
        <div class="navbar-header">
            <button type="button" class="navbar-toggle collapsed" data-toggle="collapse"
                    data-target="#bs-example-navbar-collapse-1" aria-expanded="false">
                <span class="sr-only">Toggle navigation</span>
                <span class="icon-bar"></span>
                <span class="icon-bar"></span>
                <span class="icon-bar"></span>
            </button>
            <a class="navbar-brand" href="#">
                <div><img src="/static/img/校徽.jpeg" alt=""height="35px";width="35px"></div>
            </a>
        </div>

        <!-- Collect the nav links, forms, and other content for toggling -->
        <div class="collapse navbar-collapse" id="bs-example-navbar-collapse-1">
            <ul class="nav navbar-nav">
                <li class="active"><a href="#">猫咪领养救助系统</a></li>
                <li><a href="/information">校园猫猫图鉴</a></li>
                <li><a href="/center">校园猫猫领养中心</a></li>
                <li><a href="/attention">猫猫注意事项</a></li>
            </ul>

            <ul class="nav navbar-nav navbar-right">
                <li><a href="/bbs_show">给我们留言</a></li>
                <li><a href="/adlogin">管理员入口</a></li>
                <li class="dropdown">
                    <a href="#" class="dropdown-toggle" data-toggle="dropdown" role="button" aria-haspopup="true"
                       aria-expanded="false">注册/登录<span class="caret"></span></a>
                    <ul class="dropdown-menu">
                        <li><a href="/register">注册</a></li>
                        <li><a href="/login">登录</a></li>
                    </ul>
                </li>
            </ul>
        </div><!-- /.navbar-collapse -->
    </div><!-- /.container-fluid -->
</div>
    <div id="maxbox">
        <h1>猫咪领养系统登陆</h1>
        <h2>Please sign in</h2>
        <div class="inputbox">
            <form name="frm" action="/logindef" method="get">
                <div class="inputText">
                    <span class="iconfont icon-mine"></span>
                    <input class="username" type="text" placeholder="user" name="user" style="color:while" />
                </div>
                <div class="inputText">
                    <span class="iconfont icon-lock"></span>
                    <input type="password" placeholder="password" name="password" style="color:white" />
                    <br>
                    <input class="remember" name="remember" type="checkbox" value="" checked="checked">
                    <span style="color:rgb(255, 255, 255)">Remember me</span>

                </div>
                <input class="btn btn-primary" type="submit" value="登录" >
            </form>
            <div style="color: white"></div>
        </div>
    </div>
<script src="/static/js/jquery-3.6.0.min.js"></script>
<script src="/static/plugins/bootstrap-3.4.1/js/bootstrap.js"></script>
</body>

</html>
留言板
import pymysql
from flask import Flask,render_template,request,Blueprint
import time
import gl
import flask

bbs=Blueprint('bbs',__name__)#蓝图

# 连接数据库并发起请求 获取请求结果
def model(sql):
    # 1.链接mysql数据库
    db = pymysql.connect(host="127.0.0.1", port=3306, user='root', password="123456", charset='utf8', db='admins')
    try:
        # 2.创建游标对象
        cursor = db.cursor()
        # 3.执行sql语句
        res = cursor.execute(sql)
        db.commit()  # 在执行sql语句时,注意进行提交
        # 4.提取结果
        data = cursor.fetchall()
        if data:
            return data
        else:
            return res
    except:
        db.rollback()  # 当代码出现错误时,进行回滚
    finally:
        # 6.关闭数据库连接
        db.close()


# 留言板列表 显示留言信息
@bbs.route("/bbs_show")
def hello():
    # 1.获取所有的留言板数据
    # 2.把数据分配到模板中(html页面)
    if gl.flag==0:
        # 用户没有登陆
        print('用户还没有登陆!即将重定向!')
        return flask.redirect('/login')
    row = model("select * from lyb")
    return render_template('bbs_show.html',data=row)


# 定义视图 显示留言添加的页面
@bbs.route('/bbs_add')
def add():
    return render_template('bbs_add.html')


# 定义视图函数 接收表单数据,完成数据的入库
@bbs.route('/insert', methods=['POST'])
def insert():
    # 1.接收表单数据
    data = request.form.to_dict()
    data['date'] = time.strftime('%Y-%m-%d %H:%M:%S')
    print(data)
    # 2.把数据添加到数据库
    sql = f'insert into lyb values(null,"{data["nikename"]}","{data["info"]}","{data["date"]}")'
    res = model(sql)
    print(res)
    # 3.成功后页面跳转到 留言列表界面
    if res:
        return '<script>alert("留言成功!");location.href="/bbs_show"</script>'
    else:
        return '<script>alert("留言发布失败!");location.href="/bbs_add"</script>'


if __name__ == '__main__':
    bbs.run(debug=True, host='127.0.0.1')
总结:
? 我主要负责前后端代码的编写,我女朋友主要负责数据库和文档的设计,第一次完整做完一个小项目,虽然只有简单的增删改查,边学边写感觉成就感还是满满的,这也是学习编程的第一个脚印,伴随着我的很多第一次,第一次接触框架,第一次写前后端,第一次结合数据库,很大程度上提升了自己的兴趣,emm差不多就到这里了