-
获取图片验证码、验证图片验证码
-
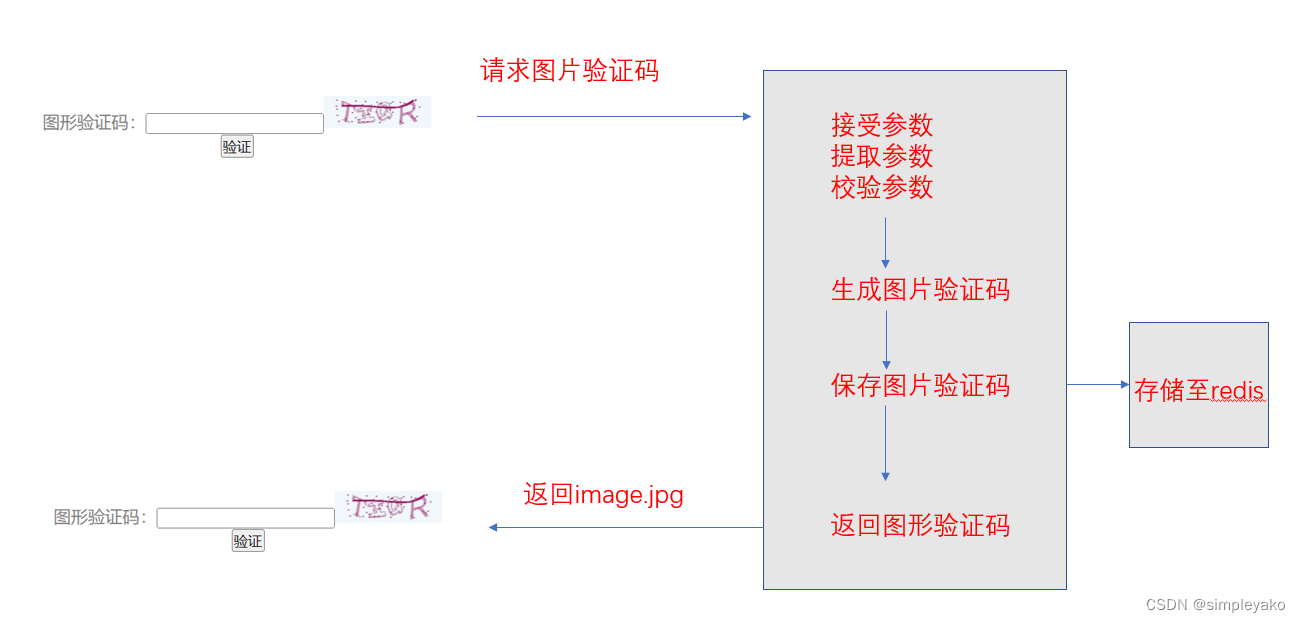
一、流程:
- 1、前端在挂载页面时生成唯一的UUID向后端发起请求获取图片验证码
- 2、后端接受请求并生成图片验证码,并以UUID为键,图片验证码的文本为值,以一定的有效期存储至redis服务器中
- 3、后端将生成的图片验证码以图片类型返回给前端
- 4、前端接受显示

- 5、用户将页面上显示的验证码输入文本框、点击验证,并携带验证码以及UUID向后端发起请求
- 6、后端接受请求,接受参数,校验参数。
- 7、后端从redis中取出当前UUID验证码的文本,并与前端传入的验证码进行比对。
- 7、后端返回相应的响应信息

-
?二、后端接口代码:
- 1、接口的定义

- 2、视图函数、路由(生成图片验证码代码)
-
import json
from django.views import View
from auth.captcha.captcha import captcha
from django_redis import get_redis_connection
from django import http


class GenerateImageCode(View):
    def get(self, request, uuid):
        """
        :param request: 请求对象
        :param uuid: 唯一标识图形验证码所属于的用户
        :return: image/jpg
        """
        # 生成图片验证码
        text, image = captcha.generate_captcha()

        # 保存图片验证码
        redis_conn = get_redis_connection('verify_code') #获取redis连接对象
        redis_conn.setex('img_%s' % uuid, 120, text) # 以img_uuid为key存储图片验证码的文本

        # 响应图片验证码
        return http.HttpResponse(image, content_type='image/jpg')
from django.urls import re_path from auth.views import GenerateImageCode urlpatterns = [ re_path(r'^image_code/(?P<uuid>[\w-]+)/$', GenerateImageCode.as_view()) ] -
三、前端代码的定义编写
- 1、使用npm create project 在前端创建一个vue项目
- 2、新建vue项目后,在vue.config.js中配置跨域请求代理
-
const { defineConfig } = require('@vue/cli-service') module.exports = defineConfig({ transpileDependencies: true, lintOnSave:false, devServer: { open: true, host: 'localhost', port: 8080, https: false, //以上的ip和端口是我们本机的;下面为需要跨域的 proxy: {//配置跨域 '/api': { target: 'http://127.0.0.1:8000',//这里后台的地址模拟的;应该填写你们真实的后台接口 ws: true, changOrigin: true,//允许跨域 pathRewrite: { '^/api': ''//请求的时候使用这个api就可以 } //rewrite:(path)=>path.replace(/^\/api/,"") } } } }) - 3、新建一个command.js文件用于生成唯一的UUID
-
var generateUUID=function(){ let d = new Date().getTime(); if(window.performance && typeof window.performance.now === "function"){ d += performance.now(); //use high-precision timer if available } let uuid = 'xxxxxxxx-xxxx-4xxx-yxxx-xxxxxxxxxxxx'.replace(/[xy]/g, function(c) { let r = (d + Math.random()*16)%16 | 0; d = Math.floor(d/16); return (c=='x' ? r : (r&0x3|0x8)).toString(16); }); return uuid; } export { generateUUID } - 4、新建一个login.vue组件,并编写相应逻辑代码
-
<template> <div id="master"> <label for="">图形验证码:</label> <input type="text" v-model="input_image_code"> <img :src="image_code" alt="" @click="get_image_code"><br/> <span v-show="show_errmsg_status">{{show_errmsg}}</span> <button @click="check_image_code">验证</button><br/> </div> </template> <script> import axios from 'axios' import { generateUUID } from '@/js/command' //导入command.js export default { data() { return { image_code: '', input_image_code:'', UUID:'', show_errmsg:'', show_errmsg_status:false } }, methods: { get_image_code() { this.UUID=generateUUID() this.image_code='http://127.0.0.1:8000/image_code/'+ this.UUID }, // 获取文本框中输入的验证码,向后端发起请求验证验证码 check_image_code(){ axios.post('/api/image_code/'+this.UUID+'/',{ image_code:this.input_image_code, responseType: 'json', }) .then((res)=>{ if(res.data.errmsg==='ok'){ this.show_errmsg_status=true; this.show_errmsg='验证成功' }else{ this.show_errmsg_status=true; this.show_errmsg='验证失败' } }) .catch(err=>{ console.log('失败') }) } }, mounted () { // 页面挂载后调用方法获取后端验证码显示在页面上 this.get_image_code(); }, } </script> <style scoped> *{ margin: 0px; padding: 0px; } #master{ text-align: center; } label{ color: grey; } img{ width: 100px; height: 30px; padding-top: 10px; } </style> - 5、在router文件夹下的index.js中配置login组件的路由
-
{ path:'/login', name:'login',component:()=>import('@/views/login')}, - 6、在main.js下导入router使用router
-
import Vue from 'vue' import App from './App.vue' import router from './router' Vue.config.productionTip = false new Vue({ router, render: h => h(App) }).$mount('#app') - 7、在app.vue下使用router视图
<template>
  <div id="app">

      <!-- home视图 -->
      <router-view></router-view>

</div>
</template>
-
四、测试 (django跨域配置)
?

