目录
过程推导 - 了解BP原理
?
?
?
-
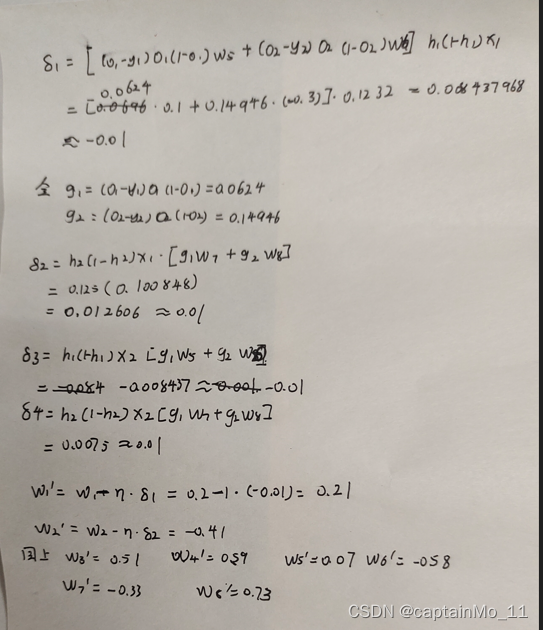
数值计算 - 手动计算,掌握细节

?
?
-
代码实现 - numpy手推 + pytorch自动
import numpy as np
class BPNetwork(object):
    def __init__(self, input_nodes, hidden_nodes, output_nodes, learning_rate):
        # 设定输入层、隐藏层、输出层的节点数nodes、学习率
        self.input_nodes = input_nodes
        self.hidden_nodes = hidden_nodes
        self.output_nodes = output_nodes
        self.lr = learning_rate
        # 为了方便理解,在此将输入设置为mnist数据实例,方便理解各个数据的shape
        # 则input_nodes=784,hidden_nodes=32, output_nodes=64
        # 设定权重值
        # w_in2hid.shape=(32,784)
        self.w_in2hid = np.array([[0.2,0.5],[-0.4,0.6]])
        # w_hid2out.shape=(64,32)
        self.w_hid2out =  np.array([[0.1,-0.3],[-0.5,0.8]])
        # 激活函数(logistic函数)
        self.act_func = (lambda x: 1/(1+np.exp(-x)))


    def train(self, inputs_org, groundtruth_org):
        # 将输入转化为2d矩阵,输入向量的shape为[feature_dimension,1]
        # input.shape=(784,1)
        inputs = np.array(inputs_org, ndmin=2).T
        # groundtruth.shape=(64,1)
        groundtruth = np.array(groundtruth_org, ndmin=2).T
        # 前向传播
        # hid_ints.shape=(32,1)
        hid_ints = np.dot(self.w_in2hid, inputs)
        # hid_outs.shape=(32,1)
        hid_outs = self.act_func(hid_ints)
        # 输出层(激活函数设置为f(x) = x)
        # out_ints.shape=(64,1)
        out_ints = np.dot(self.w_hid2out, hid_outs)
        # out_outs.shape=(64,1)
        out_outs = self.act_func(out_ints)
        # 反向传播
        # out_error.shape=(64,1)
        out_error = out_outs - groundtruth
        # hid_error.shape=(1,32)
        hid_error = np.dot(out_error.T, self.w_hid2out) * (hid_outs * (1-hid_outs)).T
        # 上式中((1,64).(64,32))*((32,1)*(32,1)).T=(1,32)
        # 更新权重
        # 更新w_hid
        self.w_hid2out -= out_error * hid_outs.T *out_outs.T*(1-out_outs)* self.lr # shape=(64,32)
        self.w_in2hid -= (inputs * hid_error * self.lr).T  # shape=(32,784)


    def run(self, inputs_org):
        inputs = np.array(inputs_org, ndmin=2).T
        # 实现前向传播
        hid_ints = np.dot(self.w_in2hid, inputs)
        hid_outs = self.act_func(hid_ints)
        # 输出层
        out_ints = np.dot(self.w_in2hid, hid_outs)
        out_outs = out_ints

        return out_outs

A=BPNetwork(2,2,2,1);
A.train([0.5,0.3],[0.23,-0.07])
print("A.w_in2hid:",A.w_in2hid)
print("A.w_hid2out:",A.w_hid2out)
A.w_in2hid: [[ 0.23380081 0.52028049] [-0.45060411 0.56963753]] A.w_hid2out: [[ 0.06536701 -0.33380337] [-0.57565699 0.72615534]]# https://blog.csdn.net/qq_41033011/article/details/109325070 # https://github.com/Darwlr/Deep_learning/blob/master/06%20Pytorch%E5%AE%9E%E7%8E%B0%E5%8F%8D%E5%90%91%E4%BC%A0%E6%92%AD.ipynb # torch.nn.Sigmoid(h_in) import torch x1, x2 = torch.Tensor([0.5]), torch.Tensor([0.3]) y1, y2 = torch.Tensor([0.23]), torch.Tensor([-0.07]) print("=====输入值:x1, x2;真实输出值:y1, y2=====") print(x1, x2, y1, y2) w1, w2, w3, w4, w5, w6, w7, w8 = torch.Tensor([0.2]), torch.Tensor([-0.4]), torch.Tensor([0.5]), torch.Tensor( [0.6]), torch.Tensor([0.1]), torch.Tensor([-0.5]), torch.Tensor([-0.3]), torch.Tensor([0.8]) # 权重初始值 w1.requires_grad = True w2.requires_grad = True w3.requires_grad = True w4.requires_grad = True w5.requires_grad = True w6.requires_grad = True w7.requires_grad = True w8.requires_grad = True def sigmoid(z): a = 1 / (1 + torch.exp(-z)) return a def forward_propagate(x1, x2): in_h1 = w1 * x1 + w3 * x2 out_h1 = sigmoid(in_h1) # out_h1 = torch.sigmoid(in_h1) in_h2 = w2 * x1 + w4 * x2 out_h2 = sigmoid(in_h2) # out_h2 = torch.sigmoid(in_h2) in_o1 = w5 * out_h1 + w7 * out_h2 out_o1 = sigmoid(in_o1) # out_o1 = torch.sigmoid(in_o1) in_o2 = w6 * out_h1 + w8 * out_h2 out_o2 = sigmoid(in_o2) # out_o2 = torch.sigmoid(in_o2) print("正向计算:o1 ,o2") print(out_o1.data, out_o2.data) return out_o1, out_o2 def loss_fuction(x1, x2, y1, y2): # 损失函数 y1_pred, y2_pred = forward_propagate(x1, x2) # 前向传播 loss = (1 / 2) * (y1_pred - y1) ** 2 + (1 / 2) * (y2_pred - y2) ** 2 # 考虑 : t.nn.MSELoss() print("损失函数(均方误差):", loss.item()) return loss def update_w(w1, w2, w3, w4, w5, w6, w7, w8): # 步长 step = 1 w1.data = w1.data - step * w1.grad.data w2.data = w2.data - step * w2.grad.data w3.data = w3.data - step * w3.grad.data w4.data = w4.data - step * w4.grad.data w5.data = w5.data - step * w5.grad.data w6.data = w6.data - step * w6.grad.data w7.data = w7.data - step * w7.grad.data w8.data = w8.data - step * w8.grad.data w1.grad.data.zero_() # 注意:将w中所有梯度清零 w2.grad.data.zero_() w3.grad.data.zero_() w4.grad.data.zero_() w5.grad.data.zero_() w6.grad.data.zero_() w7.grad.data.zero_() w8.grad.data.zero_() return w1, w2, w3, w4, w5, w6, w7, w8 if __name__ == "__main__": print("=====更新前的权值=====") print(w1.data, w2.data, w3.data, w4.data, w5.data, w6.data, w7.data, w8.data) for i in range(1): print("=====第" + str(i) + "轮=====") L = loss_fuction(x1, x2, y1, y2) # 前向传播,求 Loss,构建计算图 L.backward() # 自动求梯度,不需要人工编程实现。反向传播,求出计算图中所有梯度存入w中 print("\tgrad W: ", round(w1.grad.item(), 2), round(w2.grad.item(), 2), round(w3.grad.item(), 2), round(w4.grad.item(), 2), round(w5.grad.item(), 2), round(w6.grad.item(), 2), round(w7.grad.item(), 2), round(w8.grad.item(), 2)) w1, w2, w3, w4, w5, w6, w7, w8 = update_w(w1, w2, w3, w4, w5, w6, w7, w8) print("更新后的权值") print(w1.data, w2.data, w3.data, w4.data, w5.data, w6.data, w7.data, w8.data)D:\Anaconda\envs\pytorch\python.exe D:/pythonProject2/main4.py =====输入值:x1, x2;真实输出值:y1, y2===== tensor([0.5000]) tensor([0.3000]) tensor([0.2300]) tensor([-0.0700]) =====更新前的权值===== tensor([0.2000]) tensor([-0.4000]) tensor([0.5000]) tensor([0.6000]) tensor([0.1000]) tensor([-0.5000]) tensor([-0.3000]) tensor([0.8000]) =====第0轮===== 正向计算:o1 ,o2 tensor([0.4769]) tensor([0.5287]) 损失函数(均方误差): 0.2097097933292389 grad W: -0.01 0.01 -0.01 0.01 0.03 0.08 0.03 0.07 更新后的权值 tensor([0.2084]) tensor([-0.4126]) tensor([0.5051]) tensor([0.5924]) tensor([0.0654]) tensor([-0.5839]) tensor([-0.3305]) tensor([0.7262]) Process finished with exit code 0 -
1,对比【numpy】和【pytorch】程序,总结并陈述
答:pytorch在反向传播,更新梯度方面更有优势,更方便快捷。
2,激活函数Sigmoid用PyTorch自带函数torch.sigmoid(),观察、总结并陈述。
答:
D:\Anaconda\envs\pytorch\python.exe D:/pythonProject2/main4.py
=====输入值:x1, x2;真实输出值:y1, y2=====
tensor([0.5000]) tensor([0.3000]) tensor([0.2300]) tensor([-0.0700])
=====更新前的权值=====
tensor([0.2000]) tensor([-0.4000]) tensor([0.5000]) tensor([0.6000]) tensor([0.1000]) tensor([-0.5000]) tensor([-0.3000]) tensor([0.8000])
=====第0轮=====
正向计算:o1 ,o2
tensor([0.4769]) tensor([0.5287])
损失函数(均方误差): 0.2097097933292389
	grad W:  -0.01 0.01 -0.01 0.01 0.03 0.08 0.03 0.07
更新后的权值
tensor([0.2084]) tensor([-0.4126]) tensor([0.5051]) tensor([0.5924]) tensor([0.0654]) tensor([-0.5839]) tensor([-0.3305]) tensor([0.7262])

Process finished with exit code 0
用自己定义的函数和pytorch自带的sigmod函数损失函数,结果是一样的。
3,激活函数Sigmoid改变为Relu,观察、总结并陈述。
答:
D:\Anaconda\envs\pytorch\python.exe D:/pythonProject2/main4.py
=====输入值:x1, x2;真实输出值:y1, y2=====
tensor([0.5000]) tensor([0.3000]) tensor([0.2300]) tensor([-0.0700])
=====更新前的权值=====
tensor([0.2000]) tensor([-0.4000]) tensor([0.5000]) tensor([0.6000]) tensor([0.1000]) tensor([-0.5000]) tensor([-0.3000]) tensor([0.8000])
=====第0轮=====
正向计算:o1 ,o2
tensor([0.0250]) tensor([0.])
损失函数(均方误差): 0.023462500423192978
grad W: -0.01 0.0 -0.01 0.0 -0.05 0.0 -0.0 0.0
更新后的权值
tensor([0.2103]) tensor([-0.4000]) tensor([0.5062]) tensor([0.6000]) tensor([0.1513]) tensor([-0.5000]) tensor([-0.3000]) tensor([0.8000])
Process finished with exit code 0
使用RELU函数作为激活函数,均方损失变大了
4,损失函数MSE用PyTorch自带函数 t.nn.MSELoss()替代,观察、总结并陈述。
D:\Anaconda\envs\pytorch\python.exe D:/pythonProject2/main4.py
=====输入值:x1, x2;真实输出值:y1, y2=====
tensor([0.5000]) tensor([0.3000]) tensor([0.2300]) tensor([-0.0700])
=====更新前的权值=====
tensor([0.2000]) tensor([-0.4000]) tensor([0.5000]) tensor([0.6000]) tensor([0.1000]) tensor([-0.5000]) tensor([-0.3000]) tensor([0.8000])
=====第0轮=====
正向计算:o1 ,o2
tensor([0.4769]) tensor([0.5287])
损失函数(均方误差): 0.2097097933292389
	grad W:  -0.01 0.01 -0.01 0.01 0.03 0.08 0.03 0.07
更新后的权值
tensor([0.2084]) tensor([-0.4126]) tensor([0.5051]) tensor([0.5924]) tensor([0.0654]) tensor([-0.5839]) tensor([-0.3305]) tensor([0.7262])

Process finished with exit code 0
pytorch 自带MSE和自己定义的MSE效果几乎相同。
5,损失函数MSE改变为交叉熵,观察、总结并陈述。
def loss_fuction(x1, x2, y1, y2):  # 损失函数
    y1_pred, y2_pred = forward_propagate(x1, x2)  # 前向传播

    y1_pred1=torch.exp(y1_pred)
    y2_pred1=torch.exp(y2_pred)
    y1_pred=y1_pred1/(y1_pred1+y2_pred1)
    y2_pred = y2_pred1 / (y1_pred1 + y2_pred1)

    loss = -(1*torch.exp(y1_pred)+0*torch.exp(y2_pred))
    print("损失函数(均方误差):", loss.item())
    return loss
D:\Anaconda\envs\pytorch\python.exe D:/pythonProject2/main4.py
=====输入值:x1, x2;真实输出值:y1, y2=====
tensor([0.5000]) tensor([0.3000]) tensor([0.2300]) tensor([-0.0700])
=====更新前的权值=====
tensor([0.2000]) tensor([-0.4000]) tensor([0.5000]) tensor([0.6000]) tensor([0.1000]) tensor([-0.5000]) tensor([-0.3000]) tensor([0.8000])
=====第0轮=====
正向计算:o1 ,o2
tensor([0.4769]) tensor([0.5287])
损失函数(均方误差): -1.627532720565796
grad W: -0.01 0.01 -0.0 0.01 -0.06 0.06 -0.05 0.05
更新后的权值
tensor([0.2075]) tensor([-0.4139]) tensor([0.5045]) tensor([0.5916]) tensor([0.1570]) tensor([-0.5570]) tensor([-0.2498]) tensor([0.7498])
Process finished with exit code 0
使用交叉熵需要输出层使用softmax激活函数,从结果上看,使用均方误差效果更好。
6,改变步长,训练次数,观察、总结并陈述。
=====第499轮=====
正向计算:o1 ,o2
tensor([0.2298]) tensor([0.0057])
tensor([0.2298], grad_fn=<MulBackward0>)
损失函数(均方误差): 0.0028671766631305218
	grad W:  -0.0 -0.0 -0.0 -0.0 -0.0 0.0 -0.0 0.0
更新后的权值
tensor([1.8011]) tensor([0.2761]) tensor([1.4606]) tensor([1.0056]) tensor([-0.7541]) tensor([-4.6193]) tensor([-1.0062]) tensor([-2.4652])
步长在3.5 左右最合适,过小导致训练次数太多,效率变低。过大导致损失函数不够小。
在步长为3.5时,训练500次就能得到较小的损失。
7,权值w1-w8初始值换为随机数,对比“指定权值”的结果,观察、总结并陈述。
=====第499轮=====
正向计算:o1 ,o2
tensor([[0.2298]]) tensor([[0.0055]])
tensor([[0.2298]], grad_fn=<MulBackward0>)
损失函数(均方误差): 0.0028535539750009775
	grad W:  -0.0 -0.0 -0.0 -0.0 -0.0 0.0 -0.0 0.0
更新后的权值
tensor([[1.0727]]) tensor([[1.7805]]) tensor([[0.4359]]) tensor([[1.1177]]) tensor([[-0.7802]]) tensor([[-2.8747]]) tensor([[-0.8974]]) tensor([[-4.2579]])
损失函数基本相同,但是权值不相同。
8,权值w1-w8初始值换为0,观察、总结并陈述。
=====第499轮=====
正向计算:o1 ,o2
tensor([0.2298]) tensor([0.0055])
tensor([0.2298], grad_fn=<MulBackward0>)
损失函数(均方误差): 0.002851024502888322
	grad W:  -0.0 -0.0 -0.0 -0.0 -0.0 0.0 -0.0 0.0
更新后的权值
tensor([1.3179]) tensor([1.3179]) tensor([0.7907]) tensor([0.7907]) tensor([-0.8516]) tensor([-3.6593]) tensor([-0.8516]) tensor([-3.6593])

Process finished with exit code 0
损失函数基本相同,但是权值不相同。
9,全面总结反向传播原理和编码实现,认真写心得体会。
此次作业我更加熟悉了BP算法的正向传播,反向更新参数过程,以及不同激活函数、损失函数的选择。学习率不易过大,也不宜过小,训练次数要尽量小提高效率,但也要保证较高的准确率。设置不同的权值,会影响结果,导致结果是不同的权值,但学习率都相同。使我对BP算法有了更深的理解。
?