目录
Hello_Reverse
打开ida,shift+f12查看字符串就可以看到flag:

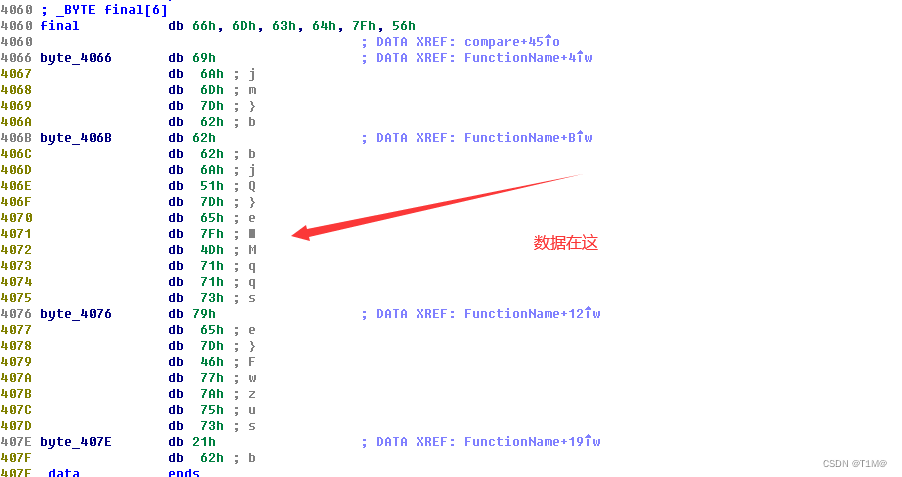
?这段数据很可疑:
c=[118,101,114,115,49,110,103,95,119,48,114,108,100,125]
for i in c:
    print(chr(i),end='')
# vers1ng_w0rld}
?合起来就是:.flag{h3llo_rvers1ng_w0rld}
Baby_Re

 exp:
exp:
c=[0x66, 0x6D, 0x63, 0x64, 0x7F, 0x56,0x69,0x6A,0x6D,0x7D,0x62,0x62,0x62,0x6A,0x51,0x7D,0x65,0x7F,0x4D,0x71,0x71,0x73,0x79,0x65,0x7D,0x46,0x77,0x7A,0x75,0x73,0x21,0x62]
for i in range(32):
    print(chr(c[i]^i),end='')
# flag{Something_run_before_main?}
Pyre
python逆向
把exe文件放在pyinstxtractor.py目录下面执行命令:
python pyinstxtractor.py pyre.exe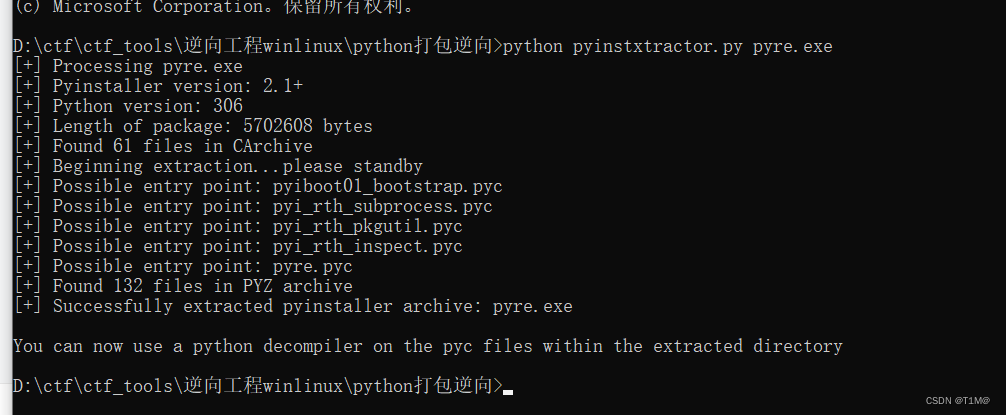
?在生成的文件夹里面找到与exe文件名一样的pyc文件,然后用uncompyle6生成py文件:
uncompyle6.exe pyre.pyc# uncompyle6 version 3.8.0
# Python bytecode 3.6 (3379)
# Decompiled from: Python 3.6.5 (v3.6.5:f59c0932b4, Mar 28 2018, 17:00:18) [MSC v.1900 64 bit (AMD64)]
# Embedded file name: pyre.py
flag = ''
encode = 'REla{PSF!!fg}!Y_SN_1_0U'
table = [7, 8, 1, 2, 4, 5, 13, 16, 20, 21, 0, 3, 22, 19, 6, 12, 11, 18, 9, 10, 15, 14, 17]
def enc(input):
tmp = ''
for i in range(len(input)):
tmp += input[table[i]]
return tmp
if __name__ == '__main__':
print('Please input your flag:')
flag = input()
if len(flag) != 23:
print('Length Wrong!!')
else:
final = enc(flag)
if final == encode:
print('Wow,you get the right flag!!')
else:
print('Sorry,Your input is Wrong')
# okay decompiling pyre.pyc代码逻辑很简单:?
encode = 'REla{PSF!!fg}!Y_SN_1_0U'
table = [7, 8, 1, 2, 4, 5, 13, 16, 20, 21, 0, 3, 22, 19, 6, 12, 11, 18, 9, 10, 15, 14, 17]
for i in range(len(encode)):
    print(encode[table.index(i)],end='')
# flag{PYRE_1S_S0_FUN!!!}
EasyRe
主函数调用了enc.dll来加密:

enc.dll:很明显就是base64加密:
int __fastcall encode_0(char *a1, __int64 a2)
{
  signed int v3; // [sp+24h] [bp+4h]@1
  signed int v4; // [sp+64h] [bp+44h]@1
  int v5; // [sp+84h] [bp+64h]@1
  char *Str; // [sp+180h] [bp+160h]@1
  __int64 v7; // [sp+188h] [bp+168h]@1

  v7 = a2;
  Str = a1;
  sub_1800112CB(asc_180021001);
  v3 = j_strlen(Str);
  v4 = 0;
  v5 = 0;
  while ( v4 < v3 )
  {
    *(_BYTE *)(v7 + v5) = aAbcdefghijklmn[Str[v4] >> 2];
    *(_BYTE *)(v7 + v5 + 1) = aAbcdefghijklmn[((Str[v4 + 1] & 0xF0) >> 4) | 16 * (Str[v4] & 3)];
    *(_BYTE *)(v7 + v5 + 2) = aAbcdefghijklmn[((Str[v4 + 2] & 0xC0) >> 6) | 4 * (Str[v4 + 1] & 0xF)];
    *(_BYTE *)(v7 + v5 + 3) = aAbcdefghijklmn[Str[v4 + 2] & 0x3F];
    v4 += 3;
    v5 += 4;
  }
  if ( v3 % 3 == 1 )
  {
    *(_BYTE *)(v7 + v5 - 1) = 61;
    *(_BYTE *)(v7 + v5 - 2) = 61;
  }
  else if ( v3 % 3 == 2 )
  {
    *(_BYTE *)(v7 + v5 - 1) = 61;
  }
  return sub_18001132A(v7);
}
char *__fastcall sub_180011660(char *a1)
{
int i; // [sp+24h] [bp+4h]@1
char *Str; // [sp+130h] [bp+110h]@1
Str = a1;
sub_1800112CB(asc_180021001);
for ( i = 0; i < j_strlen(Str); ++i )
Str[i] ^= ::Str[i % j_strlen(::Str)];
return Str;
}
?加密思路就是:先把输入先base64编码->再异或字符串。
解密思路就是:异或字符串->base64解码。
c = [0x08, 0x08, 0x0E, 0x0D, 0x28, 0x40, 0x11, 0x11, 0x3C, 0x2E, 0x2B, 0x1E, 0x3D, 0x0F, 0x00, 0x03, 0x3B, 0x3D, 0x3C, 0x15, 0x28, 0x05, 0x50, 0x46, 0x3F, 0x2A, 0x39, 0x09, 0x31, 0x56, 0x24, 0x1C, 0x3F, 0x24, 0x50, 0x3C, 0x2C, 0x25, 0x23, 0x4B]
str='Reverse'
for i in range(len(c)):
    print(chr(c[i]^ord(str[i%len(str)])),end='')
code=b'ZmxhZ3tCYXNlNjRfMXNfMW50ZXJlc3RyMW5nISF9'
import base64
print(base64.b64decode(code))
# flag{Base64_1s_1nterestr1ng!!}
艾克体悟题
JEB打开:
?电脑打开模拟器把apk.apk拖进去:
在设置开启ADB调试:

?启动指定的Activity:
adb shell am start -n com.yusuzhan.xxx/.MainActivityadb shell 进入shell
su 获得root权限
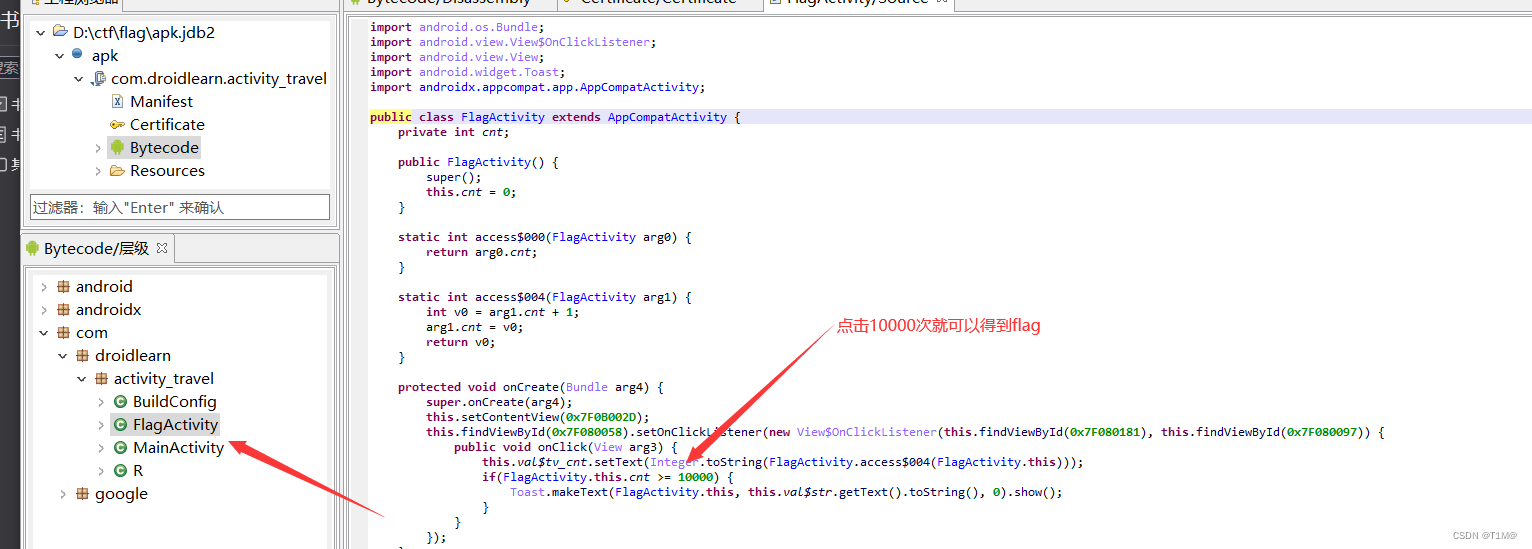
启动指定控件,对应上图的路径
am start -n com.droidlearn.activity_travel/.FlagActivity
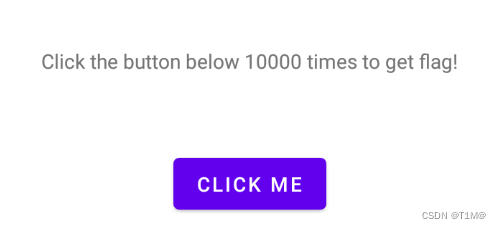
启动成功模拟器就会弹出,点击10000次得flag:
?用python脚本模拟点击:
import pyautogui as pd
import time
pd.FAILSAFE = True

time.sleep(3)
#3秒时间自己移动到要点击的位置
pd.click(clicks=100000,interval=0.0001)
# pyautogui.click()
# (100,100, clicks=2,interval=0.5,button=‘right’,duration=0.2)
# 位置,点击次数,间隔时间,右键(默认左键),移动间隔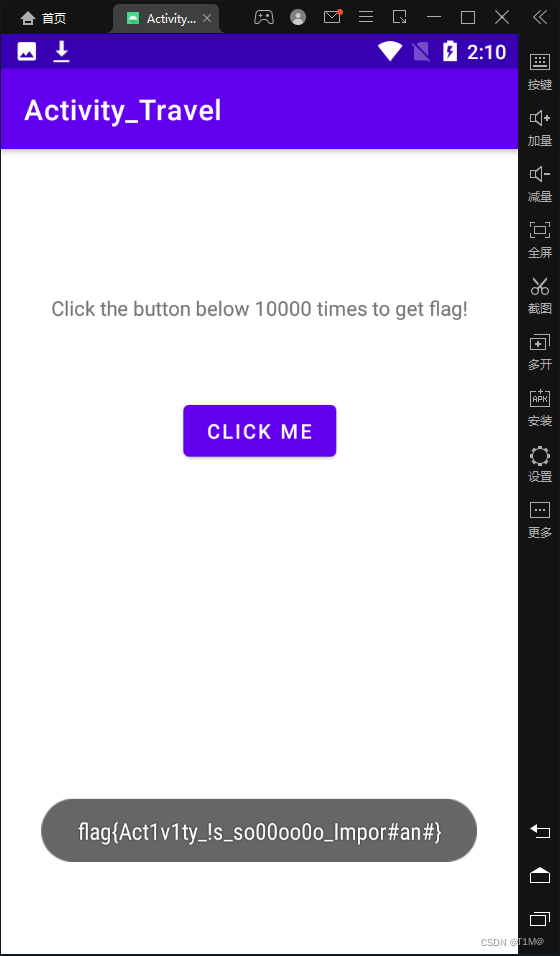
还有一个方法就是用hook access$000 函数让该函数直接返回10000,但是要在模拟器上面安装和自己电脑fiida版本对应的frida-server。
下面照搬大佬的代码:
?让我们的 js 脚本加载到该目标进程:
import frida
# 连接安卓机上的frida-server
device = frida.get_usb_device()
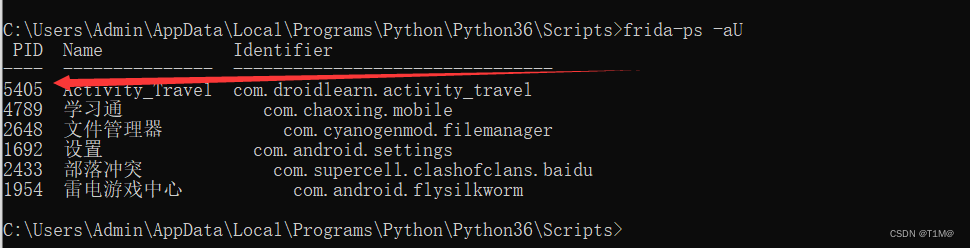
session = device.attach(5405) #对应进程的PID
# 加载hooook.js脚本
with open("hook.js", encoding='UTF-8') as f:
script = session.create_script(f.read())
script.load()
# 脚本会持续运行等待输入
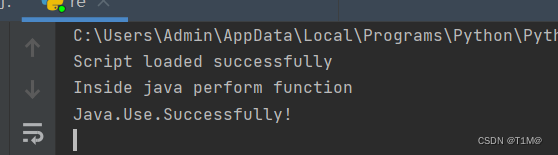
input()重写要hook的类方法:
console.log("Script loaded successfully ");
Java.perform(function x() {
    console.log("Inside java perform function");
    //定位类
    var my_class = Java.use("com.droidlearn.activity_travel.FlagActivity");
    console.log("Java.Use.Successfully!");
    //在这里更改类的方法的实现(implementation)
    my_class.access$000.implementation = function(x){
        //打印替换前的参数
        console.log("Successfully!");
        return 10001;
    }
});
启动指定的Activity后,查看我们启动控件的PID:
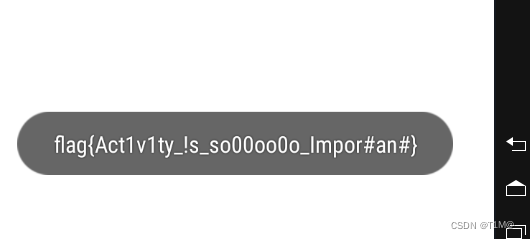
?执行frida-server后执行代码,然后再点击就出现flag了:
 ?
?
?
?