了解scikit-learn软件库的第一步--训练感知器
? ? ? ? 把150个鸢尾花样本的花瓣长度和宽度存入特征矩阵x,把相应的品种分类标签存入向量y:
from sklearn import datasets
import numpy as np

iris = datasets.load_iris()
iris
X = iris.data[:, [2, 3]]
X
y = iris.target
y

print('Class labels:', np.unique(y))
? ? ? ? 为了评估经过训练的模型对未知数据处理的效果,再进一步将数据集分裂成单独的训练集和测试集:
from sklearn.model_selection import train_test_split

# 1、train_test_split函数把x和y阵列随机分为30%的测试数据和70%的训练数据
# 2、在分割前已经在内部将训练洗牌
# 3、random_state为固定的随机数种子,确保结果可重复
# 4、通过定义stratify = y获得内置的分层支持,将各子数据集中不同分类标签的数据比例设置为总数据集
# 比例

X_train, X_test, y_train, y_test = train_test_split(
    X, y, test_size=0.3, random_state=1, stratify=y)
? ? ? ? 调用Numpy的bincount函数来对阵列中的每个值进行统计,以验证数据:
# 计算每种标签的样本数量有多少,分别是50个
print('Labels counts in y:', np.bincount(y))
# 计算训练集中每种标签样本数量有多少,分别是35个
print('Labels counts in y_train:', np.bincount(y_train))
# 计算测试集中每种标签样本数量有多少,分别是15个
print('Labels counts in y_test:', np.bincount(y_test))
? ? ? ? 调用scikit-learn库中预处理模块preprocessing中的类StanderScaler来对特征进行标准化:
? ??
# 对特征进行标准化
from sklearn.preprocessing import StandardScaler

sc = StandardScaler()
sc.fit(X_train)
X_train_std = sc.transform(X_train)
X_test_std = sc.transform(X_test)
? ? ? ? (1)调用StanderScaler的fit方法对训练数据的每个特征维度参数μ和σ进行估算。
? ? ? ? (2)调用transform方法,利用估计的参数μ和σ对训练数据进行标准化
? ? ? ? 注意:在标准化测试集时,要注意使用相同的特征调整参数以确保训练集与测试集的数值具有可比性
? ? ? ? 接下来训练感知器模型:
from sklearn.linear_model import Perceptron

ppn = Perceptron(max_iter=40, eta0=0.1, random_state=1)
ppn.fit(X_train_std, y_train)
? ? ? ? 调用predict方法做预测:
y_pred = ppn.predict(X_test_std)
print('Misclassified samples: %d' % (y_test != y_pred).sum())
? ? ? ? 此处结果为Misclassified samples:3,当然也有其它的性能指标比如分类准确度:
# 计算分类准确度
from sklearn.metrics import accuracy_score

print('Accuracy: %.2f' % accuracy_score(y_test, y_pred))
? ? ? ? 此处结果为Accuracy:0.93
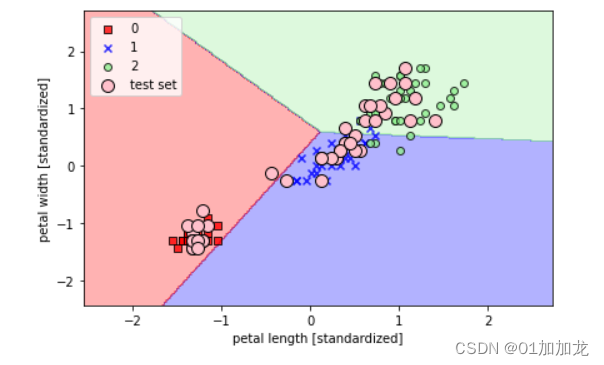
? ? ? ? 最后,利用plot_decision_regions函数绘制新训练感知器的模型决策区,并以可视化的方式展示区分不同花朵样本的效果,可以通过圆圈来突出显示来自测试集的样本:
from matplotlib.colors import ListedColormap
import matplotlib.pyplot as plt


def plot_decision_regions(X, y, classifier, test_idx=None, resolution=0.02):

    # setup marker generator and color map
    markers = ('s', 'x', 'o', '^', 'v')
    colors = ('red', 'blue', 'lightgreen', 'gray', 'cyan')
    cmap = ListedColormap(colors[:len(np.unique(y))])

    # plot the decision surface
    x1_min, x1_max = X[:, 0].min() - 1, X[:, 0].max() + 1
    x2_min, x2_max = X[:, 1].min() - 1, X[:, 1].max() + 1
    xx1, xx2 = np.meshgrid(np.arange(x1_min, x1_max, resolution),
                           np.arange(x2_min, x2_max, resolution))
    Z = classifier.predict(np.array([xx1.ravel(), xx2.ravel()]).T)
    Z = Z.reshape(xx1.shape)
    plt.contourf(xx1, xx2, Z, alpha=0.3, cmap=cmap)
    plt.xlim(xx1.min(), xx1.max())
    plt.ylim(xx2.min(), xx2.max())

    for idx, cl in enumerate(np.unique(y)):
        plt.scatter(x=X[y == cl, 0],
                    y=X[y == cl, 1],
                    alpha=0.8,
                    c=colors[idx],
                    marker=markers[idx],
                    label=cl,
                    edgecolor='black')

    # highlight test samples
    if test_idx:
        # plot all samples
        X_test, y_test = X[test_idx, :], y[test_idx]

        plt.scatter(X_test[:, 0],
                    X_test[:, 1],
                    # 将测试集数据显示为粉色标记
                    c='pink',
                    edgecolor='black',
                    alpha=1.0,
                    linewidth=1,
                    marker='o',
                    s=100,
                    label='test set')
X_combined_std = np.vstack((X_train_std, X_test_std))
y_combined = np.hstack((y_train, y_test))
plot_decision_regions(X=X_combined_std, y=y_combined,
classifier=ppn, test_idx=range(105, 150))
plt.xlabel('petal length [standardized]')
plt.ylabel('petal width [standardized]')
plt.legend(loc='upper left')
plt.tight_layout()
#plt.savefig('images/03_01.png', dpi=300)
plt.show()? ? ? ? 画出的模型决策区如下:

? ? ? ? ?正如结果图中所看到的,三种花不能被线性决策边界完全分离,所以实践中通常不推荐使用感知器算法。