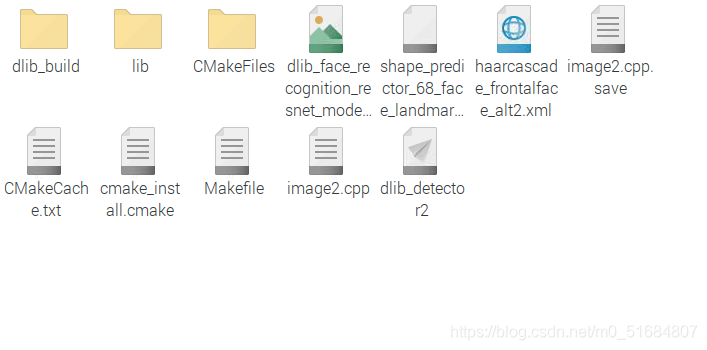
这个也是看了BILIBILI的嗨哥总结出来的一个方法
首先要准备的文件有三个

?dlib_face_recognition_resnet_model_v1.dat
shape_predictor_68_face_landmarks.dat
这两个可以在http://dlib.net/files/这里下载
haarcascade_frontalface_alt2.xml
这个是OpenCV里带的分类器
为了识别到我们训练的人脸给自己建一个容器——也就是上图的文件夹lib
里面丢自己想要识别的人脸
然后这是我的CMakeList.TXT
cmake_minimum_required(VERSION 3.19.0)

PROJECT(dlib_facedetector2)

SET(CMAKE_CXX_FLAGS "${CMAKE_CXX_FLAGS} -std=c++11 -O2 -DDLIB_JPEG_SUPPORT")

IF(CMAKE_CXX_COMPILER_ID STREQUAL "Clang")
  SET(CMAKE_CXX_FLAGS "${CMAKE_CXX_FLAGS} -Weverything")
ELSEIF(CMAKE_CXX_COMPILER_ID STREQUAL "GNU")
  SET(CMAKE_CXX_FLAGS "${CMAKE_CXX_FLAGS} -Wall -Wextra")
ENDIF()


INCLUDE(/home/pi/dlib/dlib-19.22/dlib/cmake)
#INCLUDE OPENCV
FIND_PACKAGE(OpenCV REQUIRED)
INCLUDE_DIRECTORIES(${OpenCV_INCLUDE_DIRS})
message(STATUS "Opencv include dir found at ${OpenCV_INCLUDE_DIRS}")


INCLUDE_DIRECTORIES(/home/pi/dlib/dlib-19.22)

LINK_DIRECTORIES(/home/pi/dlib/dlib-19.22/dlib)


ADD_EXECUTABLE(dlib_detector2  image2.cpp )

TARGET_LINK_LIBRARIES(dlib_detector2 dlib ${OpenCV_LIBS})
然后是我的image2.cpp
#include <cstdio>
#include <vector>
#include <algorithm>
#include <cstdio>

#include <iostream>
#include <fstream>
#include <cstring>
#include <cstdlib>
#include <cmath>
#include <algorithm>

#include "opencv/cv.h"
#include "opencv2/highgui/highgui.hpp"
#include "opencv2/imgproc/imgproc.hpp"
#include "opencv2/videoio.hpp"
#include "opencv2/imgproc/imgproc.hpp"

#include </home/pi/dlib/dlib-19.22/dlib/dnn.h>
#include </home/pi/dlib/dlib-19.22/dlib/gui_widgets.h>
#include </home/pi/dlib/dlib-19.22/dlib/clustering.h>
#include </home/pi/dlib/dlib-19.22/dlib/string.h>
#include </home/pi/dlib/dlib-19.22/dlib/image_io.h>
#include </home/pi/dlib/dlib-19.22/dlib/image_processing/frontal_face_detector.h>
#include </home/pi/dlib/dlib-19.22/dlib/opencv.h>
#include <opencv2/core/core.hpp>
#include <opencv2/freetype.hpp>
#include <dlib/image_processing/render_face_detections.h>
#include <dlib/image_processing.h>
#include <opencv/highgui.h>
#include <opencv2/opencv.hpp>

using namespace dlib;
using namespace std;
using namespace cv;

template <template <int, template<typename>class, int, typename> class block, int N, template<typename>class BN, typename SUBNET>
using residual = add_prev1<block<N, BN, 1, tag1<SUBNET>>>;

template <template <int, template<typename>class, int, typename> class block, int N, template<typename>class BN, typename SUBNET>
using residual_down = add_prev2<avg_pool<2, 2, 2, 2, skip1<tag2<block<N, BN, 2, tag1<SUBNET>>>>>>;

template <int N, template <typename> class BN, int stride, typename SUBNET>
using block = BN<con<N, 3, 3, 1, 1, relu<BN<con<N, 3, 3, stride, stride, SUBNET>>>>>;

template <int N, typename SUBNET> using ares = relu<residual<block, N, affine, SUBNET>>;
template <int N, typename SUBNET> using ares_down = relu<residual_down<block, N, affine, SUBNET>>;

template <typename SUBNET> using alevel0 = ares_down<256, SUBNET>;
template <typename SUBNET> using alevel1 = ares<256, ares<256, ares_down<256, SUBNET>>>;
template <typename SUBNET> using alevel2 = ares<128, ares<128, ares_down<128, SUBNET>>>;
template <typename SUBNET> using alevel3 = ares<64, ares<64, ares<64, ares_down<64, SUBNET>>>>;
template <typename SUBNET> using alevel4 = ares<32, ares<32, ares<32, SUBNET>>>;

using anet_type = loss_metric<fc_no_bias<128, avg_pool_everything<
	alevel0<
	alevel1<
	alevel2<
	alevel3<
	alevel4<
	max_pool<3, 3, 2, 2, relu<affine<con<32, 7, 7, 2, 2,
	input_rgb_image_sized<150>
	>>>>>>>>>>>>;
cv::Mat MyResizeImage(cv::Mat pSrc, double dScale)
{
	cv::Size sSize = cv::Size(pSrc.cols*dScale, pSrc.rows*dScale);
	cv::Mat pDes = cv::Mat(sSize, CV_32S);
	resize(pSrc, pDes, sSize);
	return pDes;
int main()
{
	cv::Mat mimg;
	std::vector<matrix<float, 0, 1>> vec;        //定义一个向量组,用于存放每一个人脸的编码;
	float vec_error[30];int count_img = 0;                      //定义一个浮点型的数组,用于存放一个人脸编码与人脸库的每一个人脸编码的差值;

	std::vector<cv::String> fileNames,img_path;
	cv::glob("/home/pi/face_test/lib",img_path);
	fileNames = img_path;

	for (int i = 0; i < img_path.size(); i++){
		if((img_path[i].find(".jpg") != img_path[i].npos)||(img_path[i].find(".png") != img_path[i].npos)){
			size_t pos = img_path[i].find_last_of('/');
			size_t len = img_path[i].find_last_of('.');
			fileNames[i] = img_path[i].substr(pos+1,len-pos-1);
			cout << "file name:" << fileNames[i] << endl;
			count_img++;
		}
	}
	cout << "The number of picture is:" << count_img << endl;
	//我们要做的第一件事是加载所有模型。首先,因为我们需要在图像中查找人脸我们需要人脸检测器:
	frontal_face_detector detector = get_frontal_face_detector();
	shape_predictor sp;
	deserialize("shape_predictor_68_face_landmarks.dat") >> sp;
	anet_type net;
	deserialize("dlib_face_recognition_resnet_model_v1.dat") >> net;
	matrix<rgb_pixel> img_obj;            //定义dlib型图片,彩色
//以下建立人脸编码库代码--------------------------------------------------------------
	for (int k = 0; k < count_img; k++)  //依次加载完图片库里的文件
	{
		string fileFullName = img_path[k];//图片地址+文件名
		load_image(img_obj, fileFullName);
		std::vector<dlib::rectangle> dets = detector(img_obj);  //检测人脸,位置大小信息存放到dets中
		if (dets.size()<1)
			cout << "There is no face" << endl;
		else if (dets.size()>1)
			cout << "There is to many face" << endl;
		else{
			std::vector<matrix<rgb_pixel>> faces;//定义存放截取人脸数据组
			auto shape = sp(img_obj, dets[0]);
			matrix<rgb_pixel> face_chip;
			extract_image_chip(img_obj, get_face_chip_details(shape, 150, 0.25), face_chip);//截取人脸部分,并将大小调为150*150
			faces.push_back(move(face_chip));
			std::vector<matrix<float, 0, 1>> face_descriptors = net(faces);//载入Resnet残差网络,返回128D人脸特征
			vec.push_back(face_descriptors[k]);                       //保存这一个人脸的特征向量到vec向量的对应位置
			cout << "The vector of picture " << img_path[k] << endl;//打印该人脸的标签和特征向量
		}
	}
//以下是识别代码------------------------------------------------------------------------------
	Ptr<freetype::FreeType2> ft2;
	ft2=freetype::createFreeType2();
	ft2->loadFontData("/usr/share/fonts/truetype/arphic/uming.ttc",0);
	cv::VideoCapture cap(-1);
	if (!cap.isOpened()){
		cerr << "Unable to connect to camera" << endl;
		return 1;
	}
	while(waitKey(1) != 27) {
		cv::Mat mimg;
		if (!cap.read(mimg)){
			cap.set(CV_CAP_PROP_POS_FRAMES, 0);
			continue;
		}
		//cv::Mat mimg = MyResizeImage(mimg, 0.4);
		array2d<rgb_pixel> img_src;
		dlib::assign_image(img_src, dlib::cv_image<dlib::bgr_pixel>(mimg));
		//pyramid_up(img_src);
		std::vector<matrix<rgb_pixel>> faces_test;
		for (auto face_test : detector(img_src)){
			auto shape_test = sp(img_src, face_test);
			matrix<rgb_pixel> face_chip_test;
			extract_image_chip(img_src, get_face_chip_details(shape_test, 150, 0.25), face_chip_test);
			faces_test.push_back(move(face_chip_test));
		}
		std::vector<dlib::rectangle> dets_test = detector(img_src);
		std::vector<matrix<float, 0, 1>> face_test_descriptors = net(faces_test);
		cout<<"size:"<<face_test_descriptors.size()<<endl;

		for (size_t i = 0; i < face_test_descriptors.size(); ++i)                 //比对,识别
		{
			for (size_t j = 0; j < vec.size(); j++){
				vec_error[j] = (double)length(face_test_descriptors[i] - vec[j]);
				cout <<vec.size()<< ":pic_"<<j<<"->pic_"<<i<<" vec_error is:" << vec_error[j] << endl;
				std::string text = "不熟";
				if (vec_error[j] < 0.4){//多个人就找出一个阀值以下的
					text = fileNames[j];//得到文件名
					cout <<"找到:"<<fileNames[j]<<","<<text<<endl;
				}
				cv::Point origin;
				origin.x = dets_test[i].left();
				origin.y = dets_test[i].top();
				ft2->putText(mimg, text, origin, 40/*size*/,Scalar(255,0,0), -1, 8, true );
			}
			cv::rectangle(mimg, cv::Rect(dets_test[i].left(), dets_test[i].top(), dets_test[i].width(), dets_test[i].width()), cv::Scalar(0, 0, 255), 1, 1, 0);//画矩形框
		}
	#if 0
		dlib::cv_image<bgr_pixel> dimg(mimg);//转成dlib格式
		image_window win(dimg);
		win.wait_until_closed();
	#else
		imshow("src", mimg);
	#endif
	}
}
其中有一点要注意的就是输出frame框的时候如果字体有问题的话会输出框框的,/usr/share/fonts/truetype/arphic/uming.ttc这个就是字体的位置。找字体地址可以用fc-list :lang=zh。?具体详情参考这个老哥https://blog.csdn.net/iteye_9818/article/details/82676982。
最后就是一如既往的?
sudo cmake ..
sudo make
ls
有我们想要的小飞机的时候
就可以愉快得    ./dlib_detector2   了
但是我的帧率有一点点感人,希望有解决办法的老哥救救孩子
最后就是结果展示

?
?
? ②https://blog.csdn.net/u012819339/article/details/82698570
感谢感谢